

Wealth Crypto
421 Publications

Wealth Crypto
Signaler
Bloquer l’utilisateur
full time trader with 5 years of experience in the market analyst with the real time crypto tradeing.
Ouvert au trading
Trade régulièrement
2.5 an(s)
62 Suivis
75 Abonnés
100 J’aime
Publications
Portefeuille
Tous
Citations
Vidéos
PINNED
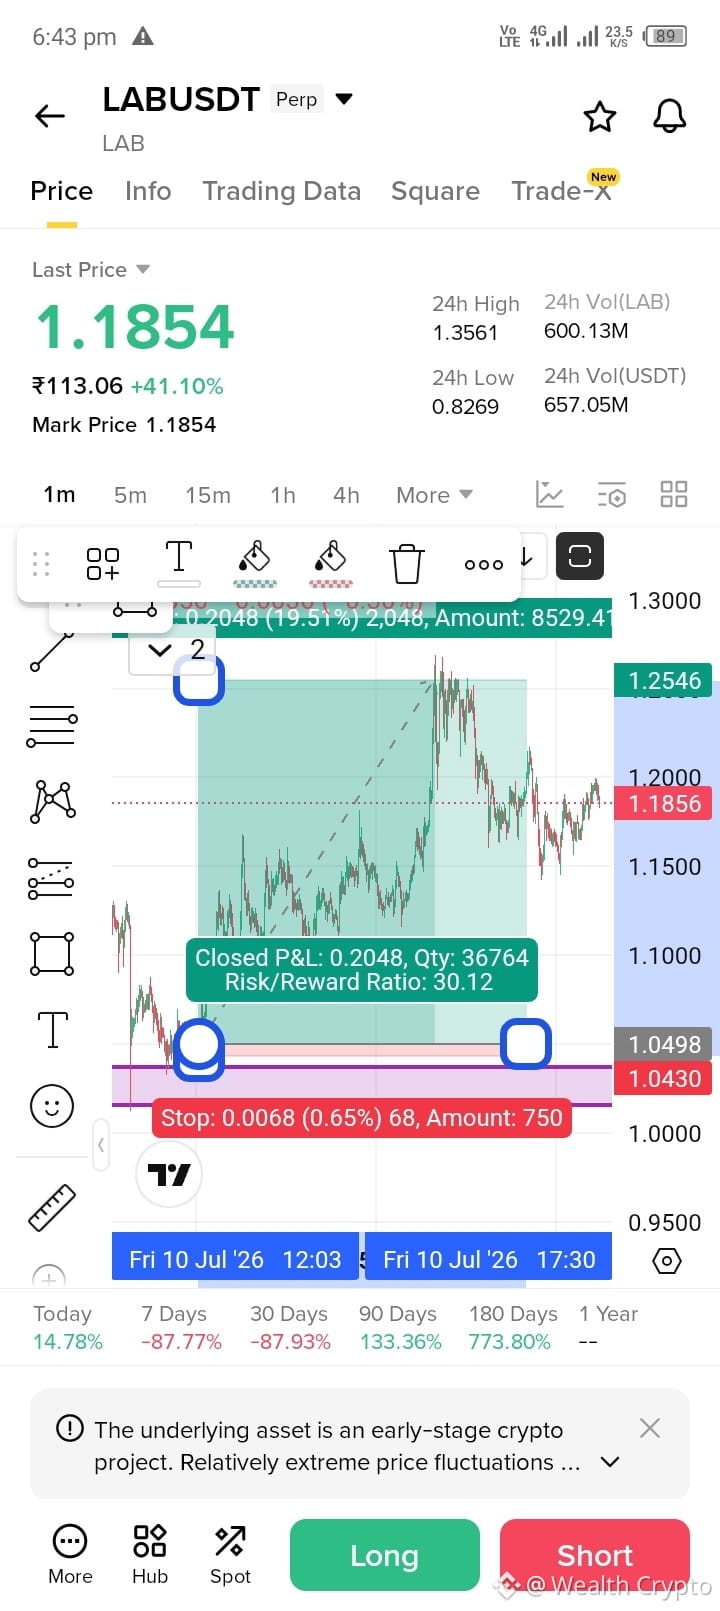
i book 1:30 on $LAB on a Scalping trade.
i book 1:30 on $LAB on a Scalping trade.

TRADING MASTER 00
·
--
$LAB is absolute carnage right now and most retail traders are getting wiped out! The data shows 581 traders stuck in 8.48M in total positions, with a brutal 23.14% long-to-short ratio. While bulls are drowning with 1.53M in losses, the shorts are absolutely feasting with 6.42M in unrealized gains. With 80.64% of short positions in profit, it’s clear the smart money has full control here. I’m personally staying in my short position because this bloodbath isn't over yet. Don't be the exit liquidity for the whales!
1
1
144
·
--
Haussier
target done guys
Thank you $NOM
{future}(NOMUSDT)
target done guys
Thank you $NOM
Thank you $NOM
Wealth Crypto
·
--
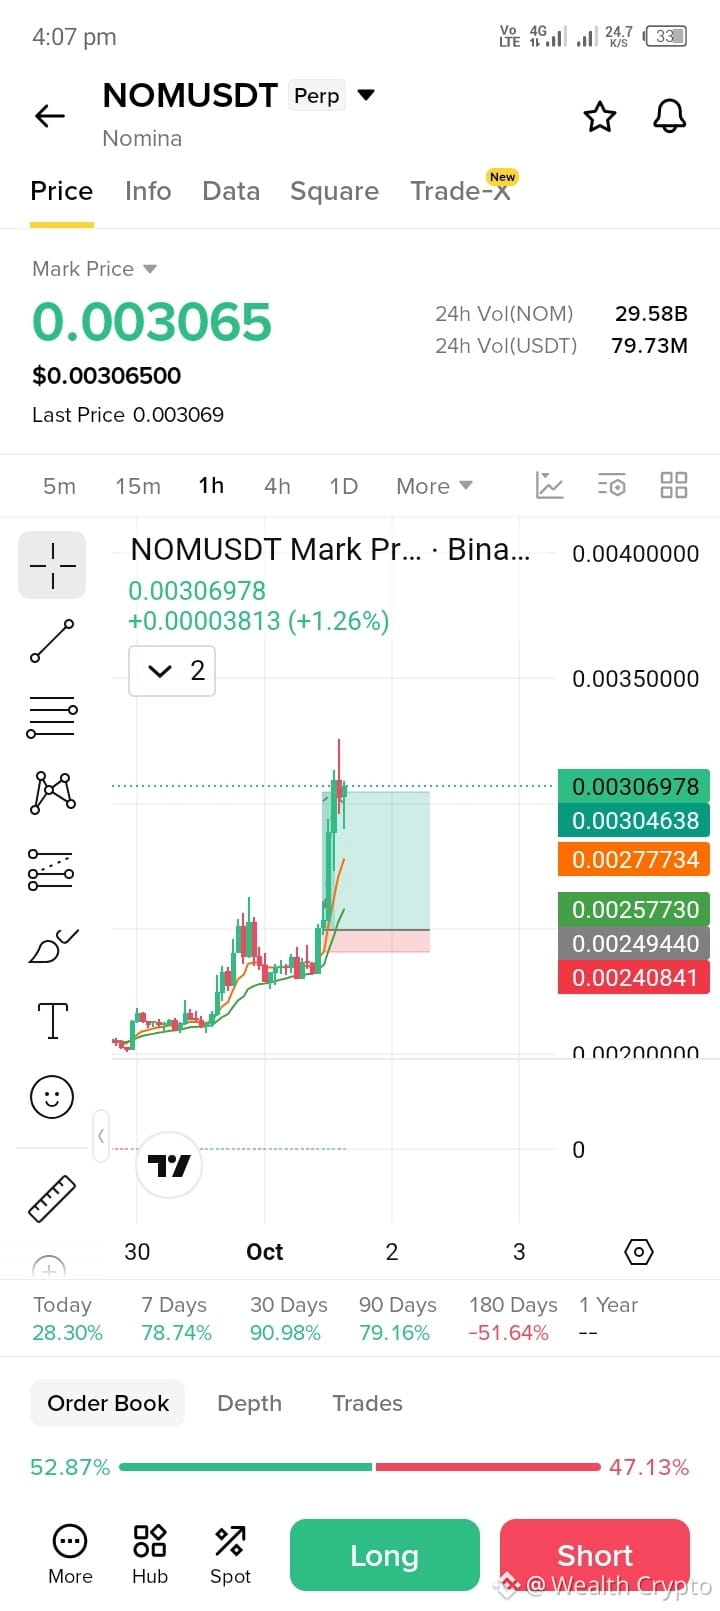
NOM EXPLODING WITH 14%+ BREAKOUT! High volume expansion! $NOM $USDT
Trade Setup (LONG):
• Entry: $0.00285 – $0.00292
• TP 1: $0.00305
• TP 2: $0.00325
• TP 3: $0.00350
• SL: $0.00250
1H Chart Analysis:
NOM printed a massive breakout candle on the 1-hour chart, surging over +14%. The sharp expansion well above EMA 20 ($0.00250) and EMA 50 ($0.00240) indicates strong momentum, with target liquidity sitting around $0.00305+.
#NOM #CryptoSignals #BinanceSignals #Write2Earn #Altcoins
Trade Setup (LONG):
• Entry: $0.00285 – $0.00292
• TP 1: $0.00305
• TP 2: $0.00325
• TP 3: $0.00350
• SL: $0.00250
1H Chart Analysis:
NOM printed a massive breakout candle on the 1-hour chart, surging over +14%. The sharp expansion well above EMA 20 ($0.00250) and EMA 50 ($0.00240) indicates strong momentum, with target liquidity sitting around $0.00305+.
#NOM #CryptoSignals #BinanceSignals #Write2Earn #Altcoins
68
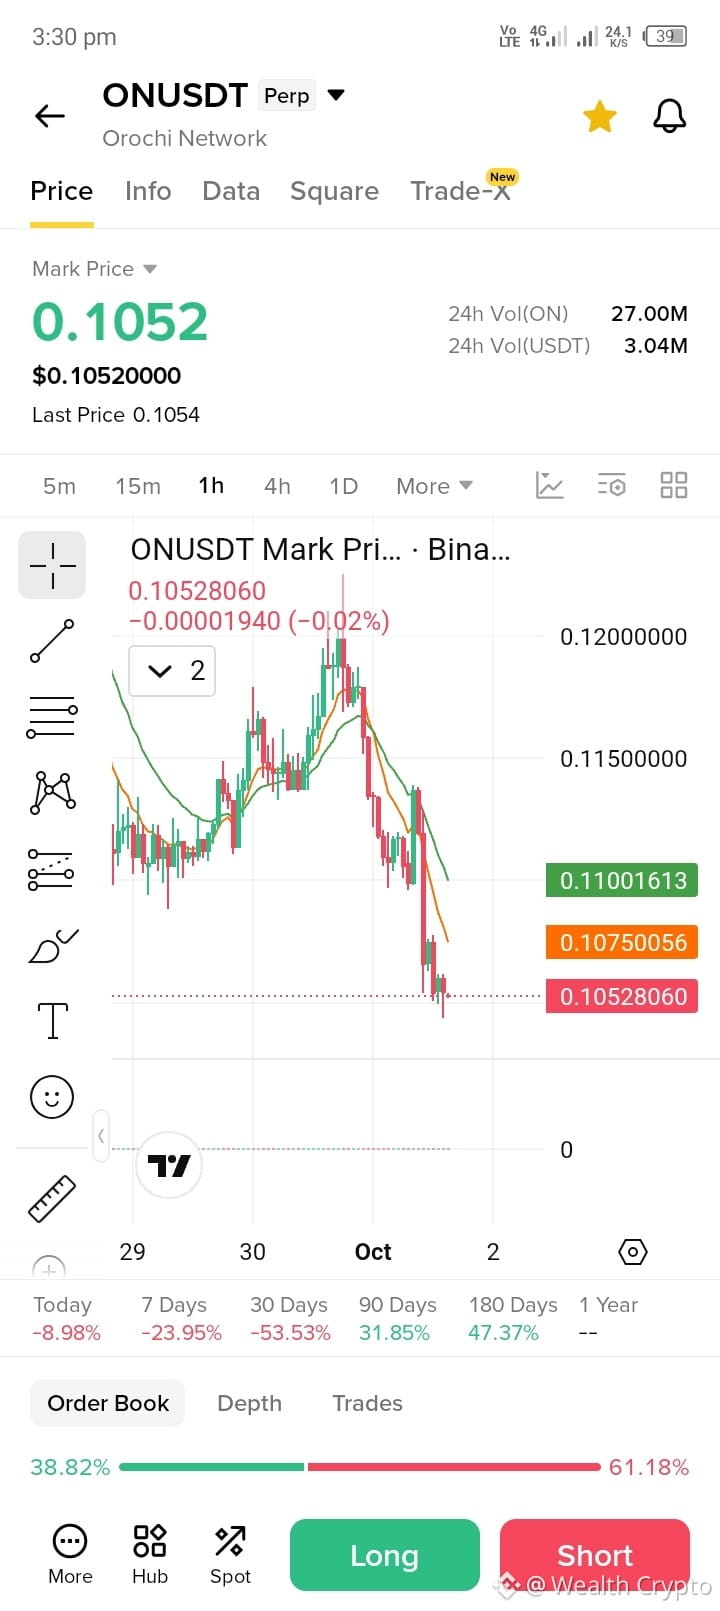
$ON IN CONTINUOUS DOWNTREND! Price trading under key EMAs! $ON $USDT
Trade Setup (SHORT):
• Entry: $0.1060 – $0.1085
• TP 1: $0.1000
• TP 2: $0.0950
• TP 3: $0.0900
• SL: $0.1115
1H Chart Analysis:
ON remains locked in a clear markdown structure with consistent lower highs and lower lows. Price continues to trade beneath EMA 20 ($0.1075) and EMA 50 ($0.1100), keeping short-term bias firmly bearish.
#ON #CryptoSignals #BinanceSignals #Write2Earn #TradingSignals
$ON IN CONTINUOUS DOWNTREND! Price trading under key EMAs! $ON $USDT
Trade Setup (SHORT):
• Entry: $0.1060 – $0.1085
• TP 1: $0.1000
• TP 2: $0.0950
• TP 3: $0.0900
• SL: $0.1115
1H Chart Analysis:
ON remains locked in a clear markdown structure with consistent lower highs and lower lows. Price continues to trade beneath EMA 20 ($0.1075) and EMA 50 ($0.1100), keeping short-term bias firmly bearish.
#ON #CryptoSignals #BinanceSignals #Write2Earn #TradingSignals
Trade Setup (SHORT):
• Entry: $0.1060 – $0.1085
• TP 1: $0.1000
• TP 2: $0.0950
• TP 3: $0.0900
• SL: $0.1115
1H Chart Analysis:
ON remains locked in a clear markdown structure with consistent lower highs and lower lows. Price continues to trade beneath EMA 20 ($0.1075) and EMA 50 ($0.1100), keeping short-term bias firmly bearish.
#ON #CryptoSignals #BinanceSignals #Write2Earn #TradingSignals
1
324
·
--
Haussier
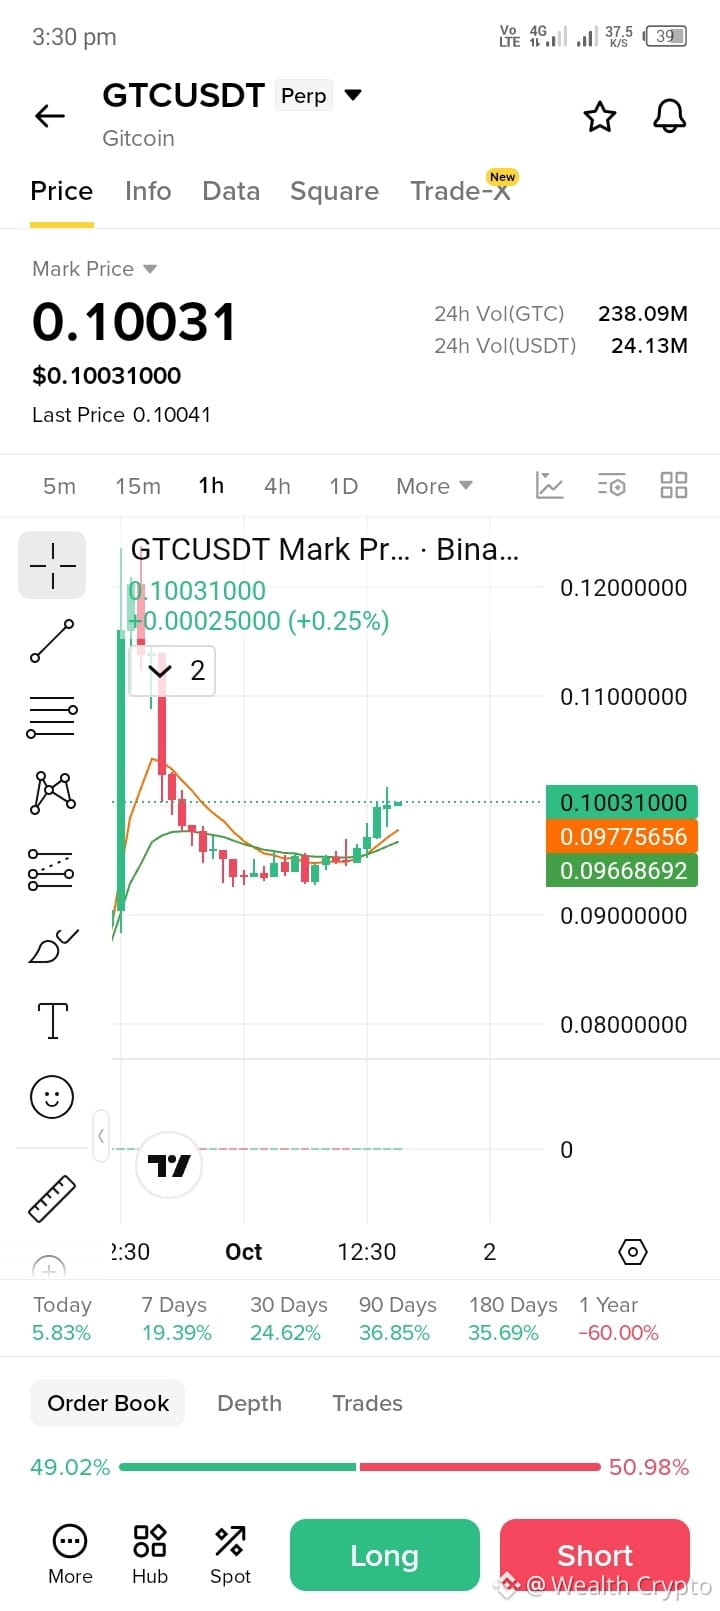
GTC CURVING UPWARD FROM SUPPORT! EMA crossover turning bullish! $GTC $USDT
Trade Setup (LONG):
• Entry: $0.09800 – $0.10050
• TP 1: $0.10800
• TP 2: $0.11400
• TP 3: $0.12000
• SL: $0.09450
1H Chart Analysis:
GTC absorbed a prior pullback and is forming a clean rounding bottom structure on the 1-hour chart. Price has reclaimed both EMA 20 ($0.0978) and EMA 50 ($0.0967), setting up a potential retest of the $0.110+ zone.
#GTC #Gitcoin #BinanceSquare #Write2Earn #Crypto
GTC CURVING UPWARD FROM SUPPORT! EMA crossover turning bullish! $GTC $USDT
Trade Setup (LONG):
• Entry: $0.09800 – $0.10050
• TP 1: $0.10800
• TP 2: $0.11400
• TP 3: $0.12000
• SL: $0.09450
1H Chart Analysis:
GTC absorbed a prior pullback and is forming a clean rounding bottom structure on the 1-hour chart. Price has reclaimed both EMA 20 ($0.0978) and EMA 50 ($0.0967), setting up a potential retest of the $0.110+ zone.
#GTC #Gitcoin #BinanceSquare #Write2Earn #Crypto
Trade Setup (LONG):
• Entry: $0.09800 – $0.10050
• TP 1: $0.10800
• TP 2: $0.11400
• TP 3: $0.12000
• SL: $0.09450
1H Chart Analysis:
GTC absorbed a prior pullback and is forming a clean rounding bottom structure on the 1-hour chart. Price has reclaimed both EMA 20 ($0.0978) and EMA 50 ($0.0967), setting up a potential retest of the $0.110+ zone.
#GTC #Gitcoin #BinanceSquare #Write2Earn #Crypto
144
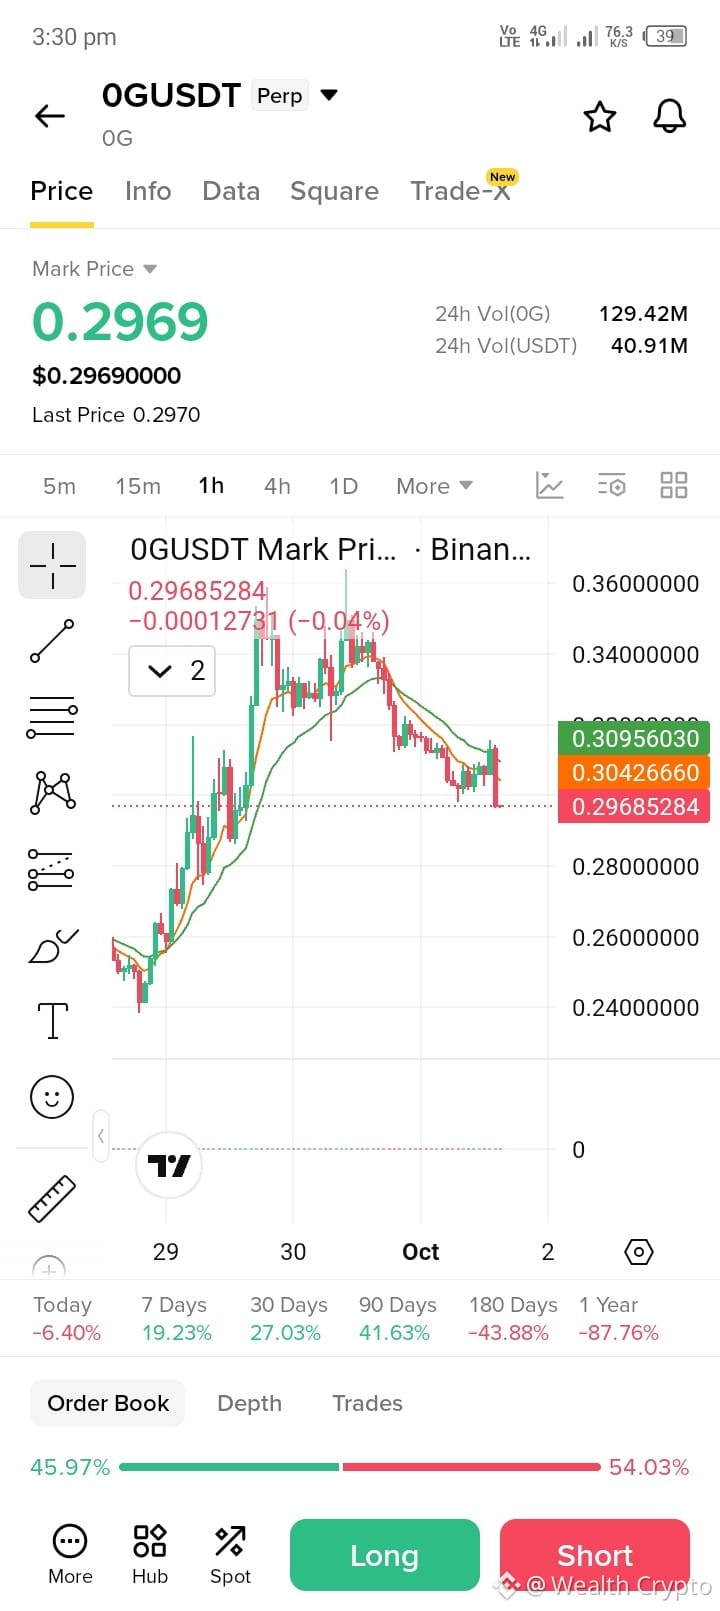
$0G RETRACING FROM RESISTANCE! EMA crossover turning down! $0G $USDT
Trade Setup (SHORT):
• Entry: $0.2980 – $0.3040
• TP 1: $0.2850
• TP 2: $0.2700
• TP 3: $0.2550
• SL: $0.3120
1H Chart Analysis:
0G is sliding downward after failing to maintain levels above $0.360. On the 1-hour chart, price action has crossed below EMA 20 ($0.304) and EMA 50 ($0.309), indicating short-term seller control toward lower support targets.
#0G #Altcoins #BinanceSignals #Write2Earn #TradingSignals
$0G RETRACING FROM RESISTANCE! EMA crossover turning down! $0G $USDT
Trade Setup (SHORT):
• Entry: $0.2980 – $0.3040
• TP 1: $0.2850
• TP 2: $0.2700
• TP 3: $0.2550
• SL: $0.3120
1H Chart Analysis:
0G is sliding downward after failing to maintain levels above $0.360. On the 1-hour chart, price action has crossed below EMA 20 ($0.304) and EMA 50 ($0.309), indicating short-term seller control toward lower support targets.
#0G #Altcoins #BinanceSignals #Write2Earn #TradingSignals
Trade Setup (SHORT):
• Entry: $0.2980 – $0.3040
• TP 1: $0.2850
• TP 2: $0.2700
• TP 3: $0.2550
• SL: $0.3120
1H Chart Analysis:
0G is sliding downward after failing to maintain levels above $0.360. On the 1-hour chart, price action has crossed below EMA 20 ($0.304) and EMA 50 ($0.309), indicating short-term seller control toward lower support targets.
#0G #Altcoins #BinanceSignals #Write2Earn #TradingSignals
448
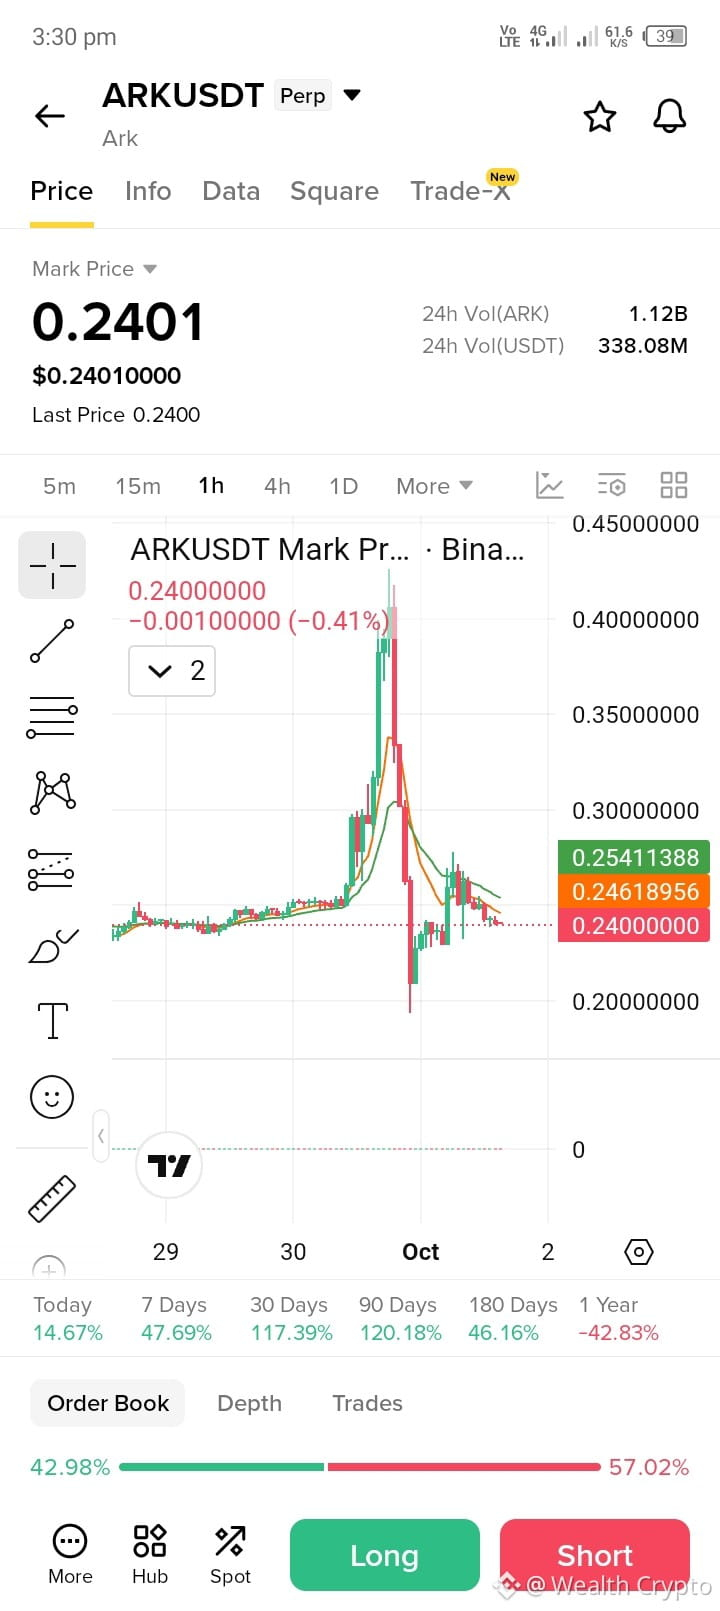
$ARK REJECTED AT LOCAL HIGHS! Pullback phase underway! $ARK $USDT
Trade Setup (SHORT):
• Entry: $0.2420 – $0.2480
• TP 1: $0.2300
• TP 2: $0.2180
• TP 3: $0.2050
• SL: $0.2580
1H Chart Analysis:
ARK printed a massive spike toward $0.42+ before encountering aggressive selling pressure and retracing back down. Price has lost support at EMA 20 ($0.246) and EMA 50 ($0.254), confirming a short-term bearish pullback.
#ARK #Crypto #BinanceSquare #Write2Earn #TradingSignals
$ARK REJECTED AT LOCAL HIGHS! Pullback phase underway! $ARK $USDT
Trade Setup (SHORT):
• Entry: $0.2420 – $0.2480
• TP 1: $0.2300
• TP 2: $0.2180
• TP 3: $0.2050
• SL: $0.2580
1H Chart Analysis:
ARK printed a massive spike toward $0.42+ before encountering aggressive selling pressure and retracing back down. Price has lost support at EMA 20 ($0.246) and EMA 50 ($0.254), confirming a short-term bearish pullback.
#ARK #Crypto #BinanceSquare #Write2Earn #TradingSignals
Trade Setup (SHORT):
• Entry: $0.2420 – $0.2480
• TP 1: $0.2300
• TP 2: $0.2180
• TP 3: $0.2050
• SL: $0.2580
1H Chart Analysis:
ARK printed a massive spike toward $0.42+ before encountering aggressive selling pressure and retracing back down. Price has lost support at EMA 20 ($0.246) and EMA 50 ($0.254), confirming a short-term bearish pullback.
#ARK #Crypto #BinanceSquare #Write2Earn #TradingSignals
1
252
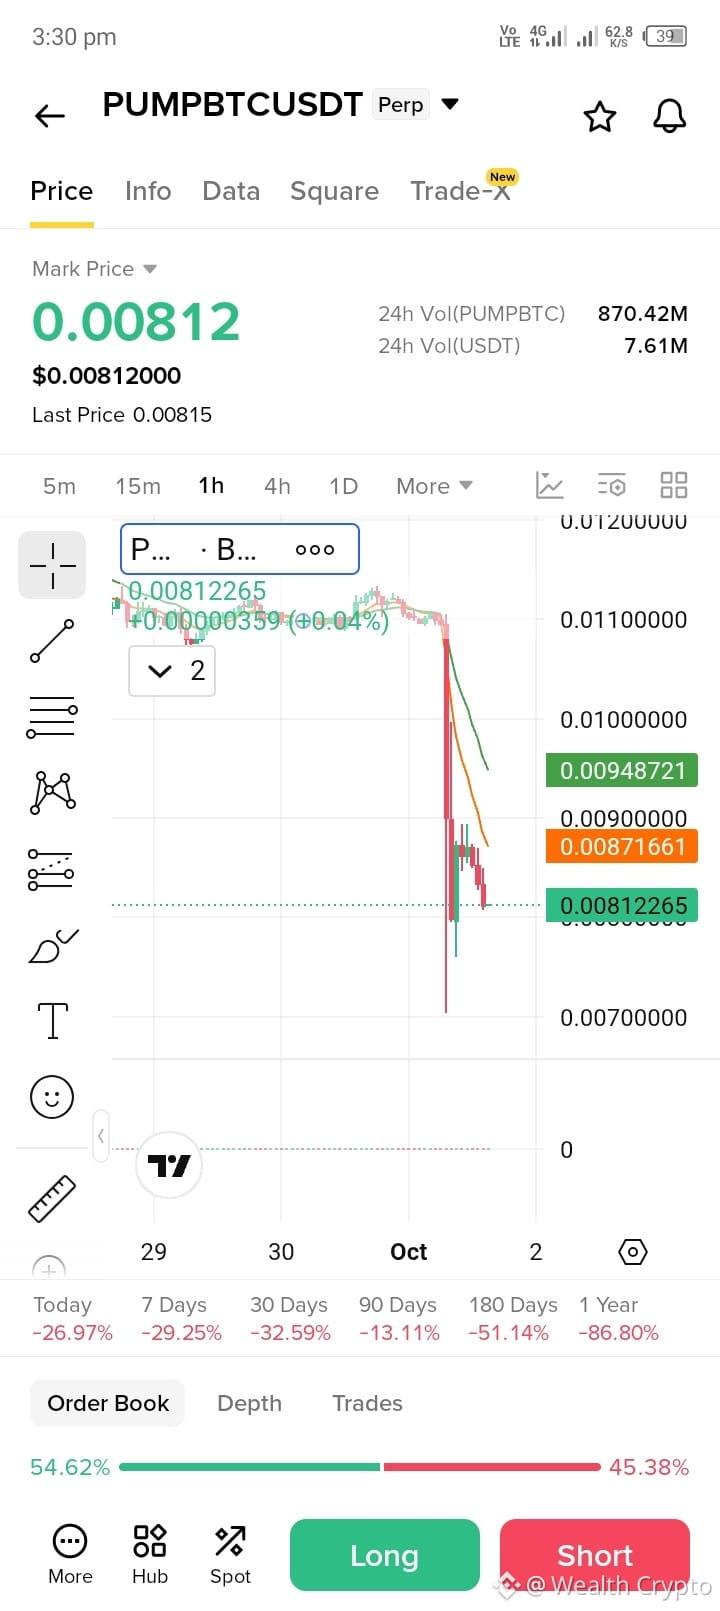
$PUMPBTC MASSIVE DROP BELOW EMAS! Bearish momentum dominates! $PUMPBTC $USDT
Trade Setup (SHORT):
• Entry: $0.00830 – $0.00870
• TP 1: $0.00760
• TP 2: $0.00710
• TP 3: $0.00650
• SL: $0.00920
1H Chart Analysis:
PUMPBTC broke down sharply with consecutive red candles, dropping below both EMA 20 ($0.0087) and EMA 50 ($0.0095). Strong overhead resistance from the moving averages suggests continued downside risks on retests.
#PUMPBTC #CryptoSignalsToday #BinanceSignals #Write2Earn #ShortSetup
$PUMPBTC MASSIVE DROP BELOW EMAS! Bearish momentum dominates! $PUMPBTC $USDT
Trade Setup (SHORT):
• Entry: $0.00830 – $0.00870
• TP 1: $0.00760
• TP 2: $0.00710
• TP 3: $0.00650
• SL: $0.00920
1H Chart Analysis:
PUMPBTC broke down sharply with consecutive red candles, dropping below both EMA 20 ($0.0087) and EMA 50 ($0.0095). Strong overhead resistance from the moving averages suggests continued downside risks on retests.
#PUMPBTC #CryptoSignalsToday #BinanceSignals #Write2Earn #ShortSetup
Trade Setup (SHORT):
• Entry: $0.00830 – $0.00870
• TP 1: $0.00760
• TP 2: $0.00710
• TP 3: $0.00650
• SL: $0.00920
1H Chart Analysis:
PUMPBTC broke down sharply with consecutive red candles, dropping below both EMA 20 ($0.0087) and EMA 50 ($0.0095). Strong overhead resistance from the moving averages suggests continued downside risks on retests.
#PUMPBTC #CryptoSignalsToday #BinanceSignals #Write2Earn #ShortSetup
374
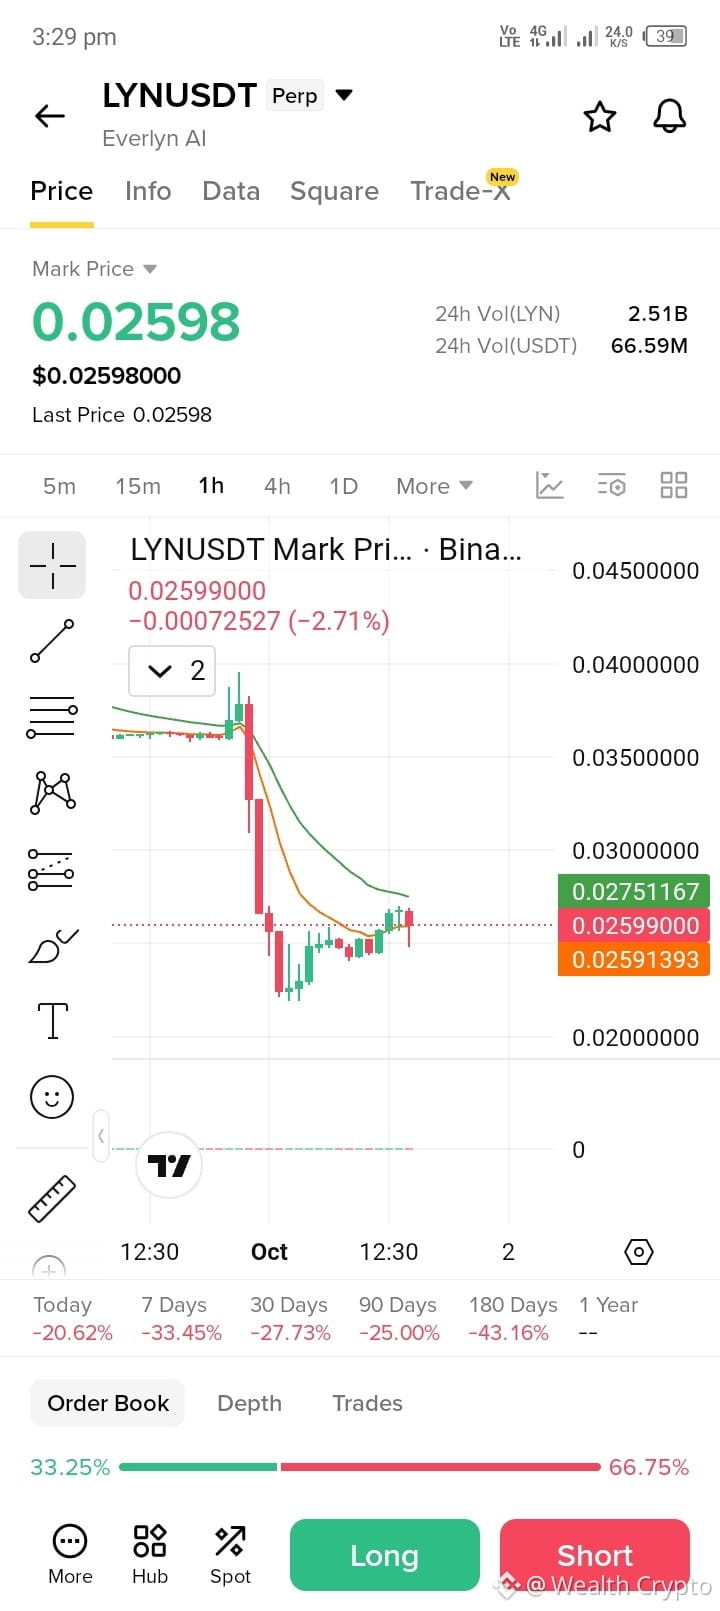
$LYN UNDER HEAVY OVERHEAD PRESSURE! Downtrend structure intact! $LYN $USDT
Trade Setup (SHORT):
• Entry: $0.02600 – $0.02680
• TP 1: $0.02450
• TP 2: $0.02300
• TP 3: $0.02150
• SL: $0.02780
1H Chart Analysis:
LYN experienced a steep decline and is struggling to build recovery momentum on the 1-hour chart. Price action remains suppressed below EMA 50 ($0.0275), making any brief relief rallies vulnerable to further selling pressure.
#LYN #Altcoins #BinanceSquare #Write2Earn #TradingSignals
$LYN UNDER HEAVY OVERHEAD PRESSURE! Downtrend structure intact! $LYN $USDT
Trade Setup (SHORT):
• Entry: $0.02600 – $0.02680
• TP 1: $0.02450
• TP 2: $0.02300
• TP 3: $0.02150
• SL: $0.02780
1H Chart Analysis:
LYN experienced a steep decline and is struggling to build recovery momentum on the 1-hour chart. Price action remains suppressed below EMA 50 ($0.0275), making any brief relief rallies vulnerable to further selling pressure.
#LYN #Altcoins #BinanceSquare #Write2Earn #TradingSignals
Trade Setup (SHORT):
• Entry: $0.02600 – $0.02680
• TP 1: $0.02450
• TP 2: $0.02300
• TP 3: $0.02150
• SL: $0.02780
1H Chart Analysis:
LYN experienced a steep decline and is struggling to build recovery momentum on the 1-hour chart. Price action remains suppressed below EMA 50 ($0.0275), making any brief relief rallies vulnerable to further selling pressure.
#LYN #Altcoins #BinanceSquare #Write2Earn #TradingSignals
499
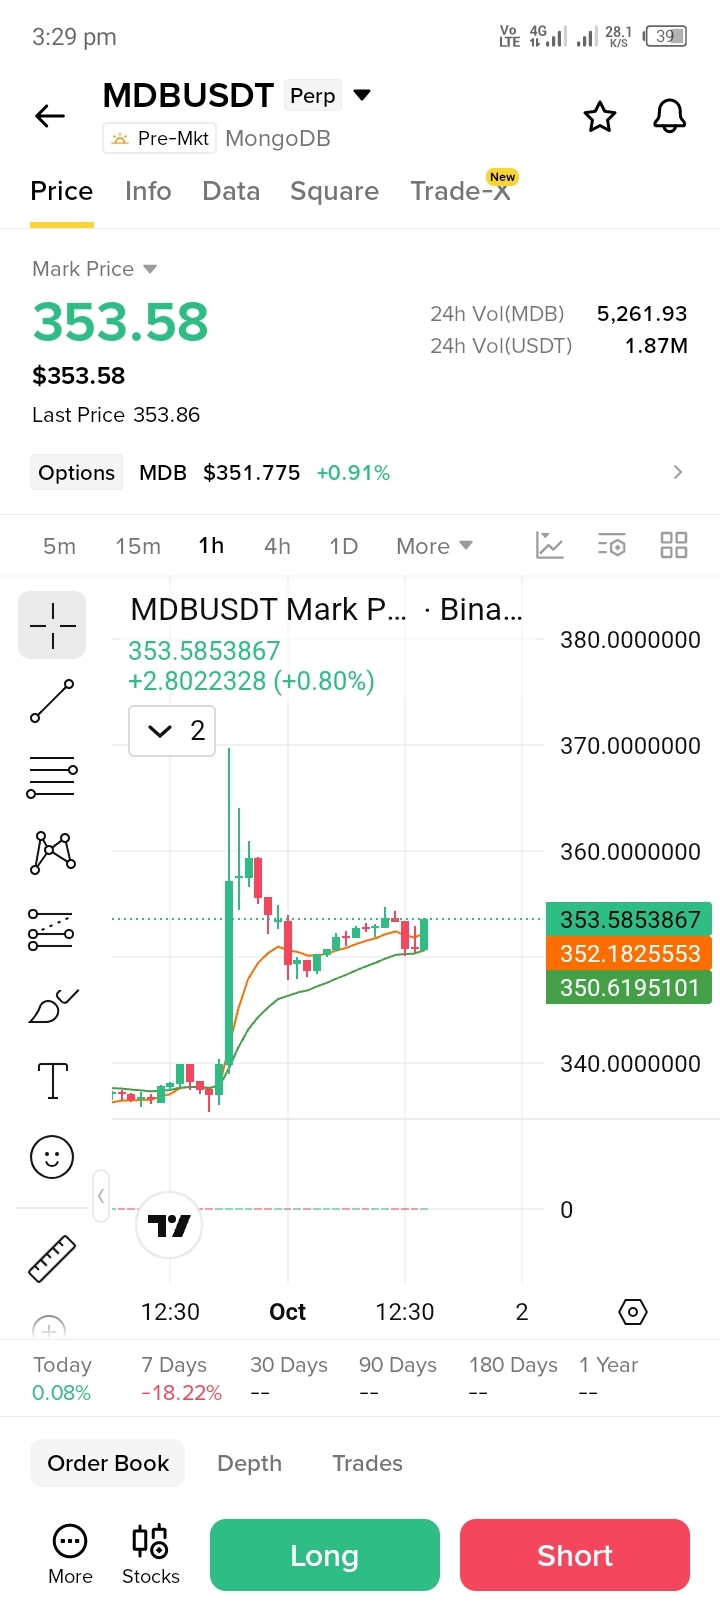
$MDB HOLDING POST-SPIKE CONSOLIDATION! Bullish continuation structure! $MDB $USDT
Trade Setup (LONG):
• Entry: $351.00 – $354.00
• TP 1: $362.00
• TP 2: $370.00
• TP 3: $382.00
• SL: $345.00
1H Chart Analysis:
MDB experienced a sharp volatility spike reaching $370+ before settling into a tight consolidation range above EMA 20 ($352.18) and EMA 50 ($350.62). Sustained trading above $350 indicates strong buyer support for another expansion leg.
#MDB #Crypto #BinanceSignals #Write2Earn #TradingSignals
$MDB HOLDING POST-SPIKE CONSOLIDATION! Bullish continuation structure! $MDB $USDT
Trade Setup (LONG):
• Entry: $351.00 – $354.00
• TP 1: $362.00
• TP 2: $370.00
• TP 3: $382.00
• SL: $345.00
1H Chart Analysis:
MDB experienced a sharp volatility spike reaching $370+ before settling into a tight consolidation range above EMA 20 ($352.18) and EMA 50 ($350.62). Sustained trading above $350 indicates strong buyer support for another expansion leg.
#MDB #Crypto #BinanceSignals #Write2Earn #TradingSignals
Trade Setup (LONG):
• Entry: $351.00 – $354.00
• TP 1: $362.00
• TP 2: $370.00
• TP 3: $382.00
• SL: $345.00
1H Chart Analysis:
MDB experienced a sharp volatility spike reaching $370+ before settling into a tight consolidation range above EMA 20 ($352.18) and EMA 50 ($350.62). Sustained trading above $350 indicates strong buyer support for another expansion leg.
#MDB #Crypto #BinanceSignals #Write2Earn #TradingSignals
67
$FET TESTING KEY EMA SUPPORT! Rebound setup in formation! $FET $USDT
Trade Setup (LONG):
• Entry: $0.2290 – $0.2320
• TP 1: $0.2420
• TP 2: $0.2500
• TP 3: $0.2620
• SL: $0.2220
1H Chart Analysis:
FET is retesting its 50 EMA dynamic support zone near $0.2310 following a pullback from local highs around $0.2450. Holding above this baseline keeps the broader recovery structure intact for a potential push toward $0.2500.
#FET #FetchAI #BinanceSquare #Write2Earn #TradingSignals
$FET TESTING KEY EMA SUPPORT! Rebound setup in formation! $FET $USDT
Trade Setup (LONG):
• Entry: $0.2290 – $0.2320
• TP 1: $0.2420
• TP 2: $0.2500
• TP 3: $0.2620
• SL: $0.2220
1H Chart Analysis:
FET is retesting its 50 EMA dynamic support zone near $0.2310 following a pullback from local highs around $0.2450. Holding above this baseline keeps the broader recovery structure intact for a potential push toward $0.2500.
#FET #FetchAI #BinanceSquare #Write2Earn #TradingSignals
Trade Setup (LONG):
• Entry: $0.2290 – $0.2320
• TP 1: $0.2420
• TP 2: $0.2500
• TP 3: $0.2620
• SL: $0.2220
1H Chart Analysis:
FET is retesting its 50 EMA dynamic support zone near $0.2310 following a pullback from local highs around $0.2450. Holding above this baseline keeps the broader recovery structure intact for a potential push toward $0.2500.
#FET #FetchAI #BinanceSquare #Write2Earn #TradingSignals
143
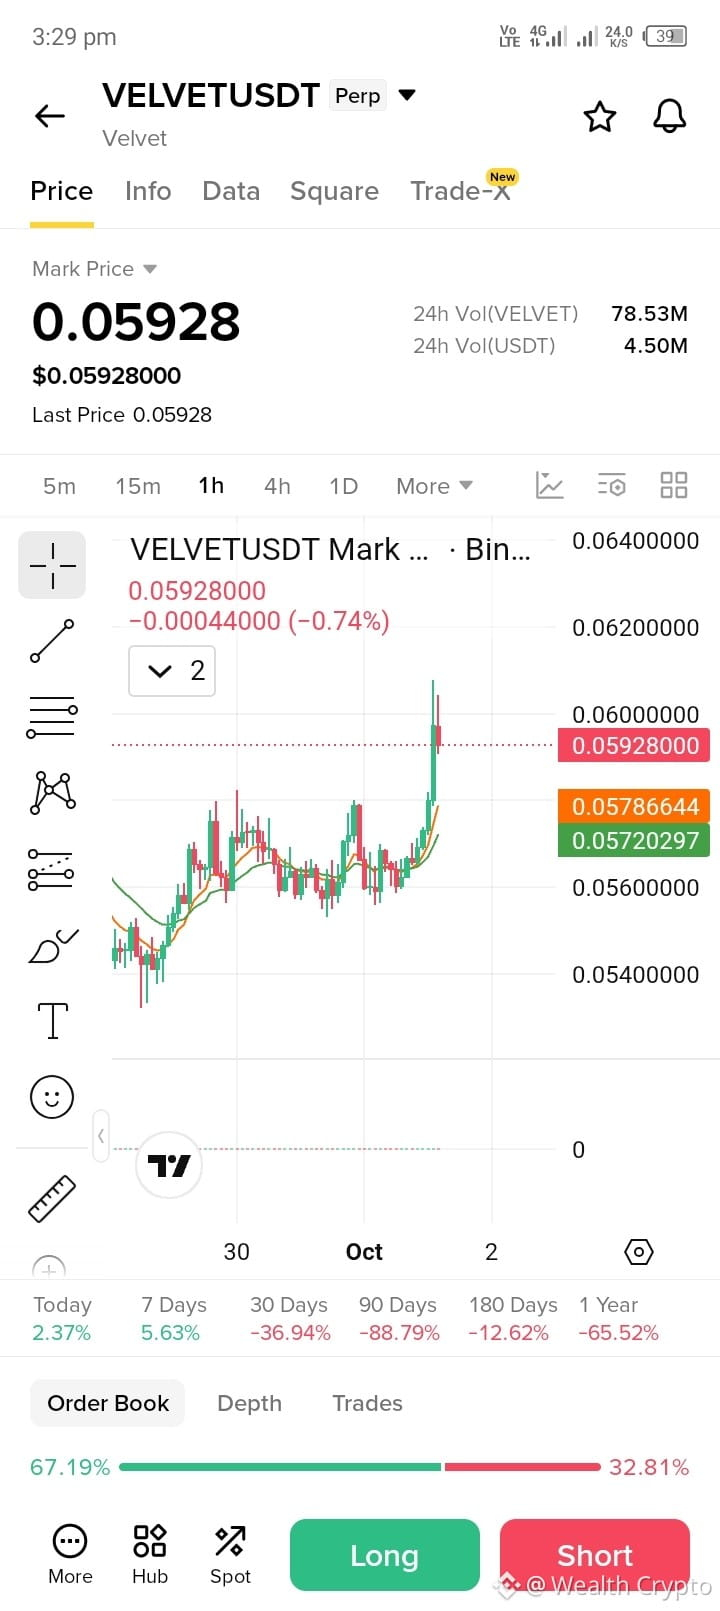
$VELVET SURGING WITH POWERFUL BULLISH IMPULSE! Strong breakout candles! $VELVET $USDT
Trade Setup (LONG):
• Entry: $0.05850 – $0.05930
• TP 1: $0.06200
• TP 2: $0.06500
• TP 3: $0.06800
• SL: $0.05650
1H Chart Analysis:
VELVET printed a strong bullish expansion candle on the 1-hour timeframe, breaking clear of recent consolidation. Price action is well-supported above EMA 20 ($0.0578) and EMA 50 ($0.0572), signaling solid upward momentum toward higher key resistance levels.
#VELVET #CryptoSignals #BinanceSignals #Write2Earn #Altcoins
$VELVET SURGING WITH POWERFUL BULLISH IMPULSE! Strong breakout candles! $VELVET $USDT
Trade Setup (LONG):
• Entry: $0.05850 – $0.05930
• TP 1: $0.06200
• TP 2: $0.06500
• TP 3: $0.06800
• SL: $0.05650
1H Chart Analysis:
VELVET printed a strong bullish expansion candle on the 1-hour timeframe, breaking clear of recent consolidation. Price action is well-supported above EMA 20 ($0.0578) and EMA 50 ($0.0572), signaling solid upward momentum toward higher key resistance levels.
#VELVET #CryptoSignals #BinanceSignals #Write2Earn #Altcoins
Trade Setup (LONG):
• Entry: $0.05850 – $0.05930
• TP 1: $0.06200
• TP 2: $0.06500
• TP 3: $0.06800
• SL: $0.05650
1H Chart Analysis:
VELVET printed a strong bullish expansion candle on the 1-hour timeframe, breaking clear of recent consolidation. Price action is well-supported above EMA 20 ($0.0578) and EMA 50 ($0.0572), signaling solid upward momentum toward higher key resistance levels.
#VELVET #CryptoSignals #BinanceSignals #Write2Earn #Altcoins
1
1
300
·
--
Haussier
$BWET CONSOLIDATING AT LOCAL HIGHS! Bullish breakout pending! $BWET
Trade Setup (LONG):
• Entry: $790.00 – $800.00
• TP 1: $820.00
• TP 2: $840.00
• TP 3: $865.00
• SL: $775.00
1H Chart Analysis:
BWET executed a massive vertical rally on the 1-hour chart and is currently consolidating near $800. Holding firmly above EMA 20 ($792.31) and EMA 50 ($782.18) prepares the asset for another bullish expansion phase.
#BWET #Crypto #BinanceSquare #Write2Earn #TradingSignals
$BWET CONSOLIDATING AT LOCAL HIGHS! Bullish breakout pending! $BWET
Trade Setup (LONG):
• Entry: $790.00 – $800.00
• TP 1: $820.00
• TP 2: $840.00
• TP 3: $865.00
• SL: $775.00
1H Chart Analysis:
BWET executed a massive vertical rally on the 1-hour chart and is currently consolidating near $800. Holding firmly above EMA 20 ($792.31) and EMA 50 ($782.18) prepares the asset for another bullish expansion phase.
#BWET #Crypto #BinanceSquare #Write2Earn #TradingSignals
Trade Setup (LONG):
• Entry: $790.00 – $800.00
• TP 1: $820.00
• TP 2: $840.00
• TP 3: $865.00
• SL: $775.00
1H Chart Analysis:
BWET executed a massive vertical rally on the 1-hour chart and is currently consolidating near $800. Holding firmly above EMA 20 ($792.31) and EMA 50 ($782.18) prepares the asset for another bullish expansion phase.
#BWET #Crypto #BinanceSquare #Write2Earn #TradingSignals
440
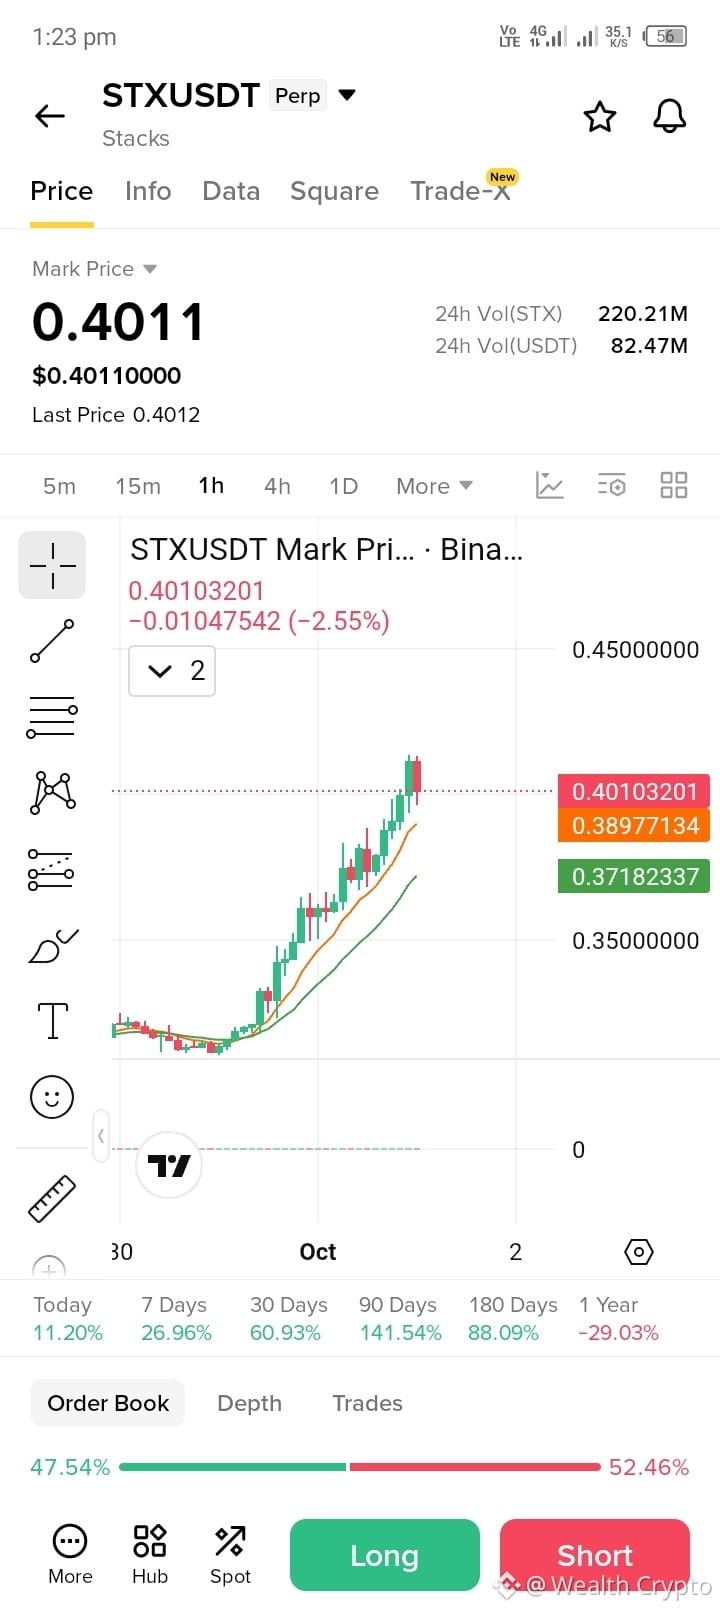
$STXB RIDING STRONG IMPULSE WAVE! Dynamic EMA support holding!
Trade Setup (LONG):
• Entry: $0.3950 – $0.4020
• TP 1: $0.4200
• TP 2: $0.4400
• TP 3: $0.4600
• SL: $0.3780
1H Chart Analysis:
STX is climbing steadily on the 1-hour chart, making higher highs and higher lows. Price action is holding above EMA 20 ($0.389) and EMA 50 ($0.371), indicating healthy momentum following a strong trend reversal.
{future}(STXUSDT)
#STX #Stacks #BinanceSignals #Write2Earn #TradingSignals
$STXB RIDING STRONG IMPULSE WAVE! Dynamic EMA support holding!
Trade Setup (LONG):
• Entry: $0.3950 – $0.4020
• TP 1: $0.4200
• TP 2: $0.4400
• TP 3: $0.4600
• SL: $0.3780
1H Chart Analysis:
STX is climbing steadily on the 1-hour chart, making higher highs and higher lows. Price action is holding above EMA 20 ($0.389) and EMA 50 ($0.371), indicating healthy momentum following a strong trend reversal.
#STX #Stacks #BinanceSignals #Write2Earn #TradingSignals
Trade Setup (LONG):
• Entry: $0.3950 – $0.4020
• TP 1: $0.4200
• TP 2: $0.4400
• TP 3: $0.4600
• SL: $0.3780
1H Chart Analysis:
STX is climbing steadily on the 1-hour chart, making higher highs and higher lows. Price action is holding above EMA 20 ($0.389) and EMA 50 ($0.371), indicating healthy momentum following a strong trend reversal.
#STX #Stacks #BinanceSignals #Write2Earn #TradingSignals
8
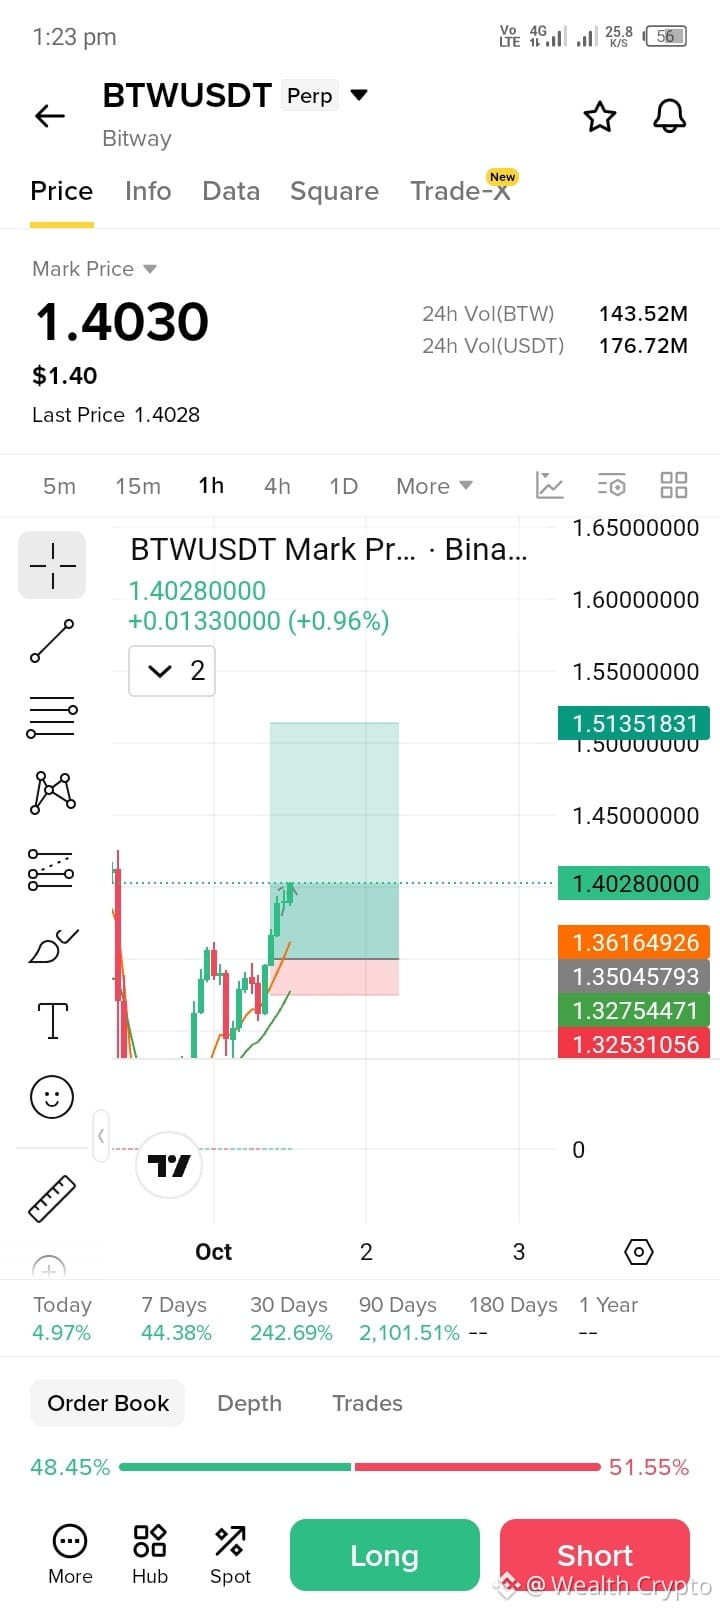
$BTW REBOUNDING FROM DEEP DIP! Bullish recovery structure! $BTW
Trade Setup (LONG):
• Entry: $1.3800 – $1.4100
• TP 1: $1.4800
• TP 2: $1.5100
• TP 3: $1.5800
• SL: $1.3200
1H Chart Analysis:
BTW has recovered sharply after a deep drop and is now establishing a bullish continuation pattern above EMA 20 ($1.361) and EMA 50 ($1.327). A sustained hold above $1.40 targets the next resistance zone near $1.51.
#BTW #BinanceSquare #TradingSignals #Write2Earn #Crypto
$BTW REBOUNDING FROM DEEP DIP! Bullish recovery structure! $BTW
Trade Setup (LONG):
• Entry: $1.3800 – $1.4100
• TP 1: $1.4800
• TP 2: $1.5100
• TP 3: $1.5800
• SL: $1.3200
1H Chart Analysis:
BTW has recovered sharply after a deep drop and is now establishing a bullish continuation pattern above EMA 20 ($1.361) and EMA 50 ($1.327). A sustained hold above $1.40 targets the next resistance zone near $1.51.
#BTW #BinanceSquare #TradingSignals #Write2Earn #Crypto
Trade Setup (LONG):
• Entry: $1.3800 – $1.4100
• TP 1: $1.4800
• TP 2: $1.5100
• TP 3: $1.5800
• SL: $1.3200
1H Chart Analysis:
BTW has recovered sharply after a deep drop and is now establishing a bullish continuation pattern above EMA 20 ($1.361) and EMA 50 ($1.327). A sustained hold above $1.40 targets the next resistance zone near $1.51.
#BTW #BinanceSquare #TradingSignals #Write2Earn #Crypto
300
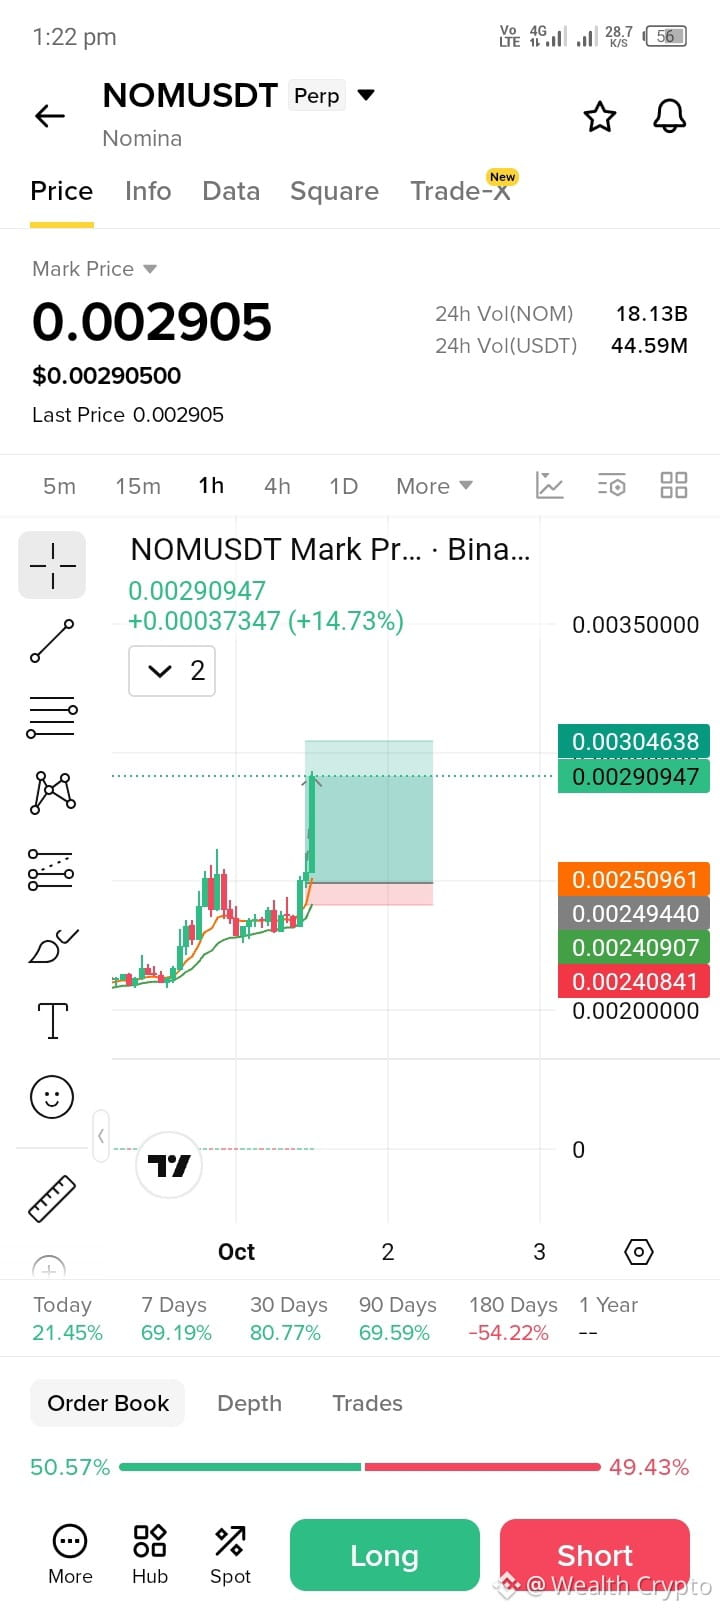
NOM EXPLODING WITH 14%+ BREAKOUT! High volume expansion! $NOM $USDT
Trade Setup (LONG):
• Entry: $0.00285 – $0.00292
• TP 1: $0.00305
• TP 2: $0.00325
• TP 3: $0.00350
• SL: $0.00250
1H Chart Analysis:
NOM printed a massive breakout candle on the 1-hour chart, surging over +14%. The sharp expansion well above EMA 20 ($0.00250) and EMA 50 ($0.00240) indicates strong momentum, with target liquidity sitting around $0.00305+.
#NOM #CryptoSignals #BinanceSignals #Write2Earn #Altcoins
NOM EXPLODING WITH 14%+ BREAKOUT! High volume expansion! $NOM $USDT
Trade Setup (LONG):
• Entry: $0.00285 – $0.00292
• TP 1: $0.00305
• TP 2: $0.00325
• TP 3: $0.00350
• SL: $0.00250
1H Chart Analysis:
NOM printed a massive breakout candle on the 1-hour chart, surging over +14%. The sharp expansion well above EMA 20 ($0.00250) and EMA 50 ($0.00240) indicates strong momentum, with target liquidity sitting around $0.00305+.
#NOM #CryptoSignals #BinanceSignals #Write2Earn #Altcoins
Trade Setup (LONG):
• Entry: $0.00285 – $0.00292
• TP 1: $0.00305
• TP 2: $0.00325
• TP 3: $0.00350
• SL: $0.00250
1H Chart Analysis:
NOM printed a massive breakout candle on the 1-hour chart, surging over +14%. The sharp expansion well above EMA 20 ($0.00250) and EMA 50 ($0.00240) indicates strong momentum, with target liquidity sitting around $0.00305+.
#NOM #CryptoSignals #BinanceSignals #Write2Earn #Altcoins
1
120
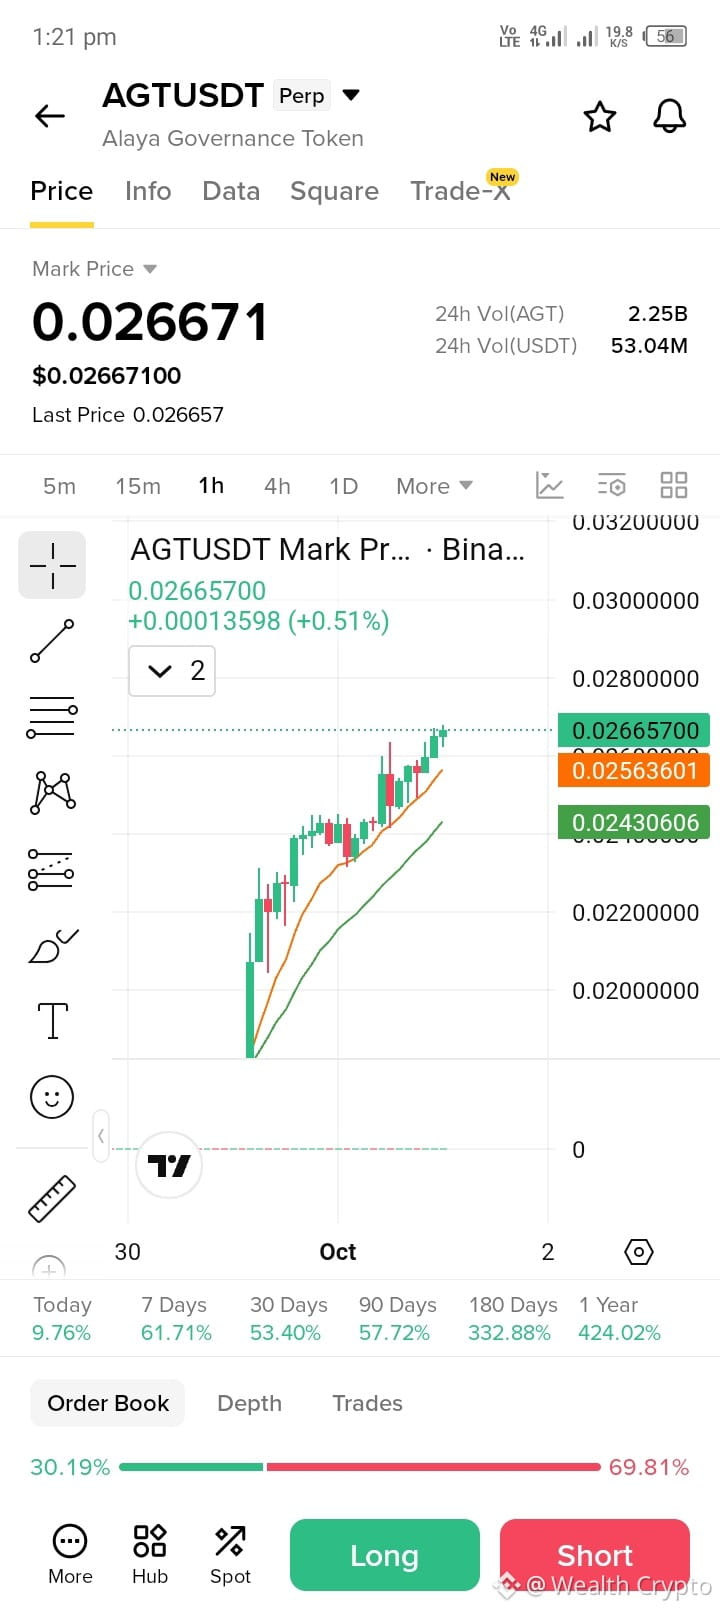
AGT STEADY UPTREND CONTINUES! Higher highs in play! $AGT $USDT
Trade Setup (LONG):
• Entry: $0.02600 – $0.02670
• TP 1: $0.02850
• TP 2: $0.03000
• TP 3: $0.03200
• SL: $0.02480
1H Chart Analysis:
AGT is maintaining a clean upward structure on the 1-hour chart with consecutive green candles. Price action stays comfortably above EMA 20 ($0.0256) and EMA 50 ($0.0243), signaling consistent buying interest for further gains.
#AGT #Altcoins #BinanceSquare #Write2Earn #TradingSignals
AGT STEADY UPTREND CONTINUES! Higher highs in play! $AGT $USDT
Trade Setup (LONG):
• Entry: $0.02600 – $0.02670
• TP 1: $0.02850
• TP 2: $0.03000
• TP 3: $0.03200
• SL: $0.02480
1H Chart Analysis:
AGT is maintaining a clean upward structure on the 1-hour chart with consecutive green candles. Price action stays comfortably above EMA 20 ($0.0256) and EMA 50 ($0.0243), signaling consistent buying interest for further gains.
#AGT #Altcoins #BinanceSquare #Write2Earn #TradingSignals
Trade Setup (LONG):
• Entry: $0.02600 – $0.02670
• TP 1: $0.02850
• TP 2: $0.03000
• TP 3: $0.03200
• SL: $0.02480
1H Chart Analysis:
AGT is maintaining a clean upward structure on the 1-hour chart with consecutive green candles. Price action stays comfortably above EMA 20 ($0.0256) and EMA 50 ($0.0243), signaling consistent buying interest for further gains.
#AGT #Altcoins #BinanceSquare #Write2Earn #TradingSignals
61
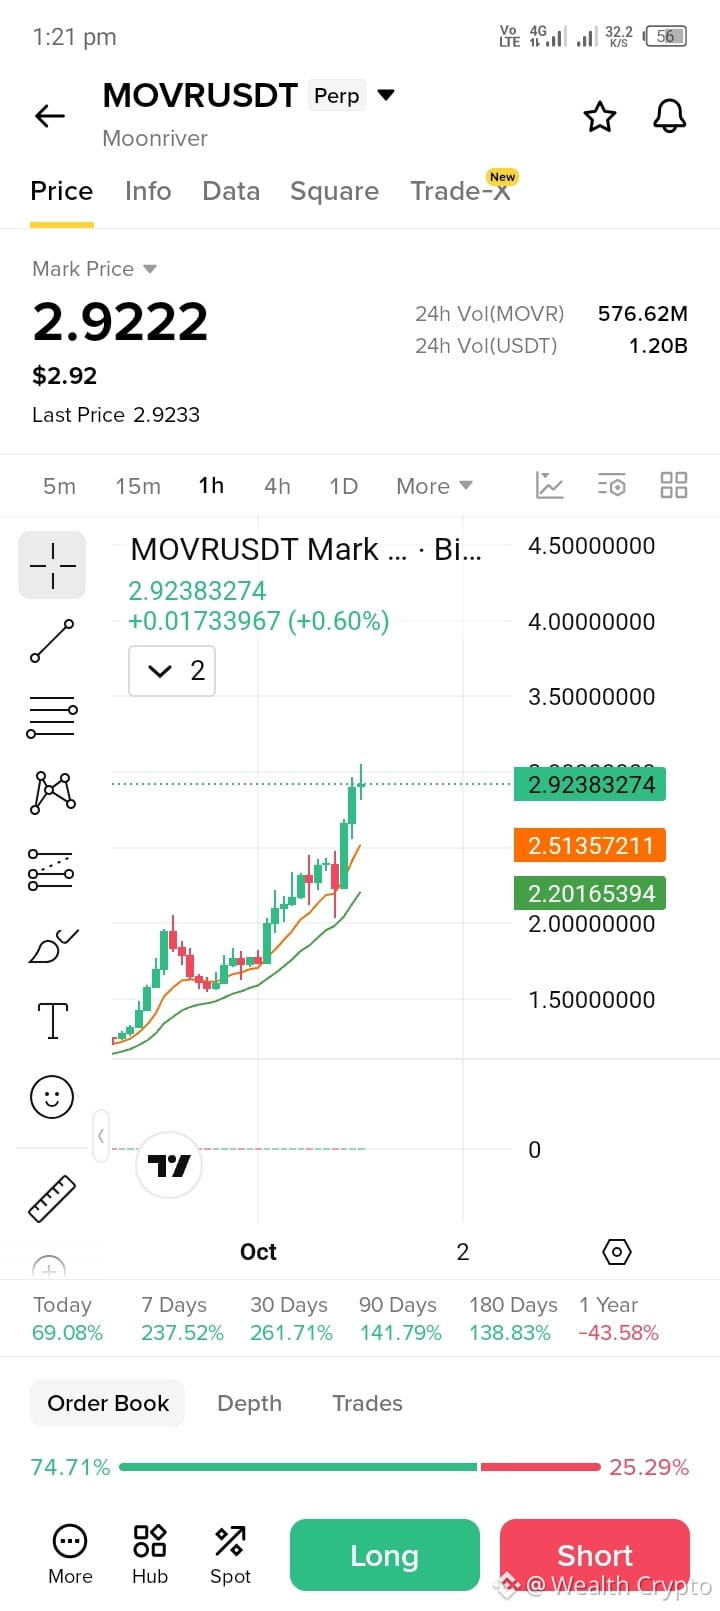
$MOVR EXTENDING BULLISH PARABOLA! Strong momentum holding above EMAs! $MOVR $USDT
Trade Setup (LONG):
• Entry: $2.8800 – $2.9300
• TP 1: $3.1500
• TP 2: $3.4000
• TP 3: $3.7000
• SL: $2.6800
1H Chart Analysis:
MOVR continues its powerful rally on the 1-hour timeframe, consolidating near $2.92. Price is well-supported above EMA 20 ($2.513) and EMA 50 ($2.201), showing strong bullish continuation potential towards higher resistance zones.
#MOVR #Crypto #BinanceSignals #Write2Earn #TradingSignals
$MOVR EXTENDING BULLISH PARABOLA! Strong momentum holding above EMAs! $MOVR $USDT
Trade Setup (LONG):
• Entry: $2.8800 – $2.9300
• TP 1: $3.1500
• TP 2: $3.4000
• TP 3: $3.7000
• SL: $2.6800
1H Chart Analysis:
MOVR continues its powerful rally on the 1-hour timeframe, consolidating near $2.92. Price is well-supported above EMA 20 ($2.513) and EMA 50 ($2.201), showing strong bullish continuation potential towards higher resistance zones.
#MOVR #Crypto #BinanceSignals #Write2Earn #TradingSignals
Trade Setup (LONG):
• Entry: $2.8800 – $2.9300
• TP 1: $3.1500
• TP 2: $3.4000
• TP 3: $3.7000
• SL: $2.6800
1H Chart Analysis:
MOVR continues its powerful rally on the 1-hour timeframe, consolidating near $2.92. Price is well-supported above EMA 20 ($2.513) and EMA 50 ($2.201), showing strong bullish continuation potential towards higher resistance zones.
#MOVR #Crypto #BinanceSignals #Write2Earn #TradingSignals
284
47
good setup
good setup


BullishBanter
·
--
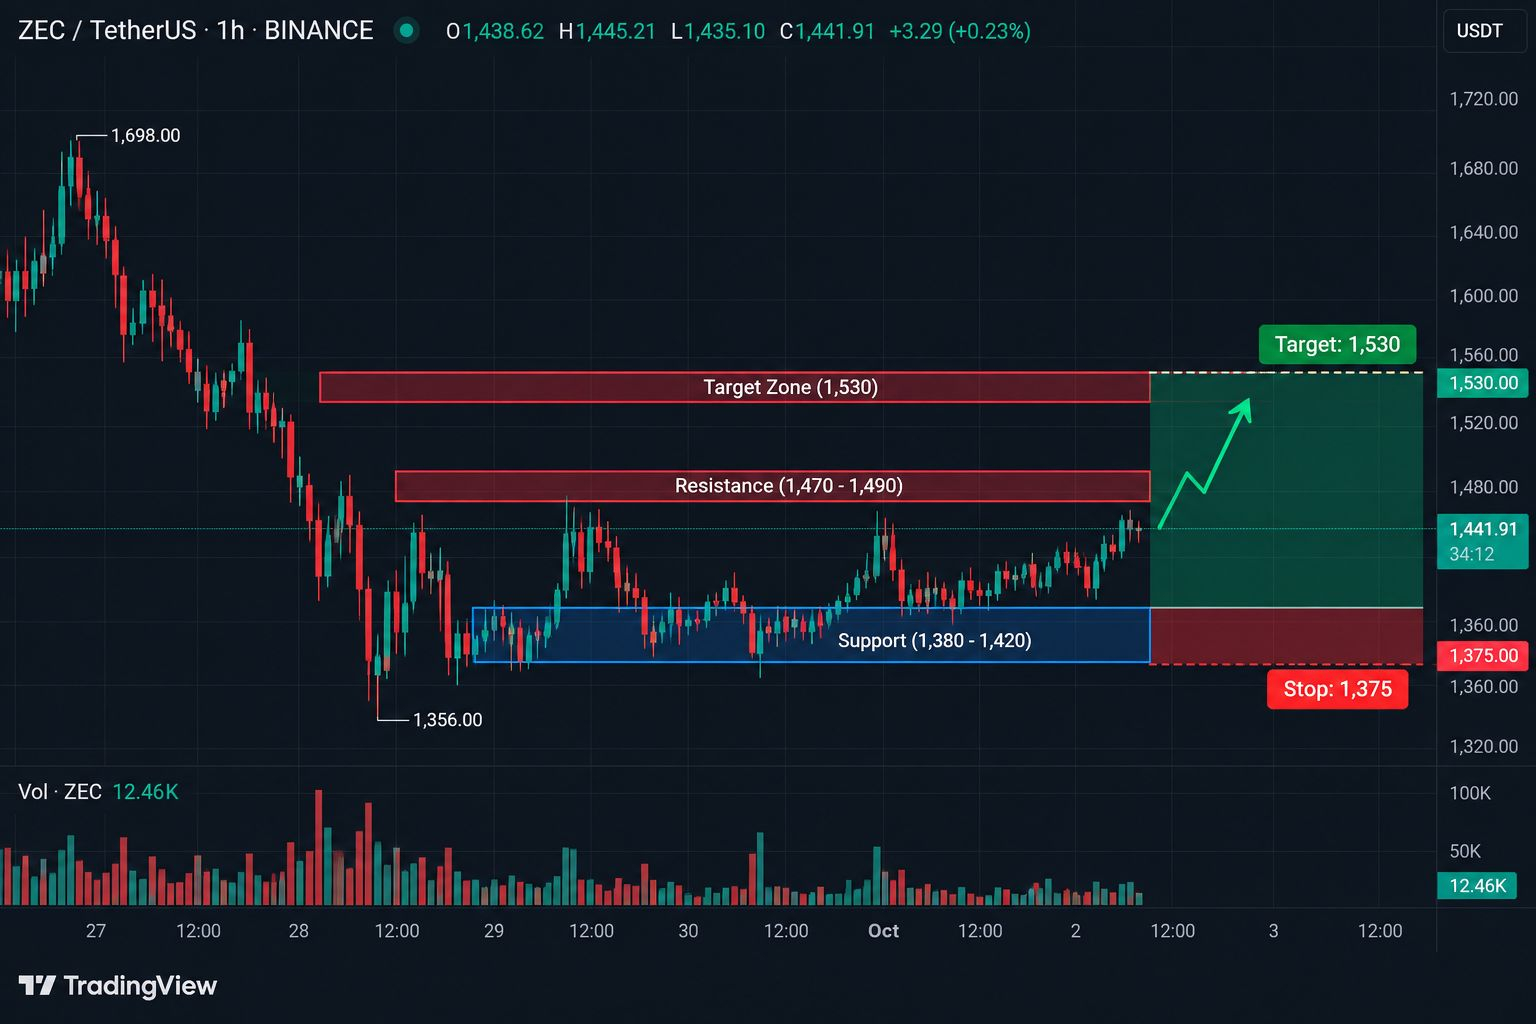
Haussier$ZEC LONG SETUP ... NEXT TARGET 1,490
Entry: 1,435–1,445
TP1: 1,470–1,490
Next Price: 1,530
Extended Target: 1,560+
SL: 1,350
ZEC is holding above the 1,380–1,420 support zone and gradually building momentum. A clean break above 1,490 resistance can open the move toward 1,530.
Trade on $ZEC
Entry: 1,435–1,445
TP1: 1,470–1,490
Next Price: 1,530
Extended Target: 1,560+
SL: 1,350
ZEC is holding above the 1,380–1,420 support zone and gradually building momentum. A clean break above 1,490 resistance can open the move toward 1,530.
Trade on $ZEC
1
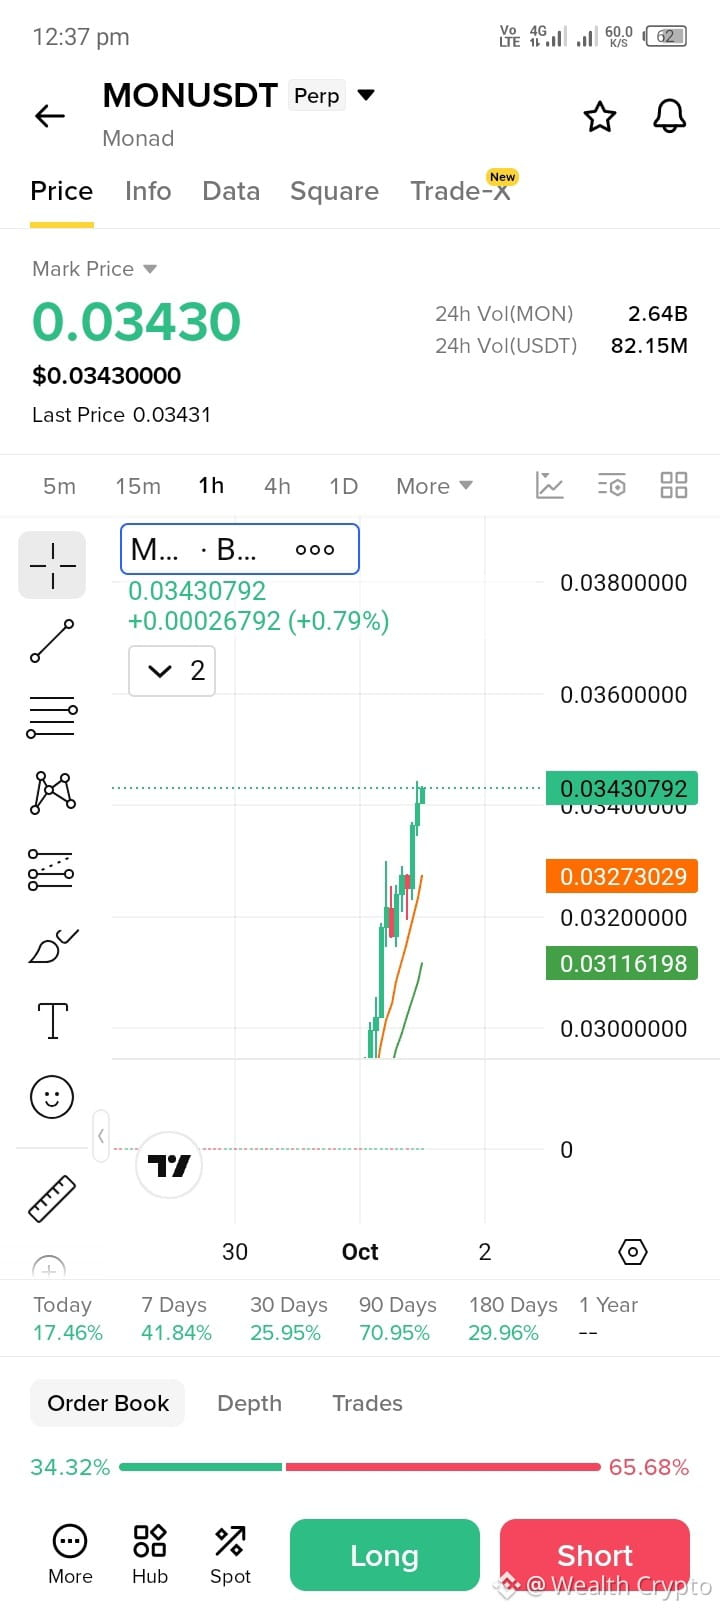
MON TOKEN EXPLODING HIGHER! Strong impulse wave in action! $MON $USDT
Trade Setup (LONG):
• Entry: $0.03350 – $0.03450
• TP 1: $0.03650
• TP 2: $0.03800
• TP 3: $0.04000
• SL: $0.03180
1H Chart Analysis:
MON has launched a sharp vertical breakout on the 1-hour chart, breaking cleanly above EMA 20 ($0.0327) and EMA 50 ($0.0311). Rising buyer volume supports further upside towards upcoming resistance levels.
{future}(MONUSDT)
#MON #BinanceSignals #crypto #Write2Earn #TradingSignals
MON TOKEN EXPLODING HIGHER! Strong impulse wave in action! $MON $USDT
Trade Setup (LONG):
• Entry: $0.03350 – $0.03450
• TP 1: $0.03650
• TP 2: $0.03800
• TP 3: $0.04000
• SL: $0.03180
1H Chart Analysis:
MON has launched a sharp vertical breakout on the 1-hour chart, breaking cleanly above EMA 20 ($0.0327) and EMA 50 ($0.0311). Rising buyer volume supports further upside towards upcoming resistance levels.
#MON #BinanceSignals #crypto #Write2Earn #TradingSignals
Trade Setup (LONG):
• Entry: $0.03350 – $0.03450
• TP 1: $0.03650
• TP 2: $0.03800
• TP 3: $0.04000
• SL: $0.03180
1H Chart Analysis:
MON has launched a sharp vertical breakout on the 1-hour chart, breaking cleanly above EMA 20 ($0.0327) and EMA 50 ($0.0311). Rising buyer volume supports further upside towards upcoming resistance levels.
#MON #BinanceSignals #crypto #Write2Earn #TradingSignals
1
175
Connectez-vous pour découvrir plus de contenu
Rejoignez la communauté mondiale des adeptes de cryptomonnaies sur Binance Square
⚡️ Suviez les dernières informations importantes sur les cryptomonnaies.
💬 Jugé digne de confiance par la plus grande plateforme d’échange de cryptomonnaies au monde.
👍 Découvrez les connaissances que partagent les créateurs vérifiés.
Adresse e-mail/Nº de téléphone
Sujets d’actualité
BitcoinParesGainsAfterRallyTo$86.5K
1,728 vues
36 mentions
$BTC sitting right on the knife edge at $86k. Bulls stacked 1,436 BTC defending that level, bears loaded 1,008 BTC as a wall at $86.5k. This is pure liquidation fuel—whoever loses this fight is getting absolutely nuked.
Short-term scalp territory. If bulls punch through $86.5k with volume, we're probably running to $88k fast. If bears hold and push down, $84k is the next stop and longs get flushed.
Watch the tape closely. One side's about to get destroyed, and the move will be violent either way.
AI Market Brief
·6 mentions J’aime
·7.8k vues
CerebrasSinksNearly20%OnReportNvidiaToPowerOpenAI
7,424 vues
142 mentions
SECProposesCryptoCustodyRules
29,949 vues
297 mentions