

lleonard
282 Posts

lleonard
Report
Block User
49 Following
28 Followers
29 Liked
Posts
All
Quotes
·
--
Bullish
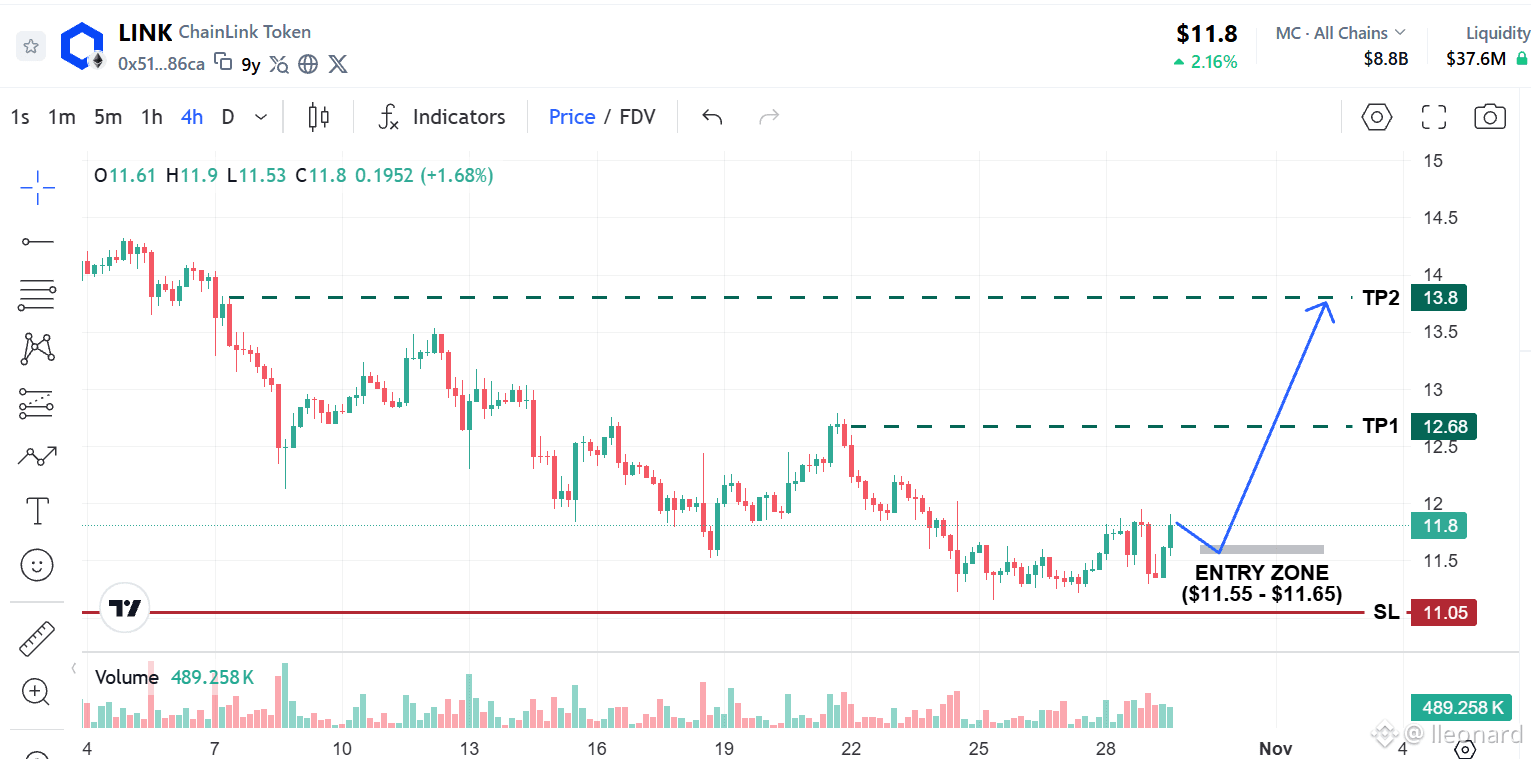
$LINK is currently trading around $11.82 following a push off the recent local support zone at $11.30 – $11.50.
The exhaustion in selling pressure near the lows presents a clean bounce setup with an attractive Risk-to-Reward ratio.
📊 Long Setup
– Entry Zone: $11.55 – $11.65
– Stop Loss: $11.05
– Targets: $12.68 | $13.80
⚠️ Strict SL.
{future}(LINKUSDT)
$LINK is currently trading around $11.82 following a push off the recent local support zone at $11.30 – $11.50.
The exhaustion in selling pressure near the lows presents a clean bounce setup with an attractive Risk-to-Reward ratio.
📊 Long Setup
– Entry Zone: $11.55 – $11.65
– Stop Loss: $11.05
– Targets: $12.68 | $13.80
⚠️ Strict SL.
The exhaustion in selling pressure near the lows presents a clean bounce setup with an attractive Risk-to-Reward ratio.
📊 Long Setup
– Entry Zone: $11.55 – $11.65
– Stop Loss: $11.05
– Targets: $12.68 | $13.80
⚠️ Strict SL.
21
·
--
Bullish
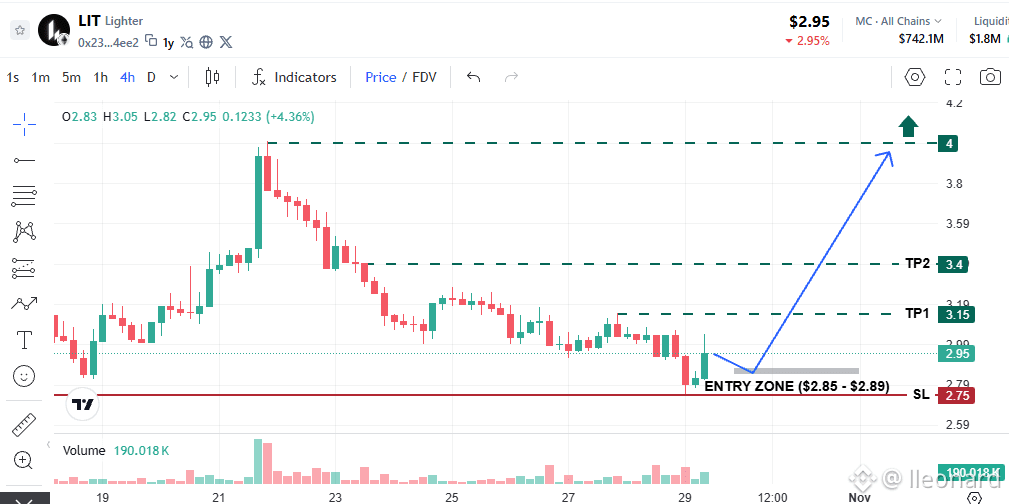
$LIT executed a classic Fakeout below the $2.80 support zone, dipping down to $2.79 before aggressively bouncing back to $2.95.
This sudden pump trapped aggressive short-sellers and suggests selling pressure is temporarily exhausted ➔ The optimal strategy is to wait for a Retest.
📊 Trade Plan
– Entry Zone: $2.85 – $2.89
– Stop Loss: $2.75
– Targets: $3.15 | $3.40 | $4.00
⚠️ If a 15m candle closes decisively below $2.75 with strong selling volume, the main downtrend will likely resume.
{future}(LITUSDT)
$LIT executed a classic Fakeout below the $2.80 support zone, dipping down to $2.79 before aggressively bouncing back to $2.95.
This sudden pump trapped aggressive short-sellers and suggests selling pressure is temporarily exhausted ➔ The optimal strategy is to wait for a Retest.
📊 Trade Plan
– Entry Zone: $2.85 – $2.89
– Stop Loss: $2.75
– Targets: $3.15 | $3.40 | $4.00
⚠️ If a 15m candle closes decisively below $2.75 with strong selling volume, the main downtrend will likely resume.
1
165
·
--
Bullish
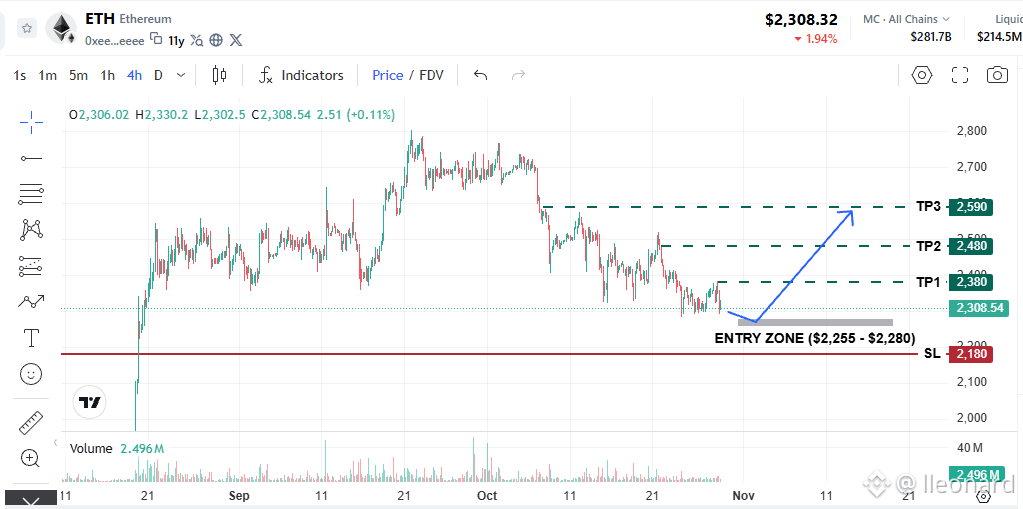
After breaking down below the 1H neckline, $ETH has pulled back into a strong 4H demand zone / major support base.
📊 Long Setup
– Entry Zone: $2,255 - $2,280
– Stop Loss: $2,180
– Targets: $2,380 | $2,480 | $2,590
💡 Using a split-entry strategy to optimize average entry and capitalize on the bounce!
{future}(ETHUSDT)
After breaking down below the 1H neckline, $ETH has pulled back into a strong 4H demand zone / major support base.
📊 Long Setup
– Entry Zone: $2,255 - $2,280
– Stop Loss: $2,180
– Targets: $2,380 | $2,480 | $2,590
💡 Using a split-entry strategy to optimize average entry and capitalize on the bounce!
📊 Long Setup
– Entry Zone: $2,255 - $2,280
– Stop Loss: $2,180
– Targets: $2,380 | $2,480 | $2,590
💡 Using a split-entry strategy to optimize average entry and capitalize on the bounce!
87
·
--
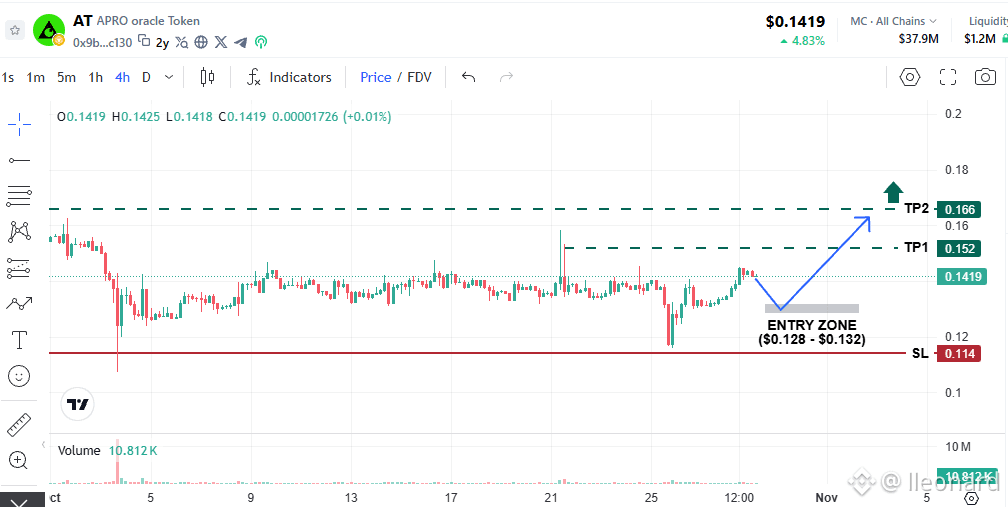
The 4H chart of $AT just printed a textbook liquidity sweep, shaking out leveraged longs before bouncing back strongly.
📊 Long Setup (Looking for accumulate on the retest)
– Entry Zone: 0.128 - 0.132
– Stop Loss: 0.114
–Targets: 0.152 | $0.166+
⚠️ Wide SL, carefully manage position size and leverage to keep risk in check.
{future}(ATUSDT)
The 4H chart of $AT just printed a textbook liquidity sweep, shaking out leveraged longs before bouncing back strongly.
📊 Long Setup (Looking for accumulate on the retest)
– Entry Zone: 0.128 - 0.132
– Stop Loss: 0.114
–Targets: 0.152 | $0.166+
⚠️ Wide SL, carefully manage position size and leverage to keep risk in check.
📊 Long Setup (Looking for accumulate on the retest)
– Entry Zone: 0.128 - 0.132
– Stop Loss: 0.114
–Targets: 0.152 | $0.166+
⚠️ Wide SL, carefully manage position size and leverage to keep risk in check.
60
·
--
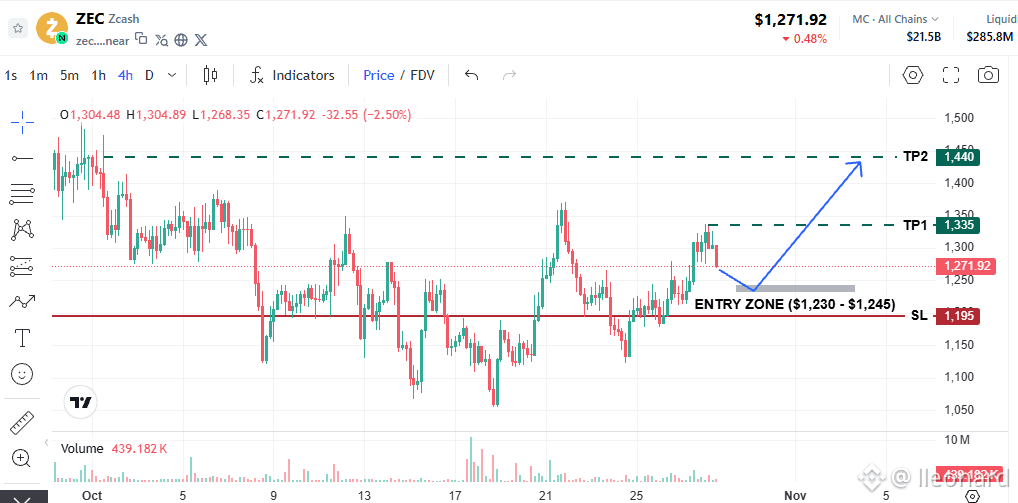
After sweeping liquidity and breaking firmly above the $1,245 key resistance, $ZEC has shifted its market structure.
📊 Long Setup
– Entry Zone: $1,230 – $1,245
– Stop Loss: $1,195
– Targets: $1,335 | $1,440
💡 You can never go wrong taking profits along the way!
{future}(ZECUSDT)
After sweeping liquidity and breaking firmly above the $1,245 key resistance, $ZEC has shifted its market structure.
📊 Long Setup
– Entry Zone: $1,230 – $1,245
– Stop Loss: $1,195
– Targets: $1,335 | $1,440
💡 You can never go wrong taking profits along the way!
📊 Long Setup
– Entry Zone: $1,230 – $1,245
– Stop Loss: $1,195
– Targets: $1,335 | $1,440
💡 You can never go wrong taking profits along the way!
1
213
·
--
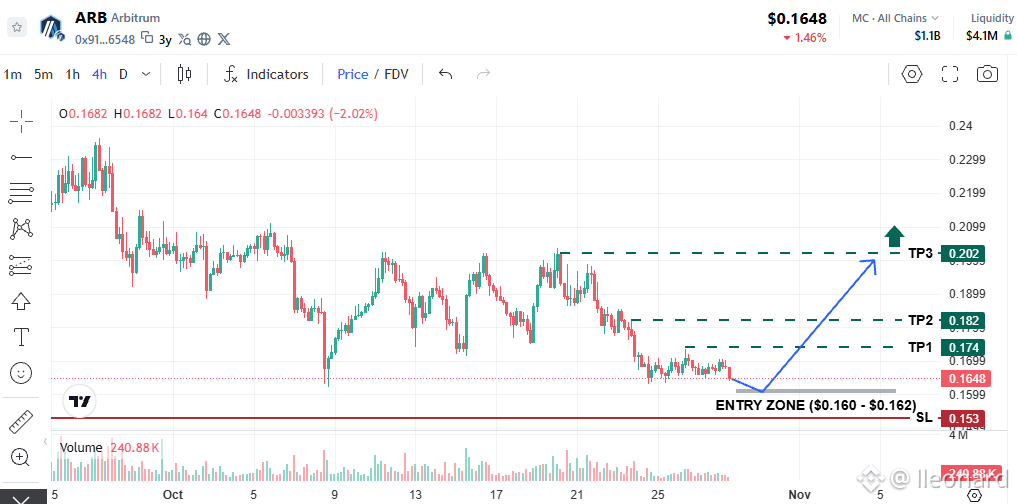
$ARB sliding toward lower structural levels, price is now approaching a key historical support/psychological demand zone.
📊 Trade Plan
– Entry Zone: $0.160 – $0.162
– Stop Loss: $0.153
– Targets: $0.174 | $0.182 | $0.202
⚠️ This trade goes against the broader timeframe bearish momentum. Always respect your SL.
{future}(ARBUSDT)
$ARB sliding toward lower structural levels, price is now approaching a key historical support/psychological demand zone.
📊 Trade Plan
– Entry Zone: $0.160 – $0.162
– Stop Loss: $0.153
– Targets: $0.174 | $0.182 | $0.202
⚠️ This trade goes against the broader timeframe bearish momentum. Always respect your SL.
📊 Trade Plan
– Entry Zone: $0.160 – $0.162
– Stop Loss: $0.153
– Targets: $0.174 | $0.182 | $0.202
⚠️ This trade goes against the broader timeframe bearish momentum. Always respect your SL.
1
285
·
--
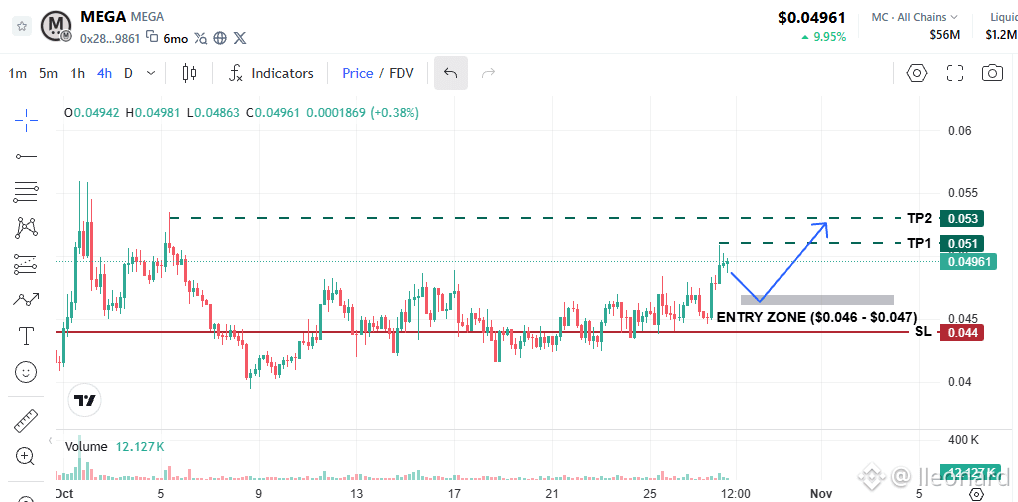
Looking at the 4H timeframe, $MEGA has just made a strong push to test the solid resistance zone around $0.049 - $0.050.
The optimal strategy right now is wait for a pullback to the lower support area around $0.046 – $0.047 for a better entry position.
📊 Long Setup
– Entry Zone: $0.046 – $0.047
– Stop Loss: $0.044
– Targets: $0.051 | $0.053
⚠️ If price breaks straight above $0.051 before pulling back to the entry zone, cancel this setup.
{future}(MEGAUSDT)
Looking at the 4H timeframe, $MEGA has just made a strong push to test the solid resistance zone around $0.049 - $0.050.
The optimal strategy right now is wait for a pullback to the lower support area around $0.046 – $0.047 for a better entry position.
📊 Long Setup
– Entry Zone: $0.046 – $0.047
– Stop Loss: $0.044
– Targets: $0.051 | $0.053
⚠️ If price breaks straight above $0.051 before pulling back to the entry zone, cancel this setup.
264
·
--
Bullish
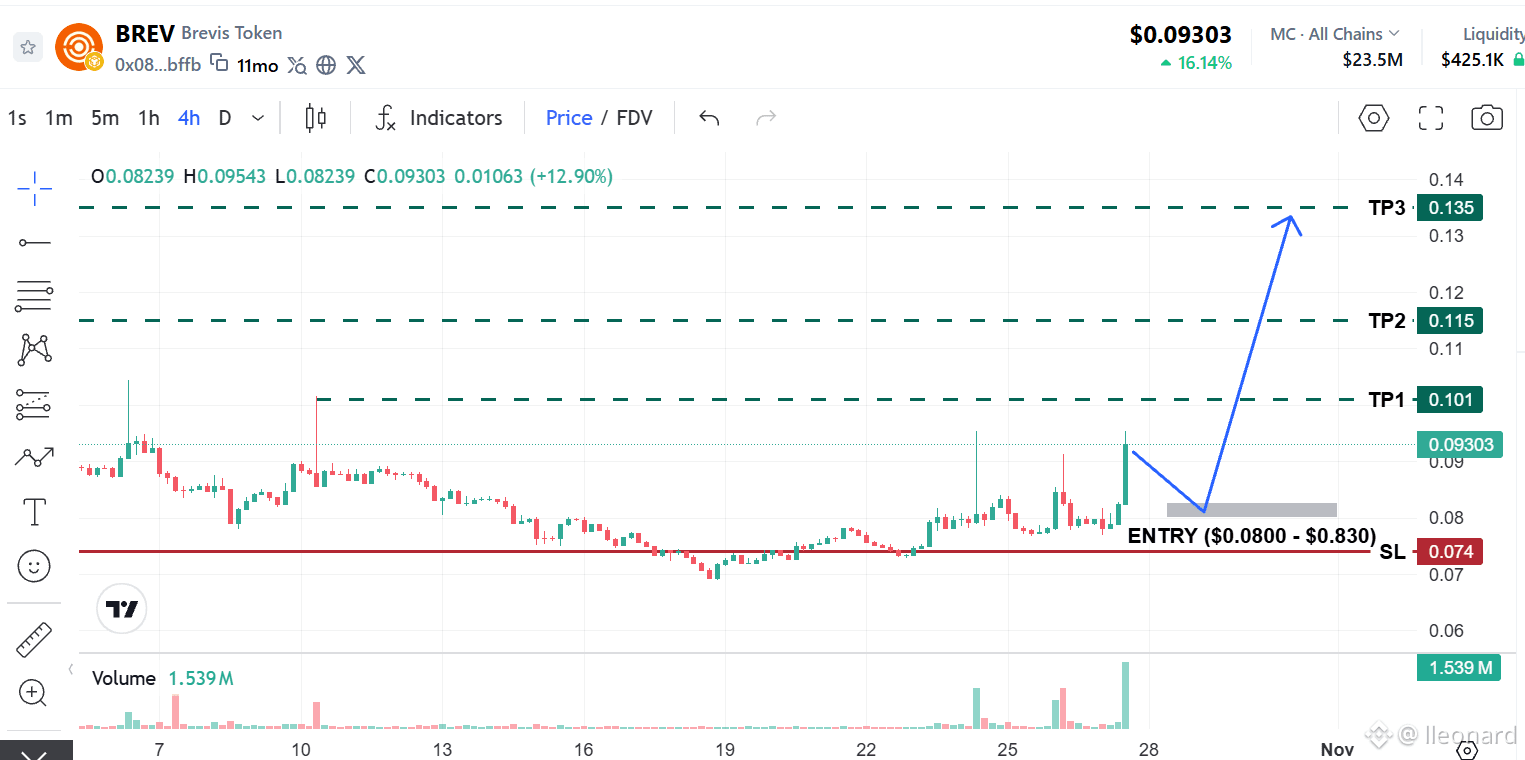
$BREV 1D and 4H charts are showing strong breakout momentum accompanied by a massive volume spike, clearing the multi-month accumulation zone held since August.
📊 Trading Plan
– Entry Zones: $0.0800 - $0.0830
– Stop Loss: $0.0740
– Targets: $0.101 | $0.115 | $0.135
⚠️ High volatility and wicks are common. Manage risk wisely, set proactive limit orders for TP and SL!
{future}(BREVUSDT)
$BREV 1D and 4H charts are showing strong breakout momentum accompanied by a massive volume spike, clearing the multi-month accumulation zone held since August.
📊 Trading Plan
– Entry Zones: $0.0800 - $0.0830
– Stop Loss: $0.0740
– Targets: $0.101 | $0.115 | $0.135
⚠️ High volatility and wicks are common. Manage risk wisely, set proactive limit orders for TP and SL!
📊 Trading Plan
– Entry Zones: $0.0800 - $0.0830
– Stop Loss: $0.0740
– Targets: $0.101 | $0.115 | $0.135
⚠️ High volatility and wicks are common. Manage risk wisely, set proactive limit orders for TP and SL!
113
·
--
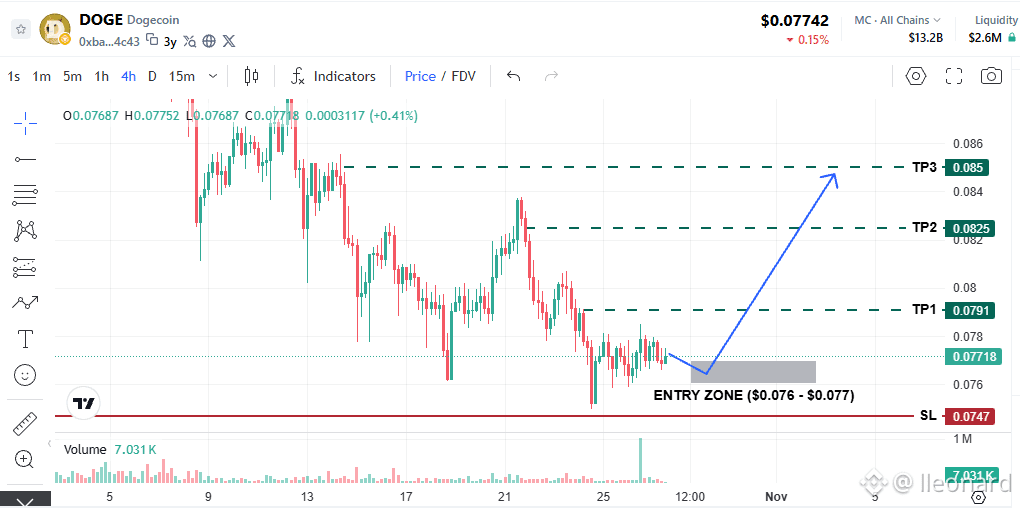
$DOGE is currently consolidating within the $0.0770 - $0.0780 range. Volatile compression is taking place, paving the way for a clearer directional breakout.
Following the failed attempt to push above $0.0780, price has pulled back toward the lower boundary, offering a high R:R Long setup.
📊 Long Setup:
– Entry: $0.0760 - $0.0770
– Stop Loss: $0.0747
– Targets: $0.0791 | $0.0825 | $0.0850
⚠️ Strict SL below local swing low.
{future}(DOGEUSDT)
$DOGE is currently consolidating within the $0.0770 - $0.0780 range. Volatile compression is taking place, paving the way for a clearer directional breakout.
Following the failed attempt to push above $0.0780, price has pulled back toward the lower boundary, offering a high R:R Long setup.
📊 Long Setup:
– Entry: $0.0760 - $0.0770
– Stop Loss: $0.0747
– Targets: $0.0791 | $0.0825 | $0.0850
⚠️ Strict SL below local swing low.
Following the failed attempt to push above $0.0780, price has pulled back toward the lower boundary, offering a high R:R Long setup.
📊 Long Setup:
– Entry: $0.0760 - $0.0770
– Stop Loss: $0.0747
– Targets: $0.0791 | $0.0825 | $0.0850
⚠️ Strict SL below local swing low.
2
359
·
--
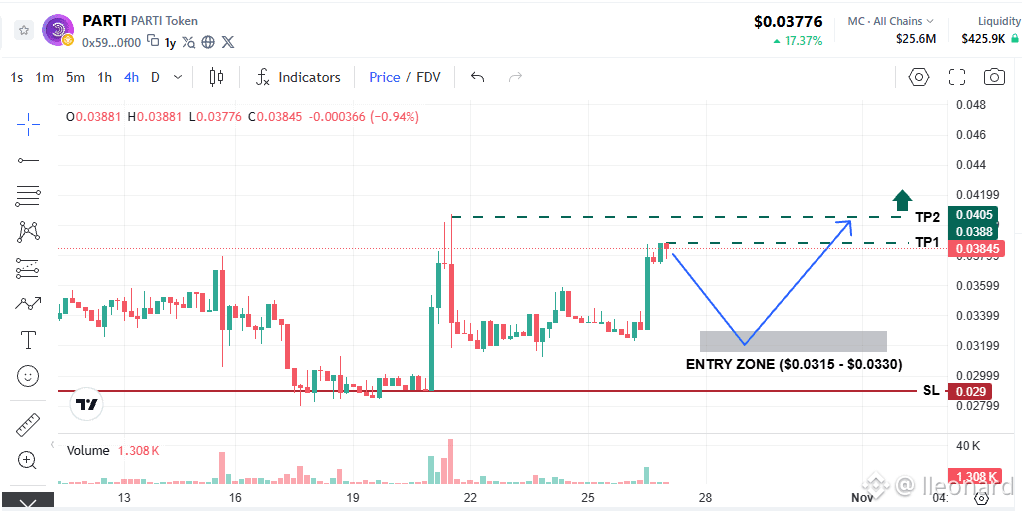
Following the retest of the previous high, $PARTI is currently undergoing a light consolidation phase.
➔ Wait for the price to pull back to a strong support zone (the previous resistance level that broke out and recently acted as a short-term local bottom) to enter a Long Pullback.
📊 Trading Plan
– Entry Zone: $0.0315 - $0.0330
– Stop Loss: $0.0290
– Targets: $0.0388 | $0.0405+
⚠️ Current trading volume remains modest—manage position size wisely and maintain strict risk management!
{future}(PARTIUSDT)
Following the retest of the previous high, $PARTI is currently undergoing a light consolidation phase.
➔ Wait for the price to pull back to a strong support zone (the previous resistance level that broke out and recently acted as a short-term local bottom) to enter a Long Pullback.
📊 Trading Plan
– Entry Zone: $0.0315 - $0.0330
– Stop Loss: $0.0290
– Targets: $0.0388 | $0.0405+
⚠️ Current trading volume remains modest—manage position size wisely and maintain strict risk management!
123
·
--
Bullish
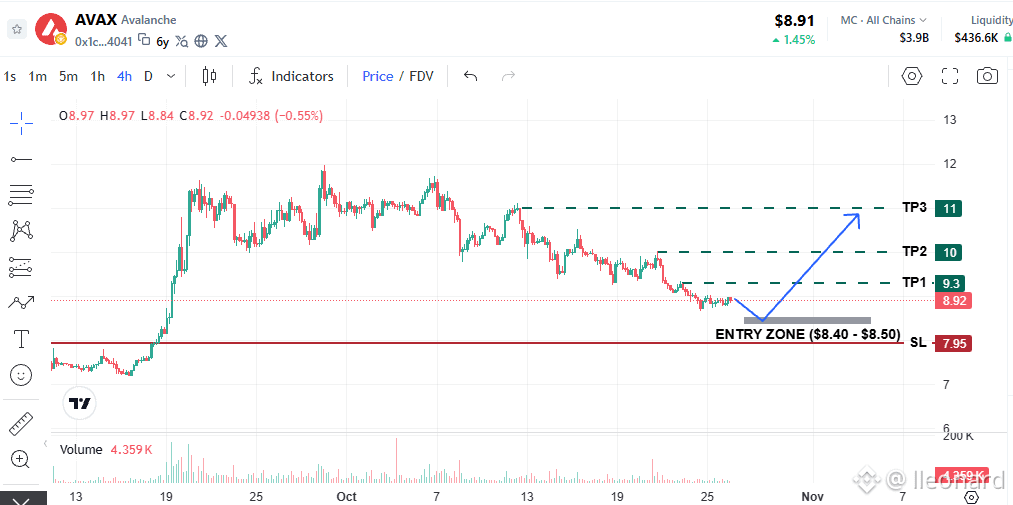
Following the recent strong flush, $AVAX is showing signs of fading selling pressure on the 4h timeframe.
While price action is stabilizing around the $8.8 zone ➔ Waiting for a slightly deeper dip to build a position with an optimal risk-reward ratio.
📊 Trade Setup
– Entry Zone: $8.40 - $8.50
– Stop Loss (SL): $7.95
– Targets: $9.30 | $10.00 | $11.00
📌 Patience for the right setup and strict risk management come first.
{future}(AVAXUSDT)
Following the recent strong flush, $AVAX is showing signs of fading selling pressure on the 4h timeframe.
While price action is stabilizing around the $8.8 zone ➔ Waiting for a slightly deeper dip to build a position with an optimal risk-reward ratio.
📊 Trade Setup
– Entry Zone: $8.40 - $8.50
– Stop Loss (SL): $7.95
– Targets: $9.30 | $10.00 | $11.00
📌 Patience for the right setup and strict risk management come first.
1
413
·
--
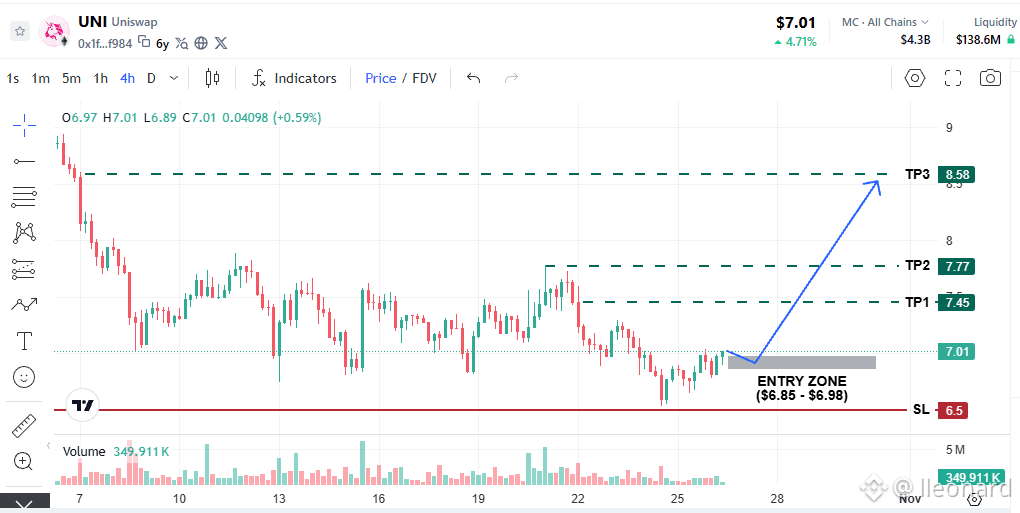
$UNI is attempting to build a higher low around $6.95 after bouncing off the recent $6.60 – $6.70 lows. While momentum is still muted, a wider stop loss below the structure allows us to position for a relief rally without getting wicked out.
📊 Long Setup
– Entry Zone: $6.85 – $6.98
– Stop Loss: $6.50
– Targets: $7.45 | $7.77 | $8.58
⚠️ Broad SL, requires smaller leverage/position size to manage risk properly.
{future}(UNIUSDT)
$UNI is attempting to build a higher low around $6.95 after bouncing off the recent $6.60 – $6.70 lows. While momentum is still muted, a wider stop loss below the structure allows us to position for a relief rally without getting wicked out.
📊 Long Setup
– Entry Zone: $6.85 – $6.98
– Stop Loss: $6.50
– Targets: $7.45 | $7.77 | $8.58
⚠️ Broad SL, requires smaller leverage/position size to manage risk properly.
📊 Long Setup
– Entry Zone: $6.85 – $6.98
– Stop Loss: $6.50
– Targets: $7.45 | $7.77 | $8.58
⚠️ Broad SL, requires smaller leverage/position size to manage risk properly.
107
·
--
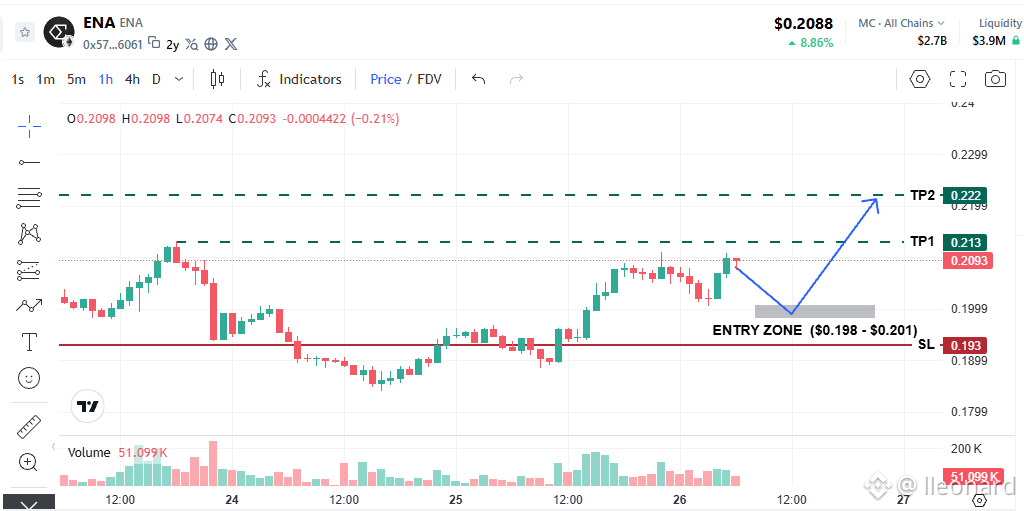
After pushing towards ~$0.209, $ENA is showing signs of weakness as trading volume remains extremely low ➔ Wait for the sweep or a clean retest to secure a tight SL and a high-R:R setup.
📊 Trading Plan
– Entry Zone: $0.1980 – $0.2010
– Stop Loss: $0.1930
– Targets: $0.213 | $0.222
💡 Patience is key!
{future}(ENAUSDT)
After pushing towards ~$0.209, $ENA is showing signs of weakness as trading volume remains extremely low ➔ Wait for the sweep or a clean retest to secure a tight SL and a high-R:R setup.
📊 Trading Plan
– Entry Zone: $0.1980 – $0.2010
– Stop Loss: $0.1930
– Targets: $0.213 | $0.222
💡 Patience is key!
📊 Trading Plan
– Entry Zone: $0.1980 – $0.2010
– Stop Loss: $0.1930
– Targets: $0.213 | $0.222
💡 Patience is key!
142
·
--
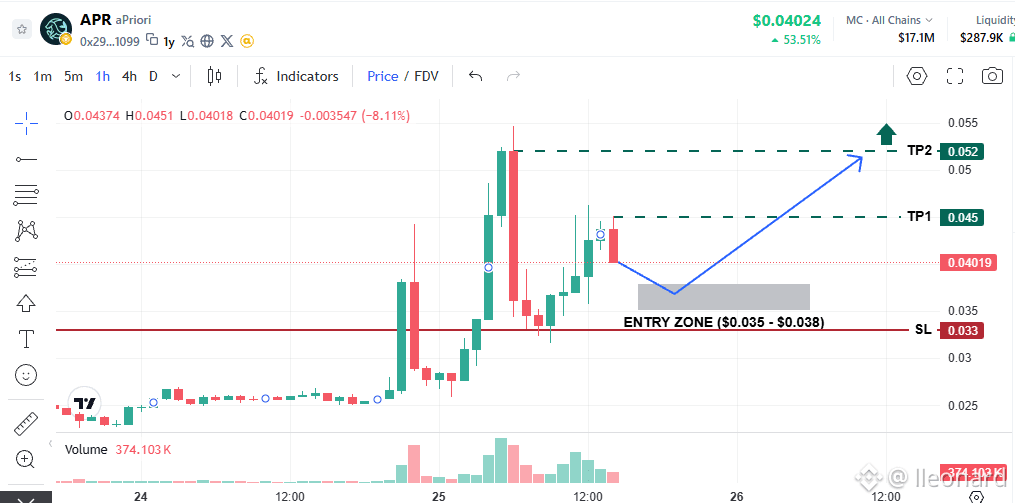
Following the heavy pull-back, $APR is retracing toward the key demand zone ($0.035 - $0.038), where sell volume is visibly drying up.
📊 Trading Plan
– Entry Zone: $0.0350 – $0.0380
– Stop-Loss: $0.0330
– Take-Profit Targets: $0.0450 | $0.0520+
⚠️ High-volatility asset. Keep position sizing low and manage risk strictly!
{future}(APRUSDT)
Following the heavy pull-back, $APR is retracing toward the key demand zone ($0.035 - $0.038), where sell volume is visibly drying up.
📊 Trading Plan
– Entry Zone: $0.0350 – $0.0380
– Stop-Loss: $0.0330
– Take-Profit Targets: $0.0450 | $0.0520+
⚠️ High-volatility asset. Keep position sizing low and manage risk strictly!
📊 Trading Plan
– Entry Zone: $0.0350 – $0.0380
– Stop-Loss: $0.0330
– Take-Profit Targets: $0.0450 | $0.0520+
⚠️ High-volatility asset. Keep position sizing low and manage risk strictly!
308
·
--
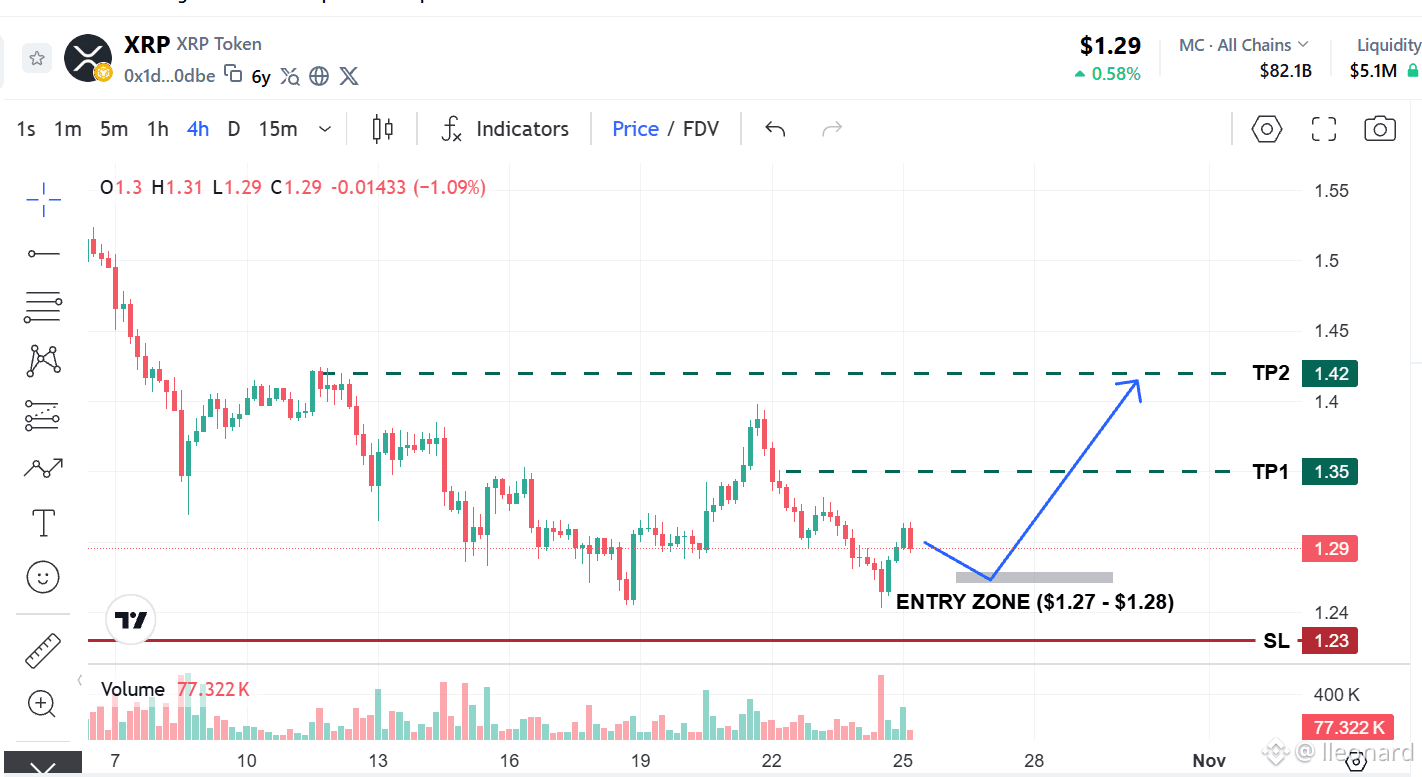
$XRP completed a deep liquidity sweep down to $1.24 before triggering a strong rejection wick back to $1.33.
➔ As price cools down from the initial bounce, we are looking for a deeper retest into $1.27 - $1.28 to secure a low-risk Higher Low entry.
📊 Long Setup
– Entry Zone: $1.270 - $1.280
– Stop Loss: $1.230
– Targets: $1.350 | $1.420
⚠️ If a 4H candle closes below $1.230, RESPECT THE SL and DO NOT DCA!
{future}(XRPUSDT)
$XRP completed a deep liquidity sweep down to $1.24 before triggering a strong rejection wick back to $1.33.
➔ As price cools down from the initial bounce, we are looking for a deeper retest into $1.27 - $1.28 to secure a low-risk Higher Low entry.
📊 Long Setup
– Entry Zone: $1.270 - $1.280
– Stop Loss: $1.230
– Targets: $1.350 | $1.420
⚠️ If a 4H candle closes below $1.230, RESPECT THE SL and DO NOT DCA!
➔ As price cools down from the initial bounce, we are looking for a deeper retest into $1.27 - $1.28 to secure a low-risk Higher Low entry.
📊 Long Setup
– Entry Zone: $1.270 - $1.280
– Stop Loss: $1.230
– Targets: $1.350 | $1.420
⚠️ If a 4H candle closes below $1.230, RESPECT THE SL and DO NOT DCA!
121
·
--
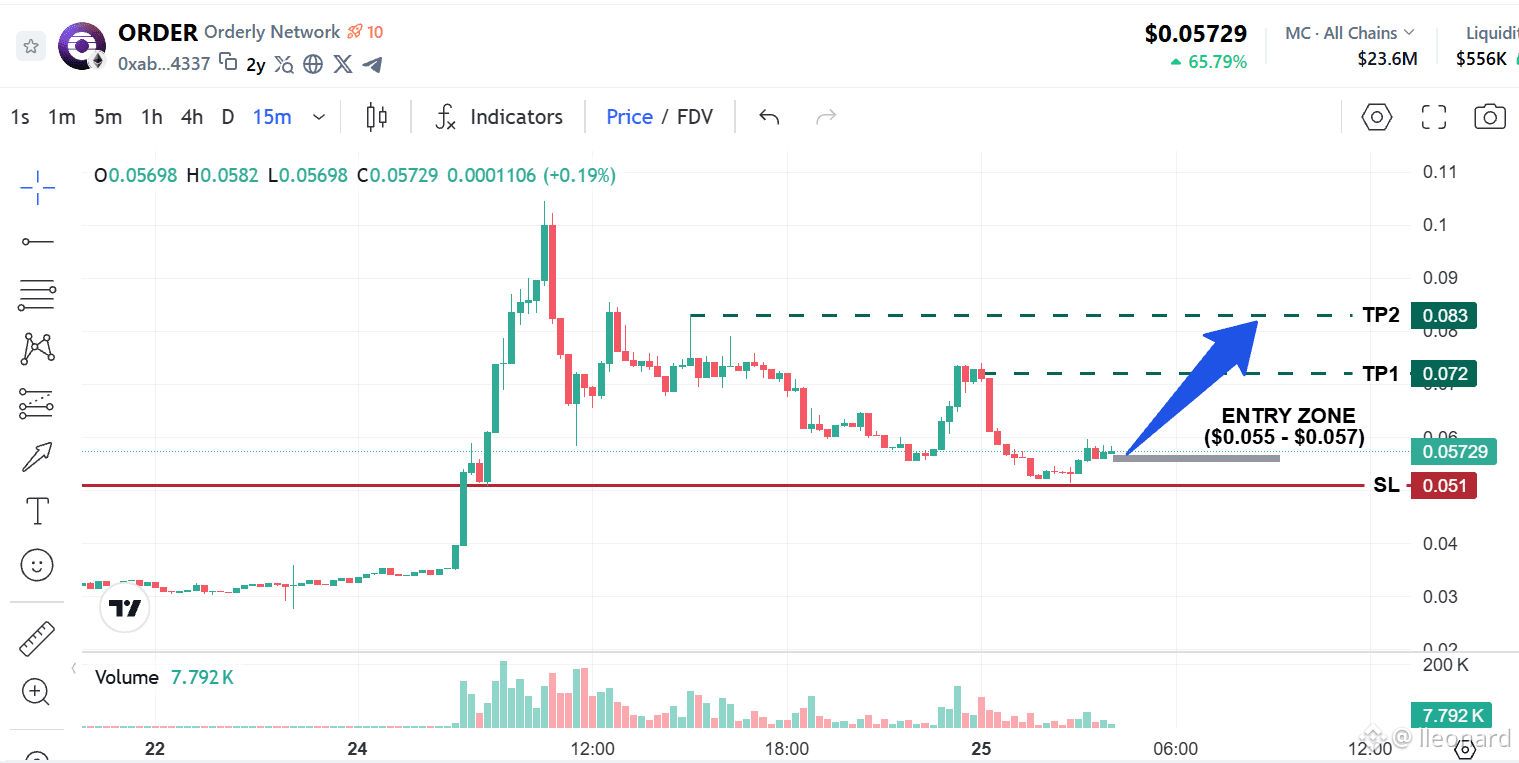
Following a strong +65% pump, $ORDER has completed its sell-off phase down to the solid support zone at $0.052 - $0.054. Selling pressure is starting to dry up, signaling potential for a technical rebound.
📊 Trading Plan
– Entry: $0.055 – $0.057
– Stop Loss: $0.051
– Targets: $0.072 | $0.083
⚠️ 15m scalps move fast. Manage risk strictly and move SL to entry once TP1 is hit.
{future}(ORDERUSDT)
Following a strong +65% pump, $ORDER has completed its sell-off phase down to the solid support zone at $0.052 - $0.054. Selling pressure is starting to dry up, signaling potential for a technical rebound.
📊 Trading Plan
– Entry: $0.055 – $0.057
– Stop Loss: $0.051
– Targets: $0.072 | $0.083
⚠️ 15m scalps move fast. Manage risk strictly and move SL to entry once TP1 is hit.
📊 Trading Plan
– Entry: $0.055 – $0.057
– Stop Loss: $0.051
– Targets: $0.072 | $0.083
⚠️ 15m scalps move fast. Manage risk strictly and move SL to entry once TP1 is hit.
173
·
--
Bullish
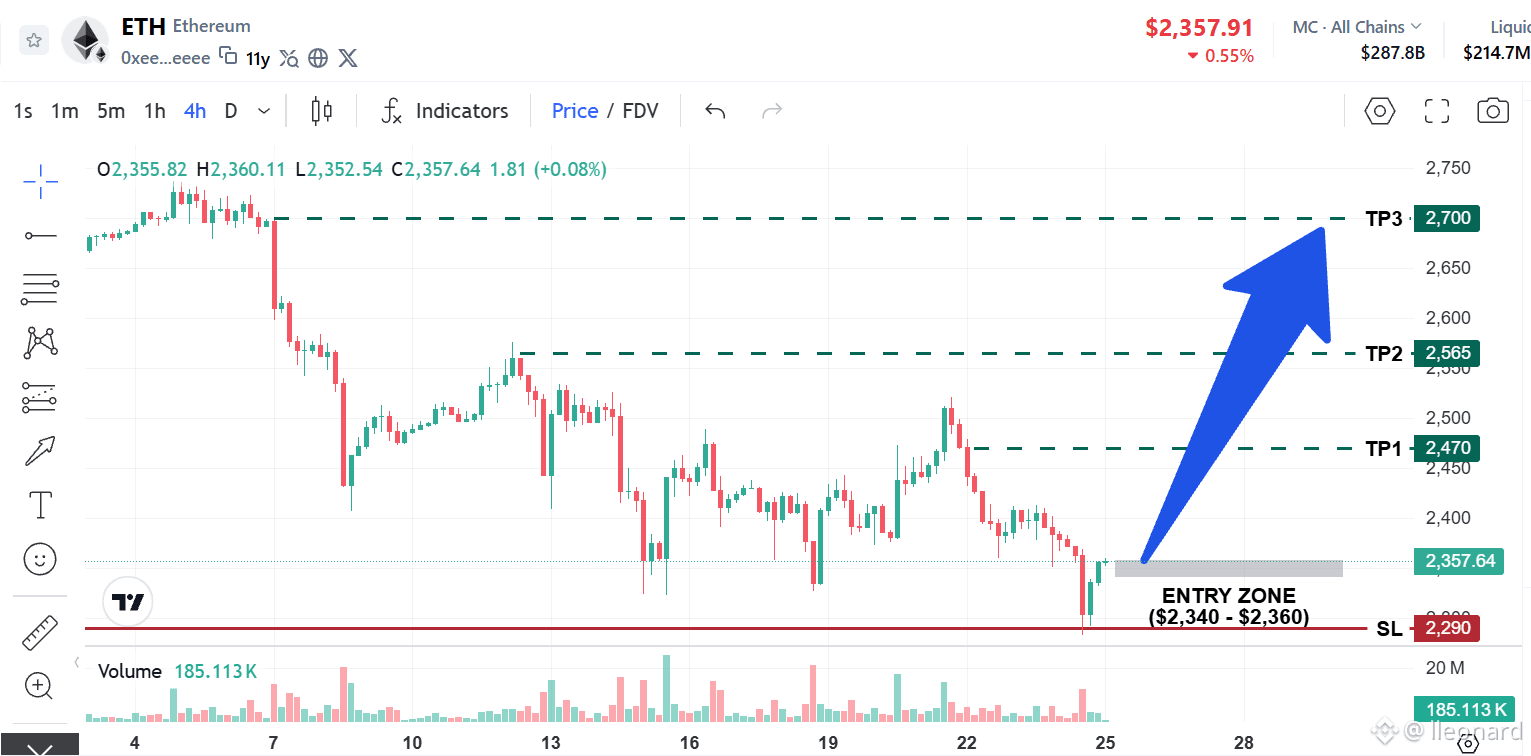
$ETH just experienced a sharp sweep below support to flush out late longs, followed by an immediate reclaim and a strong bounce back above support.
➔ The market just trapped late shorts, and now it's time to watch for retests to ride the recovery wave.
📊 Long Setup
– Entry Zone: $2,340 - $2,360
– Stop Loss: $2,290
– Targets: $2,470 | $2,565 | $2,700
{future}(ETHUSDT)
$ETH just experienced a sharp sweep below support to flush out late longs, followed by an immediate reclaim and a strong bounce back above support.
➔ The market just trapped late shorts, and now it's time to watch for retests to ride the recovery wave.
📊 Long Setup
– Entry Zone: $2,340 - $2,360
– Stop Loss: $2,290
– Targets: $2,470 | $2,565 | $2,700
➔ The market just trapped late shorts, and now it's time to watch for retests to ride the recovery wave.
📊 Long Setup
– Entry Zone: $2,340 - $2,360
– Stop Loss: $2,290
– Targets: $2,470 | $2,565 | $2,700
113
·
--
Bullish
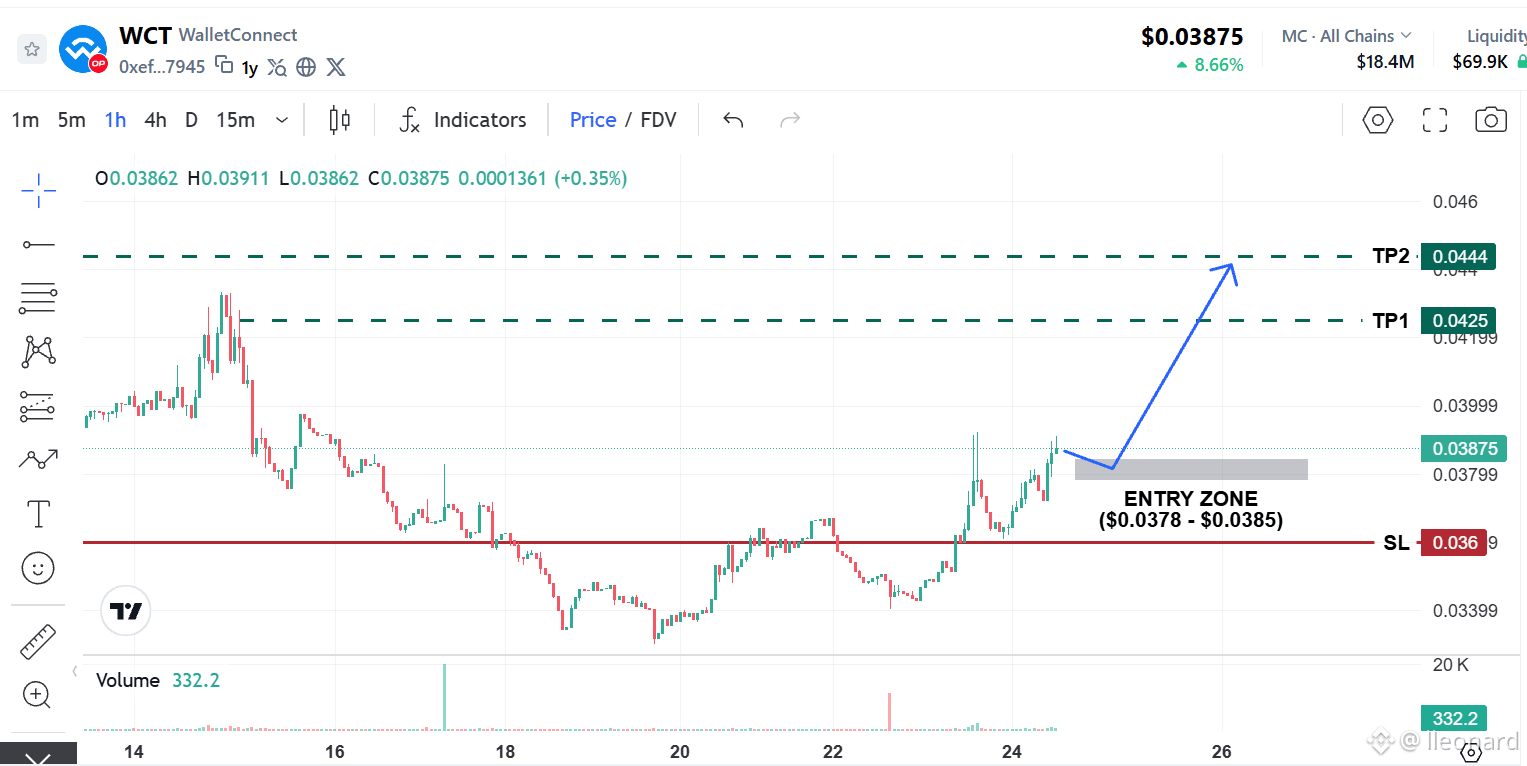
The recent $WCT 1H candle is pushing momentum to break through the short-term resistance at $0.0390. Expecting price to hold above the $0.0378 - $0.0385 zone to consolidate before the next leg up towards $0.0425 - $0.0444.
🎯 Trade Setup
– Entry: $0.0378 - $0.0385
– Stop Loss: $0.0360
– Targets: $0.0425 | $0.0444
⚠️ Thin liquidity, price action could be volatile. Always manage your risk and keep a strict Stop Loss!
{future}(WCTUSDT)
The recent $WCT 1H candle is pushing momentum to break through the short-term resistance at $0.0390. Expecting price to hold above the $0.0378 - $0.0385 zone to consolidate before the next leg up towards $0.0425 - $0.0444.
🎯 Trade Setup
– Entry: $0.0378 - $0.0385
– Stop Loss: $0.0360
– Targets: $0.0425 | $0.0444
⚠️ Thin liquidity, price action could be volatile. Always manage your risk and keep a strict Stop Loss!
🎯 Trade Setup
– Entry: $0.0378 - $0.0385
– Stop Loss: $0.0360
– Targets: $0.0425 | $0.0444
⚠️ Thin liquidity, price action could be volatile. Always manage your risk and keep a strict Stop Loss!
224
·
--
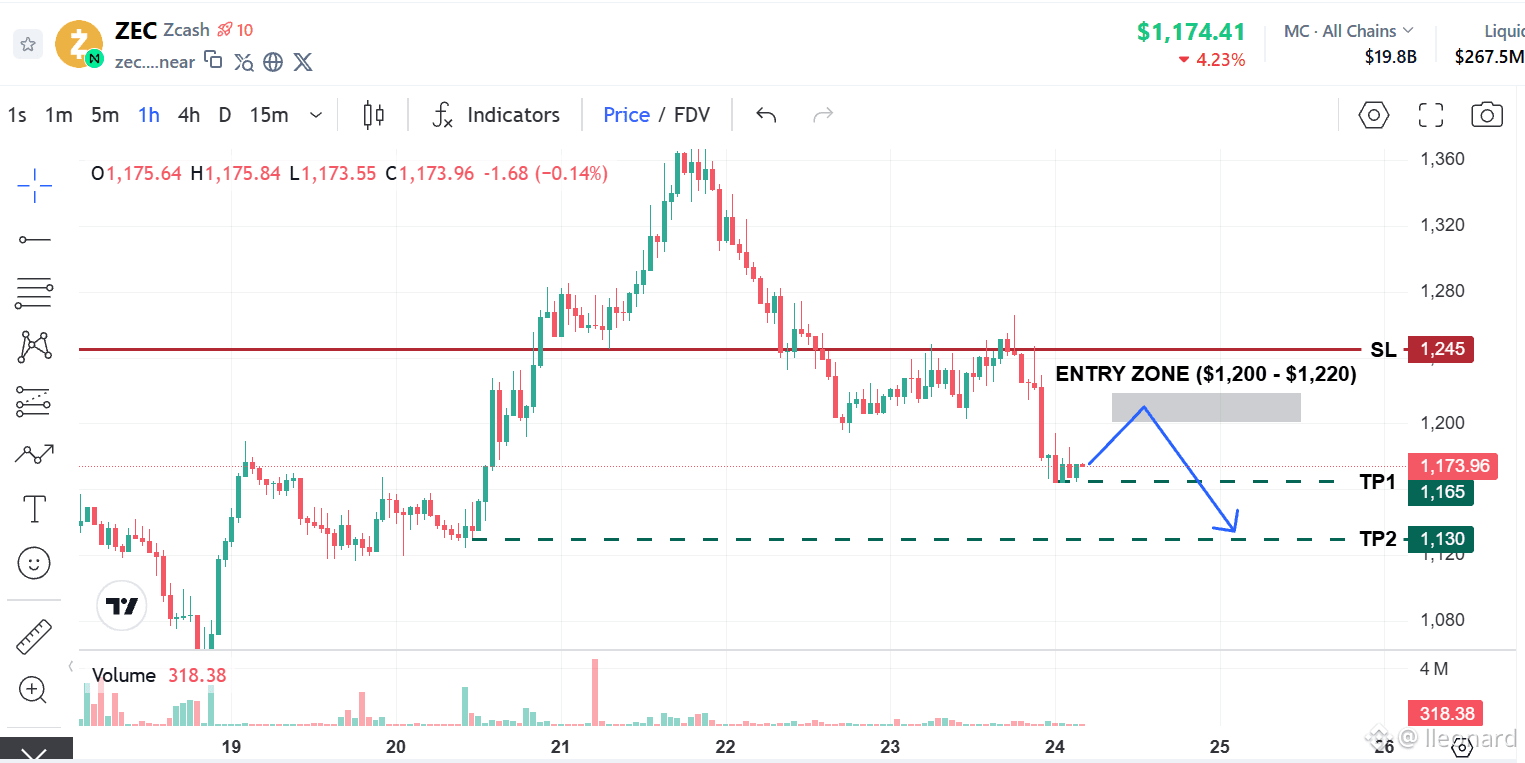
After a heavy liquidity sweep above $1,300, $ZEC rapidly dumped back into its range, confirming a classic Bull Trap.
📊 Short Setup (Scalp)
– Entry Zone: $1,200 – $1,220
– Stop Loss: $1,245
– Targets: $1,165 | $1,130
⚠️ Respect the $1,245 SL strictly. If price aggressively breaks above $1,245 on high buy volume, wait for a pullback to $1,220 – $1,230 to look for Long re-entries.
{future}(ZECUSDT)
After a heavy liquidity sweep above $1,300, $ZEC rapidly dumped back into its range, confirming a classic Bull Trap.
📊 Short Setup (Scalp)
– Entry Zone: $1,200 – $1,220
– Stop Loss: $1,245
– Targets: $1,165 | $1,130
⚠️ Respect the $1,245 SL strictly. If price aggressively breaks above $1,245 on high buy volume, wait for a pullback to $1,220 – $1,230 to look for Long re-entries.
📊 Short Setup (Scalp)
– Entry Zone: $1,200 – $1,220
– Stop Loss: $1,245
– Targets: $1,165 | $1,130
⚠️ Respect the $1,245 SL strictly. If price aggressively breaks above $1,245 on high buy volume, wait for a pullback to $1,220 – $1,230 to look for Long re-entries.
269
·
--
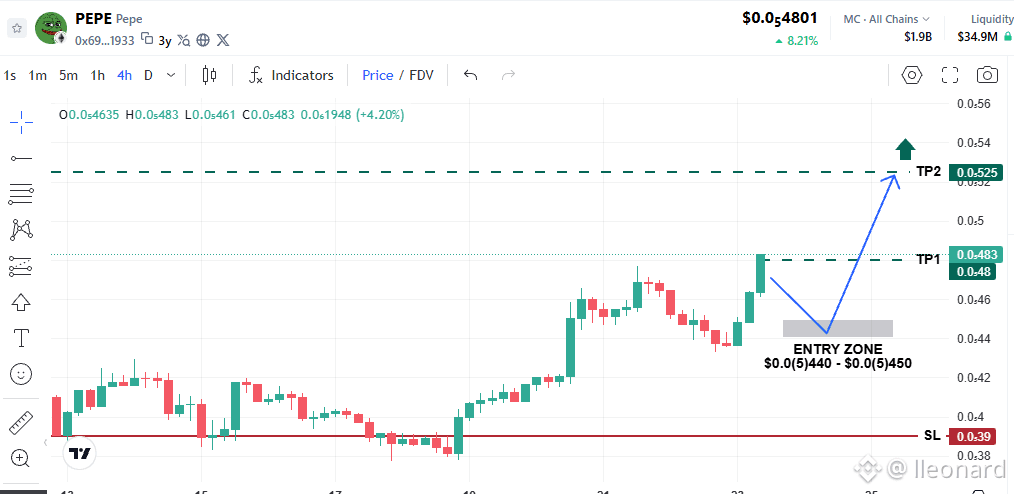
$PEPE is showing solid bullish momentum on the 4H chart, currently approaching local resistance around $0.0(5)480 ➔ Patiently waiting for a pullback into key support before entering to optimize R:R ratio.
📊 Trade Setup
– Entry Zone: $0.0(5)440 – $0.0(5)450
– Stop Loss: $0.0(5)390
– Targets: $0.0(5)480 - $0.0(5)525
💡 A clear break above $0.0(5)530 will officially confirm the continuation of the macro uptrend. Take partial profits along the way as targets are reached, and move SL to entry.
{spot}(PEPEUSDT)
$PEPE is showing solid bullish momentum on the 4H chart, currently approaching local resistance around $0.0(5)480 ➔ Patiently waiting for a pullback into key support before entering to optimize R:R ratio.
📊 Trade Setup
– Entry Zone: $0.0(5)440 – $0.0(5)450
– Stop Loss: $0.0(5)390
– Targets: $0.0(5)480 - $0.0(5)525
💡 A clear break above $0.0(5)530 will officially confirm the continuation of the macro uptrend. Take partial profits along the way as targets are reached, and move SL to entry.
📊 Trade Setup
– Entry Zone: $0.0(5)440 – $0.0(5)450
– Stop Loss: $0.0(5)390
– Targets: $0.0(5)480 - $0.0(5)525
💡 A clear break above $0.0(5)530 will officially confirm the continuation of the macro uptrend. Take partial profits along the way as targets are reached, and move SL to entry.
122
Log in to explore more content
Join global crypto users on Binance Square
⚡️ Get latest and useful information about crypto.
💬 Trusted by the world’s largest crypto exchange.
👍 Discover real insights from verified creators.
Email / Phone number