
BTC_Fahmi
15.5k Posts

BTC_Fahmi
 Square Verified+
Report
Block User
Content Creator | Crypto & Technical Analyst | Trading Expert | Blockchain & Web3 Specialist | X : @btc_fahmi
High-Frequency Trader
2.1 Years
227 Following
56.1K+ Followers
58.2K+ Liked
Posts
All
Quotes
Videos
Live
·
--
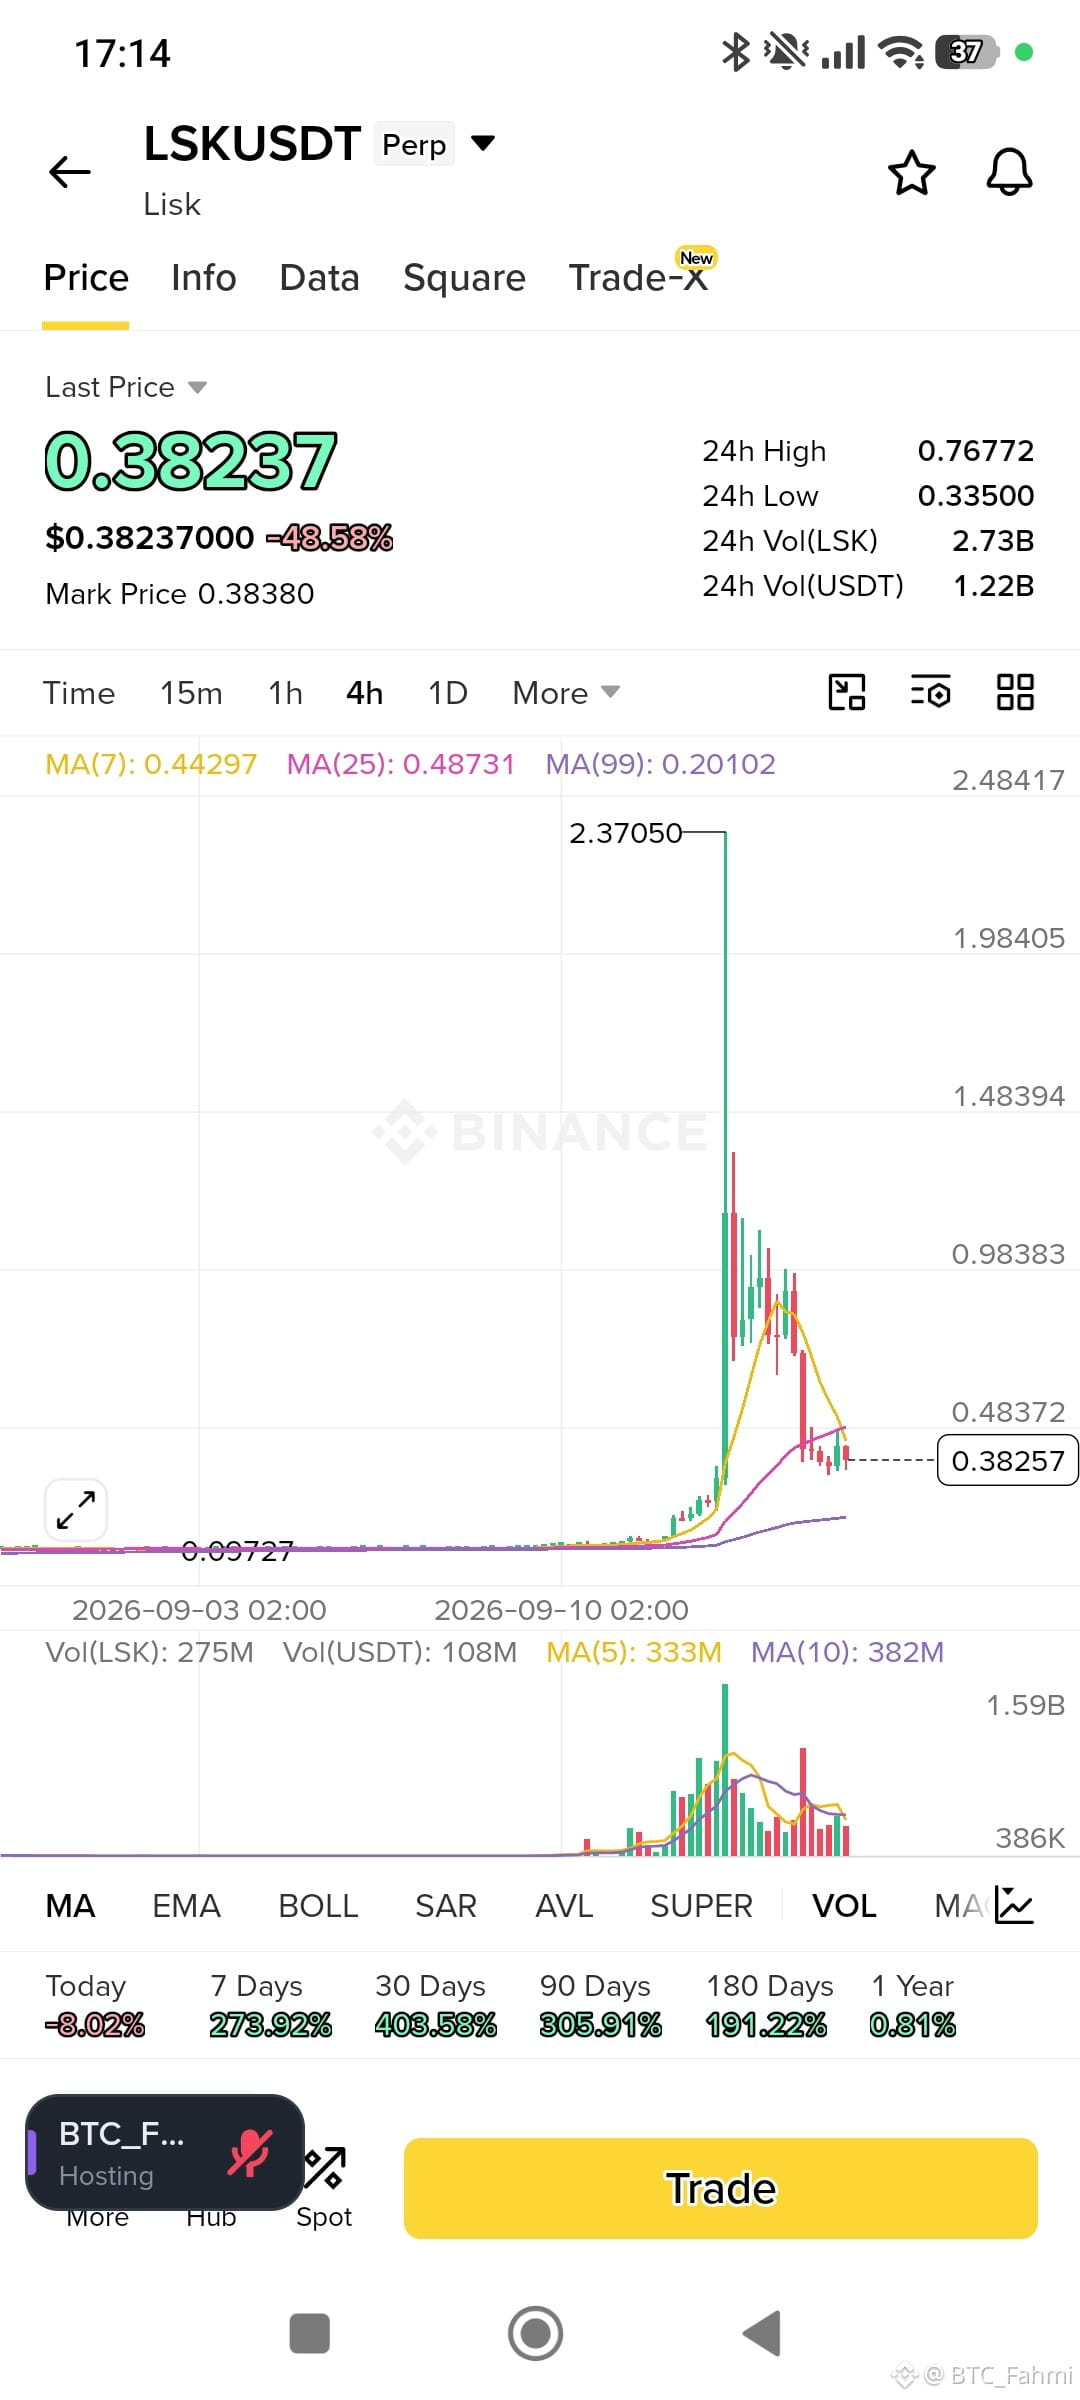
🟢 LONG $LSK USDT (⏱️ Timeframe: 15m - 1h)
📍 Entry: 0.375 - 0.385
🛑 SL: 0.325
🎯 TP1: 0.450
🎯 TP2: 0.560
🎯 TP3: 0.680
The recent price action shows a violent liquidation cascade from the 2.37 peak, driving the asset into a major demand zone around the 0.33-0.38 range. With sellers showing clear exhaustion after a 48% drop and price holding above the 24h low of 0.335, a high-probability relief bounce is likely to target previous broken support levels around the 0.45-0.50 area as late shorts get trapped. Watch for a reclaim of 0.40 to confirm upward momentum and continuation toward the mid-range liquidity gaps.
Trade Here 👉
{future}(LSKUSDT)
$AKE
{future}(AKEUSDT)
$LAB
{future}(LABUSDT)
#LSK #TradeSetup #TechnicalAnalysis #WriteToEarnUpgrade #Write2Earn
⚠️ Not financial advice. Always manage your risk.
🟢 LONG $LSK USDT (⏱️ Timeframe: 15m - 1h)
📍 Entry: 0.375 - 0.385
🛑 SL: 0.325
🎯 TP1: 0.450
🎯 TP2: 0.560
🎯 TP3: 0.680
The recent price action shows a violent liquidation cascade from the 2.37 peak, driving the asset into a major demand zone around the 0.33-0.38 range. With sellers showing clear exhaustion after a 48% drop and price holding above the 24h low of 0.335, a high-probability relief bounce is likely to target previous broken support levels around the 0.45-0.50 area as late shorts get trapped. Watch for a reclaim of 0.40 to confirm upward momentum and continuation toward the mid-range liquidity gaps.
Trade Here 👉
$AKE
$LAB
#LSK #TradeSetup #TechnicalAnalysis #WriteToEarnUpgrade #Write2Earn
⚠️ Not financial advice. Always manage your risk.
📍 Entry: 0.375 - 0.385
🛑 SL: 0.325
🎯 TP1: 0.450
🎯 TP2: 0.560
🎯 TP3: 0.680
The recent price action shows a violent liquidation cascade from the 2.37 peak, driving the asset into a major demand zone around the 0.33-0.38 range. With sellers showing clear exhaustion after a 48% drop and price holding above the 24h low of 0.335, a high-probability relief bounce is likely to target previous broken support levels around the 0.45-0.50 area as late shorts get trapped. Watch for a reclaim of 0.40 to confirm upward momentum and continuation toward the mid-range liquidity gaps.
Trade Here 👉
$AKE
$LAB
#LSK #TradeSetup #TechnicalAnalysis #WriteToEarnUpgrade #Write2Earn
⚠️ Not financial advice. Always manage your risk.
1
1
5
364
·
--
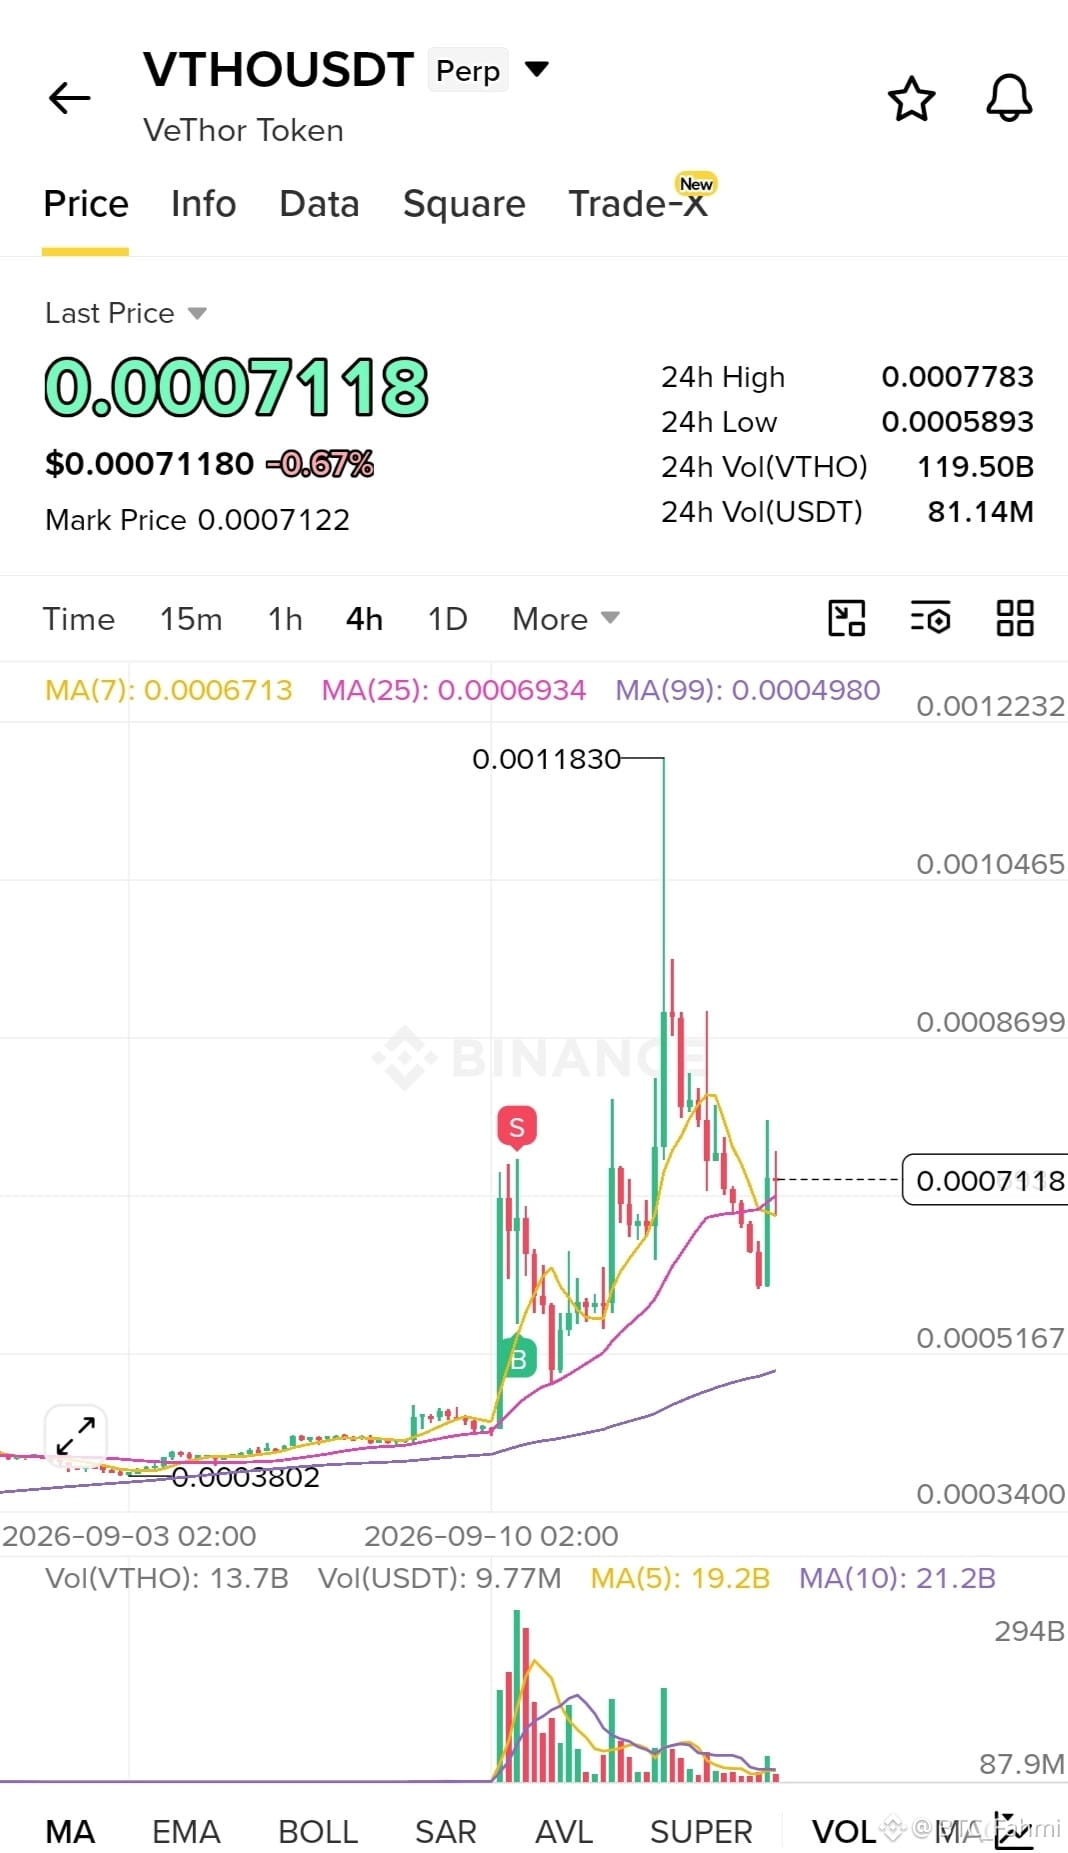
🟢 LONG $VTHO (⏱️ Timeframe: 4H)
📍 Entry: 0.0007000 - 0.0007150
🛑 SL: 0.0006500
🎯 TP1: 0.0007800
🎯 TP2: 0.0008500
🎯 TP3: 0.0010000
VTHO is showing a textbook bullish continuation structure after a massive expansion phase, currently consolidating above key dynamic support. The recent pullback is simply cooling off momentum, offering a high-probability entry before the next leg up. Bulls need to defend the 0.00069 zone to target the liquidity resting above the recent highs.
Trade Here 👉
{future}(VTHOUSDT)
$LSK
{future}(LSKUSDT)
$LAB
{future}(LABUSDT)
#VTHO #TradeSetup #TechnicalAnalysis #WriteToEarnUpgrade #Write2Earn
⚠️ Not financial advice. Always manage your risk.
🟢 LONG $VTHO (⏱️ Timeframe: 4H)
📍 Entry: 0.0007000 - 0.0007150
🛑 SL: 0.0006500
🎯 TP1: 0.0007800
🎯 TP2: 0.0008500
🎯 TP3: 0.0010000
VTHO is showing a textbook bullish continuation structure after a massive expansion phase, currently consolidating above key dynamic support. The recent pullback is simply cooling off momentum, offering a high-probability entry before the next leg up. Bulls need to defend the 0.00069 zone to target the liquidity resting above the recent highs.
Trade Here 👉
$LSK
$LAB
#VTHO #TradeSetup #TechnicalAnalysis #WriteToEarnUpgrade #Write2Earn
⚠️ Not financial advice. Always manage your risk.
📍 Entry: 0.0007000 - 0.0007150
🛑 SL: 0.0006500
🎯 TP1: 0.0007800
🎯 TP2: 0.0008500
🎯 TP3: 0.0010000
VTHO is showing a textbook bullish continuation structure after a massive expansion phase, currently consolidating above key dynamic support. The recent pullback is simply cooling off momentum, offering a high-probability entry before the next leg up. Bulls need to defend the 0.00069 zone to target the liquidity resting above the recent highs.
Trade Here 👉
$LSK
$LAB
#VTHO #TradeSetup #TechnicalAnalysis #WriteToEarnUpgrade #Write2Earn
⚠️ Not financial advice. Always manage your risk.
4
308
·
--
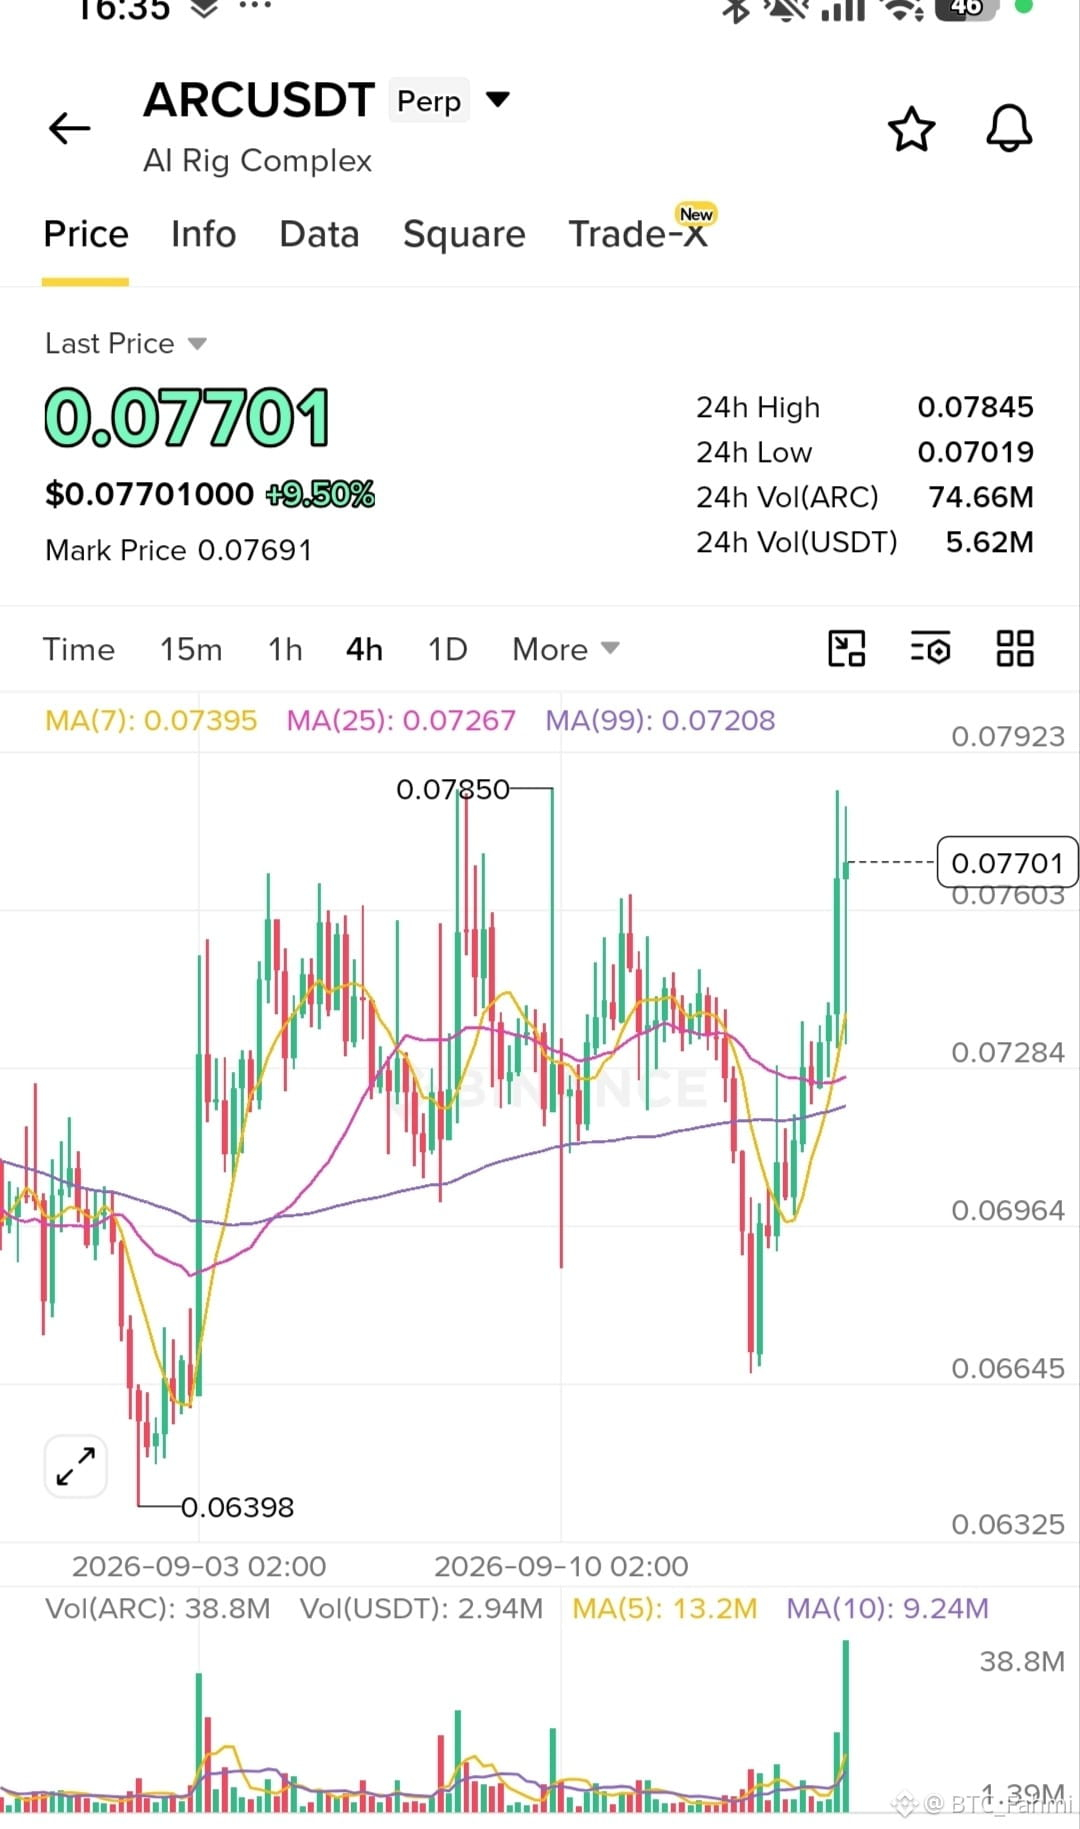
🟢 LONG $ARC USDT (⏱️ Timeframe: 1D Swing)
📍 Entry: 0.0750 - 0.0770
🛑 SL: 0.0715
🎯 TP1: 0.0800
🎯 TP2: 0.0850
🎯 TP3: 0.0920
ARC is showing a sharp bullish reversal after sweeping liquidity near the 0.064 lows. The recent impulsive leg up to 0.0785 reclaimed crucial higher-timeframe levels, and the current consolidation looks like a classic accumulation before continuation. Holding above the 0.073 area will confirm the reclaim, opening the path to higher targets.
Trade Here 👉
{future}(ARCUSDT)
$AKE
{future}(AKEUSDT)
$LAB
{future}(LABUSDT)
#ARCUSDT #TradeSetup #TechnicalAnalysis #WriteToEarnUpgrade #Write2Earn
⚠️ Not financial advice. Always manage your risk.
🟢 LONG $ARC USDT (⏱️ Timeframe: 1D Swing)
📍 Entry: 0.0750 - 0.0770
🛑 SL: 0.0715
🎯 TP1: 0.0800
🎯 TP2: 0.0850
🎯 TP3: 0.0920
ARC is showing a sharp bullish reversal after sweeping liquidity near the 0.064 lows. The recent impulsive leg up to 0.0785 reclaimed crucial higher-timeframe levels, and the current consolidation looks like a classic accumulation before continuation. Holding above the 0.073 area will confirm the reclaim, opening the path to higher targets.
Trade Here 👉
$AKE
$LAB
#ARCUSDT #TradeSetup #TechnicalAnalysis #WriteToEarnUpgrade #Write2Earn
⚠️ Not financial advice. Always manage your risk.
📍 Entry: 0.0750 - 0.0770
🛑 SL: 0.0715
🎯 TP1: 0.0800
🎯 TP2: 0.0850
🎯 TP3: 0.0920
ARC is showing a sharp bullish reversal after sweeping liquidity near the 0.064 lows. The recent impulsive leg up to 0.0785 reclaimed crucial higher-timeframe levels, and the current consolidation looks like a classic accumulation before continuation. Holding above the 0.073 area will confirm the reclaim, opening the path to higher targets.
Trade Here 👉
$AKE
$LAB
#ARCUSDT #TradeSetup #TechnicalAnalysis #WriteToEarnUpgrade #Write2Earn
⚠️ Not financial advice. Always manage your risk.
5
345
·
--
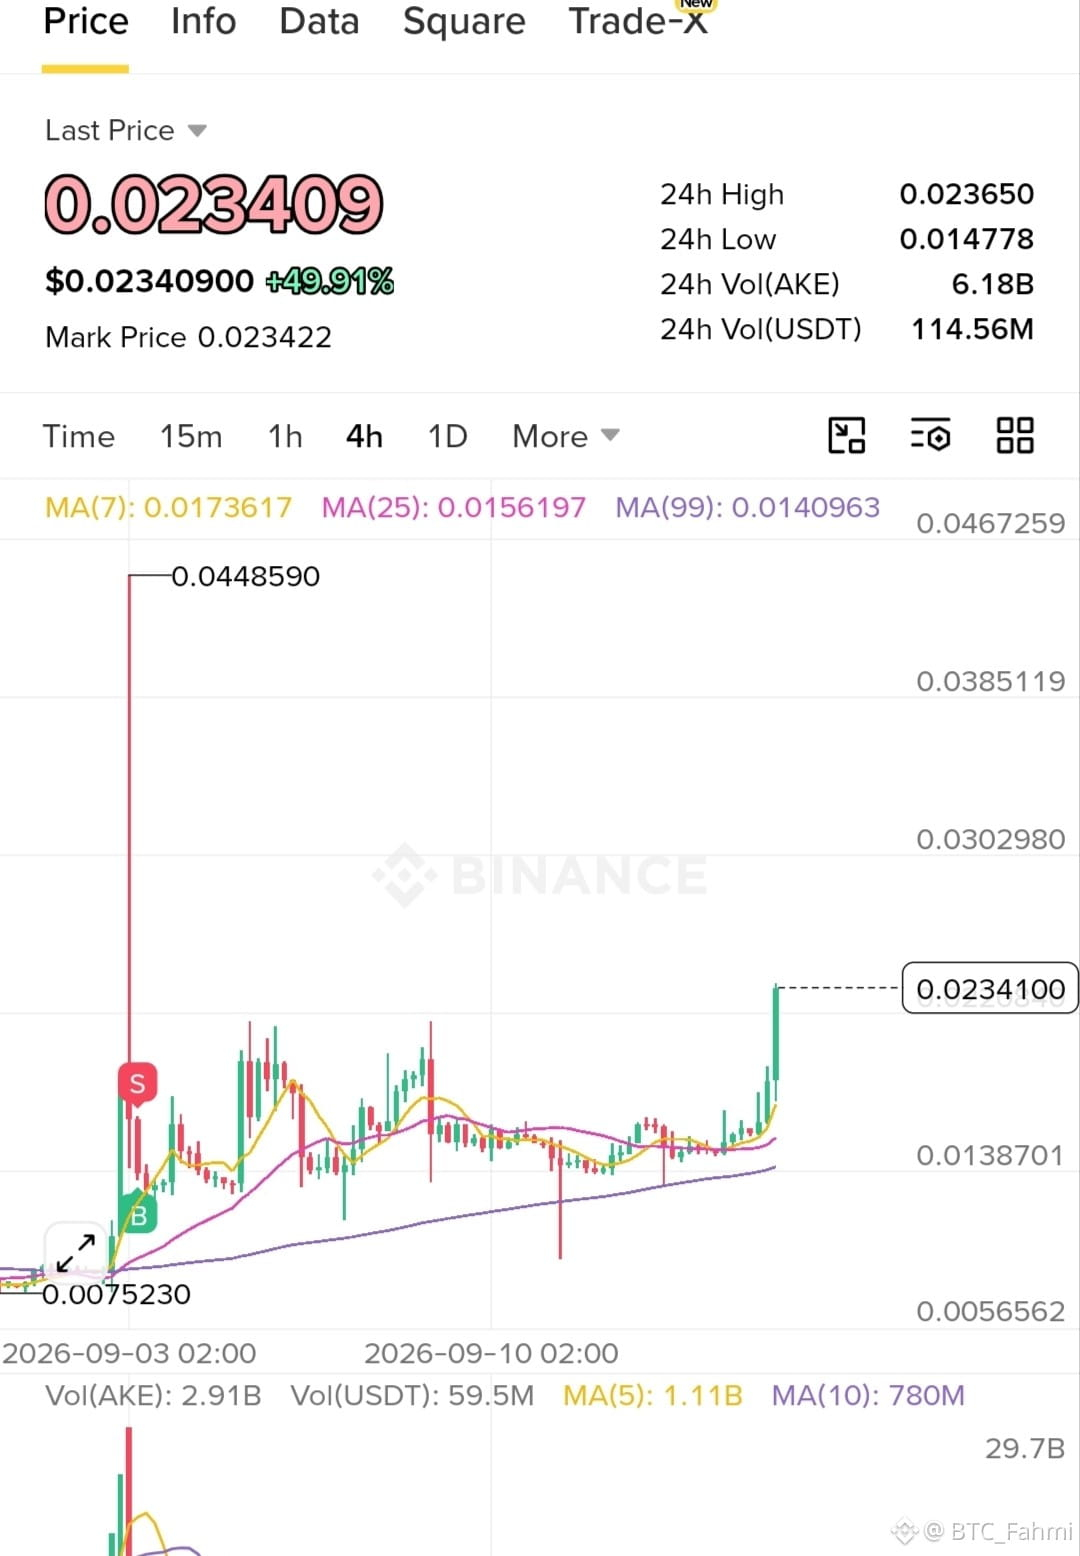
🟢 LONG $AKE USDT (⏱️ Timeframe: 4H)
📍 Entry: 0.0220 - 0.0235
🛑 SL: 0.0195
🎯 TP1: 0.0265
🎯 TP2: 0.0300
🎯 TP3: 0.0345
AKE has aggressively broken out of its multi-day accumulation structure, reclaiming previous local highs with a strong surge in volume. The immediate market structure remains highly bullish with local support now established around the 0.020-0.022 region; holding this zone should provide the fuel needed to push into higher liquidity targets.
Trade Here 👉
{future}(AKEUSDT)
$LAB
{future}(LABUSDT)
$LSK
{future}(LSKUSDT)
#AKE #TradeSetup #TechnicalAnalysis #WriteToEarnUpgrade #Write2Earn
⚠️ Not financial advice. Always manage your risk.
🟢 LONG $AKE USDT (⏱️ Timeframe: 4H)
📍 Entry: 0.0220 - 0.0235
🛑 SL: 0.0195
🎯 TP1: 0.0265
🎯 TP2: 0.0300
🎯 TP3: 0.0345
AKE has aggressively broken out of its multi-day accumulation structure, reclaiming previous local highs with a strong surge in volume. The immediate market structure remains highly bullish with local support now established around the 0.020-0.022 region; holding this zone should provide the fuel needed to push into higher liquidity targets.
Trade Here 👉
$LAB
$LSK
#AKE #TradeSetup #TechnicalAnalysis #WriteToEarnUpgrade #Write2Earn
⚠️ Not financial advice. Always manage your risk.
📍 Entry: 0.0220 - 0.0235
🛑 SL: 0.0195
🎯 TP1: 0.0265
🎯 TP2: 0.0300
🎯 TP3: 0.0345
AKE has aggressively broken out of its multi-day accumulation structure, reclaiming previous local highs with a strong surge in volume. The immediate market structure remains highly bullish with local support now established around the 0.020-0.022 region; holding this zone should provide the fuel needed to push into higher liquidity targets.
Trade Here 👉
$LAB
$LSK
#AKE #TradeSetup #TechnicalAnalysis #WriteToEarnUpgrade #Write2Earn
⚠️ Not financial advice. Always manage your risk.
3
495

·
--
🟢 LONG $AIN USDT (⏱️ Timeframe: 4H)
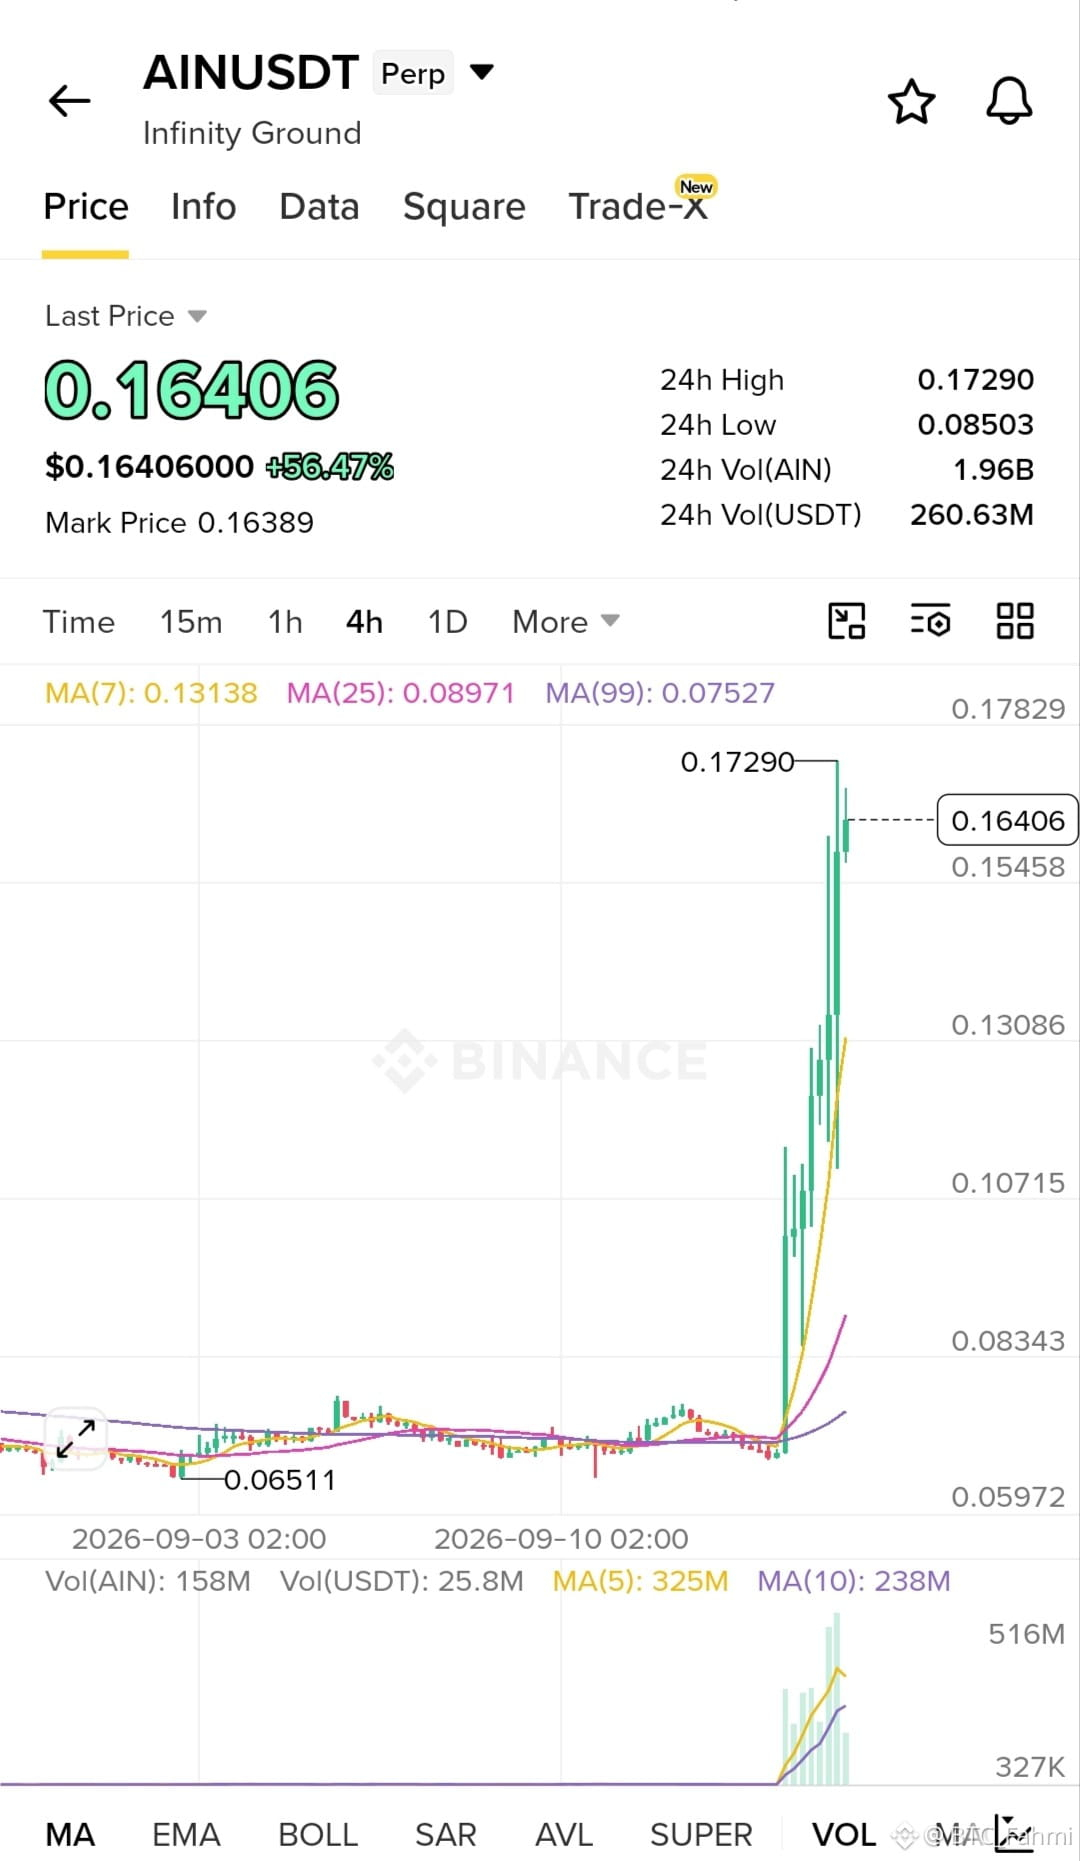
📍 Entry: 0.1550 - 0.1630
🛑 SL: 0.1440
🎯 TP1: 0.1729
🎯 TP2: 0.1850
🎯 TP3: 0.2000
AIN is showing an aggressive parabolic expansion after breaking out of a prolonged low-volatility accumulation phase. This sharp vertical move, backed by massive volume, signals a clear market structure shift, leaving the 0.06-0.08 range behind. The current pullback from local highs is carving out a new demand zone between 0.155 and 0.163. With the price holding well above all immediate dynamic supports, the structure favors a continuation toward the 0.173 liquidity pocket once consolidation finishes.
Trade Here 👉
{future}(AINUSDT)
$LSK
{future}(LSKUSDT)
$LAB
{future}(LABUSDT)
#AIN #TradeSetup #TechnicalAnalysis #WriteToEarnUpgrade #Write2Earn
⚠️ Not financial advice. Always manage your risk.
🟢 LONG $AIN USDT (⏱️ Timeframe: 4H)
📍 Entry: 0.1550 - 0.1630
🛑 SL: 0.1440
🎯 TP1: 0.1729
🎯 TP2: 0.1850
🎯 TP3: 0.2000
AIN is showing an aggressive parabolic expansion after breaking out of a prolonged low-volatility accumulation phase. This sharp vertical move, backed by massive volume, signals a clear market structure shift, leaving the 0.06-0.08 range behind. The current pullback from local highs is carving out a new demand zone between 0.155 and 0.163. With the price holding well above all immediate dynamic supports, the structure favors a continuation toward the 0.173 liquidity pocket once consolidation finishes.
Trade Here 👉
$LSK
$LAB
#AIN #TradeSetup #TechnicalAnalysis #WriteToEarnUpgrade #Write2Earn
⚠️ Not financial advice. Always manage your risk.
📍 Entry: 0.1550 - 0.1630
🛑 SL: 0.1440
🎯 TP1: 0.1729
🎯 TP2: 0.1850
🎯 TP3: 0.2000
AIN is showing an aggressive parabolic expansion after breaking out of a prolonged low-volatility accumulation phase. This sharp vertical move, backed by massive volume, signals a clear market structure shift, leaving the 0.06-0.08 range behind. The current pullback from local highs is carving out a new demand zone between 0.155 and 0.163. With the price holding well above all immediate dynamic supports, the structure favors a continuation toward the 0.173 liquidity pocket once consolidation finishes.
Trade Here 👉
$LSK
$LAB
#AIN #TradeSetup #TechnicalAnalysis #WriteToEarnUpgrade #Write2Earn
⚠️ Not financial advice. Always manage your risk.
4
656
·
--
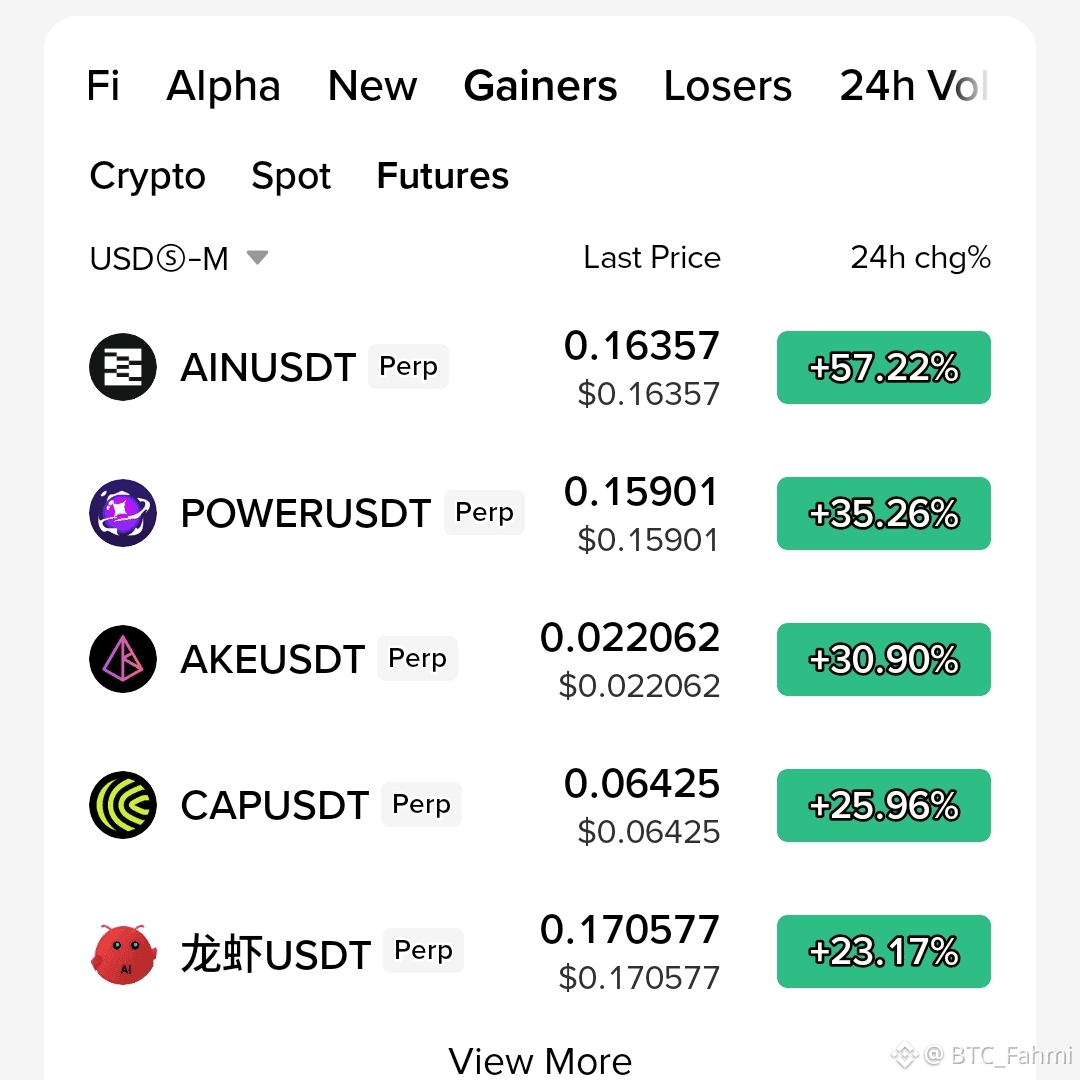
🚀 ALTCOINS ARE MOVING HARD TODAY!
The Futures market is heating up fast 👀
$AIN USDT +57.22%
$POWER USDT +35.26%
$AKE USDT +30.90%
CAPUSDT +25.96%
龙虾USDT +23.17%
Strong momentum across several names, but after moves this large, volatility and pullbacks can come just as quickly.
Are you chasing the pump or waiting for a better entry? 📈🔥
🚀 ALTCOINS ARE MOVING HARD TODAY!
The Futures market is heating up fast 👀
$AIN USDT +57.22%
$POWER USDT +35.26%
$AKE USDT +30.90%
CAPUSDT +25.96%
龙虾USDT +23.17%
Strong momentum across several names, but after moves this large, volatility and pullbacks can come just as quickly.
Are you chasing the pump or waiting for a better entry? 📈🔥
The Futures market is heating up fast 👀
$AIN USDT +57.22%
$POWER USDT +35.26%
$AKE USDT +30.90%
CAPUSDT +25.96%
龙虾USDT +23.17%
Strong momentum across several names, but after moves this large, volatility and pullbacks can come just as quickly.
Are you chasing the pump or waiting for a better entry? 📈🔥
6
732
·
--
🟢 LONG $TEM USDT (⏱️ Timeframe: 4H)
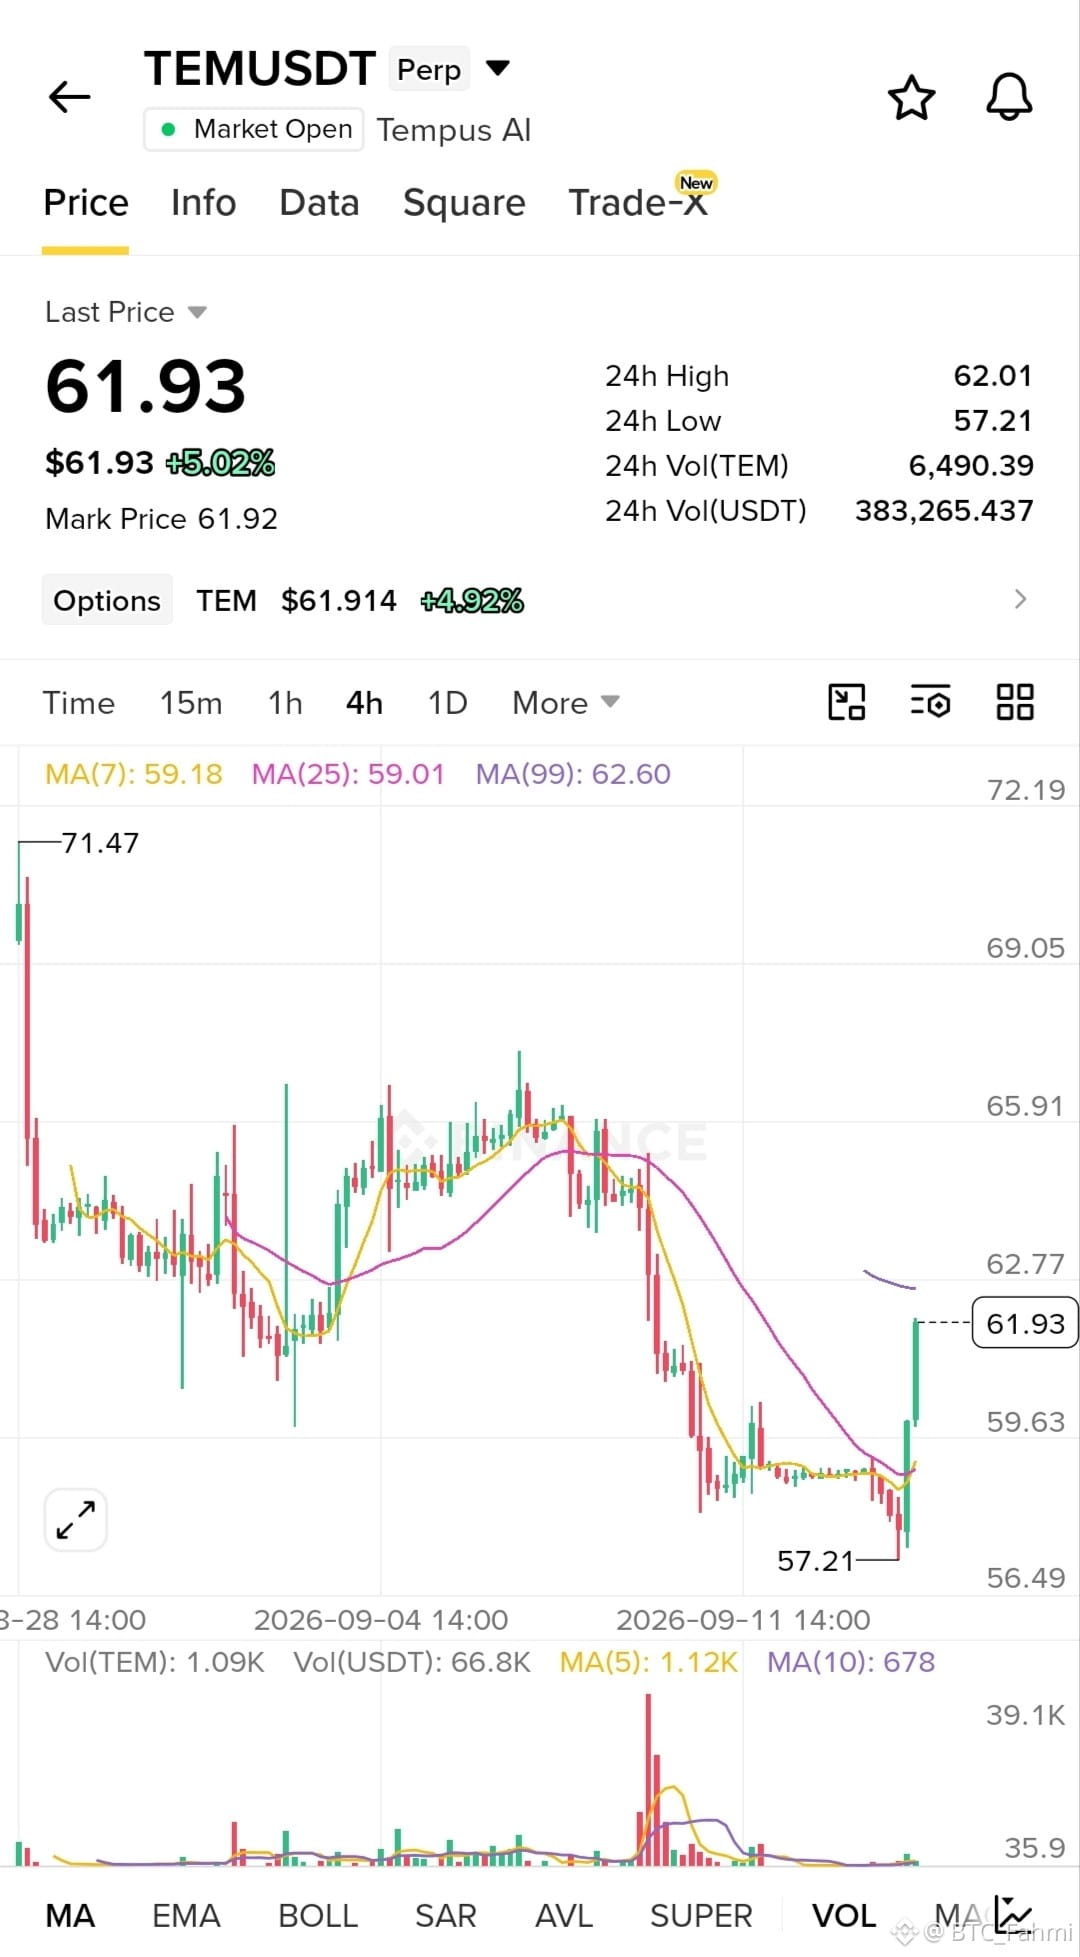
📍 Entry: 61.50 - 62.00
🛑 SL: 58.80
🎯 TP1: 65.90
🎯 TP2: 69.00
🎯 TP3: 71.50
Price is showing strong recovery momentum after establishing a solid demand zone near the 57.20 lows. The current push is reclaiming short-term structure, with immediate liquidity sitting just above at 62.60. A confirmed flip of this level into support will likely trigger a continuation toward the previous breakdown zones at 65.90 and 69.00.
Trade Here 👉
{future}(TEMUSDT)
$LSK
{future}(LSKUSDT)
$LAB
{future}(LABUSDT)
#TEMUSDT #TradeSetup #TechnicalAnalysis #WriteToEarnUpgrade #Write2Earn
⚠️ Not financial advice. Always manage your risk.
🟢 LONG $TEM USDT (⏱️ Timeframe: 4H)
📍 Entry: 61.50 - 62.00
🛑 SL: 58.80
🎯 TP1: 65.90
🎯 TP2: 69.00
🎯 TP3: 71.50
Price is showing strong recovery momentum after establishing a solid demand zone near the 57.20 lows. The current push is reclaiming short-term structure, with immediate liquidity sitting just above at 62.60. A confirmed flip of this level into support will likely trigger a continuation toward the previous breakdown zones at 65.90 and 69.00.
Trade Here 👉
$LSK
$LAB
#TEMUSDT #TradeSetup #TechnicalAnalysis #WriteToEarnUpgrade #Write2Earn
⚠️ Not financial advice. Always manage your risk.
📍 Entry: 61.50 - 62.00
🛑 SL: 58.80
🎯 TP1: 65.90
🎯 TP2: 69.00
🎯 TP3: 71.50
Price is showing strong recovery momentum after establishing a solid demand zone near the 57.20 lows. The current push is reclaiming short-term structure, with immediate liquidity sitting just above at 62.60. A confirmed flip of this level into support will likely trigger a continuation toward the previous breakdown zones at 65.90 and 69.00.
Trade Here 👉
$LSK
$LAB
#TEMUSDT #TradeSetup #TechnicalAnalysis #WriteToEarnUpgrade #Write2Earn
⚠️ Not financial advice. Always manage your risk.
1
5
196
·
--
🟢 LONG $AIN USDT (⏱️ Timeframe: 4H)
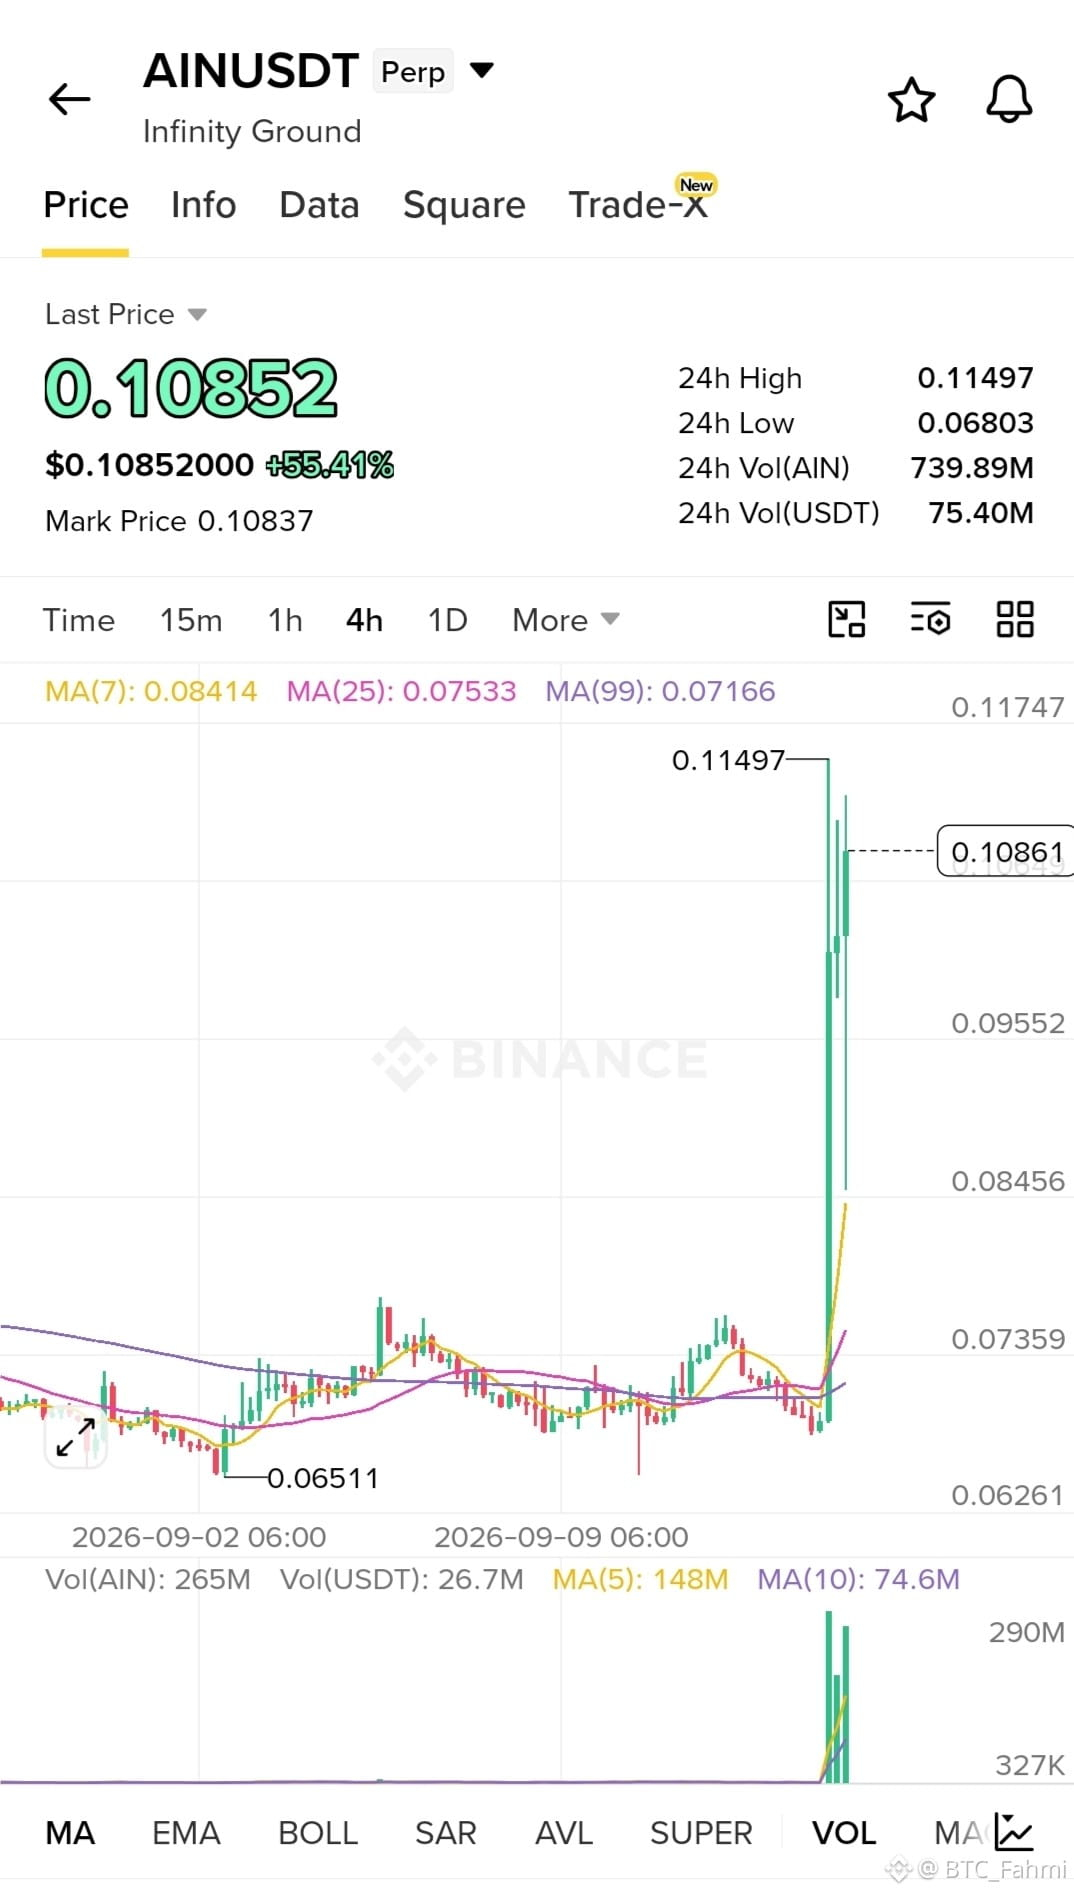
📍 Entry: 0.1020 – 0.1085
🛑 SL: 0.0935
🎯 TP1: 0.1150
🎯 TP2: 0.1280
🎯 TP3: 0.1420
Price coiled for days under the old 0.076 cap, then ripped through every prior high on a massive volume expansion and is now holding just under 0.115. The 0.095–0.100 zone is the first reclaimed demand after the impulse as long as that shelf holds, this looks like a clean range expansion, not a one-candle fade.
Trade Here 👉
{future}(AINUSDT)
$LAB
{future}(LABUSDT)
$LSK
{future}(LSKUSDT)
#AIN #TradeSetup #TechnicalAnalysis #WriteToEarnUpgrade #Write2Earn
⚠️ Not financial advice. Always manage your risk.
🟢 LONG $AIN USDT (⏱️ Timeframe: 4H)
📍 Entry: 0.1020 – 0.1085
🛑 SL: 0.0935
🎯 TP1: 0.1150
🎯 TP2: 0.1280
🎯 TP3: 0.1420
Price coiled for days under the old 0.076 cap, then ripped through every prior high on a massive volume expansion and is now holding just under 0.115. The 0.095–0.100 zone is the first reclaimed demand after the impulse as long as that shelf holds, this looks like a clean range expansion, not a one-candle fade.
Trade Here 👉
$LAB
$LSK
#AIN #TradeSetup #TechnicalAnalysis #WriteToEarnUpgrade #Write2Earn
⚠️ Not financial advice. Always manage your risk.
📍 Entry: 0.1020 – 0.1085
🛑 SL: 0.0935
🎯 TP1: 0.1150
🎯 TP2: 0.1280
🎯 TP3: 0.1420
Price coiled for days under the old 0.076 cap, then ripped through every prior high on a massive volume expansion and is now holding just under 0.115. The 0.095–0.100 zone is the first reclaimed demand after the impulse as long as that shelf holds, this looks like a clean range expansion, not a one-candle fade.
Trade Here 👉
$LAB
$LSK
#AIN #TradeSetup #TechnicalAnalysis #WriteToEarnUpgrade #Write2Earn
⚠️ Not financial advice. Always manage your risk.
3
289
·
--
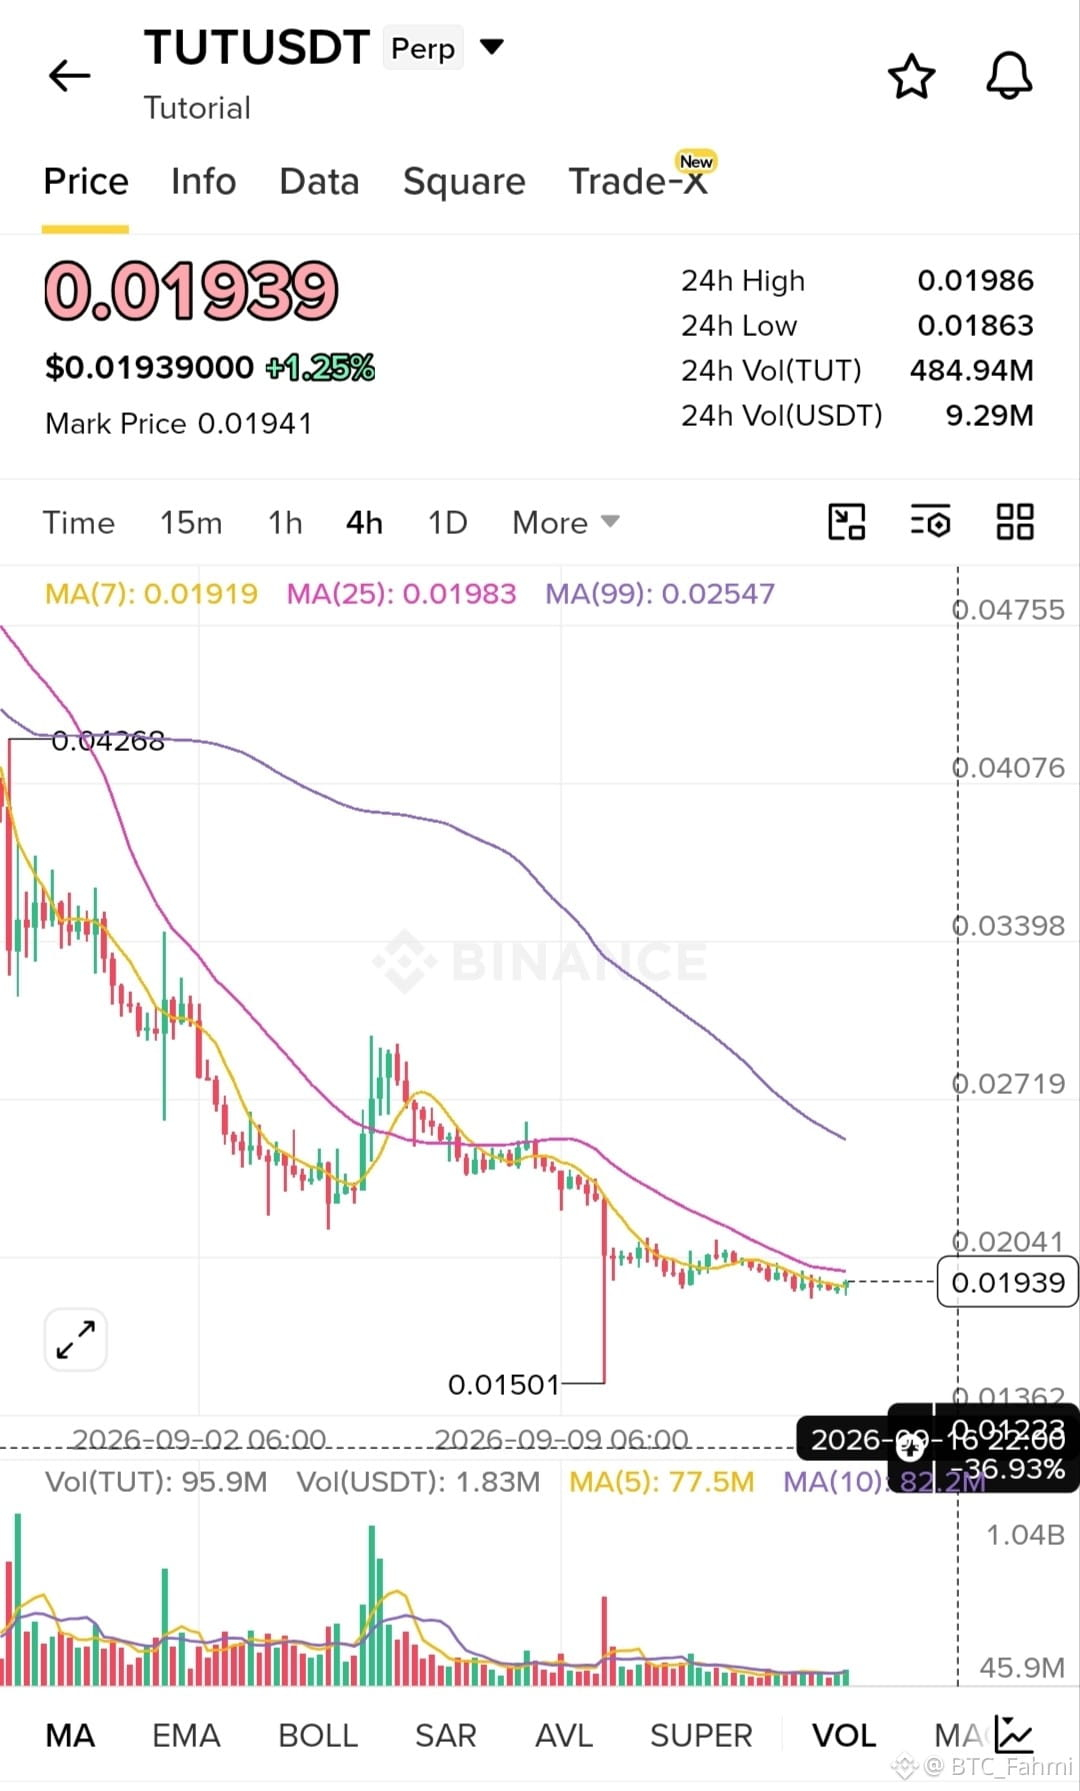
🟢 LONG $TUT (⏱️ Timeframe: 4H)
📍 Entry: 0.0191 - 0.0194
🛑 SL: 0.0175
🎯 TP1: 0.0204
🎯 TP2: 0.0225
🎯 TP3: 0.0255
The chart shows a massive sell-off that has finally found a structural floor near the 0.0150 zone, with sellers showing clear exhaustion. Price is now attempting to stabilize and reclaim local levels, presenting a high-risk, high-reward long scalp opportunity. We are targeting the overhead liquidity pools at the previous breakdown levels, with invalidation strictly below the recent swing low.
Trade Here 👉
{future}(TUTUSDT)
$LSK
{future}(LSKUSDT)
$LAB
{future}(LABUSDT)
#TUT #TradeSetup #TechnicalAnalysis #WriteToEarnUpgrade #Write2Earn
⚠️ Not financial advice. Always manage your risk.
🟢 LONG $TUT (⏱️ Timeframe: 4H)
📍 Entry: 0.0191 - 0.0194
🛑 SL: 0.0175
🎯 TP1: 0.0204
🎯 TP2: 0.0225
🎯 TP3: 0.0255
The chart shows a massive sell-off that has finally found a structural floor near the 0.0150 zone, with sellers showing clear exhaustion. Price is now attempting to stabilize and reclaim local levels, presenting a high-risk, high-reward long scalp opportunity. We are targeting the overhead liquidity pools at the previous breakdown levels, with invalidation strictly below the recent swing low.
Trade Here 👉
$LSK
$LAB
#TUT #TradeSetup #TechnicalAnalysis #WriteToEarnUpgrade #Write2Earn
⚠️ Not financial advice. Always manage your risk.
📍 Entry: 0.0191 - 0.0194
🛑 SL: 0.0175
🎯 TP1: 0.0204
🎯 TP2: 0.0225
🎯 TP3: 0.0255
The chart shows a massive sell-off that has finally found a structural floor near the 0.0150 zone, with sellers showing clear exhaustion. Price is now attempting to stabilize and reclaim local levels, presenting a high-risk, high-reward long scalp opportunity. We are targeting the overhead liquidity pools at the previous breakdown levels, with invalidation strictly below the recent swing low.
Trade Here 👉
$LSK
$LAB
#TUT #TradeSetup #TechnicalAnalysis #WriteToEarnUpgrade #Write2Earn
⚠️ Not financial advice. Always manage your risk.
5
1k
·
--
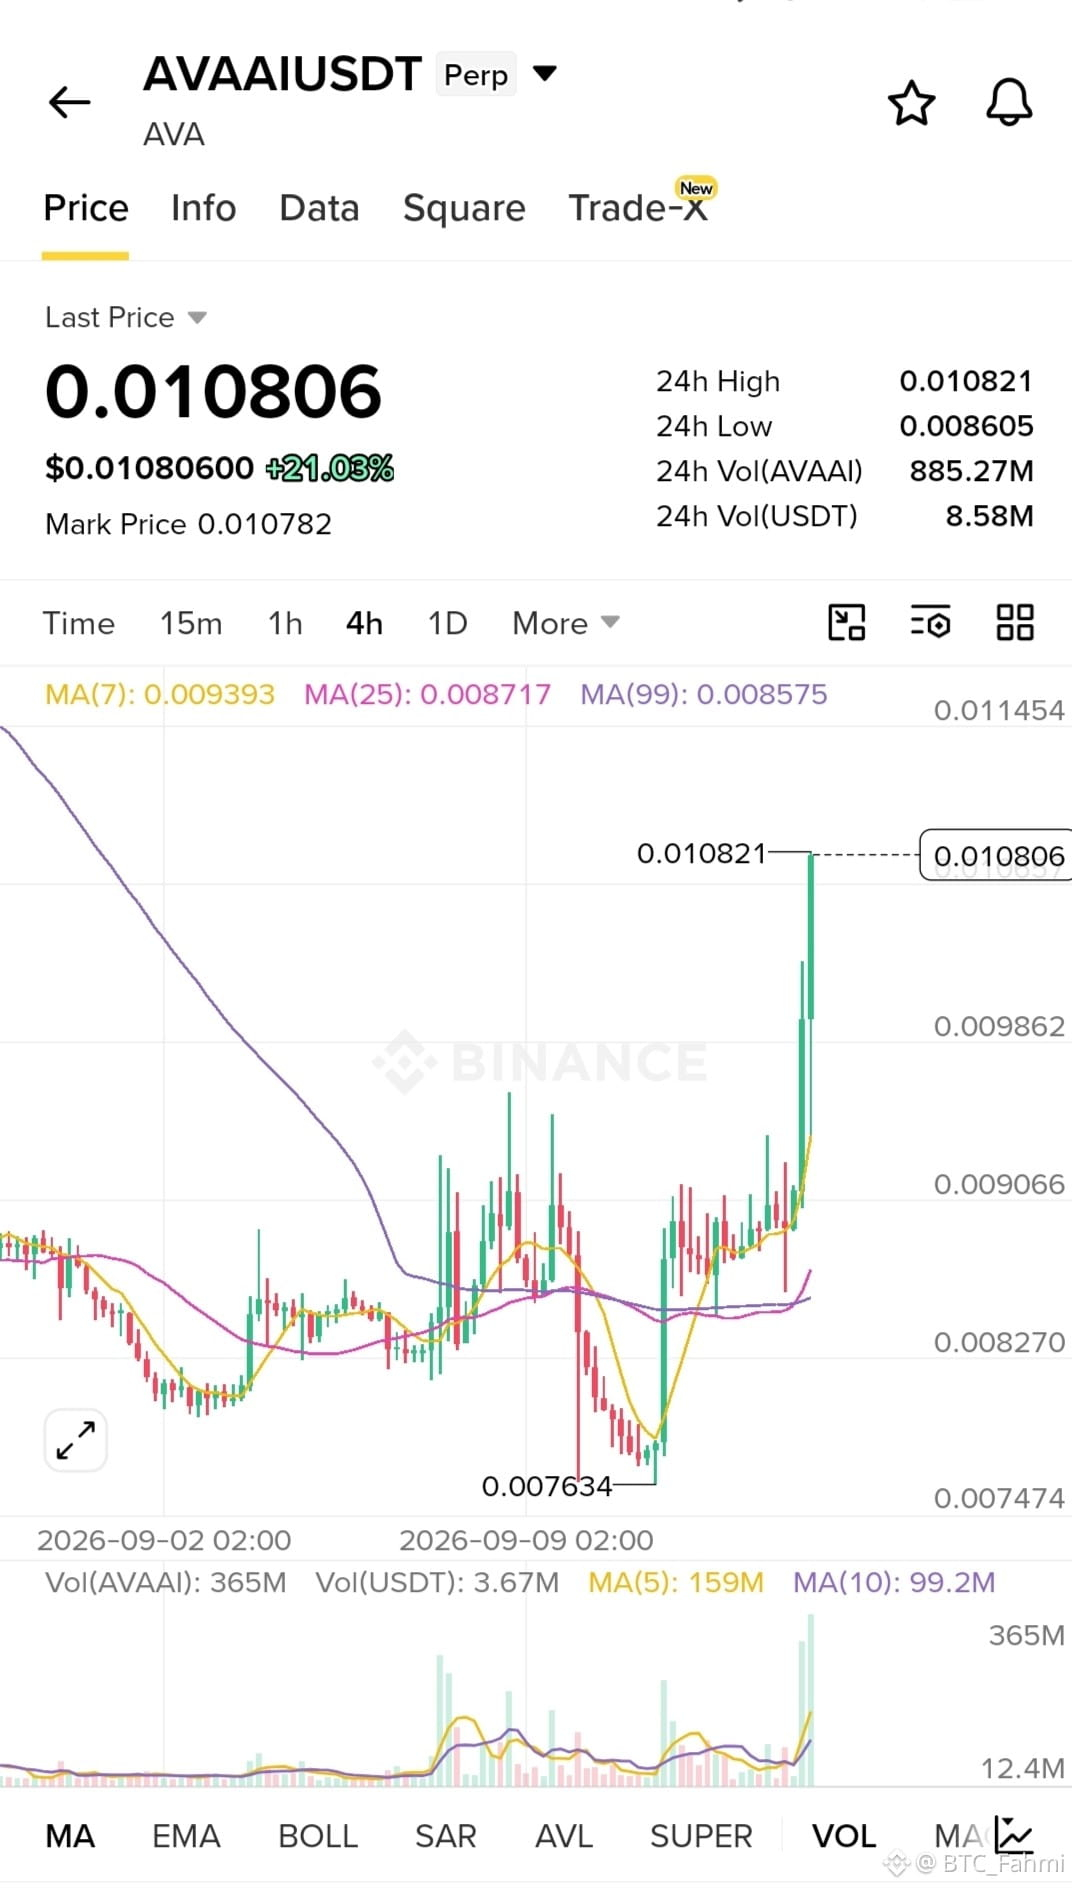
🟢 LONG $AVAAI PAIR (⏱️ Timeframe: 15m)
📍 Entry: 0.010700 - 0.010850
🛑 SL: 0.010150
🎯 TP1: 0.011250
🎯 TP2: 0.011900
🎯 TP3: 0.012800
AVAAI has aggressively reclaimed the 0.010 psychological level, shattering recent resistance with a massive volume surge. The structure completely flipped bullish after defending the 0.0076 demand zone, and as long as the price holds above this breakout level, we are likely to see a continuation towards higher liquidity zones. Momentum is firmly in the bulls' hands.
Trade Here 👉
{future}(AVAAIUSDT)
$LSK
{future}(LSKUSDT)
$LAB
{future}(LABUSDT)
#AVAAI #TradeSetup #TechnicalAnalysis #WriteToEarnUpgrade #Write2Earn
⚠️ Not financial advice. Always manage your risk.
🟢 LONG $AVAAI PAIR (⏱️ Timeframe: 15m)
📍 Entry: 0.010700 - 0.010850
🛑 SL: 0.010150
🎯 TP1: 0.011250
🎯 TP2: 0.011900
🎯 TP3: 0.012800
AVAAI has aggressively reclaimed the 0.010 psychological level, shattering recent resistance with a massive volume surge. The structure completely flipped bullish after defending the 0.0076 demand zone, and as long as the price holds above this breakout level, we are likely to see a continuation towards higher liquidity zones. Momentum is firmly in the bulls' hands.
Trade Here 👉
$LSK
$LAB
#AVAAI #TradeSetup #TechnicalAnalysis #WriteToEarnUpgrade #Write2Earn
⚠️ Not financial advice. Always manage your risk.
📍 Entry: 0.010700 - 0.010850
🛑 SL: 0.010150
🎯 TP1: 0.011250
🎯 TP2: 0.011900
🎯 TP3: 0.012800
AVAAI has aggressively reclaimed the 0.010 psychological level, shattering recent resistance with a massive volume surge. The structure completely flipped bullish after defending the 0.0076 demand zone, and as long as the price holds above this breakout level, we are likely to see a continuation towards higher liquidity zones. Momentum is firmly in the bulls' hands.
Trade Here 👉
$LSK
$LAB
#AVAAI #TradeSetup #TechnicalAnalysis #WriteToEarnUpgrade #Write2Earn
⚠️ Not financial advice. Always manage your risk.
1
340
·
--
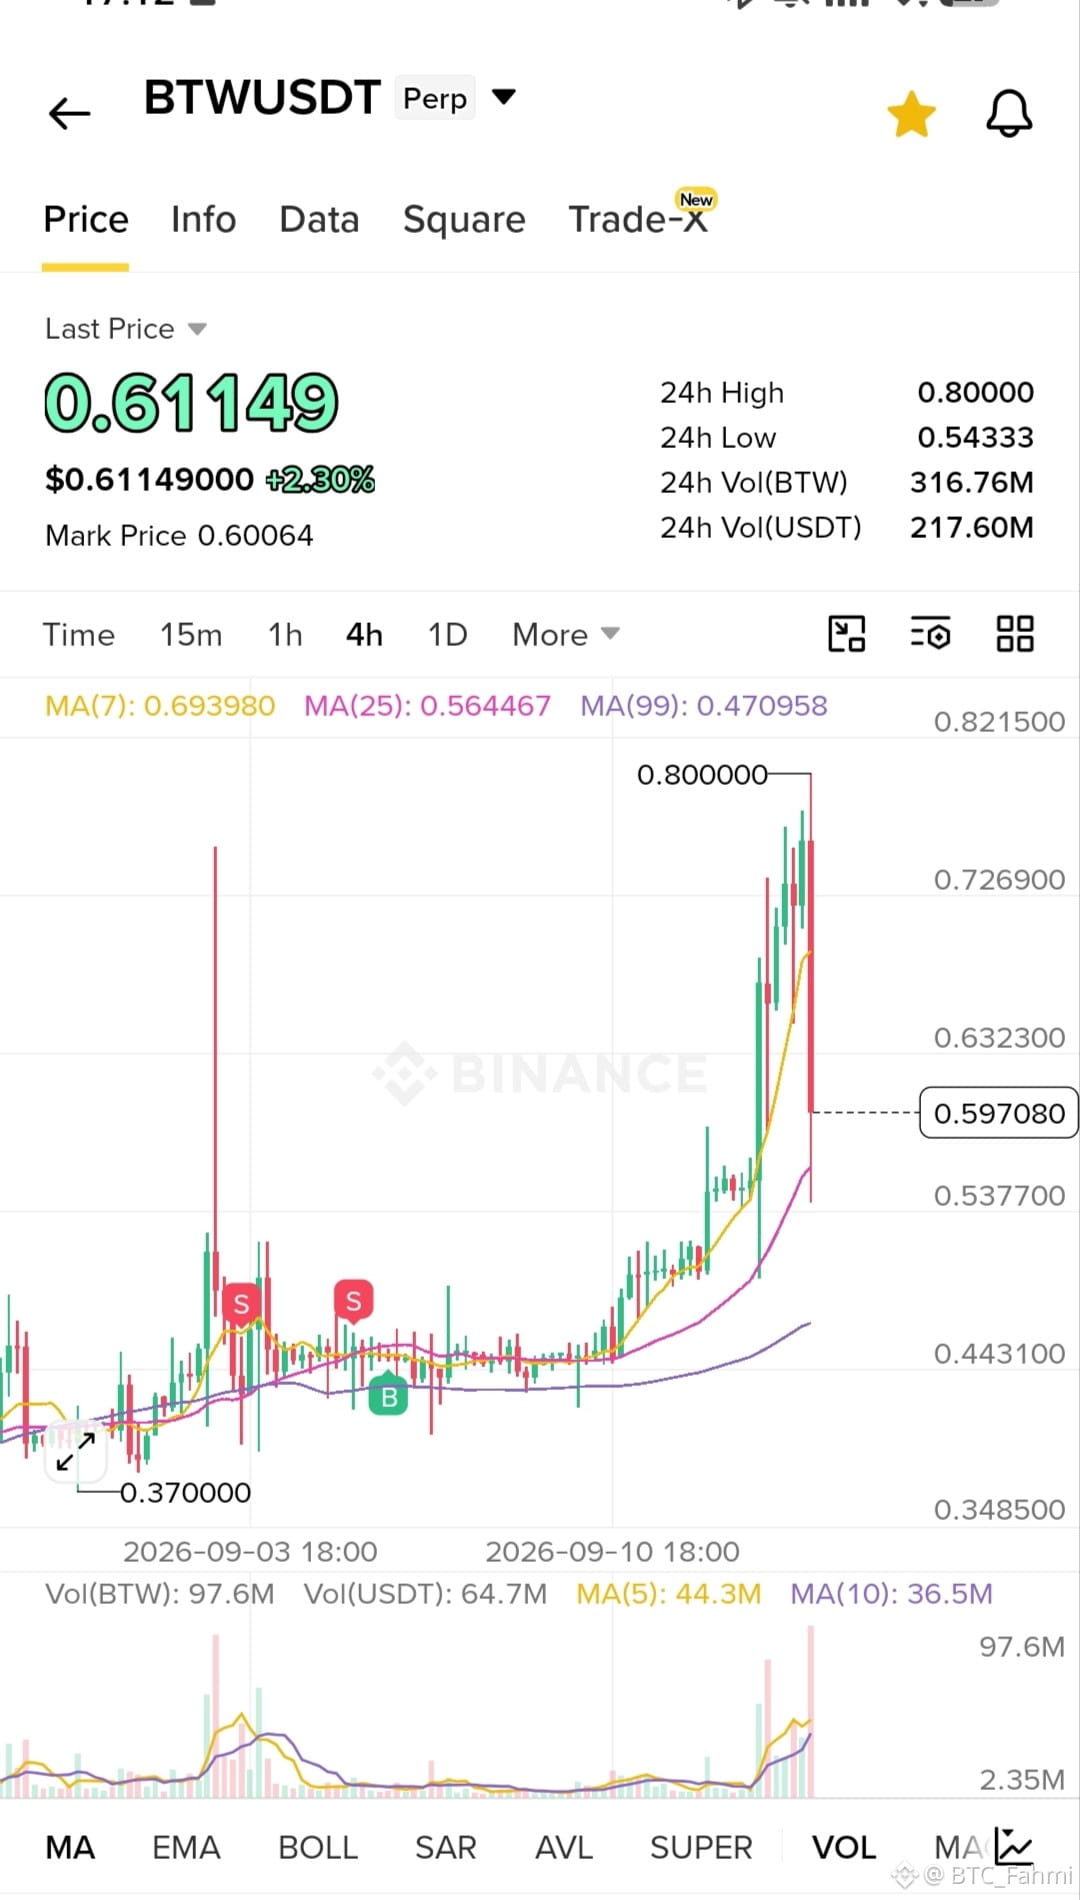
🔴 SHORT $BTW (⏱️ Timeframe: 4H)
📍 Entry: 0.611 - 0.625
🛑 SL: 0.665
🎯 TP1: 0.580
🎯 TP2: 0.565
🎯 TP3: 0.540
BTW printed a massive rejection wick at the 0.80 psychological level, confirming a local top and losing its short-term trend structure. The current 4H candle is heavily bearish, showing aggressive profit-taking and fading momentum. I expect a brief bounce to the 0.62 zone to fill the recent imbalance before the correction extends toward the key structural support at 0.565.
Trade Here 👉
{future}(BTWUSDT)
$LAB
{future}(LABUSDT)
$LSK
{future}(LSKUSDT)
#BTW #TradeSetup #TechnicalAnalysis #WriteToEarnUpgrade #Write2Earn
⚠️ Not financial advice. Always manage your risk.
🔴 SHORT $BTW (⏱️ Timeframe: 4H)
📍 Entry: 0.611 - 0.625
🛑 SL: 0.665
🎯 TP1: 0.580
🎯 TP2: 0.565
🎯 TP3: 0.540
BTW printed a massive rejection wick at the 0.80 psychological level, confirming a local top and losing its short-term trend structure. The current 4H candle is heavily bearish, showing aggressive profit-taking and fading momentum. I expect a brief bounce to the 0.62 zone to fill the recent imbalance before the correction extends toward the key structural support at 0.565.
Trade Here 👉
$LAB
$LSK
#BTW #TradeSetup #TechnicalAnalysis #WriteToEarnUpgrade #Write2Earn
⚠️ Not financial advice. Always manage your risk.
📍 Entry: 0.611 - 0.625
🛑 SL: 0.665
🎯 TP1: 0.580
🎯 TP2: 0.565
🎯 TP3: 0.540
BTW printed a massive rejection wick at the 0.80 psychological level, confirming a local top and losing its short-term trend structure. The current 4H candle is heavily bearish, showing aggressive profit-taking and fading momentum. I expect a brief bounce to the 0.62 zone to fill the recent imbalance before the correction extends toward the key structural support at 0.565.
Trade Here 👉
$LAB
$LSK
#BTW #TradeSetup #TechnicalAnalysis #WriteToEarnUpgrade #Write2Earn
⚠️ Not financial advice. Always manage your risk.
1
641
·
--
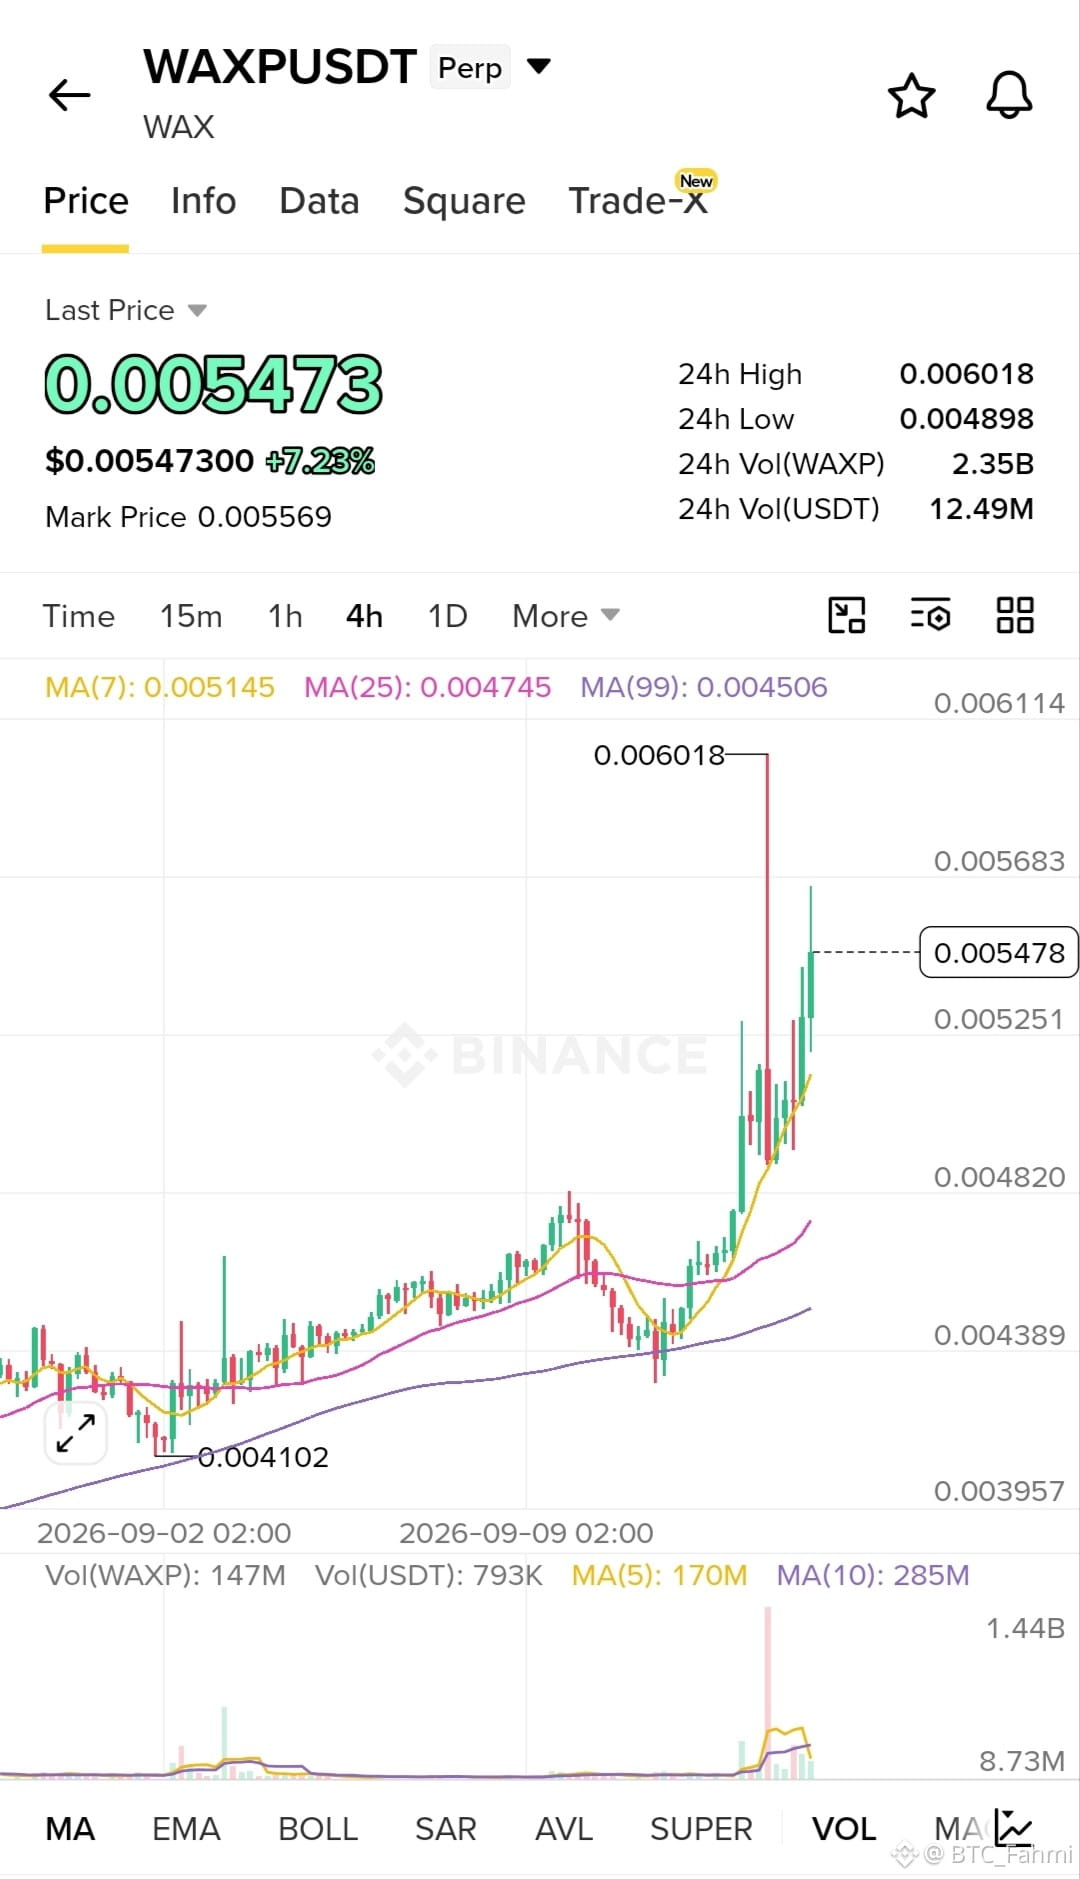
🟢 LONG $WAXP (⏱️ Timeframe: 4H)
📍 Entry: 0.005300 - 0.005480
🛑 SL: 0.004950
🎯 TP1: 0.005800
🎯 TP2: 0.006020
🎯 TP3: 0.006500
WAXP just printed a massive impulsive breakout backed by strong volume, clearing previous resistance. Price is now consolidating in a healthy pullback, holding well above key support levels. The demand zone around 0.005300 acts as a strong launchpad for the next leg up. As long as price holds above 0.005000, bulls remain in control targeting new local highs.
Trade Here 👉
{future}(WAXPUSDT)
$LAB
{future}(LABUSDT)
$LSK
{future}(LSKUSDT)
#WAXP #TradeSetup #TechnicalAnalysis #WriteToEarnUpgrade #Write2Earn
⚠️ Not financial advice. Always manage your risk.
🟢 LONG $WAXP (⏱️ Timeframe: 4H)
📍 Entry: 0.005300 - 0.005480
🛑 SL: 0.004950
🎯 TP1: 0.005800
🎯 TP2: 0.006020
🎯 TP3: 0.006500
WAXP just printed a massive impulsive breakout backed by strong volume, clearing previous resistance. Price is now consolidating in a healthy pullback, holding well above key support levels. The demand zone around 0.005300 acts as a strong launchpad for the next leg up. As long as price holds above 0.005000, bulls remain in control targeting new local highs.
Trade Here 👉
$LAB
$LSK
#WAXP #TradeSetup #TechnicalAnalysis #WriteToEarnUpgrade #Write2Earn
⚠️ Not financial advice. Always manage your risk.
📍 Entry: 0.005300 - 0.005480
🛑 SL: 0.004950
🎯 TP1: 0.005800
🎯 TP2: 0.006020
🎯 TP3: 0.006500
WAXP just printed a massive impulsive breakout backed by strong volume, clearing previous resistance. Price is now consolidating in a healthy pullback, holding well above key support levels. The demand zone around 0.005300 acts as a strong launchpad for the next leg up. As long as price holds above 0.005000, bulls remain in control targeting new local highs.
Trade Here 👉
$LAB
$LSK
#WAXP #TradeSetup #TechnicalAnalysis #WriteToEarnUpgrade #Write2Earn
⚠️ Not financial advice. Always manage your risk.
2
1
568
·
--
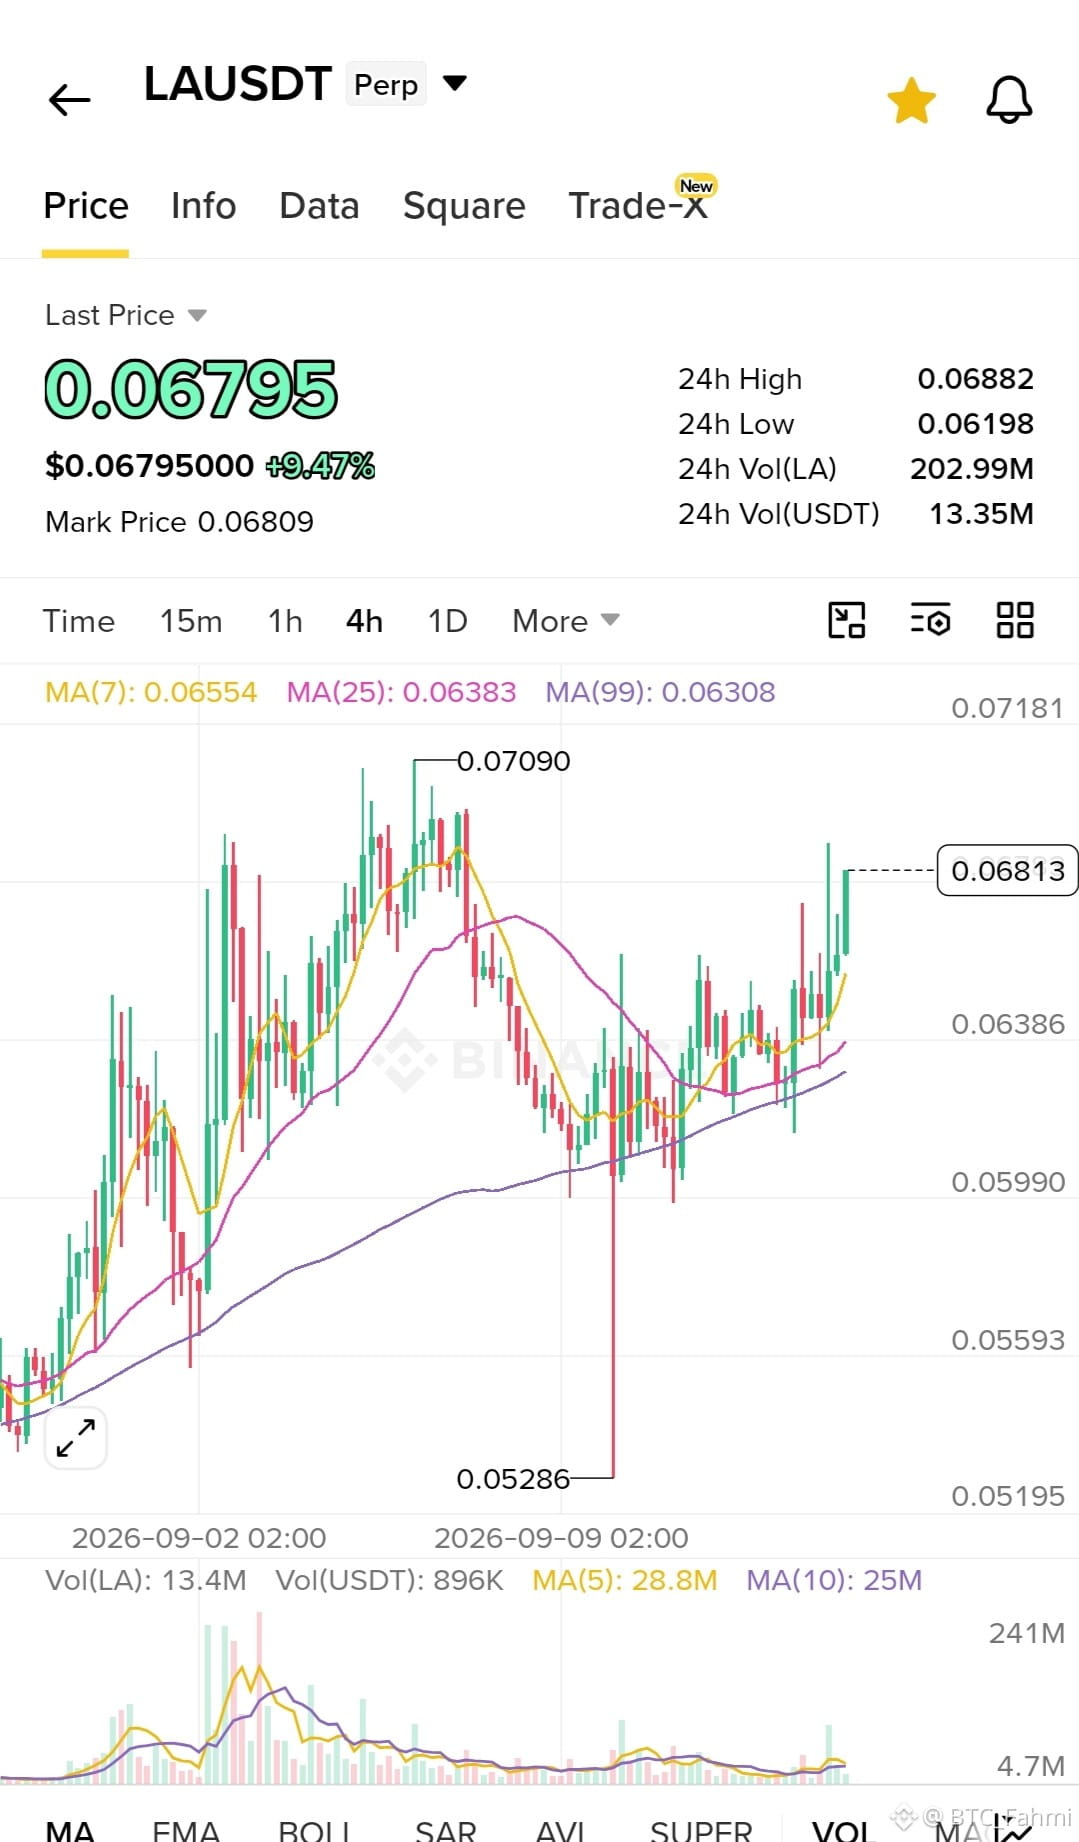
🟢 LONG $LA USDT (⏱️ Timeframe: 4H Swing)
📍 Entry Range: 0.0670 - 0.0680
🛑 Stop Loss: 0.0630
🎯 TP1: 0.0709
🎯 TP2: 0.0750
🎯 TP3: 0.0800
$LAUSDT has successfully reclaimed key support levels after a healthy correction, establishing a strong demand base around the 0.063 zone. Price action shows buyers stepping in aggressively to push back toward the recent 0.0709 resistance. A clean break above this local high will open the door for a continuation toward higher liquidity pools, making a long position favorable on minor pullbacks.
Trade Here 👉
{future}(LAUSDT)
$LAB
{future}(LABUSDT)
$龙虾
{future}(龙虾USDT)
#LAUSDT #TradeSetup #TechnicalAnalysis #WriteToEarnUpgrade #Write2Earn
⚠️ Not financial advice. Always manage your risk.
🟢 LONG $LA USDT (⏱️ Timeframe: 4H Swing)
📍 Entry Range: 0.0670 - 0.0680
🛑 Stop Loss: 0.0630
🎯 TP1: 0.0709
🎯 TP2: 0.0750
🎯 TP3: 0.0800
$LAUSDT has successfully reclaimed key support levels after a healthy correction, establishing a strong demand base around the 0.063 zone. Price action shows buyers stepping in aggressively to push back toward the recent 0.0709 resistance. A clean break above this local high will open the door for a continuation toward higher liquidity pools, making a long position favorable on minor pullbacks.
Trade Here 👉
$LAB
$龙虾
#LAUSDT #TradeSetup #TechnicalAnalysis #WriteToEarnUpgrade #Write2Earn
⚠️ Not financial advice. Always manage your risk.
📍 Entry Range: 0.0670 - 0.0680
🛑 Stop Loss: 0.0630
🎯 TP1: 0.0709
🎯 TP2: 0.0750
🎯 TP3: 0.0800
$LAUSDT has successfully reclaimed key support levels after a healthy correction, establishing a strong demand base around the 0.063 zone. Price action shows buyers stepping in aggressively to push back toward the recent 0.0709 resistance. A clean break above this local high will open the door for a continuation toward higher liquidity pools, making a long position favorable on minor pullbacks.
Trade Here 👉
$LAB
$龙虾
#LAUSDT #TradeSetup #TechnicalAnalysis #WriteToEarnUpgrade #Write2Earn
⚠️ Not financial advice. Always manage your risk.
1
178
·
--
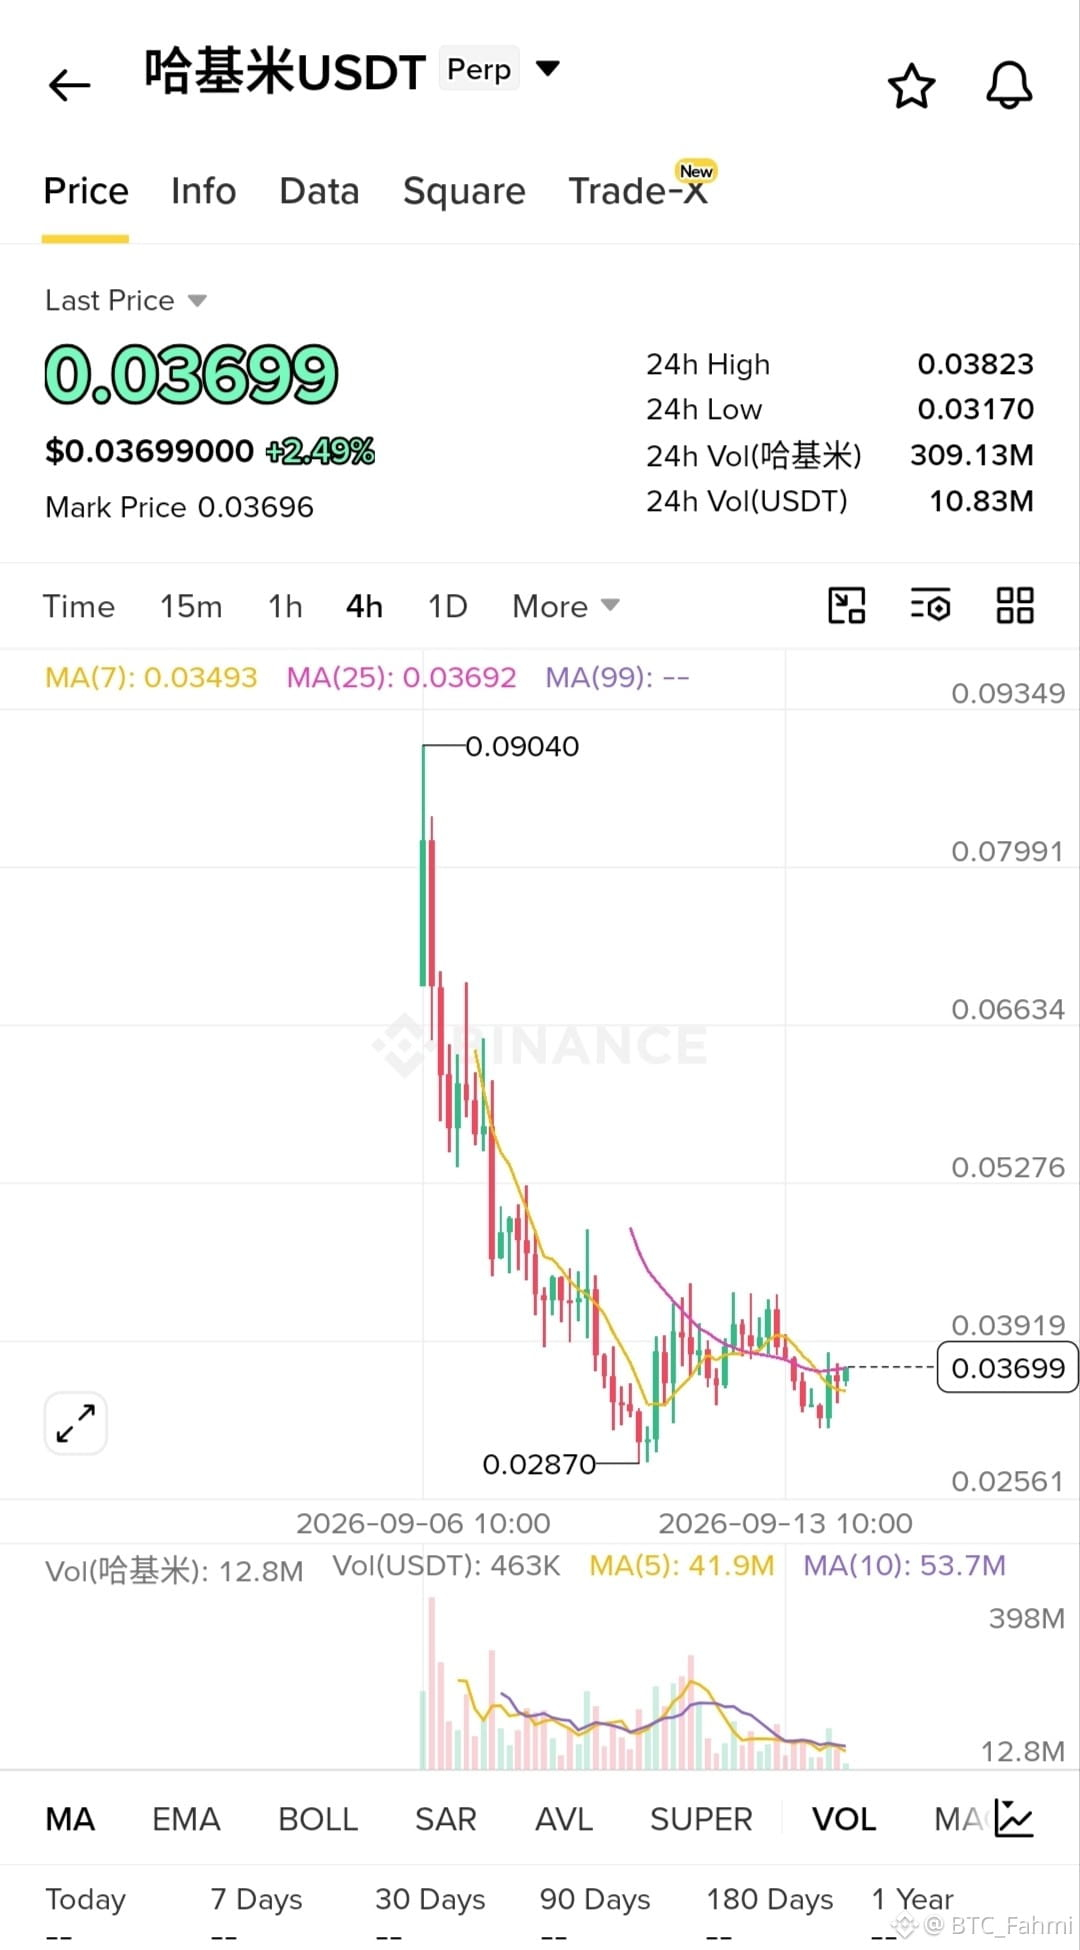
🟢 LONG $哈基米 🚀 ⏱️ Timeframe: 1D
📍 Entry Range: 0.0350 - 0.0370
🛑 Stop Loss: 0.0310
🎯 TP1: 0.0395
🎯 TP2: 0.0445
🎯 TP3: 0.0505
The chart shows a classic post-capitulation accumulation phase, with sellers clearly losing momentum after the massive drop from the 0.09 highs. Price is now reclaiming lost ground and holding above the 0.0350 support zone, with declining activity indicating a lack of selling pressure. If buyers defend this immediate demand area, a short squeeze toward the 0.0400 liquidity pocket is highly probable, offering a clean risk-to-reward entry.
Trade Here 👉
{future}(哈基米USDT)
$龙虾
{future}(龙虾USDT)
$LAB
{future}(LABUSDT)
#AnthropicCEOCallsForAISlowdown #BrazilCentralBankRaisesVASPCapitalRequirements #BitcoinThirdSingleBlockReorgInFourWeeks #WhiteHouseRejectsAISlowdownCalls #UKMayExemptTokenizedGoldFromFundRules
⚠️ Not financial advice. Always manage your risk.
🟢 LONG $哈基米 🚀 ⏱️ Timeframe: 1D
📍 Entry Range: 0.0350 - 0.0370
🛑 Stop Loss: 0.0310
🎯 TP1: 0.0395
🎯 TP2: 0.0445
🎯 TP3: 0.0505
The chart shows a classic post-capitulation accumulation phase, with sellers clearly losing momentum after the massive drop from the 0.09 highs. Price is now reclaiming lost ground and holding above the 0.0350 support zone, with declining activity indicating a lack of selling pressure. If buyers defend this immediate demand area, a short squeeze toward the 0.0400 liquidity pocket is highly probable, offering a clean risk-to-reward entry.
Trade Here 👉
$龙虾
$LAB
#AnthropicCEOCallsForAISlowdown #BrazilCentralBankRaisesVASPCapitalRequirements #BitcoinThirdSingleBlockReorgInFourWeeks #WhiteHouseRejectsAISlowdownCalls #UKMayExemptTokenizedGoldFromFundRules
⚠️ Not financial advice. Always manage your risk.
📍 Entry Range: 0.0350 - 0.0370
🛑 Stop Loss: 0.0310
🎯 TP1: 0.0395
🎯 TP2: 0.0445
🎯 TP3: 0.0505
The chart shows a classic post-capitulation accumulation phase, with sellers clearly losing momentum after the massive drop from the 0.09 highs. Price is now reclaiming lost ground and holding above the 0.0350 support zone, with declining activity indicating a lack of selling pressure. If buyers defend this immediate demand area, a short squeeze toward the 0.0400 liquidity pocket is highly probable, offering a clean risk-to-reward entry.
Trade Here 👉
$龙虾
$LAB
#AnthropicCEOCallsForAISlowdown #BrazilCentralBankRaisesVASPCapitalRequirements #BitcoinThirdSingleBlockReorgInFourWeeks #WhiteHouseRejectsAISlowdownCalls #UKMayExemptTokenizedGoldFromFundRules
⚠️ Not financial advice. Always manage your risk.
1
505
·
--
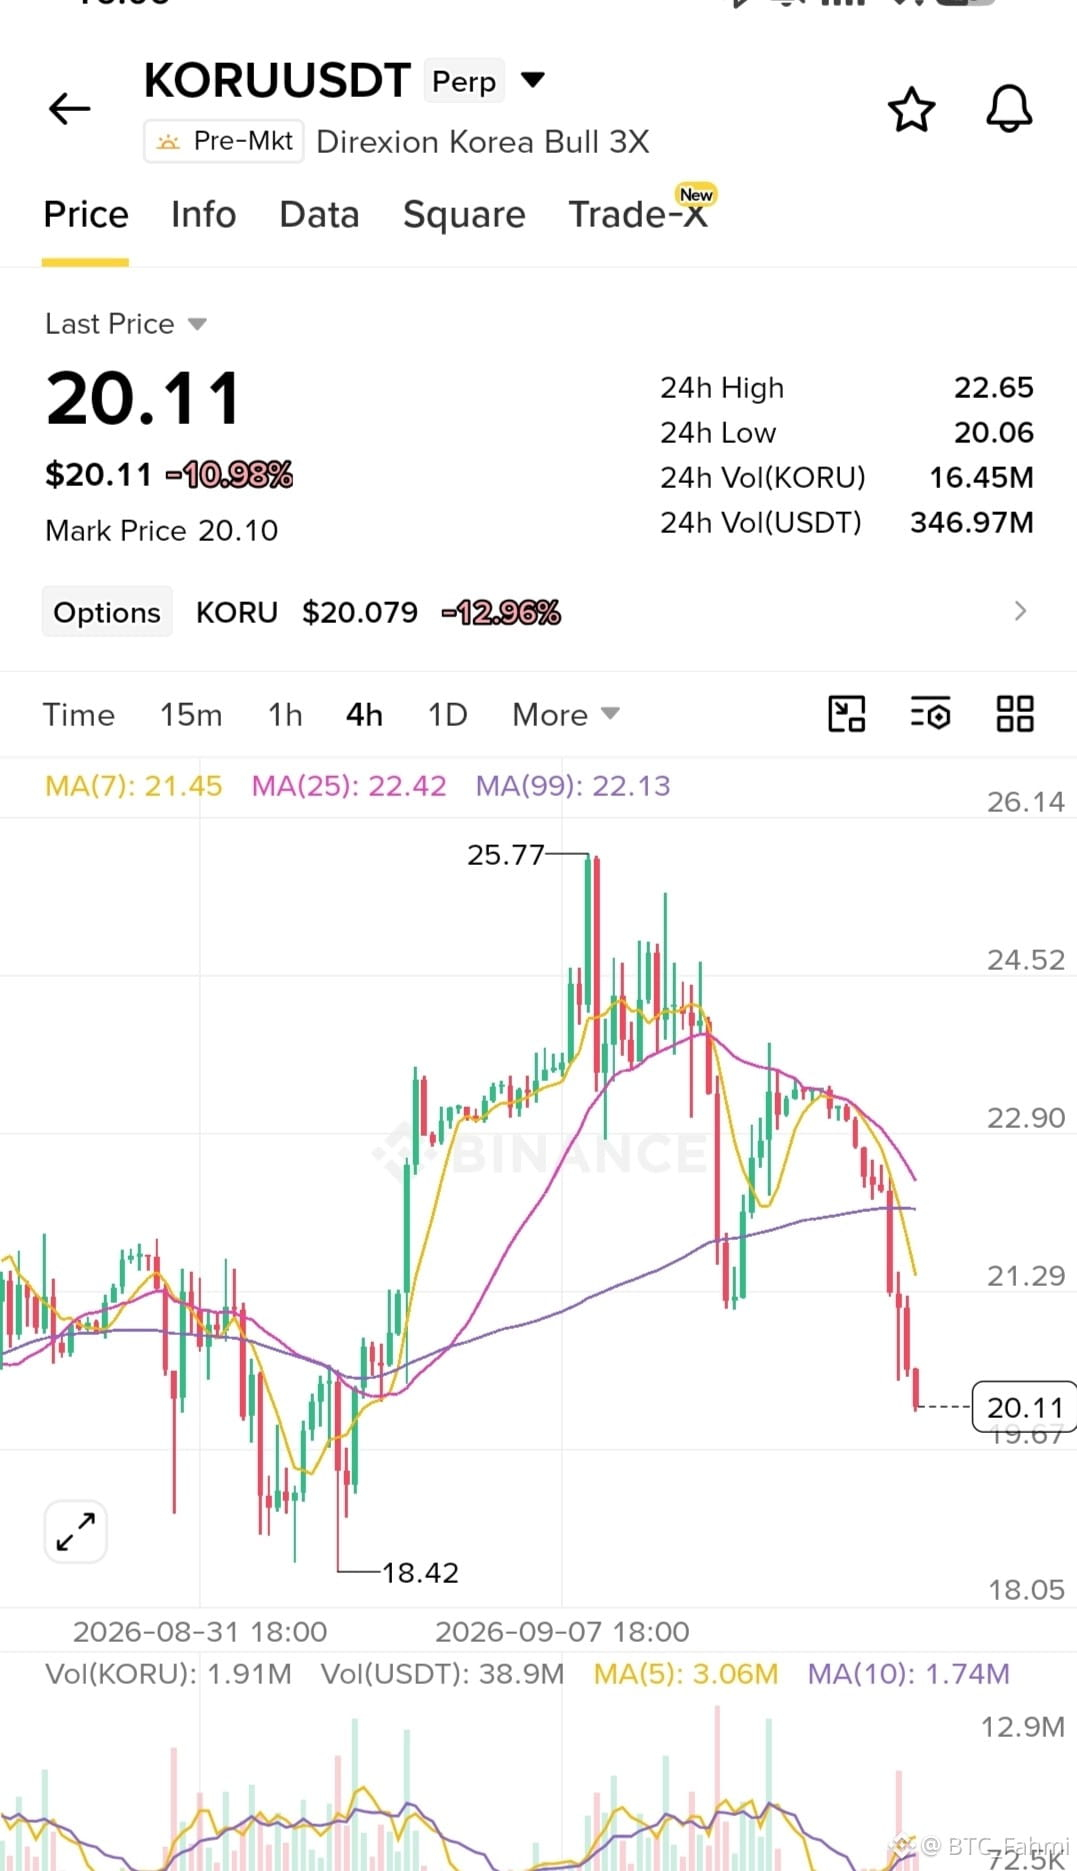
🔴 SHORT $KORU USDT (⏱️ Timeframe: 4H)
📍 Entry: 20.10 - 20.40
🛑 SL: 21.50
🎯 TP1: 19.50
🎯 TP2: 18.45
🎯 TP3: 17.20
$KORUUSDT is showing heavy bearish continuation after getting firmly rejected from the 25.70 peak. The asset has lost key dynamic support around the 21.50 level, which now acts as firm supply. With the price aggressively breaking below the 20.50 zone and testing 24h lows, momentum is heavily favoring sellers. A clean break below 20.00 will likely trigger a cascade of stop losses, targeting deeper liquidity pockets near the previous swing low at 18.40. Any intraday bounce toward 20.40 is a prime selling opportunity.
Trade Here 👉
{future}(KORUUSDT)
$LSK
{future}(LSKUSDT)
$龙虾
{future}(龙虾USDT)
#KORUUSDT #TradeSetup #TechnicalAnalysis #WriteToEarnUpgrade #Write2Earn
⚠️ Not financial advice. Always manage your risk.
🔴 SHORT $KORU USDT (⏱️ Timeframe: 4H)
📍 Entry: 20.10 - 20.40
🛑 SL: 21.50
🎯 TP1: 19.50
🎯 TP2: 18.45
🎯 TP3: 17.20
$KORUUSDT is showing heavy bearish continuation after getting firmly rejected from the 25.70 peak. The asset has lost key dynamic support around the 21.50 level, which now acts as firm supply. With the price aggressively breaking below the 20.50 zone and testing 24h lows, momentum is heavily favoring sellers. A clean break below 20.00 will likely trigger a cascade of stop losses, targeting deeper liquidity pockets near the previous swing low at 18.40. Any intraday bounce toward 20.40 is a prime selling opportunity.
Trade Here 👉
$LSK
$龙虾
#KORUUSDT #TradeSetup #TechnicalAnalysis #WriteToEarnUpgrade #Write2Earn
⚠️ Not financial advice. Always manage your risk.
📍 Entry: 20.10 - 20.40
🛑 SL: 21.50
🎯 TP1: 19.50
🎯 TP2: 18.45
🎯 TP3: 17.20
$KORUUSDT is showing heavy bearish continuation after getting firmly rejected from the 25.70 peak. The asset has lost key dynamic support around the 21.50 level, which now acts as firm supply. With the price aggressively breaking below the 20.50 zone and testing 24h lows, momentum is heavily favoring sellers. A clean break below 20.00 will likely trigger a cascade of stop losses, targeting deeper liquidity pockets near the previous swing low at 18.40. Any intraday bounce toward 20.40 is a prime selling opportunity.
Trade Here 👉
$LSK
$龙虾
#KORUUSDT #TradeSetup #TechnicalAnalysis #WriteToEarnUpgrade #Write2Earn
⚠️ Not financial advice. Always manage your risk.
2
442
·
--
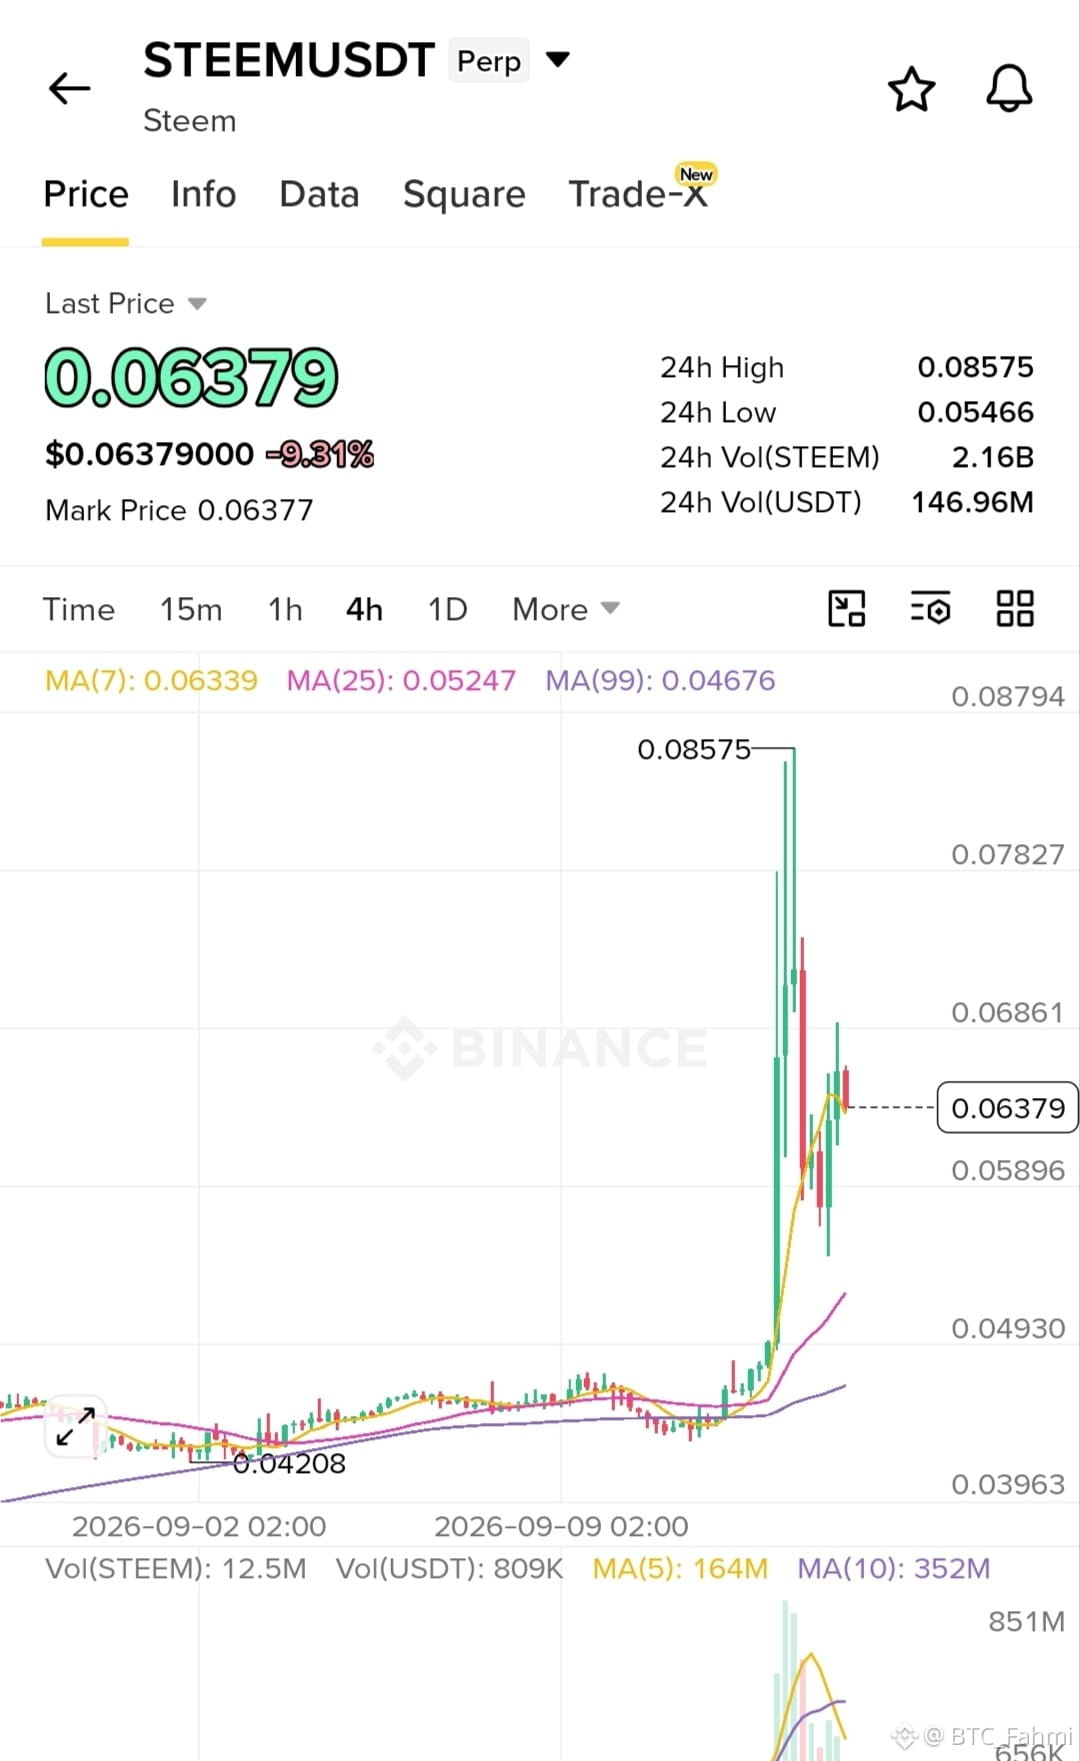
🟢 LONG $STEEM USDT (⏱️ Timeframe: 4H)
📍 Entry: 0.0620 - 0.0645
🛑 SL: 0.0540
🎯 TP1: 0.0685
🎯 TP2: 0.0750
🎯 TP3: 0.0850
Massive buying pressure pushed the price to a local high of 0.0857, and the current pullback is now testing a fresh demand zone around 0.063. Holding this level sets up a continuation bounce toward the highs, with 0.054 acting as the hard invalidation if the structure fails.
Trade Here 👉
{future}(STEEMUSDT)
$LAB
{future}(LABUSDT)
$LSK
{future}(LSKUSDT)
#STEEM #TradeSetup #TechnicalAnalysis #WriteToEarnUpgrade #Write2Earn
⚠️ Not financial advice. Always manage your risk.
🟢 LONG $STEEM USDT (⏱️ Timeframe: 4H)
📍 Entry: 0.0620 - 0.0645
🛑 SL: 0.0540
🎯 TP1: 0.0685
🎯 TP2: 0.0750
🎯 TP3: 0.0850
Massive buying pressure pushed the price to a local high of 0.0857, and the current pullback is now testing a fresh demand zone around 0.063. Holding this level sets up a continuation bounce toward the highs, with 0.054 acting as the hard invalidation if the structure fails.
Trade Here 👉
$LAB
$LSK
#STEEM #TradeSetup #TechnicalAnalysis #WriteToEarnUpgrade #Write2Earn
⚠️ Not financial advice. Always manage your risk.
📍 Entry: 0.0620 - 0.0645
🛑 SL: 0.0540
🎯 TP1: 0.0685
🎯 TP2: 0.0750
🎯 TP3: 0.0850
Massive buying pressure pushed the price to a local high of 0.0857, and the current pullback is now testing a fresh demand zone around 0.063. Holding this level sets up a continuation bounce toward the highs, with 0.054 acting as the hard invalidation if the structure fails.
Trade Here 👉
$LAB
$LSK
#STEEM #TradeSetup #TechnicalAnalysis #WriteToEarnUpgrade #Write2Earn
⚠️ Not financial advice. Always manage your risk.
2
76
·
--
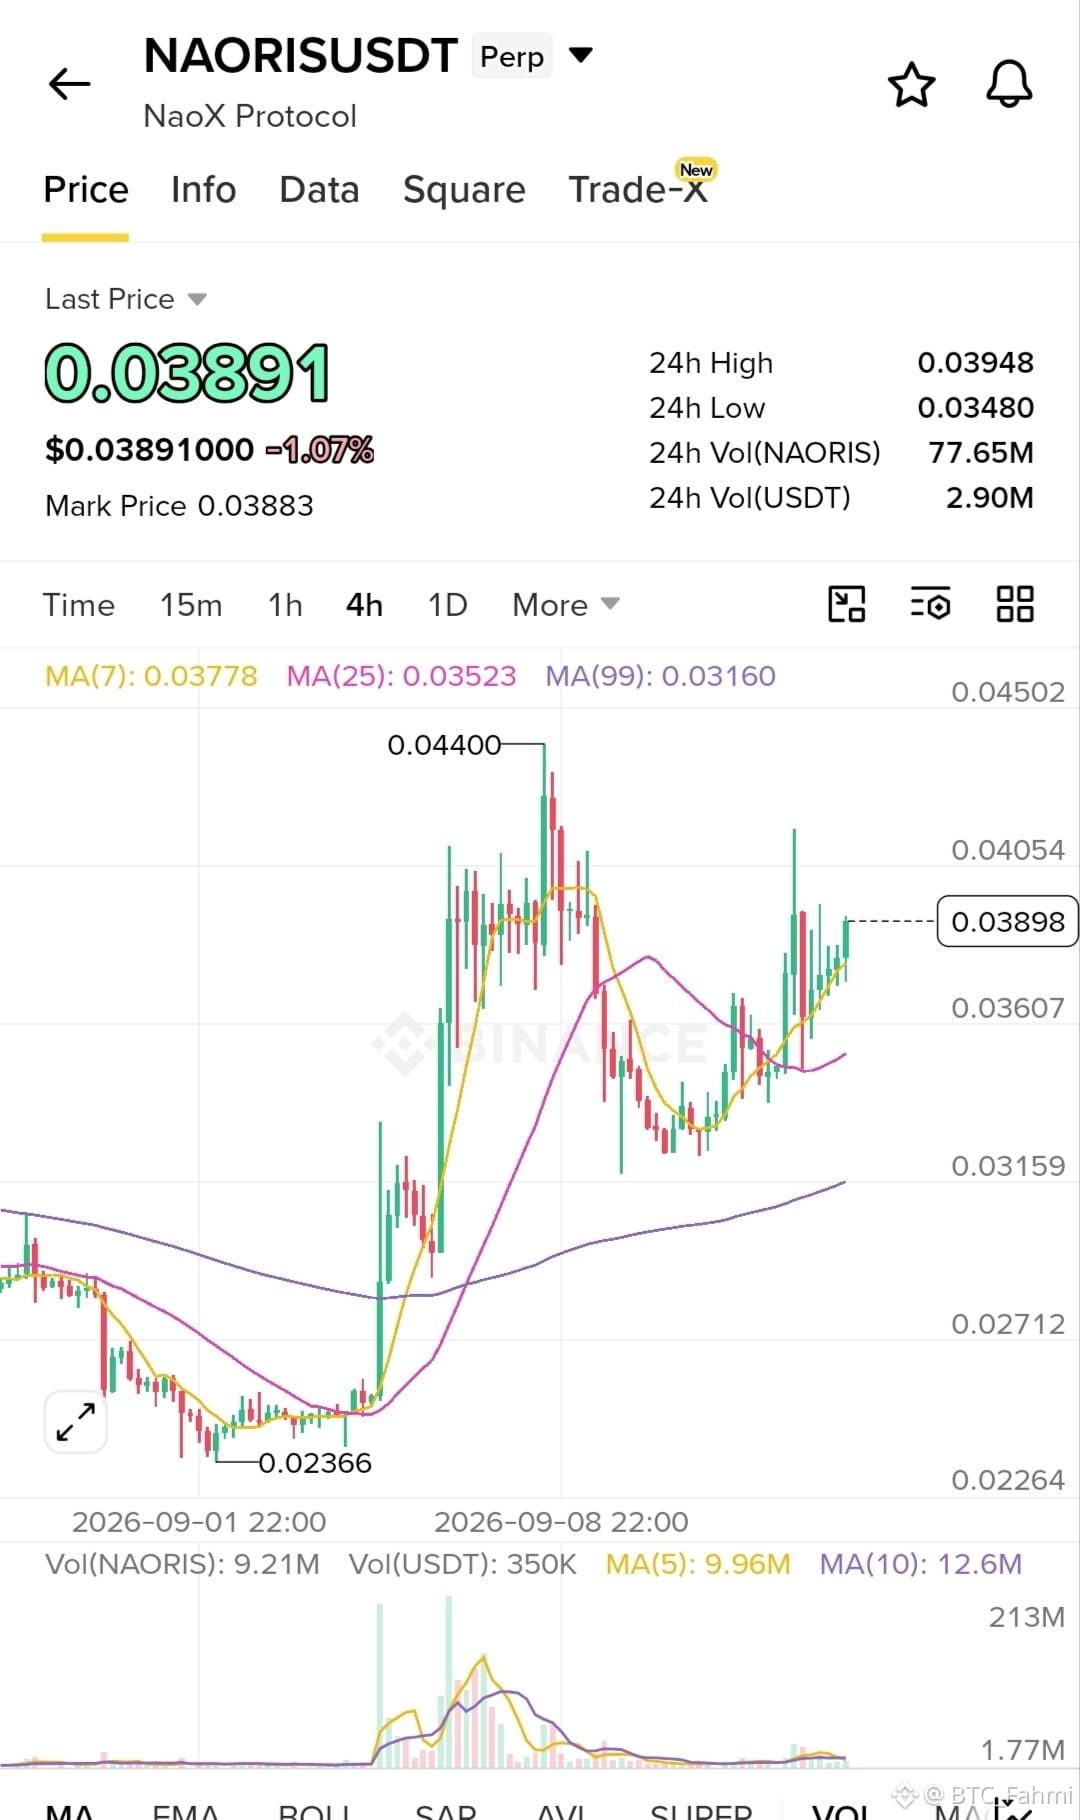
🟢 LONG $NAORIS USDT (⏱️ Timeframe: 4H)
📍 Entry: 0.0380 - 0.0389
🛑 SL: 0.0355
🎯 TP1: 0.0405
🎯 TP2: 0.0425
🎯 TP3: 0.0440
After a sharp impulse to 0.044 and a subsequent healthy correction, price has established a solid higher low around the 0.032 demand zone. The current price action is reclaiming previous support levels with increasing bullish momentum, setting up a continuation move. Bulls need to clear the immediate 0.040 supply wall to open the path toward the previous swing high.
Trade Here 👉
{future}(NAORISUSDT)
$LAB
{future}(LABUSDT)
$LSK
{future}(LSKUSDT)
#NAORISUSDT #TradeSetup #TechnicalAnalysis #WriteToEarnUpgrade #Write2Earn
⚠️ Not financial advice. Always manage your risk.
🟢 LONG $NAORIS USDT (⏱️ Timeframe: 4H)
📍 Entry: 0.0380 - 0.0389
🛑 SL: 0.0355
🎯 TP1: 0.0405
🎯 TP2: 0.0425
🎯 TP3: 0.0440
After a sharp impulse to 0.044 and a subsequent healthy correction, price has established a solid higher low around the 0.032 demand zone. The current price action is reclaiming previous support levels with increasing bullish momentum, setting up a continuation move. Bulls need to clear the immediate 0.040 supply wall to open the path toward the previous swing high.
Trade Here 👉
$LAB
$LSK
#NAORISUSDT #TradeSetup #TechnicalAnalysis #WriteToEarnUpgrade #Write2Earn
⚠️ Not financial advice. Always manage your risk.
📍 Entry: 0.0380 - 0.0389
🛑 SL: 0.0355
🎯 TP1: 0.0405
🎯 TP2: 0.0425
🎯 TP3: 0.0440
After a sharp impulse to 0.044 and a subsequent healthy correction, price has established a solid higher low around the 0.032 demand zone. The current price action is reclaiming previous support levels with increasing bullish momentum, setting up a continuation move. Bulls need to clear the immediate 0.040 supply wall to open the path toward the previous swing high.
Trade Here 👉
$LAB
$LSK
#NAORISUSDT #TradeSetup #TechnicalAnalysis #WriteToEarnUpgrade #Write2Earn
⚠️ Not financial advice. Always manage your risk.
3
134
·
--
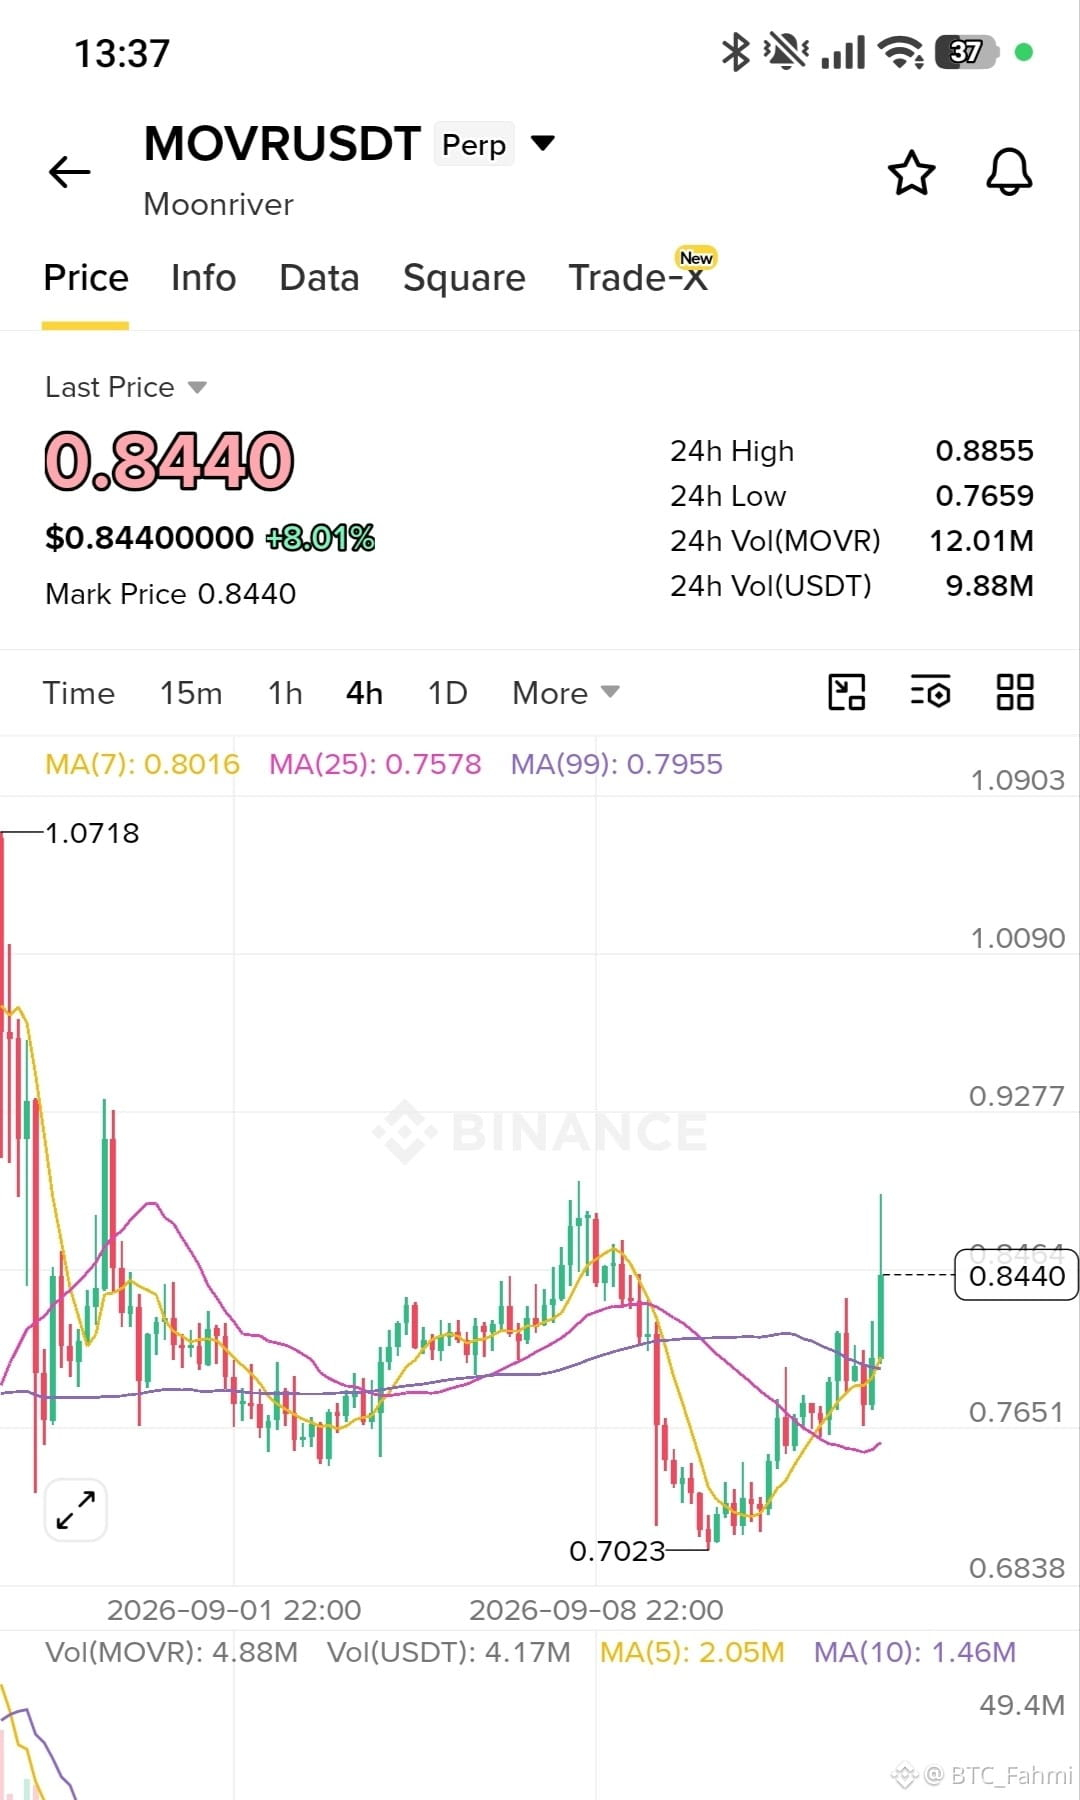
🟢 LONG $MOVR USDT (⏱️ Timeframe: 4H)
📍 Entry: 0.8200 - 0.8450
🛑 SL: 0.7850
🎯 TP1: 0.8855
🎯 TP2: 0.9277
🎯 TP3: 1.0090
$MOVRUSDT has confirmed a strong structural shift after printing a clean bottom at 0.7023. The aggressive bounce has reclaimed previous resistance levels, with buyers stepping in aggressively to defend the 0.80 psychological zone. A healthy retest of this breakout area will likely act as a launchpad for continuation toward higher liquidity pools, making this a high-probability long setup.
Trade Here 👉
{future}(MOVRUSDT)
$LAB
{future}(LABUSDT)
$LSK
{future}(LSKUSDT)
#MOVR #TradeSetup #TechnicalAnalysis #WriteToEarnUpgrade #Write2Earn
⚠️ Not financial advice. Always manage your risk.
🟢 LONG $MOVR USDT (⏱️ Timeframe: 4H)
📍 Entry: 0.8200 - 0.8450
🛑 SL: 0.7850
🎯 TP1: 0.8855
🎯 TP2: 0.9277
🎯 TP3: 1.0090
$MOVRUSDT has confirmed a strong structural shift after printing a clean bottom at 0.7023. The aggressive bounce has reclaimed previous resistance levels, with buyers stepping in aggressively to defend the 0.80 psychological zone. A healthy retest of this breakout area will likely act as a launchpad for continuation toward higher liquidity pools, making this a high-probability long setup.
Trade Here 👉
$LAB
$LSK
#MOVR #TradeSetup #TechnicalAnalysis #WriteToEarnUpgrade #Write2Earn
⚠️ Not financial advice. Always manage your risk.
📍 Entry: 0.8200 - 0.8450
🛑 SL: 0.7850
🎯 TP1: 0.8855
🎯 TP2: 0.9277
🎯 TP3: 1.0090
$MOVRUSDT has confirmed a strong structural shift after printing a clean bottom at 0.7023. The aggressive bounce has reclaimed previous resistance levels, with buyers stepping in aggressively to defend the 0.80 psychological zone. A healthy retest of this breakout area will likely act as a launchpad for continuation toward higher liquidity pools, making this a high-probability long setup.
Trade Here 👉
$LAB
$LSK
#MOVR #TradeSetup #TechnicalAnalysis #WriteToEarnUpgrade #Write2Earn
⚠️ Not financial advice. Always manage your risk.
358
·
--
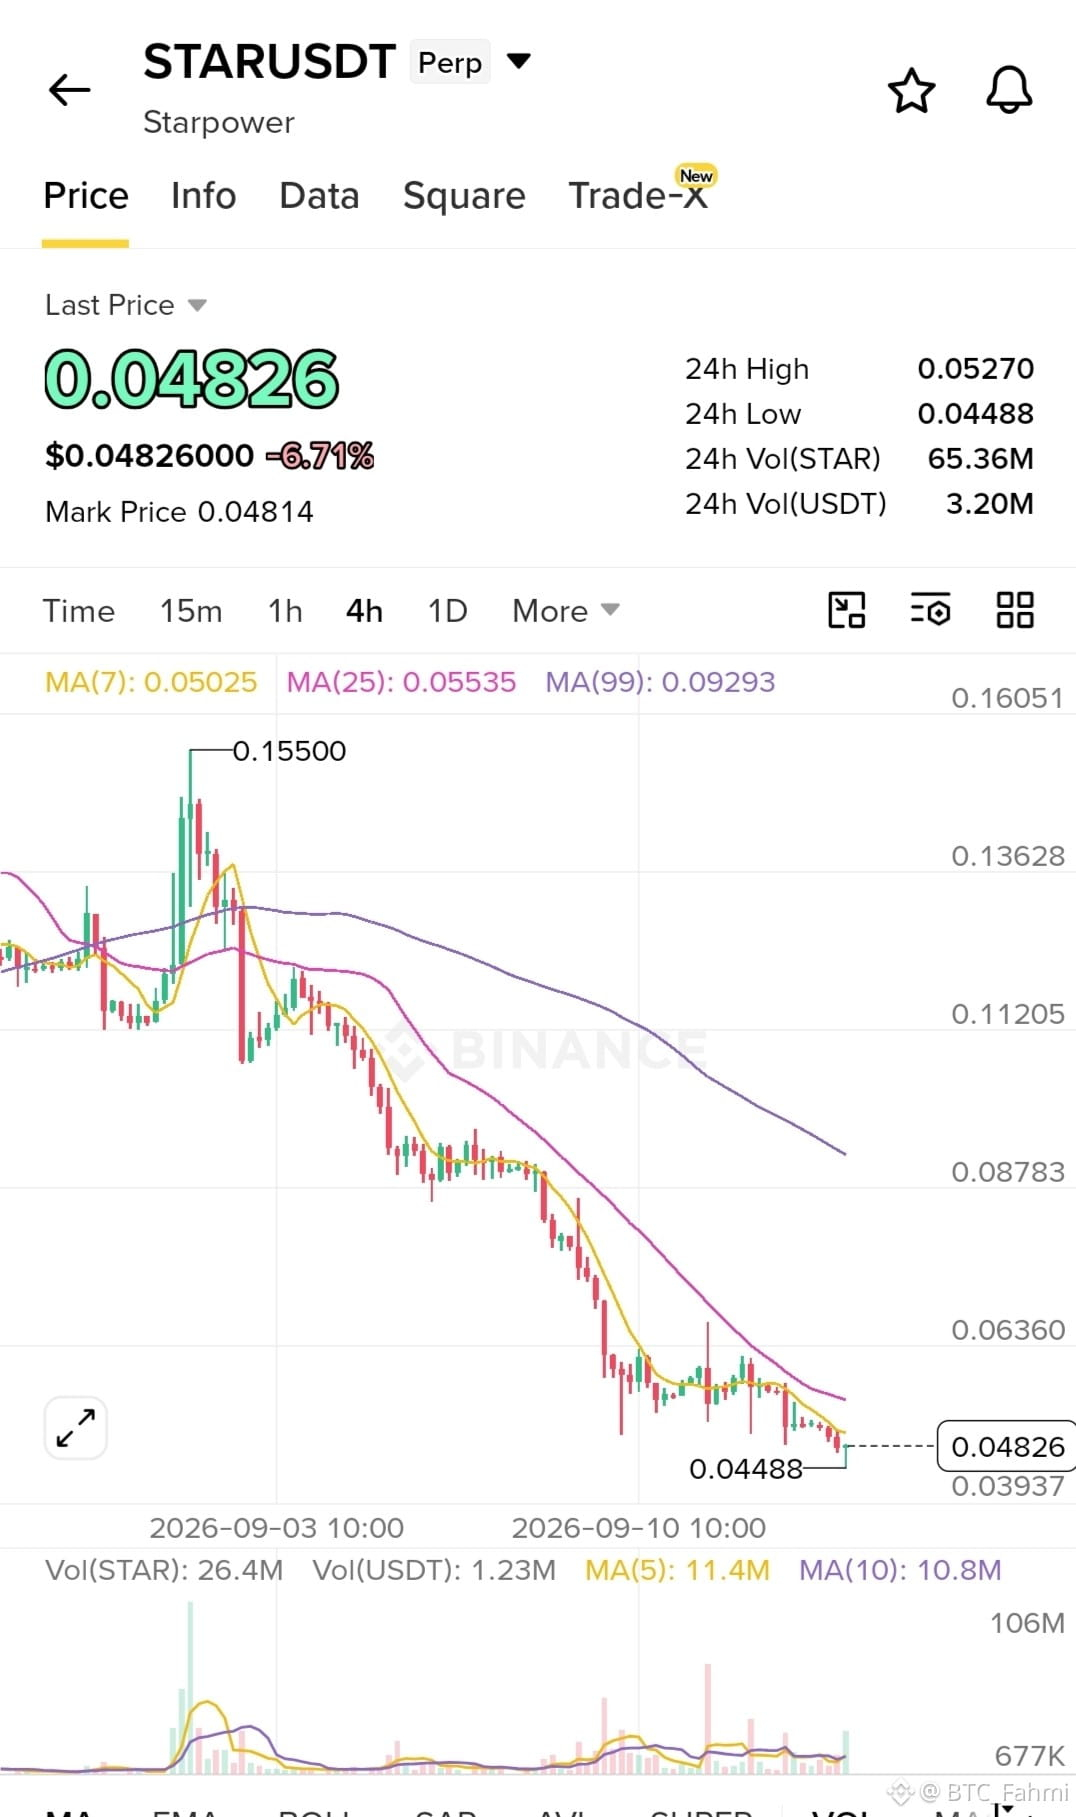
🔴 SHORT $STAR USDT (⏱️ Timeframe: 4H)
📍 Entry: 0.0490 - 0.0510
🛑 SL: 0.0545
🎯 TP1: 0.0448
🎯 TP2: 0.0400
🎯 TP3: 0.0360
The chart displays a persistent downtrend with clear lower highs and lower lows, confirming sellers are fully in control. The recent rejection from the mid-0.05 zone shows supply is dominant, and the failure to reclaim key levels suggests liquidity is sitting lower. As momentum heavily favors the downside, any minor relief rally toward the entry range will likely be met with fresh selling pressure, targeting the recent 24h low and beyond. Immediate resistance sits at 0.052, while critical support is established at 0.0448.
Trade Here 👉
{future}(STARUSDT)
$LSK
{future}(LSKUSDT)
$LAB
{future}(LABUSDT)
#STARUSDT #TradeSetup #TechnicalAnalysis #WriteToEarnUpgrade #Write2Earn
⚠️ Not financial advice. Always manage your risk.
🔴 SHORT $STAR USDT (⏱️ Timeframe: 4H)
📍 Entry: 0.0490 - 0.0510
🛑 SL: 0.0545
🎯 TP1: 0.0448
🎯 TP2: 0.0400
🎯 TP3: 0.0360
The chart displays a persistent downtrend with clear lower highs and lower lows, confirming sellers are fully in control. The recent rejection from the mid-0.05 zone shows supply is dominant, and the failure to reclaim key levels suggests liquidity is sitting lower. As momentum heavily favors the downside, any minor relief rally toward the entry range will likely be met with fresh selling pressure, targeting the recent 24h low and beyond. Immediate resistance sits at 0.052, while critical support is established at 0.0448.
Trade Here 👉
$LSK
$LAB
#STARUSDT #TradeSetup #TechnicalAnalysis #WriteToEarnUpgrade #Write2Earn
⚠️ Not financial advice. Always manage your risk.
📍 Entry: 0.0490 - 0.0510
🛑 SL: 0.0545
🎯 TP1: 0.0448
🎯 TP2: 0.0400
🎯 TP3: 0.0360
The chart displays a persistent downtrend with clear lower highs and lower lows, confirming sellers are fully in control. The recent rejection from the mid-0.05 zone shows supply is dominant, and the failure to reclaim key levels suggests liquidity is sitting lower. As momentum heavily favors the downside, any minor relief rally toward the entry range will likely be met with fresh selling pressure, targeting the recent 24h low and beyond. Immediate resistance sits at 0.052, while critical support is established at 0.0448.
Trade Here 👉
$LSK
$LAB
#STARUSDT #TradeSetup #TechnicalAnalysis #WriteToEarnUpgrade #Write2Earn
⚠️ Not financial advice. Always manage your risk.
1
1
488
Log in to explore more content
Join global crypto users on Binance Square
⚡️ Get latest and useful information about crypto.
💬 Trusted by the world’s largest crypto exchange.
👍 Discover real insights from verified creators.
Email / Phone number
Trending Topics
FedRateWatch
864,242 views
4,102 Discussing
Share & Win Traffic Reward in our Trending Hashtag Campaign
✨Topic: FOMC September, What's The Fed's Next Move?
👉How to Join:
Publish a short post or article with hashtag #FedRateWatch
Create content based on the below angles:
- August core CPI rose 0.3% month-over-month, and the odds of a 25bp hike this week are now close to 90%. Do you anticipate a rate hike this week? Is it a one-off, or the start of a longer hiking cycle?
- If the hike lands, how does it play out for BTC, tech stocks, and gold? Bullish or bearish?
- How are you planning to trade next? Share your BTC, stocks or gold trade/holdings with our trade sharing widget.
⏰Campaign Period:
- 2026-09-15 11:00 - 2026-09-17 3:00 UTC
🎁Reward:
- Qualified posts that comply with the above guidelines and contain more than 100 words will be reviewed and may receive a random traffic boost of 500 to 3,000 views. You will receive a notification from your feed secretary if your post is selected.
- Get a chance to have your article featured on Binance Square Official
Need ideas for your post? Visit the topic page #FedRateWatch or the Square Guide on How to Post for Better Reach.
Binance Square Official
·503 Likes
·1.1M views
BitcoinFalls4%
4,569 views
220 Discussing
SKHynixInTalksToMakeMemoryChipsInUS
1,369 views
53 Discussing