

Genny Cruz 1
731 Bài đăng

Genny Cruz 1
Báo cáo
Chặn người dùng
Sharing market moves, memes & mindset.
0 Đang theo dõi
4 Người theo dõi
4 Đã thích
Bài đăng
·
--
Xem bản dịch
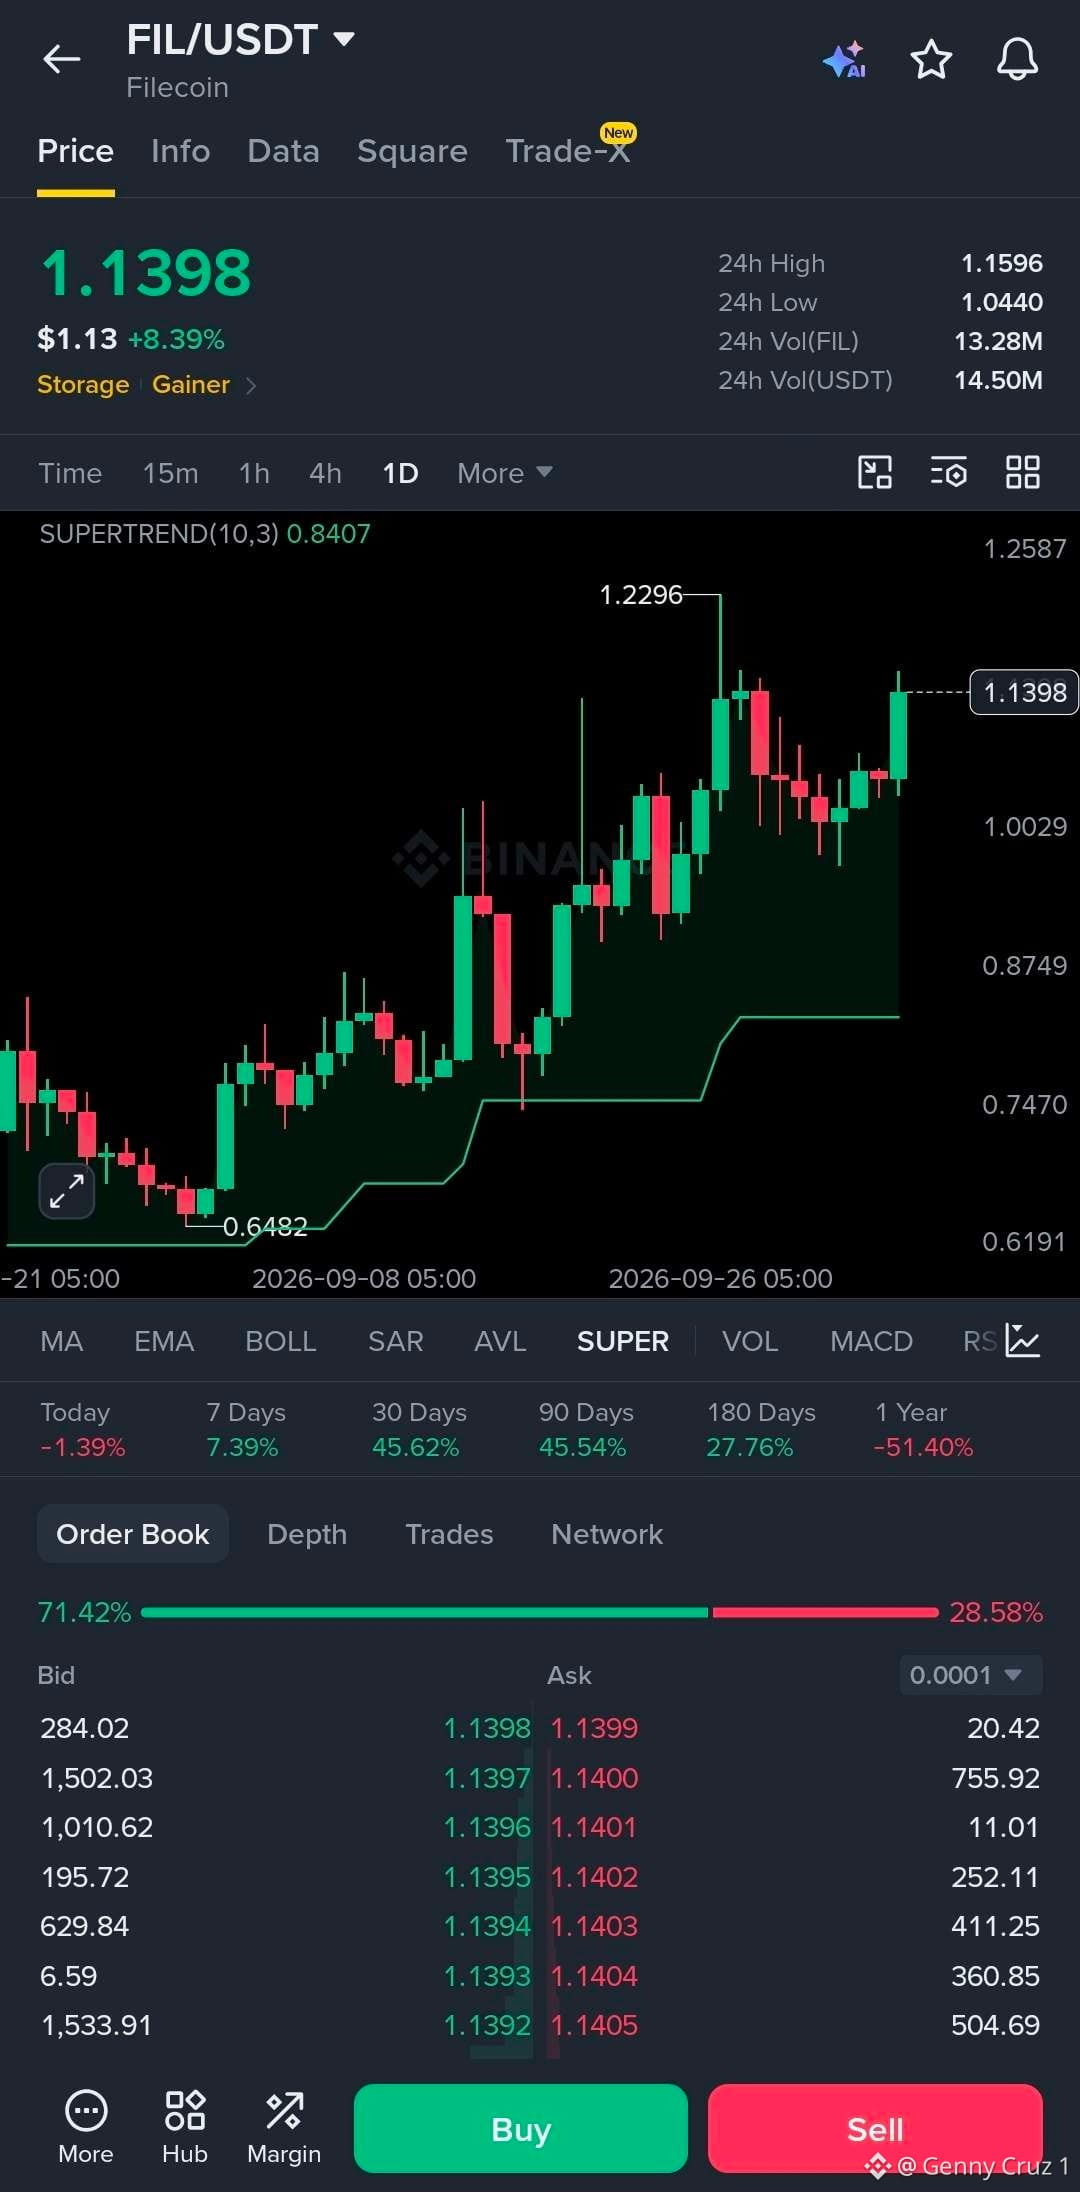
FIL is quietly putting together a pretty clean recovery structure.
$FIL is trading around $1.14, up strongly from the $0.6482 low. Price is holding well above the daily Supertrend at $0.8407, and the recent pullback was absorbed without breaking the broader structure.
What stands out is the higher low followed by another push toward the recent high. That keeps the setup constructive.
My map:
Current: $1.14
Support: $1.08–$1.10
Major support: $1.00–$1.03
Key resistance: $1.16–$1.23
Target 1: $1.25
Target 2: $1.35
Target 3: $1.45+
The level I’m watching is $1.23.
FIL already printed $1.2296, so a clean reclaim and daily close above that level could open the way toward $1.25 and $1.35.
The chart doesn’t need a dramatic move here. It just needs to keep making higher lows and respect the $1.08–$1.10 area.
Hold the structure, reclaim $1.23, and FIL starts looking seriously interesting.
#FIL
FIL is quietly putting together a pretty clean recovery structure.
$FIL is trading around $1.14, up strongly from the $0.6482 low. Price is holding well above the daily Supertrend at $0.8407, and the recent pullback was absorbed without breaking the broader structure.
What stands out is the higher low followed by another push toward the recent high. That keeps the setup constructive.
My map:
Current: $1.14
Support: $1.08–$1.10
Major support: $1.00–$1.03
Key resistance: $1.16–$1.23
Target 1: $1.25
Target 2: $1.35
Target 3: $1.45+
The level I’m watching is $1.23.
FIL already printed $1.2296, so a clean reclaim and daily close above that level could open the way toward $1.25 and $1.35.
The chart doesn’t need a dramatic move here. It just needs to keep making higher lows and respect the $1.08–$1.10 area.
Hold the structure, reclaim $1.23, and FIL starts looking seriously interesting.
#FIL
$FIL is trading around $1.14, up strongly from the $0.6482 low. Price is holding well above the daily Supertrend at $0.8407, and the recent pullback was absorbed without breaking the broader structure.
What stands out is the higher low followed by another push toward the recent high. That keeps the setup constructive.
My map:
Current: $1.14
Support: $1.08–$1.10
Major support: $1.00–$1.03
Key resistance: $1.16–$1.23
Target 1: $1.25
Target 2: $1.35
Target 3: $1.45+
The level I’m watching is $1.23.
FIL already printed $1.2296, so a clean reclaim and daily close above that level could open the way toward $1.25 and $1.35.
The chart doesn’t need a dramatic move here. It just needs to keep making higher lows and respect the $1.08–$1.10 area.
Hold the structure, reclaim $1.23, and FIL starts looking seriously interesting.
#FIL
15
·
--
Xem bản dịch
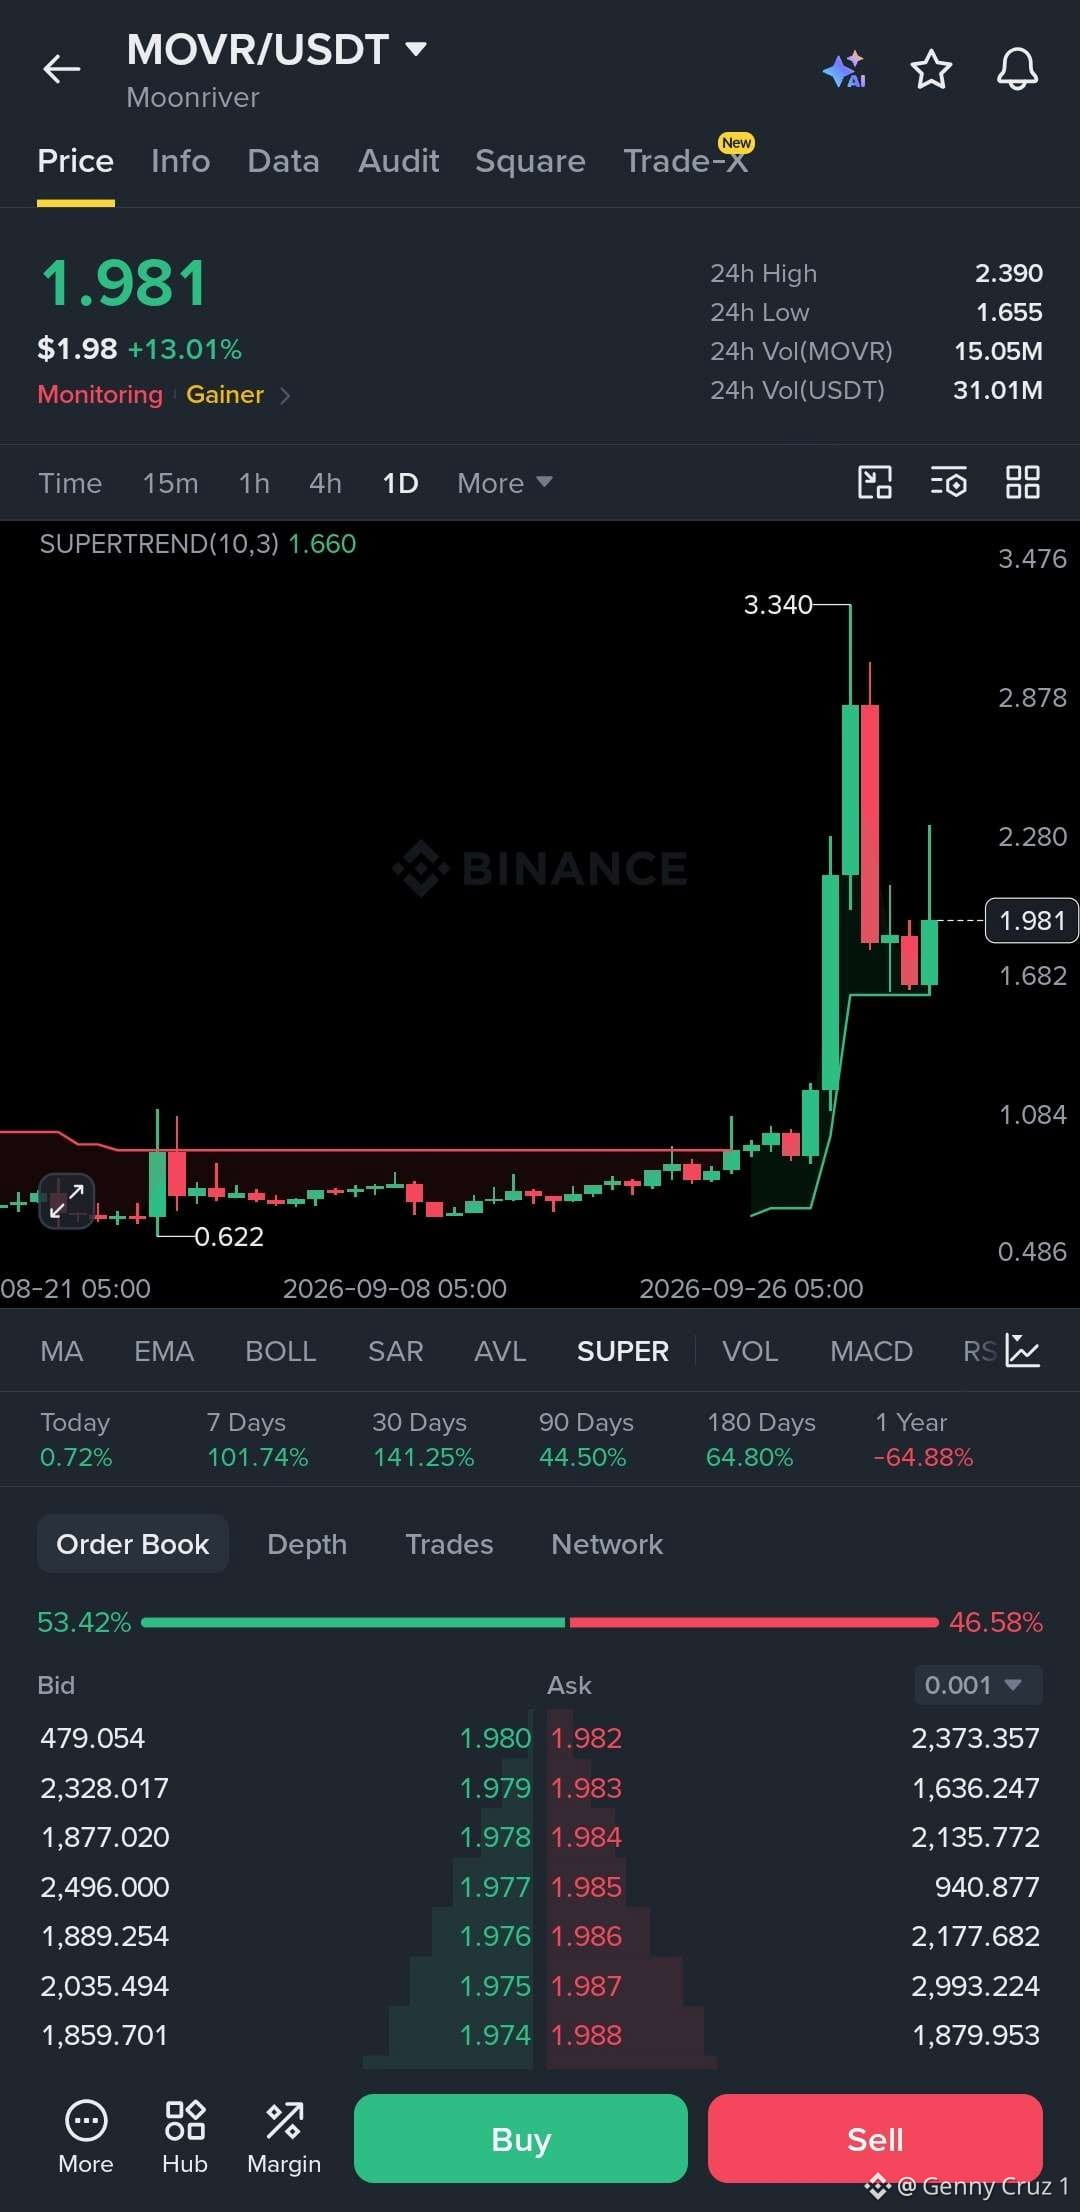
MOVR has already made the big move. Now the question is whether it can be built on it.
$MOVR is trading around $1.98 after an aggressive move from the $0.62 area. Price spiked to $3.34, pulled back sharply, and is now trying to stabilize above the daily Supertrend at $1.66.
That recovery is the part I’m watching.
My map:
Current: $1.98
Support: $1.65–$1.70
Key support: $1.80–$1.85
Resistance: $2.28–$2.40
Major resistance: $2.88–$3.00
Target 1: $2.40
Target 2: $2.90
Target 3: $3.34
The key level now is $2.28.
A clean reclaim would show that buyers are starting to absorb the supply left from the sharp rejection. If that happens, the $2.90–$3.00 region becomes the next area to watch.
I would not chase after a move this extended. The cleaner setup is price $1.65–$1.70 and gradually reclaims resistance.
MOVR has momentum. Now it needs structure.
#MOVR
MOVR has already made the big move. Now the question is whether it can be built on it.
$MOVR is trading around $1.98 after an aggressive move from the $0.62 area. Price spiked to $3.34, pulled back sharply, and is now trying to stabilize above the daily Supertrend at $1.66.
That recovery is the part I’m watching.
My map:
Current: $1.98
Support: $1.65–$1.70
Key support: $1.80–$1.85
Resistance: $2.28–$2.40
Major resistance: $2.88–$3.00
Target 1: $2.40
Target 2: $2.90
Target 3: $3.34
The key level now is $2.28.
A clean reclaim would show that buyers are starting to absorb the supply left from the sharp rejection. If that happens, the $2.90–$3.00 region becomes the next area to watch.
I would not chase after a move this extended. The cleaner setup is price $1.65–$1.70 and gradually reclaims resistance.
MOVR has momentum. Now it needs structure.
#MOVR
$MOVR is trading around $1.98 after an aggressive move from the $0.62 area. Price spiked to $3.34, pulled back sharply, and is now trying to stabilize above the daily Supertrend at $1.66.
That recovery is the part I’m watching.
My map:
Current: $1.98
Support: $1.65–$1.70
Key support: $1.80–$1.85
Resistance: $2.28–$2.40
Major resistance: $2.88–$3.00
Target 1: $2.40
Target 2: $2.90
Target 3: $3.34
The key level now is $2.28.
A clean reclaim would show that buyers are starting to absorb the supply left from the sharp rejection. If that happens, the $2.90–$3.00 region becomes the next area to watch.
I would not chase after a move this extended. The cleaner setup is price $1.65–$1.70 and gradually reclaims resistance.
MOVR has momentum. Now it needs structure.
#MOVR
16
·
--
Xem bản dịch
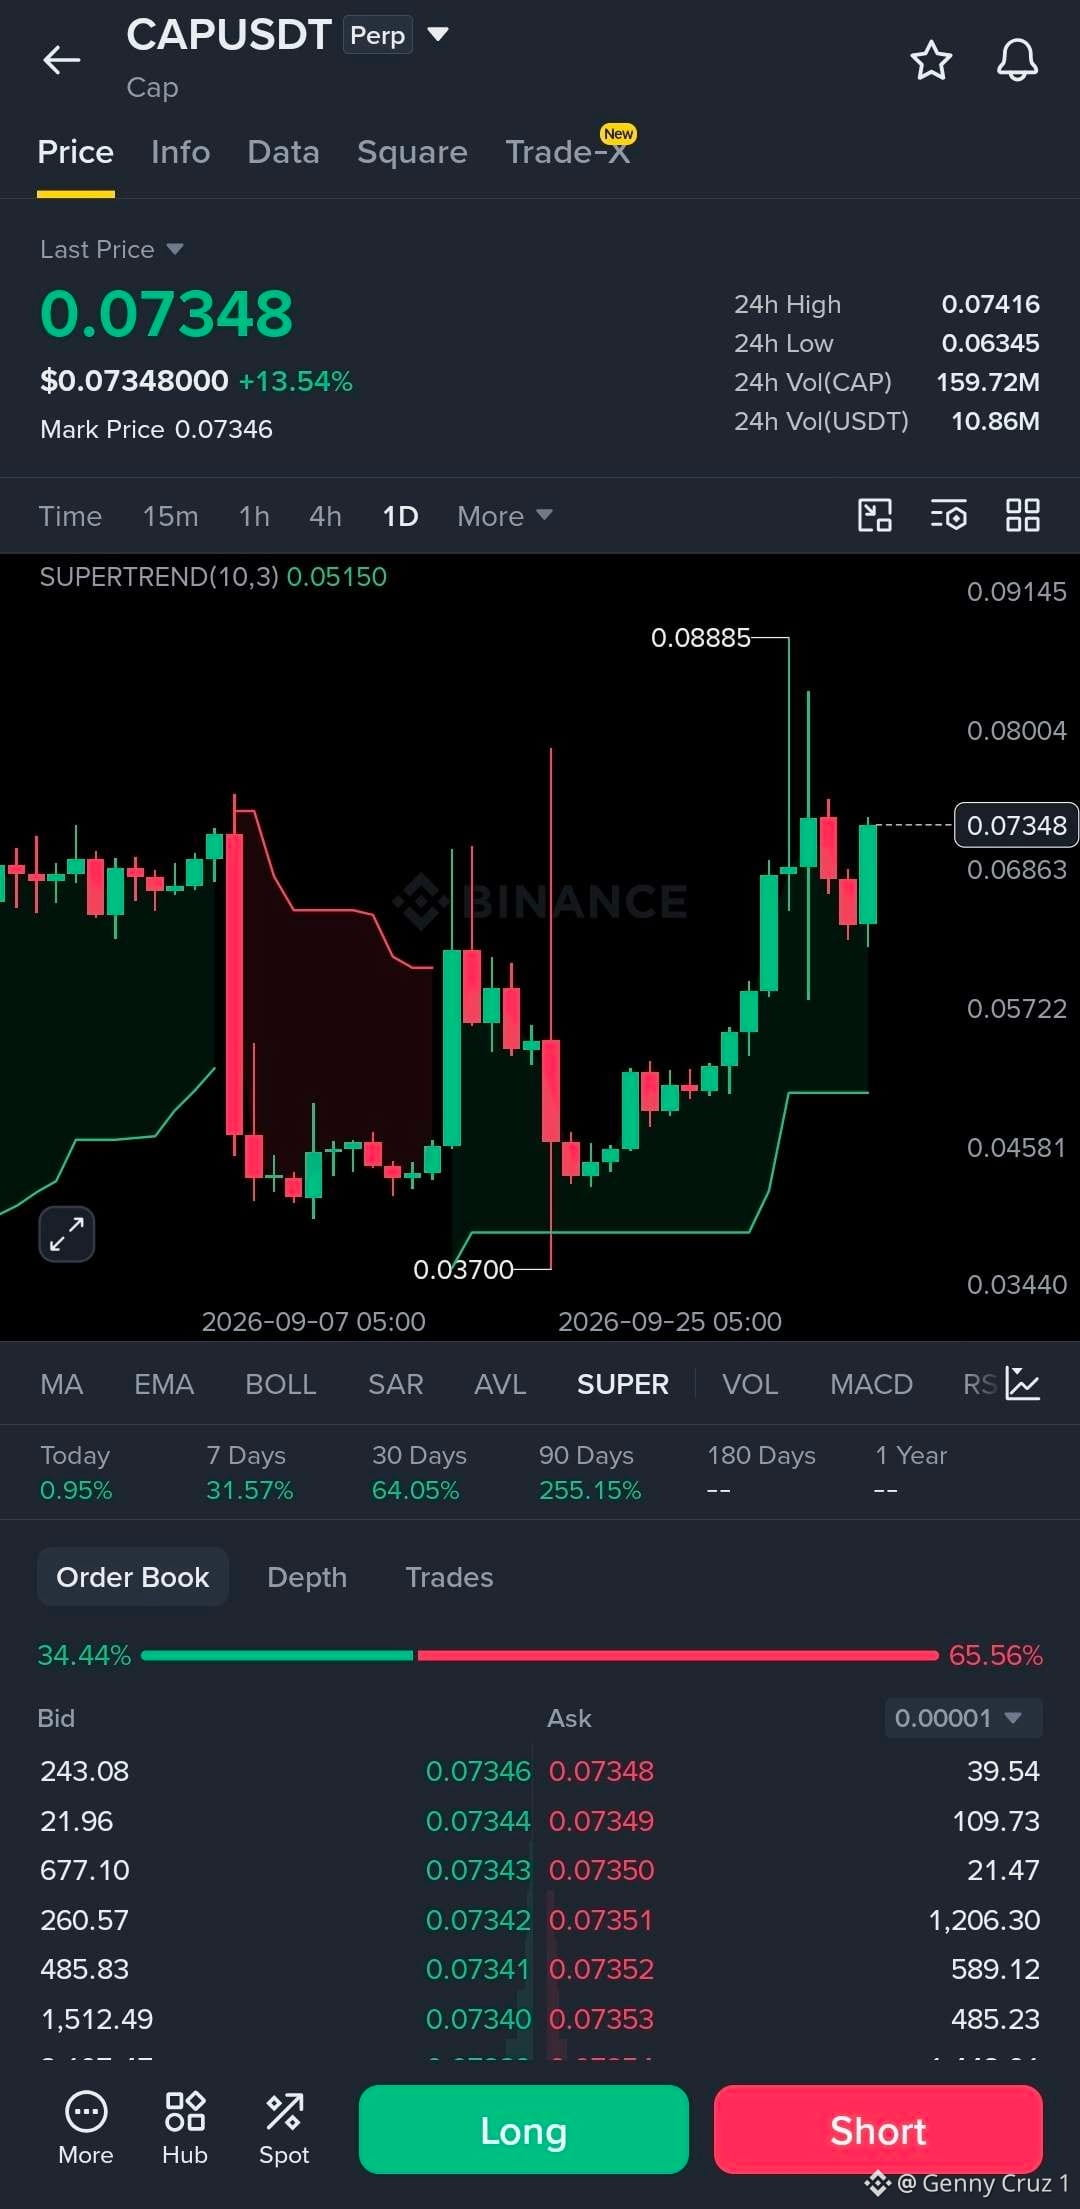
CAP is holding the breakout zone well, and the daily structure has shifted nicely in buyers’ favor.
$CAP is trading around $0.0735, up strongly from the $0.0370 low. The daily Supertrend has flipped bullish at $0.0515, while price continues to hold comfortably above it.
What I like here is the recovery structure. After breaking out of the previous range, CAP pulled back and buyers stepped in again instead of letting price lose the move.
My map:
Current: $0.0735
Support: $0.0680–$0.0700
Major support: $0.0600–$0.0630
Resistance: $0.0740–$0.0750
Target 1: $0.0800
Target 2: $0.0888
Target 3: $0.0950+
The level I’m watching is $0.0750.
A clean daily break above this area would put the previous $0.08885 high back in play.
One thing to keep in mind: the order book currently shows heavier sell-side liquidity, so I’d rather see price absorb that supply than chase the move.
Hold $0.068–$0.070 and reclaim $0.075, and the setup gets considerably cleaner.
#cap
CAP is holding the breakout zone well, and the daily structure has shifted nicely in buyers’ favor.
$CAP is trading around $0.0735, up strongly from the $0.0370 low. The daily Supertrend has flipped bullish at $0.0515, while price continues to hold comfortably above it.
What I like here is the recovery structure. After breaking out of the previous range, CAP pulled back and buyers stepped in again instead of letting price lose the move.
My map:
Current: $0.0735
Support: $0.0680–$0.0700
Major support: $0.0600–$0.0630
Resistance: $0.0740–$0.0750
Target 1: $0.0800
Target 2: $0.0888
Target 3: $0.0950+
The level I’m watching is $0.0750.
A clean daily break above this area would put the previous $0.08885 high back in play.
One thing to keep in mind: the order book currently shows heavier sell-side liquidity, so I’d rather see price absorb that supply than chase the move.
Hold $0.068–$0.070 and reclaim $0.075, and the setup gets considerably cleaner.
#cap
$CAP is trading around $0.0735, up strongly from the $0.0370 low. The daily Supertrend has flipped bullish at $0.0515, while price continues to hold comfortably above it.
What I like here is the recovery structure. After breaking out of the previous range, CAP pulled back and buyers stepped in again instead of letting price lose the move.
My map:
Current: $0.0735
Support: $0.0680–$0.0700
Major support: $0.0600–$0.0630
Resistance: $0.0740–$0.0750
Target 1: $0.0800
Target 2: $0.0888
Target 3: $0.0950+
The level I’m watching is $0.0750.
A clean daily break above this area would put the previous $0.08885 high back in play.
One thing to keep in mind: the order book currently shows heavier sell-side liquidity, so I’d rather see price absorb that supply than chase the move.
Hold $0.068–$0.070 and reclaim $0.075, and the setup gets considerably cleaner.
#cap
42
·
--
Xem bản dịch
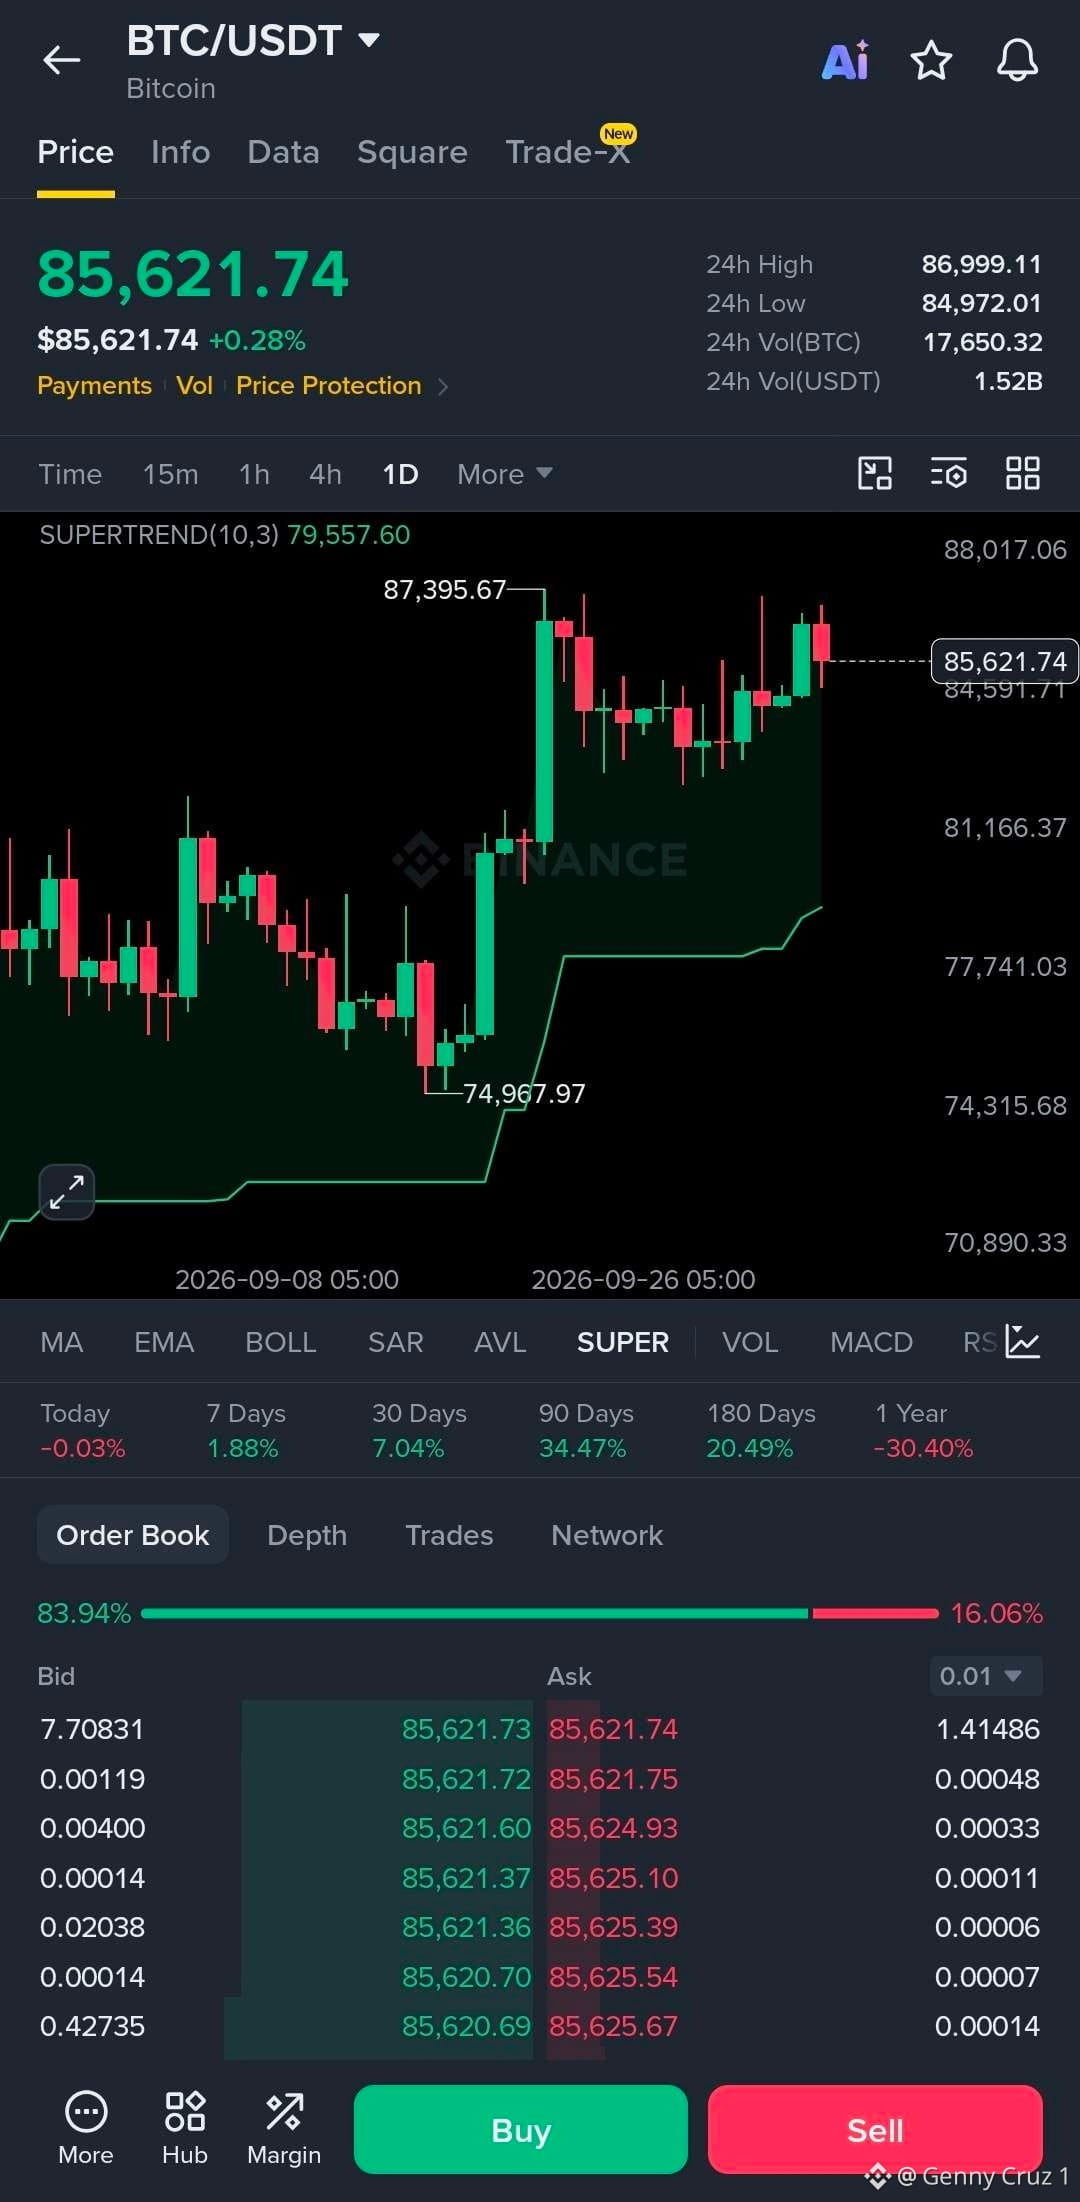
BTC is still holding the higher range, and this structure deserves attention.
$BTC is sitting around $85.6K, with the daily Supertrend at $79.5K. After the strong move from $74.9K to $87.4K, the price has been consolidating near the highs without losing the broader structure.
That is the part I like here.
My map:
Current: $85.6K
Support: $84K–$85K
Major support: $81K–$82K
Key resistance: $87.4K
Target 1: $90K
Target 2: $93K
Target 3: $95K–$97K
The real test remains $87.4K.
A clean daily reclaim above the previous high would give the BTC room to start exploring the $90K+ area.
For now, I’m not forcing a breakout narrative. BTC is simply holding its ground, and that is exactly what I want to see before the next move.
Hold $84K–$85K and reclaim $87.4K, and the chart starts looking very clean.
#BTC
BTC is still holding the higher range, and this structure deserves attention.
$BTC is sitting around $85.6K, with the daily Supertrend at $79.5K. After the strong move from $74.9K to $87.4K, the price has been consolidating near the highs without losing the broader structure.
That is the part I like here.
My map:
Current: $85.6K
Support: $84K–$85K
Major support: $81K–$82K
Key resistance: $87.4K
Target 1: $90K
Target 2: $93K
Target 3: $95K–$97K
The real test remains $87.4K.
A clean daily reclaim above the previous high would give the BTC room to start exploring the $90K+ area.
For now, I’m not forcing a breakout narrative. BTC is simply holding its ground, and that is exactly what I want to see before the next move.
Hold $84K–$85K and reclaim $87.4K, and the chart starts looking very clean.
#BTC
$BTC is sitting around $85.6K, with the daily Supertrend at $79.5K. After the strong move from $74.9K to $87.4K, the price has been consolidating near the highs without losing the broader structure.
That is the part I like here.
My map:
Current: $85.6K
Support: $84K–$85K
Major support: $81K–$82K
Key resistance: $87.4K
Target 1: $90K
Target 2: $93K
Target 3: $95K–$97K
The real test remains $87.4K.
A clean daily reclaim above the previous high would give the BTC room to start exploring the $90K+ area.
For now, I’m not forcing a breakout narrative. BTC is simply holding its ground, and that is exactly what I want to see before the next move.
Hold $84K–$85K and reclaim $87.4K, and the chart starts looking very clean.
#BTC
51
·
--
Xem bản dịch
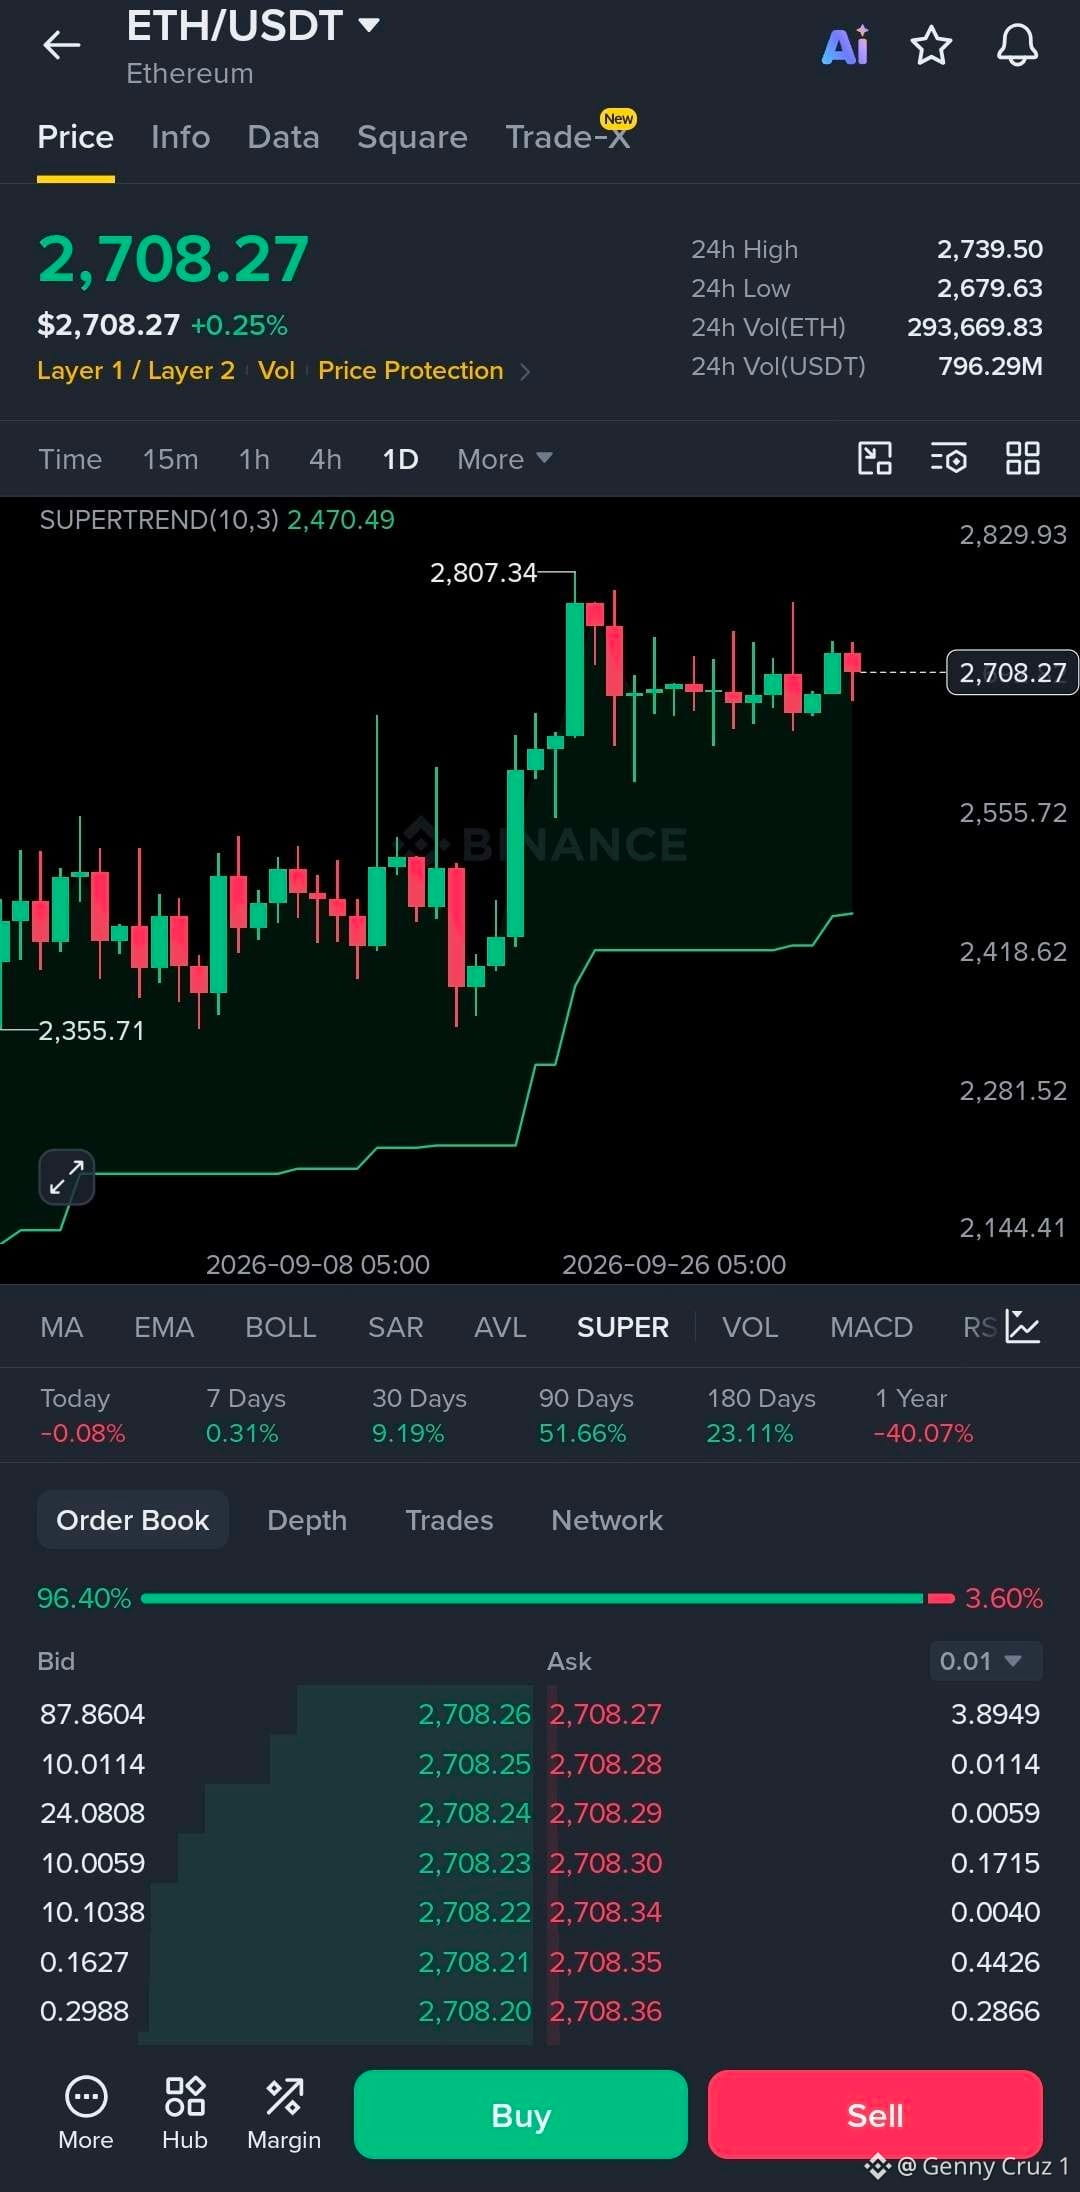
ETH is doing something I actually like here: holding the breakout instead of giving it all back.
$ETH is around $2,708, still well above the daily Supertrend at $2,470. After pushing into $2,807, the price has spent several sessions consolidating near the highs. That kind of price action keeps the structure clean as long as buyers continue defending the range.
My map:
Current: $2,708
Support: $2,660–$2,680
Major support: $2,550–$2,600
Key resistance: $2,750–$2,810
Target 1: $2,900
Target 2: $3,000
Target 3: $3,050+
The real test is $2,750–$2,810.
A clean daily reclaim of that zone would put the recent $2,807 high behind us and make the $3K area a much more realistic next objective.
I’m not looking for a random breakout candle here. I want to see ETH hold the higher range, take resistance properly, and then build from there.
So far, the chart is doing its job. Let price confirm the next move.
#ETH
ETH is doing something I actually like here: holding the breakout instead of giving it all back.
$ETH is around $2,708, still well above the daily Supertrend at $2,470. After pushing into $2,807, the price has spent several sessions consolidating near the highs. That kind of price action keeps the structure clean as long as buyers continue defending the range.
My map:
Current: $2,708
Support: $2,660–$2,680
Major support: $2,550–$2,600
Key resistance: $2,750–$2,810
Target 1: $2,900
Target 2: $3,000
Target 3: $3,050+
The real test is $2,750–$2,810.
A clean daily reclaim of that zone would put the recent $2,807 high behind us and make the $3K area a much more realistic next objective.
I’m not looking for a random breakout candle here. I want to see ETH hold the higher range, take resistance properly, and then build from there.
So far, the chart is doing its job. Let price confirm the next move.
#ETH
$ETH is around $2,708, still well above the daily Supertrend at $2,470. After pushing into $2,807, the price has spent several sessions consolidating near the highs. That kind of price action keeps the structure clean as long as buyers continue defending the range.
My map:
Current: $2,708
Support: $2,660–$2,680
Major support: $2,550–$2,600
Key resistance: $2,750–$2,810
Target 1: $2,900
Target 2: $3,000
Target 3: $3,050+
The real test is $2,750–$2,810.
A clean daily reclaim of that zone would put the recent $2,807 high behind us and make the $3K area a much more realistic next objective.
I’m not looking for a random breakout candle here. I want to see ETH hold the higher range, take resistance properly, and then build from there.
So far, the chart is doing its job. Let price confirm the next move.
#ETH
65
·
--
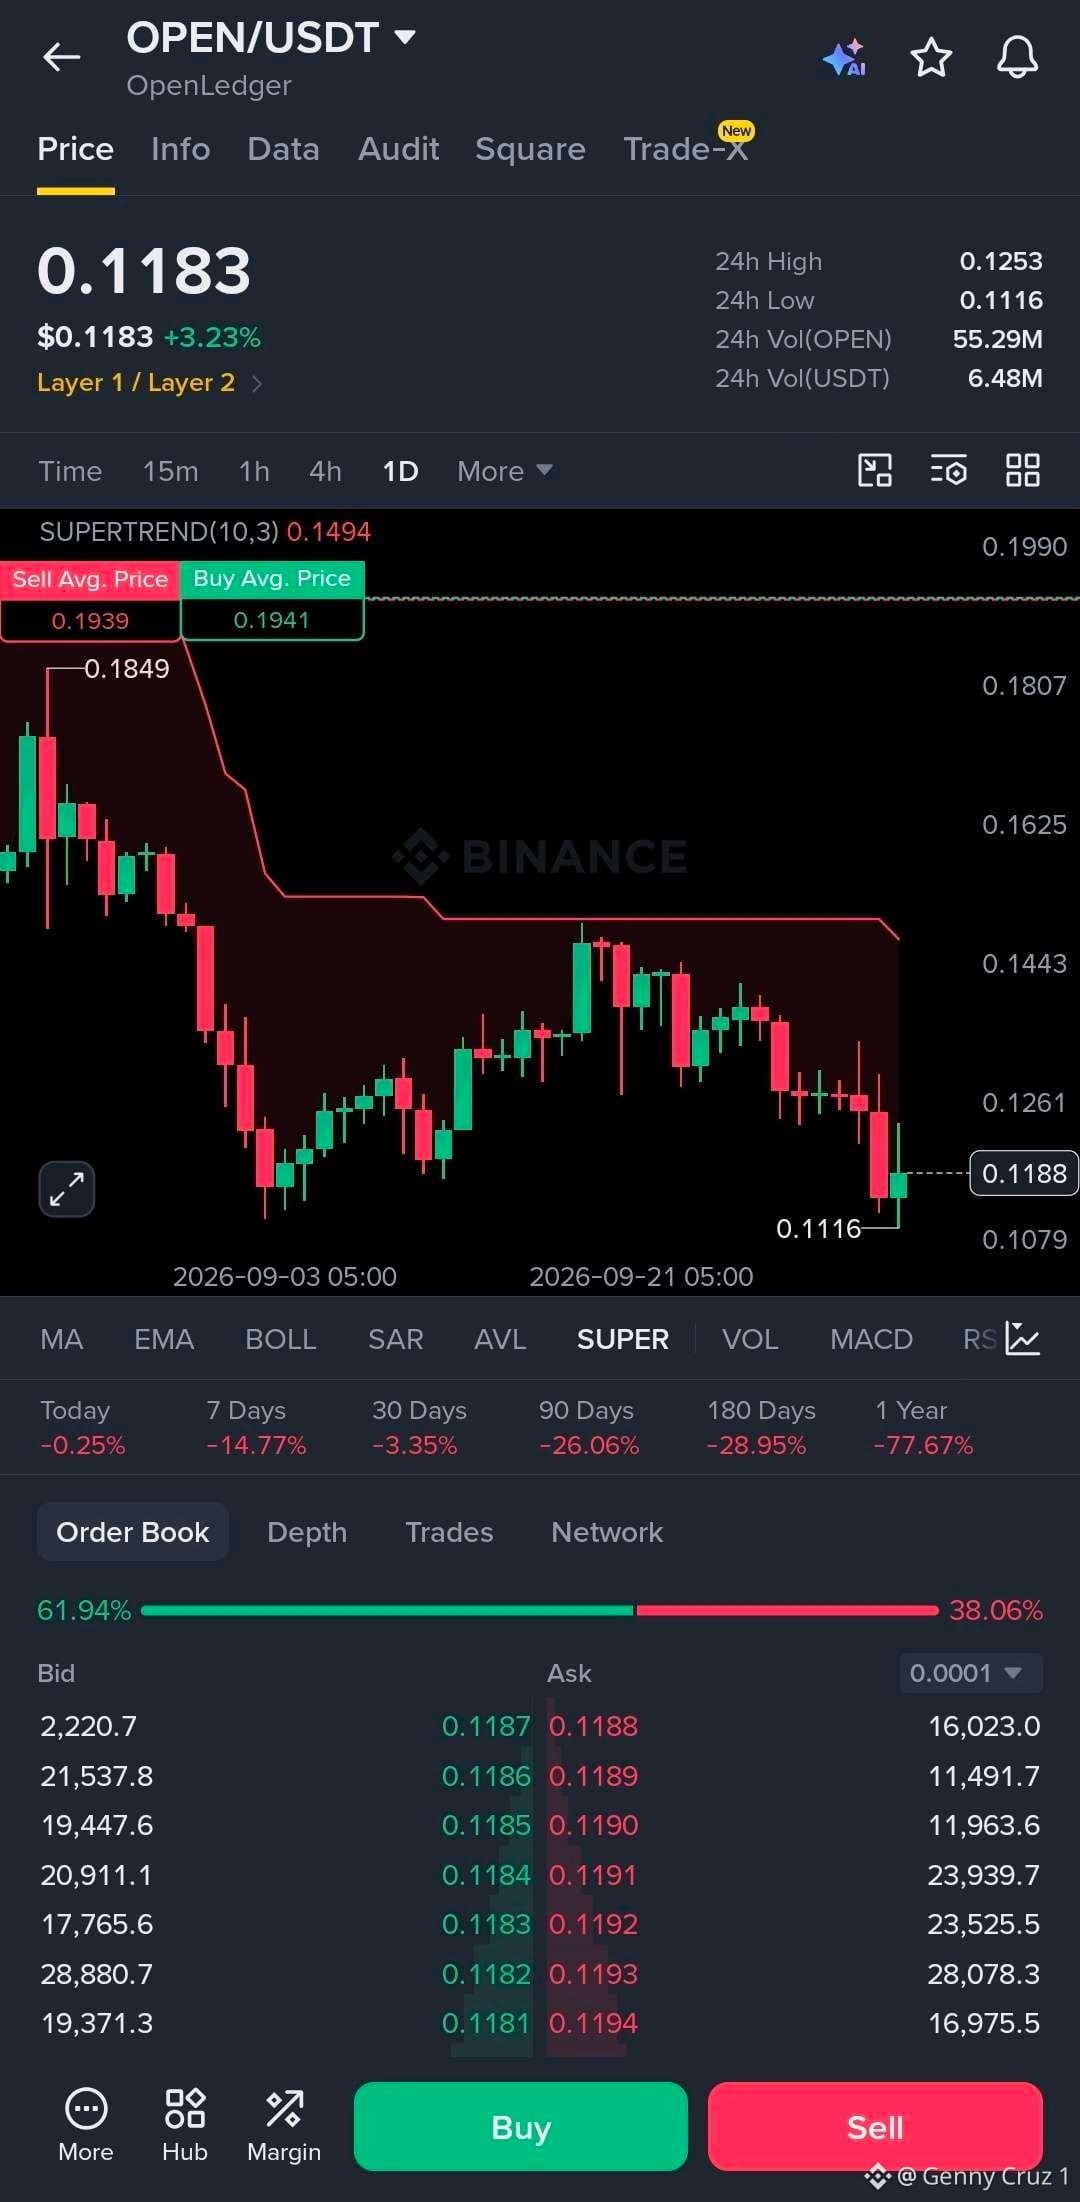
OPEN đang ở một mức độ quan trọng, và nước đi tiếp theo có thể quyết định cấu trúc ngắn hạn.
$OPEN đang giao dịch quanh $0.1183, sau một đợt sụt giảm mạnh từ vùng $0.1849. Supertrend khung ngày vẫn đang giảm (bearish) tại $0.1494, vì vậy biểu đồ này vẫn cần thêm xác nhận trước khi gọi một đợt đảo chiều xu hướng.
Dưới đây là bản đồ của tôi:
Hiện tại: $0.1183
Hỗ trợ: $0.1116–$0.1150
Kháng cự quan trọng: $0.1260–$0.1300
Kháng cự chính: $0.1440–$0.1495
Mục tiêu 1: $0.1350
Mục tiêu 2: $0.1450
Mục tiêu 3: $0.1600
Mức tôi đang theo dõi nhiều nhất là $0.1260.
Việc giành lại (reclaim) vùng đó sẽ là dấu hiệu đầu tiên cho thấy bên mua bắt đầu lấy lại quyền kiểm soát. Trên $0.1495, cấu trúc khung ngày sẽ trông khỏe hơn đáng kể.
Tạm thời, $0.1116 là đường mà tôi không muốn thấy bị mất.
Nếu giữ vững tại đây rồi giành lại $0.126, có thể giúp OPEN có một kịch bản phục hồi rõ ràng và sạch sẽ hơn.
#open
OPEN đang ở một mức độ quan trọng, và nước đi tiếp theo có thể quyết định cấu trúc ngắn hạn.
$OPEN đang giao dịch quanh $0.1183, sau một đợt sụt giảm mạnh từ vùng $0.1849. Supertrend khung ngày vẫn đang giảm (bearish) tại $0.1494, vì vậy biểu đồ này vẫn cần thêm xác nhận trước khi gọi một đợt đảo chiều xu hướng.
Dưới đây là bản đồ của tôi:
Hiện tại: $0.1183
Hỗ trợ: $0.1116–$0.1150
Kháng cự quan trọng: $0.1260–$0.1300
Kháng cự chính: $0.1440–$0.1495
Mục tiêu 1: $0.1350
Mục tiêu 2: $0.1450
Mục tiêu 3: $0.1600
Mức tôi đang theo dõi nhiều nhất là $0.1260.
Việc giành lại (reclaim) vùng đó sẽ là dấu hiệu đầu tiên cho thấy bên mua bắt đầu lấy lại quyền kiểm soát. Trên $0.1495, cấu trúc khung ngày sẽ trông khỏe hơn đáng kể.
Tạm thời, $0.1116 là đường mà tôi không muốn thấy bị mất.
Nếu giữ vững tại đây rồi giành lại $0.126, có thể giúp OPEN có một kịch bản phục hồi rõ ràng và sạch sẽ hơn.
#open
$OPEN đang giao dịch quanh $0.1183, sau một đợt sụt giảm mạnh từ vùng $0.1849. Supertrend khung ngày vẫn đang giảm (bearish) tại $0.1494, vì vậy biểu đồ này vẫn cần thêm xác nhận trước khi gọi một đợt đảo chiều xu hướng.
Dưới đây là bản đồ của tôi:
Hiện tại: $0.1183
Hỗ trợ: $0.1116–$0.1150
Kháng cự quan trọng: $0.1260–$0.1300
Kháng cự chính: $0.1440–$0.1495
Mục tiêu 1: $0.1350
Mục tiêu 2: $0.1450
Mục tiêu 3: $0.1600
Mức tôi đang theo dõi nhiều nhất là $0.1260.
Việc giành lại (reclaim) vùng đó sẽ là dấu hiệu đầu tiên cho thấy bên mua bắt đầu lấy lại quyền kiểm soát. Trên $0.1495, cấu trúc khung ngày sẽ trông khỏe hơn đáng kể.
Tạm thời, $0.1116 là đường mà tôi không muốn thấy bị mất.
Nếu giữ vững tại đây rồi giành lại $0.126, có thể giúp OPEN có một kịch bản phục hồi rõ ràng và sạch sẽ hơn.
#open
25
·
--
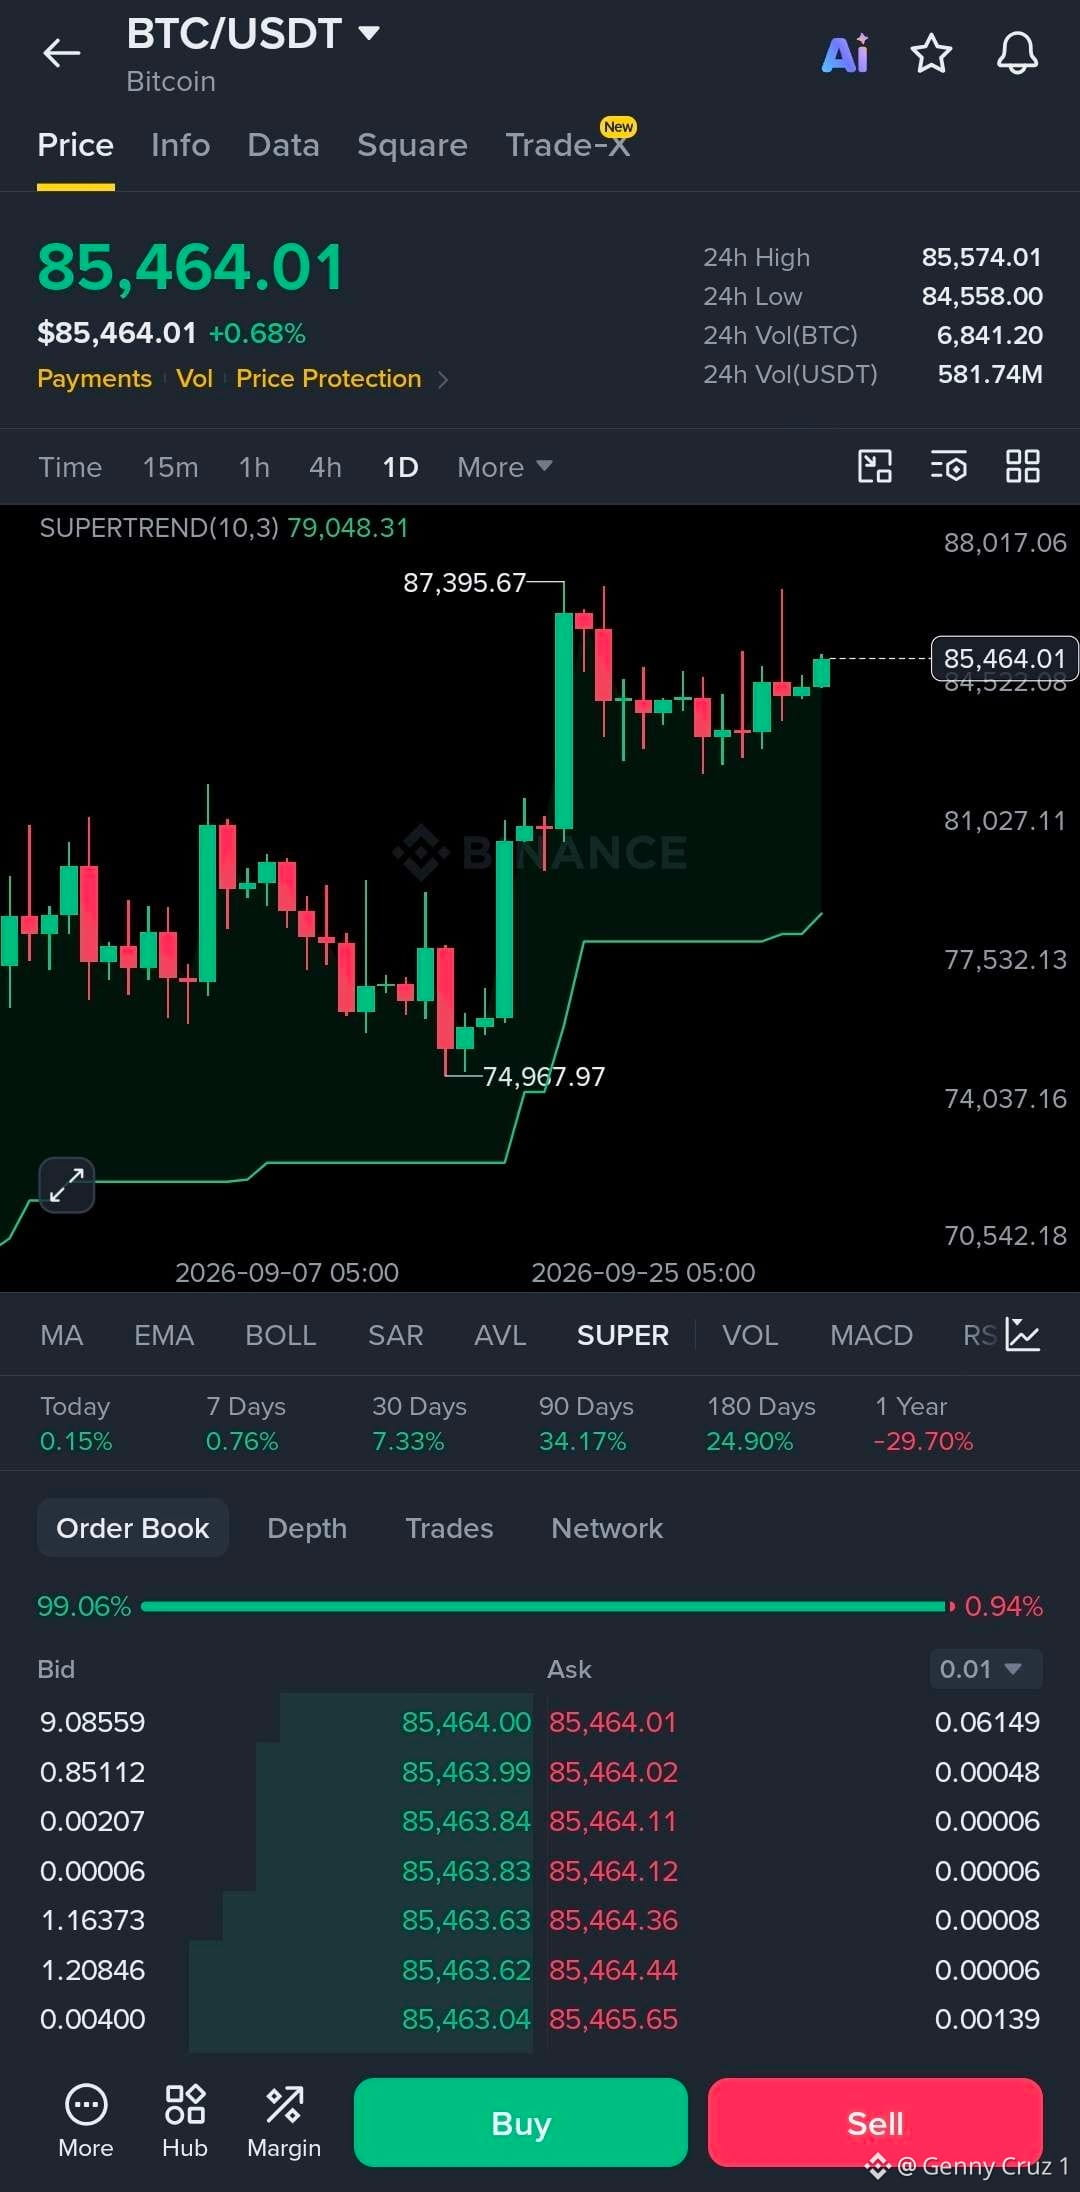
Bitcoin đang củng cố dưới vùng kháng cự, nhưng cấu trúc vẫn trông có vẻ tích cực.
$BTC đang giao dịch quanh $85,464, giữ vững tốt phía trên Supertrend khung ngày ở $79,048. Sau đợt tăng mạnh từ $74,968 lên $87,395, giá đã xây dựng một vùng tích lũy thay vì quay lại toàn bộ mức tăng.
Dưới đây là bản đồ của tôi:
Hiện tại: $85,464
Hỗ trợ: $83,500–$84,000
Hỗ trợ chính: $81,000–$82,000
Vùng bứt phá: $87,400–$88,000
Mục tiêu 1: $90,000
Mục tiêu 2: $93,000
Mục tiêu 3: $95,000+
Mức then chốt là $87,400.
Bứt phá khung ngày rõ ràng và giữ được trên đỉnh trước đó có thể đưa BTC sang giai đoạn mở rộng tiếp theo. Cho đến lúc đó, đây vẫn là trạng thái củng cố dưới vùng kháng cự.
Tôi đang theo dõi sát vùng dao động này, nhưng tôi thà chờ tín hiệu xác nhận hơn là đuổi theo biến động.
Giữ trên $83.5K và giành lại $87.4K, thì kịch bản sẽ mạnh lên đáng kể.
#BTC
Bitcoin đang củng cố dưới vùng kháng cự, nhưng cấu trúc vẫn trông có vẻ tích cực.
$BTC đang giao dịch quanh $85,464, giữ vững tốt phía trên Supertrend khung ngày ở $79,048. Sau đợt tăng mạnh từ $74,968 lên $87,395, giá đã xây dựng một vùng tích lũy thay vì quay lại toàn bộ mức tăng.
Dưới đây là bản đồ của tôi:
Hiện tại: $85,464
Hỗ trợ: $83,500–$84,000
Hỗ trợ chính: $81,000–$82,000
Vùng bứt phá: $87,400–$88,000
Mục tiêu 1: $90,000
Mục tiêu 2: $93,000
Mục tiêu 3: $95,000+
Mức then chốt là $87,400.
Bứt phá khung ngày rõ ràng và giữ được trên đỉnh trước đó có thể đưa BTC sang giai đoạn mở rộng tiếp theo. Cho đến lúc đó, đây vẫn là trạng thái củng cố dưới vùng kháng cự.
Tôi đang theo dõi sát vùng dao động này, nhưng tôi thà chờ tín hiệu xác nhận hơn là đuổi theo biến động.
Giữ trên $83.5K và giành lại $87.4K, thì kịch bản sẽ mạnh lên đáng kể.
#BTC
$BTC đang giao dịch quanh $85,464, giữ vững tốt phía trên Supertrend khung ngày ở $79,048. Sau đợt tăng mạnh từ $74,968 lên $87,395, giá đã xây dựng một vùng tích lũy thay vì quay lại toàn bộ mức tăng.
Dưới đây là bản đồ của tôi:
Hiện tại: $85,464
Hỗ trợ: $83,500–$84,000
Hỗ trợ chính: $81,000–$82,000
Vùng bứt phá: $87,400–$88,000
Mục tiêu 1: $90,000
Mục tiêu 2: $93,000
Mục tiêu 3: $95,000+
Mức then chốt là $87,400.
Bứt phá khung ngày rõ ràng và giữ được trên đỉnh trước đó có thể đưa BTC sang giai đoạn mở rộng tiếp theo. Cho đến lúc đó, đây vẫn là trạng thái củng cố dưới vùng kháng cự.
Tôi đang theo dõi sát vùng dao động này, nhưng tôi thà chờ tín hiệu xác nhận hơn là đuổi theo biến động.
Giữ trên $83.5K và giành lại $87.4K, thì kịch bản sẽ mạnh lên đáng kể.
#BTC
23
·
--
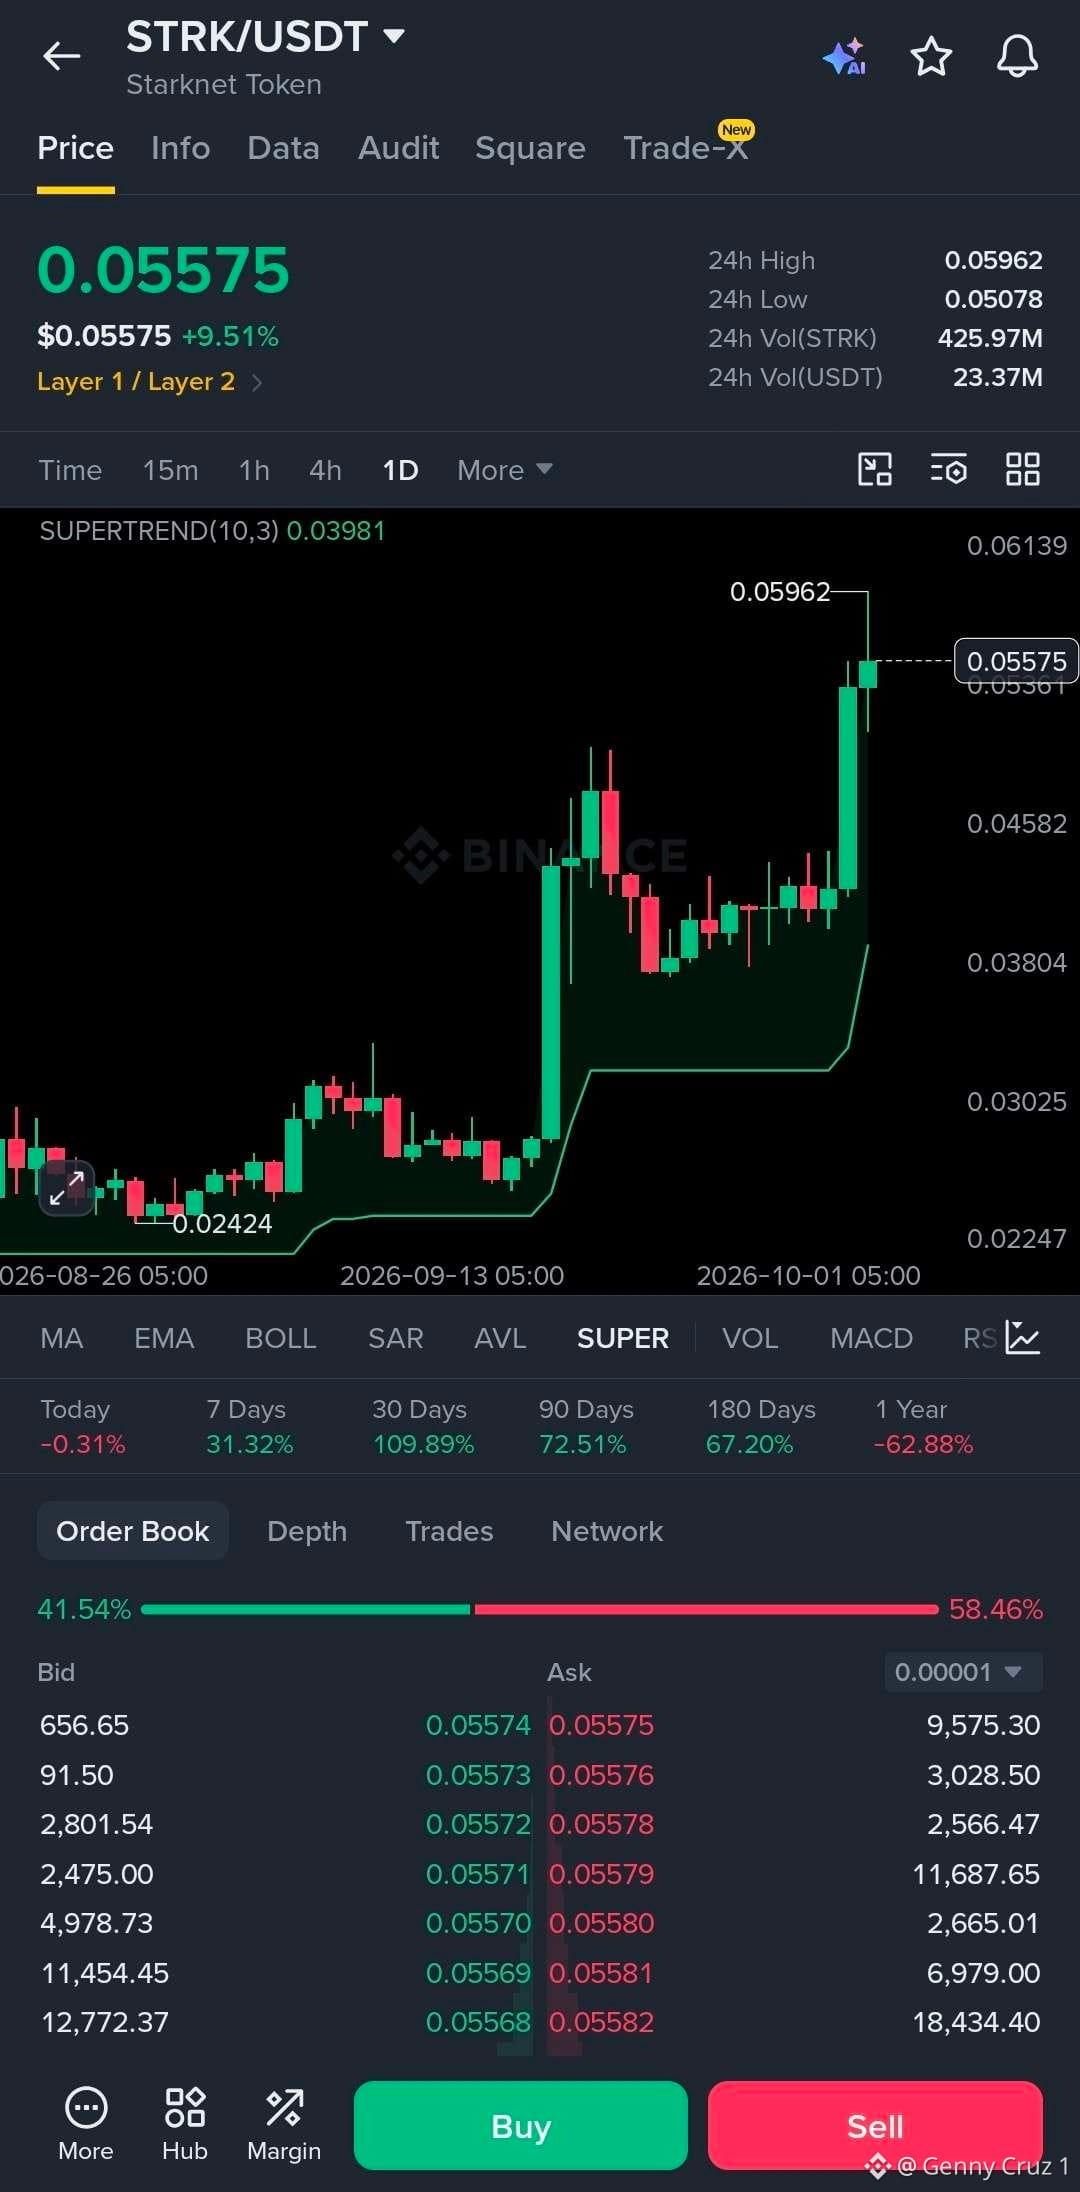
STRK vừa mới thay đổi cấu trúc, và hiện tại vùng phá vỡ là mốc cần theo dõi.
$STRK đang giao dịch quanh $0.05575, tăng mạnh so với vùng hợp nhất gần đây. Supertrend khung ngày đã đảo chiều tăng lên $0.03981, cho thấy xu hướng tổng thể vẫn tích cực.
Dưới đây là bản đồ của tôi:
Hiện tại: $0.05575
Hỗ trợ: $0.0500–$0.0520
Hỗ trợ quan trọng: $0.0450–$0.0460
Vùng phá vỡ: $0.0596–$0.0600
Mục tiêu 1: $0.0650
Mục tiêu 2: $0.0700
Mục tiêu 3: $0.0800
Mốc quan trọng là $0.0600.
STRK đã đẩy lên tới $0.05962 rồi, vì vậy nếu có một cây nến ngày đóng cửa rõ ràng phía trên vùng này có thể xác nhận thêm một nhịp tăng tiếp theo.
Tôi không muốn đuổi theo cây nến hiện tại. Việc kiểm tra lại $0.050–$0.052 và giữ vững được sẽ tạo ra cấu trúc rủi ro–lợi nhuận rõ ràng hơn nhiều.
Trên $0.060, STRK trở nên rất đáng chú ý.
#STRK
STRK vừa mới thay đổi cấu trúc, và hiện tại vùng phá vỡ là mốc cần theo dõi.
$STRK đang giao dịch quanh $0.05575, tăng mạnh so với vùng hợp nhất gần đây. Supertrend khung ngày đã đảo chiều tăng lên $0.03981, cho thấy xu hướng tổng thể vẫn tích cực.
Dưới đây là bản đồ của tôi:
Hiện tại: $0.05575
Hỗ trợ: $0.0500–$0.0520
Hỗ trợ quan trọng: $0.0450–$0.0460
Vùng phá vỡ: $0.0596–$0.0600
Mục tiêu 1: $0.0650
Mục tiêu 2: $0.0700
Mục tiêu 3: $0.0800
Mốc quan trọng là $0.0600.
STRK đã đẩy lên tới $0.05962 rồi, vì vậy nếu có một cây nến ngày đóng cửa rõ ràng phía trên vùng này có thể xác nhận thêm một nhịp tăng tiếp theo.
Tôi không muốn đuổi theo cây nến hiện tại. Việc kiểm tra lại $0.050–$0.052 và giữ vững được sẽ tạo ra cấu trúc rủi ro–lợi nhuận rõ ràng hơn nhiều.
Trên $0.060, STRK trở nên rất đáng chú ý.
#STRK
$STRK đang giao dịch quanh $0.05575, tăng mạnh so với vùng hợp nhất gần đây. Supertrend khung ngày đã đảo chiều tăng lên $0.03981, cho thấy xu hướng tổng thể vẫn tích cực.
Dưới đây là bản đồ của tôi:
Hiện tại: $0.05575
Hỗ trợ: $0.0500–$0.0520
Hỗ trợ quan trọng: $0.0450–$0.0460
Vùng phá vỡ: $0.0596–$0.0600
Mục tiêu 1: $0.0650
Mục tiêu 2: $0.0700
Mục tiêu 3: $0.0800
Mốc quan trọng là $0.0600.
STRK đã đẩy lên tới $0.05962 rồi, vì vậy nếu có một cây nến ngày đóng cửa rõ ràng phía trên vùng này có thể xác nhận thêm một nhịp tăng tiếp theo.
Tôi không muốn đuổi theo cây nến hiện tại. Việc kiểm tra lại $0.050–$0.052 và giữ vững được sẽ tạo ra cấu trúc rủi ro–lợi nhuận rõ ràng hơn nhiều.
Trên $0.060, STRK trở nên rất đáng chú ý.
#STRK
38
·
--
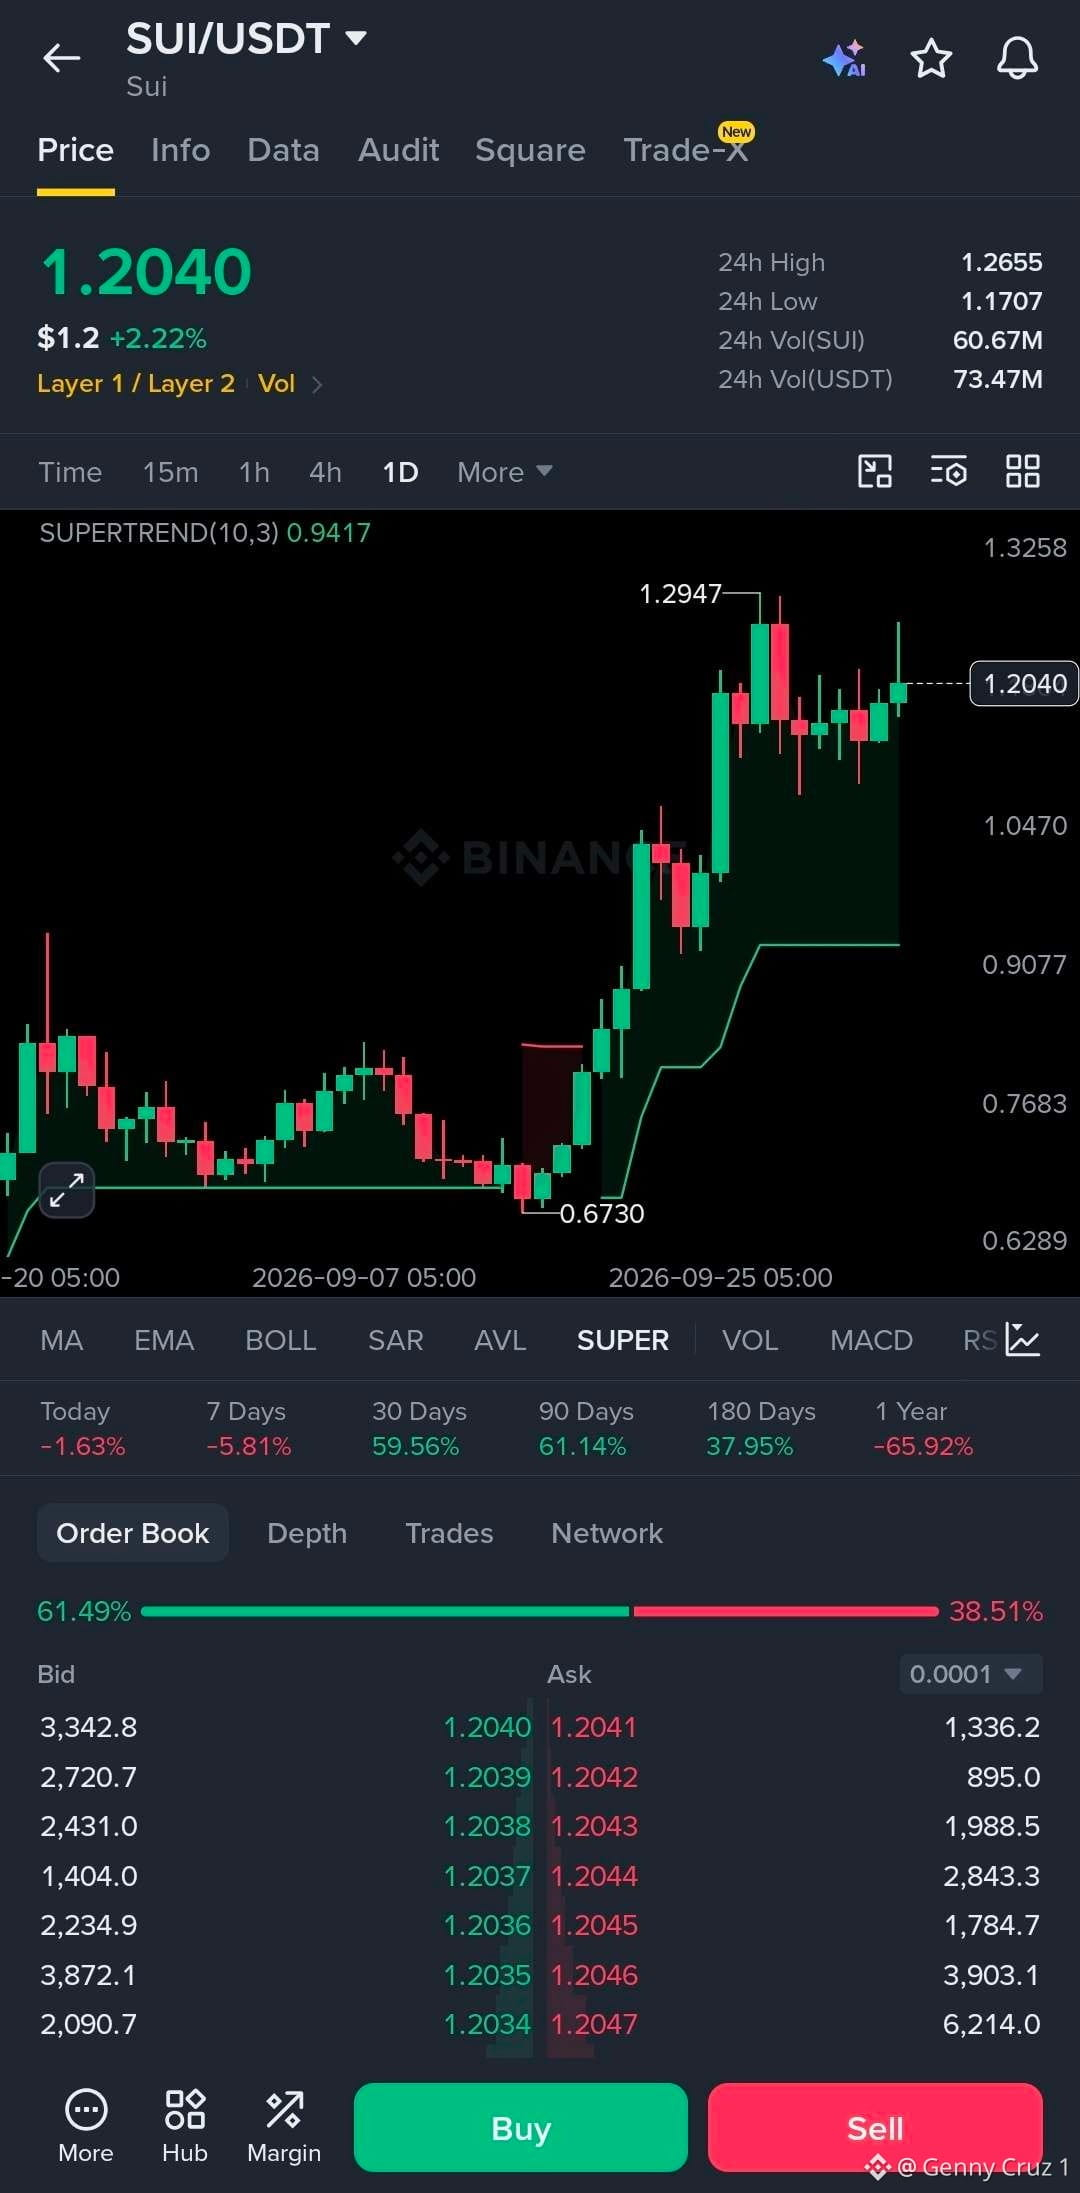
SUI đang tích lũy sau một đợt tăng mạnh, và ngưỡng đột phá tiếp theo đang dần rõ ràng.
$SUI đang giao dịch quanh mức $1.204 sau khi tăng từ đáy $0.6730. Giá vẫn cao hơn đáng kể so với chỉ báo Supertrend khung ngày ở mức $0.9417, giúp cấu trúc tổng thể vẫn tích cực.
Các mốc tôi theo dõi:
Hiện tại: $1.204
Hỗ trợ: $1.15–$1.17
Hỗ trợ chính: $1.05–$1.08
Vùng đột phá: $1.26–$1.30
Mục tiêu 1: $1.40
Mục tiêu 2: $1.50
Mục tiêu chính: $1.60+
Mốc then chốt là $1.30.
SUI đã chạm mức $1.2947 rồi điều chỉnh, vì vậy nếu giá lấy lại vùng này một cách dứt khoát trên khung ngày, đó có thể là tiền đề để tiến tới $1.40 và cao hơn nữa.
Tôi muốn chờ đột phá được xác nhận hơn là đuổi theo giá khi vẫn còn trong biên độ.
Chừng nào vùng $1.15–$1.17 còn trụ vững, cấu trúc vẫn thuận lợi.
#sui
SUI đang tích lũy sau một đợt tăng mạnh, và ngưỡng đột phá tiếp theo đang dần rõ ràng.
$SUI đang giao dịch quanh mức $1.204 sau khi tăng từ đáy $0.6730. Giá vẫn cao hơn đáng kể so với chỉ báo Supertrend khung ngày ở mức $0.9417, giúp cấu trúc tổng thể vẫn tích cực.
Các mốc tôi theo dõi:
Hiện tại: $1.204
Hỗ trợ: $1.15–$1.17
Hỗ trợ chính: $1.05–$1.08
Vùng đột phá: $1.26–$1.30
Mục tiêu 1: $1.40
Mục tiêu 2: $1.50
Mục tiêu chính: $1.60+
Mốc then chốt là $1.30.
SUI đã chạm mức $1.2947 rồi điều chỉnh, vì vậy nếu giá lấy lại vùng này một cách dứt khoát trên khung ngày, đó có thể là tiền đề để tiến tới $1.40 và cao hơn nữa.
Tôi muốn chờ đột phá được xác nhận hơn là đuổi theo giá khi vẫn còn trong biên độ.
Chừng nào vùng $1.15–$1.17 còn trụ vững, cấu trúc vẫn thuận lợi.
#sui
$SUI đang giao dịch quanh mức $1.204 sau khi tăng từ đáy $0.6730. Giá vẫn cao hơn đáng kể so với chỉ báo Supertrend khung ngày ở mức $0.9417, giúp cấu trúc tổng thể vẫn tích cực.
Các mốc tôi theo dõi:
Hiện tại: $1.204
Hỗ trợ: $1.15–$1.17
Hỗ trợ chính: $1.05–$1.08
Vùng đột phá: $1.26–$1.30
Mục tiêu 1: $1.40
Mục tiêu 2: $1.50
Mục tiêu chính: $1.60+
Mốc then chốt là $1.30.
SUI đã chạm mức $1.2947 rồi điều chỉnh, vì vậy nếu giá lấy lại vùng này một cách dứt khoát trên khung ngày, đó có thể là tiền đề để tiến tới $1.40 và cao hơn nữa.
Tôi muốn chờ đột phá được xác nhận hơn là đuổi theo giá khi vẫn còn trong biên độ.
Chừng nào vùng $1.15–$1.17 còn trụ vững, cấu trúc vẫn thuận lợi.
#sui
71
·
--
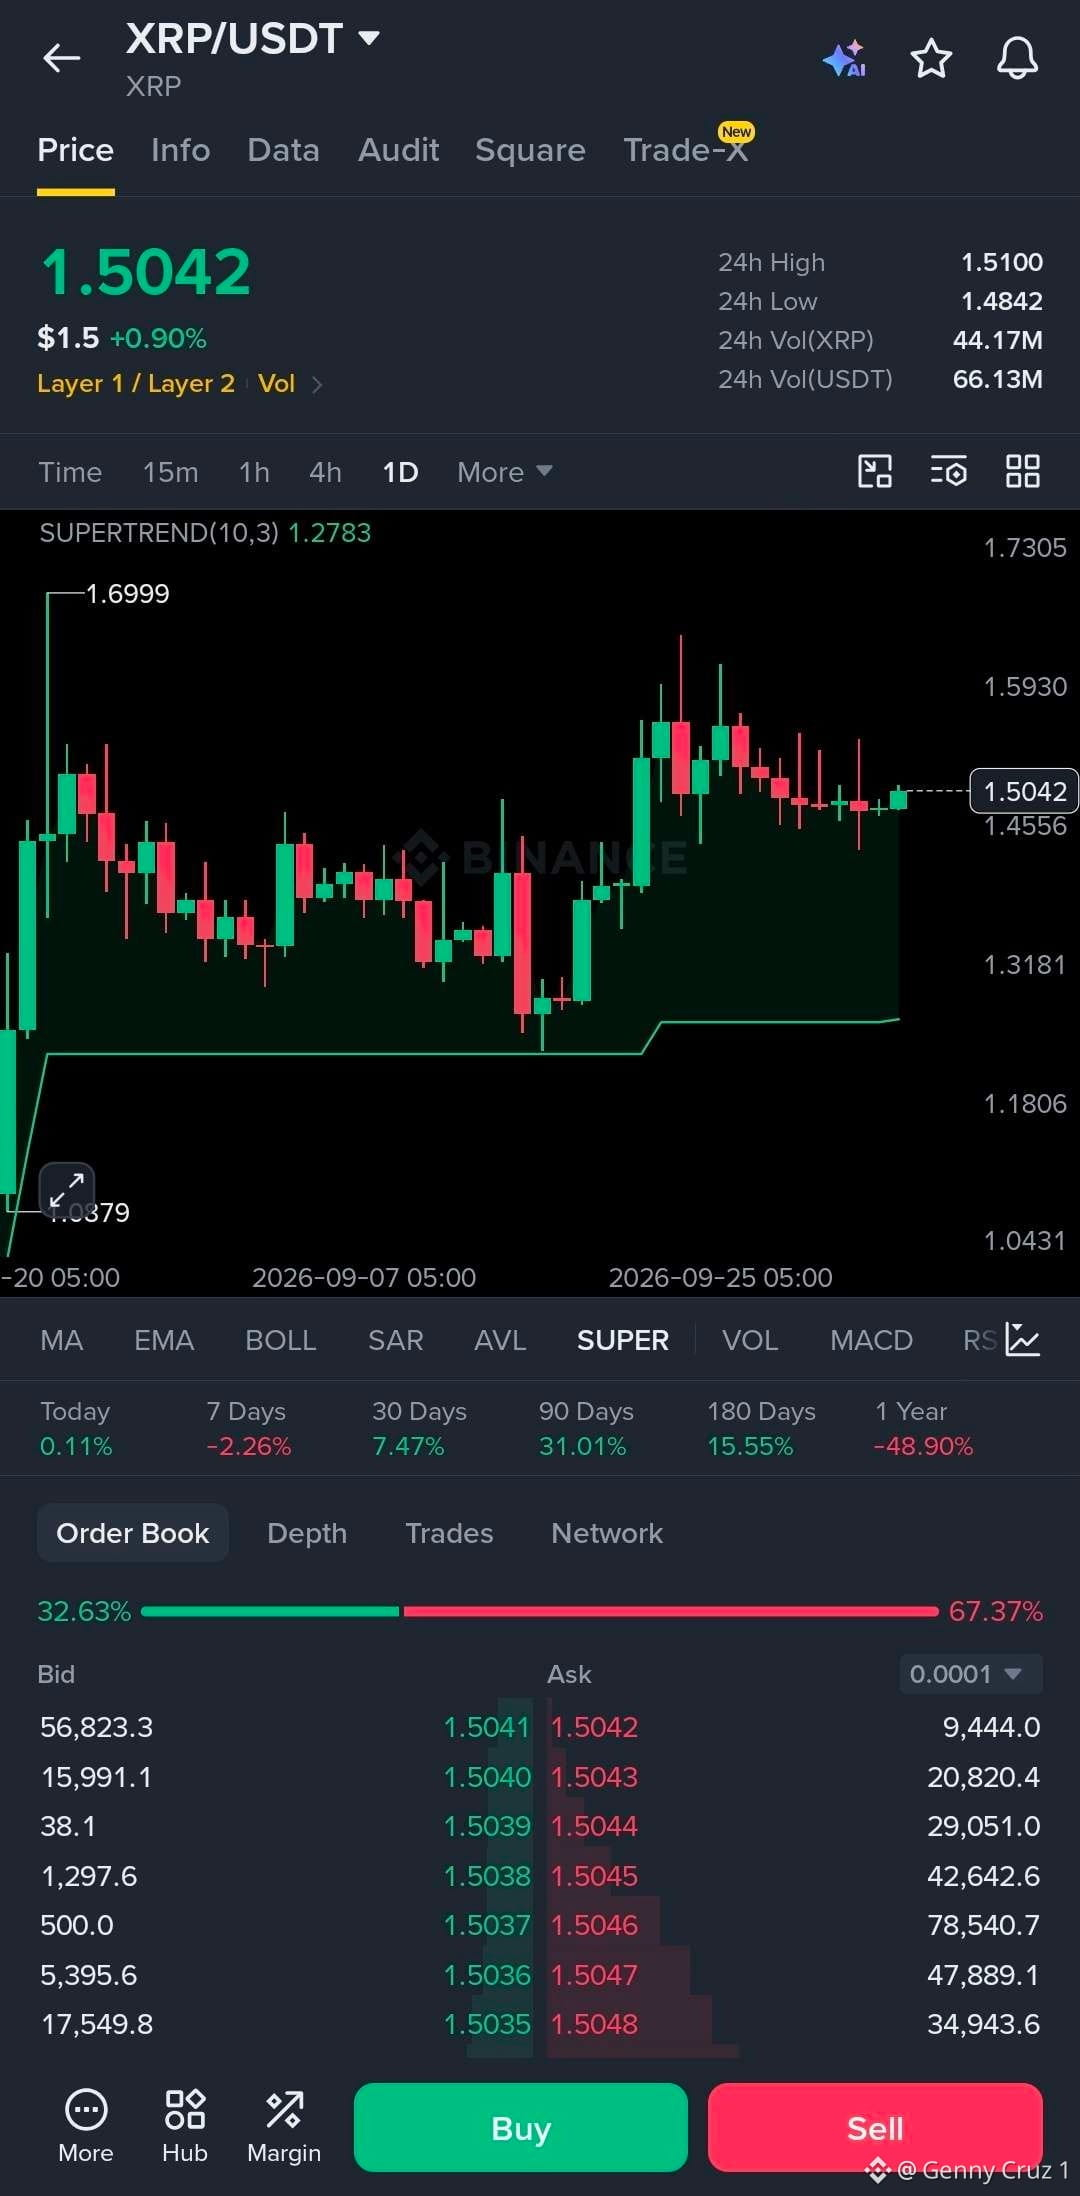
XRP trông khá trầm lắng ở đây, nhưng đây là một mức giá đáng theo dõi.
$XRP đang giữ quanh mức $1.50 sau đợt tăng gần đây, trong khi cấu trúc giá trên khung ngày vẫn tích cực khi nằm trên mức Supertrend $1.2783.
Các mức giá của tôi:
Hiện tại: $1.504
Hỗ trợ: $1.45–$1.48
Vùng bứt phá: $1.54–$1.55
Mục tiêu 1: $1.60
Mục tiêu 2: $1.70
Mục tiêu 3: $1.80+
Điều tôi muốn thấy nhất là giá lấy lại mốc $1.55 một cách dứt khoát.
Nếu XRP vượt lên trên vùng đó và giữ được làm hỗ trợ, đỉnh trước đó ở $1.70 sẽ lại trở thành mục tiêu đáng chú ý.
Cho đến lúc đó, tôi không muốn mua đuổi. Hãy để giá chứng minh đà tăng trước.
Nếu vùng $1.45–$1.48 trụ vững và giá vượt $1.55, thiết lập này sẽ trở nên hấp dẫn hơn nhiều.
#XRP
XRP trông khá trầm lắng ở đây, nhưng đây là một mức giá đáng theo dõi.
$XRP đang giữ quanh mức $1.50 sau đợt tăng gần đây, trong khi cấu trúc giá trên khung ngày vẫn tích cực khi nằm trên mức Supertrend $1.2783.
Các mức giá của tôi:
Hiện tại: $1.504
Hỗ trợ: $1.45–$1.48
Vùng bứt phá: $1.54–$1.55
Mục tiêu 1: $1.60
Mục tiêu 2: $1.70
Mục tiêu 3: $1.80+
Điều tôi muốn thấy nhất là giá lấy lại mốc $1.55 một cách dứt khoát.
Nếu XRP vượt lên trên vùng đó và giữ được làm hỗ trợ, đỉnh trước đó ở $1.70 sẽ lại trở thành mục tiêu đáng chú ý.
Cho đến lúc đó, tôi không muốn mua đuổi. Hãy để giá chứng minh đà tăng trước.
Nếu vùng $1.45–$1.48 trụ vững và giá vượt $1.55, thiết lập này sẽ trở nên hấp dẫn hơn nhiều.
#XRP
$XRP đang giữ quanh mức $1.50 sau đợt tăng gần đây, trong khi cấu trúc giá trên khung ngày vẫn tích cực khi nằm trên mức Supertrend $1.2783.
Các mức giá của tôi:
Hiện tại: $1.504
Hỗ trợ: $1.45–$1.48
Vùng bứt phá: $1.54–$1.55
Mục tiêu 1: $1.60
Mục tiêu 2: $1.70
Mục tiêu 3: $1.80+
Điều tôi muốn thấy nhất là giá lấy lại mốc $1.55 một cách dứt khoát.
Nếu XRP vượt lên trên vùng đó và giữ được làm hỗ trợ, đỉnh trước đó ở $1.70 sẽ lại trở thành mục tiêu đáng chú ý.
Cho đến lúc đó, tôi không muốn mua đuổi. Hãy để giá chứng minh đà tăng trước.
Nếu vùng $1.45–$1.48 trụ vững và giá vượt $1.55, thiết lập này sẽ trở nên hấp dẫn hơn nhiều.
#XRP
69
·
--
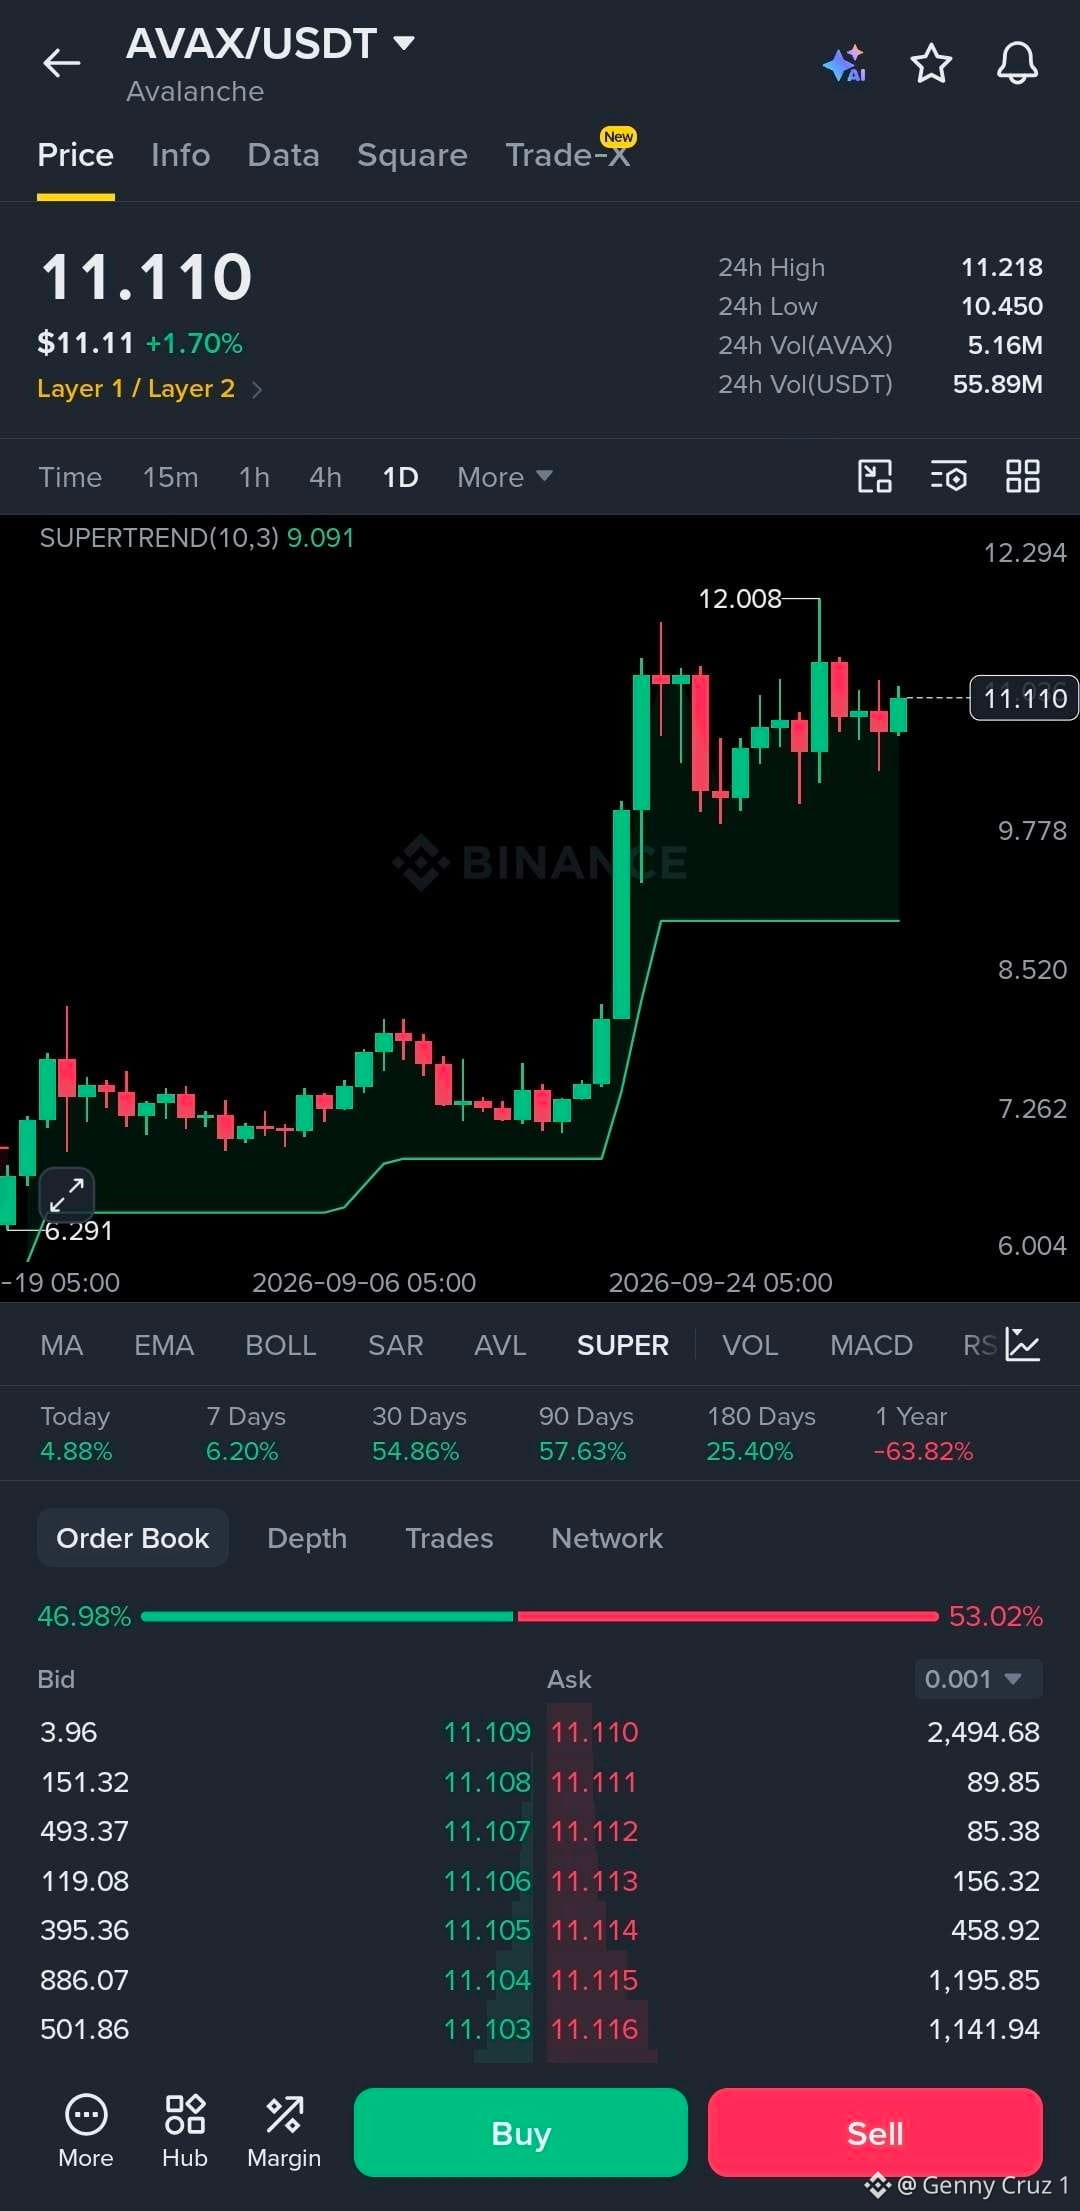
AVAX trông có vẻ bình tĩnh… nhưng biểu đồ đang âm thầm tích lũy áp lực 👀
$AVAX đang giữ quanh $11.11 sau một pha tăng mạnh từ vùng $7, và xu hướng trong ngày vẫn đang nằm khá thoải mái trên đường Supertrend ở mức $9.09.
Đây là thiết lập mình đang theo dõi:
📍 Hiện tại: $11.11
🟢 Hỗ trợ: $10.50–$10.80
🟡 Kháng cự: $11.20–$11.30
🎯 TP1: $12.00
🎯 TP2: $12.30
🎯 TP3: $13.00
🛡️ Hỗ trợ xu hướng quan trọng: $9.09
Phần quan trọng nằm ở $12.00.
AVAX đã thử kiểm tra mức $12.008 và bị từ chối, nên nếu có một cú breakout (vượt) rõ ràng trong khung ngày trên vùng đó, khu vực mở rộng tiếp theo có thể sẽ được đưa vào tầm ngắm.
Cho đến khi điều đó xảy ra, thì hiện tại trông giống như đang tích lũy dưới vùng kháng cự hơn là một đợt bứt phá đã được xác nhận.
Mức $12 là điểm mình sẽ tiếp tục để mắt tới. 👀📈
#AVAX
AVAX trông có vẻ bình tĩnh… nhưng biểu đồ đang âm thầm tích lũy áp lực 👀
$AVAX đang giữ quanh $11.11 sau một pha tăng mạnh từ vùng $7, và xu hướng trong ngày vẫn đang nằm khá thoải mái trên đường Supertrend ở mức $9.09.
Đây là thiết lập mình đang theo dõi:
📍 Hiện tại: $11.11
🟢 Hỗ trợ: $10.50–$10.80
🟡 Kháng cự: $11.20–$11.30
🎯 TP1: $12.00
🎯 TP2: $12.30
🎯 TP3: $13.00
🛡️ Hỗ trợ xu hướng quan trọng: $9.09
Phần quan trọng nằm ở $12.00.
AVAX đã thử kiểm tra mức $12.008 và bị từ chối, nên nếu có một cú breakout (vượt) rõ ràng trong khung ngày trên vùng đó, khu vực mở rộng tiếp theo có thể sẽ được đưa vào tầm ngắm.
Cho đến khi điều đó xảy ra, thì hiện tại trông giống như đang tích lũy dưới vùng kháng cự hơn là một đợt bứt phá đã được xác nhận.
Mức $12 là điểm mình sẽ tiếp tục để mắt tới. 👀📈
#AVAX
$AVAX đang giữ quanh $11.11 sau một pha tăng mạnh từ vùng $7, và xu hướng trong ngày vẫn đang nằm khá thoải mái trên đường Supertrend ở mức $9.09.
Đây là thiết lập mình đang theo dõi:
📍 Hiện tại: $11.11
🟢 Hỗ trợ: $10.50–$10.80
🟡 Kháng cự: $11.20–$11.30
🎯 TP1: $12.00
🎯 TP2: $12.30
🎯 TP3: $13.00
🛡️ Hỗ trợ xu hướng quan trọng: $9.09
Phần quan trọng nằm ở $12.00.
AVAX đã thử kiểm tra mức $12.008 và bị từ chối, nên nếu có một cú breakout (vượt) rõ ràng trong khung ngày trên vùng đó, khu vực mở rộng tiếp theo có thể sẽ được đưa vào tầm ngắm.
Cho đến khi điều đó xảy ra, thì hiện tại trông giống như đang tích lũy dưới vùng kháng cự hơn là một đợt bứt phá đã được xác nhận.
Mức $12 là điểm mình sẽ tiếp tục để mắt tới. 👀📈
#AVAX
31
·
--
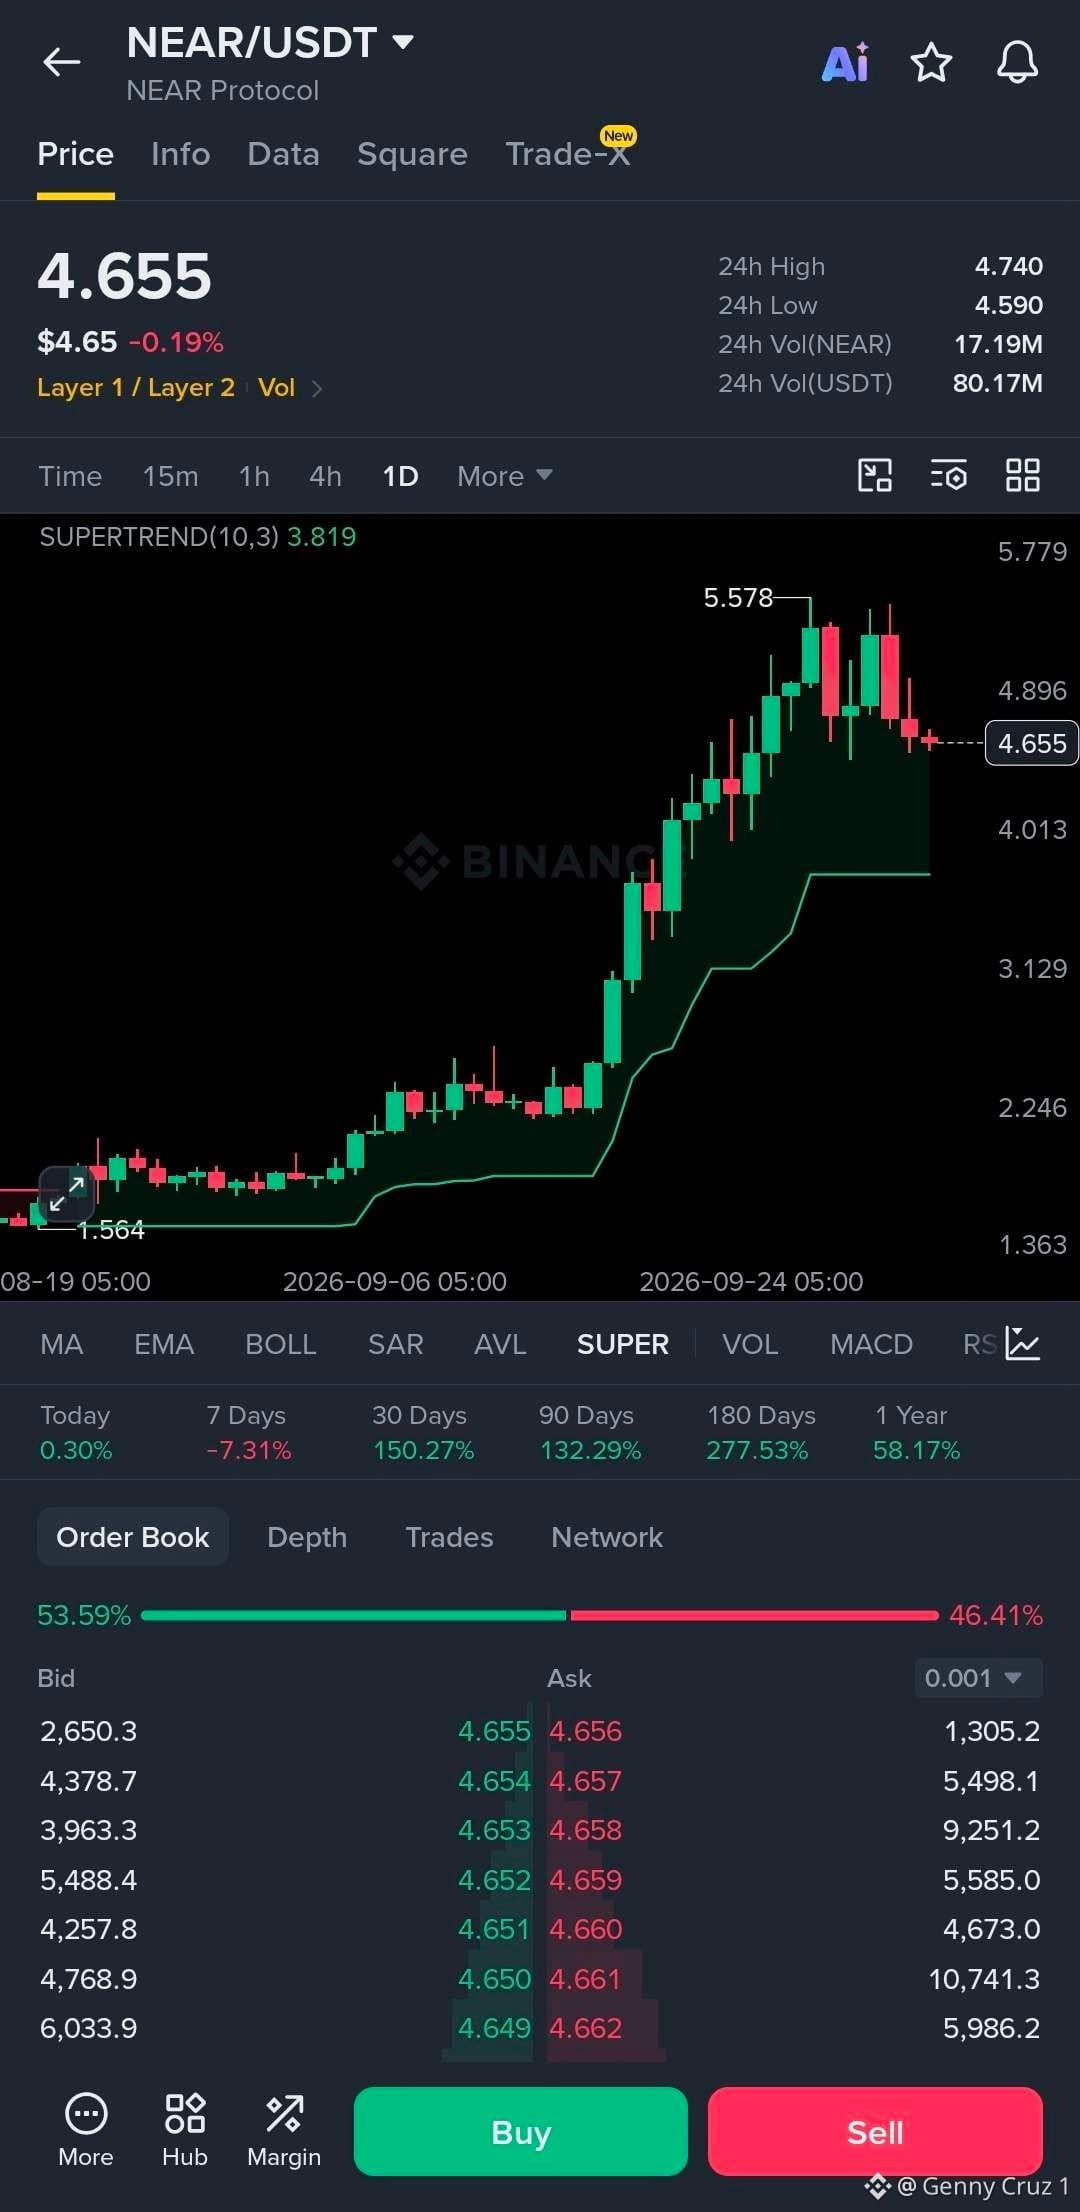
$NEAR hiện đang khá yên ắng… nhưng biểu đồ này đang ở một vùng rất quan trọng 👀
NEAR đang ở mức $4.655 sau đợt tăng mạnh từ vùng $2, và cấu trúc trên khung ngày vẫn trụ vững phía trên Supertrend tại $3.819.
Những gì mình đang theo dõi lúc này 👇
📍 Hiện tại: $4.655
🟢 Hỗ trợ: $4.50–$4.60
🟡 Kháng cự: $4.90
🎯 TP1: $5.20
🎯 TP2: $5.58
🎯 TP3: $6.00+
Điểm đáng chú ý là gì?
NEAR đã chạm $5.578, điều chỉnh rồi hiện đang tích lũy thay vì đánh mất hoàn toàn cấu trúc.
Nếu phe mua giành lại mốc $4.90, đỉnh trước đó quanh $5.58 sẽ lại trở thành tâm điểm.
Nhưng nếu mốc $4.50 bị phá vỡ, mình sẽ theo dõi phản ứng quanh các vùng hỗ trợ tiếp theo thay vì mù quáng đuổi theo giá.
Đây là mức có thể quyết định bước đi tiếp theo của NEAR. 👀📈
#NEAR
$NEAR hiện đang khá yên ắng… nhưng biểu đồ này đang ở một vùng rất quan trọng 👀
NEAR đang ở mức $4.655 sau đợt tăng mạnh từ vùng $2, và cấu trúc trên khung ngày vẫn trụ vững phía trên Supertrend tại $3.819.
Những gì mình đang theo dõi lúc này 👇
📍 Hiện tại: $4.655
🟢 Hỗ trợ: $4.50–$4.60
🟡 Kháng cự: $4.90
🎯 TP1: $5.20
🎯 TP2: $5.58
🎯 TP3: $6.00+
Điểm đáng chú ý là gì?
NEAR đã chạm $5.578, điều chỉnh rồi hiện đang tích lũy thay vì đánh mất hoàn toàn cấu trúc.
Nếu phe mua giành lại mốc $4.90, đỉnh trước đó quanh $5.58 sẽ lại trở thành tâm điểm.
Nhưng nếu mốc $4.50 bị phá vỡ, mình sẽ theo dõi phản ứng quanh các vùng hỗ trợ tiếp theo thay vì mù quáng đuổi theo giá.
Đây là mức có thể quyết định bước đi tiếp theo của NEAR. 👀📈
#NEAR
NEAR đang ở mức $4.655 sau đợt tăng mạnh từ vùng $2, và cấu trúc trên khung ngày vẫn trụ vững phía trên Supertrend tại $3.819.
Những gì mình đang theo dõi lúc này 👇
📍 Hiện tại: $4.655
🟢 Hỗ trợ: $4.50–$4.60
🟡 Kháng cự: $4.90
🎯 TP1: $5.20
🎯 TP2: $5.58
🎯 TP3: $6.00+
Điểm đáng chú ý là gì?
NEAR đã chạm $5.578, điều chỉnh rồi hiện đang tích lũy thay vì đánh mất hoàn toàn cấu trúc.
Nếu phe mua giành lại mốc $4.90, đỉnh trước đó quanh $5.58 sẽ lại trở thành tâm điểm.
Nhưng nếu mốc $4.50 bị phá vỡ, mình sẽ theo dõi phản ứng quanh các vùng hỗ trợ tiếp theo thay vì mù quáng đuổi theo giá.
Đây là mức có thể quyết định bước đi tiếp theo của NEAR. 👀📈
#NEAR
33
·
--
Xem bản dịch
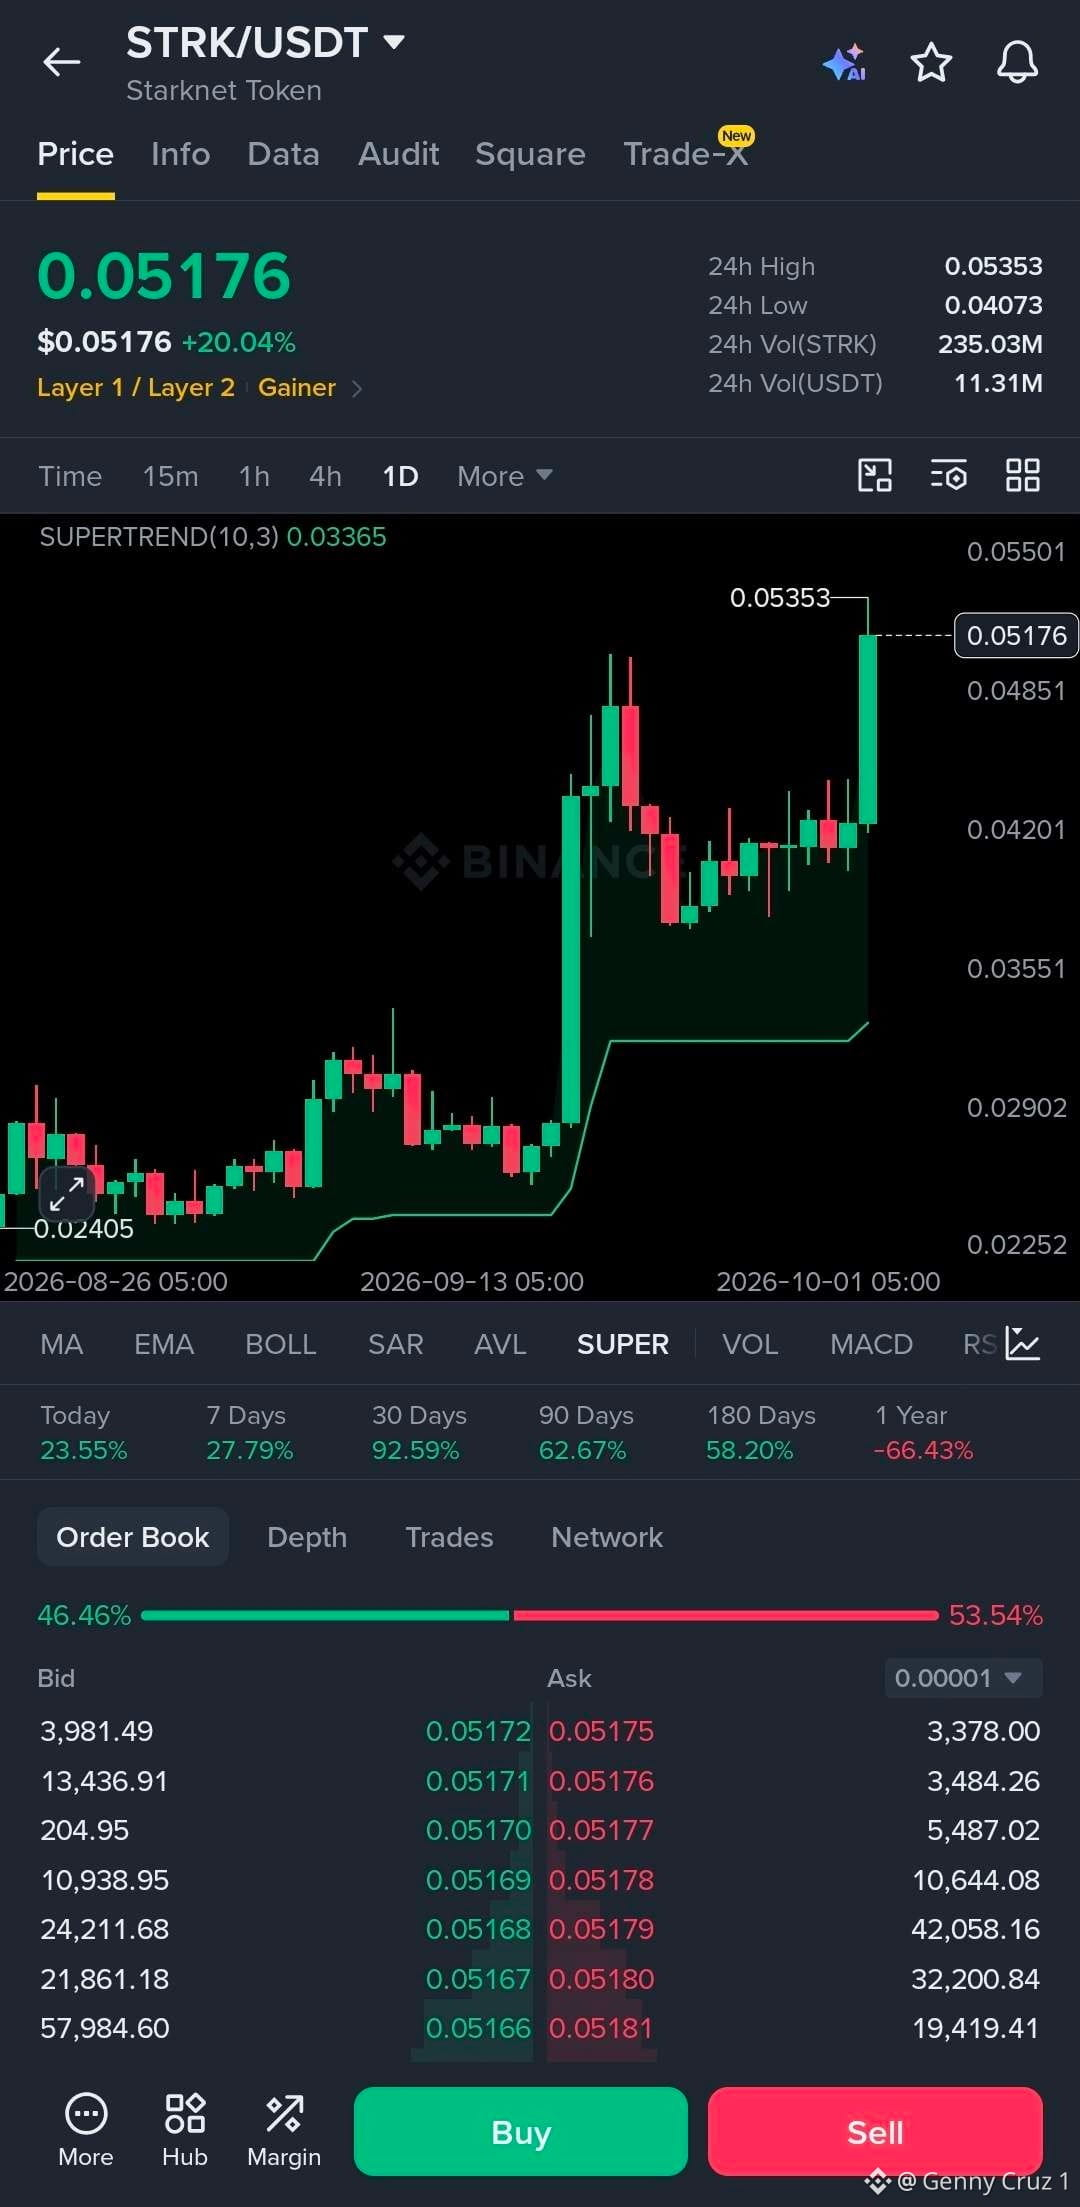
$STRK just made the move… but the interesting part is what happens NEXT 👀🔥
STRK is up 20% today and has pushed straight into the $0.05353 resistance after breaking out of a long consolidation range.
The daily structure has flipped strongly bullish, with prices comfortably above the Supertrend at $0.03365.
📍 Current: $0.05176
🎯 Breakout: $0.05353
🎯 TP1: $0.0580
🎯 TP2: $0.0620
🎯 TP3: $0.0680
🛡️ Key support: $0.0420
⚠️ Invalidation: Below $0.0400
The clean setup here is simple:
Hold above $0.0485 → $0.0535 breakout attempt → next expansion zone opens.
But after a 20% daily move, chasing the candle can be risky. A retest around the breakout area would give the chart a much cleaner confirmation.
$0.0535 is the level I’m watching now. 👀📈
#STRK
$STRK just made the move… but the interesting part is what happens NEXT 👀🔥
STRK is up 20% today and has pushed straight into the $0.05353 resistance after breaking out of a long consolidation range.
The daily structure has flipped strongly bullish, with prices comfortably above the Supertrend at $0.03365.
📍 Current: $0.05176
🎯 Breakout: $0.05353
🎯 TP1: $0.0580
🎯 TP2: $0.0620
🎯 TP3: $0.0680
🛡️ Key support: $0.0420
⚠️ Invalidation: Below $0.0400
The clean setup here is simple:
Hold above $0.0485 → $0.0535 breakout attempt → next expansion zone opens.
But after a 20% daily move, chasing the candle can be risky. A retest around the breakout area would give the chart a much cleaner confirmation.
$0.0535 is the level I’m watching now. 👀📈
#STRK
STRK is up 20% today and has pushed straight into the $0.05353 resistance after breaking out of a long consolidation range.
The daily structure has flipped strongly bullish, with prices comfortably above the Supertrend at $0.03365.
📍 Current: $0.05176
🎯 Breakout: $0.05353
🎯 TP1: $0.0580
🎯 TP2: $0.0620
🎯 TP3: $0.0680
🛡️ Key support: $0.0420
⚠️ Invalidation: Below $0.0400
The clean setup here is simple:
Hold above $0.0485 → $0.0535 breakout attempt → next expansion zone opens.
But after a 20% daily move, chasing the candle can be risky. A retest around the breakout area would give the chart a much cleaner confirmation.
$0.0535 is the level I’m watching now. 👀📈
#STRK
46
·
--
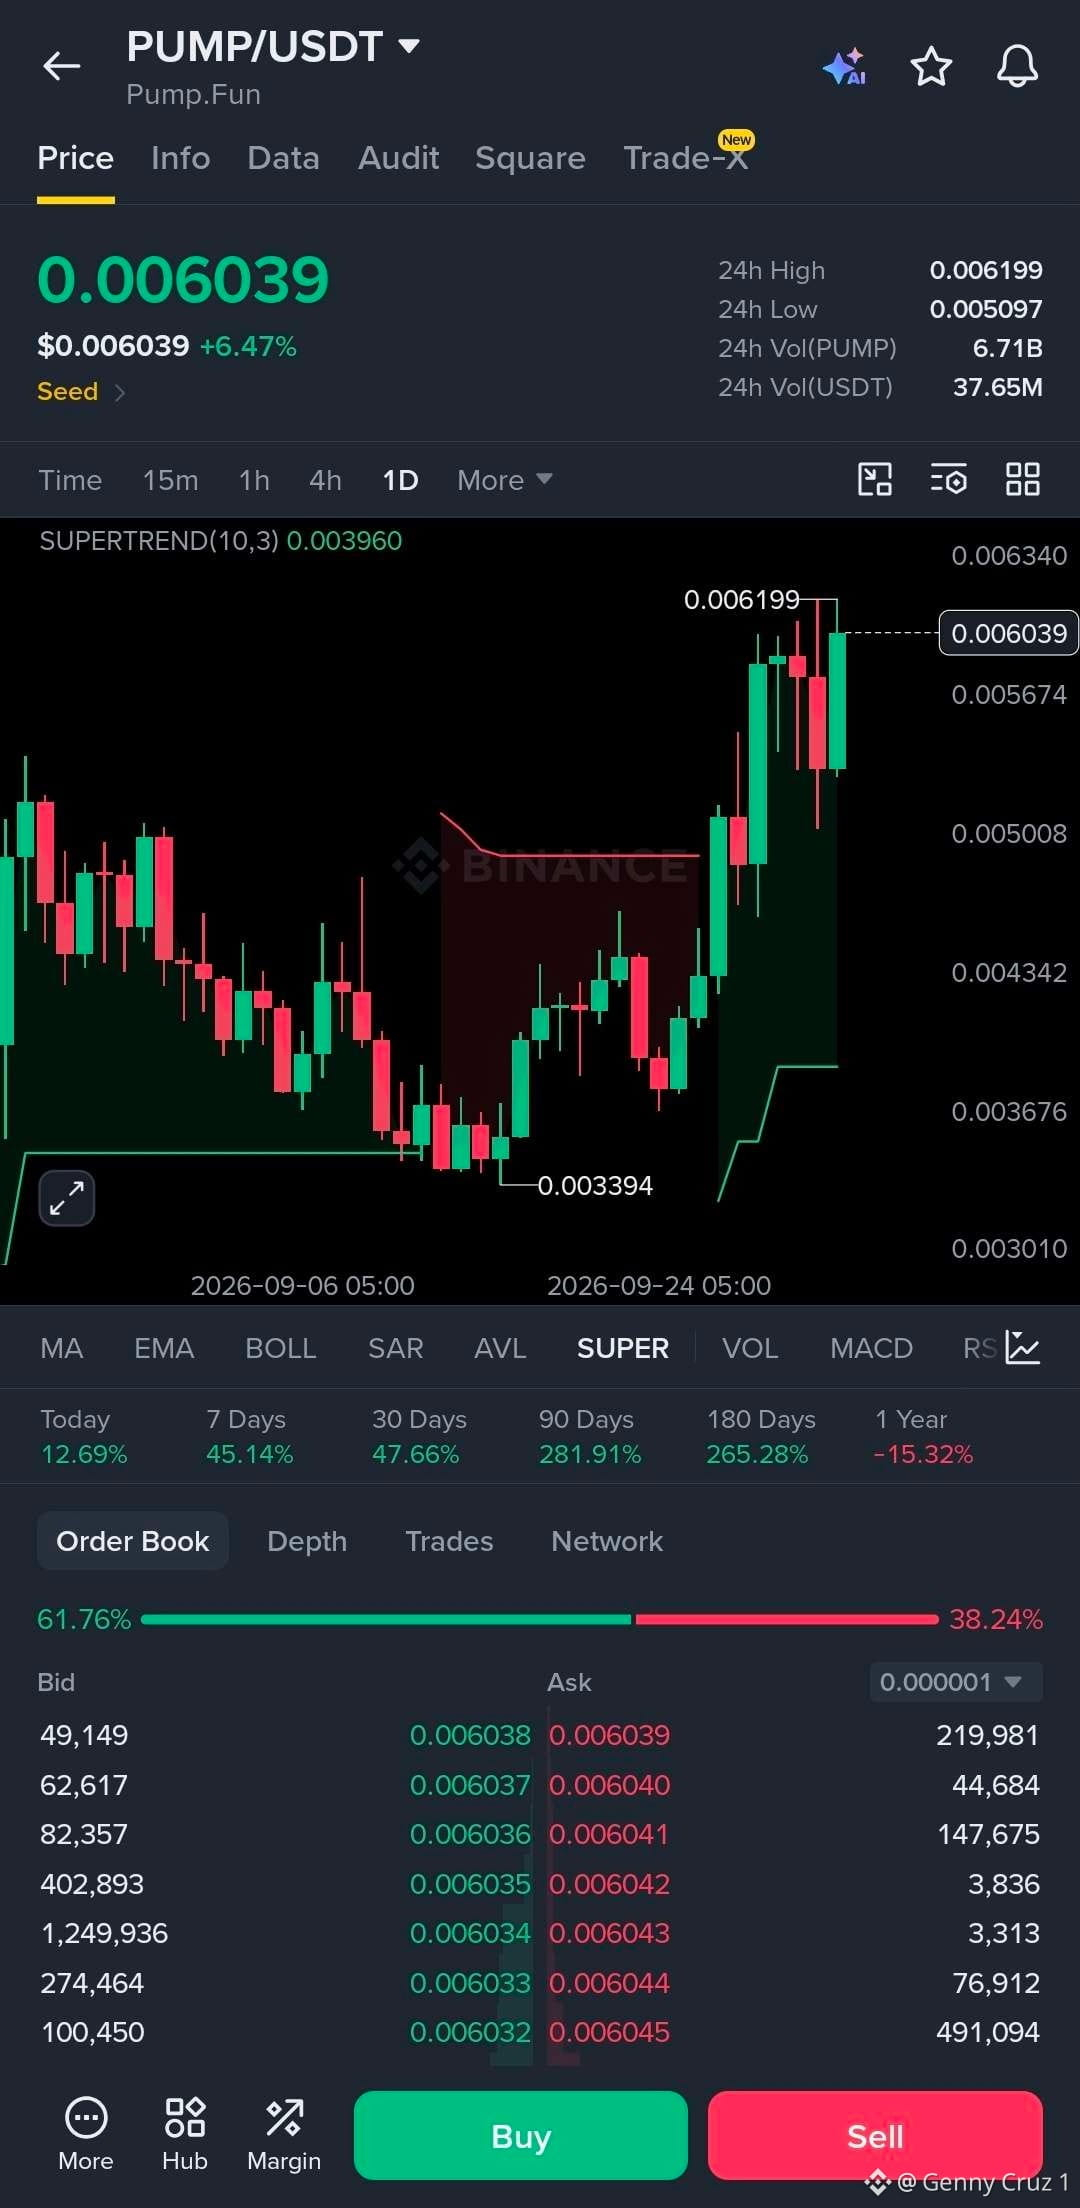
$PUMP đã quay trở lại đỉnh… nhưng liệu đợt bứt phá này đã sẵn sàng cho một nhịp đi tiếp nữa không? 👀
Giá đang giữ quanh mức $0.00604 sau khi giành lại khu vực $0.0050 và đẩy lên đỉnh gần đây tại $0.006199. Supertrend khung ngày đang tăng tại $0.00396, nên cấu trúc vẫn đang trông khá mạnh.
Vào lệnh: $0.00570–$0.00595
SL: $0.00535
TP1: $0.00620
TP2: $0.00660
TP3: $0.00700
Vùng quan trọng là $0.00570–$0.00585. Nếu người mua bảo vệ được khu vực này và PUMP bứt phá rõ ràng lên trên $0.00620, thì các mức tiếp theo sẽ dần lộ diện.
Việc đóng cửa khung ngày trở lại dưới $0.00535 sẽ làm suy yếu kịch bản.
Biểu đồ có đà, nhưng xác nhận thực sự nằm ở cú bứt phá $0.00620. 👀📈
#PUMP
$PUMP đã quay trở lại đỉnh… nhưng liệu đợt bứt phá này đã sẵn sàng cho một nhịp đi tiếp nữa không? 👀
Giá đang giữ quanh mức $0.00604 sau khi giành lại khu vực $0.0050 và đẩy lên đỉnh gần đây tại $0.006199. Supertrend khung ngày đang tăng tại $0.00396, nên cấu trúc vẫn đang trông khá mạnh.
Vào lệnh: $0.00570–$0.00595
SL: $0.00535
TP1: $0.00620
TP2: $0.00660
TP3: $0.00700
Vùng quan trọng là $0.00570–$0.00585. Nếu người mua bảo vệ được khu vực này và PUMP bứt phá rõ ràng lên trên $0.00620, thì các mức tiếp theo sẽ dần lộ diện.
Việc đóng cửa khung ngày trở lại dưới $0.00535 sẽ làm suy yếu kịch bản.
Biểu đồ có đà, nhưng xác nhận thực sự nằm ở cú bứt phá $0.00620. 👀📈
#PUMP
Giá đang giữ quanh mức $0.00604 sau khi giành lại khu vực $0.0050 và đẩy lên đỉnh gần đây tại $0.006199. Supertrend khung ngày đang tăng tại $0.00396, nên cấu trúc vẫn đang trông khá mạnh.
Vào lệnh: $0.00570–$0.00595
SL: $0.00535
TP1: $0.00620
TP2: $0.00660
TP3: $0.00700
Vùng quan trọng là $0.00570–$0.00585. Nếu người mua bảo vệ được khu vực này và PUMP bứt phá rõ ràng lên trên $0.00620, thì các mức tiếp theo sẽ dần lộ diện.
Việc đóng cửa khung ngày trở lại dưới $0.00535 sẽ làm suy yếu kịch bản.
Biểu đồ có đà, nhưng xác nhận thực sự nằm ở cú bứt phá $0.00620. 👀📈
#PUMP
61
·
--
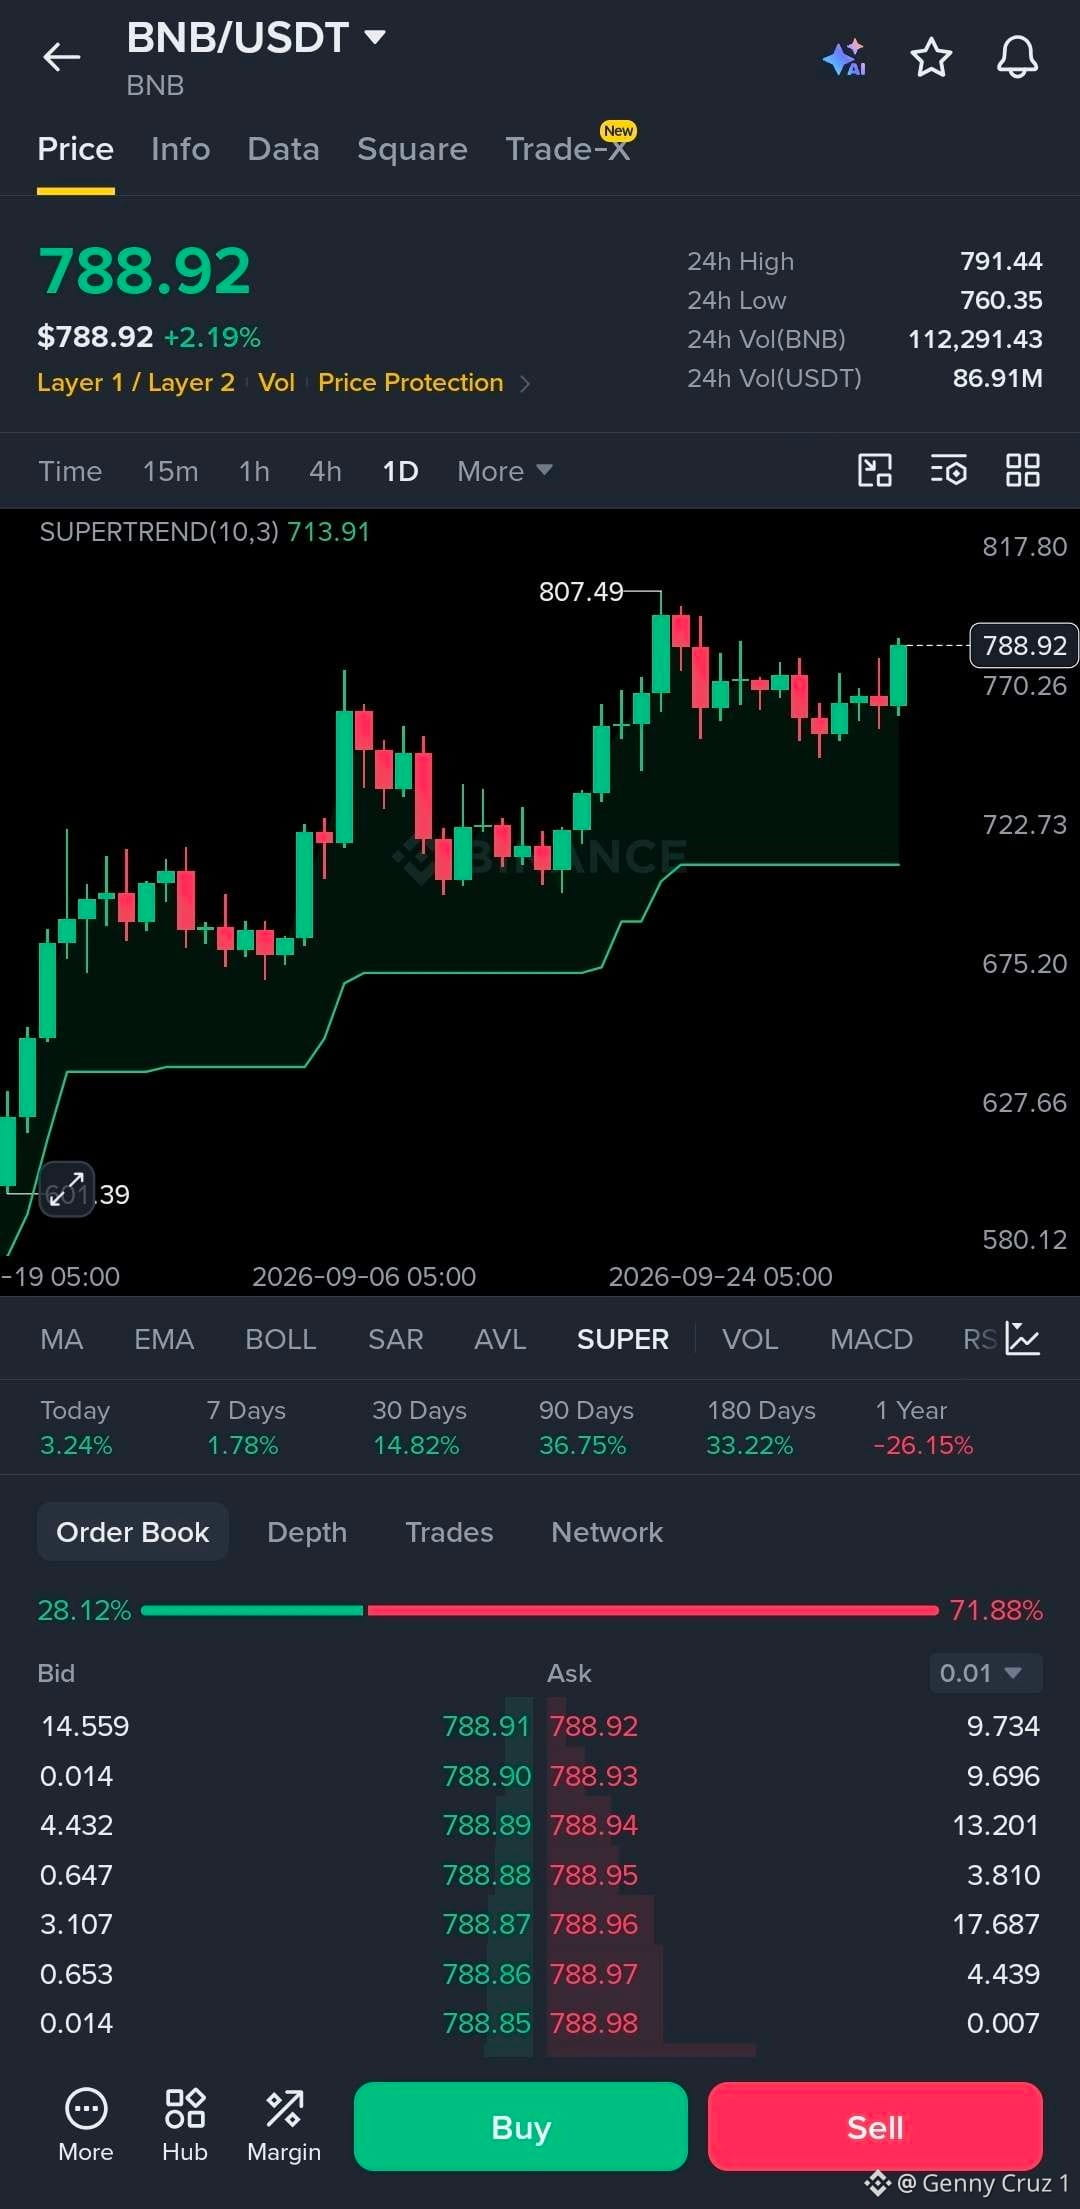
$BNB đã quay lại gần các đỉnh… và mốc này đang trở nên thú vị 👀
Giá đang giữ quanh $789 sau khi giành lại vùng $770, trong khi đỉnh trước đó ở $807.49 đang nằm ngay phía trên. Supertrend khung ngày vẫn đang tăng tại $713.91, nên cấu trúc tổng thể vẫn được duy trì.
Vào lệnh: $775–$790
SL: $750
TP1: $807
TP2: $825
TP3: $850
Vùng $770–$775 là khu vực then chốt cần giữ. Nếu phe mua bảo vệ được vùng này và BNB bứt phá sạch sẽ trên $807.49, thì các mốc tiếp theo đáng chú ý là $825 và $850.
Nếu giá mất $750, kịch bản này bắt đầu suy yếu.
BNB đang tích lũy ngay dưới ngưỡng kháng cự. Giờ mình đang theo dõi sát cú breakout $807 đó. 👀📈
#BNB
$BNB đã quay lại gần các đỉnh… và mốc này đang trở nên thú vị 👀
Giá đang giữ quanh $789 sau khi giành lại vùng $770, trong khi đỉnh trước đó ở $807.49 đang nằm ngay phía trên. Supertrend khung ngày vẫn đang tăng tại $713.91, nên cấu trúc tổng thể vẫn được duy trì.
Vào lệnh: $775–$790
SL: $750
TP1: $807
TP2: $825
TP3: $850
Vùng $770–$775 là khu vực then chốt cần giữ. Nếu phe mua bảo vệ được vùng này và BNB bứt phá sạch sẽ trên $807.49, thì các mốc tiếp theo đáng chú ý là $825 và $850.
Nếu giá mất $750, kịch bản này bắt đầu suy yếu.
BNB đang tích lũy ngay dưới ngưỡng kháng cự. Giờ mình đang theo dõi sát cú breakout $807 đó. 👀📈
#BNB
Giá đang giữ quanh $789 sau khi giành lại vùng $770, trong khi đỉnh trước đó ở $807.49 đang nằm ngay phía trên. Supertrend khung ngày vẫn đang tăng tại $713.91, nên cấu trúc tổng thể vẫn được duy trì.
Vào lệnh: $775–$790
SL: $750
TP1: $807
TP2: $825
TP3: $850
Vùng $770–$775 là khu vực then chốt cần giữ. Nếu phe mua bảo vệ được vùng này và BNB bứt phá sạch sẽ trên $807.49, thì các mốc tiếp theo đáng chú ý là $825 và $850.
Nếu giá mất $750, kịch bản này bắt đầu suy yếu.
BNB đang tích lũy ngay dưới ngưỡng kháng cự. Giờ mình đang theo dõi sát cú breakout $807 đó. 👀📈
#BNB
83
·
--
Xem bản dịch
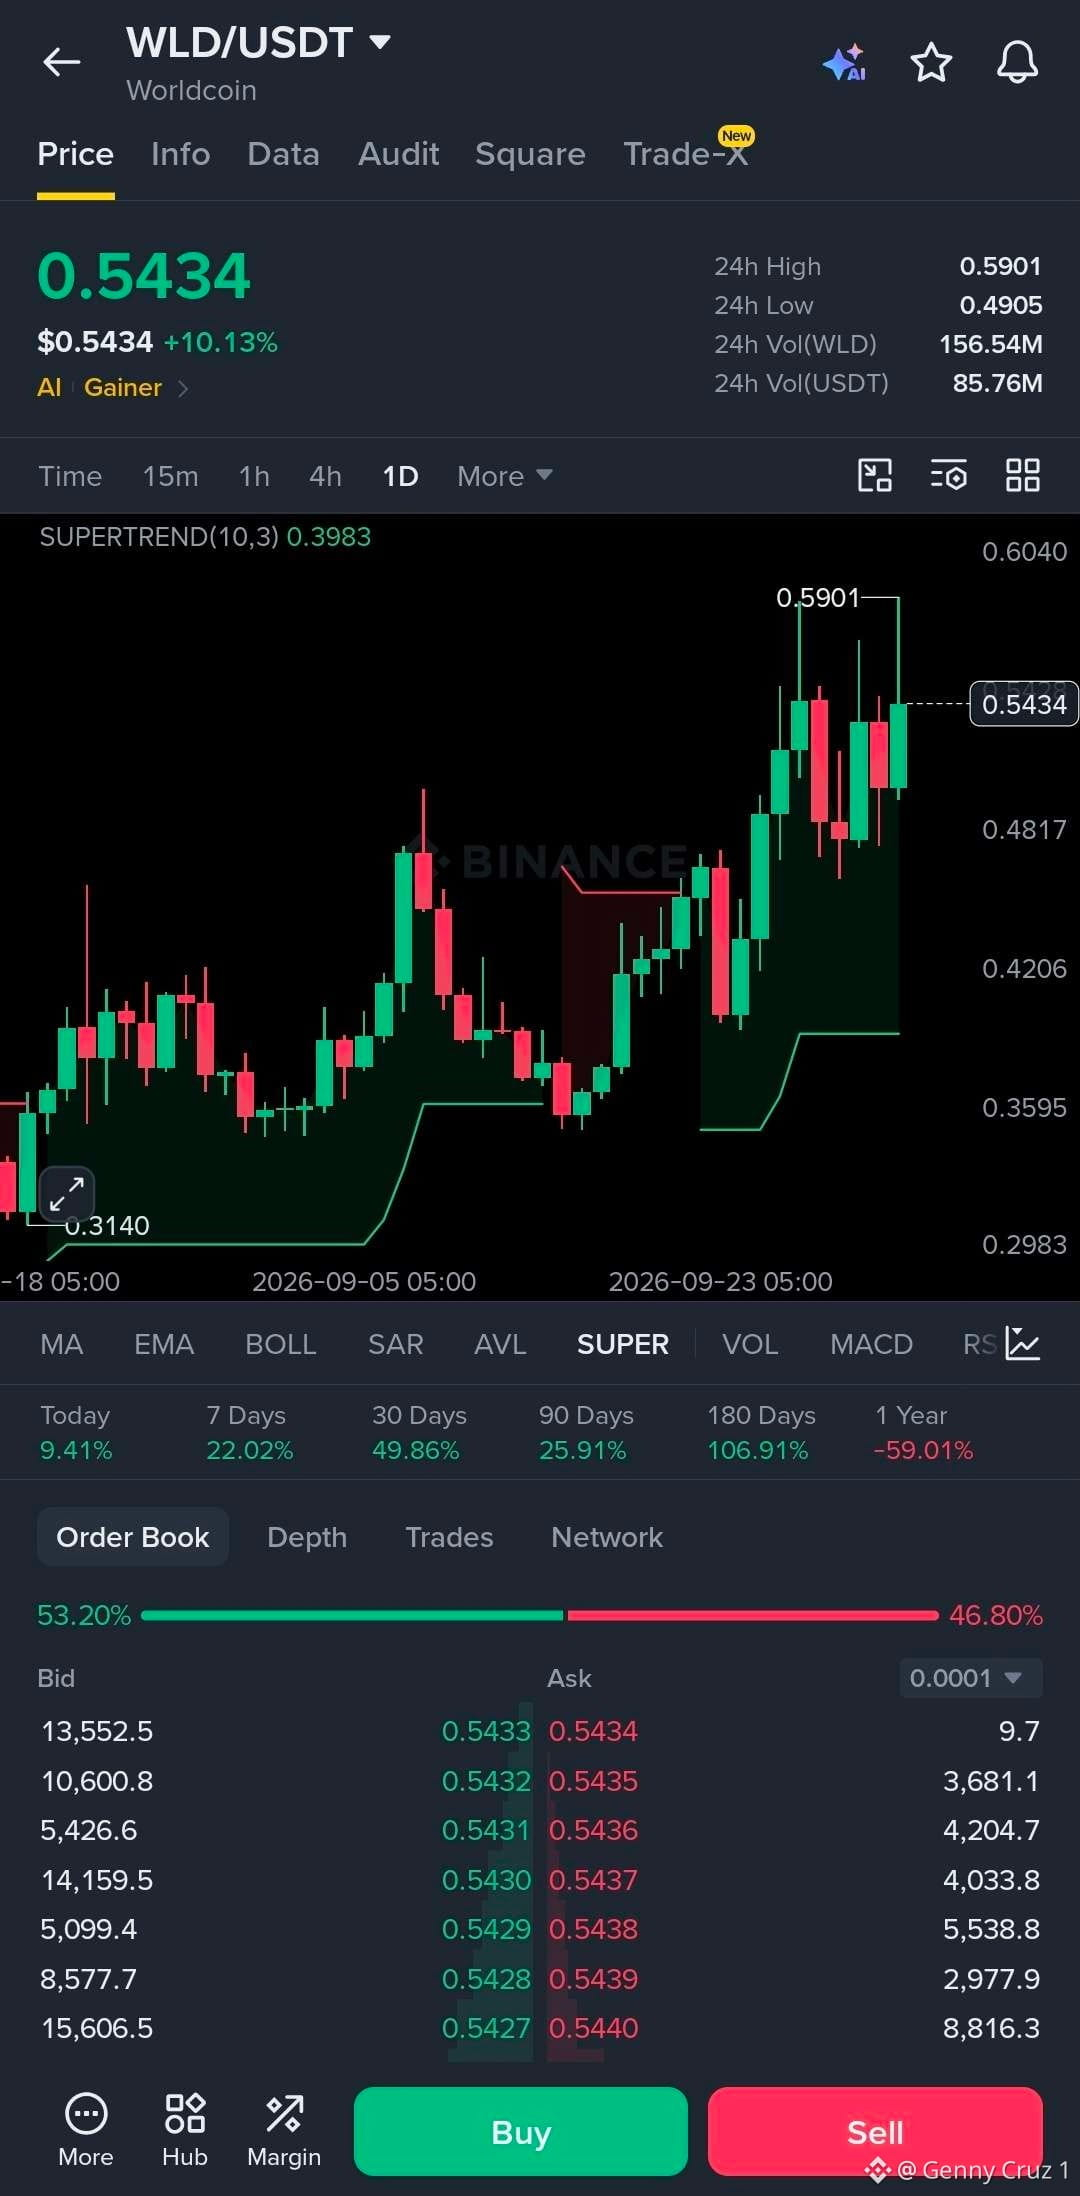
$WLD is quietly holding a strong structure… but can it take out the recent high? 👀
WLD is sitting around $0.543 after pushing to $0.5901. The pullback has been relatively controlled, and the price is still comfortably above the daily Supertrend at $0.3983.
Trade Setup 📊
Entry: $0.52–$0.54
SL: $0.49
TP1: $0.57
TP2: $0.60
TP3: $0.65
The key zone is $0.52–$0.53. If buyers keep defending it and WLD breaks cleanly above $0.5901, the next psychological level around $0.60 comes into play, followed by $0.65.
A daily loss below $0.49 would weaken this setup and suggest the current consolidation needs more time.
The structure is looking clean. Now I’m watching that $0.59 breakout very closely. 👀📈
#WLD
$WLD is quietly holding a strong structure… but can it take out the recent high? 👀
WLD is sitting around $0.543 after pushing to $0.5901. The pullback has been relatively controlled, and the price is still comfortably above the daily Supertrend at $0.3983.
Trade Setup 📊
Entry: $0.52–$0.54
SL: $0.49
TP1: $0.57
TP2: $0.60
TP3: $0.65
The key zone is $0.52–$0.53. If buyers keep defending it and WLD breaks cleanly above $0.5901, the next psychological level around $0.60 comes into play, followed by $0.65.
A daily loss below $0.49 would weaken this setup and suggest the current consolidation needs more time.
The structure is looking clean. Now I’m watching that $0.59 breakout very closely. 👀📈
#WLD
WLD is sitting around $0.543 after pushing to $0.5901. The pullback has been relatively controlled, and the price is still comfortably above the daily Supertrend at $0.3983.
Trade Setup 📊
Entry: $0.52–$0.54
SL: $0.49
TP1: $0.57
TP2: $0.60
TP3: $0.65
The key zone is $0.52–$0.53. If buyers keep defending it and WLD breaks cleanly above $0.5901, the next psychological level around $0.60 comes into play, followed by $0.65.
A daily loss below $0.49 would weaken this setup and suggest the current consolidation needs more time.
The structure is looking clean. Now I’m watching that $0.59 breakout very closely. 👀📈
#WLD
69
·
--
$CAP vừa thực hiện một nước đi xứng đáng để bạn chú ý 👀
Phần thú vị không phải là cây nến +32%… mà là những gì đã xảy ra trước đó.
CAP đã mất vài ngày để xây dựng một nền quanh $0.045–$0.055, rồi bứt phá lên $0.0686 với động lượng mạnh. Giờ giá đang dao động gần đỉnh $0.08885.
Kịch bản tôi đang theo dõi:
🎯 Vào lệnh: $0.076–$0.081
🛑 Cắt lỗ: $0.071
TP1: $0.0888
TP2: $0.095
TP3: $0.105
Vùng $0.076–$0.081 là khu vực kiểm tra lại (retest) quan trọng. Nếu bên mua bảo vệ được, việc lấy lại mốc $0.0888 có thể mở ra một nhịp tăng tiếp theo.
Nhưng sau một cú di chuyển quá mạnh như vậy, việc đuổi theo đỉnh của cây nến không phải lựa chọn ưu tiên của tôi. Hãy để đợt bứt phá tự chứng minh qua lần retest.
Biểu đồ này có động lượng. Giờ chúng ta cần sự xác nhận. 👀📈
#Cap
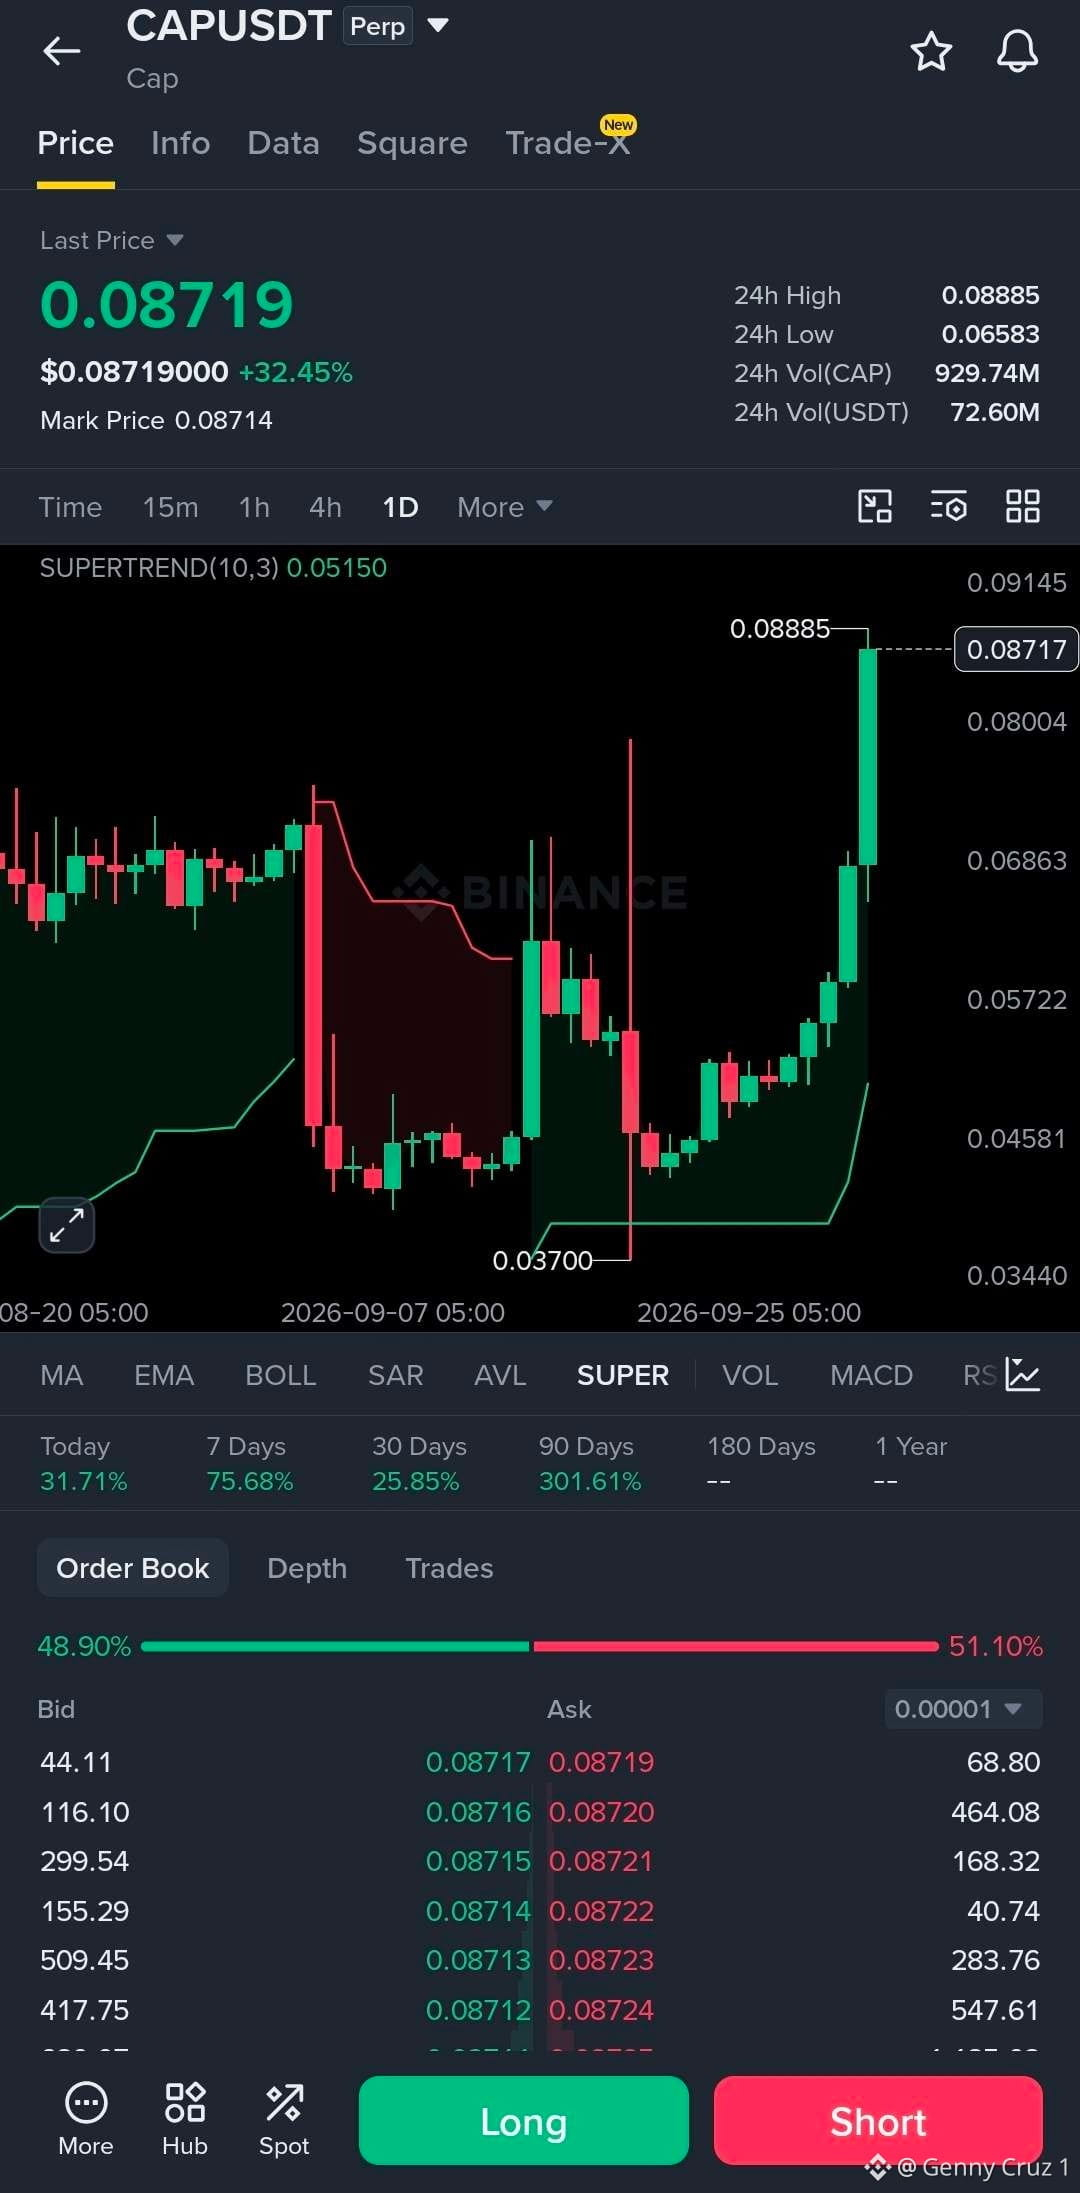
$CAP vừa thực hiện một nước đi xứng đáng để bạn chú ý 👀
Phần thú vị không phải là cây nến +32%… mà là những gì đã xảy ra trước đó.
CAP đã mất vài ngày để xây dựng một nền quanh $0.045–$0.055, rồi bứt phá lên $0.0686 với động lượng mạnh. Giờ giá đang dao động gần đỉnh $0.08885.
Kịch bản tôi đang theo dõi:
🎯 Vào lệnh: $0.076–$0.081
🛑 Cắt lỗ: $0.071
TP1: $0.0888
TP2: $0.095
TP3: $0.105
Vùng $0.076–$0.081 là khu vực kiểm tra lại (retest) quan trọng. Nếu bên mua bảo vệ được, việc lấy lại mốc $0.0888 có thể mở ra một nhịp tăng tiếp theo.
Nhưng sau một cú di chuyển quá mạnh như vậy, việc đuổi theo đỉnh của cây nến không phải lựa chọn ưu tiên của tôi. Hãy để đợt bứt phá tự chứng minh qua lần retest.
Biểu đồ này có động lượng. Giờ chúng ta cần sự xác nhận. 👀📈
#Cap
Phần thú vị không phải là cây nến +32%… mà là những gì đã xảy ra trước đó.
CAP đã mất vài ngày để xây dựng một nền quanh $0.045–$0.055, rồi bứt phá lên $0.0686 với động lượng mạnh. Giờ giá đang dao động gần đỉnh $0.08885.
Kịch bản tôi đang theo dõi:
🎯 Vào lệnh: $0.076–$0.081
🛑 Cắt lỗ: $0.071
TP1: $0.0888
TP2: $0.095
TP3: $0.105
Vùng $0.076–$0.081 là khu vực kiểm tra lại (retest) quan trọng. Nếu bên mua bảo vệ được, việc lấy lại mốc $0.0888 có thể mở ra một nhịp tăng tiếp theo.
Nhưng sau một cú di chuyển quá mạnh như vậy, việc đuổi theo đỉnh của cây nến không phải lựa chọn ưu tiên của tôi. Hãy để đợt bứt phá tự chứng minh qua lần retest.
Biểu đồ này có động lượng. Giờ chúng ta cần sự xác nhận. 👀📈
#Cap
29
·
--
$BTC đang siết chặt gần các đỉnh… liệu lần bứt phá tiếp theo có sắp xảy ra? 👀
Giá đang giữ quanh $84.97K sau đợt tăng lên $87.4K, trong khi Supertrend khung ngày vẫn đang duy trì xu hướng tăng tại $78.35K.
Vào lệnh: $83.5K–$85K
SL: $81.5K
TP1: $87.4K
TP2: $90K
TP3: $94K
Vùng $83.5K–$84K là mức hỗ trợ quan trọng cần theo dõi. Nếu BTC giữ được phạm vi này và giành lại $87.4K, biểu đồ sẽ mở ra hướng tới $90K+.
Việc thủng xuống dưới $81.5K trên khung ngày sẽ làm suy yếu thiết lập.
Hiện tại, BTC đang tích lũy ngay dưới kháng cự. Hãy để lần bứt phá hoặc lần test lại xác nhận hướng đi tiếp theo. 📈
#BTC
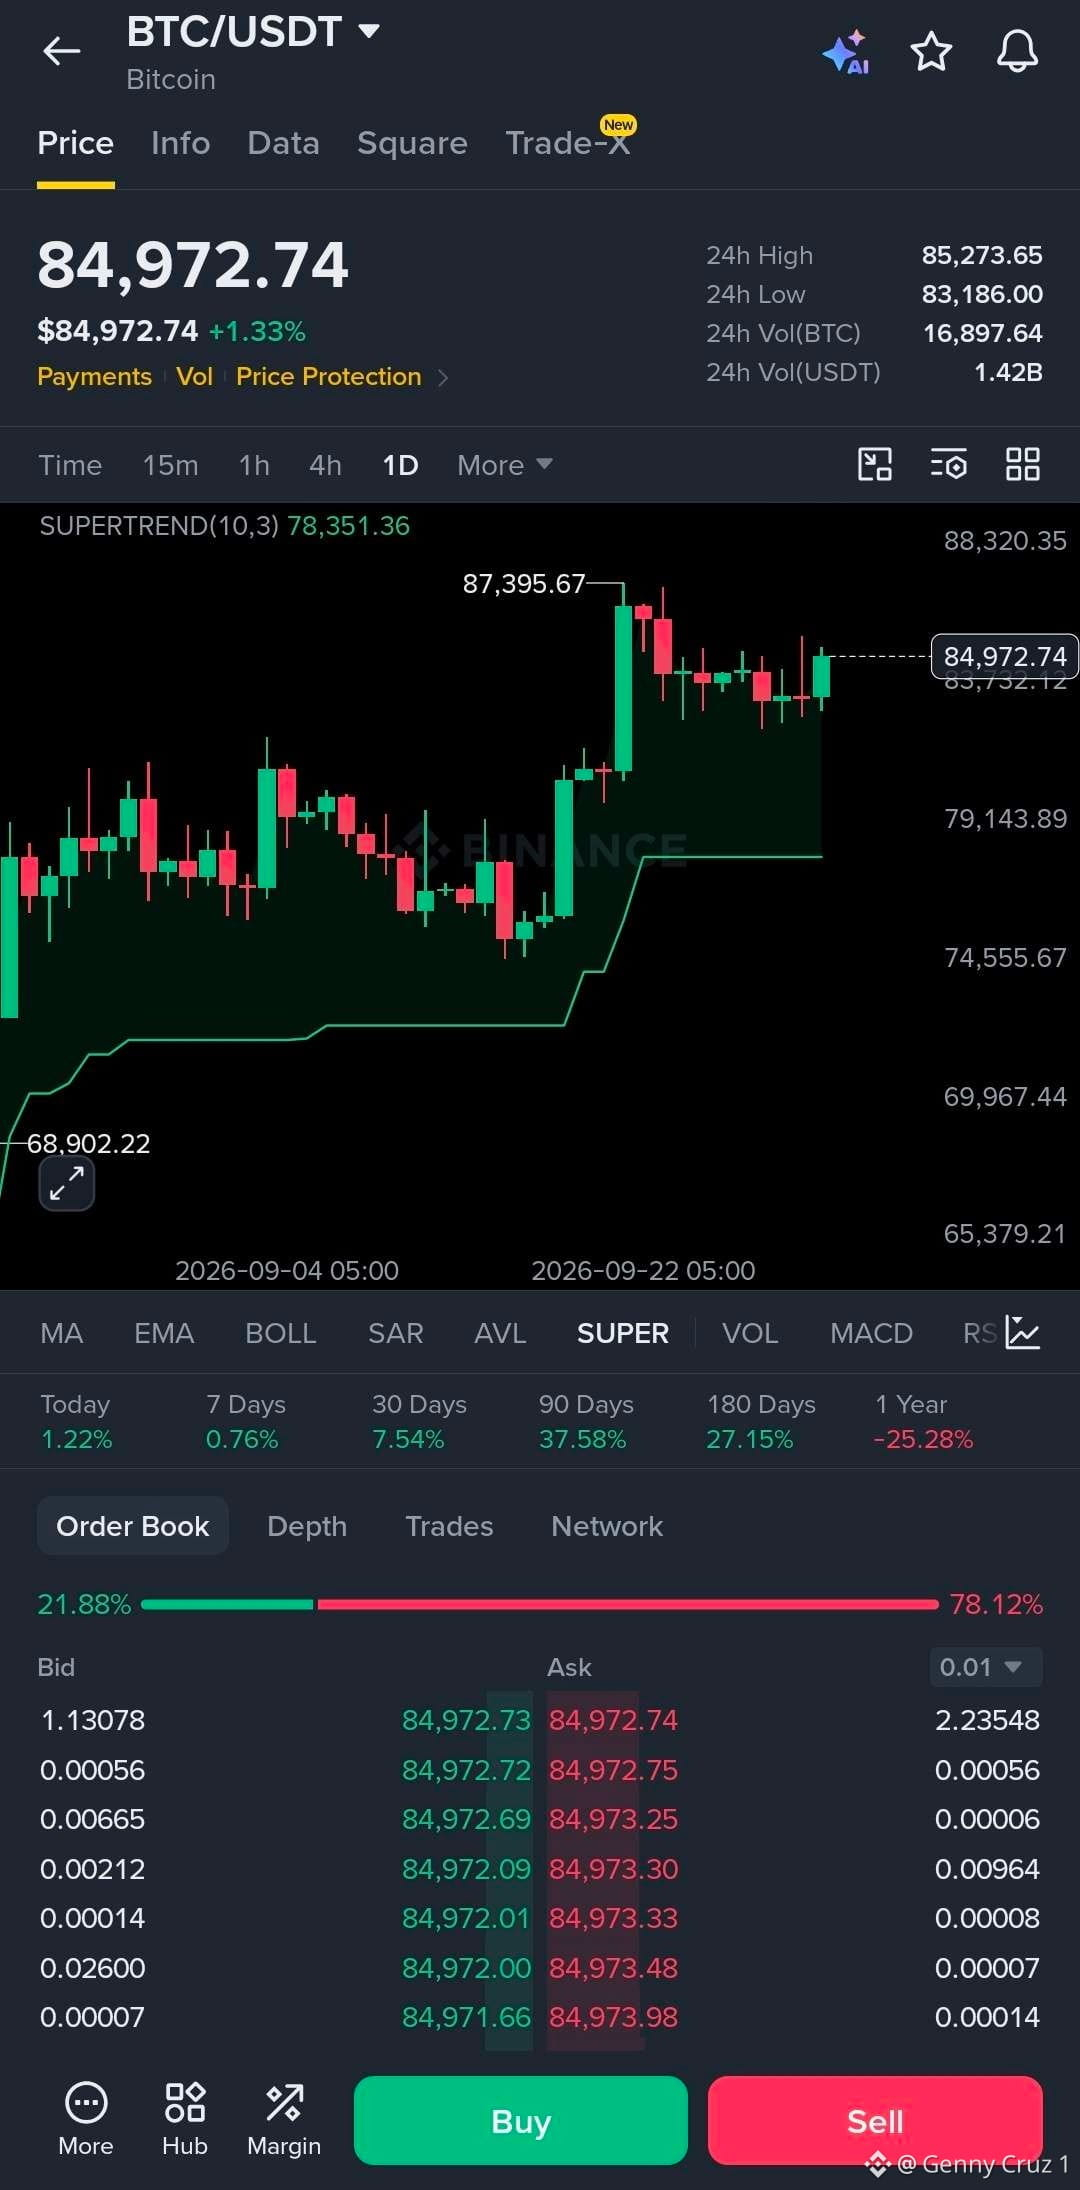
$BTC đang siết chặt gần các đỉnh… liệu lần bứt phá tiếp theo có sắp xảy ra? 👀
Giá đang giữ quanh $84.97K sau đợt tăng lên $87.4K, trong khi Supertrend khung ngày vẫn đang duy trì xu hướng tăng tại $78.35K.
Vào lệnh: $83.5K–$85K
SL: $81.5K
TP1: $87.4K
TP2: $90K
TP3: $94K
Vùng $83.5K–$84K là mức hỗ trợ quan trọng cần theo dõi. Nếu BTC giữ được phạm vi này và giành lại $87.4K, biểu đồ sẽ mở ra hướng tới $90K+.
Việc thủng xuống dưới $81.5K trên khung ngày sẽ làm suy yếu thiết lập.
Hiện tại, BTC đang tích lũy ngay dưới kháng cự. Hãy để lần bứt phá hoặc lần test lại xác nhận hướng đi tiếp theo. 📈
#BTC
Giá đang giữ quanh $84.97K sau đợt tăng lên $87.4K, trong khi Supertrend khung ngày vẫn đang duy trì xu hướng tăng tại $78.35K.
Vào lệnh: $83.5K–$85K
SL: $81.5K
TP1: $87.4K
TP2: $90K
TP3: $94K
Vùng $83.5K–$84K là mức hỗ trợ quan trọng cần theo dõi. Nếu BTC giữ được phạm vi này và giành lại $87.4K, biểu đồ sẽ mở ra hướng tới $90K+.
Việc thủng xuống dưới $81.5K trên khung ngày sẽ làm suy yếu thiết lập.
Hiện tại, BTC đang tích lũy ngay dưới kháng cự. Hãy để lần bứt phá hoặc lần test lại xác nhận hướng đi tiếp theo. 📈
#BTC
28
·
--
Xem bản dịch
$SUI is holding the pullback pretty well… but can it reclaim the highs? 👀
Price is around $1.18 after rejecting from $1.2947. The daily structure is still bullish, with the Supertrend at $0.9417 and price holding well above it.
Entry: $1.14–$1.18
SL: $1.08
TP1: $1.25
TP2: $1.295
TP3: $1.40
The key zone is $1.13–$1.15. If buyers keep defending this area and SUI reclaims $1.25, the previous high around $1.295 becomes the next major test.
A clean break above $1.295 could open the way toward $1.40.
For now, the structure still looks healthy. I’d watch the $1.13–$1.15 retest closely rather than chase the move. 📈
#sui
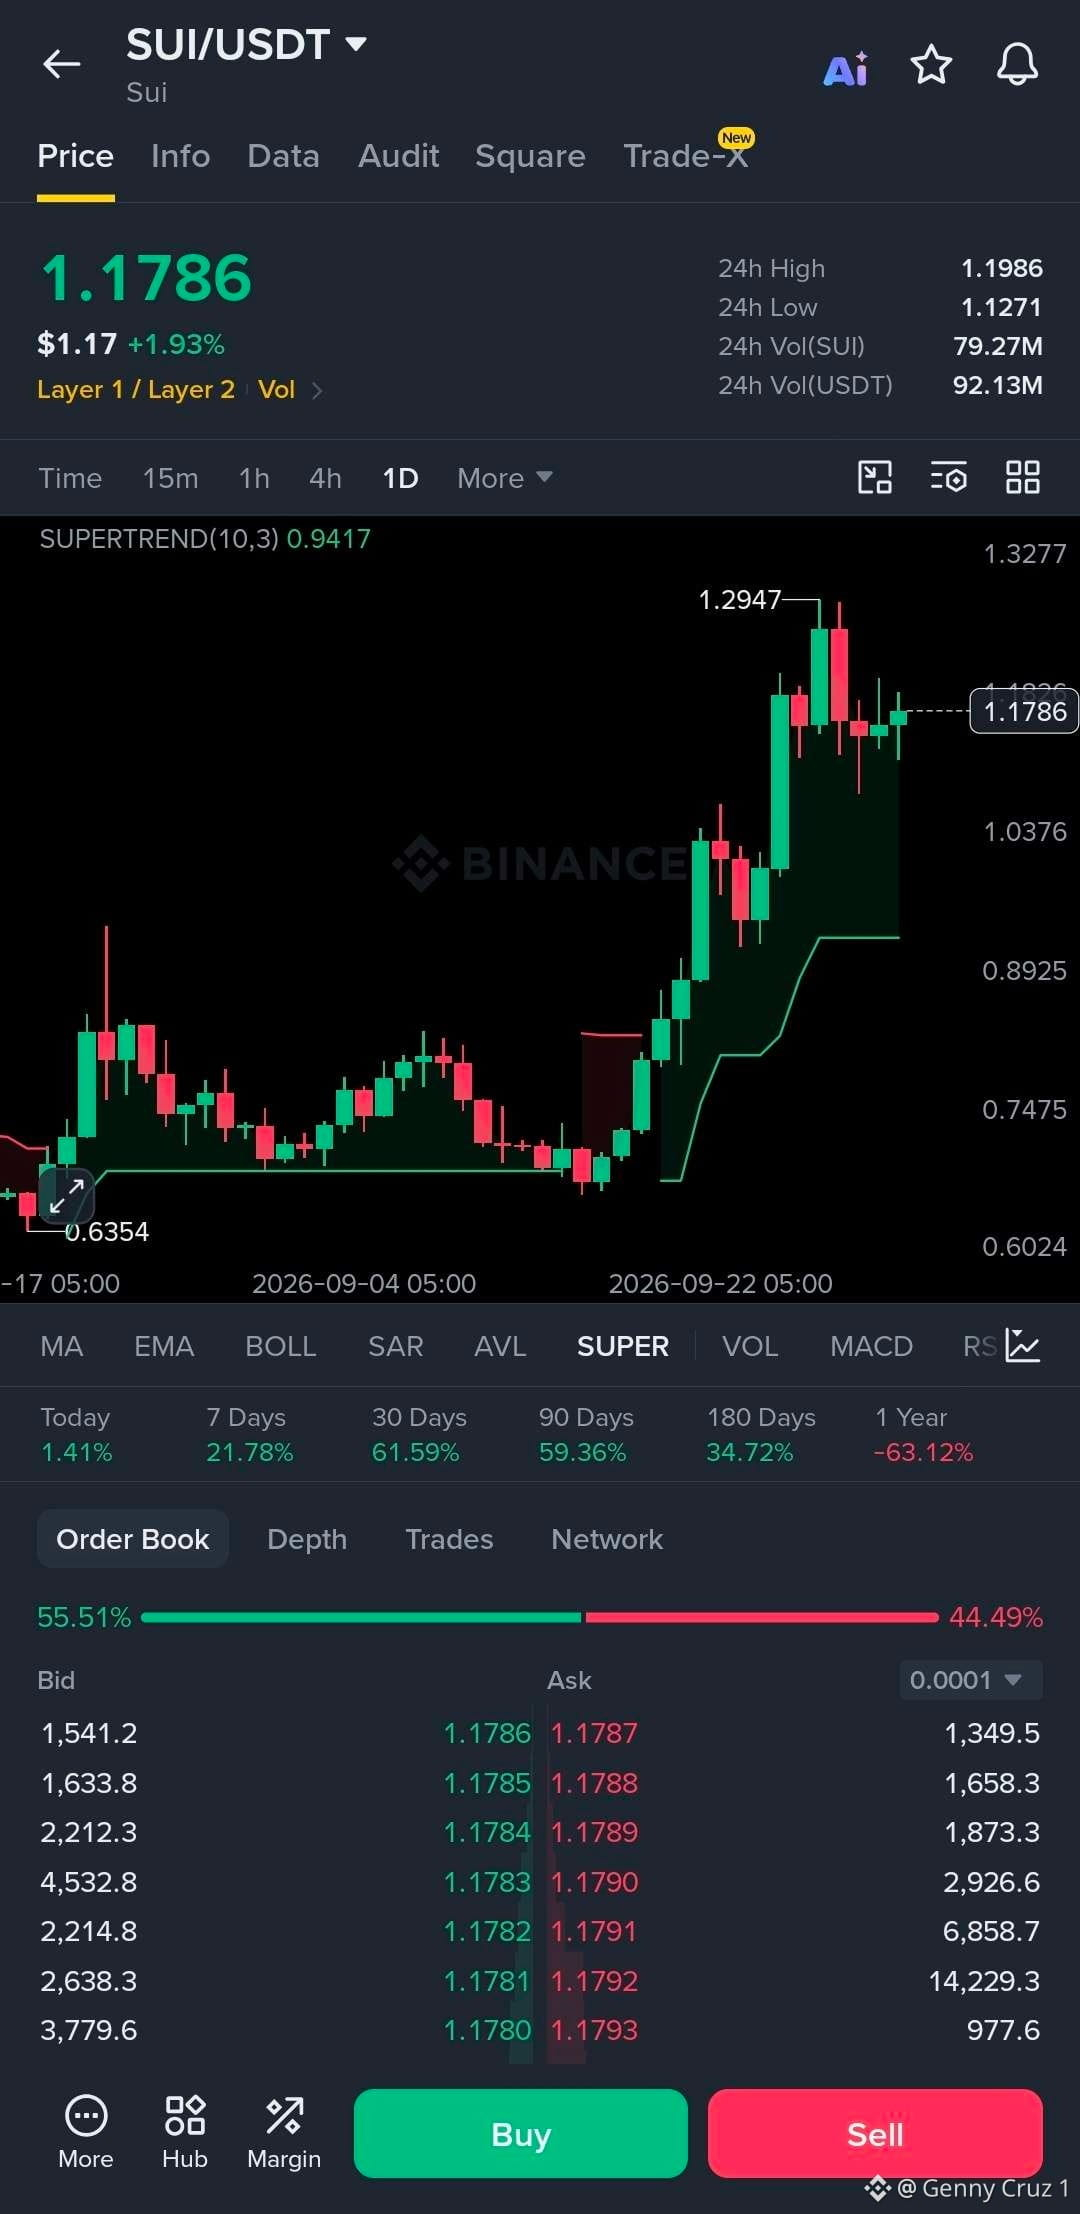
$SUI is holding the pullback pretty well… but can it reclaim the highs? 👀
Price is around $1.18 after rejecting from $1.2947. The daily structure is still bullish, with the Supertrend at $0.9417 and price holding well above it.
Entry: $1.14–$1.18
SL: $1.08
TP1: $1.25
TP2: $1.295
TP3: $1.40
The key zone is $1.13–$1.15. If buyers keep defending this area and SUI reclaims $1.25, the previous high around $1.295 becomes the next major test.
A clean break above $1.295 could open the way toward $1.40.
For now, the structure still looks healthy. I’d watch the $1.13–$1.15 retest closely rather than chase the move. 📈
#sui
Price is around $1.18 after rejecting from $1.2947. The daily structure is still bullish, with the Supertrend at $0.9417 and price holding well above it.
Entry: $1.14–$1.18
SL: $1.08
TP1: $1.25
TP2: $1.295
TP3: $1.40
The key zone is $1.13–$1.15. If buyers keep defending this area and SUI reclaims $1.25, the previous high around $1.295 becomes the next major test.
A clean break above $1.295 could open the way toward $1.40.
For now, the structure still looks healthy. I’d watch the $1.13–$1.15 retest closely rather than chase the move. 📈
#sui
43
·
--
$ENA đang điều chỉnh lại, nhưng xu hướng lớn hơn vẫn còn nguyên vẹn chứ? 👀
Sau khi đẩy lên $0.2946, hiện ENA đang ở quanh mức $0.2483. Supertrend theo khung ngày vẫn đang tăng tại $0.2067, nên cấu trúc vẫn chưa bị phá vỡ.
Vào lệnh: $0.240–$0.250
SL: $0.220
TP1: $0.270
TP2: $0.295
TP3: $0.330
Vùng quan trọng là $0.240–$0.245. Nếu người mua bảo vệ được khu vực này và ENA giành lại $0.270, đỉnh trước đó quanh $0.2946 sẽ trở thành mục tiêu kiểm tra lớn tiếp theo.
Nếu đóng cửa lỗ theo ngày dưới $0.220 thì kịch bản sẽ suy yếu đáng kể.
Tạm thời, điều này trông giống như một nhịp điều chỉnh trong cấu trúc tăng, hơn là một sự phá vỡ xu hướng đã được xác nhận. 📈
#ENA
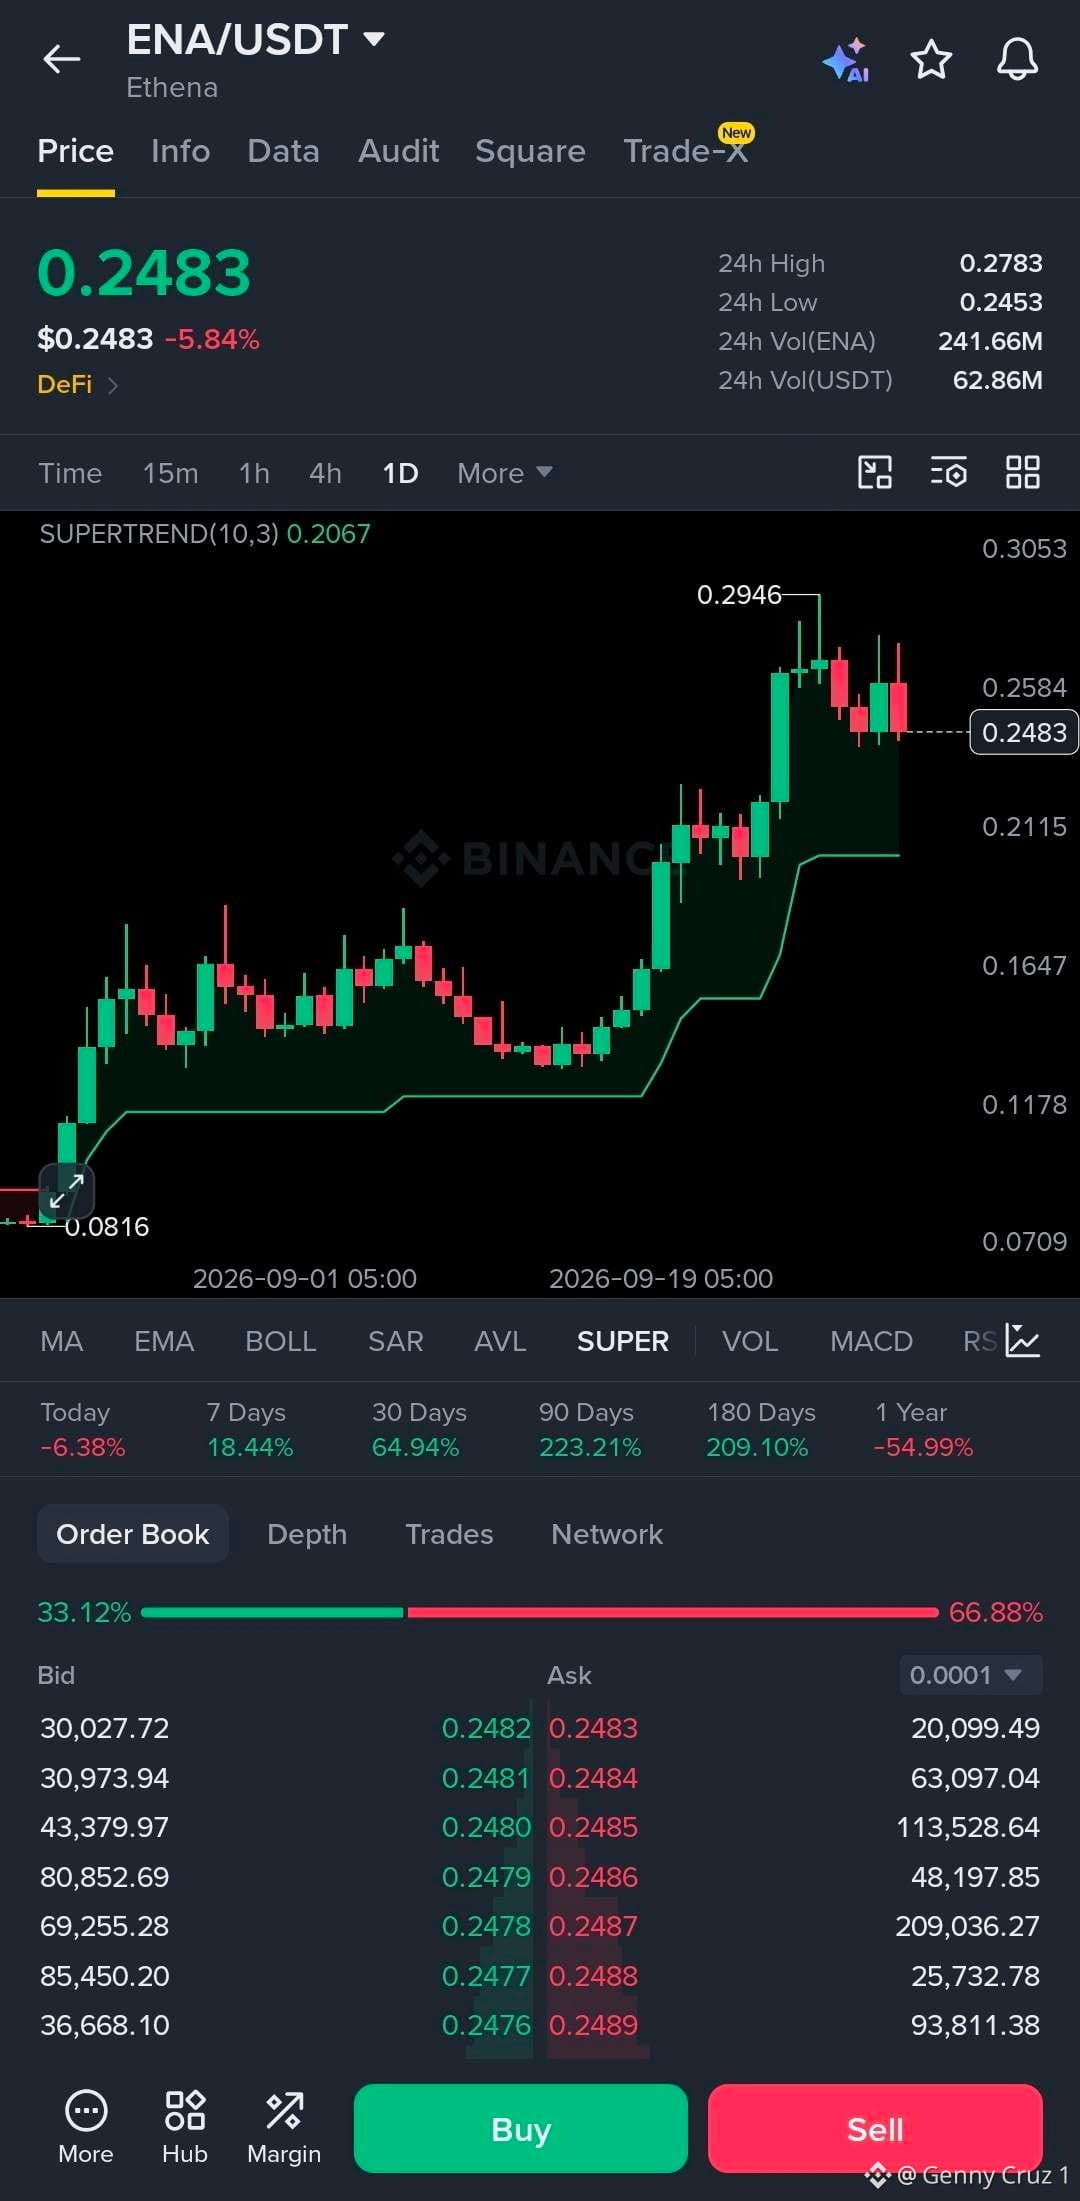
$ENA đang điều chỉnh lại, nhưng xu hướng lớn hơn vẫn còn nguyên vẹn chứ? 👀
Sau khi đẩy lên $0.2946, hiện ENA đang ở quanh mức $0.2483. Supertrend theo khung ngày vẫn đang tăng tại $0.2067, nên cấu trúc vẫn chưa bị phá vỡ.
Vào lệnh: $0.240–$0.250
SL: $0.220
TP1: $0.270
TP2: $0.295
TP3: $0.330
Vùng quan trọng là $0.240–$0.245. Nếu người mua bảo vệ được khu vực này và ENA giành lại $0.270, đỉnh trước đó quanh $0.2946 sẽ trở thành mục tiêu kiểm tra lớn tiếp theo.
Nếu đóng cửa lỗ theo ngày dưới $0.220 thì kịch bản sẽ suy yếu đáng kể.
Tạm thời, điều này trông giống như một nhịp điều chỉnh trong cấu trúc tăng, hơn là một sự phá vỡ xu hướng đã được xác nhận. 📈
#ENA
Sau khi đẩy lên $0.2946, hiện ENA đang ở quanh mức $0.2483. Supertrend theo khung ngày vẫn đang tăng tại $0.2067, nên cấu trúc vẫn chưa bị phá vỡ.
Vào lệnh: $0.240–$0.250
SL: $0.220
TP1: $0.270
TP2: $0.295
TP3: $0.330
Vùng quan trọng là $0.240–$0.245. Nếu người mua bảo vệ được khu vực này và ENA giành lại $0.270, đỉnh trước đó quanh $0.2946 sẽ trở thành mục tiêu kiểm tra lớn tiếp theo.
Nếu đóng cửa lỗ theo ngày dưới $0.220 thì kịch bản sẽ suy yếu đáng kể.
Tạm thời, điều này trông giống như một nhịp điều chỉnh trong cấu trúc tăng, hơn là một sự phá vỡ xu hướng đã được xác nhận. 📈
#ENA
73
Đăng nhập để khám phá thêm nội dung
Tham gia cùng người dùng tiền mã hóa toàn cầu trên Binance Square
⚡️ Nhận thông tin mới nhất và hữu ích về tiền mã hóa.
💬 Được tin cậy bởi sàn giao dịch tiền mã hóa lớn nhất thế giới.
👍 Khám phá những thông tin chuyên sâu thực tế từ những nhà sáng tạo đã xác minh.
Email / Số điện thoại
Chủ đề thịnh hành
TheoDõiFOMC
124,297 lượt xem
694 đang thảo luận
#TheoDõiFOMC
🔥 FOMC lại bắt đầu trở thành tâm điểm của crypto
Bitcoin vừa bước vào tháng 10, nhưng câu chuyện lớn phía sau thị trường lúc này không chỉ là giá.
Các trader đang bắt đầu hướng sự chú ý về cuộc họp FOMC ngày 27–28/10. Sau một loạt phát biểu mới từ quan chức Fed, kỳ vọng về việc tăng lãi suất ngay trong tháng 10 đã giảm đáng kể.
Điều thú vị là trước đó thị trường từng đặt cược khá cao vào một đợt tăng tiếp theo.
Giờ thì mọi thứ lại quay sang chờ dữ liệu kinh tế và những phát biểu tiếp theo của Fed.
Với crypto, chỉ cần kỳ vọng lãi suất thay đổi mạnh là $BTC có thể lập tức biến động, rồi kéo theo cả thị trường altcoin.
Tháng 10 mới bắt đầu mà macro đã có chuyện để hóng rồi 👀
#Bitcoin #Crypto #Macro #Fed #BinanceSquare
X LEI
·0 lượt thích
·174 lượt xem
TinFed
109,102 lượt xem
497 đang thảo luận
BinanceLaunchesBinanceIntelligence
97,556 lượt xem
1,051 đang thảo luận