After trading cryptocurrencies for 10 years, I made a fortune during the 10-year bull market, faced 'bankruptcy' twice, and now I can support my family through trading, withdrawing over 8 million to spend, with more than 26 million still in the exchange. To be honest, I’ve made it through!
Only because of the classic buying and selling mantra of dead-holding moving averages, I have almost eaten up all the profits of my positions. The principle is simple; firmly adopting this type of trading system will turn it into your ATM over time.
The trading system includes a comprehensive system covering various aspects such as traders' trading philosophy, trading signals, risk management, and emotional control.
Trading philosophy: A trader's understanding of the market and their trading objectives, such as whether they are pursuing trend trading, swing trading, or other specific types of trading opportunities.
Trading Signals: Specific indications of buy and sell points, such as those generated by technical analysis indicators (e.g., moving averages, MACD, etc.), or information based on fundamental analysis.
Risk Management: Set stop-loss points, take-profit points, and money management strategies to ensure that losses are controlled even in adverse market conditions.
Emotional control: Maintain calm decision-making ability and avoid irrational trading behavior caused by greed or fear
Execution difficulties: including overcoming psychological barriers, strictly implementing established trading plans, and continuously optimizing and improving trading systems.
Let me share with you the correct usage of the million-value indicator EMA in the medium and long term and the details to pay attention to!
1. Indicator Overview
The Moving Average Convergence/Divergence (MACD) is a common technical analysis tool in stock trading. Introduced by Gerald Appel in the 1970s, it is used to determine the strength, direction, energy, and trend cycles of stock price changes in order to identify buying and selling opportunities.
The MACD indicator consists of a set of curves and graphs, calculated by the difference between the fast and slow exponential moving averages (EMA) of the stock price or index at the closing time. "Fast" refers to the EMA of a shorter period, while "slow" refers to the EMA of a longer period, with the most commonly used being the 12-day and 26-day EMAs. Of course (from Wikipedia)
Those who often watch the market should have seen it, which probably looks like this:
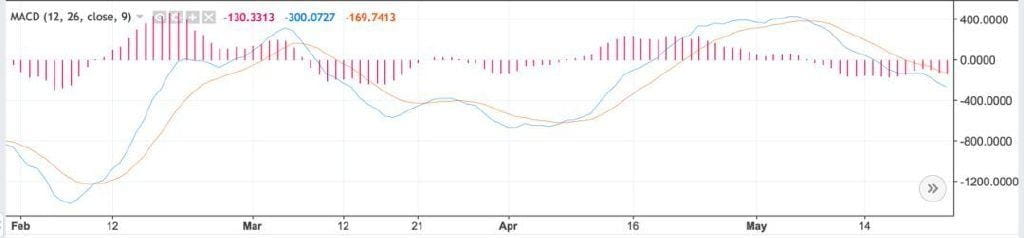
2. Principle explanation
To understand how to use MACD, we must first understand what parts MACD consists of.
The above picture shows the MACD of BTC/USDT on Bitfinex in daily units.
You can see that the horizontal axis is time, the vertical axis is units, and the graph consists of three main parts: the blue line, the yellow line, and the red column. Let's introduce each of them below.
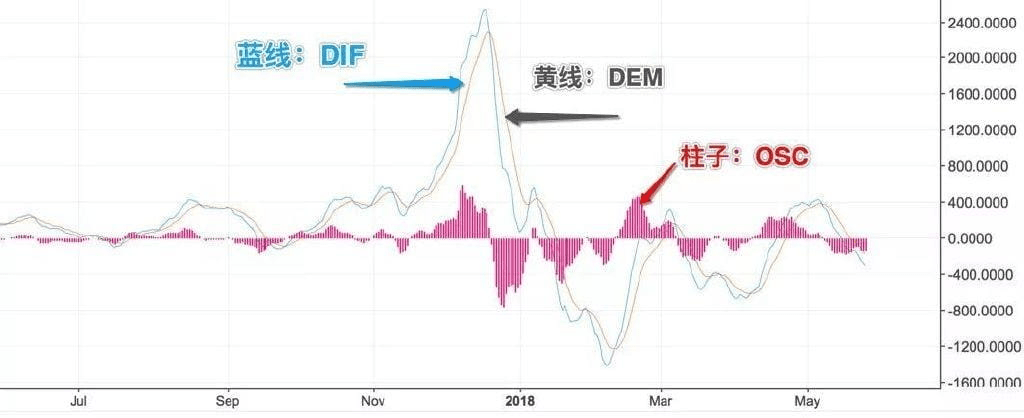
Blue line: DIF
The blue line is the MACD Line, also known as DIF. By default, it represents the difference in speed between the 12-day and 26-day moving averages of price. The calculation formula is as follows:

We can roughly take the average closing price over a period of time as the average holding cost of the market during this period.
EMA(close,12) represents the average closing price of the last 12 days. Similarly, EMA(close,26) represents the average closing price of the last 26 days. The average closing price of the 12th day minus the average closing price of the 26th day is the DIF. From this, we can summarize what will happen in an ideal situation:
1. The stock price rises rapidly over a period of time, with the increase becoming increasingly larger. The average closing price of the last 12 days is greater than the average closing price of the last 26 days. The DIF is greater than 0 and the value is increasing, moving further and further away from the zero axis. The average holding cost in the market is increasing by a large amount.
2. When a stock price rises over a period of time, the increase becomes smaller and smaller. The average of the last 12 days is greater than the average of the last 26 days. The DIF is greater than 0, but the value is decreasing, getting closer to the zero axis. The average holding cost of the market increases, but the amount is small.
3. When the stock price declines over a period of time, the decline becomes increasingly larger. The average of the last 12 days is less than the average of the last 26 days. The DIF is less than 0 and the value becomes smaller and smaller, moving further and further away from the zero axis. The average holding cost of the market is decreasing, but the amount is large.
4. When the stock price declines over a period of time, the decline becomes smaller and smaller, the average of the last 12 days is less than the average of the last 26 days, the DIF is less than 0, and the value becomes larger and larger, getting closer to the zero axis. The average holding cost of the market decreases, but the amount is small.
Red line: DEM
The red line is the Signal Line, also known as the DEM. By default, it represents the 9-day average of the MACD Line (DIF). The calculation formula is as follows:

In other words, it represents the average change in holding costs over a 9-day period. Therefore, DEM always fluctuates less than DIF and reacts more slowly.
Therefore, we call DIF the fast line and DEM the slow line.
Histogram: OSC
The red column is the MACD Histogram, also known as OSC. OSC represents the difference between DIF and DEM. The formula is as follows:
OSC = DIF - DEM
Sometimes, in order to make it easier for us to check, we multiply the difference between DIF and DEM by 2. At this time, the column will be twice as high and more recognizable.
OSC represents the difference between today's change in average holding cost and the average change in average holding cost. What is the significance of this difference?
We can use the size and positive/negative nature of this difference to reflect the market's upward or downward trend and the strength of its willingness. OSC can be considered the "acceleration" of price, indicating changes in potential energy.
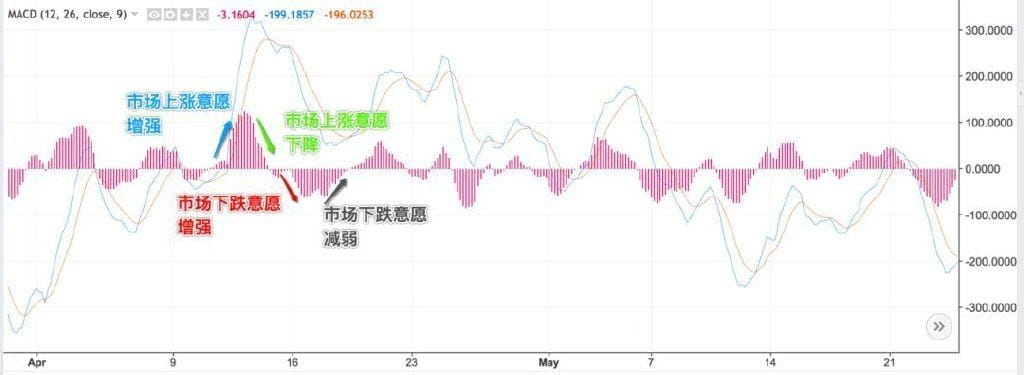
As shown in the figure, through OSC, we can see the changes in the short-term trend of the market and thus determine the timing of buying and selling.
3. Two basic ways to use MACD
Let's take a look at the two most basic ways to use MACD:
Golden cross and death cross judgment method;
Method of judging bottom divergence and top divergence.
Golden Cross and Death Cross
Golden cross and death cross often represent the turning point of a trend and are very important reference indicators for buying and selling points. As shown in the figure below:
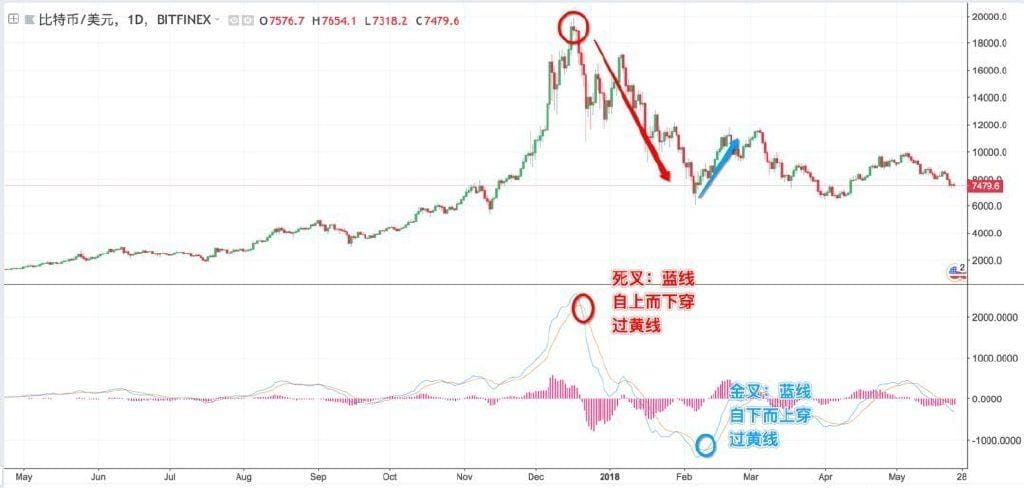
BTC K-line and MACD comparison chart
Let's look at the trend after BTC reached $20,000 in December. When the DIF crosses the DEM from top to bottom, as seen in the first circle on the lower left of the chart, the blue line crosses the orange line from top to bottom, forming a death cross, and the entire market enters a downward trend. It wasn't until February 10th, the second circle from the bottom, that the DIF crosses the DEM from bottom to top, as seen in the second circle on the chart, that the blue line crosses the orange line from bottom to top, forming a golden cross, ushering in a market rebound.
For a dead cross, the higher the position, the greater the probability of a downward trend; similarly, for a golden cross, the lower the position, the greater the probability of an upward trend.
Therefore, we see that between the two peaks, there are many cases of DIF and DEM crossing or even entanglement. Due to insufficient height and depth, they cannot constitute strong buy and sell signals. They are often very short-term market conditions and have little guiding significance for trends.
In actual trading, it's crucial to pay attention to the height and depth of the crossover, combining this with trading volume and the candlestick chart. Does this mean a trade isn't a good trade if the depth is shallower or the height is lower than before? Let's look at how to identify top and bottom divergences.
Bottom divergence and top divergence
1. What is the bottom divergence phenomenon? Above:
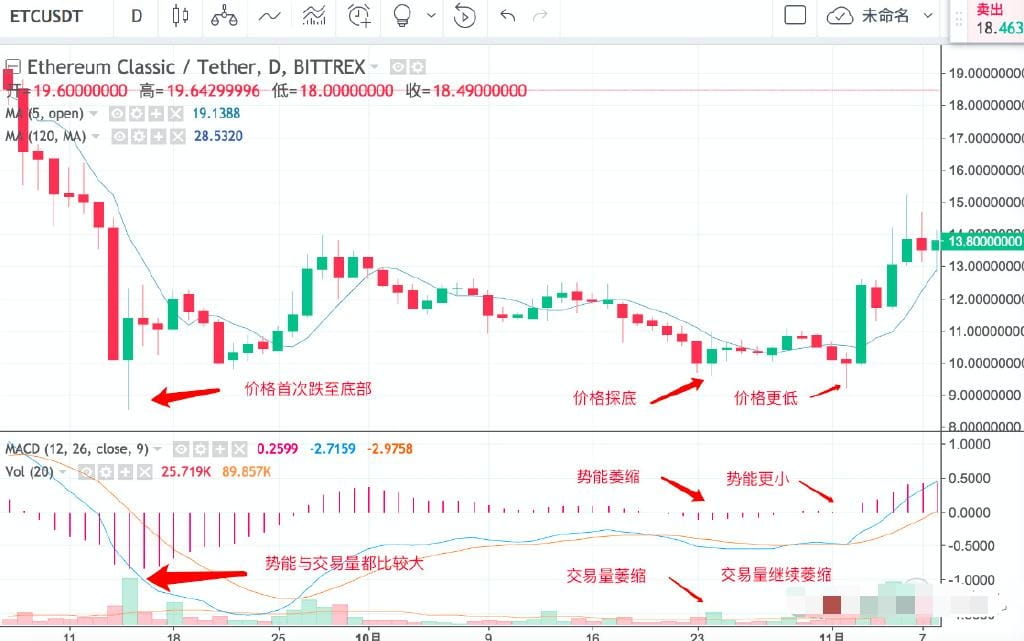
Comparison chart of ETC's K-line and MACD before the bull market in 2017
First, let's look at the phenomenon: As we can see at the left arrow on the candlestick chart, the price first hit the bottom, forming a large lower shadow, then moving sideways into a range of fluctuations. Throughout this range, potential energy continued to shrink, and while trading volume did fluctuate, it was very weak, showing a shrinking trend compared to the trading volume immediately after the bottom.
Pay attention to the two groups of arrows in the middle and back of the figure. After experiencing a period of shock and washing, the main force tried to bottom out for the first time at the middle group of arrows, testing the number of unsteady chips in the market. In this test, both trading volume and potential energy increased at the same time, but compared with before, it has shrunk severely; in the last group of arrows, the main force bottomed out for the second time, and a lower shadow line appeared. Compared with the first bottoming out, both potential energy and volume energy continued to shrink.
This situation where the price falls but the trading volume and OSC shrink is called bottom divergence.
Let's talk about the principle: We can imagine that when prices in the market hit bottom or peak, there is often a fierce game between bulls and bears, so under normal circumstances, there will be large trading volume. When the price bottoms out lower and lower, but the trading volume and MACD changes become smaller and smaller, we believe that the market is stabilizing and it is difficult for the main players to absorb chips through the market crash. Therefore, the main players are often looking for opportunities to quickly drive up the market in line with the overall market environment, which means that a bull market is likely to arrive in the near future.
Therefore, when a bottom divergence occurs, the market may have reached its bottom, and it is time to ambush and enter the market. (Please note!)
2. Top Divergence
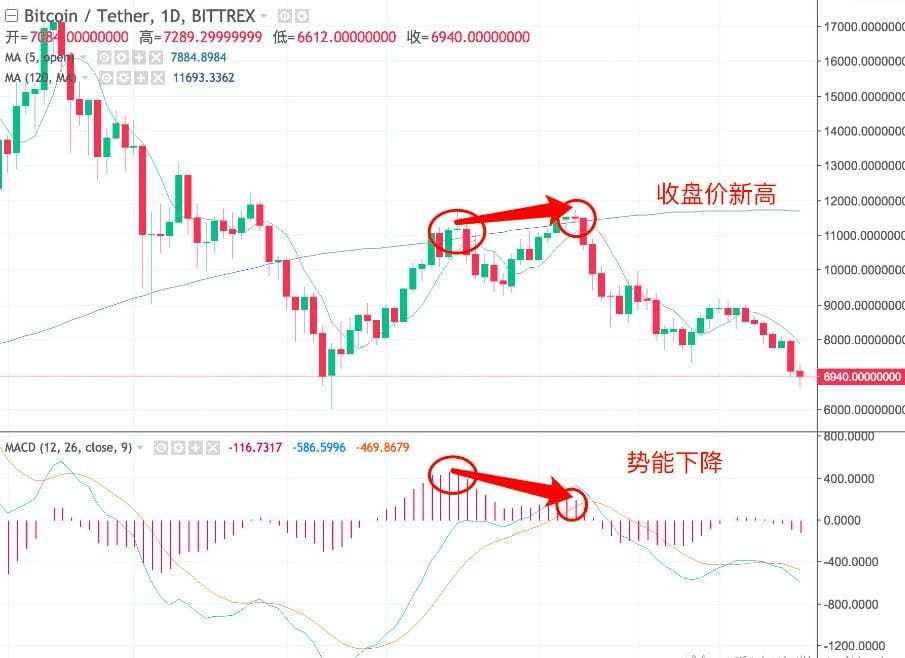
The picture shows BTC's two rebounds
Let's first discuss the phenomenon: In the first circle on the left, the price rebounded to 11,230, then a wave of correction formed a head-and-shoulders bottom with a high on the left and a low on the right. The price then rebounded again, but unfortunately, we can see that although the closing price reached a new high, the OSC fell significantly compared to the previous level, and the momentum weakened. The bulls were no longer able to continue to break through. Ultimately, the price fell all the way, and BTC fell below 7,000, entering a downward trend. This situation where the price rises but the OSC falls is called a top divergence.
Let's talk about the principle: Under normal circumstances, during the first rise, the bulls try to break through the resistance level, but fail, and market confidence wanes. After the pullback, the market gathers strength to rise again. At this time, the resistance at the resistance level is stronger. If it is not a breakout market with large volume, it is difficult to break through the resistance level.
Therefore, we believe that when a top divergence occurs, the possibility of breaking through the resistance level is greatly reduced, which is a relatively strong bearish signal. At this time, you should stop loss and liquidate your position in time and look for new entry opportunities.
4. Summary
MACD is one of the simplest and most reliable indicators. There are two most common methods for using it:
1. Golden cross and death cross judgment method;
2. Method of judging bottom divergence and top divergence.
The golden cross and dead cross judgment method is a lagging indicator and has weak practicality; relatively speaking, bottom divergence and top divergence are more instructive for bottom fishing and top selling.
Indicator introduction: EMA, moving average indicator, here we only share the medium and long-term usage, very practical and highly accurate
Applicable groups: Suitable for spot or low-multiple medium and long-term trading users
Applicable targets: high liquidity, high market value, that is, targets with large volume and high stability. Not suitable for small targets such as copycats.
Applicable cycle: The level above the daily line is best, with strong stability, and the short-term signal should be at least 4 hours.
Indicator parameters: EMA21-55-120-200, bear or bull market are arranged as short (from top to bottom 200-120-55-21) or long (from top to bottom 21-55-120-200), the initial signal only looks at the crossover signal of EMA21-55
Signal judgment: observe the crossover of EMA21 and EMA55 above the daily level, buy when there is a golden cross, sell when there is a dead cross, and strictly implement it.
Usage instructions and details:
1. Buy: Buy when you see a golden cross at the daily level
You can't buy at the lowest point here, but you can buy along the trend and leave the profit to time. If you focus on the buying position, there are a few things you need to pay attention to.
When the market is fluctuating and sideways, the golden cross and dead cross of the daily line sometimes alternate frequently, resulting in buying and selling losses, but eventually one side will have a midline continuation, so even if there are losses, the buy and sell signals must be strictly implemented to prevent missing the trend. In order to reduce losses, it can be judged that when the market is fluctuating and sideways, such as when the golden cross and dead cross signals are formed, wait for the price to pull back to the moving average to buy, or wait for the moving average to move up and close to the average price to buy and cover the position. Usually, you can buy when it is close to EMA21 or above EMA55. There is a case explanation in the figure below.
2. Selling: There are two types of selling
1. Sell when a death cross is seen above the daily level (this usually leads to some profit taking when the mid-term trend is short)
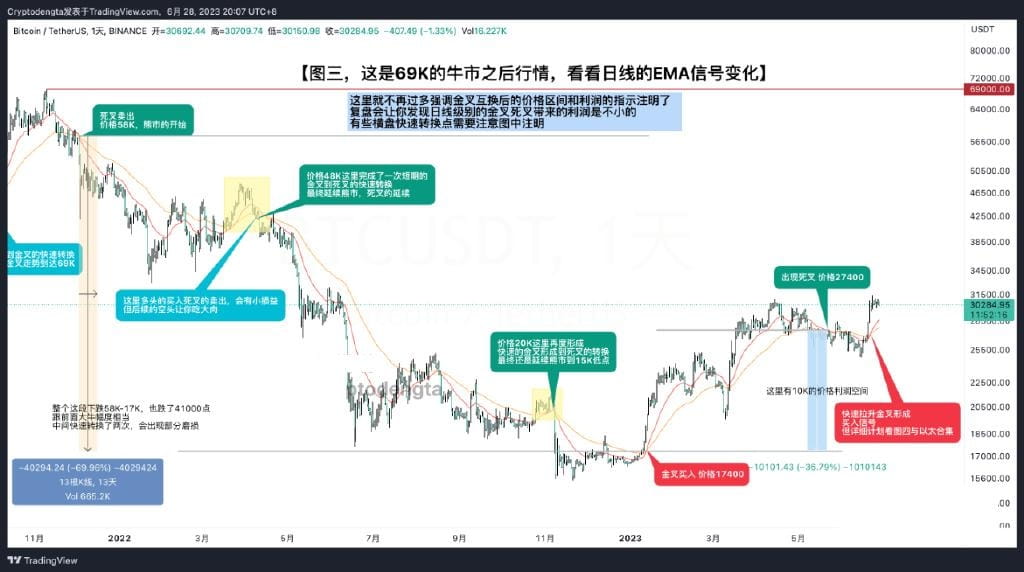
2. Sell when the target is reached (this can be flexibly adopted according to personal needs and plans. The disadvantage is that it is easy to sell at a high price during the bull stage)
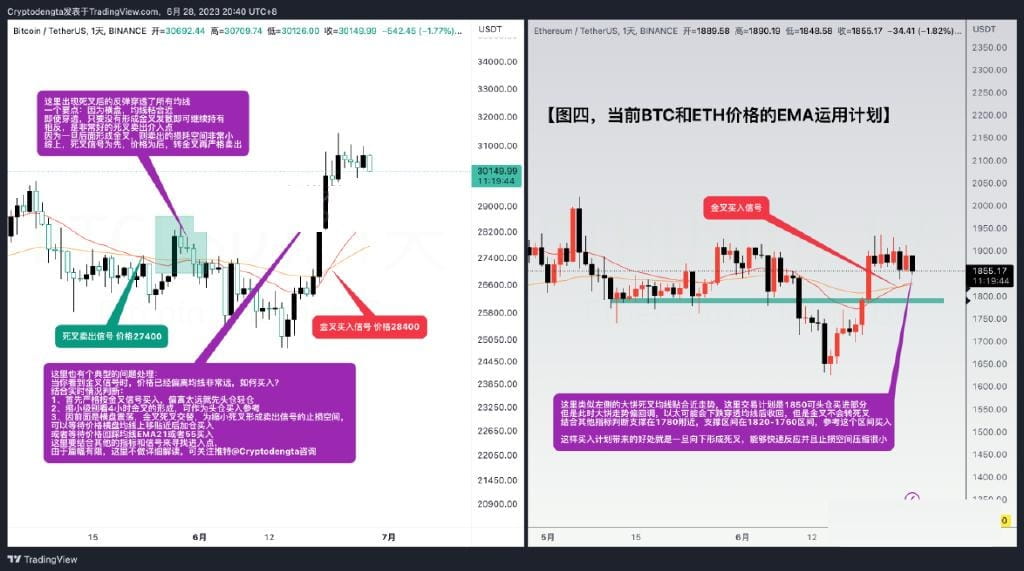
The above are all important points and necessary conditions. For more details, please refer to the illustrated case
In summary, the EMA indicator is used to judge the medium and long-term direction. It is used to take advantage of the trend and will never buy at the lowest point or sell at the highest point. It can be used flexibly for greater profits and usage.
EXPMA indicator forms a golden cross:
Every time the market turns, the price of a cryptocurrency always catches the eye of the cryptocurrency community, and the hype is always different. The rise in price and the arrival of a bull market are what everyone truly hopes for and what they will achieve.
There is not much to say about the market, but it should be noted that, regardless of the bull or bear market, timely stop-loss and take-profit are crucial for every investor. Be cautious and calm, and only by cashing in your chips can you determine the final profit. Don't try to pocket all the profits. Only by knowing when to stop when you are ahead can you effectively avoid risks.
Trading should never be driven by emotion. When the mood strikes, you might sell everything you own and use high leverage, while when the mood strikes, you'll recklessly trade without regard for cost. Such enthusiasm will ultimately lead to disastrous losses. When investing, profit is secondary; preserving your principal is paramount. If you can't even protect your principal, how can you lock in gains or achieve sudden wealth? Therefore, today, let's discuss the exponential moving average (EXPMA) indicator and common candlestick chart patterns.
First, let's look at the EXPMA indicator, a trend indicator that uses an exponentially decreasing weighted moving average. Its construction principle is to take the arithmetic average of closing prices and analyze the results to determine future price trends.
Compared to the MACD and DMA indicators, the EXPMA indicator prioritizes the weight of the current day's price movements in its calculation formula. Therefore, as a trend analysis indicator, the indicator overcomes the lag of MACD signals in predicting price trends. It also eliminates the tendency of DMA indicators to generate signals ahead of time, making it a very effective analytical indicator.
So, in actual cryptocurrency trading, what are the buying and selling techniques of the EXPMA indicator? First, let’s take a look at the buying techniques:
① When the EXPMA indicator forms a golden cross, the price reverses and rises, and the trading volume increases, buy;
② When the EXPMA indicator turns flat or upward, and the price crosses above the EXPMA indicator, buy when the price closes with a positive line;
③. When the EXPMA indicator moves upward and the price falls below EXPMA, it indicates an oversold reversal and an upward trend. Buy when the price rises by more than 4%.
④. When the EXPMA indicator moves upward and the price adjusts to confirm its support, buy when a reversal upward candlestick pattern appears;
⑤. When the EXPMA indicator points downward and the price moves away from the EXPMA indicator, the price oversells and reverses to rise, the trading volume increases, or a large bullish candlestick with a reversal appears, buy.
The selling technique is just the opposite:
①. When the EXPMA indicator forms a death cross, the price reverses and falls, sell;
② When the EXPMA indicator turns flat or downward, and the price crosses below the EXPMA indicator, sell when the price closes with a negative line;
③. When the EXPMA indicator moves downward and the price breaks through EXPMA, the stagflation will reverse and fall, and the high point will be lowered to sell;
④. When the EXPMA indicator moves downward and the price rebounds to confirm its pressure, sell when a reversal decline K-line appears;
⑤. When the EXPMA indicator points upward, the price rises rapidly and moves away from the EXPMA indicator. When the price stagnates and reverses to fall, sell.
Of course, all the techniques summarized here are for reference only. Specific operations should be evaluated and analyzed based on your own investment habits and priorities. After all, market inefficiencies and individual investor differences exist, and a bookish or generic approach will lead to widely varying results. Furthermore, EXPMA is not necessarily accurate or universally applicable. It's important to note that the golden cross buy we emphasize requires the following conditions to be met:
① The EXPMA indicator and the MACD indicator should form resonance;
② Check whether the MACD indicator crosses the 0 axis;
③. Check whether the EXPMA indicator has formed a golden cross before the day when the MACD indicator crosses the 0 axis.
If all of the above conditions are true, you can choose to increase your position. If the answer is no, it is better to observe and wait for the right time to buy.
Risk Warning: The MACD indicator usage is for reference only. Technical analysis never relies on a single indicator to determine market trends. If you use only a single indicator to predict future market trends, the probability of failure is high. Be aware of the risks.
Again, if you don’t know what to do in the bull market, click on Aze’s avatar, follow, bull market spot planning, the latest news in the currency circle, contract passwords, free sharing