

김수현 6
1.3k Жариялаулар

김수현 6
Хабарлау
Пайдаланушыны блоктау
Ашық сауда
Кездейсоқ трейдер
4.2 ай
18 Жазылым
30 Жазылушылар
140 лайк басылған
Жазбалар
Портфолио
·
--
Жоғары (өспелі)
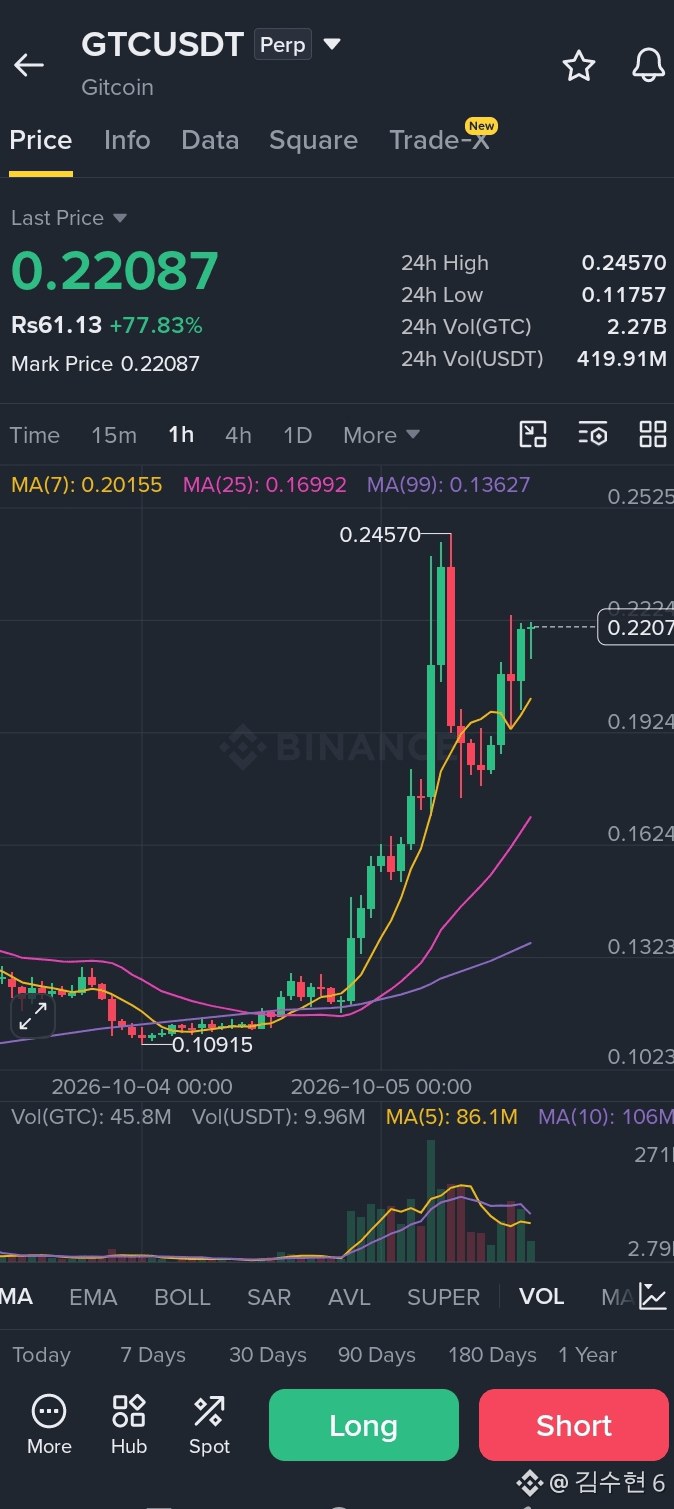
🚀 NEW TRADE CALL | $GTC (LONG)
Entry Zone: $0.215 – $0.219
Stop-Loss: $0.204
Take-Profit Targets:
🎯 TP1: $0.225
🎯 TP2: $0.235
🎯 TP3: $0.245
$GTC
{future}(GTCUSDT)
#Nikkei225Jumps2.5%ToThreeMonthHigh #DriftHackVictimsBeginClaims
🚀 NEW TRADE CALL | $GTC (LONG)
Entry Zone: $0.215 – $0.219
Stop-Loss: $0.204
Take-Profit Targets:
🎯 TP1: $0.225
🎯 TP2: $0.235
🎯 TP3: $0.245
$GTC
#Nikkei225Jumps2.5%ToThreeMonthHigh #DriftHackVictimsBeginClaims
Entry Zone: $0.215 – $0.219
Stop-Loss: $0.204
Take-Profit Targets:
🎯 TP1: $0.225
🎯 TP2: $0.235
🎯 TP3: $0.245
$GTC
#Nikkei225Jumps2.5%ToThreeMonthHigh #DriftHackVictimsBeginClaims
96
·
--
Жоғары (өспелі)
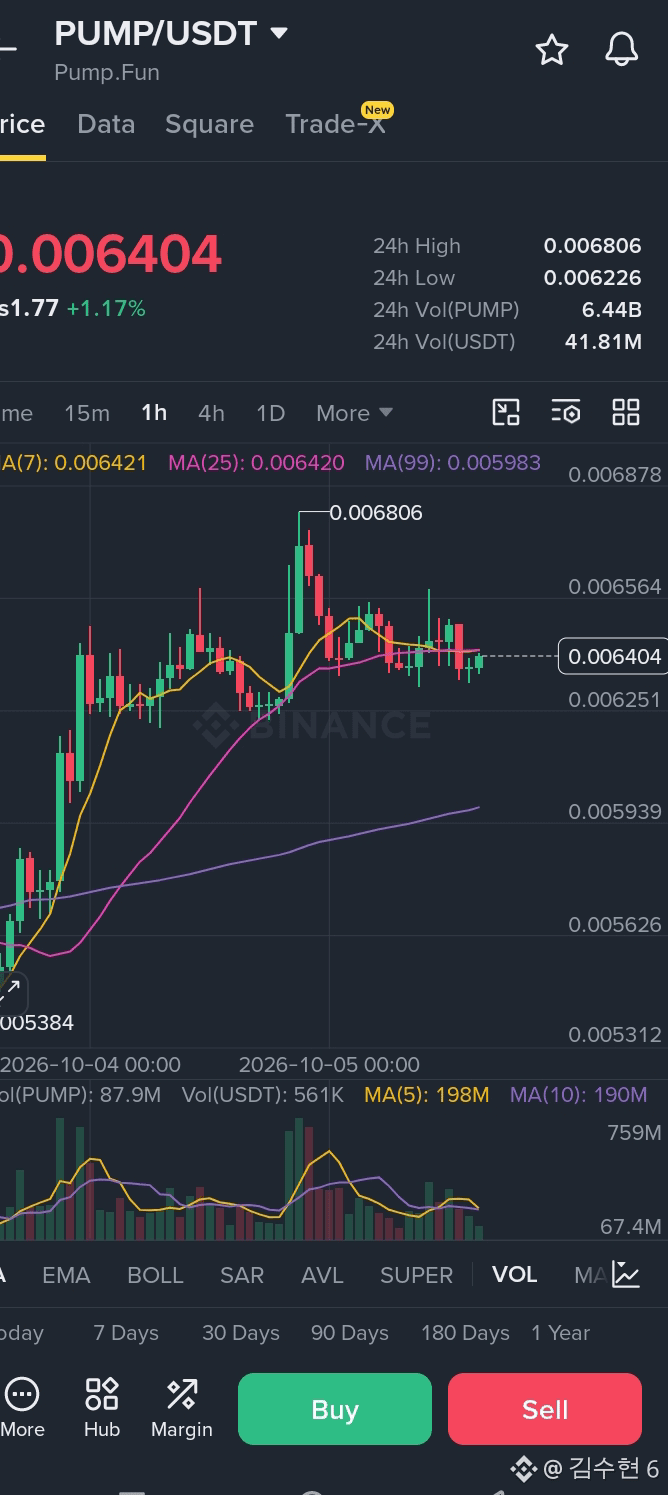
🚨 $PUMP Dump Alert 📉
I've just entered a SHORT position on $PUMP.
Entry Zone: $0.00635 – $0.00645
Stop-Loss: $0.00658
Take-Profit 1: $0.00620
Take-Profit 2: $0.00605
Take-Profit 3: $0.00585
$PUMP
{future}(PUMPUSDT)
#Nikkei225Jumps2.5%ToThreeMonthHigh #DriftHackVictimsBeginClaims
🚨 $PUMP Dump Alert 📉
I've just entered a SHORT position on $PUMP .
Entry Zone: $0.00635 – $0.00645
Stop-Loss: $0.00658
Take-Profit 1: $0.00620
Take-Profit 2: $0.00605
Take-Profit 3: $0.00585
$PUMP
#Nikkei225Jumps2.5%ToThreeMonthHigh #DriftHackVictimsBeginClaims
I've just entered a SHORT position on $PUMP .
Entry Zone: $0.00635 – $0.00645
Stop-Loss: $0.00658
Take-Profit 1: $0.00620
Take-Profit 2: $0.00605
Take-Profit 3: $0.00585
$PUMP
#Nikkei225Jumps2.5%ToThreeMonthHigh #DriftHackVictimsBeginClaims
63
·
--
Жоғары (өспелі)
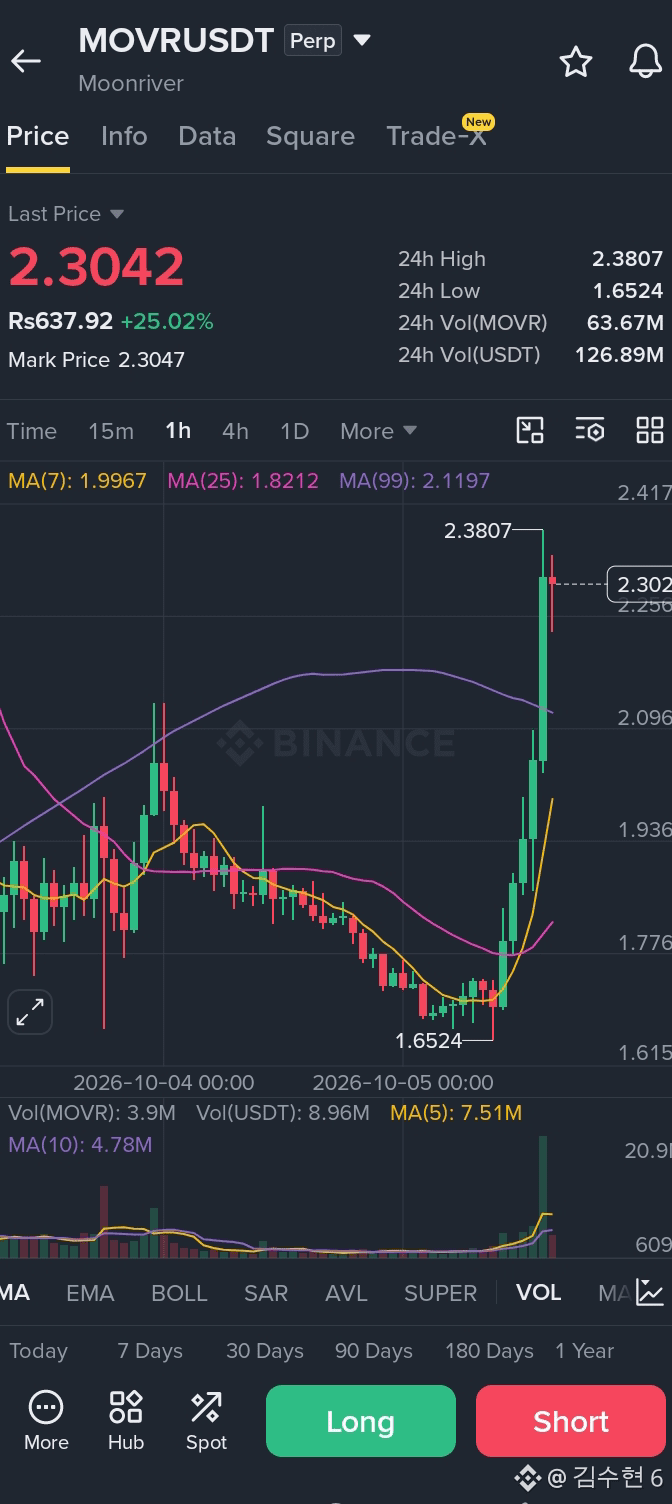
$MOVR MOMENTUM EXPLODING 📈
Just took a long position on $MOVR!
Entry: $2.25 – $2.32
Stop-Loss: $2.08
Targets:
🎯 TP1: $2.45
🎯 TP2: $2.60
🎯 TP3: $2.80
Always manage your risk properly. NFA / DYOR! 🚨
$MOVR
{future}(MOVRUSDT)
#Nikkei225Jumps2.5%ToThreeMonthHigh #DriftHackVictimsBeginClaims
$MOVR MOMENTUM EXPLODING 📈
Just took a long position on $MOVR !
Entry: $2.25 – $2.32
Stop-Loss: $2.08
Targets:
🎯 TP1: $2.45
🎯 TP2: $2.60
🎯 TP3: $2.80
Always manage your risk properly. NFA / DYOR! 🚨
$MOVR
#Nikkei225Jumps2.5%ToThreeMonthHigh #DriftHackVictimsBeginClaims
Just took a long position on $MOVR !
Entry: $2.25 – $2.32
Stop-Loss: $2.08
Targets:
🎯 TP1: $2.45
🎯 TP2: $2.60
🎯 TP3: $2.80
Always manage your risk properly. NFA / DYOR! 🚨
$MOVR
#Nikkei225Jumps2.5%ToThreeMonthHigh #DriftHackVictimsBeginClaims
67
·
--
Жоғары (өспелі)
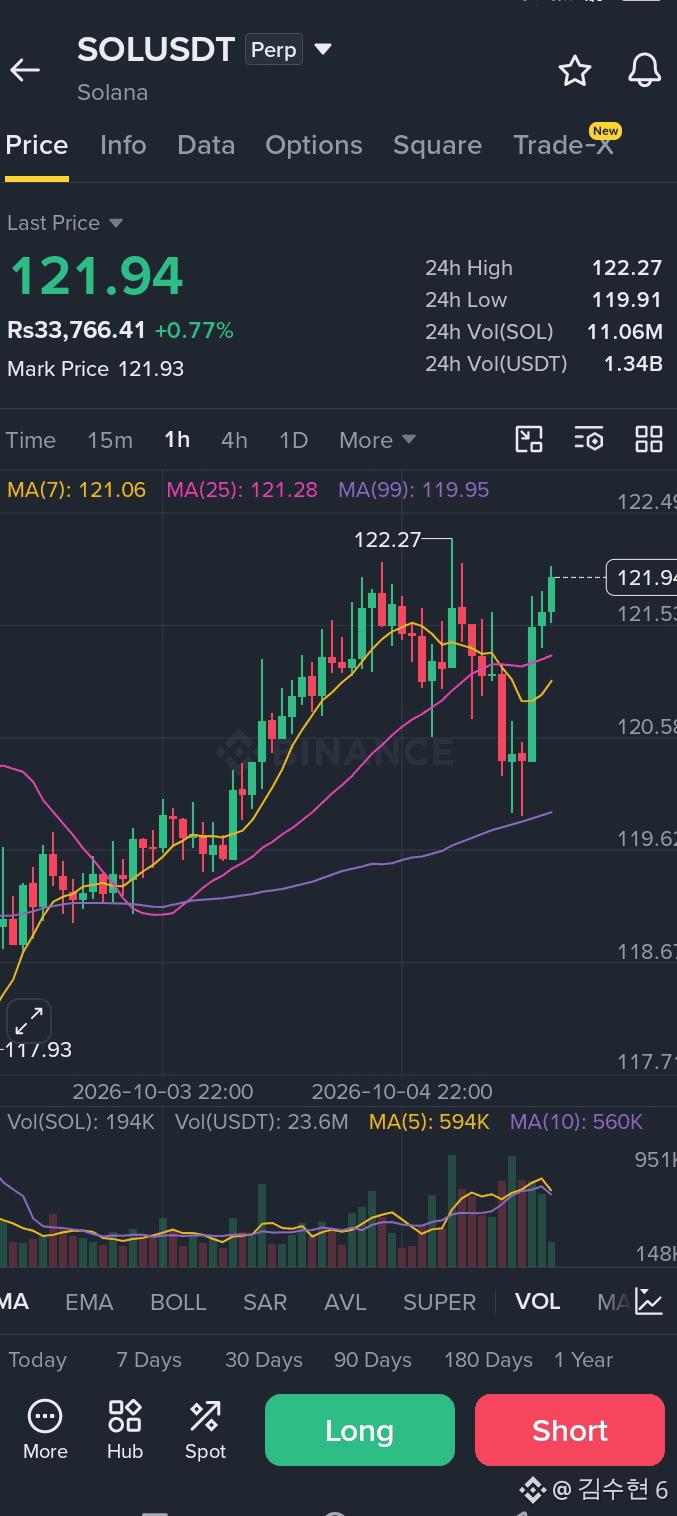
$SOL Long Setup 📈
Entry Zone: $121.20 – $121.80
Stop Loss: $119.80
Take Profit Targets:
TP1: $122.50
TP2: $123.50
TP3: $125.00
Manage your risk appropriately. NFA / DYOR.
$SOL
{future}(SOLUSDT)
#DriftHackVictimsBeginClaims #EthereumValidatorExitQueueJumps392%
$SOL Long Setup 📈
Entry Zone: $121.20 – $121.80
Stop Loss: $119.80
Take Profit Targets:
TP1: $122.50
TP2: $123.50
TP3: $125.00
Manage your risk appropriately. NFA / DYOR.
$SOL
#DriftHackVictimsBeginClaims #EthereumValidatorExitQueueJumps392%
Entry Zone: $121.20 – $121.80
Stop Loss: $119.80
Take Profit Targets:
TP1: $122.50
TP2: $123.50
TP3: $125.00
Manage your risk appropriately. NFA / DYOR.
$SOL
#DriftHackVictimsBeginClaims #EthereumValidatorExitQueueJumps392%
87
·
--
Жоғары (өспелі)
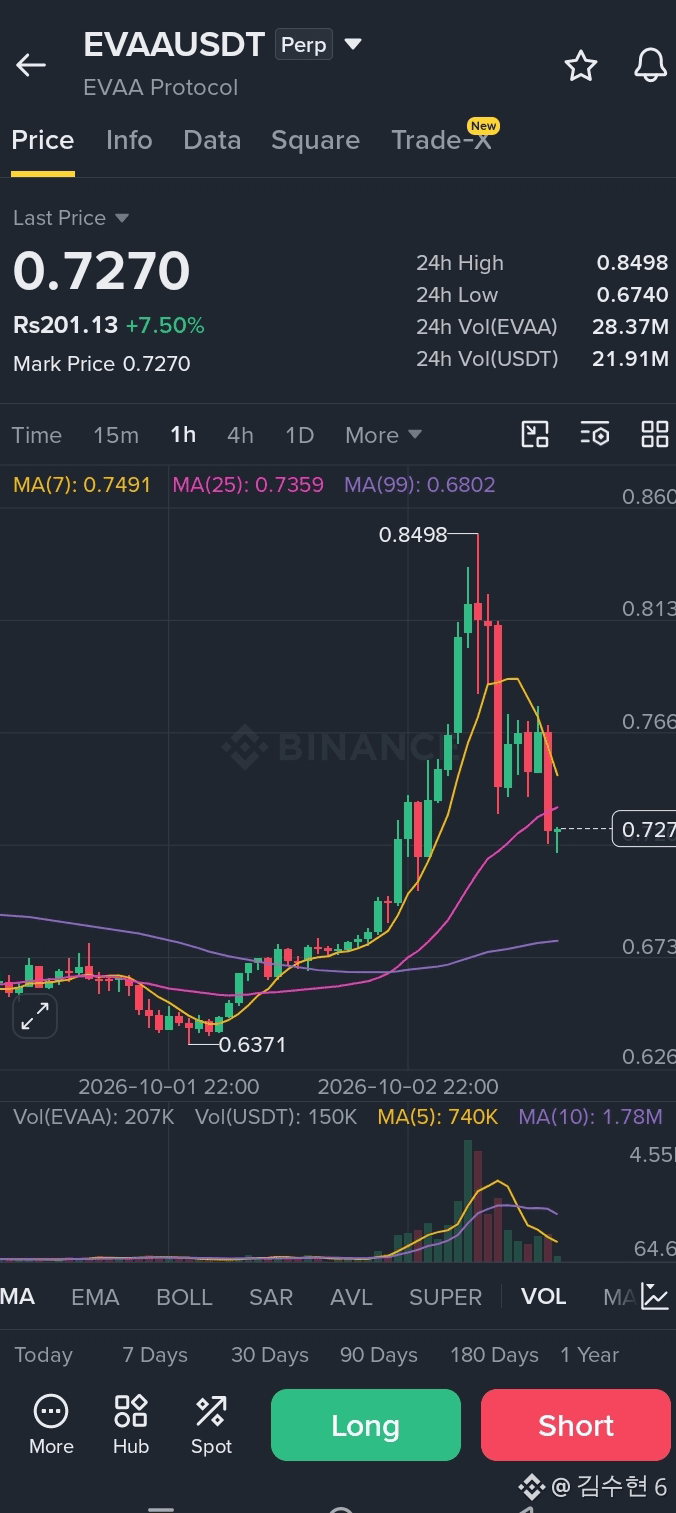
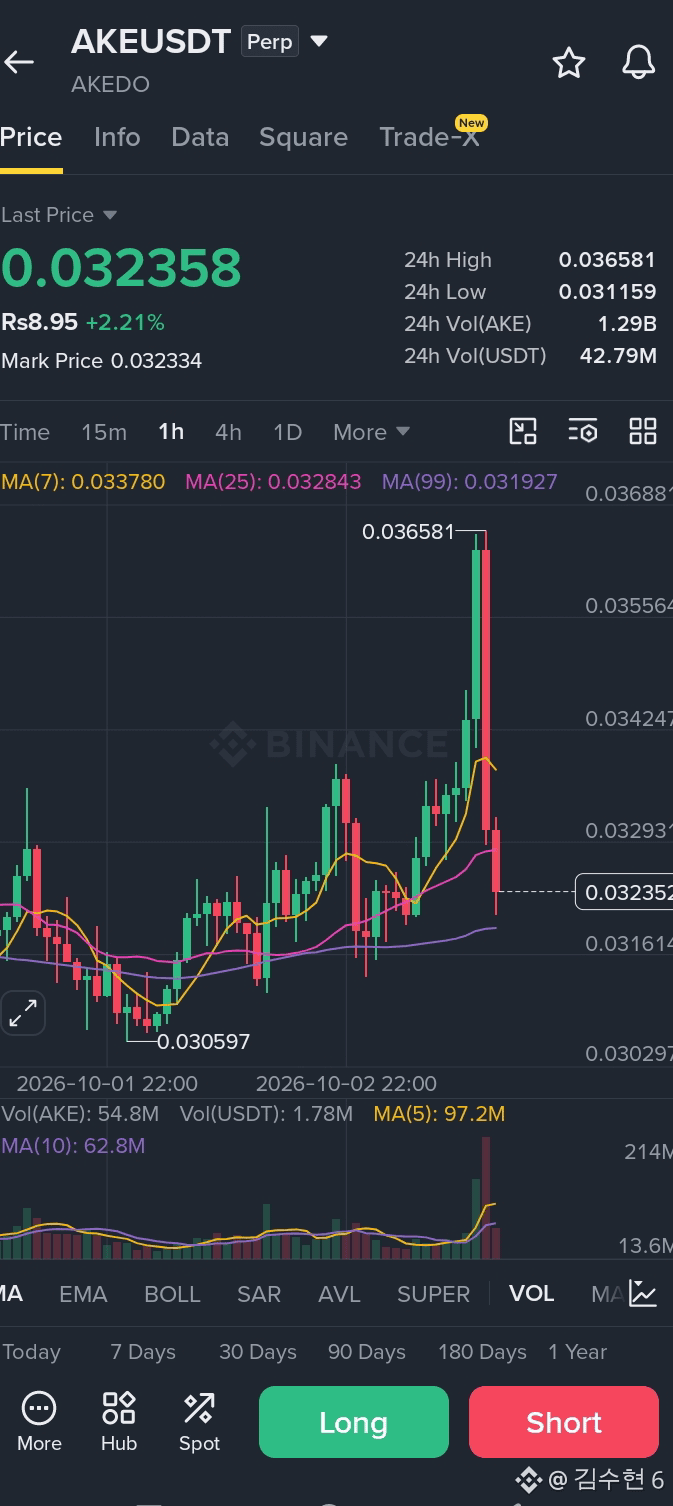
$$AKE Long — Full TP Hit! 🎯
$EVAA Long — TP2 Cleared! 🎯
$AKE has completed its full run, hitting all targets! just smashed through TP2, locking in solid gains.
Next Move: Consider securing more profits on here and letting your remaining position run toward the final target with a trailed stop loss.
{future}(AKEUSDT)
{future}(EVAAUSDT)
#CerebrasSinksNearly20%OnReportNvidiaToPowerOpenAI #SECProposesCryptoCustodyRules
$$AKE Long — Full TP Hit! 🎯
$EVAA Long — TP2 Cleared! 🎯
$AKE has completed its full run, hitting all targets! just smashed through TP2, locking in solid gains.
Next Move: Consider securing more profits on here and letting your remaining position run toward the final target with a trailed stop loss.
#CerebrasSinksNearly20%OnReportNvidiaToPowerOpenAI #SECProposesCryptoCustodyRules
$EVAA Long — TP2 Cleared! 🎯
$AKE has completed its full run, hitting all targets! just smashed through TP2, locking in solid gains.
Next Move: Consider securing more profits on here and letting your remaining position run toward the final target with a trailed stop loss.
#CerebrasSinksNearly20%OnReportNvidiaToPowerOpenAI #SECProposesCryptoCustodyRules
59
·
--
Төмен (кемімелі)
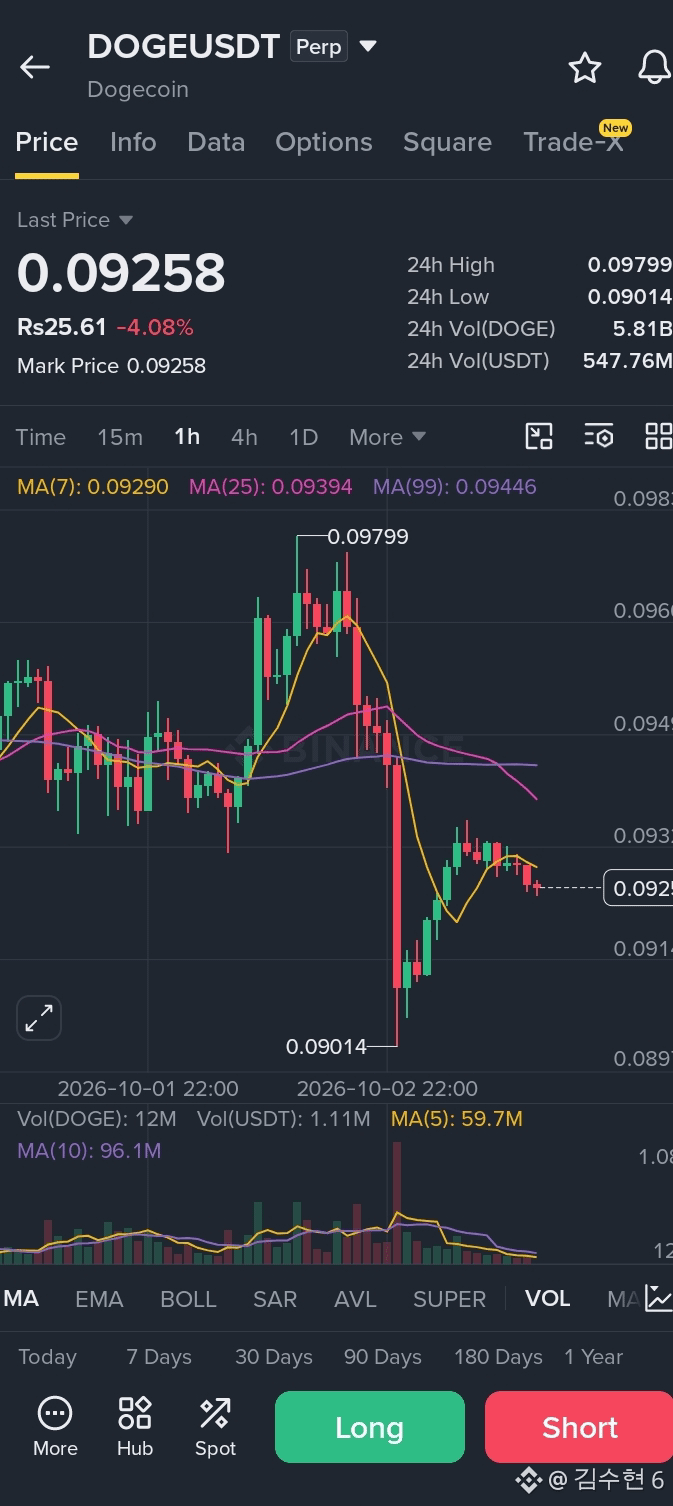
🚀 Just entered a DOGE Long Position (10x Leverage)
Bounced hard off $0.0905 and currently holding strong around $0.093. Looking for another leg up if this support holds!
Entry Zone: $0.0928 – $0.0931
TP1: $0.0935
TP2: $0.0940
TP3: $0.0946
SL: $0.0907
Manage your risk properly. Let’s see how this plays out! 🤝♥️
$DOGE
{future}(DOGEUSDT)
#CerebrasSinksNearly20%OnReportNvidiaToPowerOpenAI #SECProposesCryptoCustodyRules
🚀 Just entered a DOGE Long Position (10x Leverage)
Bounced hard off $0.0905 and currently holding strong around $0.093. Looking for another leg up if this support holds!
Entry Zone: $0.0928 – $0.0931
TP1: $0.0935
TP2: $0.0940
TP3: $0.0946
SL: $0.0907
Manage your risk properly. Let’s see how this plays out! 🤝♥️
$DOGE
#CerebrasSinksNearly20%OnReportNvidiaToPowerOpenAI #SECProposesCryptoCustodyRules
Bounced hard off $0.0905 and currently holding strong around $0.093. Looking for another leg up if this support holds!
Entry Zone: $0.0928 – $0.0931
TP1: $0.0935
TP2: $0.0940
TP3: $0.0946
SL: $0.0907
Manage your risk properly. Let’s see how this plays out! 🤝♥️
$DOGE
#CerebrasSinksNearly20%OnReportNvidiaToPowerOpenAI #SECProposesCryptoCustodyRules
6
·
--
Төмен (кемімелі)
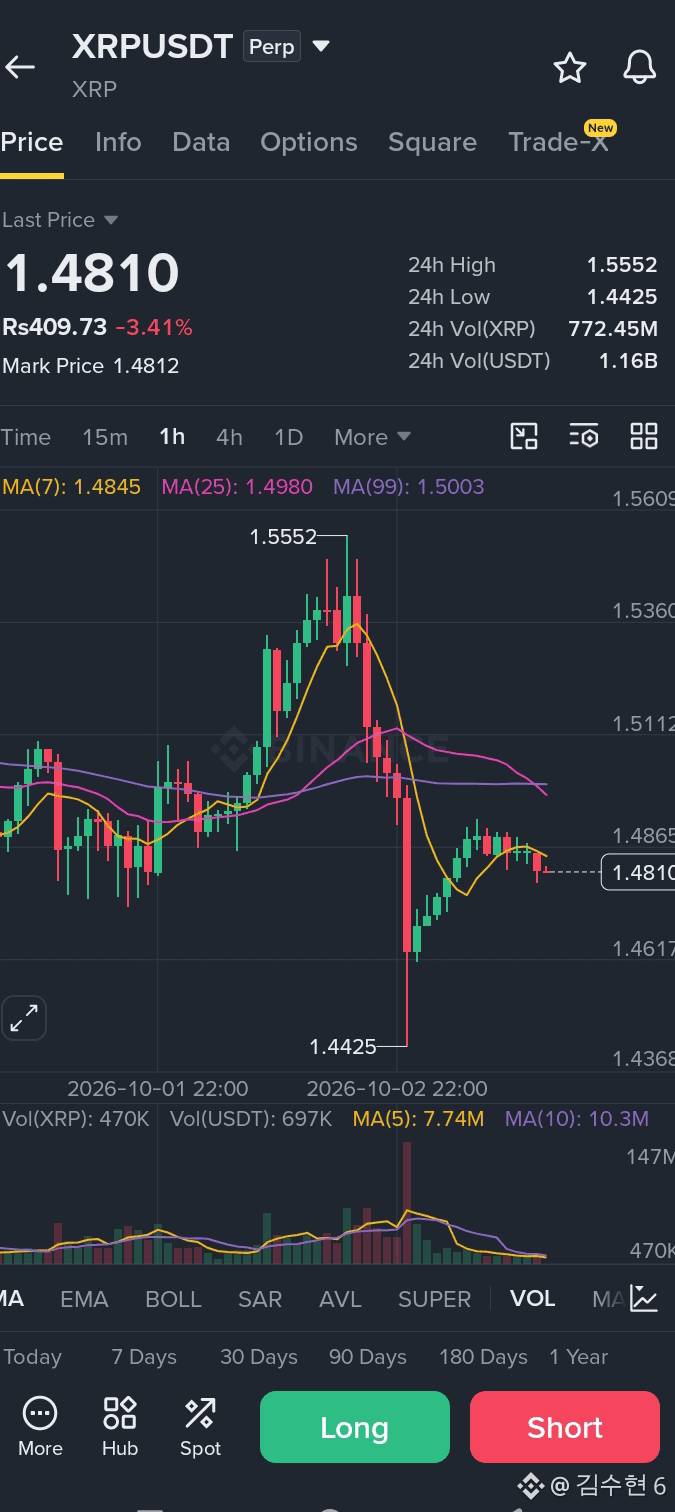
XRP/USDT Long Setup 🚀
Entry Zone: $1.483 – $1.487
Leverage: Up to 30x
Targets: TP1: $1.495 | TP2: $1.505 | TP3: $1.520
Stop Loss: $1.382
Analysis: Holding current support levels could trigger another leg up. Maintain strict risk management. 🤝
$XRP
{future}(XRPUSDT)
#CerebrasSinksNearly20%OnReportNvidiaToPowerOpenAI #SECProposesCryptoCustodyRules
XRP/USDT Long Setup 🚀
Entry Zone: $1.483 – $1.487
Leverage: Up to 30x
Targets: TP1: $1.495 | TP2: $1.505 | TP3: $1.520
Stop Loss: $1.382
Analysis: Holding current support levels could trigger another leg up. Maintain strict risk management. 🤝
$XRP
#CerebrasSinksNearly20%OnReportNvidiaToPowerOpenAI #SECProposesCryptoCustodyRules
Entry Zone: $1.483 – $1.487
Leverage: Up to 30x
Targets: TP1: $1.495 | TP2: $1.505 | TP3: $1.520
Stop Loss: $1.382
Analysis: Holding current support levels could trigger another leg up. Maintain strict risk management. 🤝
$XRP
#CerebrasSinksNearly20%OnReportNvidiaToPowerOpenAI #SECProposesCryptoCustodyRules
6
·
--
Жоғары (өспелі)
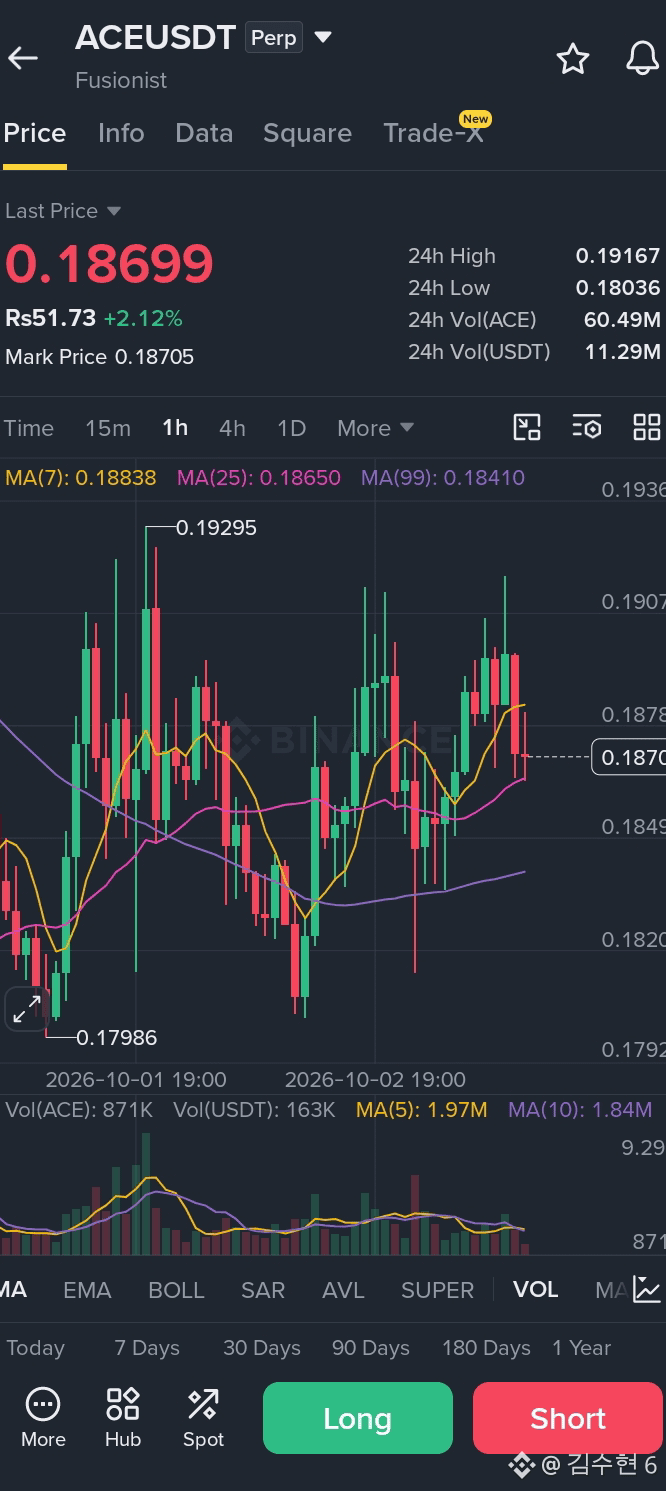
Trade Signal: LONG $ACE/USDT
Bias: Long (Moderate Conviction)
Entry Zone: 0.186786 – 0.187534
Position Sizing: Light (Risk-managed for moderate conviction)
Take-Profit & Stop-Loss Levels
TP1: 0.192738 (+3.0%)
TP2: 0.196456 (+5.0%)
TP3: 0.202034 (+7.9%)
Stop-Loss (SL): 0.179723 (-4.0%)
Execution & Trade Management Plan
Entry: Limit orders strictly within the designated entry zone (0.186786 – 0.187534). Do not chase above the range.
Profit Management: Scale out 50% of the position at TP1.
Risk Management: Immediately move the Stop-Loss to Breakeven (entry price) once TP1 is hit. The trade setup is invalidated if price hits 0.179723.
Trade Rationale (Confluence Checklist: 4/12 Bullish, 0 Bearish, 8 Neutral)
Multi-Timeframe Trend Alignment: The Daily, 4-Hour, and 1-Hour timeframes all display a classic bullish EMA stack (\text{Price} > \text{EMA50} > \text{EMA200}), indicating macro, swing, and short-term alignment.
Cautionary Signals: The 4-Hour RSI remains in neutral territory, and lower-timeframe momentum (15m) lacks clear expansion. Position size should remain conservative until lower timeframes confirm participation.
$ACE
{future}(ACEUSDT)
$QNT
{future}(QNTUSDT)
$AAPLB
{spot}(AAPLBUSDT)
#CerebrasSinksNearly20%OnReportNvidiaToPowerOpenAI #SECProposesCryptoCustodyRules
Trade Signal: LONG $ACE /USDT
Bias: Long (Moderate Conviction)
Entry Zone: 0.186786 – 0.187534
Position Sizing: Light (Risk-managed for moderate conviction)
Take-Profit & Stop-Loss Levels
TP1: 0.192738 (+3.0%)
TP2: 0.196456 (+5.0%)
TP3: 0.202034 (+7.9%)
Stop-Loss (SL): 0.179723 (-4.0%)
Execution & Trade Management Plan
Entry: Limit orders strictly within the designated entry zone (0.186786 – 0.187534). Do not chase above the range.
Profit Management: Scale out 50% of the position at TP1.
Risk Management: Immediately move the Stop-Loss to Breakeven (entry price) once TP1 is hit. The trade setup is invalidated if price hits 0.179723.
Trade Rationale (Confluence Checklist: 4/12 Bullish, 0 Bearish, 8 Neutral)
Multi-Timeframe Trend Alignment: The Daily, 4-Hour, and 1-Hour timeframes all display a classic bullish EMA stack (\text{Price} > \text{EMA50} > \text{EMA200}), indicating macro, swing, and short-term alignment.
Cautionary Signals: The 4-Hour RSI remains in neutral territory, and lower-timeframe momentum (15m) lacks clear expansion. Position size should remain conservative until lower timeframes confirm participation.
$ACE
$QNT
$AAPLB
#CerebrasSinksNearly20%OnReportNvidiaToPowerOpenAI #SECProposesCryptoCustodyRules
Bias: Long (Moderate Conviction)
Entry Zone: 0.186786 – 0.187534
Position Sizing: Light (Risk-managed for moderate conviction)
Take-Profit & Stop-Loss Levels
TP1: 0.192738 (+3.0%)
TP2: 0.196456 (+5.0%)
TP3: 0.202034 (+7.9%)
Stop-Loss (SL): 0.179723 (-4.0%)
Execution & Trade Management Plan
Entry: Limit orders strictly within the designated entry zone (0.186786 – 0.187534). Do not chase above the range.
Profit Management: Scale out 50% of the position at TP1.
Risk Management: Immediately move the Stop-Loss to Breakeven (entry price) once TP1 is hit. The trade setup is invalidated if price hits 0.179723.
Trade Rationale (Confluence Checklist: 4/12 Bullish, 0 Bearish, 8 Neutral)
Multi-Timeframe Trend Alignment: The Daily, 4-Hour, and 1-Hour timeframes all display a classic bullish EMA stack (\text{Price} > \text{EMA50} > \text{EMA200}), indicating macro, swing, and short-term alignment.
Cautionary Signals: The 4-Hour RSI remains in neutral territory, and lower-timeframe momentum (15m) lacks clear expansion. Position size should remain conservative until lower timeframes confirm participation.
$ACE
$QNT
$AAPLB
#CerebrasSinksNearly20%OnReportNvidiaToPowerOpenAI #SECProposesCryptoCustodyRules
56
·
--
Төмен (кемімелі)
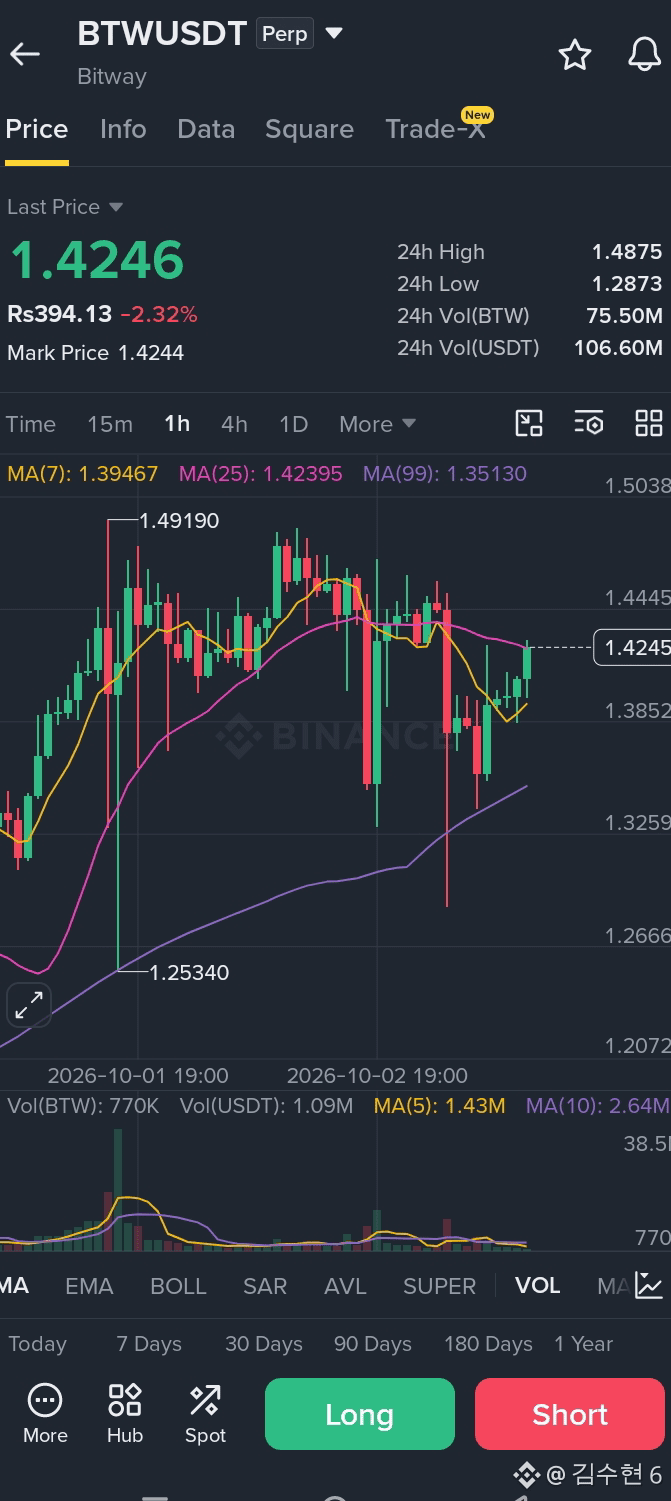
$BTW Short Setup
The recent bounce is losing momentum, signaling potential for another leg down.
Entry Zone: 1.40 – 1.44
Stop Loss (SL): 1.55
Take Profit 1 (TP1): 1.38
Take Profit 2 (TP2): 1.32
Take Profit 3 (TP3): 1.27
Trade $BTW here 👇
{future}(BTWUSDT)
$BTC
{future}(BTCUSDT)
#CerebrasSinksNearly20%OnReportNvidiaToPowerOpenAI #SECProposesCryptoCustodyRules
$BTW Short Setup
The recent bounce is losing momentum, signaling potential for another leg down.
Entry Zone: 1.40 – 1.44
Stop Loss (SL): 1.55
Take Profit 1 (TP1): 1.38
Take Profit 2 (TP2): 1.32
Take Profit 3 (TP3): 1.27
Trade $BTW here 👇
$BTC
#CerebrasSinksNearly20%OnReportNvidiaToPowerOpenAI #SECProposesCryptoCustodyRules
The recent bounce is losing momentum, signaling potential for another leg down.
Entry Zone: 1.40 – 1.44
Stop Loss (SL): 1.55
Take Profit 1 (TP1): 1.38
Take Profit 2 (TP2): 1.32
Take Profit 3 (TP3): 1.27
Trade $BTW here 👇
$BTC
#CerebrasSinksNearly20%OnReportNvidiaToPowerOpenAI #SECProposesCryptoCustodyRules
74
·
--
Жоғары (өспелі)
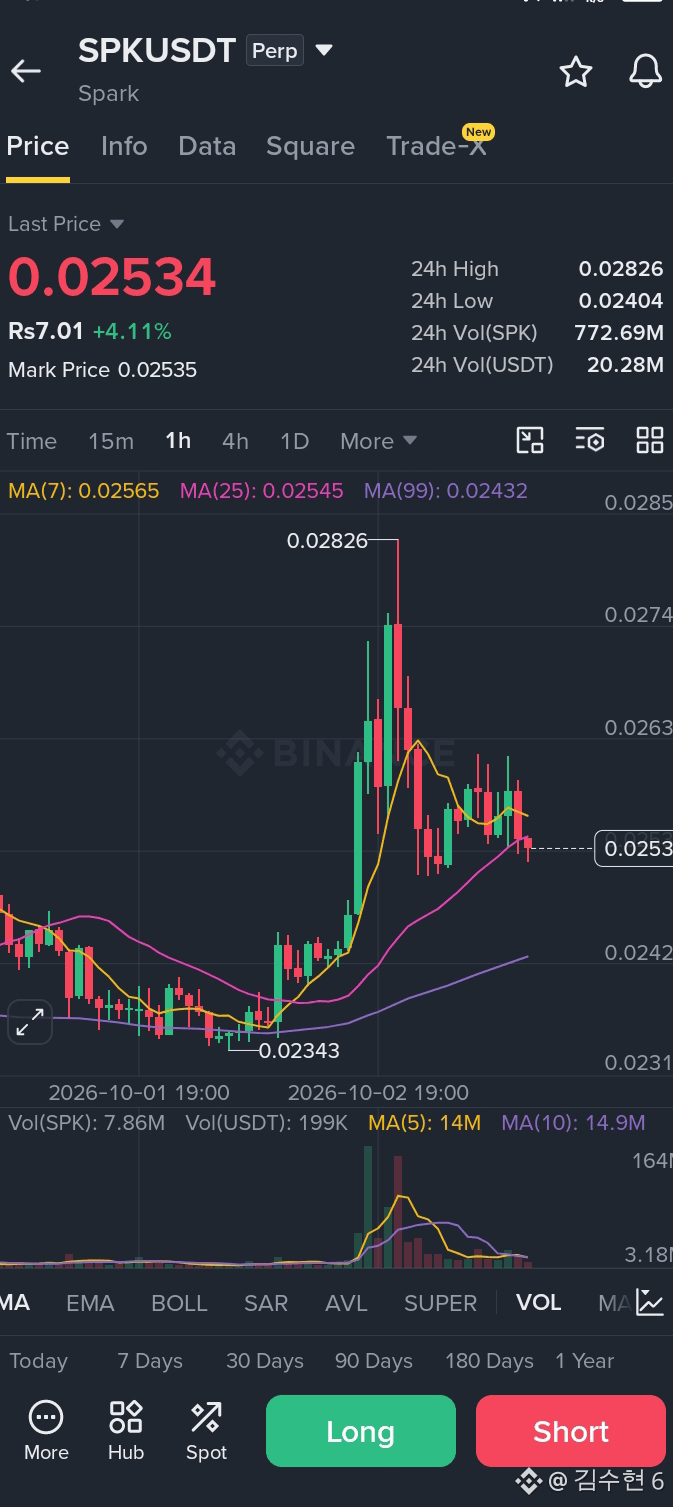
$SPK SHORT SETUP | Rejection in Play 📉
Entry Zone: 0.02560 – 0.02585
Target 1: 0.02520
Target 2: 0.02485
Target 3: 0.02450
Stop Loss: 0.02625
Analysis: $SPK is consolidating following a strong rejection. Keep stops tight and avoid chasing if price breaks above entry.
$SPK
{future}(SPKUSDT)
#CerebrasSinksNearly20%OnReportNvidiaToPowerOpenAI #SECProposesCryptoCustodyRules
$SPK SHORT SETUP | Rejection in Play 📉
Entry Zone: 0.02560 – 0.02585
Target 1: 0.02520
Target 2: 0.02485
Target 3: 0.02450
Stop Loss: 0.02625
Analysis: $SPK is consolidating following a strong rejection. Keep stops tight and avoid chasing if price breaks above entry.
$SPK
#CerebrasSinksNearly20%OnReportNvidiaToPowerOpenAI #SECProposesCryptoCustodyRules
Entry Zone: 0.02560 – 0.02585
Target 1: 0.02520
Target 2: 0.02485
Target 3: 0.02450
Stop Loss: 0.02625
Analysis: $SPK is consolidating following a strong rejection. Keep stops tight and avoid chasing if price breaks above entry.
$SPK
#CerebrasSinksNearly20%OnReportNvidiaToPowerOpenAI #SECProposesCryptoCustodyRules
1
·
--
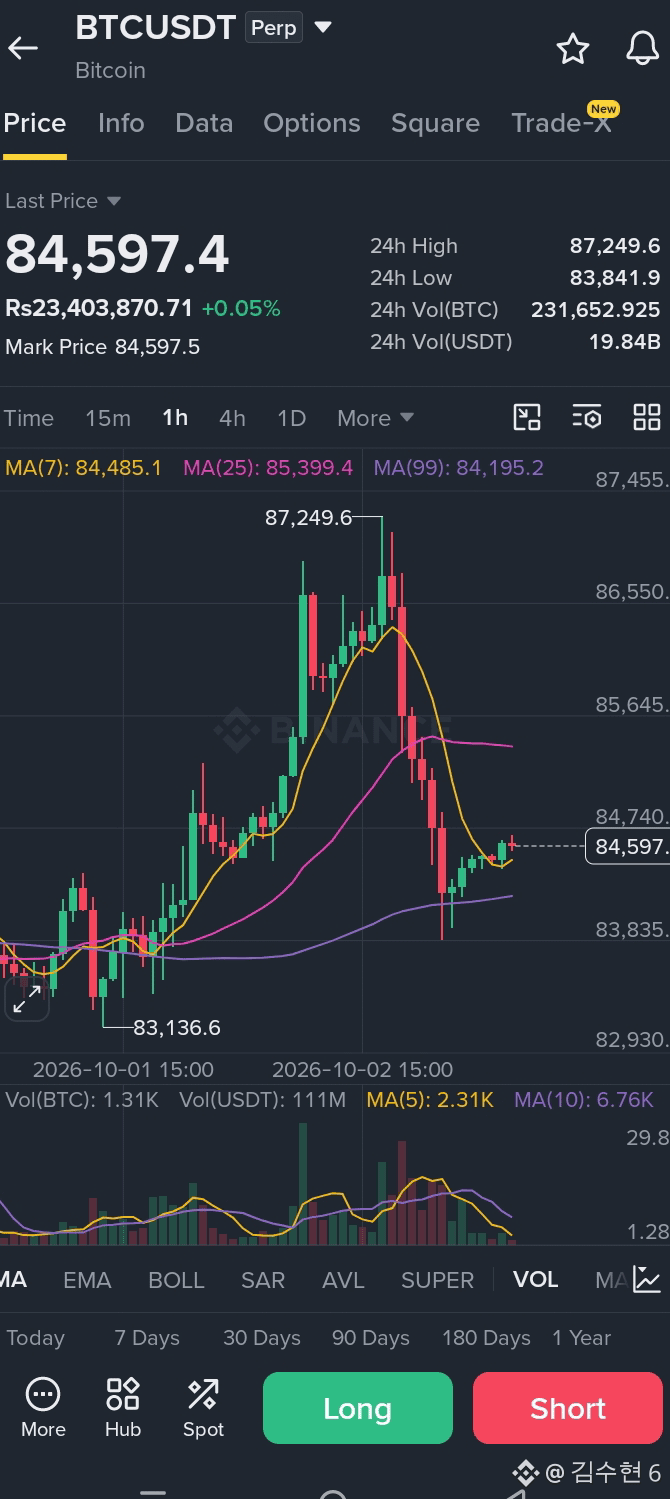
$BTC/USDT: NEUTRAL / RANGE-BOUND (No Trade Zone)
Bias: NEUTRAL (2 Bullish vs. 2 Bearish signals)
Status: Stand aside. Market is stuck in a 4.2% neutral range. Waiting for a high-probability breakout setup.
Trade Execution Plan
Scenario 1: Bullish Breakout (LONG)
Trigger: 1-hour candle close above 87,249.60
Targets:
88,106.78
88,678.24
89,535.42
Stop Loss: 86,106.69
Scenario 2: Bearish Breakdown (SHORT)
Trigger: 1-hour candle close below 83,690.41
Targets:
82,833.23
82,261.77
81,404.59
Stop Loss: 84,833.32
Technical Breakdown
Bullish Alignment (Higher Timeframes): Both the 1D and 4H charts display a healthy bullish alignment (Price > EMA 50 > EMA 200), confirming the broader macro trend remains upward.
Bearish Alignment (Lower Timeframes): Short-term momentum favors sellers. The 15m ADX (27.0) indicates active selling pressure (DI− 21.6 vs. DI+ 17.7), and the 1H RSI sits at 43.6 (bearish territory below 45).
Execution Strategy Decision
If the 1-hour candle closes above 87,249.60, standard breakout rules suggest taking the LONG trigger immediately, as a confirmed close above range resistance validates buyers reclaiming short-term momentum.
However, if higher-timeframe EMA extension is a concern, aggressive traders can take an initial position on the breakout close, while conservative traders can wait for a retest/pullback toward the breakout level or intermediate EMAs before entering.
$BTC
{future}(BTCUSDT)
$ZEC
{future}(ZECUSDT)
$QNT
{future}(QNTUSDT)
#G7PlansToReleaseUpTo100MBarrelsOilDiesel #ICBASuesOCCOverCryptoBankCharters
$BTC /USDT: NEUTRAL / RANGE-BOUND (No Trade Zone)
Bias: NEUTRAL (2 Bullish vs. 2 Bearish signals)
Status: Stand aside. Market is stuck in a 4.2% neutral range. Waiting for a high-probability breakout setup.
Trade Execution Plan
Scenario 1: Bullish Breakout (LONG)
Trigger: 1-hour candle close above 87,249.60
Targets:
88,106.78
88,678.24
89,535.42
Stop Loss: 86,106.69
Scenario 2: Bearish Breakdown (SHORT)
Trigger: 1-hour candle close below 83,690.41
Targets:
82,833.23
82,261.77
81,404.59
Stop Loss: 84,833.32
Technical Breakdown
Bullish Alignment (Higher Timeframes): Both the 1D and 4H charts display a healthy bullish alignment (Price > EMA 50 > EMA 200), confirming the broader macro trend remains upward.
Bearish Alignment (Lower Timeframes): Short-term momentum favors sellers. The 15m ADX (27.0) indicates active selling pressure (DI− 21.6 vs. DI+ 17.7), and the 1H RSI sits at 43.6 (bearish territory below 45).
Execution Strategy Decision
If the 1-hour candle closes above 87,249.60, standard breakout rules suggest taking the LONG trigger immediately, as a confirmed close above range resistance validates buyers reclaiming short-term momentum.
However, if higher-timeframe EMA extension is a concern, aggressive traders can take an initial position on the breakout close, while conservative traders can wait for a retest/pullback toward the breakout level or intermediate EMAs before entering.
$BTC
$ZEC
$QNT
#G7PlansToReleaseUpTo100MBarrelsOilDiesel #ICBASuesOCCOverCryptoBankCharters
Bias: NEUTRAL (2 Bullish vs. 2 Bearish signals)
Status: Stand aside. Market is stuck in a 4.2% neutral range. Waiting for a high-probability breakout setup.
Trade Execution Plan
Scenario 1: Bullish Breakout (LONG)
Trigger: 1-hour candle close above 87,249.60
Targets:
88,106.78
88,678.24
89,535.42
Stop Loss: 86,106.69
Scenario 2: Bearish Breakdown (SHORT)
Trigger: 1-hour candle close below 83,690.41
Targets:
82,833.23
82,261.77
81,404.59
Stop Loss: 84,833.32
Technical Breakdown
Bullish Alignment (Higher Timeframes): Both the 1D and 4H charts display a healthy bullish alignment (Price > EMA 50 > EMA 200), confirming the broader macro trend remains upward.
Bearish Alignment (Lower Timeframes): Short-term momentum favors sellers. The 15m ADX (27.0) indicates active selling pressure (DI− 21.6 vs. DI+ 17.7), and the 1H RSI sits at 43.6 (bearish territory below 45).
Execution Strategy Decision
If the 1-hour candle closes above 87,249.60, standard breakout rules suggest taking the LONG trigger immediately, as a confirmed close above range resistance validates buyers reclaiming short-term momentum.
However, if higher-timeframe EMA extension is a concern, aggressive traders can take an initial position on the breakout close, while conservative traders can wait for a retest/pullback toward the breakout level or intermediate EMAs before entering.
$BTC
$ZEC
$QNT
#G7PlansToReleaseUpTo100MBarrelsOilDiesel #ICBASuesOCCOverCryptoBankCharters
138
·
--
Жоғары (өспелі)
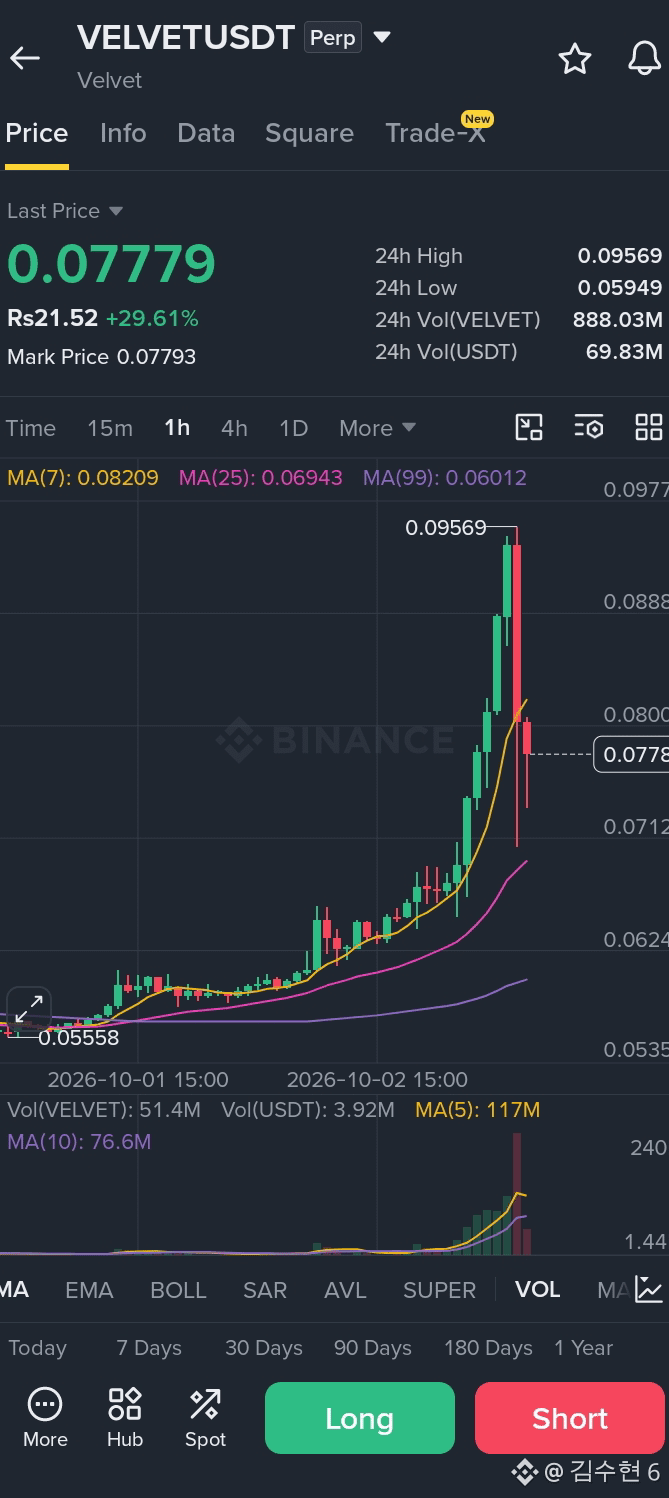
$VELVET looking heavy here. 📉
Momentum is severely stretched, and this setup is primed for a deep unwind lower.
Short $VELVET
🎯 Entry: 0.0755 – 0.0779
🛡 Stop Loss: 0.0840
📍 TP1: 0.0740
📍 TP2: 0.0705
📍 TP3: 0.0675
Trade $VELVET here 👇
$VELVET
{future}(VELVETUSDT)
#G7PlansToReleaseUpTo100MBarrelsOilDiesel #ICBASuesOCCOverCryptoBankCharters
$VELVET looking heavy here. 📉
Momentum is severely stretched, and this setup is primed for a deep unwind lower.
Short $VELVET
🎯 Entry: 0.0755 – 0.0779
🛡 Stop Loss: 0.0840
📍 TP1: 0.0740
📍 TP2: 0.0705
📍 TP3: 0.0675
Trade $VELVET here 👇
$VELVET
#G7PlansToReleaseUpTo100MBarrelsOilDiesel #ICBASuesOCCOverCryptoBankCharters
Momentum is severely stretched, and this setup is primed for a deep unwind lower.
Short $VELVET
🎯 Entry: 0.0755 – 0.0779
🛡 Stop Loss: 0.0840
📍 TP1: 0.0740
📍 TP2: 0.0705
📍 TP3: 0.0675
Trade $VELVET here 👇
$VELVET
#G7PlansToReleaseUpTo100MBarrelsOilDiesel #ICBASuesOCCOverCryptoBankCharters
38
·
--
Төмен (кемімелі)
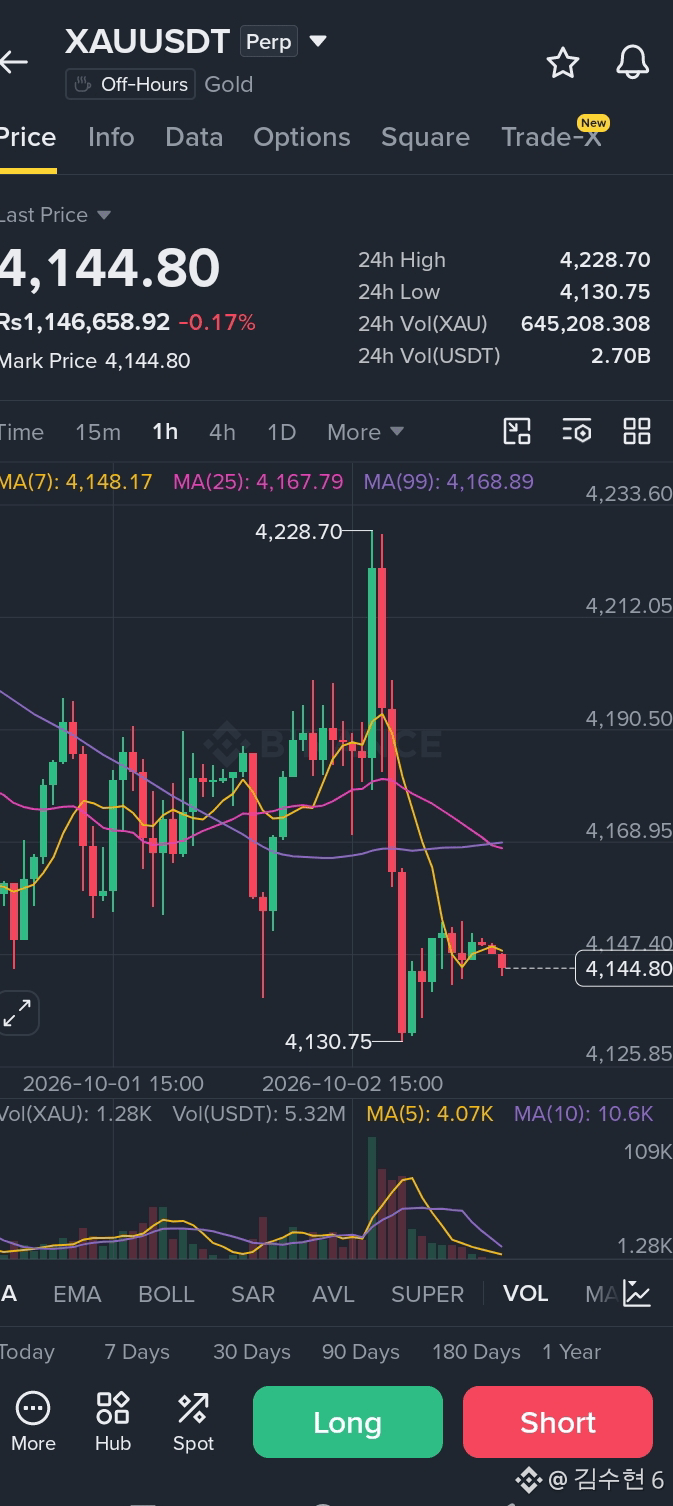
🚨 VIP TRADE SIGNAL: XAU/USD (GOLD) 🚀
Direction: LONG (BUY) 📈
Action: Open Long Position Now
Stop Loss (SL): $4,100
Take Profit (TP): $4,244
⚠️️ Manage your risk and use proper lot sizing!
$XAU
{future}(XAUUSDT)
#G7PlansToReleaseUpTo100MBarrelsOilDiesel #ICBASuesOCCOverCryptoBankCharters
🚨 VIP TRADE SIGNAL: XAU/USD (GOLD) 🚀
Direction: LONG (BUY) 📈
Action: Open Long Position Now
Stop Loss (SL): $4,100
Take Profit (TP): $4,244
⚠️️ Manage your risk and use proper lot sizing!
$XAU
#G7PlansToReleaseUpTo100MBarrelsOilDiesel #ICBASuesOCCOverCryptoBankCharters
Direction: LONG (BUY) 📈
Action: Open Long Position Now
Stop Loss (SL): $4,100
Take Profit (TP): $4,244
⚠️️ Manage your risk and use proper lot sizing!
$XAU
#G7PlansToReleaseUpTo100MBarrelsOilDiesel #ICBASuesOCCOverCryptoBankCharters
6
·
--
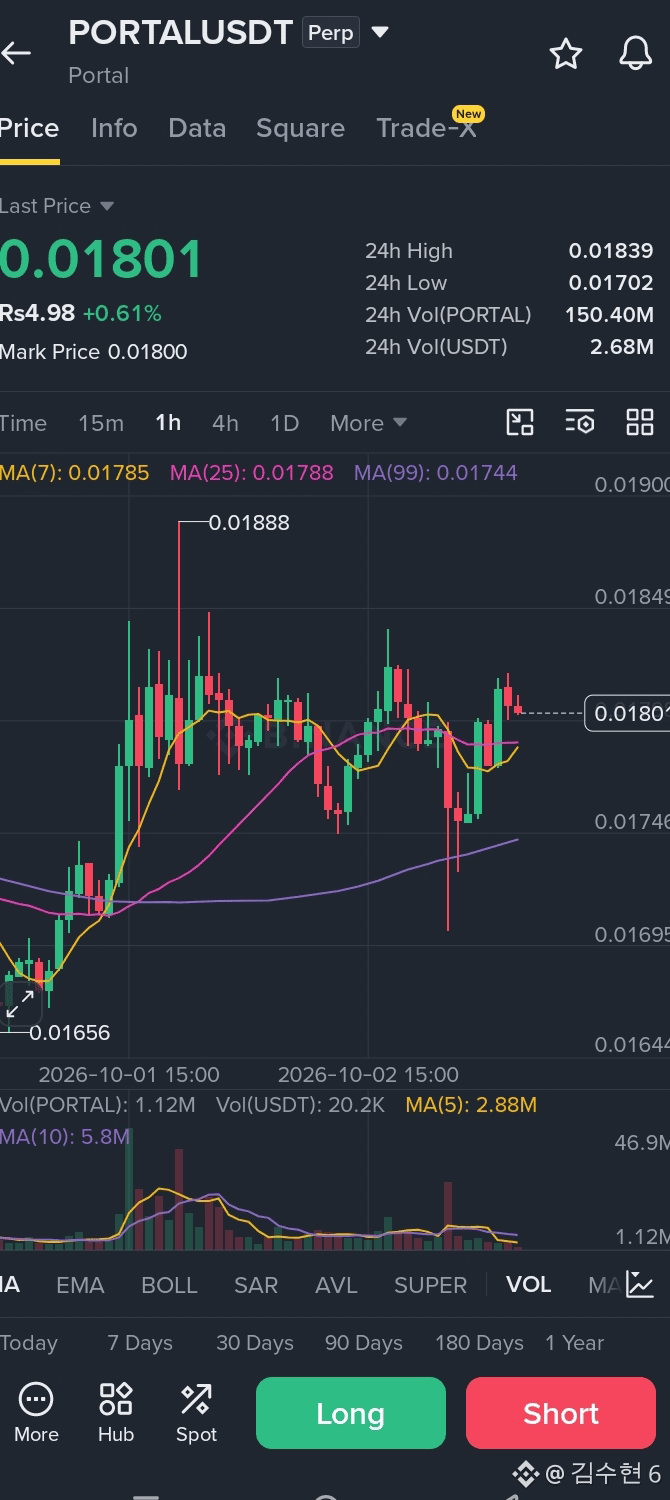
🟢 LONG: PORTAL/USDT
Bias: Bullish (Moderate Conviction — keep position size light)
Entry Zone: 0.0180251 – 0.0180949
Take Profit 1: 0.0186344 (+3.2%)
Take Profit 2: 0.0190173 (+5.3%)
Take Profit 3: 0.0195917 (+8.5%)
Stop Loss: 0.0172941 (-4.2%)
Execution Plan
Entry: Enter strictly within the defined entry zone.
Risk Management: Take 50% profit at TP1 and move Stop Loss to Breakeven (Entry).
Trade Rationale
Confluence: 3/12 indicators bullish, 0 bearish, 9 neutral.
Macro Trend (1D): Price > EMA50 > EMA200 (bullish alignment).
Swing Trend (4H): Price > EMA50 > EMA200 (bullish structure).
Momentum (4H RSI): Sitting at 57.3, confirming active buyer momentum above the 55 key level.
$PORTAL
{future}(PORTALUSDT)
#G7PlansToReleaseUpTo100MBarrelsOilDiesel #ICBASuesOCCOverCryptoBankCharters
🟢 LONG: PORTAL/USDT
Bias: Bullish (Moderate Conviction — keep position size light)
Entry Zone: 0.0180251 – 0.0180949
Take Profit 1: 0.0186344 (+3.2%)
Take Profit 2: 0.0190173 (+5.3%)
Take Profit 3: 0.0195917 (+8.5%)
Stop Loss: 0.0172941 (-4.2%)
Execution Plan
Entry: Enter strictly within the defined entry zone.
Risk Management: Take 50% profit at TP1 and move Stop Loss to Breakeven (Entry).
Trade Rationale
Confluence: 3/12 indicators bullish, 0 bearish, 9 neutral.
Macro Trend (1D): Price > EMA50 > EMA200 (bullish alignment).
Swing Trend (4H): Price > EMA50 > EMA200 (bullish structure).
Momentum (4H RSI): Sitting at 57.3, confirming active buyer momentum above the 55 key level.
$PORTAL
#G7PlansToReleaseUpTo100MBarrelsOilDiesel #ICBASuesOCCOverCryptoBankCharters
Bias: Bullish (Moderate Conviction — keep position size light)
Entry Zone: 0.0180251 – 0.0180949
Take Profit 1: 0.0186344 (+3.2%)
Take Profit 2: 0.0190173 (+5.3%)
Take Profit 3: 0.0195917 (+8.5%)
Stop Loss: 0.0172941 (-4.2%)
Execution Plan
Entry: Enter strictly within the defined entry zone.
Risk Management: Take 50% profit at TP1 and move Stop Loss to Breakeven (Entry).
Trade Rationale
Confluence: 3/12 indicators bullish, 0 bearish, 9 neutral.
Macro Trend (1D): Price > EMA50 > EMA200 (bullish alignment).
Swing Trend (4H): Price > EMA50 > EMA200 (bullish structure).
Momentum (4H RSI): Sitting at 57.3, confirming active buyer momentum above the 55 key level.
$PORTAL
#G7PlansToReleaseUpTo100MBarrelsOilDiesel #ICBASuesOCCOverCryptoBankCharters
9
·
--
Жоғары (өспелі)
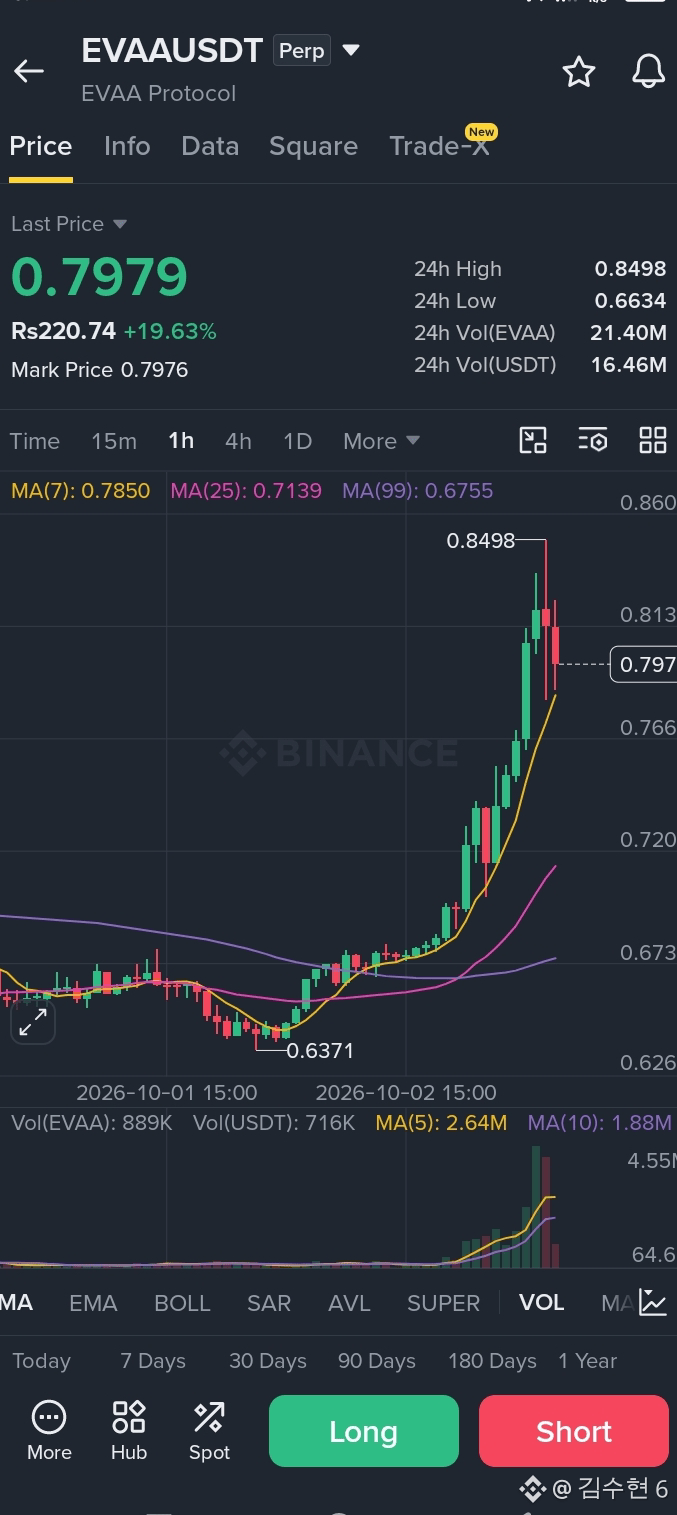
🚨 $EVAA SHORT SETUP 🚨
Momentum is fading and seller pressure is mounting. Looking for a deeper downside expansion.
📉 Trade Setup:
• Entry Zone: 0.795 – 0.819
• Stop Loss: 0.880
🎯 Targets:
• TP1: 0.783
• TP2: 0.747
• TP3: 0.710
👇 Trade $EVAA here:
$EVAA
{future}(EVAAUSDT)
#NFPWatch #BitcoinFundingRateTriplesTo10%
🚨 $EVAA SHORT SETUP 🚨
Momentum is fading and seller pressure is mounting. Looking for a deeper downside expansion.
📉 Trade Setup:
• Entry Zone: 0.795 – 0.819
• Stop Loss: 0.880
🎯 Targets:
• TP1: 0.783
• TP2: 0.747
• TP3: 0.710
👇 Trade $EVAA here:
$EVAA
#NFPWatch #BitcoinFundingRateTriplesTo10%
Momentum is fading and seller pressure is mounting. Looking for a deeper downside expansion.
📉 Trade Setup:
• Entry Zone: 0.795 – 0.819
• Stop Loss: 0.880
🎯 Targets:
• TP1: 0.783
• TP2: 0.747
• TP3: 0.710
👇 Trade $EVAA here:
$EVAA
#NFPWatch #BitcoinFundingRateTriplesTo10%
13
·
--
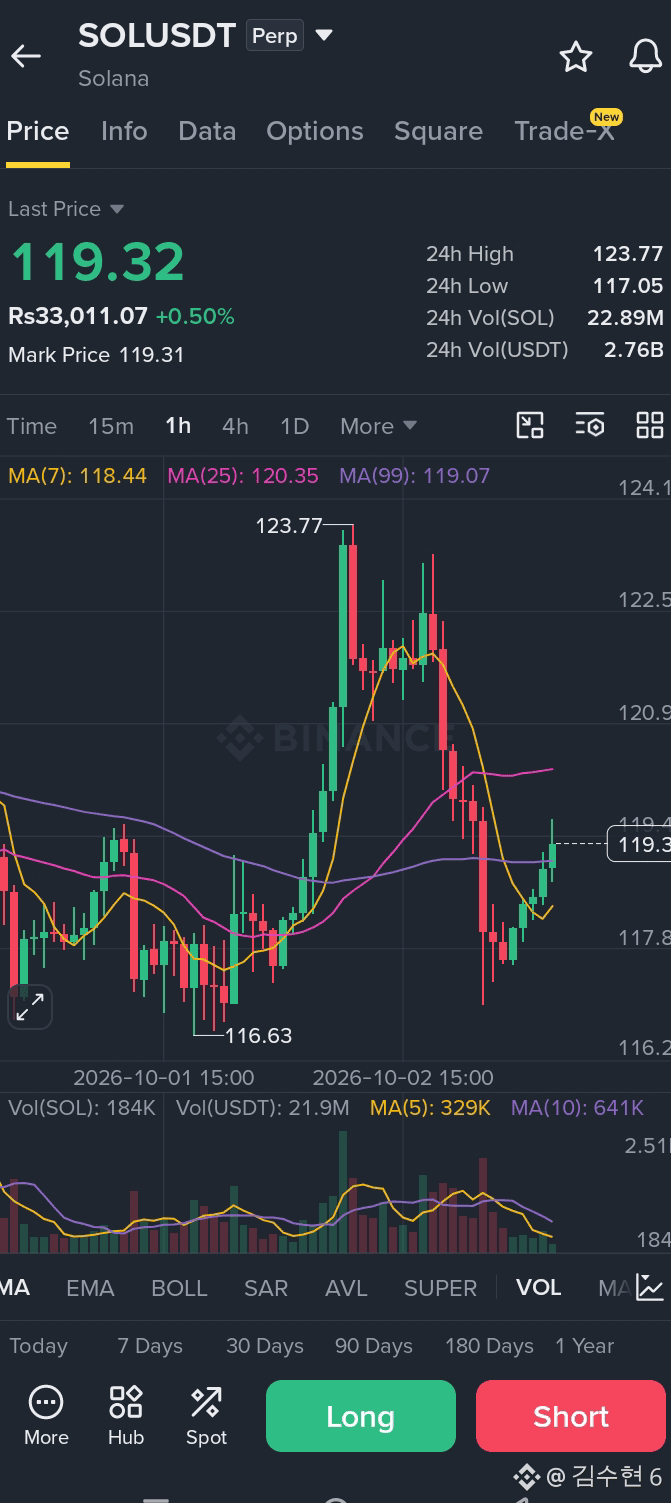
Trade Setup: SOL/USDT (LONG)
Direction: LONG (Expecting Price Expansion Upwards)
Bias: Leaning (Moderate Conviction)
Entry Zone: 118.9285 – 119.1115
Take-Profit Targets:
TP1: 120.9604 (+1.6%)
TP2: 122.2540 (+2.7%)
TP3: 124.1944 (+4.3%)
Stop-Loss: 116.4328 (-2.2%)
Trade Plan & Execution Strategy
Entry: Limit orders positioned strictly within the 118.9285 – 119.1115 entry zone.
Risk Management: Light position sizing due to moderate conviction.
Profit Taking & Stop Adjustment: Close 50% of the position at TP1 (120.9604) and immediately shift the Stop-Loss to Breakeven (Entry). Let the remainder run toward TP2 and TP3.
Invalidation: A clean breakdown past 116.4328 invalidates the structural thesis and triggers the exit.
$SOL
{future}(SOLUSDT)
$QNT
{future}(QNTUSDT)
$ZEC
{future}(ZECUSDT)
#NFPWatch #BitcoinFundingRateTriplesTo10%
Trade Setup: SOL/USDT (LONG)
Direction: LONG (Expecting Price Expansion Upwards)
Bias: Leaning (Moderate Conviction)
Entry Zone: 118.9285 – 119.1115
Take-Profit Targets:
TP1: 120.9604 (+1.6%)
TP2: 122.2540 (+2.7%)
TP3: 124.1944 (+4.3%)
Stop-Loss: 116.4328 (-2.2%)
Trade Plan & Execution Strategy
Entry: Limit orders positioned strictly within the 118.9285 – 119.1115 entry zone.
Risk Management: Light position sizing due to moderate conviction.
Profit Taking & Stop Adjustment: Close 50% of the position at TP1 (120.9604) and immediately shift the Stop-Loss to Breakeven (Entry). Let the remainder run toward TP2 and TP3.
Invalidation: A clean breakdown past 116.4328 invalidates the structural thesis and triggers the exit.
$SOL
$QNT
$ZEC
#NFPWatch #BitcoinFundingRateTriplesTo10%
Direction: LONG (Expecting Price Expansion Upwards)
Bias: Leaning (Moderate Conviction)
Entry Zone: 118.9285 – 119.1115
Take-Profit Targets:
TP1: 120.9604 (+1.6%)
TP2: 122.2540 (+2.7%)
TP3: 124.1944 (+4.3%)
Stop-Loss: 116.4328 (-2.2%)
Trade Plan & Execution Strategy
Entry: Limit orders positioned strictly within the 118.9285 – 119.1115 entry zone.
Risk Management: Light position sizing due to moderate conviction.
Profit Taking & Stop Adjustment: Close 50% of the position at TP1 (120.9604) and immediately shift the Stop-Loss to Breakeven (Entry). Let the remainder run toward TP2 and TP3.
Invalidation: A clean breakdown past 116.4328 invalidates the structural thesis and triggers the exit.
$SOL
$QNT
$ZEC
#NFPWatch #BitcoinFundingRateTriplesTo10%
128
·
--
Жоғары (өспелі)
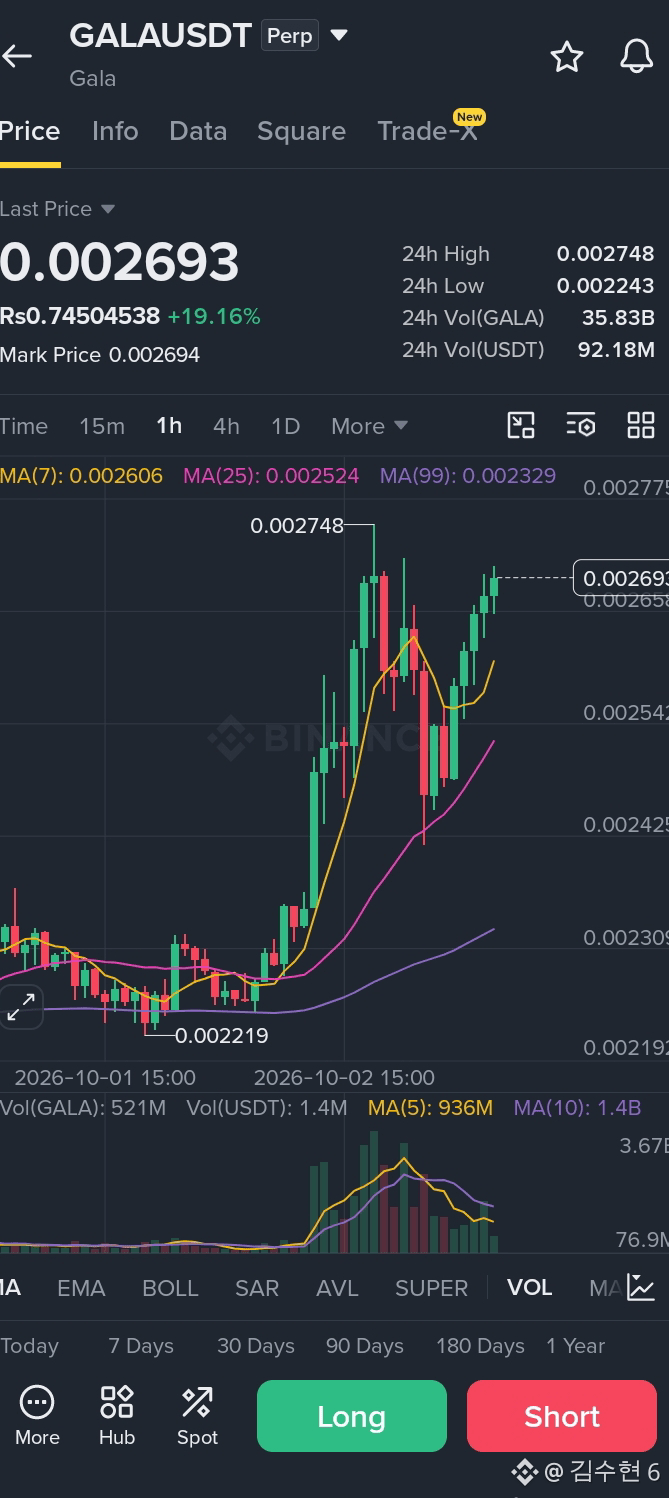
🚀 $GALA Long Trade Signal
Entry Zone: $0.00260 – $0.00268 (Current: $0.002681)
Leverage: 10x
Take-Profit Targets:
🎯 TP1: $0.00280
🎯 TP2: $0.00295
🎯 TP3: $0.00315
🛑 Stop Loss: $0.00242
Market Insight:
$GALA is showing strong bullish momentum following a clean breakout above $0.00250. Continuation relies on holding this support zone. Given the recent rapid move, avoid FOMO or chasing if price pushes significantly past the entry range. Manage risk accordingly
$GALA
{future}(GALAUSDT)
#NFPWatch #BitcoinFundingRateTriplesTo10%
🚀 $GALA Long Trade Signal
Entry Zone: $0.00260 – $0.00268 (Current: $0.002681)
Leverage: 10x
Take-Profit Targets:
🎯 TP1: $0.00280
🎯 TP2: $0.00295
🎯 TP3: $0.00315
🛑 Stop Loss: $0.00242
Market Insight:
$GALA is showing strong bullish momentum following a clean breakout above $0.00250. Continuation relies on holding this support zone. Given the recent rapid move, avoid FOMO or chasing if price pushes significantly past the entry range. Manage risk accordingly
$GALA
#NFPWatch #BitcoinFundingRateTriplesTo10%
Entry Zone: $0.00260 – $0.00268 (Current: $0.002681)
Leverage: 10x
Take-Profit Targets:
🎯 TP1: $0.00280
🎯 TP2: $0.00295
🎯 TP3: $0.00315
🛑 Stop Loss: $0.00242
Market Insight:
$GALA is showing strong bullish momentum following a clean breakout above $0.00250. Continuation relies on holding this support zone. Given the recent rapid move, avoid FOMO or chasing if price pushes significantly past the entry range. Manage risk accordingly
$GALA
#NFPWatch #BitcoinFundingRateTriplesTo10%
25
·
--
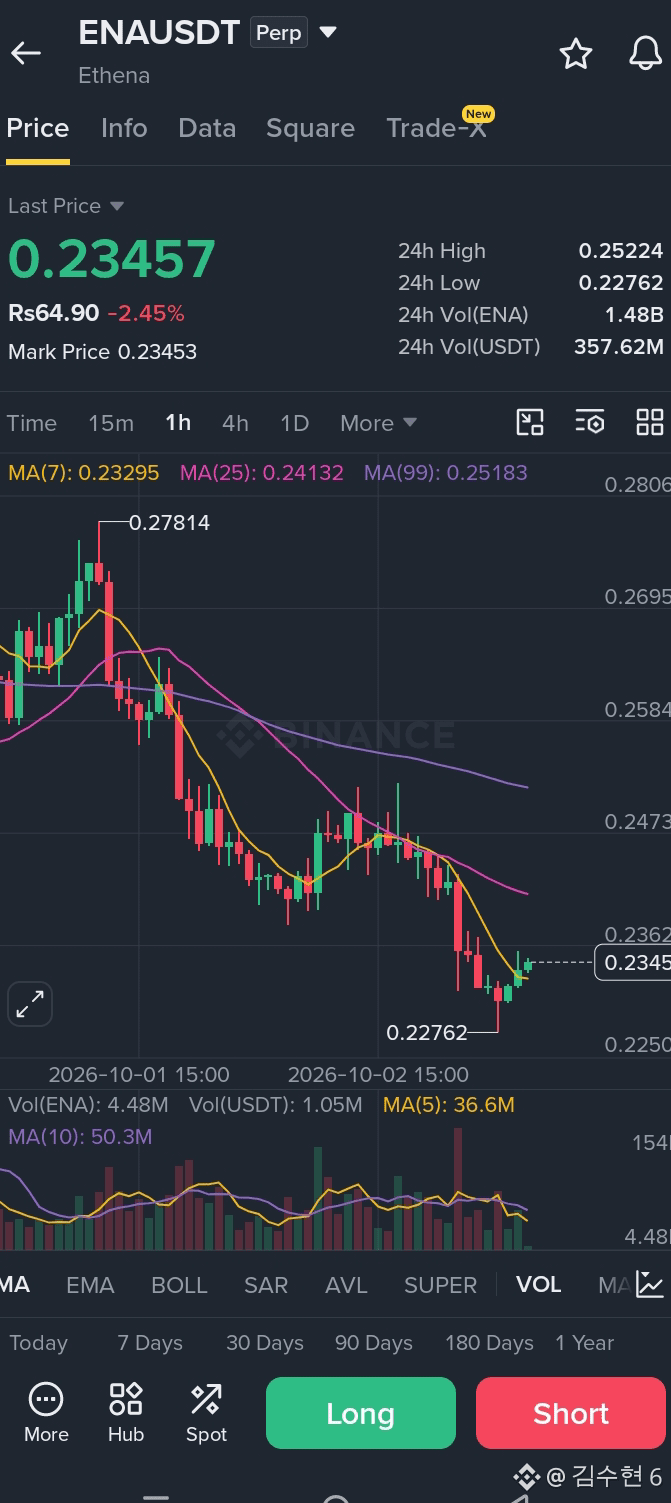
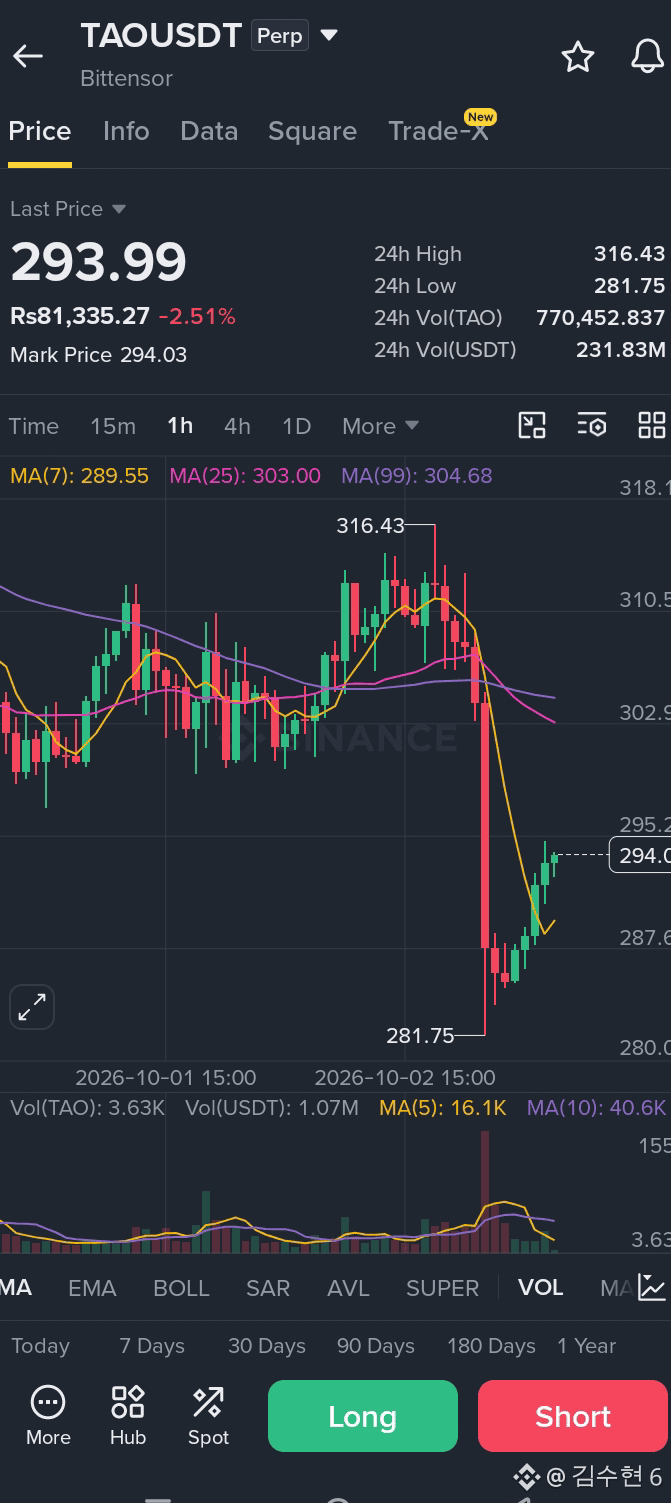
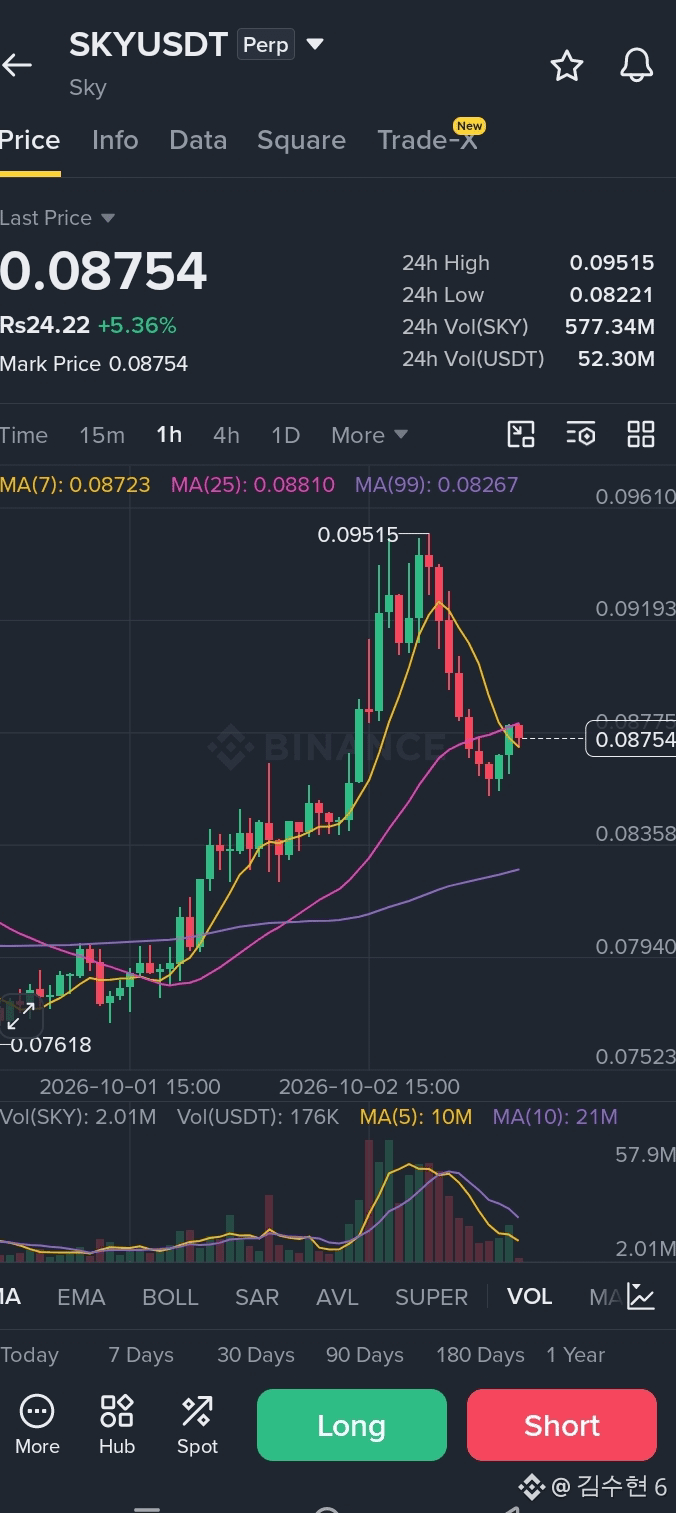
$TAO \vert{}$ENA | $ZRO \vert{}$SKY — Short Targets Hit
All four short positions have successfully hit TP2, securing strong profits across the board. Consider taking additional profits here and letting a runner position roll toward the final target with stop-loss moved to entry.
{future}(TAOUSDT)
{future}(ENAUSDT)
{future}(SKYUSDT)
#NFPWatch #BitcoinFundingRateTriplesTo10%
$TAO \vert{}$ENA | $ZRO \vert{}$SKY — Short Targets Hit
All four short positions have successfully hit TP2, securing strong profits across the board. Consider taking additional profits here and letting a runner position roll toward the final target with stop-loss moved to entry.
#NFPWatch #BitcoinFundingRateTriplesTo10%
All four short positions have successfully hit TP2, securing strong profits across the board. Consider taking additional profits here and letting a runner position roll toward the final target with stop-loss moved to entry.
#NFPWatch #BitcoinFundingRateTriplesTo10%
33
·
--
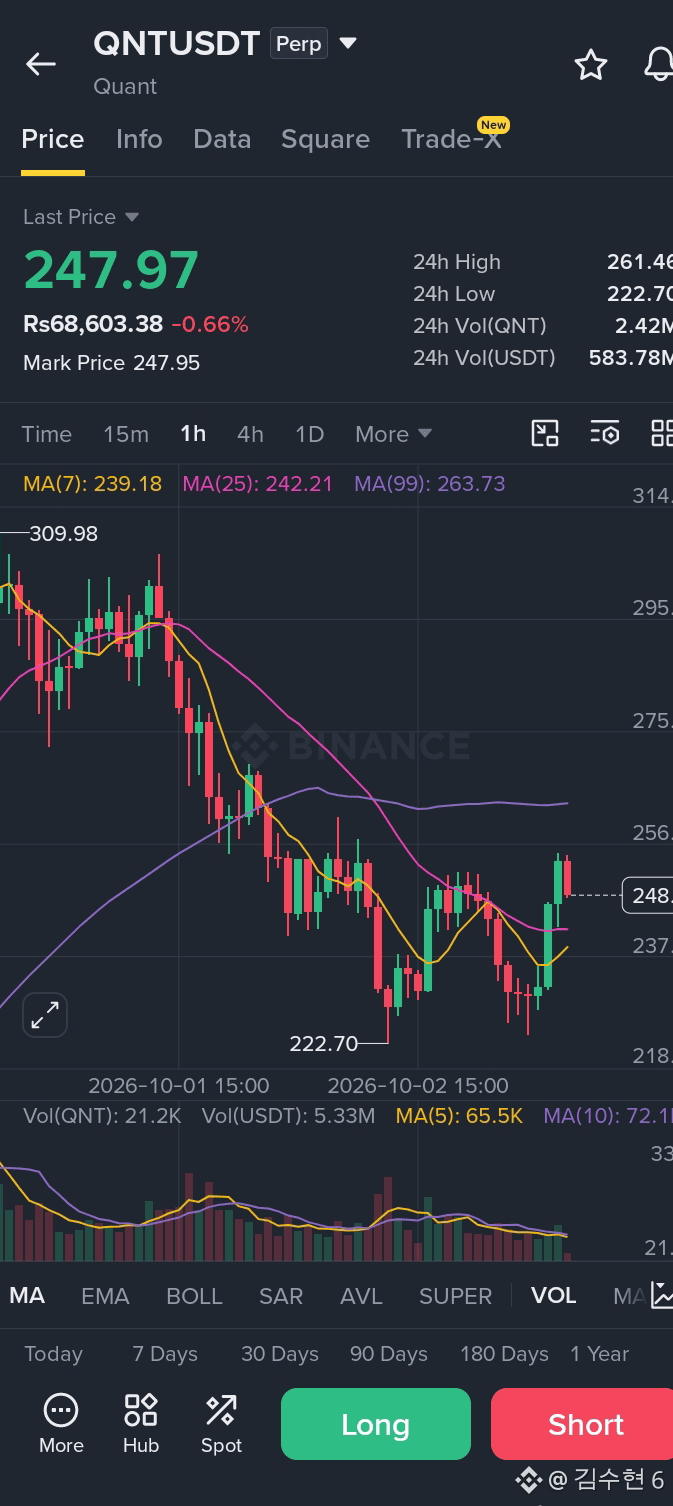
If forcing a choice among QNT, PUMP, NIGHT, and AAVE based on structural strength, risk-reward profile, and fundamentals:
$QNT
{future}(QNTUSDT)
$PUMP
{future}(PUMPUSDT)
$AAVE
{future}(AAVEUSDT)
#NFPWatch #BitcoinFundingRateTriplesTo10%
If forcing a choice among QNT, PUMP, NIGHT, and AAVE based on structural strength, risk-reward profile, and fundamentals:
$QNT
$PUMP
$AAVE
#NFPWatch #BitcoinFundingRateTriplesTo10%
$QNT
$PUMP
$AAVE
#NFPWatch #BitcoinFundingRateTriplesTo10%
73
·
--
Төмен (кемімелі)
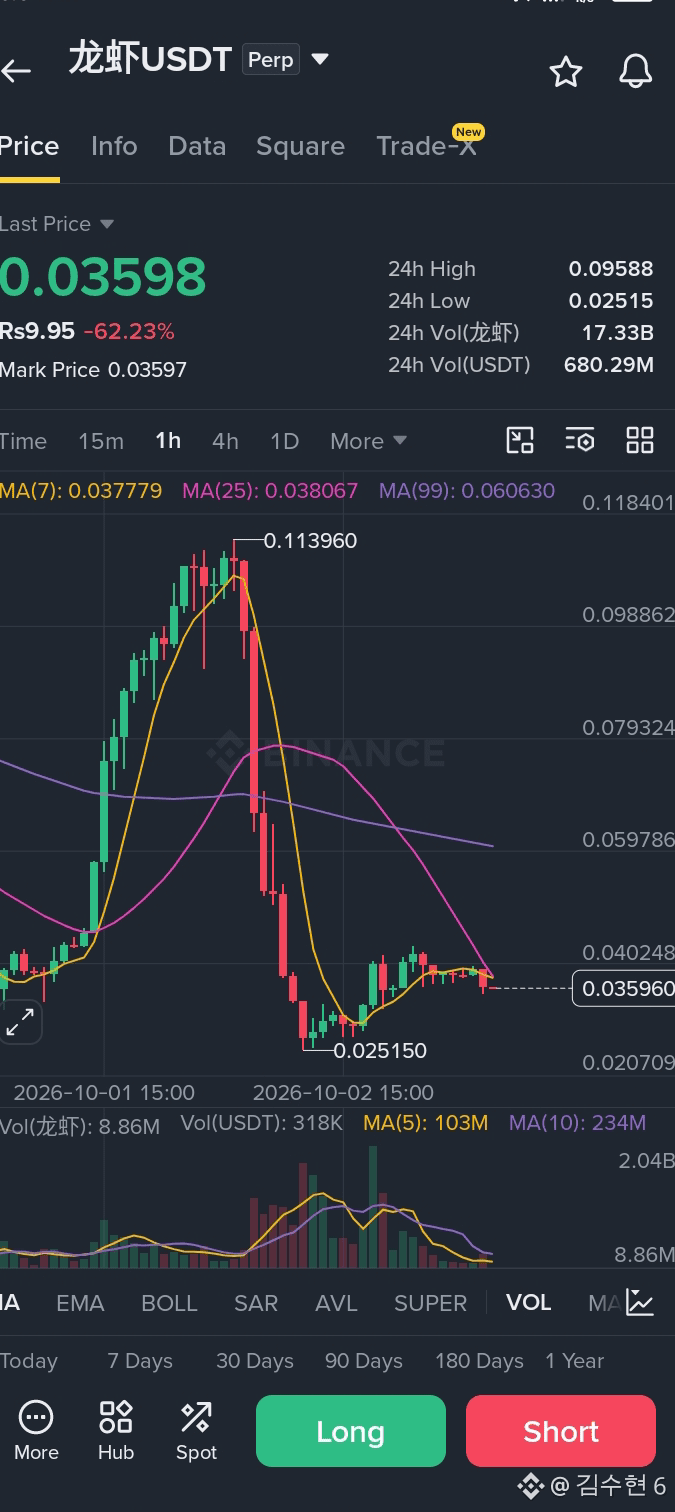
$龙虾 Setup
Strong bounce off the lows with buyers gradually stepping back in. Looking for a continuation move here—keep position sizing small and strictly honor the stop loss given the recent volatility.
Entry Zone: $0.0400 – $0.0420
TP1: $0.0460
TP2: $0.0520
TP3: $0.0600
Stop Loss: $0.0365
$龙虾
{future}(龙虾USDT)
#NFPWatch #BitcoinFundingRateTriplesTo10%
$龙虾 Setup
Strong bounce off the lows with buyers gradually stepping back in. Looking for a continuation move here—keep position sizing small and strictly honor the stop loss given the recent volatility.
Entry Zone: $0.0400 – $0.0420
TP1: $0.0460
TP2: $0.0520
TP3: $0.0600
Stop Loss: $0.0365
$龙虾
#NFPWatch #BitcoinFundingRateTriplesTo10%
Strong bounce off the lows with buyers gradually stepping back in. Looking for a continuation move here—keep position sizing small and strictly honor the stop loss given the recent volatility.
Entry Zone: $0.0400 – $0.0420
TP1: $0.0460
TP2: $0.0520
TP3: $0.0600
Stop Loss: $0.0365
$龙虾
#NFPWatch #BitcoinFundingRateTriplesTo10%
104
Көбірек контент көру үшін кіріңіз
Binance Square платформасында әлемдік криптоқоғамдастыққа қосылыңыз
⚡️ Криптовалюта туралы ең соңғы және пайдалы ақпаратты алыңыз.
💬 Әлемдегі ең ірі криптобиржаның сеніміне ие.
👍 Расталған авторлардың нақты пікірлерін табыңыз.
Электрондық пошта/телефон нөмірі
Трендтегі тақырыптар
ETHUp70%InQ3ButLiquidityFalls
4 рет көрілді
27 адам талқылап жатыр
👀 ETH had an explosive Q3, yet liquidity is fading. The next move could be volatile, making careful spot trading more important than ever. $ETH $XRP
#ethup70%inq3butliquidityfalls
CryptoMahibaloch
·0 лайк
·9 рет көрілді
EthStakingExitQueueHits2026High
682 рет көрілді
111 адам талқылап жатыр
FedOctoberHoldOdds82.3%
732 рет көрілді
76 адам талқылап жатыр