

Harshith Elite Trader
7.9k Publications

Harshith Elite Trader
Signaler
Bloquer l’utilisateur
Harshith | Private Crypto Trader | Precision Entries. Calculated Risk. | Capital Preservation First. | Profits Built with Discipline.🔥🔥
Ouvert au trading
Trade régulièrement
9.7 mois
498 Suivis
1.4K+ Abonnés
7.7K+ J’aime
Publications
Portefeuille
Tous
Citations
Direct
·
--
Baissier
🔴🔥 $1000000BOB — BREAKDOWN MODE, DOWNSIDE IN FOCUS 📉
🔻 SHORT SETUP
Entry: 0.0135 – 0.0138
TP1: 0.01262
TP2: 0.01172
TP3: 0.01108
SL: 0.0147
$1000000BOB has already broken down sharply, with price around 0.01351 (-22.88%). If sellers maintain control below 0.0138, further downside could remain in focus.
⚡ Key level: 0.0138
Below it → bearish momentum stays active.
Reclaim above it → short setup weakens.
👇 Trade $1000000BOB here
{future}(1000000BOBUSDT)
🔴🔥 $1000000BOB — BREAKDOWN MODE, DOWNSIDE IN FOCUS 📉
🔻 SHORT SETUP
Entry: 0.0135 – 0.0138
TP1: 0.01262
TP2: 0.01172
TP3: 0.01108
SL: 0.0147
$1000000BOB has already broken down sharply, with price around 0.01351 (-22.88%). If sellers maintain control below 0.0138, further downside could remain in focus.
⚡ Key level: 0.0138
Below it → bearish momentum stays active.
Reclaim above it → short setup weakens.
👇 Trade $1000000BOB here
🔻 SHORT SETUP
Entry: 0.0135 – 0.0138
TP1: 0.01262
TP2: 0.01172
TP3: 0.01108
SL: 0.0147
$1000000BOB has already broken down sharply, with price around 0.01351 (-22.88%). If sellers maintain control below 0.0138, further downside could remain in focus.
⚡ Key level: 0.0138
Below it → bearish momentum stays active.
Reclaim above it → short setup weakens.
👇 Trade $1000000BOB here
1
285
·
--
Haussier
🟢🔥 $SKHYNIX — DIP BUYERS ARE BACK 📈🚀
🟢 LONG SETUP
Entry: 1,304.75 – 1,311.31
TP1: 1,371.29
TP2: 1,421.90
SL: 1,265.61
⚡ Funding is heavily pressuring shorts, creating potential fuel for a sharp relief squeeze if buyers defend the entry zone.
🔑 Key level: 1,304
Hold support → upside continuation stays in focus.
Lose 1,304 → trend continuation risk increases.
Never go all-in. Use a position size that fits your account.
👇👇 Ride the upside — Trade $SKHYNIX
{future}(SKHYNIXUSDT)
🟢🔥 $SKHYNIX — DIP BUYERS ARE BACK 📈🚀
🟢 LONG SETUP
Entry: 1,304.75 – 1,311.31
TP1: 1,371.29
TP2: 1,421.90
SL: 1,265.61
⚡ Funding is heavily pressuring shorts, creating potential fuel for a sharp relief squeeze if buyers defend the entry zone.
🔑 Key level: 1,304
Hold support → upside continuation stays in focus.
Lose 1,304 → trend continuation risk increases.
Never go all-in. Use a position size that fits your account.
👇👇 Ride the upside — Trade $SKHYNIX
🟢 LONG SETUP
Entry: 1,304.75 – 1,311.31
TP1: 1,371.29
TP2: 1,421.90
SL: 1,265.61
⚡ Funding is heavily pressuring shorts, creating potential fuel for a sharp relief squeeze if buyers defend the entry zone.
🔑 Key level: 1,304
Hold support → upside continuation stays in focus.
Lose 1,304 → trend continuation risk increases.
Never go all-in. Use a position size that fits your account.
👇👇 Ride the upside — Trade $SKHYNIX
1
7
·
--
Haussier
🚀🔥 $ALICE — WONDERLAND RALLY IS JUST GETTING STARTED? 📈
🟢 LONG SETUP
Entry: 0.2114 – 0.2162
TP1: 0.2450
TP2: 0.2700
SL: 0.2008
$ALICE is moving parabolic with aggressive buying pressure. If momentum holds, the next upside levels could come into focus.
⚠️ RSI is extremely overbought, so a sharp pullback remains possible. Don’t chase the candle.
Never go all-in. Use a position size that fits your account.
👇 Trade $ALICE here
{future}(ALICEUSDT)
🚀🔥 $ALICE — WONDERLAND RALLY IS JUST GETTING STARTED? 📈
🟢 LONG SETUP
Entry: 0.2114 – 0.2162
TP1: 0.2450
TP2: 0.2700
SL: 0.2008
$ALICE is moving parabolic with aggressive buying pressure. If momentum holds, the next upside levels could come into focus.
⚠️ RSI is extremely overbought, so a sharp pullback remains possible. Don’t chase the candle.
Never go all-in. Use a position size that fits your account.
👇 Trade $ALICE here
🟢 LONG SETUP
Entry: 0.2114 – 0.2162
TP1: 0.2450
TP2: 0.2700
SL: 0.2008
$ALICE is moving parabolic with aggressive buying pressure. If momentum holds, the next upside levels could come into focus.
⚠️ RSI is extremely overbought, so a sharp pullback remains possible. Don’t chase the candle.
Never go all-in. Use a position size that fits your account.
👇 Trade $ALICE here
1
189
·
--
Haussier
🟢 $SOON — LONG SETUP 🚀📈
Entry: 0.420 – 0.430
TP1: 0.455
TP2: 0.490
TP3: 0.545
SL: 0.396
⚡ Support Zone: 0.40
Sharp move ke baad $SOON 0.40 ke around stabilize kar raha hai. Agar support hold hota hai aur buyers momentum regain karte hain, 0.455 → 0.490 → 0.545 recovery targets open ho sakte hain.
❌ 0.40 ke neeche strong breakdown = setup invalid.
👇 Trade $SOON here
{future}(SOONUSDT)
🟢 $SOON — LONG SETUP 🚀📈
Entry: 0.420 – 0.430
TP1: 0.455
TP2: 0.490
TP3: 0.545
SL: 0.396
⚡ Support Zone: 0.40
Sharp move ke baad $SOON 0.40 ke around stabilize kar raha hai. Agar support hold hota hai aur buyers momentum regain karte hain, 0.455 → 0.490 → 0.545 recovery targets open ho sakte hain.
❌ 0.40 ke neeche strong breakdown = setup invalid.
👇 Trade $SOON here
Entry: 0.420 – 0.430
TP1: 0.455
TP2: 0.490
TP3: 0.545
SL: 0.396
⚡ Support Zone: 0.40
Sharp move ke baad $SOON 0.40 ke around stabilize kar raha hai. Agar support hold hota hai aur buyers momentum regain karte hain, 0.455 → 0.490 → 0.545 recovery targets open ho sakte hain.
❌ 0.40 ke neeche strong breakdown = setup invalid.
👇 Trade $SOON here
1
40
·
--
Haussier
🟢 $SOON — SUPPORT HOLDING, BOUNCE IN FOCUS 🚀📈
$SOON is attempting to stabilize after a sharp move. If buyers defend the 0.40 area and momentum returns, a recovery toward the upside targets could develop.
🟢 LONG SETUP
Entry: 0.420 – 0.430
TP1: 0.455
TP2: 0.490
TP3: 0.545
SL: 0.396
⚡ Key level: 0.40 support
Hold the zone → bounce potential stays active.
Break below support → setup invalidated.
👇 Trade $SOON here
{future}(SOONUSDT)
🟢 $SOON — SUPPORT HOLDING, BOUNCE IN FOCUS 🚀📈
$SOON is attempting to stabilize after a sharp move. If buyers defend the 0.40 area and momentum returns, a recovery toward the upside targets could develop.
🟢 LONG SETUP
Entry: 0.420 – 0.430
TP1: 0.455
TP2: 0.490
TP3: 0.545
SL: 0.396
⚡ Key level: 0.40 support
Hold the zone → bounce potential stays active.
Break below support → setup invalidated.
👇 Trade $SOON here
$SOON is attempting to stabilize after a sharp move. If buyers defend the 0.40 area and momentum returns, a recovery toward the upside targets could develop.
🟢 LONG SETUP
Entry: 0.420 – 0.430
TP1: 0.455
TP2: 0.490
TP3: 0.545
SL: 0.396
⚡ Key level: 0.40 support
Hold the zone → bounce potential stays active.
Break below support → setup invalidated.
👇 Trade $SOON here
1
292
·
--
Baissier
🔴 $CL — BIG SHORT SETUP 📉🔥
$CL is back in the short zone. Watching for another downside move from here.
🔻 SHORT $CL
Entry: Current Market Price
TP: 86
SL: 96
⚡ Key level: 96 — reclaiming this level invalidates the short setup.
👇👇 Click Here To SHORT $CL
{future}(CLUSDT)
🔴 $CL — BIG SHORT SETUP 📉🔥
$CL is back in the short zone. Watching for another downside move from here.
🔻 SHORT $CL
Entry: Current Market Price
TP: 86
SL: 96
⚡ Key level: 96 — reclaiming this level invalidates the short setup.
👇👇 Click Here To SHORT $CL
$CL is back in the short zone. Watching for another downside move from here.
🔻 SHORT $CL
Entry: Current Market Price
TP: 86
SL: 96
⚡ Key level: 96 — reclaiming this level invalidates the short setup.
👇👇 Click Here To SHORT $CL
1
165
·
--
Haussier
💢🚀 $ETH — $2,806 IS IN SIGHT 🥂💫
$ETH is pushing higher, currently around $2,693.41 (+0.5%), with momentum building toward the $2,806 level.
🎯 Key Target: $2,806
⚡ Holding the current momentum could keep the upside move in focus.
Meanwhile, $MOVR is also heating up with a strong +51.4% move. 🔥
👀 Keeping $OPN on watch too.
🚀 Stay locked on $ETH
{future}(ETHUSDT)
💢🚀 $ETH — $2,806 IS IN SIGHT 🥂💫
$ETH is pushing higher, currently around $2,693.41 (+0.5%), with momentum building toward the $2,806 level.
🎯 Key Target: $2,806
⚡ Holding the current momentum could keep the upside move in focus.
Meanwhile, $MOVR is also heating up with a strong +51.4% move. 🔥
👀 Keeping $OPN on watch too.
🚀 Stay locked on $ETH
$ETH is pushing higher, currently around $2,693.41 (+0.5%), with momentum building toward the $2,806 level.
🎯 Key Target: $2,806
⚡ Holding the current momentum could keep the upside move in focus.
Meanwhile, $MOVR is also heating up with a strong +51.4% move. 🔥
👀 Keeping $OPN on watch too.
🚀 Stay locked on $ETH
1
71
·
--
Haussier
🟢 $COHR — 1H LONG SETUP 📈🔥
The breakout area is being revisited as a potential long entry. No chase — wait for the retest and confirmation.
🟢 LONG WATCHLIST
Entry Zone: 299.22 – 300.50
SL: 290.95
TP1: 317.80 — 2.01R
TP2: 321.38 — 2.42R
TP3: 324.96 — 2.82R
📊 Scale Out: 25% / 25% / 50%
⚡ Confirmation: 15M entry confirmation is still incomplete. Price is currently away from the planned entry and may need a clean retest.
👀 WATCHLIST ONLY — WAIT FOR CONFIRMATION
👇 Keep $COHR on watch
{future}(COHRUSDT)
🟢 $COHR — 1H LONG SETUP 📈🔥
The breakout area is being revisited as a potential long entry. No chase — wait for the retest and confirmation.
🟢 LONG WATCHLIST
Entry Zone: 299.22 – 300.50
SL: 290.95
TP1: 317.80 — 2.01R
TP2: 321.38 — 2.42R
TP3: 324.96 — 2.82R
📊 Scale Out: 25% / 25% / 50%
⚡ Confirmation: 15M entry confirmation is still incomplete. Price is currently away from the planned entry and may need a clean retest.
👀 WATCHLIST ONLY — WAIT FOR CONFIRMATION
👇 Keep $COHR on watch
The breakout area is being revisited as a potential long entry. No chase — wait for the retest and confirmation.
🟢 LONG WATCHLIST
Entry Zone: 299.22 – 300.50
SL: 290.95
TP1: 317.80 — 2.01R
TP2: 321.38 — 2.42R
TP3: 324.96 — 2.82R
📊 Scale Out: 25% / 25% / 50%
⚡ Confirmation: 15M entry confirmation is still incomplete. Price is currently away from the planned entry and may need a clean retest.
👀 WATCHLIST ONLY — WAIT FOR CONFIRMATION
👇 Keep $COHR on watch
1
91
·
--
Haussier
🚀🔥 $C /USDT — 1H TREND CONTINUATION LONG 🟢📈
🟢 LONG — Buy The Dip
🎯 Entry Zone: $0.07815 – $0.07991
🎯 TP1: $0.08750
🎯 TP2: $0.09430
🛑 SL: $0.07424
📌 Dips into macro support are getting bought
📌 1H structure remains bullish
📌 Looking for continuation back toward the highs
📌 Let the entry zone confirm before chasing
Strong Bias On 👉 $C 👈
👇 Click and Trade $C Here
{future}(CUSDT)
🚀🔥 $C /USDT — 1H TREND CONTINUATION LONG 🟢📈
🟢 LONG — Buy The Dip
🎯 Entry Zone: $0.07815 – $0.07991
🎯 TP1: $0.08750
🎯 TP2: $0.09430
🛑 SL: $0.07424
📌 Dips into macro support are getting bought
📌 1H structure remains bullish
📌 Looking for continuation back toward the highs
📌 Let the entry zone confirm before chasing
Strong Bias On 👉 $C 👈
👇 Click and Trade $C Here
🟢 LONG — Buy The Dip
🎯 Entry Zone: $0.07815 – $0.07991
🎯 TP1: $0.08750
🎯 TP2: $0.09430
🛑 SL: $0.07424
📌 Dips into macro support are getting bought
📌 1H structure remains bullish
📌 Looking for continuation back toward the highs
📌 Let the entry zone confirm before chasing
Strong Bias On 👉 $C 👈
👇 Click and Trade $C Here
1
148
·
--
Haussier
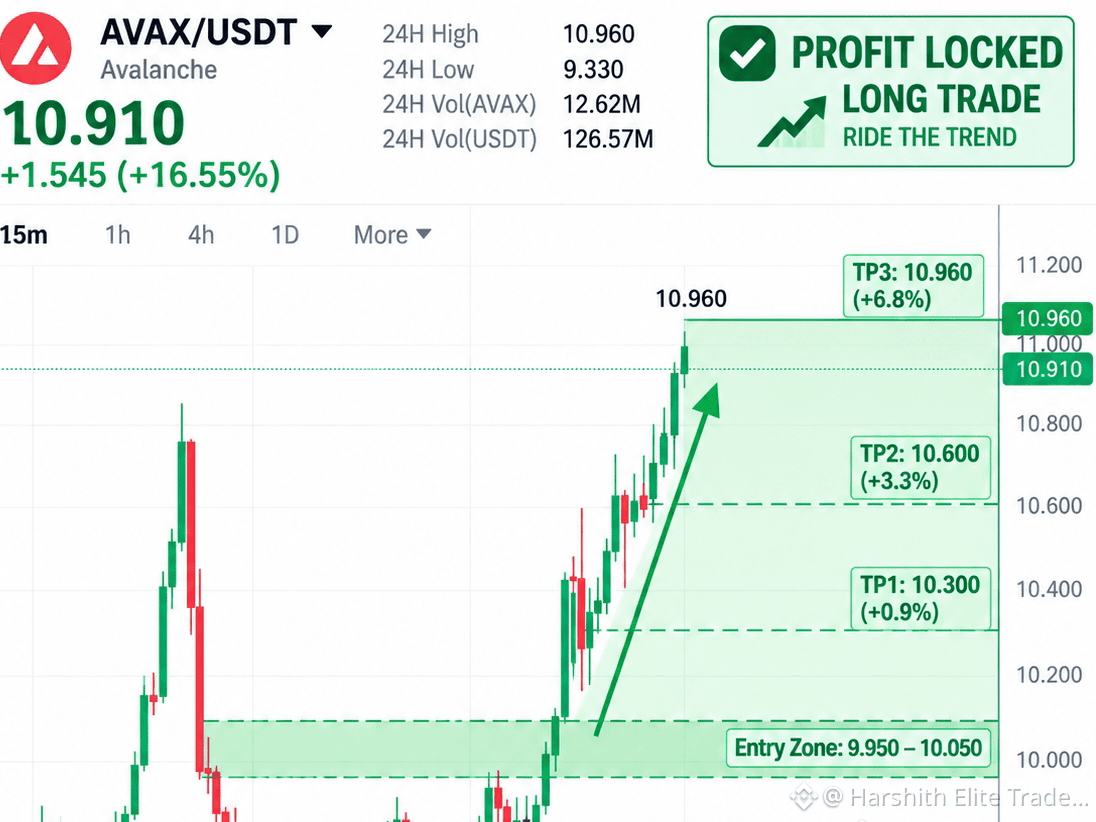
🏆 $AVAX — PERFECT LONG WIN! 🟢
$AVAX pushed all the way to $10.96 and the LONG delivered beautifully! 🚀
Momentum is still looking strong, and the next levels I’m watching are:
🎯 $11.20
🎯 $11.50
🎯 $12.00
The move is playing out — now watching how price reacts at each level.
Strong Bias On 👉 $AVAX 👈
👇 Click and Trade Here
{future}(AVAXUSDT)
🏆 $AVAX — PERFECT LONG WIN! 🟢
$AVAX pushed all the way to $10.96 and the LONG delivered beautifully! 🚀
Momentum is still looking strong, and the next levels I’m watching are:
🎯 $11.20
🎯 $11.50
🎯 $12.00
The move is playing out — now watching how price reacts at each level.
Strong Bias On 👉 $AVAX 👈
👇 Click and Trade Here
$AVAX pushed all the way to $10.96 and the LONG delivered beautifully! 🚀
Momentum is still looking strong, and the next levels I’m watching are:
🎯 $11.20
🎯 $11.50
🎯 $12.00
The move is playing out — now watching how price reacts at each level.
Strong Bias On 👉 $AVAX 👈
👇 Click and Trade Here
1
81
·
--
Haussier
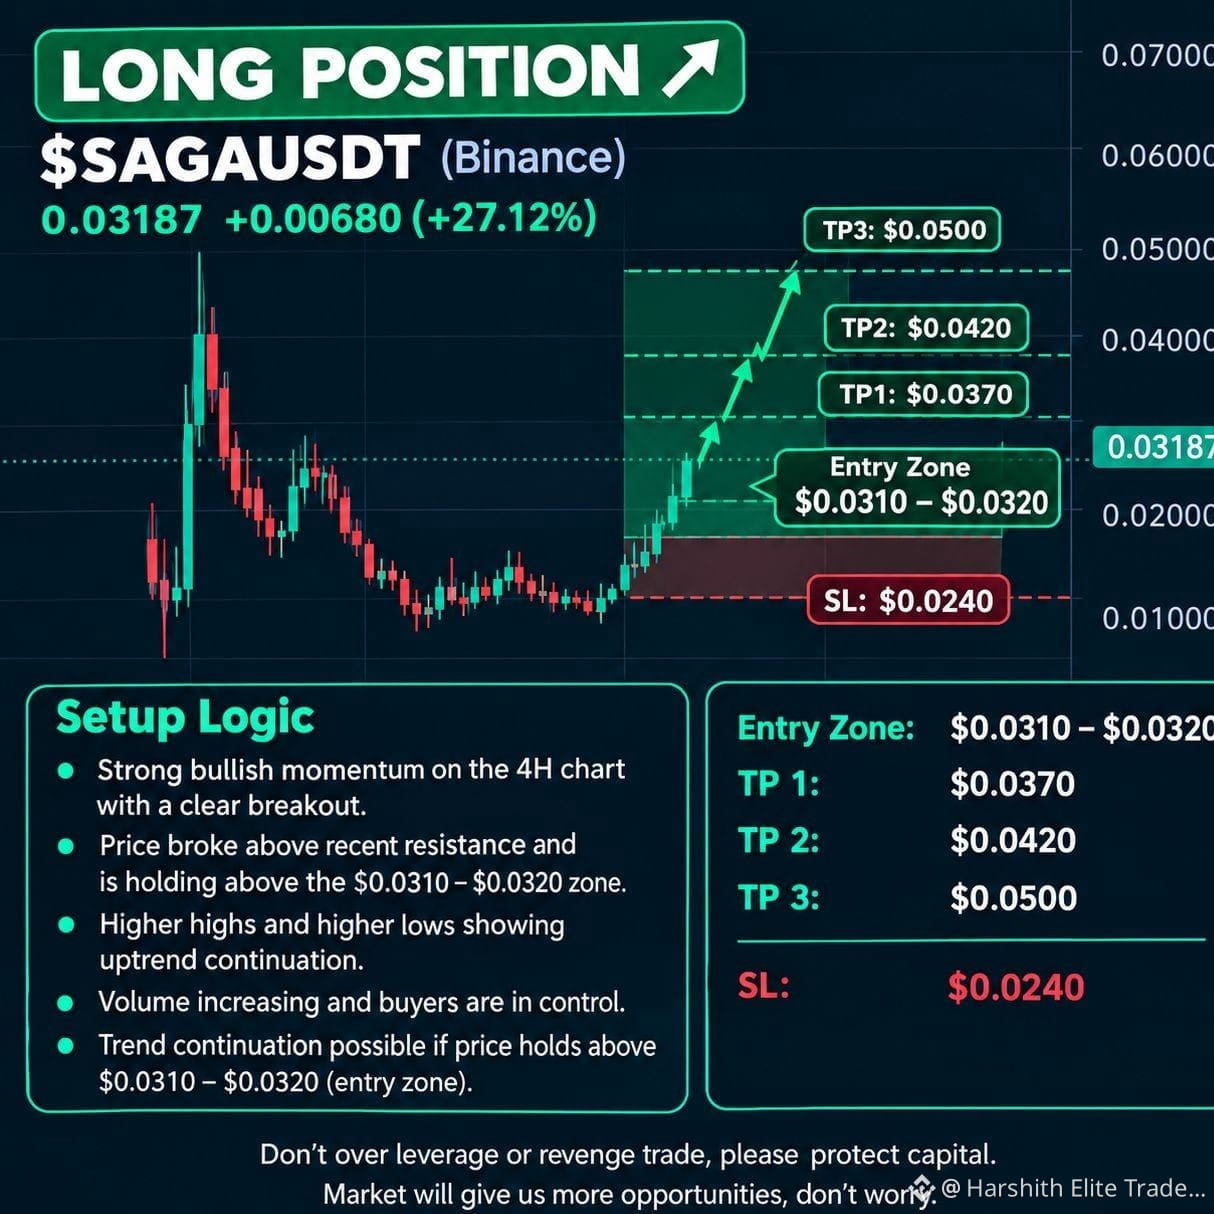
🚀🔥 $SAGA /USDT — HIGH-CONVICTION LONG SETUP 🟢📈
💥 +30%+ MOVE | Buyers Taking Control
🟢 LONG · 10x Leverage
🎯 Entry Zone: $0.0312 – $0.0324
🎯 TP1: $0.0340
🎯 TP2: $0.0365
🎯 TP3: $0.0395
🎯 TP4: $0.0440
🎯 TP5: $0.0500
🛑 SL: $0.02420
📌 Strong momentum after the breakout
📌 Watch the entry zone for a clean retest
📌 Scale out progressively into the targets
Strong Bias On 👉 $SAGA 👈
👇 Click and Trade $SAGA Here
{future}(SAGAUSDT)
🚀🔥 $SAGA /USDT — HIGH-CONVICTION LONG SETUP 🟢📈
💥 +30%+ MOVE | Buyers Taking Control
🟢 LONG · 10x Leverage
🎯 Entry Zone: $0.0312 – $0.0324
🎯 TP1: $0.0340
🎯 TP2: $0.0365
🎯 TP3: $0.0395
🎯 TP4: $0.0440
🎯 TP5: $0.0500
🛑 SL: $0.02420
📌 Strong momentum after the breakout
📌 Watch the entry zone for a clean retest
📌 Scale out progressively into the targets
Strong Bias On 👉 $SAGA 👈
👇 Click and Trade $SAGA Here
💥 +30%+ MOVE | Buyers Taking Control
🟢 LONG · 10x Leverage
🎯 Entry Zone: $0.0312 – $0.0324
🎯 TP1: $0.0340
🎯 TP2: $0.0365
🎯 TP3: $0.0395
🎯 TP4: $0.0440
🎯 TP5: $0.0500
🛑 SL: $0.02420
📌 Strong momentum after the breakout
📌 Watch the entry zone for a clean retest
📌 Scale out progressively into the targets
Strong Bias On 👉 $SAGA 👈
👇 Click and Trade $SAGA Here
2
249
·
--
Haussier
🚀🔥 $UNI /USDT — PULLBACK BUYING ZONE 🟢📈
$UNI broke above $9 and has now pulled back toward ~$8.70 — a level worth watching for a potential continuation setup.
📌 Previous Area: $6+
📌 Breakout: $9+
🟢 Buy Zone: ~$8.70
🎯 Upside Focus: $9.50 → $10.00+
💎 UNI remains one of the established DeFi names, with protocol fee and token-burn mechanisms adding a different token-value dynamic compared with governance-only DeFi tokens.
The key is whether buyers defend the ~$8.70 area and reclaim $9 with momentum.
Strong Bias On 👉 $UNI 👈
👇 Click and Trade Here
{future}(UNIUSDT)
🚀🔥 $UNI /USDT — PULLBACK BUYING ZONE 🟢📈
$UNI broke above $9 and has now pulled back toward ~$8.70 — a level worth watching for a potential continuation setup.
📌 Previous Area: $6+
📌 Breakout: $9+
🟢 Buy Zone: ~$8.70
🎯 Upside Focus: $9.50 → $10.00+
💎 UNI remains one of the established DeFi names, with protocol fee and token-burn mechanisms adding a different token-value dynamic compared with governance-only DeFi tokens.
The key is whether buyers defend the ~$8.70 area and reclaim $9 with momentum.
Strong Bias On 👉 $UNI 👈
👇 Click and Trade Here
$UNI broke above $9 and has now pulled back toward ~$8.70 — a level worth watching for a potential continuation setup.
📌 Previous Area: $6+
📌 Breakout: $9+
🟢 Buy Zone: ~$8.70
🎯 Upside Focus: $9.50 → $10.00+
💎 UNI remains one of the established DeFi names, with protocol fee and token-burn mechanisms adding a different token-value dynamic compared with governance-only DeFi tokens.
The key is whether buyers defend the ~$8.70 area and reclaim $9 with momentum.
Strong Bias On 👉 $UNI 👈
👇 Click and Trade Here
1
54
·
--
Haussier
🚀🔥 $BTC /USDT — PULLBACK, NOT A TREND REVERSAL? 🟢📈
$BTC pulled back from ~$81,900 to ~$80,700, but the bigger structure is still holding above the key $76,000 level.
📌 Previous Low: ~$75,000
📌 Recent High: ~$81,900+
📌 Key Support: $80,000
📌 Major Invalidation: $76,000
🎯 Upside Target: $84,000
🟢 As long as BTC continues holding around $80K, the pullback can remain a healthy retracement rather than a confirmed trend reversal.
The next major upside level remains 👉 $84,000 👈
👇 Click and Trade $BTC Here
{future}(BTCUSDT)
🚀🔥 $BTC /USDT — PULLBACK, NOT A TREND REVERSAL? 🟢📈
$BTC pulled back from ~$81,900 to ~$80,700, but the bigger structure is still holding above the key $76,000 level.
📌 Previous Low: ~$75,000
📌 Recent High: ~$81,900+
📌 Key Support: $80,000
📌 Major Invalidation: $76,000
🎯 Upside Target: $84,000
🟢 As long as BTC continues holding around $80K, the pullback can remain a healthy retracement rather than a confirmed trend reversal.
The next major upside level remains 👉 $84,000 👈
👇 Click and Trade $BTC Here
$BTC pulled back from ~$81,900 to ~$80,700, but the bigger structure is still holding above the key $76,000 level.
📌 Previous Low: ~$75,000
📌 Recent High: ~$81,900+
📌 Key Support: $80,000
📌 Major Invalidation: $76,000
🎯 Upside Target: $84,000
🟢 As long as BTC continues holding around $80K, the pullback can remain a healthy retracement rather than a confirmed trend reversal.
The next major upside level remains 👉 $84,000 👈
👇 Click and Trade $BTC Here
1
38
·
--
Baissier
🔻💥 $CELR /USDT — REJECTION → SHORT SETUP 📉🔴
⚠️ $CELR is struggling around the $0.0040 zone after its massive rally. Rejection here could trigger another sharp correction.
🔴 SHORT — Sell The Rejection
🎯 Entry Zone: 0.00390 – 0.00405
🎯 TP1: 0.00350
🎯 TP2: 0.00300
🎯 TP3: 0.00250
🛑 SL: 0.00445
📌 Breakdown below 0.00385 could accelerate downside
📌 0.00445 = key invalidation level
📌 Watch for confirmation before chasing the move
Bearish Bias On 👉 $CELR 👈
👇 Click and Trade Here
{future}(CELRUSDT)
🔻💥 $CELR /USDT — REJECTION → SHORT SETUP 📉🔴
⚠️ $CELR is struggling around the $0.0040 zone after its massive rally. Rejection here could trigger another sharp correction.
🔴 SHORT — Sell The Rejection
🎯 Entry Zone: 0.00390 – 0.00405
🎯 TP1: 0.00350
🎯 TP2: 0.00300
🎯 TP3: 0.00250
🛑 SL: 0.00445
📌 Breakdown below 0.00385 could accelerate downside
📌 0.00445 = key invalidation level
📌 Watch for confirmation before chasing the move
Bearish Bias On 👉 $CELR 👈
👇 Click and Trade Here
⚠️ $CELR is struggling around the $0.0040 zone after its massive rally. Rejection here could trigger another sharp correction.
🔴 SHORT — Sell The Rejection
🎯 Entry Zone: 0.00390 – 0.00405
🎯 TP1: 0.00350
🎯 TP2: 0.00300
🎯 TP3: 0.00250
🛑 SL: 0.00445
📌 Breakdown below 0.00385 could accelerate downside
📌 0.00445 = key invalidation level
📌 Watch for confirmation before chasing the move
Bearish Bias On 👉 $CELR 👈
👇 Click and Trade Here
1
114
·
--
Baissier
🛢️🔻 $CL /USDT — OIL BEARS ARE WATCHING 📉🐻
⚠️ U.S.–Iran talks are driving expectations of increased supply pressure, while oil faces downside risk at the next open.
🔴 SHORT BIAS
🎯 Target 1: 90.00
🎯 Target 2: 88.50
🎯 Target 3: 87.00
📌 Watch the opening reaction carefully
📌 A confirmed breakdown can accelerate downside momentum
📌 Avoid chasing if price gaps sharply lower
Bearish Bias On 👉 $CL 👈
👇 Click and Trade $CL Here
{future}(CLUSDT)
🛢️🔻 $CL /USDT — OIL BEARS ARE WATCHING 📉🐻
⚠️ U.S.–Iran talks are driving expectations of increased supply pressure, while oil faces downside risk at the next open.
🔴 SHORT BIAS
🎯 Target 1: 90.00
🎯 Target 2: 88.50
🎯 Target 3: 87.00
📌 Watch the opening reaction carefully
📌 A confirmed breakdown can accelerate downside momentum
📌 Avoid chasing if price gaps sharply lower
Bearish Bias On 👉 $CL 👈
👇 Click and Trade $CL Here
⚠️ U.S.–Iran talks are driving expectations of increased supply pressure, while oil faces downside risk at the next open.
🔴 SHORT BIAS
🎯 Target 1: 90.00
🎯 Target 2: 88.50
🎯 Target 3: 87.00
📌 Watch the opening reaction carefully
📌 A confirmed breakdown can accelerate downside momentum
📌 Avoid chasing if price gaps sharply lower
Bearish Bias On 👉 $CL 👈
👇 Click and Trade $CL Here
1
209
·
--
Baissier
🔻💥 $G /USDT — BEARISH BREAKDOWN SETUP 📉🔴
⚠️ $G rejected from ~0.0151 and has been making lower highs ever since.
🔴 SHORT — Bearish Pressure Building
🎯 Entry: 0.00650 – 0.00680
🎯 TP1: 0.00630
🎯 TP2: 0.00600
🎯 TP3: 0.00570
🛑 SL: 0.00720
📌 Key support: 0.00650
📌 Breakdown below 0.00650 could open the path toward 0.00600
📌 Bullish recovery requires a reclaim of 0.00740
Bearish Bias On 👉 $G 👈
👇 Click and Trade Here
{future}(GUSDT)
🔻💥 $G /USDT — BEARISH BREAKDOWN SETUP 📉🔴
⚠️ $G rejected from ~0.0151 and has been making lower highs ever since.
🔴 SHORT — Bearish Pressure Building
🎯 Entry: 0.00650 – 0.00680
🎯 TP1: 0.00630
🎯 TP2: 0.00600
🎯 TP3: 0.00570
🛑 SL: 0.00720
📌 Key support: 0.00650
📌 Breakdown below 0.00650 could open the path toward 0.00600
📌 Bullish recovery requires a reclaim of 0.00740
Bearish Bias On 👉 $G 👈
👇 Click and Trade Here
⚠️ $G rejected from ~0.0151 and has been making lower highs ever since.
🔴 SHORT — Bearish Pressure Building
🎯 Entry: 0.00650 – 0.00680
🎯 TP1: 0.00630
🎯 TP2: 0.00600
🎯 TP3: 0.00570
🛑 SL: 0.00720
📌 Key support: 0.00650
📌 Breakdown below 0.00650 could open the path toward 0.00600
📌 Bullish recovery requires a reclaim of 0.00740
Bearish Bias On 👉 $G 👈
👇 Click and Trade Here
2
256
·
--
Haussier
🚀🔥 $SAGA /USDT — BULLISH BREAKOUT SETUP 🟢📈
💥 +22.42% in 24H | Strong buying pressure
🟢 LONG — Buy The Pullback
🎯 Entry Zone: $0.02980 – $0.03050
🎯 TP1: $0.03190
🎯 TP2: $0.03350
🎯 TP3: $0.03600
🛑 SL: Below $0.02900
📌 1H trend holding above MA(7), MA(25) & MA(99)
📌 Strong volume + bullish momentum
📌 Price near the 24H high → wait for a clean pullback instead of chasing
Strong Bias On 👉 $SAGA 👈
👇 Click and Trade $SAGA Here
{future}(SAGAUSDT)
🚀🔥 $SAGA /USDT — BULLISH BREAKOUT SETUP 🟢📈
💥 +22.42% in 24H | Strong buying pressure
🟢 LONG — Buy The Pullback
🎯 Entry Zone: $0.02980 – $0.03050
🎯 TP1: $0.03190
🎯 TP2: $0.03350
🎯 TP3: $0.03600
🛑 SL: Below $0.02900
📌 1H trend holding above MA(7), MA(25) & MA(99)
📌 Strong volume + bullish momentum
📌 Price near the 24H high → wait for a clean pullback instead of chasing
Strong Bias On 👉 $SAGA 👈
👇 Click and Trade $SAGA Here
💥 +22.42% in 24H | Strong buying pressure
🟢 LONG — Buy The Pullback
🎯 Entry Zone: $0.02980 – $0.03050
🎯 TP1: $0.03190
🎯 TP2: $0.03350
🎯 TP3: $0.03600
🛑 SL: Below $0.02900
📌 1H trend holding above MA(7), MA(25) & MA(99)
📌 Strong volume + bullish momentum
📌 Price near the 24H high → wait for a clean pullback instead of chasing
Strong Bias On 👉 $SAGA 👈
👇 Click and Trade $SAGA Here
1
206
·
--
Baissier
⚡️ $BTW /USDT — QUICK SCALP SHORT 🔴📉
🚨 Pumped into $0.80 → sharp rejection → momentum fading
That long wick shows heavy rejection, and the structure is starting to roll over.
🎯 SHORT ENTRY: $0.7146
⚡ Leverage: 20x
TARGETS 🎯
TP1: $0.700
TP2: $0.690
TP3: $0.680
TP4: $0.670
TP5: $0.650
🛑 STOP LOSS: $0.760
Keep it tight — this is a scalp, not a hold.
⚠️ In and out. No greed. Scale out into each TP.
Strong Bearish Bias 👉 $BTW 👈
👇 Click and Trade $BTW Here
{future}(BTWUSDT)
⚡️ $BTW /USDT — QUICK SCALP SHORT 🔴📉
🚨 Pumped into $0.80 → sharp rejection → momentum fading
That long wick shows heavy rejection, and the structure is starting to roll over.
🎯 SHORT ENTRY: $0.7146
⚡ Leverage: 20x
TARGETS 🎯
TP1: $0.700
TP2: $0.690
TP3: $0.680
TP4: $0.670
TP5: $0.650
🛑 STOP LOSS: $0.760
Keep it tight — this is a scalp, not a hold.
⚠️ In and out. No greed. Scale out into each TP.
Strong Bearish Bias 👉 $BTW 👈
👇 Click and Trade $BTW Here
🚨 Pumped into $0.80 → sharp rejection → momentum fading
That long wick shows heavy rejection, and the structure is starting to roll over.
🎯 SHORT ENTRY: $0.7146
⚡ Leverage: 20x
TARGETS 🎯
TP1: $0.700
TP2: $0.690
TP3: $0.680
TP4: $0.670
TP5: $0.650
🛑 STOP LOSS: $0.760
Keep it tight — this is a scalp, not a hold.
⚠️ In and out. No greed. Scale out into each TP.
Strong Bearish Bias 👉 $BTW 👈
👇 Click and Trade $BTW Here
1
94
·
--
Haussier
🚀💥 $BULLA /USDT — HIGH-CONVICTION LONG SETUP 🟢📈
🟢 LONG · 85% CONFIDENCE
🎯 Entry: 0.1046668 – 0.1059132
🛑 SL: 0.0889579
🎯 TP1: 0.1175391
🎯 TP2: 0.1270000
🎯 TP3: 0.1379543
📌 Bullish trend + demand-zone entry
📌 Looking for continuation toward higher targets
📌 Let price confirm the setup — don’t chase the move
Strong Bias On 👉 $BULLA 👈
👇 Click and Trade $BULLA Here
{future}(BULLAUSDT)
🚀💥 $BULLA /USDT — HIGH-CONVICTION LONG SETUP 🟢📈
🟢 LONG · 85% CONFIDENCE
🎯 Entry: 0.1046668 – 0.1059132
🛑 SL: 0.0889579
🎯 TP1: 0.1175391
🎯 TP2: 0.1270000
🎯 TP3: 0.1379543
📌 Bullish trend + demand-zone entry
📌 Looking for continuation toward higher targets
📌 Let price confirm the setup — don’t chase the move
Strong Bias On 👉 $BULLA 👈
👇 Click and Trade $BULLA Here
🟢 LONG · 85% CONFIDENCE
🎯 Entry: 0.1046668 – 0.1059132
🛑 SL: 0.0889579
🎯 TP1: 0.1175391
🎯 TP2: 0.1270000
🎯 TP3: 0.1379543
📌 Bullish trend + demand-zone entry
📌 Looking for continuation toward higher targets
📌 Let price confirm the setup — don’t chase the move
Strong Bias On 👉 $BULLA 👈
👇 Click and Trade $BULLA Here
1
191
·
--
Haussier
🟢 $AVAX — BREAKOUT MODE, BUT DON'T CHASE 🚀📈
$AVAX is showing a strong 15M higher-high structure, with buyers holding above 10.80. Price is now testing the 11.20–11.25 resistance zone, so a retest could offer a cleaner entry.
🟢 LONG — LET THE RETEST CONFIRM
Entry: 10.95 – 11.05
TP1: 11.25
TP2: 11.45
TP3: 11.70
SL: 10.70
⚡ Key level: 10.80–10.90 should hold.
Hold + reclaim → upside continuation stays in focus.
Lose the zone → setup weakens.
Personal chart analysis. Manage risk & DYOR.
👇 Trade $AVAX here
{future}(AVAXUSDT)
🟢 $AVAX — BREAKOUT MODE, BUT DON'T CHASE 🚀📈
$AVAX is showing a strong 15M higher-high structure, with buyers holding above 10.80. Price is now testing the 11.20–11.25 resistance zone, so a retest could offer a cleaner entry.
🟢 LONG — LET THE RETEST CONFIRM
Entry: 10.95 – 11.05
TP1: 11.25
TP2: 11.45
TP3: 11.70
SL: 10.70
⚡ Key level: 10.80–10.90 should hold.
Hold + reclaim → upside continuation stays in focus.
Lose the zone → setup weakens.
Personal chart analysis. Manage risk & DYOR.
👇 Trade $AVAX here
$AVAX is showing a strong 15M higher-high structure, with buyers holding above 10.80. Price is now testing the 11.20–11.25 resistance zone, so a retest could offer a cleaner entry.
🟢 LONG — LET THE RETEST CONFIRM
Entry: 10.95 – 11.05
TP1: 11.25
TP2: 11.45
TP3: 11.70
SL: 10.70
⚡ Key level: 10.80–10.90 should hold.
Hold + reclaim → upside continuation stays in focus.
Lose the zone → setup weakens.
Personal chart analysis. Manage risk & DYOR.
👇 Trade $AVAX here
1
106
Connectez-vous pour découvrir plus de contenu
Rejoignez la communauté mondiale des adeptes de cryptomonnaies sur Binance Square
⚡️ Suviez les dernières informations importantes sur les cryptomonnaies.
💬 Jugé digne de confiance par la plus grande plateforme d’échange de cryptomonnaies au monde.
👍 Découvrez les connaissances que partagent les créateurs vérifiés.
Adresse e-mail/Nº de téléphone
Sujets d’actualité
EtherGains70.9%InQ3
61,860 vues
723 mentions
One of the best third quarters in history 💰
September closed out last night, and with it, the quarter. For the quarter, BTC is up 42%—the second-best Q3 on record. ETH had a record-breaking Q3 overall, up 70%.
Looking at the chart, things are still looking good: we’re holding support, but we’re testing it more and more often. Plus, ETF momentum is weakening — inflows are gradually declining, and yesterday saw outflows for the first time in a long while.
Yes, historically, October has been a good month for crypto — it’s not called “Uptober” for nothing. But it’s also one of the most volatile months. Last year, for example, we managed to hit a new all-time high (ATH) and experience a flash crash.
🚀 High Accuracy Trades.
$BTC
$ETH
$SOL
#EtherGains70.9%InQ3 #DollarIndexHitsHighestSinceMay2025 #CFTCSubmitsTwoEventContractRulesToWhiteHouse #MicronBeatsEarningsLiftsGuidance
Knowledge is Power
·0 mentions J’aime
·148 vues
TreasuryLetsStatesFileStablecoinCertificationsEarly
2,588 vues
33 mentions
US10YearYieldNears5.3%
93,824 vues
868 mentions