
CryptoRise01
8.8k Posts

CryptoRise01
Report
Block User
Crypto signals | market analysis | trading signals. X:@CryptoRise01
Occasional Trader
2.4 Years
8.9K+ Following
3.6K+ Followers
9.4K+ Liked
Posts
All
Quotes
Videos
Live
·
--
Bullish
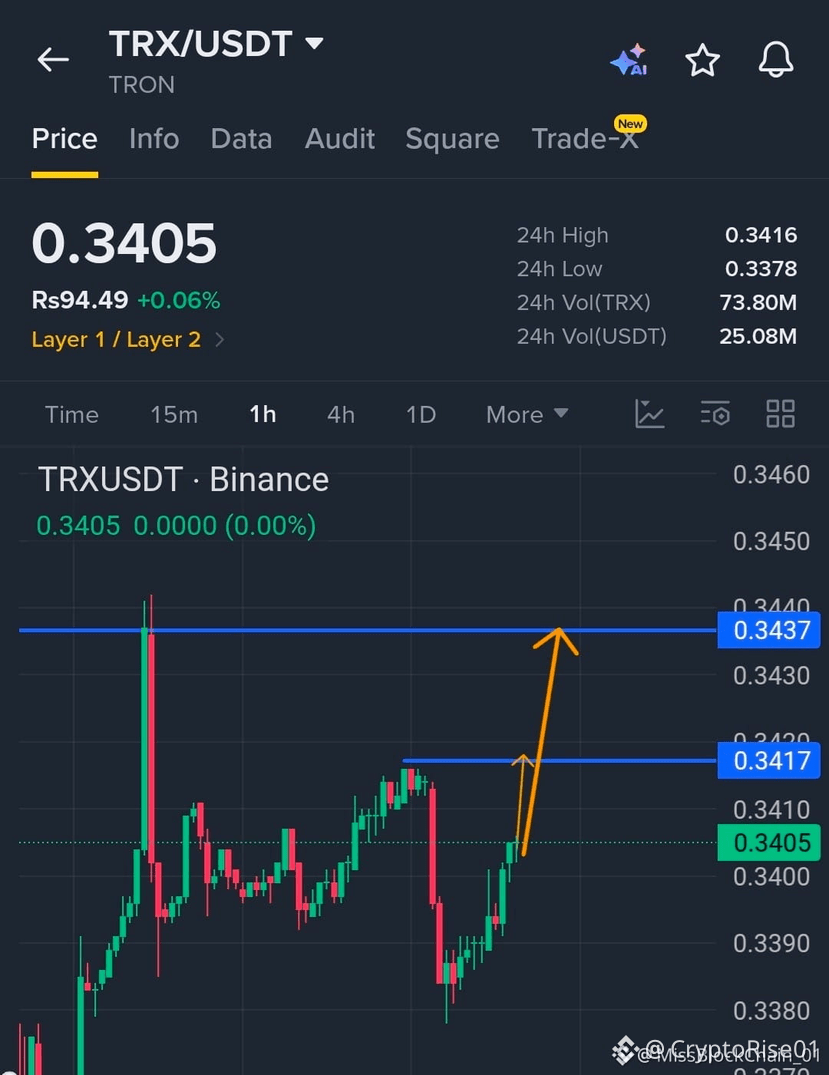
$TRX /USDT — LONG
Entry: 0.3400–0.3406
TP1: 0.3417
TP2: 0.3430
TP3: 0.3437
SL: 0.3377
{future}(TRXUSDT)
$BR
{future}(BRUSDT)
$TRX /USDT — LONG
Entry: 0.3400–0.3406
TP1: 0.3417
TP2: 0.3430
TP3: 0.3437
SL: 0.3377
$BR
Entry: 0.3400–0.3406
TP1: 0.3417
TP2: 0.3430
TP3: 0.3437
SL: 0.3377
$BR
307
·
--
Bullish
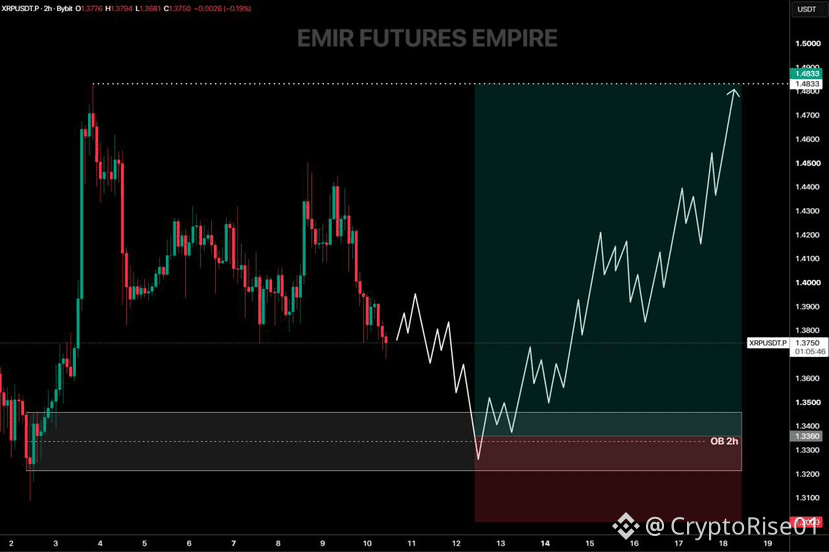
💰 Ripple ($XRP ).
The price of XRP is correcting toward the 2-hourOB zone between $1.32 and $1.35. If the price holds this zone during the correction, a new uptrend will begin. The main target for the rally is the liquidity zone at the previous high of $1.48.
{future}(XRPUSDT)
$VTHO
{future}(VTHOUSDT)
💰 Ripple ($XRP ).
The price of XRP is correcting toward the 2-hourOB zone between $1.32 and $1.35. If the price holds this zone during the correction, a new uptrend will begin. The main target for the rally is the liquidity zone at the previous high of $1.48.
$VTHO
The price of XRP is correcting toward the 2-hourOB zone between $1.32 and $1.35. If the price holds this zone during the correction, a new uptrend will begin. The main target for the rally is the liquidity zone at the previous high of $1.48.
$VTHO
1
237
·
--
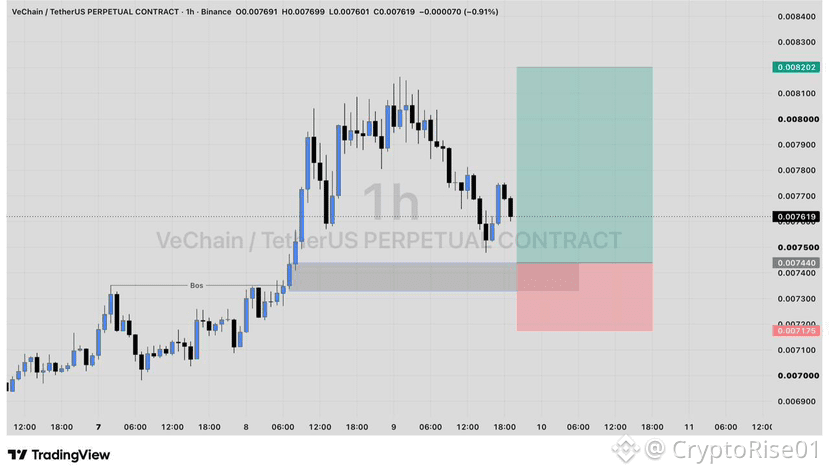
📈 $VET /USDT– Long Setup
🕒 Timeframe: 1 Hour
⚙️ Leverage: 10x — 50x
Entry - 0.007440
StopLoss - 0.007175
🎯 TAKE PROFIT 👇
1] 0.007600
2] 0.007800
3] 0.008000
4] 0.008100
5] 0.008202
📊 Risk–Reward Ratio: Approx 2:8+
⚠️ Key Notes:
▪️Use Recommended Leverage
🔔 Use Only upto 2-3% Of Total Funds
{future}(VETUSDT)
📈 $VET /USDT– Long Setup
🕒 Timeframe: 1 Hour
⚙️ Leverage: 10x — 50x
Entry - 0.007440
StopLoss - 0.007175
🎯 TAKE PROFIT 👇
1] 0.007600
2] 0.007800
3] 0.008000
4] 0.008100
5] 0.008202
📊 Risk–Reward Ratio: Approx 2:8+
⚠️ Key Notes:
▪️Use Recommended Leverage
🔔 Use Only upto 2-3% Of Total Funds
🕒 Timeframe: 1 Hour
⚙️ Leverage: 10x — 50x
Entry - 0.007440
StopLoss - 0.007175
🎯 TAKE PROFIT 👇
1] 0.007600
2] 0.007800
3] 0.008000
4] 0.008100
5] 0.008202
📊 Risk–Reward Ratio: Approx 2:8+
⚠️ Key Notes:
▪️Use Recommended Leverage
🔔 Use Only upto 2-3% Of Total Funds
130
·
--
Bullish
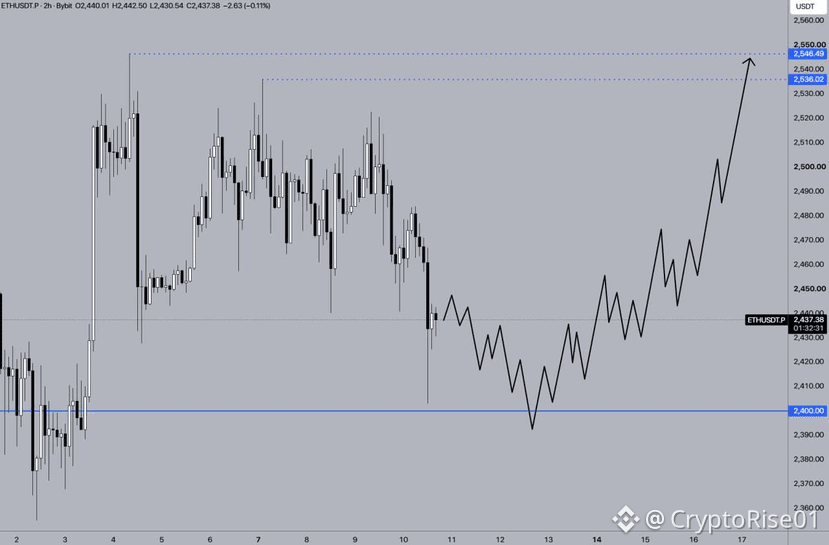
💰 $ETH /USDT
↗️ The price of ETH is approaching the $2,400 level and is attempting to hold it. If this effort is successful, a new upward move will begin. The main target for price growth is the liquidity at previous highs above the $2,530 level.
{future}(ETHUSDT)
$VTHO
{future}(VTHOUSDT)
💰 $ETH /USDT
↗️ The price of ETH is approaching the $2,400 level and is attempting to hold it. If this effort is successful, a new upward move will begin. The main target for price growth is the liquidity at previous highs above the $2,530 level.
$VTHO
↗️ The price of ETH is approaching the $2,400 level and is attempting to hold it. If this effort is successful, a new upward move will begin. The main target for price growth is the liquidity at previous highs above the $2,530 level.
$VTHO
108
·
--
Bullish
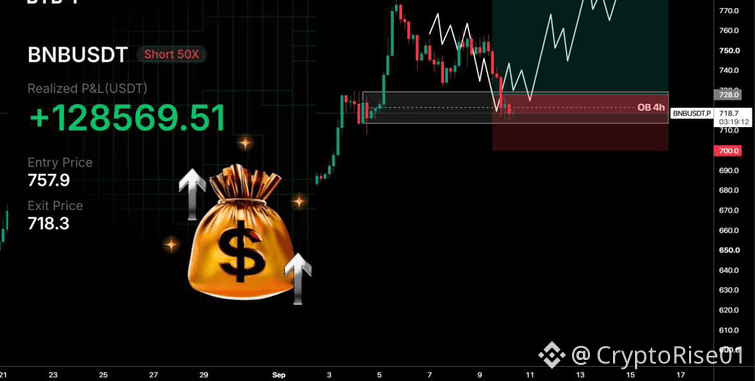
🪙 During the correction, the price of $BNB reached the 4-hour OB zone. The profit on the short position was 261%, or $128,500.
$VTHO
{future}(BNBUSDT)
{future}(VTHOUSDT)
🪙 During the correction, the price of $BNB reached the 4-hour OB zone. The profit on the short position was 261%, or $128,500.
$VTHO
$VTHO
143
·
--
Bearish
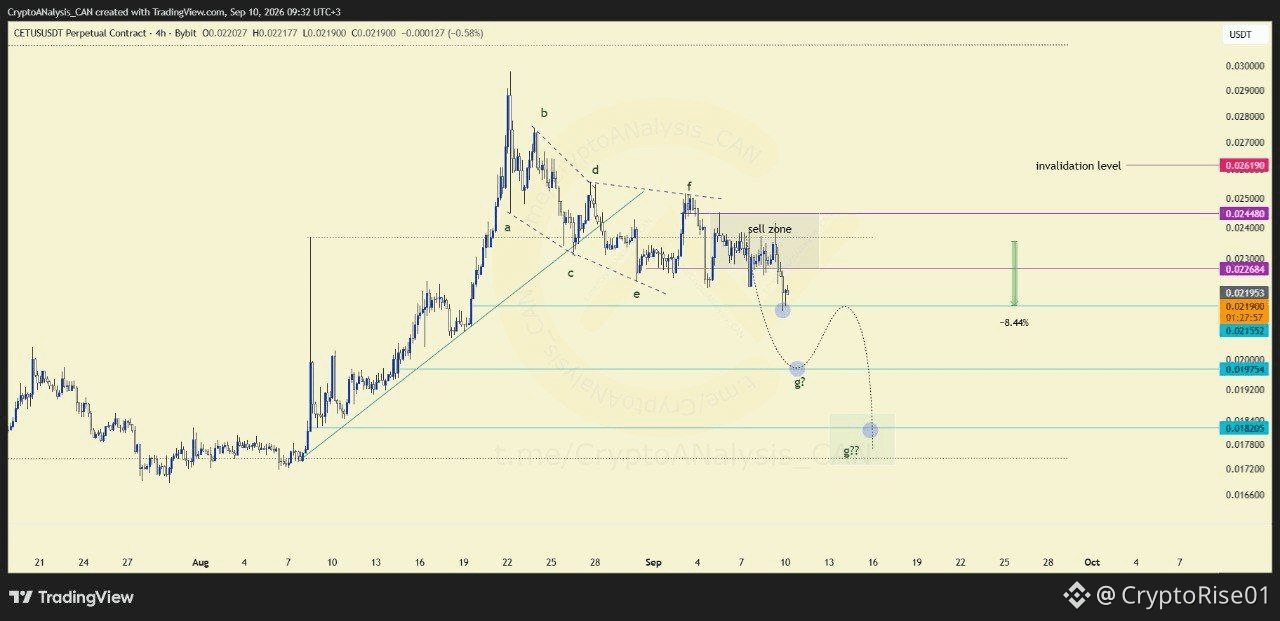
$CETUS USDT | 4H | Chart
Insight Update | Edit Level 1 📌
📉 8.44 Correction since DCA
🫥 Price is moving just according to plan by activating both resistant levels and moving downwards towards wave (g).
As this move is not strong enough, let's just pay ourselves faster at this technical level and keep the remaining according to plan. 🛡
{future}(CETUSUSDT)
$VTHO
{future}(VTHOUSDT)
$CETUS USDT | 4H | Chart
Insight Update | Edit Level 1 📌
📉 8.44 Correction since DCA
🫥 Price is moving just according to plan by activating both resistant levels and moving downwards towards wave (g).
As this move is not strong enough, let's just pay ourselves faster at this technical level and keep the remaining according to plan. 🛡
$VTHO
Insight Update | Edit Level 1 📌
📉 8.44 Correction since DCA
🫥 Price is moving just according to plan by activating both resistant levels and moving downwards towards wave (g).
As this move is not strong enough, let's just pay ourselves faster at this technical level and keep the remaining according to plan. 🛡
$VTHO
242
·
--
Bullish
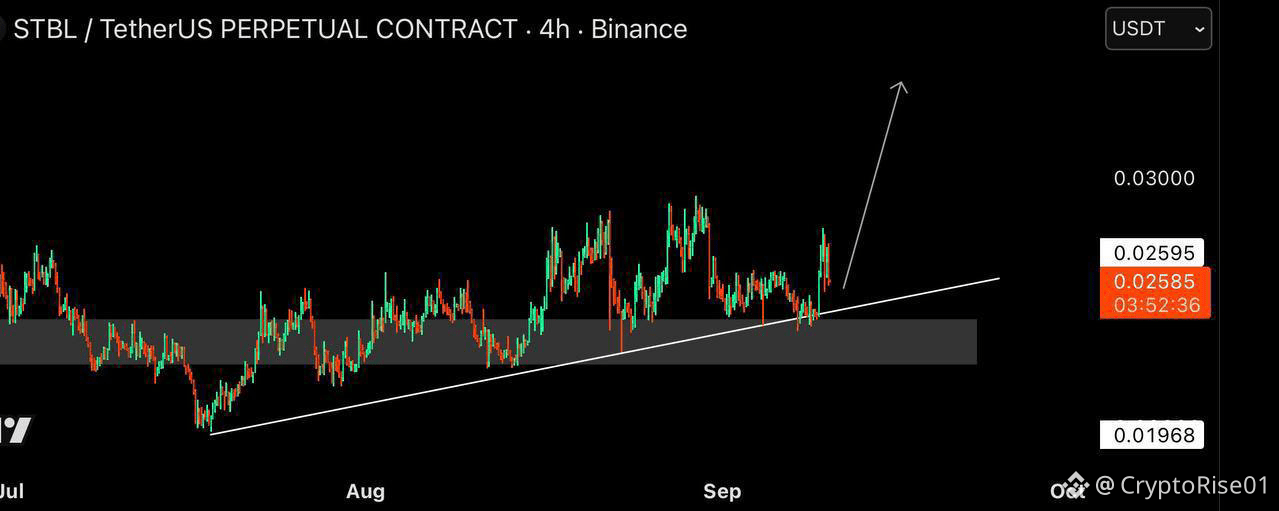
$STBL Long
Entry: 0.02590-0.02680
Targets:
0.032
0.04
0.045
0.05
5x leverage
Full size of margin
{future}(STBLUSDT)
$VTHO
{spot}(VTHOUSDT)
$STBL Long
Entry: 0.02590-0.02680
Targets:
0.032
0.04
0.045
0.05
5x leverage
Full size of margin
$VTHO
Entry: 0.02590-0.02680
Targets:
0.032
0.04
0.045
0.05
5x leverage
Full size of margin
$VTHO
73
·
--
🔥 MetaMask Breaks Away
Consensys will split into MetaMask and a separate infrastructure company by the end of 2026.
📊 MetaMask will keep serving retail users, while Consensys targets financial institutions with Ethereum infrastructure.
MetaMask already has over 100 million downloads and trillions in transaction volume.
$VTHO
{future}(VTHOUSDT)
🔥 MetaMask Breaks Away
Consensys will split into MetaMask and a separate infrastructure company by the end of 2026.
📊 MetaMask will keep serving retail users, while Consensys targets financial institutions with Ethereum infrastructure.
MetaMask already has over 100 million downloads and trillions in transaction volume.
$VTHO
Consensys will split into MetaMask and a separate infrastructure company by the end of 2026.
📊 MetaMask will keep serving retail users, while Consensys targets financial institutions with Ethereum infrastructure.
MetaMask already has over 100 million downloads and trillions in transaction volume.
$VTHO

146
·
--
Bullish
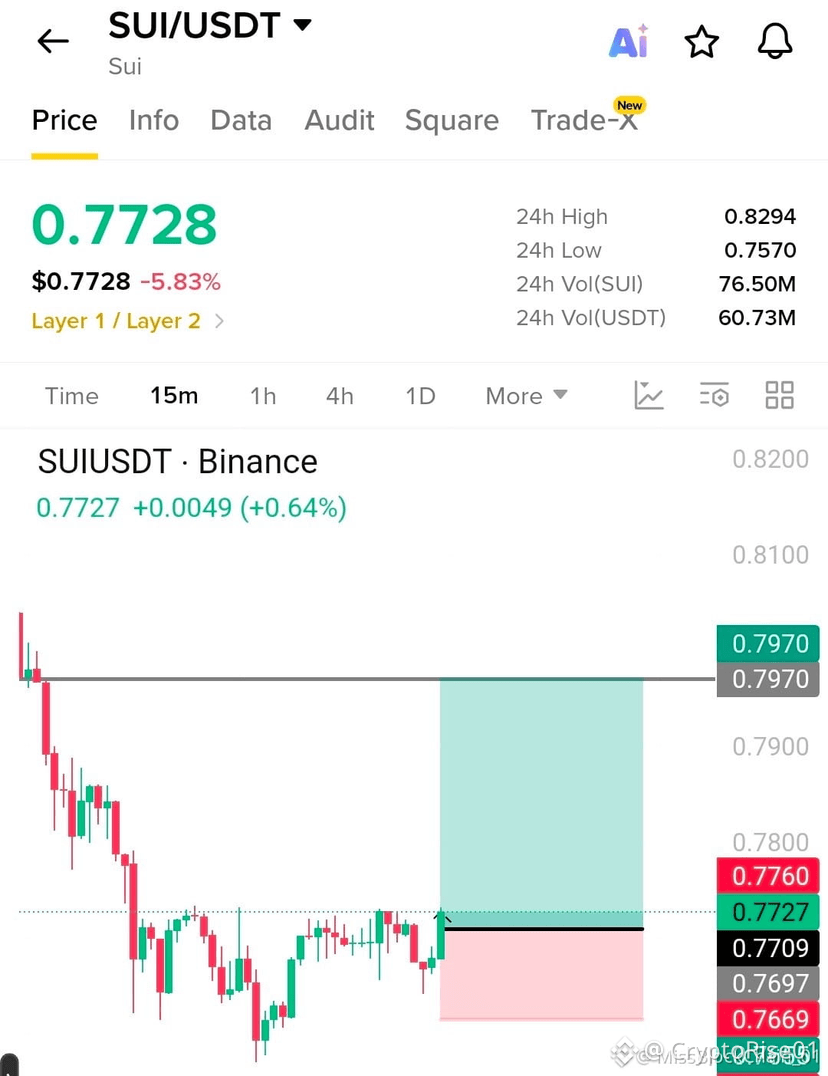
$SUI — LONG 📈📈📈
Entry: $0.7710–$0.7740
SL: $0.7669
TP1: $0.7800
TP2: $0.7900
TP3: $0.7970
{future}(SUIUSDT)
$VTHO
{future}(VTHOUSDT)
$SUI — LONG 📈📈📈
Entry: $0.7710–$0.7740
SL: $0.7669
TP1: $0.7800
TP2: $0.7900
TP3: $0.7970
$VTHO
Entry: $0.7710–$0.7740
SL: $0.7669
TP1: $0.7800
TP2: $0.7900
TP3: $0.7970
$VTHO
1
252

·
--
Bullish
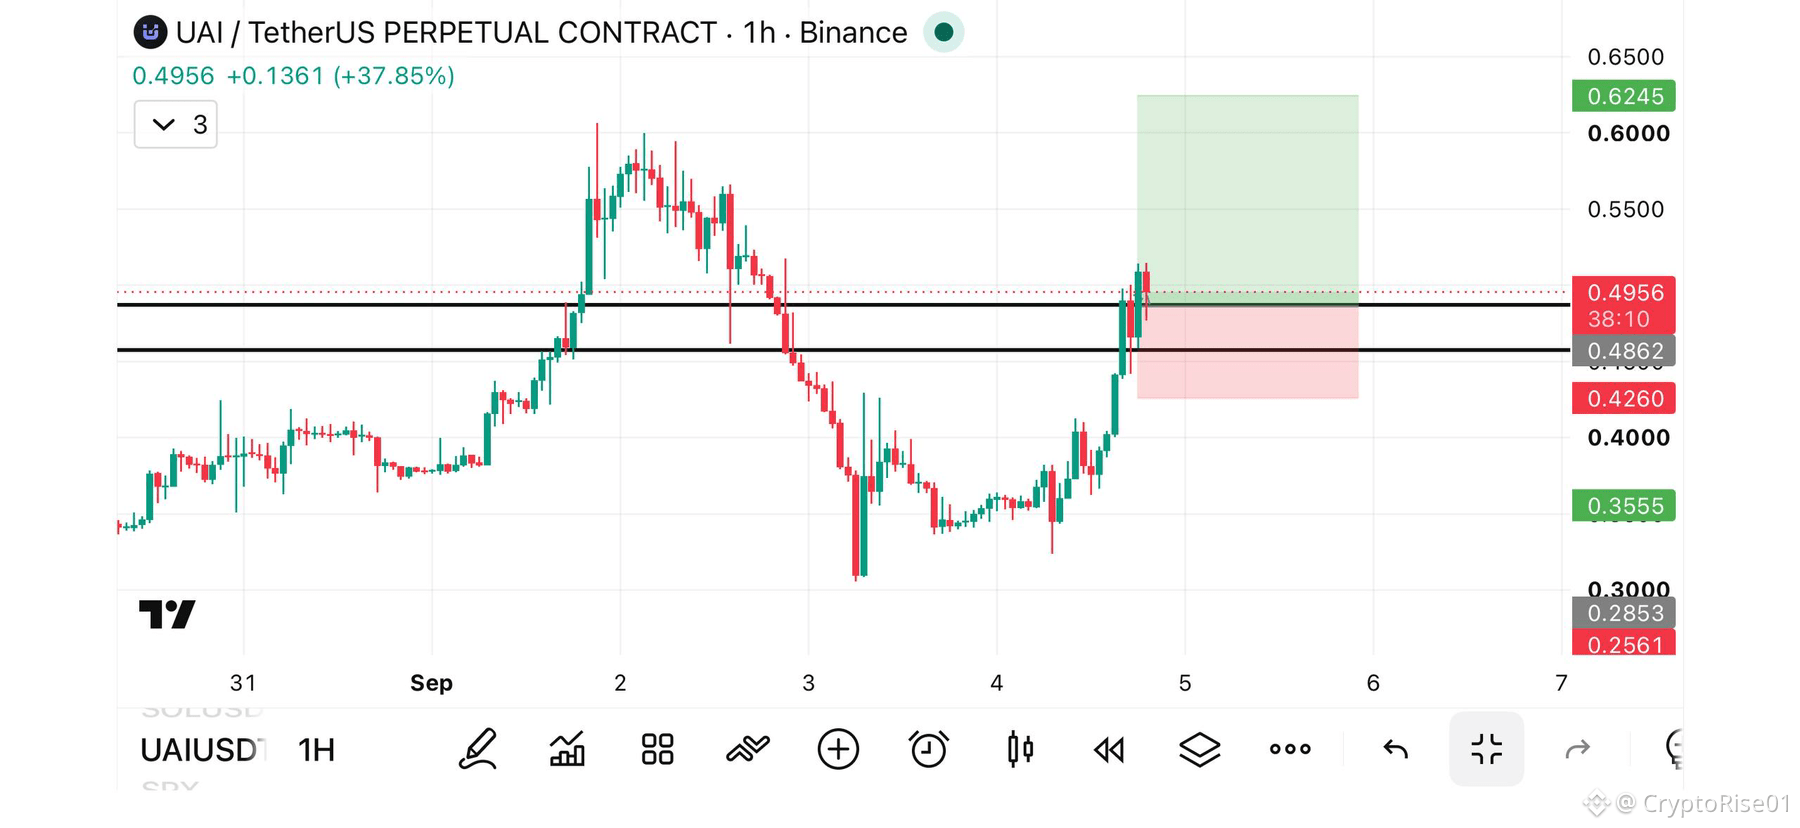
🚨 $UAI /USDT | LONG
⚡Leverage: Cross 25x
🎯Entry Targets: 0.4980
💵Take Profits👇
1️⃣0.5100
2️⃣0.5300
3️⃣0.5500
4️⃣0.5899
🛑Stop Loss: 0.4600
💵Bullish setup active — follow the signal and secure profits at targets.💎
{future}(UAIUSDT)
$MARSCOIN
{future}(MARSCOINUSDT)
🚨 $UAI /USDT | LONG
⚡Leverage: Cross 25x
🎯Entry Targets: 0.4980
💵Take Profits👇
1️⃣0.5100
2️⃣0.5300
3️⃣0.5500
4️⃣0.5899
🛑Stop Loss: 0.4600
💵Bullish setup active — follow the signal and secure profits at targets.💎
$MARSCOIN
⚡Leverage: Cross 25x
🎯Entry Targets: 0.4980
💵Take Profits👇
1️⃣0.5100
2️⃣0.5300
3️⃣0.5500
4️⃣0.5899
🛑Stop Loss: 0.4600
💵Bullish setup active — follow the signal and secure profits at targets.💎
$MARSCOIN
217
·
--
Bullish
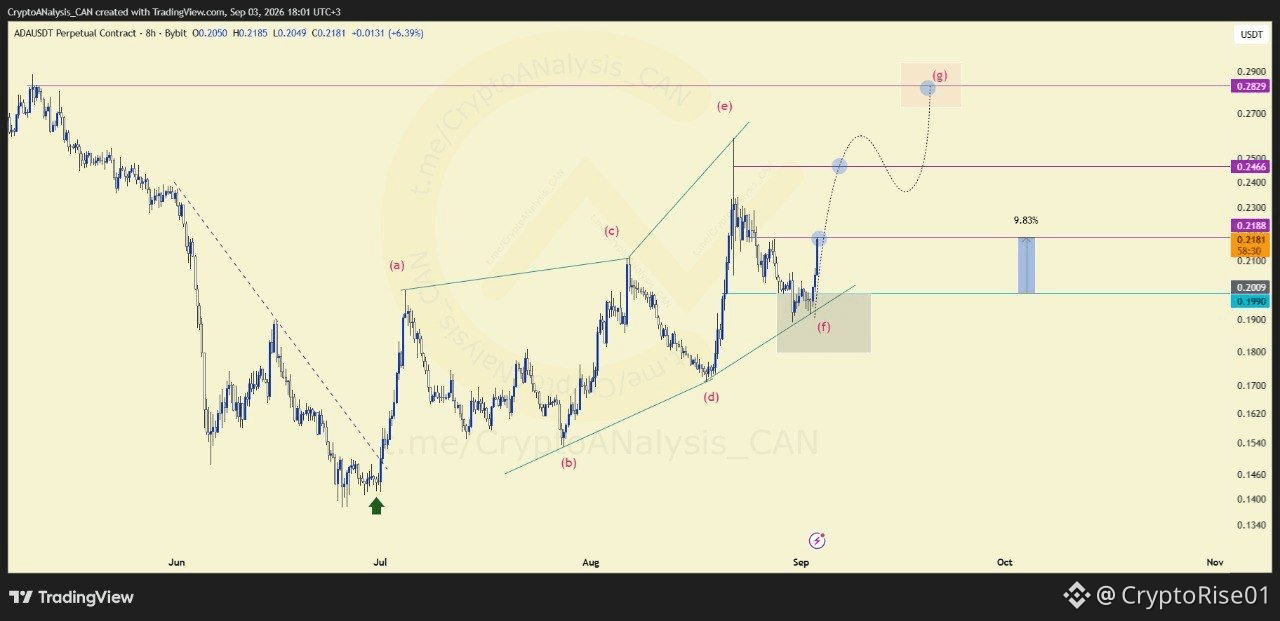
$ADA USDT | 8H UPDATE | Chart Link
INSIGHT UPDATE | Level 1 🏹
↗️ 9.83% growth since Support
🫥 Another diametric pattern playing out perfectly with final leg (g) on its way up already at level 1.
🎚️ Best plan is to book half and wait to see how far wave (g) extends. Don't forget about making it risk free as well.
{future}(ADAUSDT)
$MARSCOIN
{future}(MARSCOINUSDT)
$ADA USDT | 8H UPDATE | Chart Link
INSIGHT UPDATE | Level 1 🏹
↗️ 9.83% growth since Support
🫥 Another diametric pattern playing out perfectly with final leg (g) on its way up already at level 1.
🎚️ Best plan is to book half and wait to see how far wave (g) extends. Don't forget about making it risk free as well.
$MARSCOIN
INSIGHT UPDATE | Level 1 🏹
↗️ 9.83% growth since Support
🫥 Another diametric pattern playing out perfectly with final leg (g) on its way up already at level 1.
🎚️ Best plan is to book half and wait to see how far wave (g) extends. Don't forget about making it risk free as well.
$MARSCOIN
1
373
·
--
Bullish
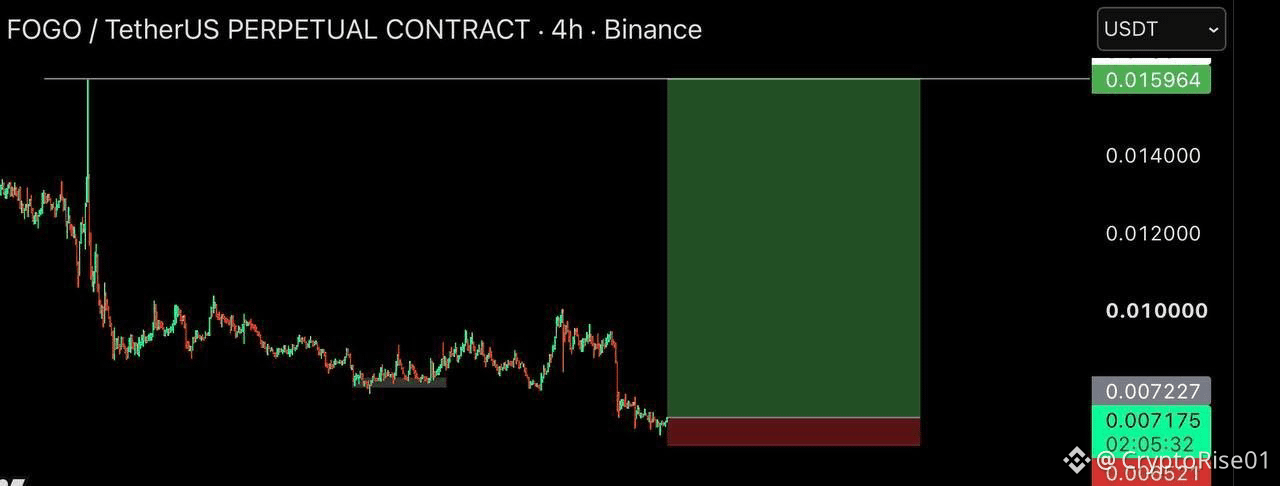
$FOGO | Long 📈📈📈
Entry: 0.007180-0.007280
Targets:
0.008
0.009
0.010
0.015
Nfa.
{future}(FOGOUSDT)
$MARSCOIN
{future}(MARSCOINUSDT)
$FOGO | Long 📈📈📈
Entry: 0.007180-0.007280
Targets:
0.008
0.009
0.010
0.015
Nfa.
$MARSCOIN
Entry: 0.007180-0.007280
Targets:
0.008
0.009
0.010
0.015
Nfa.
$MARSCOIN
1
372
·
--
Bullish
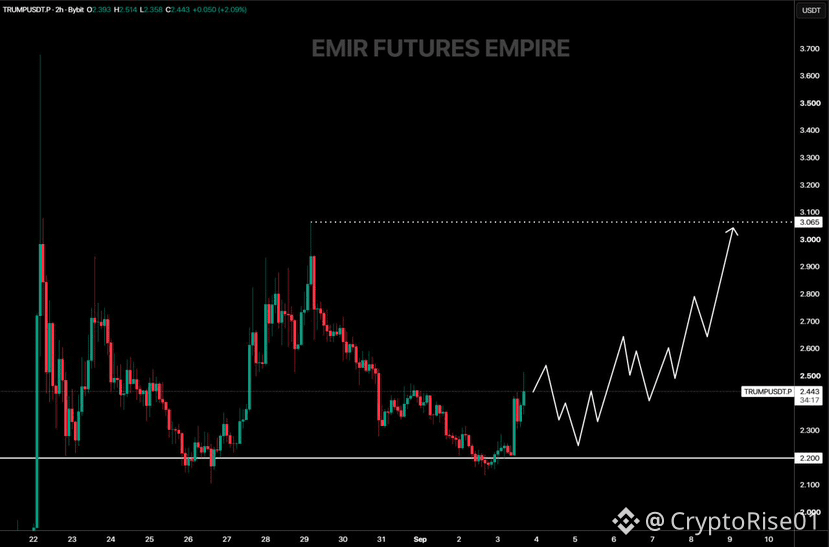
💰 Trump Official ($TRUMP ).
The price of TRUMP has held the local support level of $2.20. This gives the price the potential to begin an upward move following a local correction. The main target for the price increase is the liquidity at the previous high of $3.06.
$MARSCOIN
{future}(TRUMPUSDT)
{future}(MARSCOINUSDT)
💰 Trump Official ($TRUMP ).
The price of TRUMP has held the local support level of $2.20. This gives the price the potential to begin an upward move following a local correction. The main target for the price increase is the liquidity at the previous high of $3.06.
$MARSCOIN
The price of TRUMP has held the local support level of $2.20. This gives the price the potential to begin an upward move following a local correction. The main target for the price increase is the liquidity at the previous high of $3.06.
$MARSCOIN
1
445
·
--
Bullish
$OKLO.US is sitting near a major weekly support zone around $36–$40 after a large decline from the ~$190 area.
The broader weekly trend is still damaged, but our Wyckoff model is showing a possible Phase A structure with an AR confirmed and waiting for a Secondary Test.
At the same time, the options market is showing unusually aggressive upside positioning.
{stock_us}(OKLO.US)
$USELESS
{future}(USELESSUSDT)
$0G
{future}(0GUSDT)
$OKLO.US is sitting near a major weekly support zone around $36–$40 after a large decline from the ~$190 area.
The broader weekly trend is still damaged, but our Wyckoff model is showing a possible Phase A structure with an AR confirmed and waiting for a Secondary Test.
At the same time, the options market is showing unusually aggressive upside positioning.
$USELESS
$0G
The broader weekly trend is still damaged, but our Wyckoff model is showing a possible Phase A structure with an AR confirmed and waiting for a Secondary Test.
At the same time, the options market is showing unusually aggressive upside positioning.
$USELESS
$0G
381
·
--
Bullish
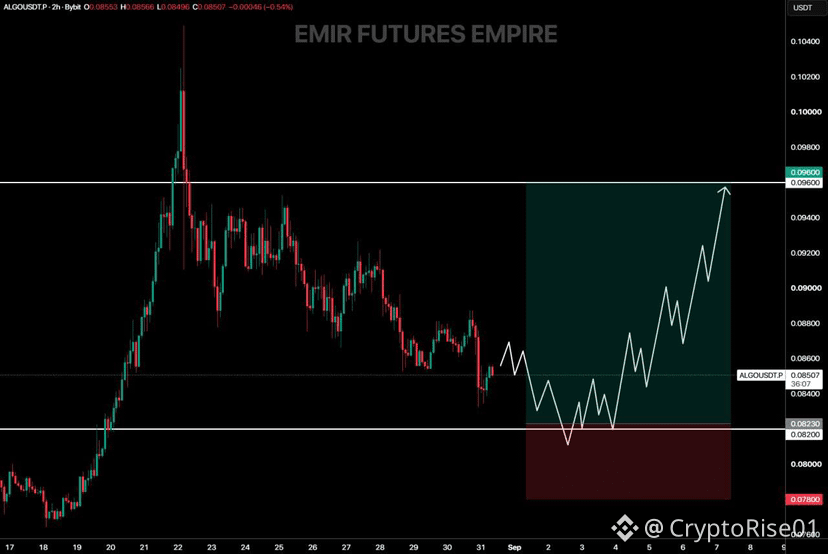
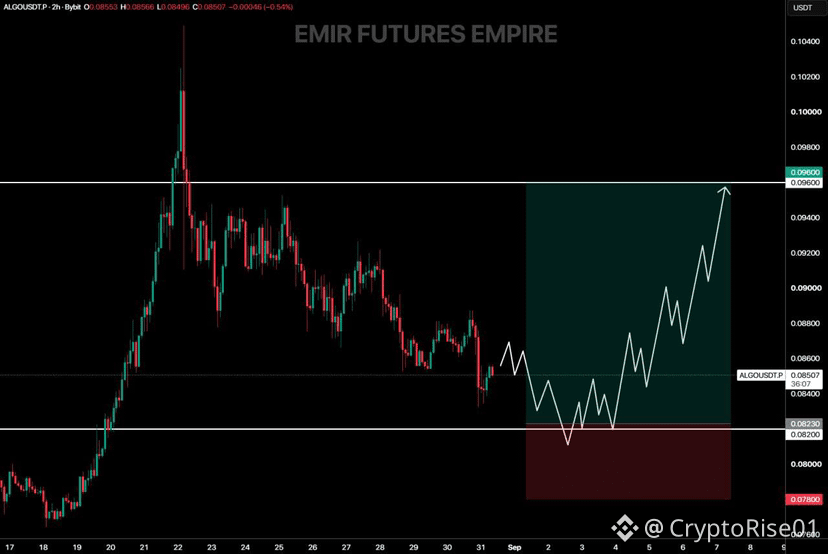
Algorand ($ALGO ).
During the correction, the price of ALGO could reach the lower support level of $0.082. If the price reaches this level and shows a rebound, a new uptrend will begin. The main target for the uptrend is the resistance level of $0.096.
{future}(ALGOUSDT)
$USELESS
{future}(USELESSUSDT)
Algorand ($ALGO ).
During the correction, the price of ALGO could reach the lower support level of $0.082. If the price reaches this level and shows a rebound, a new uptrend will begin. The main target for the uptrend is the resistance level of $0.096.
$USELESS
During the correction, the price of ALGO could reach the lower support level of $0.082. If the price reaches this level and shows a rebound, a new uptrend will begin. The main target for the uptrend is the resistance level of $0.096.
$USELESS
2
229
·
--
Bullish
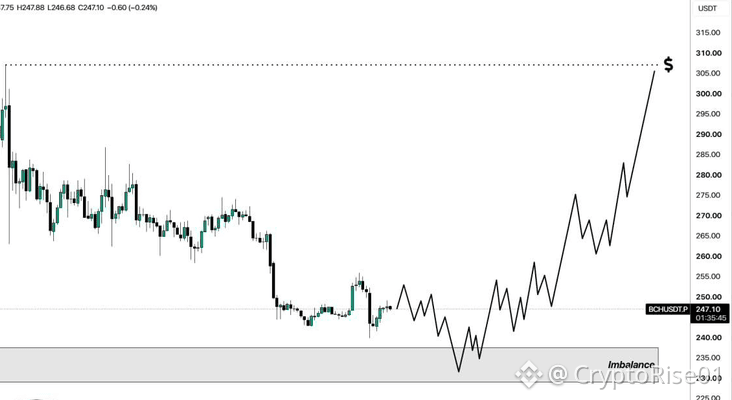
Trading pair: $BCH USDT
🕯 Chart analysis:
The price of BCH is approaching the imbalance zone. If the price holds this zone, a new uptrend will begin.
📍 Entry:
A long position can be opened in the imbalance zone between $229.10 and 237.50.
✔️ Main Target:
Liquidity is at the current high of $307.2.
$USELESS
{future}(BCHUSDT)
{future}(USELESSUSDT)
Trading pair: $BCH USDT
🕯 Chart analysis:
The price of BCH is approaching the imbalance zone. If the price holds this zone, a new uptrend will begin.
📍 Entry:
A long position can be opened in the imbalance zone between $229.10 and 237.50.
✔️ Main Target:
Liquidity is at the current high of $307.2.
$USELESS
🕯 Chart analysis:
The price of BCH is approaching the imbalance zone. If the price holds this zone, a new uptrend will begin.
📍 Entry:
A long position can be opened in the imbalance zone between $229.10 and 237.50.
✔️ Main Target:
Liquidity is at the current high of $307.2.
$USELESS
61
·
--
⚠️ Oil above $90 rattles stocks as Iran risk returns
Crude spike is lifting inflation fears and complicating the Fed outlook.
Brent rose nearly 4% above $90, while WTI moved above $86. S&P 500 futures slipped 0.2% and Nasdaq 100 fell 0.1% as traders priced fresh geopolitical risk. 📉
Energy names led premarket, with CVX and XOM up about 2%. Watch oil, yields, and rate expectations: if crude holds higher, inflation-sensitive trades and sector rotation could accelerate. 🔥
$CL
#Stocks #OIL #BRENT #WTI #SPX #NDX #CVX #XOM #FED
$USELESS
{future}(USELESSUSDT)
$CL
{future}(CLUSDT)
⚠️ Oil above $90 rattles stocks as Iran risk returns
Crude spike is lifting inflation fears and complicating the Fed outlook.
Brent rose nearly 4% above $90, while WTI moved above $86. S&P 500 futures slipped 0.2% and Nasdaq 100 fell 0.1% as traders priced fresh geopolitical risk. 📉
Energy names led premarket, with CVX and XOM up about 2%. Watch oil, yields, and rate expectations: if crude holds higher, inflation-sensitive trades and sector rotation could accelerate. 🔥
$CL
#Stocks #OIL #BRENT #WTI #SPX #NDX #CVX #XOM #FED
$USELESS
$CL
Crude spike is lifting inflation fears and complicating the Fed outlook.
Brent rose nearly 4% above $90, while WTI moved above $86. S&P 500 futures slipped 0.2% and Nasdaq 100 fell 0.1% as traders priced fresh geopolitical risk. 📉
Energy names led premarket, with CVX and XOM up about 2%. Watch oil, yields, and rate expectations: if crude holds higher, inflation-sensitive trades and sector rotation could accelerate. 🔥
$CL
#Stocks #OIL #BRENT #WTI #SPX #NDX #CVX #XOM #FED
$USELESS
$CL

160
·
--
Bullish
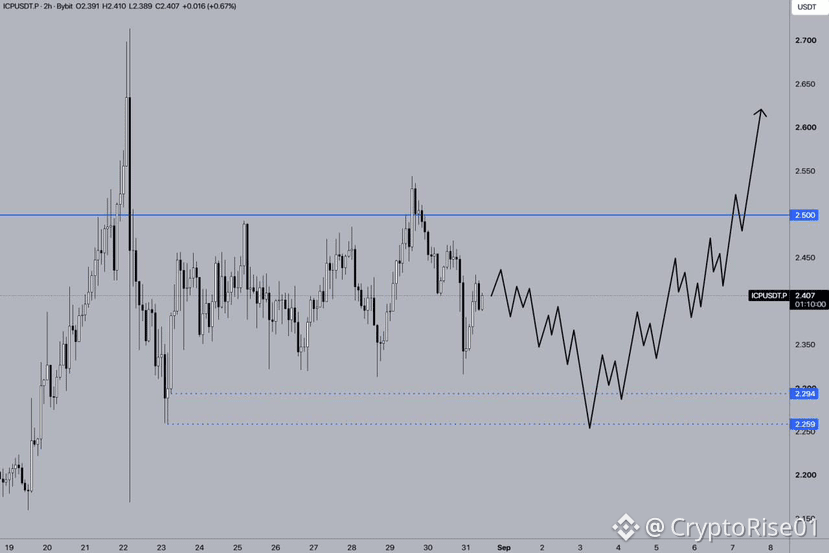
🪙 $ICP /USDT
↗️ The ICP price is poised to begin a new uptrend after consolidating below the $2,300 level. If the price successfully finds support at these liquidity levels, a new uptrend will begin with the goal of breaking through the $2,500 resistance level.
$SKR
{future}(ICPUSDT)
{future}(SKRUSDT)
🪙 $ICP /USDT
↗️ The ICP price is poised to begin a new uptrend after consolidating below the $2,300 level. If the price successfully finds support at these liquidity levels, a new uptrend will begin with the goal of breaking through the $2,500 resistance level.
$SKR
↗️ The ICP price is poised to begin a new uptrend after consolidating below the $2,300 level. If the price successfully finds support at these liquidity levels, a new uptrend will begin with the goal of breaking through the $2,500 resistance level.
$SKR
276
·
--
JUST IN: Tom Lee's 'BitMine' buys 53,501 $ETH worth $131 million.
{future}(ETHUSDT)
$SKR
{future}(SKRUSDT)
$ZORA
{future}(ZORAUSDT)
JUST IN: Tom Lee's 'BitMine' buys 53,501 $ETH worth $131 million.
$SKR
$ZORA
$SKR
$ZORA

66
Log in to explore more content
Join global crypto users on Binance Square
⚡️ Get latest and useful information about crypto.
💬 Trusted by the world’s largest crypto exchange.
👍 Discover real insights from verified creators.
Email / Phone number
Trending Topics
FedRateWatch
709,282 views
3,360 Discussing
Share & Win Traffic Reward in our Trending Hashtag Campaign
✨Topic: FOMC September, What's The Fed's Next Move?
👉How to Join:
Publish a short post or article with hashtag #FedRateWatch
Create content based on the below angles:
- August core CPI rose 0.3% month-over-month, and the odds of a 25bp hike this week are now close to 90%. Do you anticipate a rate hike this week? Is it a one-off, or the start of a longer hiking cycle?
- If the hike lands, how does it play out for BTC, tech stocks, and gold? Bullish or bearish?
- How are you planning to trade next? Share your BTC, stocks or gold trade/holdings with our trade sharing widget.
⏰Campaign Period:
- 2026-09-15 11:00 - 2026-09-17 3:00 UTC
🎁Reward:
- Qualified posts that comply with the above guidelines and contain more than 100 words will be reviewed and may receive a random traffic boost of 500 to 3,000 views. You will receive a notification from your feed secretary if your post is selected.
- Get a chance to have your article featured on Binance Square Official
Need ideas for your post? Visit the topic page #FedRateWatch or the Square Guide on How to Post for Better Reach.
Binance Square Official
·430 Likes
·977.8k views
ArgentinaCommitsToOECDCryptoReportingBy2029
194 views
20 Discussing
EthereumFallsBelow$2400
1,144 views
40 Discussing