
Arthur Mint
3.7k Posts

Arthur Mint
 Square Verified+
Report
Block User
Arthur is here. Crypto Expert. Web3 Builder. Verified KOL on Binance Square. Let's keep growing together: X - @ArthurMint99
71 Following
41.9K+ Followers
13.7K+ Liked
Posts
All
Live
·
--
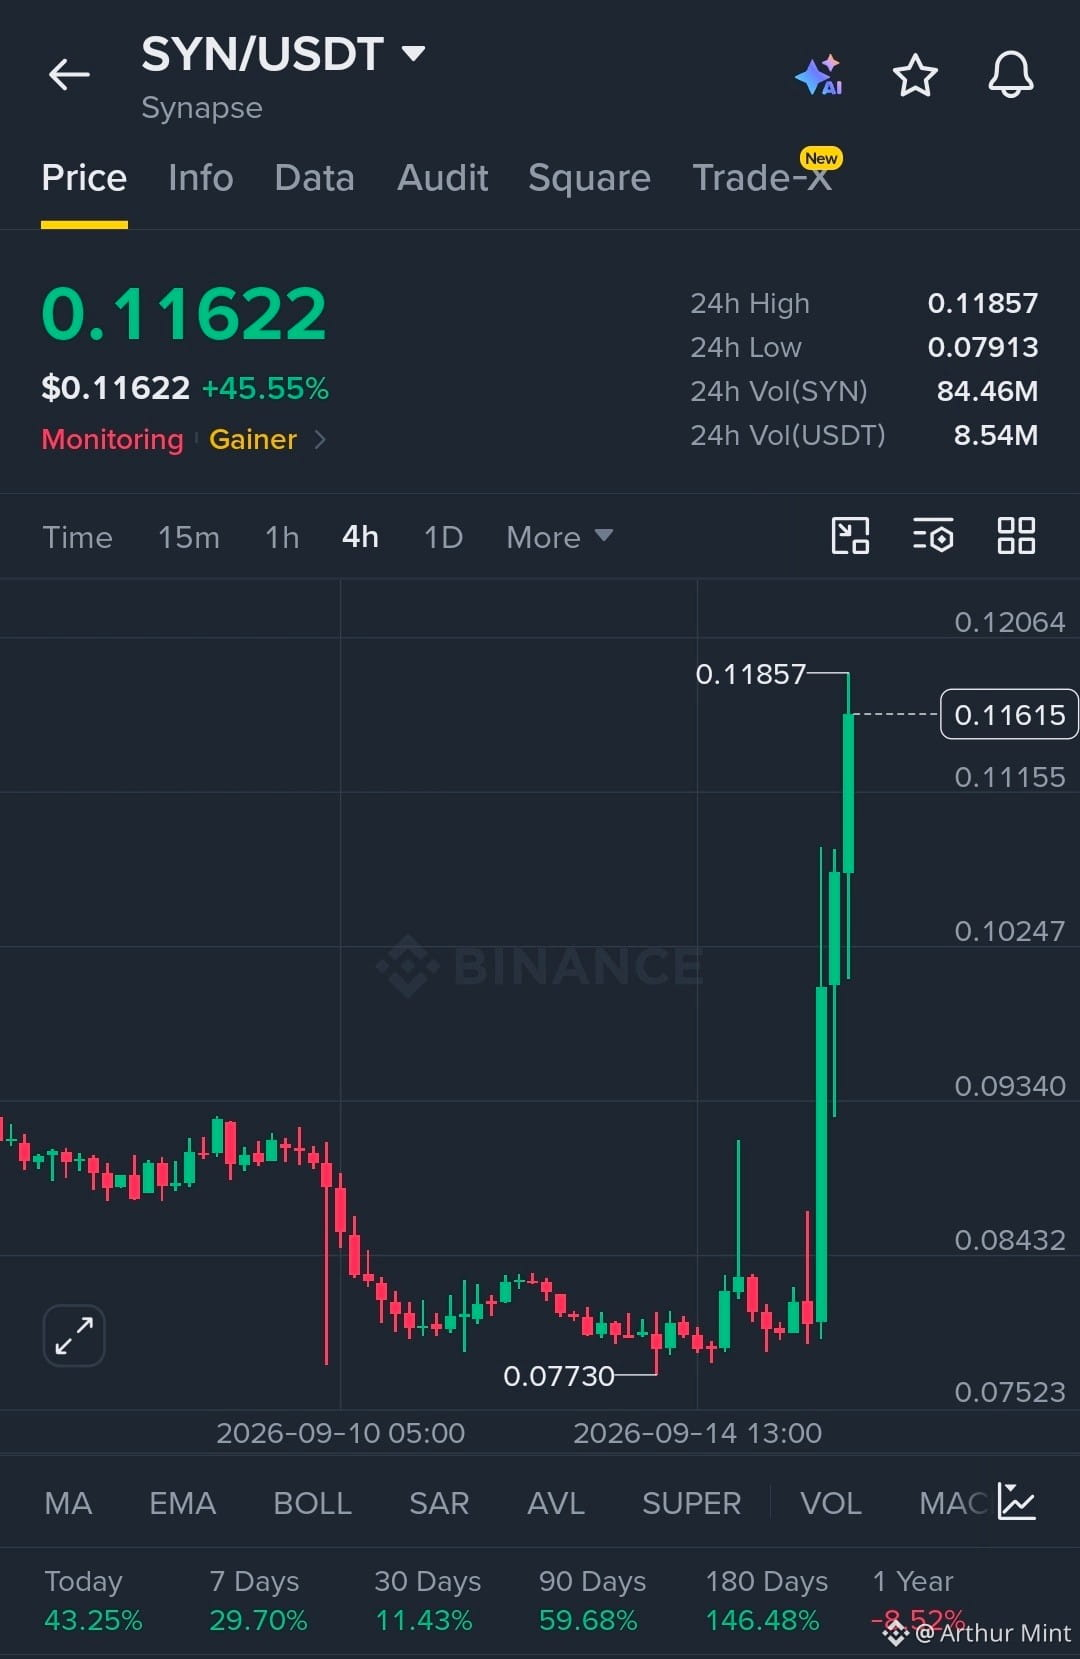
$SYN is showing strong bullish strength after a sharp breakout.
Structure remains firmly in buyers control above the breakout zone.
EP
0.1120 - 0.1160
TP
TP1 0.1206
TP2 0.1280
TP3 0.1350
SL
0.1020
Liquidity has been swept above the previous range, with strong reaction confirming buyer control. Holding the breakout structure keeps the continuation setup active.
Let’s go $SYN
$SYN is showing strong bullish strength after a sharp breakout.
Structure remains firmly in buyers control above the breakout zone.
EP
0.1120 - 0.1160
TP
TP1 0.1206
TP2 0.1280
TP3 0.1350
SL
0.1020
Liquidity has been swept above the previous range, with strong reaction confirming buyer control. Holding the breakout structure keeps the continuation setup active.
Let’s go $SYN
Structure remains firmly in buyers control above the breakout zone.
EP
0.1120 - 0.1160
TP
TP1 0.1206
TP2 0.1280
TP3 0.1350
SL
0.1020
Liquidity has been swept above the previous range, with strong reaction confirming buyer control. Holding the breakout structure keeps the continuation setup active.
Let’s go $SYN
94
·
--
🎙️ 建设币安广场,持有BNB|周三,CLARITY 法案没过,市场反应很诚实,大家觉得加密市场接下来会怎么样,来聊聊~

End
05 h 01 m 24 s
12.3k
40
45
·
--
Bullish
Verified
Fed Rate Watch: Bitcoin Is Heading Into a High-Risk Decision Zone
The next Fed decision could become one of the most important short-term catalysts for Bitcoin.
August CPI came in at 3.4% year over year, while core CPI rose 0.3% month over month. At the same time, the market is now pricing a very high probability of a 25-basis-point rate hike at the September FOMC meeting.
For me, the bigger question is not simply whether the Fed hikes.
It is how Bitcoin reacts after the decision.
If the Fed hikes but signals that further tightening will depend on incoming data, BTC could absorb the initial pressure and recover once uncertainty clears.
But if the hike comes with a clearly hawkish message and expectations shift toward additional increases, higher yields and a stronger dollar could create another wave of pressure on crypto and other risk assets.
My BTC position: I am keeping my position small because this is an event-driven trade, not a high-conviction long-term bet.
My reason for taking a small BTC position is simple: much of the rate-hike expectation is already being priced into the market. If the Fed delivers what traders already expect, the reaction after the announcement may matter more than the hike itself.
I will watch price action closely rather than blindly holding through volatility. If the market invalidates my setup, I am prepared to exit quickly.
For me, this FOMC is about risk management first and prediction second.
The decision may create volatility, but volatility also creates opportunity.
What are you expecting after the Fed decision — BTC breakout or another risk-off move?
#FedRateWatch
Fed Rate Watch: Bitcoin Is Heading Into a High-Risk Decision Zone
The next Fed decision could become one of the most important short-term catalysts for Bitcoin.
August CPI came in at 3.4% year over year, while core CPI rose 0.3% month over month. At the same time, the market is now pricing a very high probability of a 25-basis-point rate hike at the September FOMC meeting.
For me, the bigger question is not simply whether the Fed hikes.
It is how Bitcoin reacts after the decision.
If the Fed hikes but signals that further tightening will depend on incoming data, BTC could absorb the initial pressure and recover once uncertainty clears.
But if the hike comes with a clearly hawkish message and expectations shift toward additional increases, higher yields and a stronger dollar could create another wave of pressure on crypto and other risk assets.
My BTC position: I am keeping my position small because this is an event-driven trade, not a high-conviction long-term bet.
My reason for taking a small BTC position is simple: much of the rate-hike expectation is already being priced into the market. If the Fed delivers what traders already expect, the reaction after the announcement may matter more than the hike itself.
I will watch price action closely rather than blindly holding through volatility. If the market invalidates my setup, I am prepared to exit quickly.
For me, this FOMC is about risk management first and prediction second.
The decision may create volatility, but volatility also creates opportunity.
What are you expecting after the Fed decision — BTC breakout or another risk-off move?
#FedRateWatch
The next Fed decision could become one of the most important short-term catalysts for Bitcoin.
August CPI came in at 3.4% year over year, while core CPI rose 0.3% month over month. At the same time, the market is now pricing a very high probability of a 25-basis-point rate hike at the September FOMC meeting.
For me, the bigger question is not simply whether the Fed hikes.
It is how Bitcoin reacts after the decision.
If the Fed hikes but signals that further tightening will depend on incoming data, BTC could absorb the initial pressure and recover once uncertainty clears.
But if the hike comes with a clearly hawkish message and expectations shift toward additional increases, higher yields and a stronger dollar could create another wave of pressure on crypto and other risk assets.
My BTC position: I am keeping my position small because this is an event-driven trade, not a high-conviction long-term bet.
My reason for taking a small BTC position is simple: much of the rate-hike expectation is already being priced into the market. If the Fed delivers what traders already expect, the reaction after the announcement may matter more than the hike itself.
I will watch price action closely rather than blindly holding through volatility. If the market invalidates my setup, I am prepared to exit quickly.
For me, this FOMC is about risk management first and prediction second.
The decision may create volatility, but volatility also creates opportunity.
What are you expecting after the Fed decision — BTC breakout or another risk-off move?
#FedRateWatch

1
182
·
--
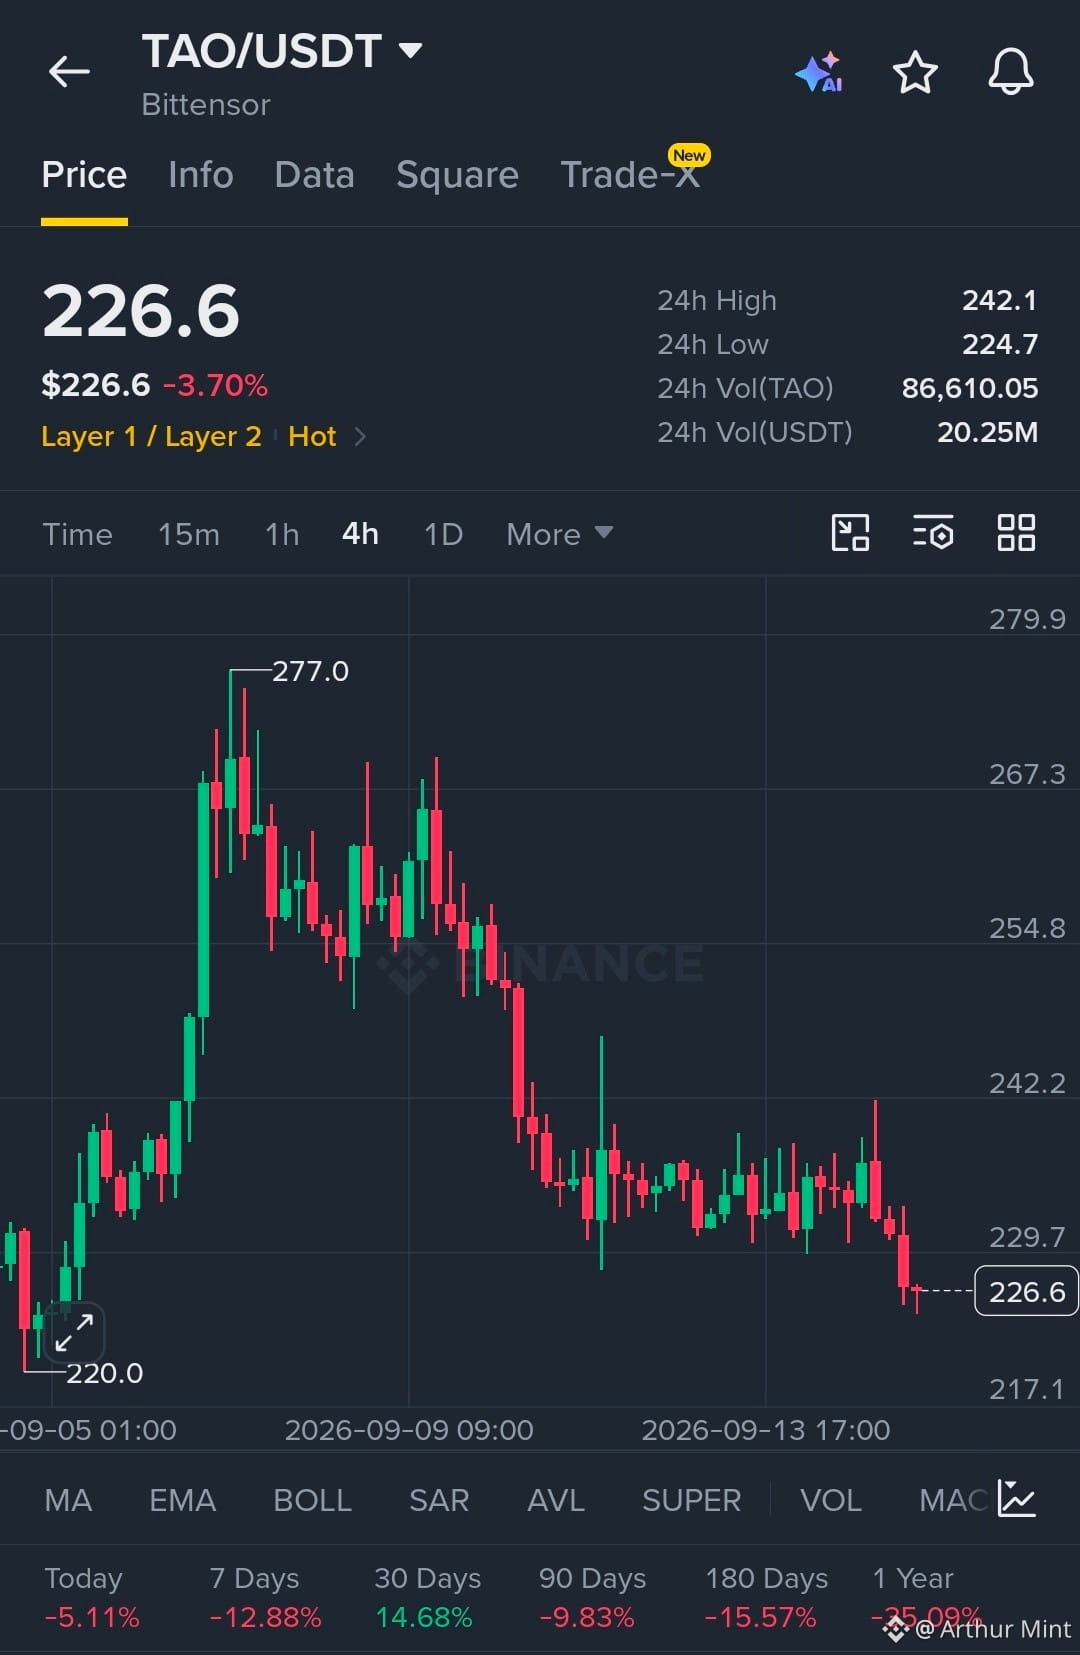
$TAO is defending a critical support zone despite continued selling pressure.
Sellers remain in control below 229.7, with structure needing a reclaim for reversal confirmation.
EP
224.7 - 229.7
TP
TP1 242.2
TP2 254.8
TP3 267.3
SL
217.1
Liquidity is sitting above the recent range while TAO reacts near the lower structure. A clean reclaim of 229.7 can shift momentum toward upside liquidity, while losing 224.7 keeps the bearish structure active.
Let’s go $TAO
$TAO is defending a critical support zone despite continued selling pressure.
Sellers remain in control below 229.7, with structure needing a reclaim for reversal confirmation.
EP
224.7 - 229.7
TP
TP1 242.2
TP2 254.8
TP3 267.3
SL
217.1
Liquidity is sitting above the recent range while TAO reacts near the lower structure. A clean reclaim of 229.7 can shift momentum toward upside liquidity, while losing 224.7 keeps the bearish structure active.
Let’s go $TAO
Sellers remain in control below 229.7, with structure needing a reclaim for reversal confirmation.
EP
224.7 - 229.7
TP
TP1 242.2
TP2 254.8
TP3 267.3
SL
217.1
Liquidity is sitting above the recent range while TAO reacts near the lower structure. A clean reclaim of 229.7 can shift momentum toward upside liquidity, while losing 224.7 keeps the bearish structure active.
Let’s go $TAO
239
·
--
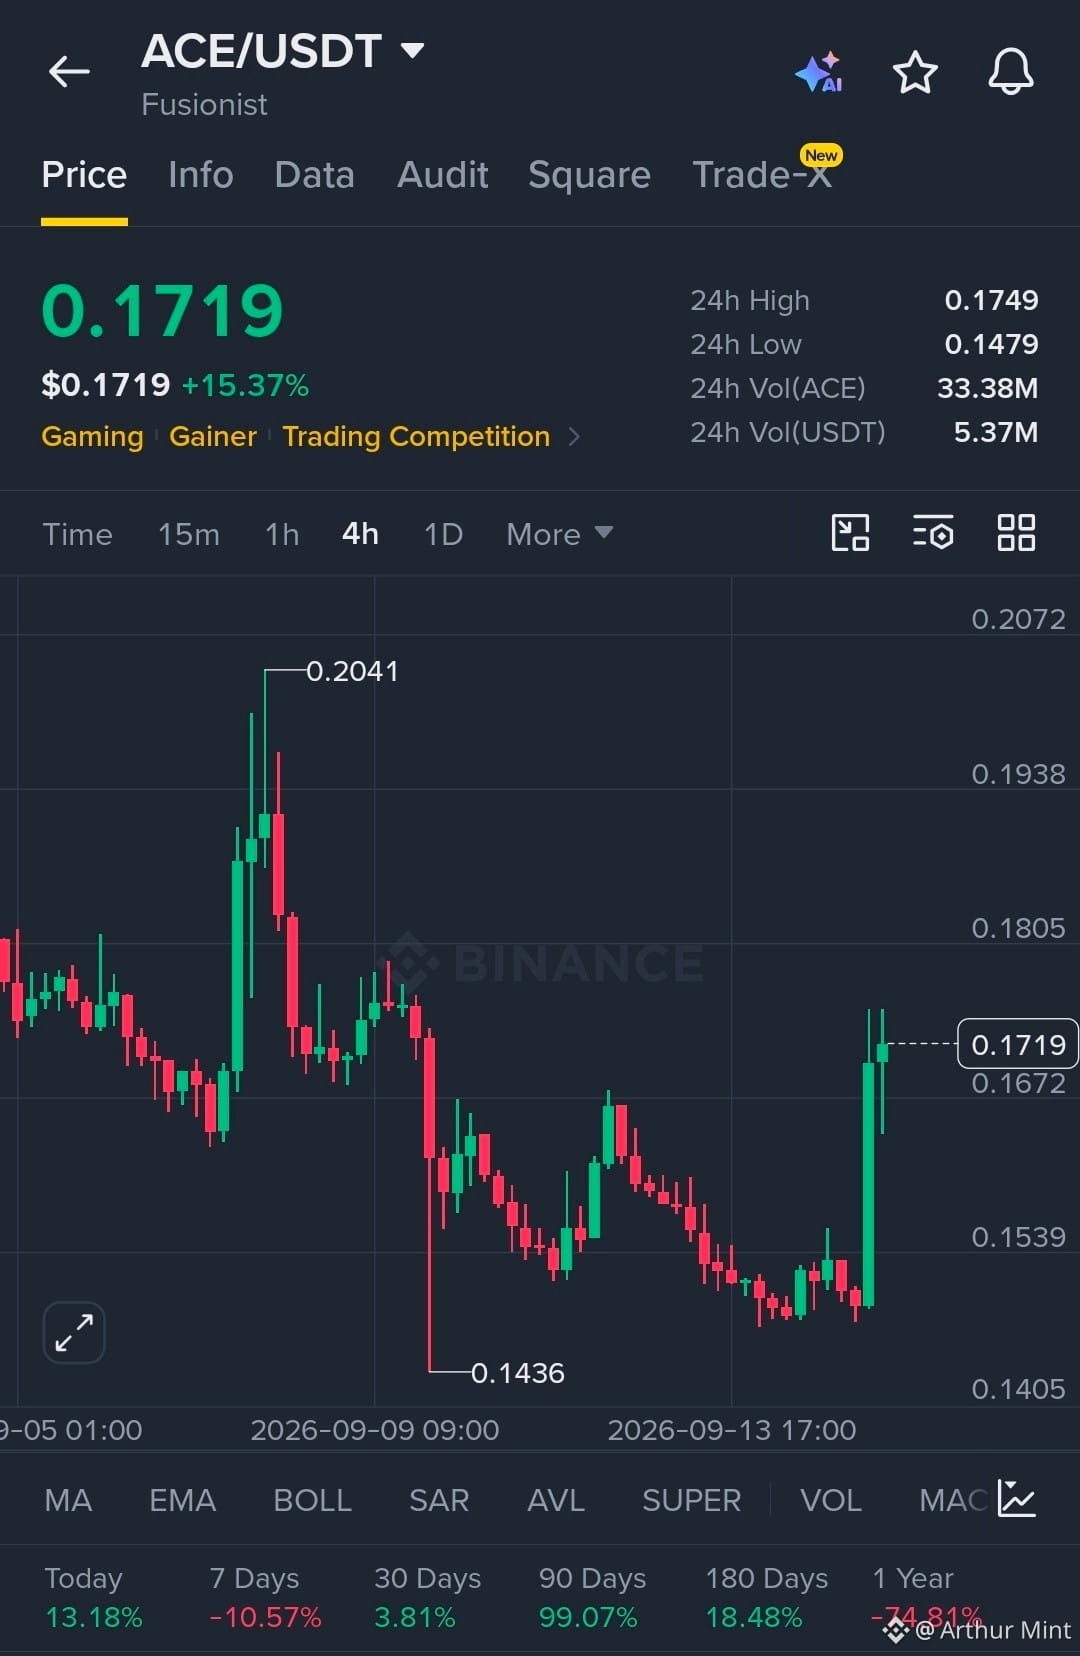
$ACE is showing strong bullish momentum after a sharp recovery from the recent base.
Buyers have reclaimed structure above 0.1672 and remain in control while this level holds.
EP
0.1680 - 0.1720
TP
TP1 0.1805
TP2 0.1938
TP3 0.2041
SL
0.1539
Liquidity is building above the recent highs, with price reacting strongly from the lower structure. Holding above 0.1672 keeps the bullish continuation setup intact, while losing 0.1539 would weaken the structure.
Let’s go $ACE
$ACE is showing strong bullish momentum after a sharp recovery from the recent base.
Buyers have reclaimed structure above 0.1672 and remain in control while this level holds.
EP
0.1680 - 0.1720
TP
TP1 0.1805
TP2 0.1938
TP3 0.2041
SL
0.1539
Liquidity is building above the recent highs, with price reacting strongly from the lower structure. Holding above 0.1672 keeps the bullish continuation setup intact, while losing 0.1539 would weaken the structure.
Let’s go $ACE
Buyers have reclaimed structure above 0.1672 and remain in control while this level holds.
EP
0.1680 - 0.1720
TP
TP1 0.1805
TP2 0.1938
TP3 0.2041
SL
0.1539
Liquidity is building above the recent highs, with price reacting strongly from the lower structure. Holding above 0.1672 keeps the bullish continuation setup intact, while losing 0.1539 would weaken the structure.
Let’s go $ACE
302
·
--
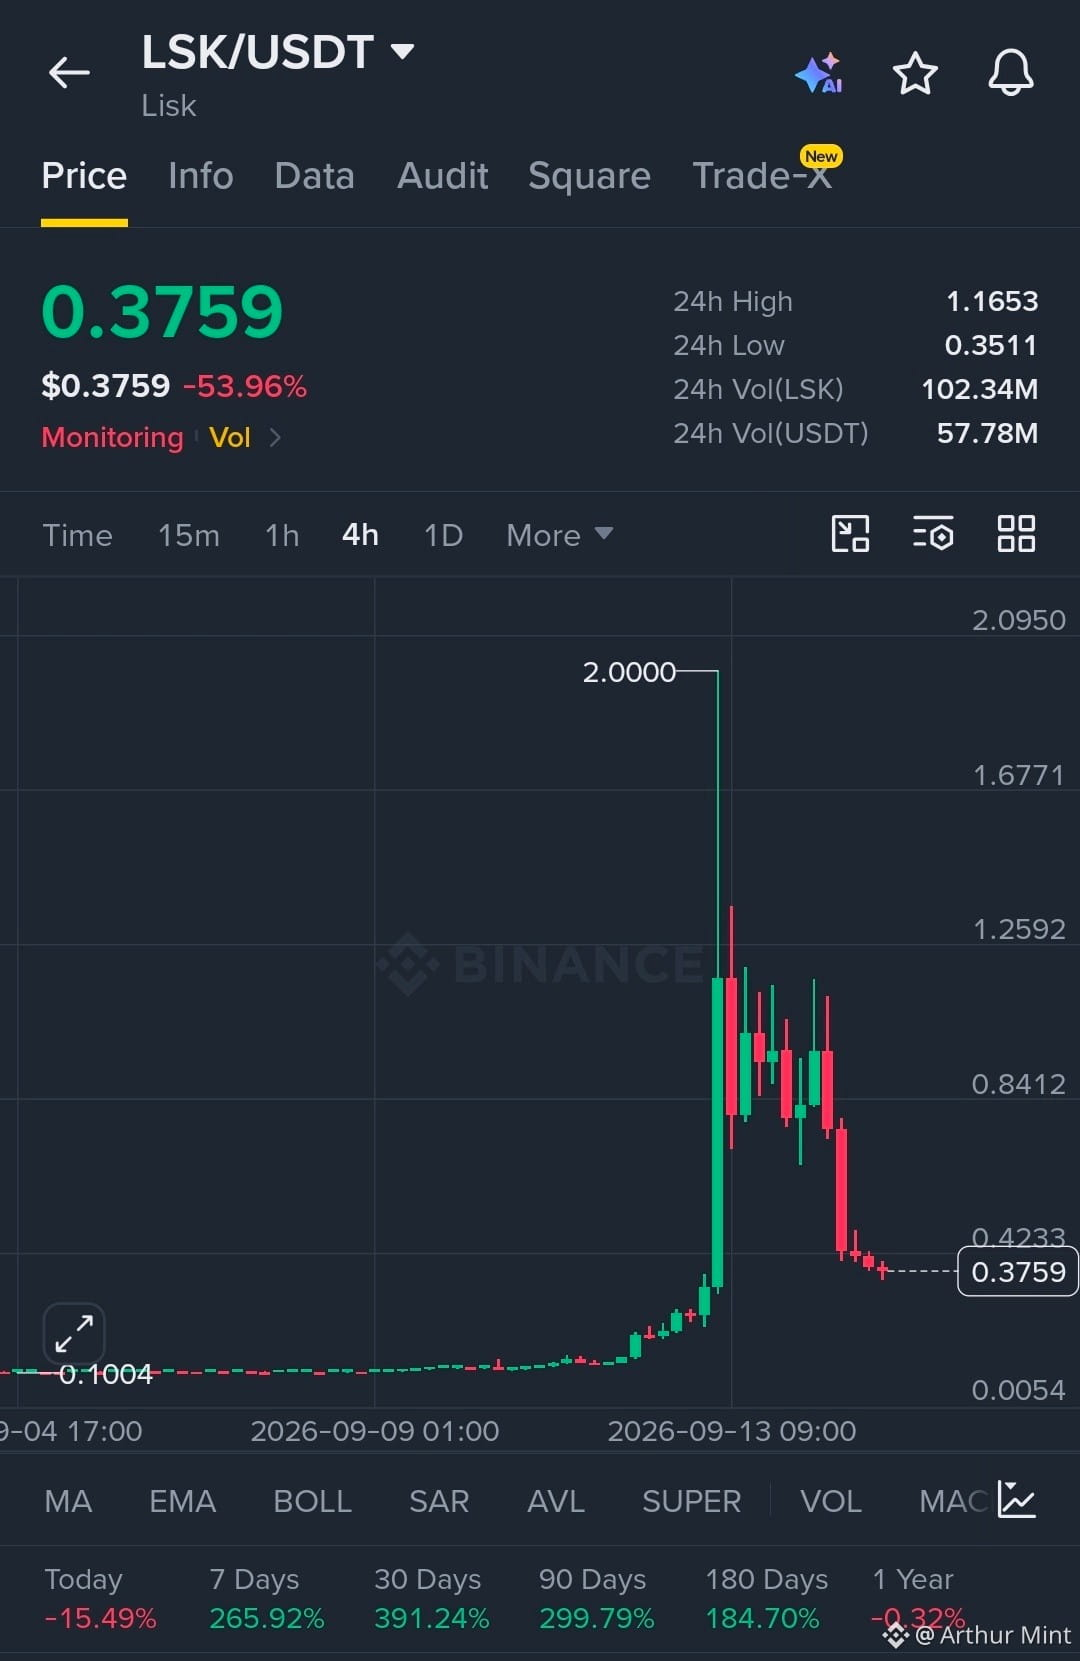
$LSK is showing strong momentum after a sharp liquidity reset.
Buyers are attempting to regain control as the structure stabilizes.
EP
0.3600 - 0.3850
TP
TP1 0.4233
TP2 0.5200
TP3 0.6500
SL
0.3400
Liquidity was aggressively cleared after the spike, triggering a strong downside reaction. Holding the current support zone keeps the recovery structure intact and opens room toward upper liquidity.
Let’s go $LSK
$LSK is showing strong momentum after a sharp liquidity reset.
Buyers are attempting to regain control as the structure stabilizes.
EP
0.3600 - 0.3850
TP
TP1 0.4233
TP2 0.5200
TP3 0.6500
SL
0.3400
Liquidity was aggressively cleared after the spike, triggering a strong downside reaction. Holding the current support zone keeps the recovery structure intact and opens room toward upper liquidity.
Let’s go $LSK
Buyers are attempting to regain control as the structure stabilizes.
EP
0.3600 - 0.3850
TP
TP1 0.4233
TP2 0.5200
TP3 0.6500
SL
0.3400
Liquidity was aggressively cleared after the spike, triggering a strong downside reaction. Holding the current support zone keeps the recovery structure intact and opens room toward upper liquidity.
Let’s go $LSK
332
·
--
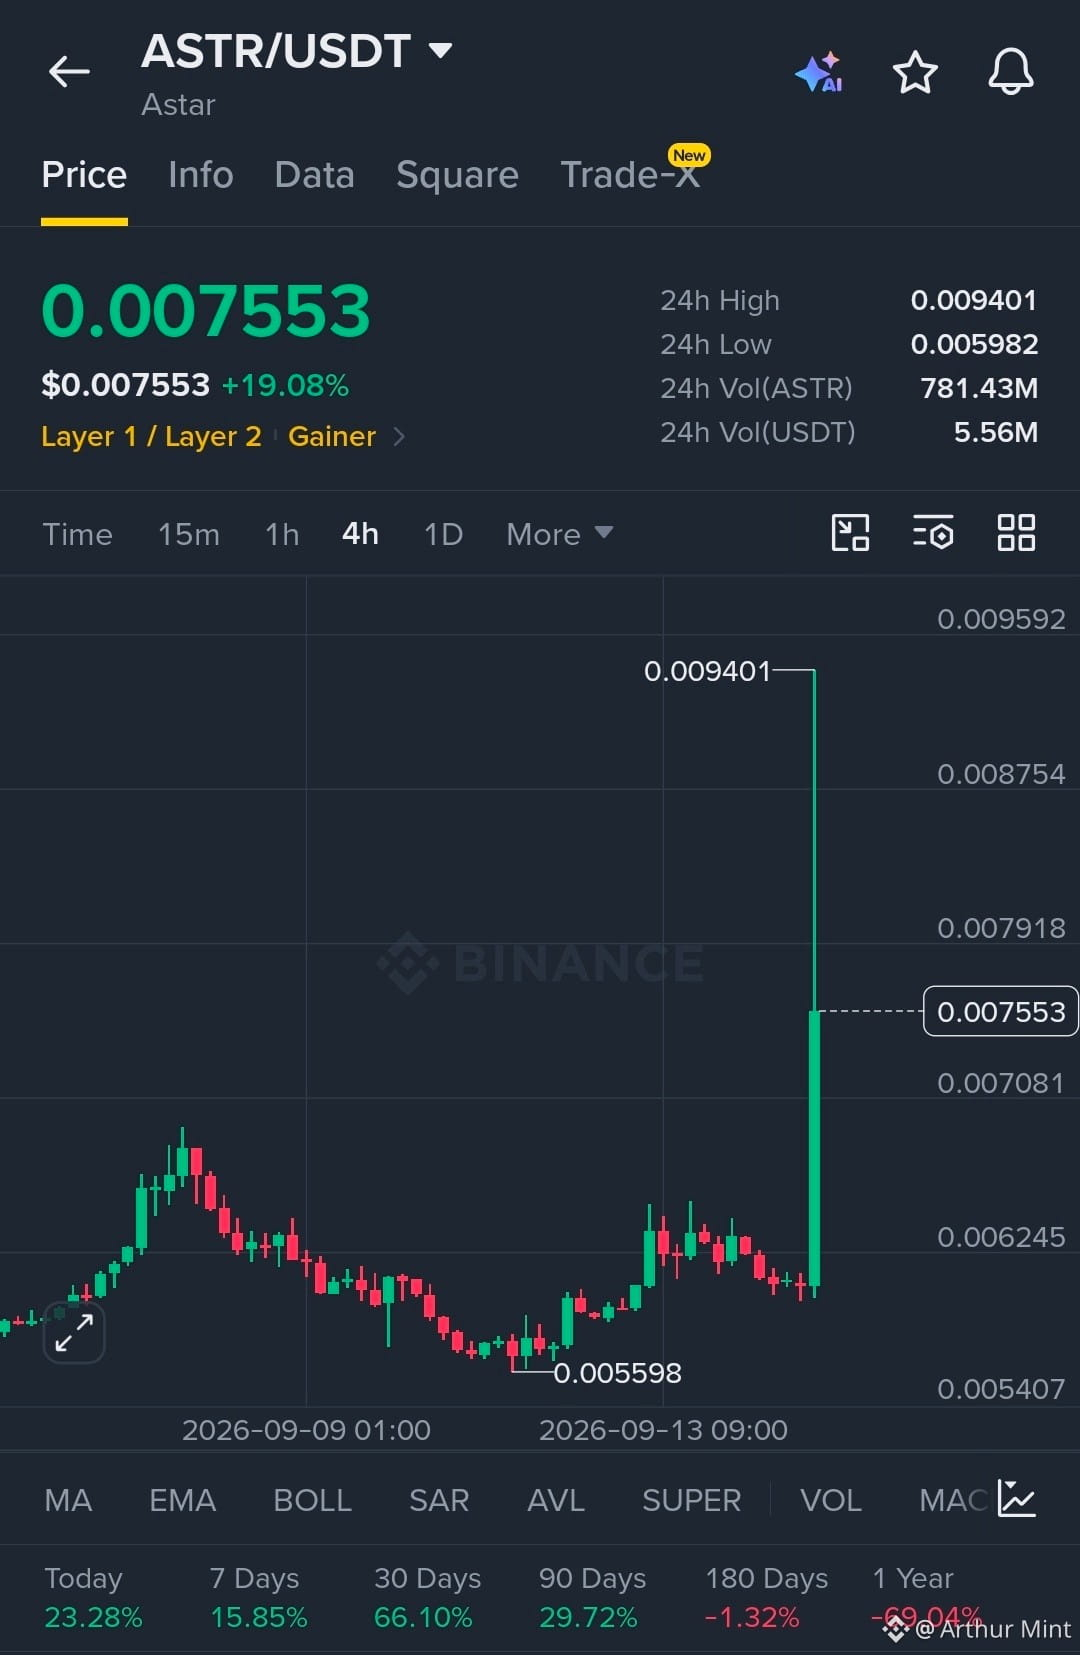
$ASTR is showing strong momentum after an explosive breakout.
Buyers are holding control as the structure shifts bullish.
EP
0.00730 - 0.00755
TP
TP1 0.00792
TP2 0.00875
TP3 0.00940
SL
0.00695
Liquidity surged into the breakout, triggering a sharp reaction from the lower structure. Holding above the breakout zone keeps the bullish structure intact and opens room toward upper liquidity.
Let’s go $ASTR
$ASTR is showing strong momentum after an explosive breakout.
Buyers are holding control as the structure shifts bullish.
EP
0.00730 - 0.00755
TP
TP1 0.00792
TP2 0.00875
TP3 0.00940
SL
0.00695
Liquidity surged into the breakout, triggering a sharp reaction from the lower structure. Holding above the breakout zone keeps the bullish structure intact and opens room toward upper liquidity.
Let’s go $ASTR
Buyers are holding control as the structure shifts bullish.
EP
0.00730 - 0.00755
TP
TP1 0.00792
TP2 0.00875
TP3 0.00940
SL
0.00695
Liquidity surged into the breakout, triggering a sharp reaction from the lower structure. Holding above the breakout zone keeps the bullish structure intact and opens room toward upper liquidity.
Let’s go $ASTR
294
·
--
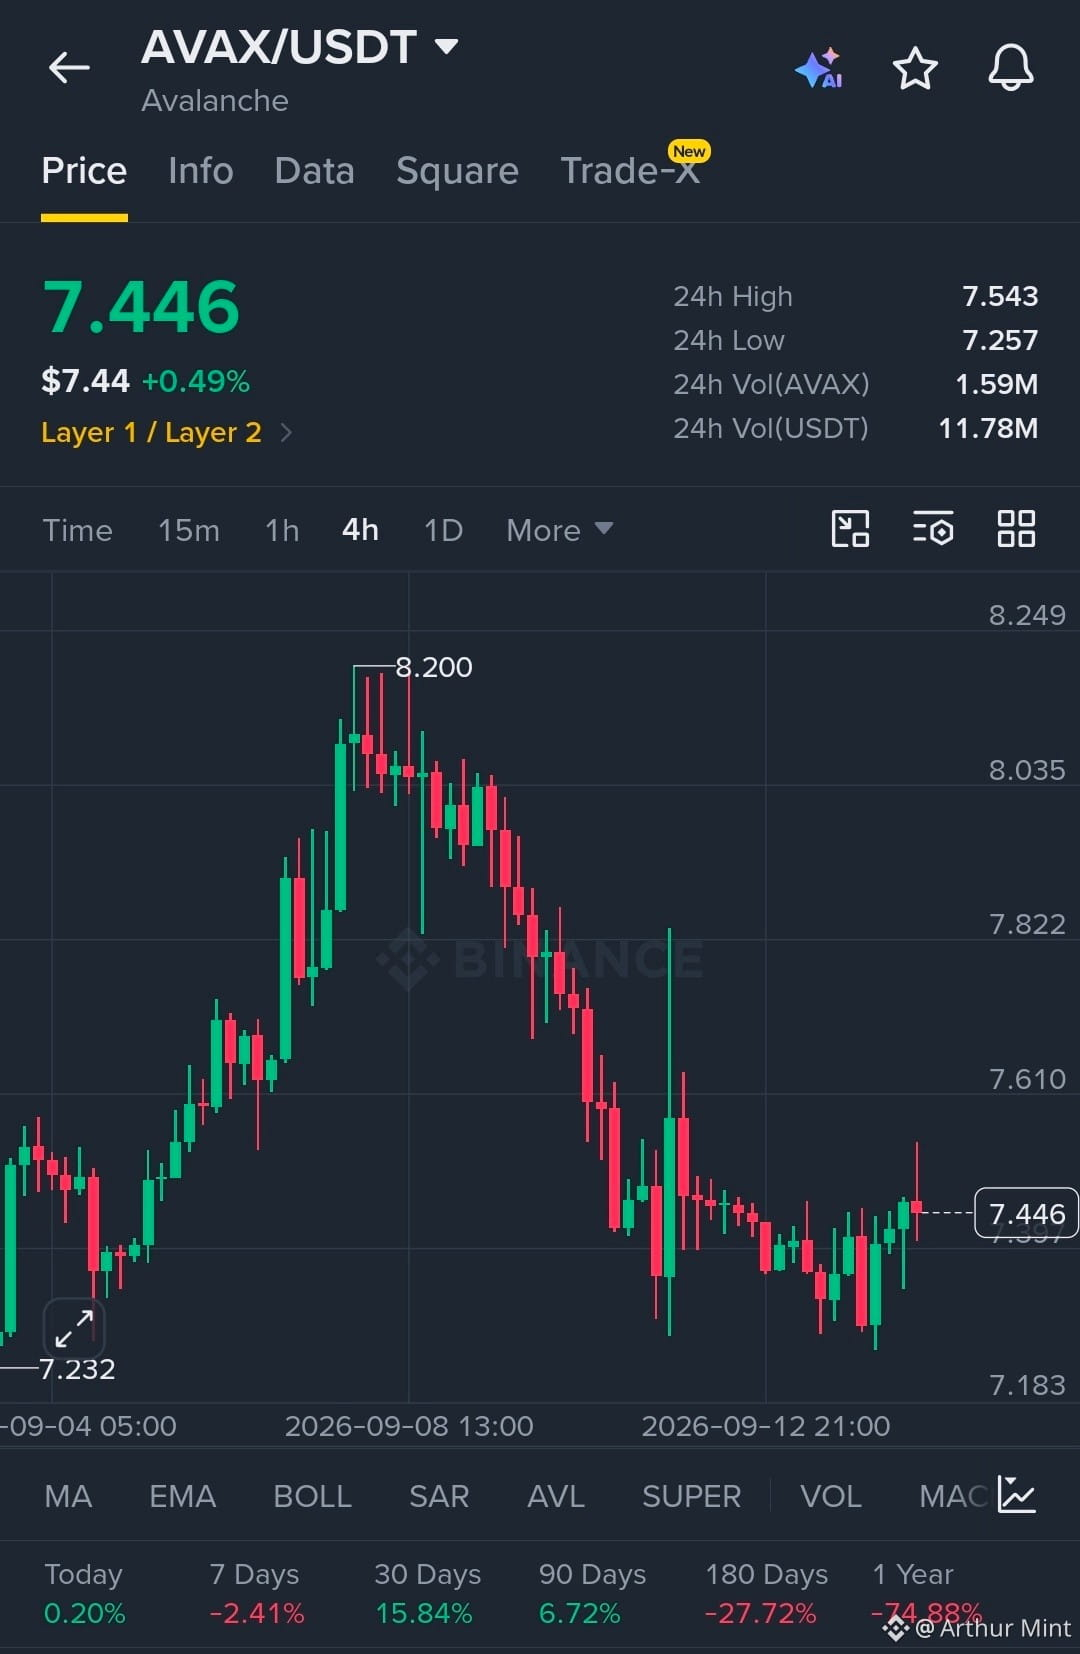
$AVAX is showing strong recovery momentum from the lower liquidity zone.
Buyers are defending the structure above the key support area.
EP
7.40 - 7.46
TP
TP1 7.61
TP2 7.82
TP3 8.03
SL
7.23
Liquidity was swept near the lows, followed by a strong reaction back into structure. Holding the 7.40-7.46 area keeps buyers in control and opens the path toward the upper liquidity zones.
Let’s go $AVAX
$AVAX is showing strong recovery momentum from the lower liquidity zone.
Buyers are defending the structure above the key support area.
EP
7.40 - 7.46
TP
TP1 7.61
TP2 7.82
TP3 8.03
SL
7.23
Liquidity was swept near the lows, followed by a strong reaction back into structure. Holding the 7.40-7.46 area keeps buyers in control and opens the path toward the upper liquidity zones.
Let’s go $AVAX
Buyers are defending the structure above the key support area.
EP
7.40 - 7.46
TP
TP1 7.61
TP2 7.82
TP3 8.03
SL
7.23
Liquidity was swept near the lows, followed by a strong reaction back into structure. Holding the 7.40-7.46 area keeps buyers in control and opens the path toward the upper liquidity zones.
Let’s go $AVAX
1
361
·
--
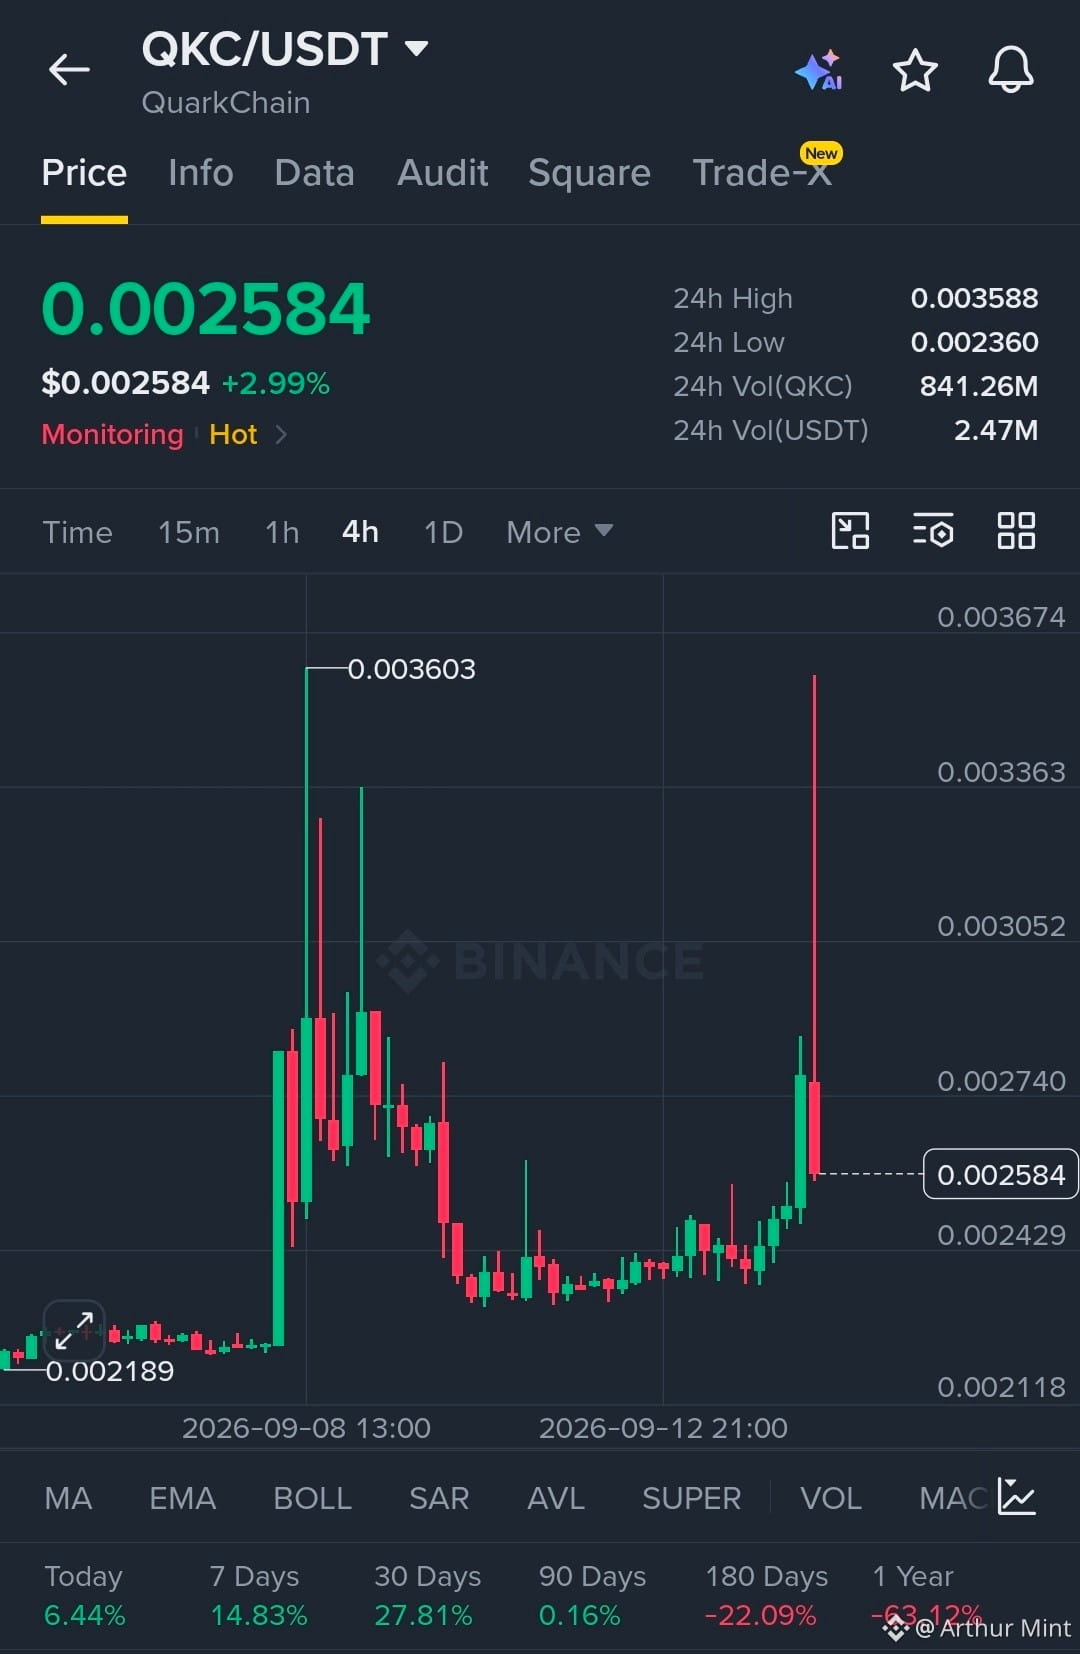
$QKC is showing strong momentum after a sharp liquidity expansion.
Buyers are still defending the structure above the key support zone.
EP
0.00250 - 0.00258
TP
TP1 0.00274
TP2 0.00305
TP3 0.00336
SL
0.00235
Liquidity was swept near the highs, followed by a strong reaction back into structure. Holding the 0.00242-0.00250 area keeps buyers in control and opens the path toward the upper liquidity zones.
Let’s go $QKC
$QKC is showing strong momentum after a sharp liquidity expansion.
Buyers are still defending the structure above the key support zone.
EP
0.00250 - 0.00258
TP
TP1 0.00274
TP2 0.00305
TP3 0.00336
SL
0.00235
Liquidity was swept near the highs, followed by a strong reaction back into structure. Holding the 0.00242-0.00250 area keeps buyers in control and opens the path toward the upper liquidity zones.
Let’s go $QKC
Buyers are still defending the structure above the key support zone.
EP
0.00250 - 0.00258
TP
TP1 0.00274
TP2 0.00305
TP3 0.00336
SL
0.00235
Liquidity was swept near the highs, followed by a strong reaction back into structure. Holding the 0.00242-0.00250 area keeps buyers in control and opens the path toward the upper liquidity zones.
Let’s go $QKC
272
·
--
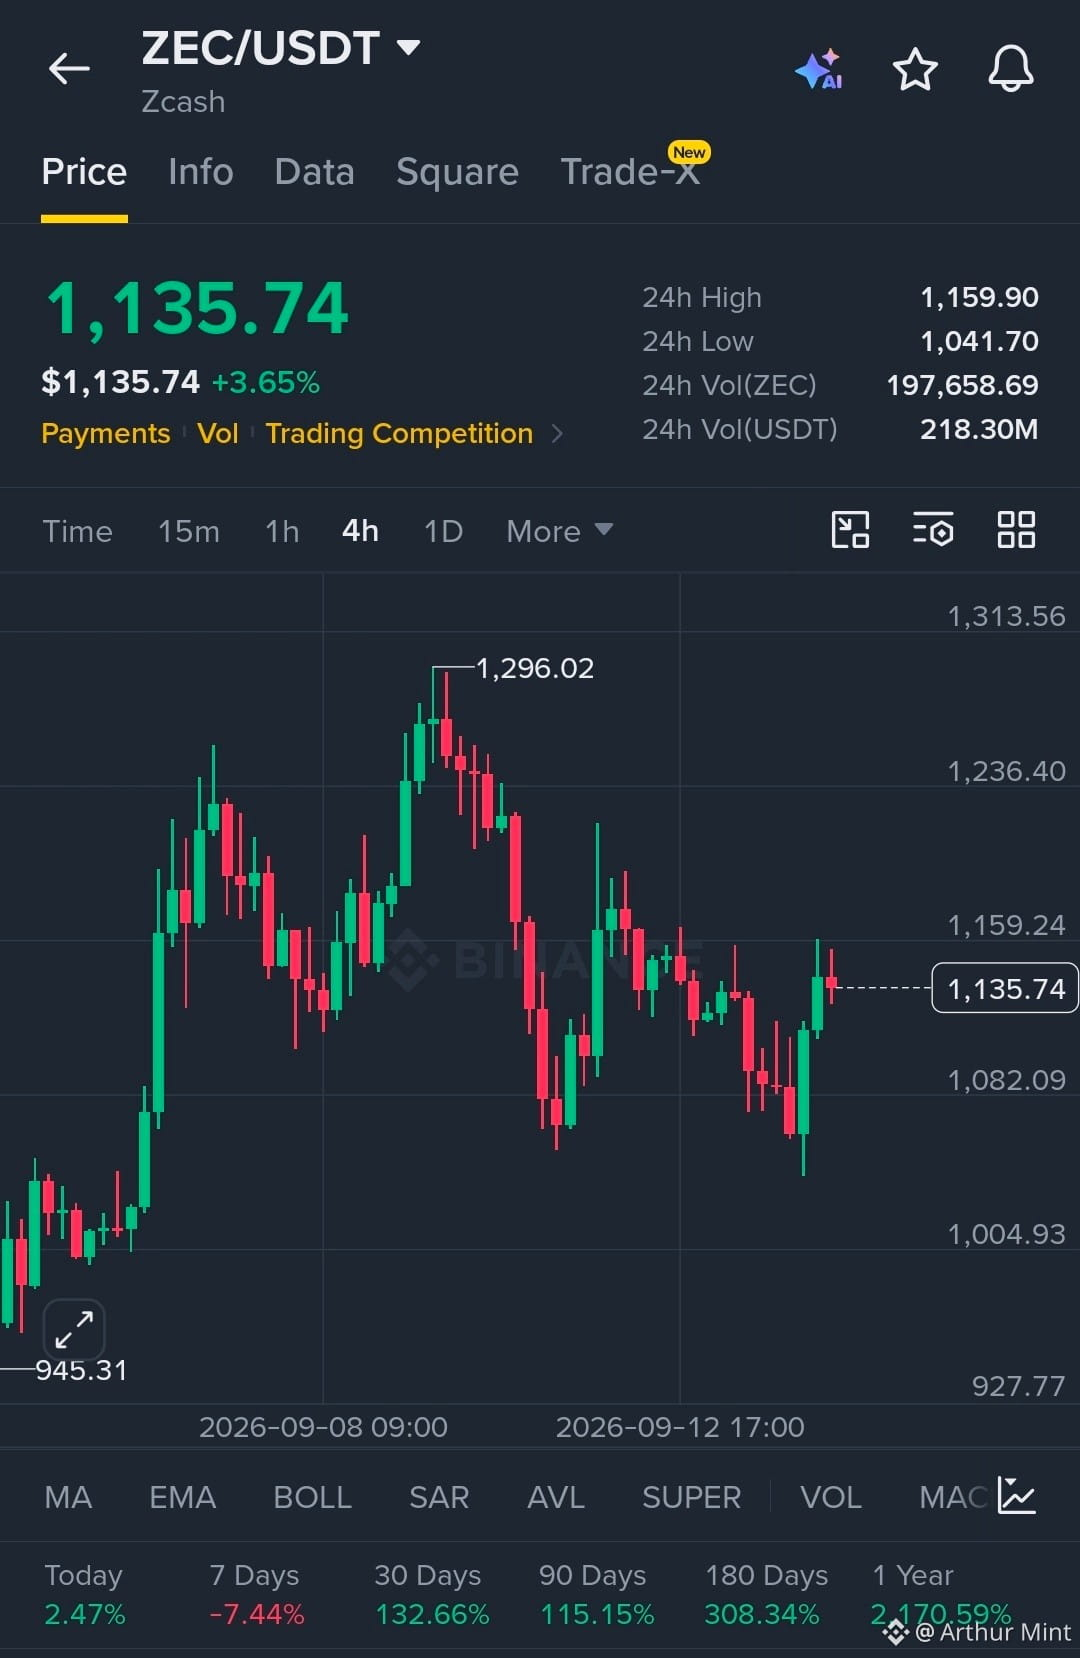
$ZEC is showing strong momentum after a sharp reaction from support.
Bulls remain in control as ZEC holds the recovery structure.
EP
1,120 - 1,140
TP
TP1 1,159
TP2 1,200
TP3 1,236
SL
1,080
Liquidity above 1,159 remains the key target. A clean reaction from the 1,120-1,140 zone can support continuation, while holding the recovery structure keeps bullish momentum intact.
Let’s go $ZEC
$ZEC is showing strong momentum after a sharp reaction from support.
Bulls remain in control as ZEC holds the recovery structure.
EP
1,120 - 1,140
TP
TP1 1,159
TP2 1,200
TP3 1,236
SL
1,080
Liquidity above 1,159 remains the key target. A clean reaction from the 1,120-1,140 zone can support continuation, while holding the recovery structure keeps bullish momentum intact.
Let’s go $ZEC
Bulls remain in control as ZEC holds the recovery structure.
EP
1,120 - 1,140
TP
TP1 1,159
TP2 1,200
TP3 1,236
SL
1,080
Liquidity above 1,159 remains the key target. A clean reaction from the 1,120-1,140 zone can support continuation, while holding the recovery structure keeps bullish momentum intact.
Let’s go $ZEC
352
·
--
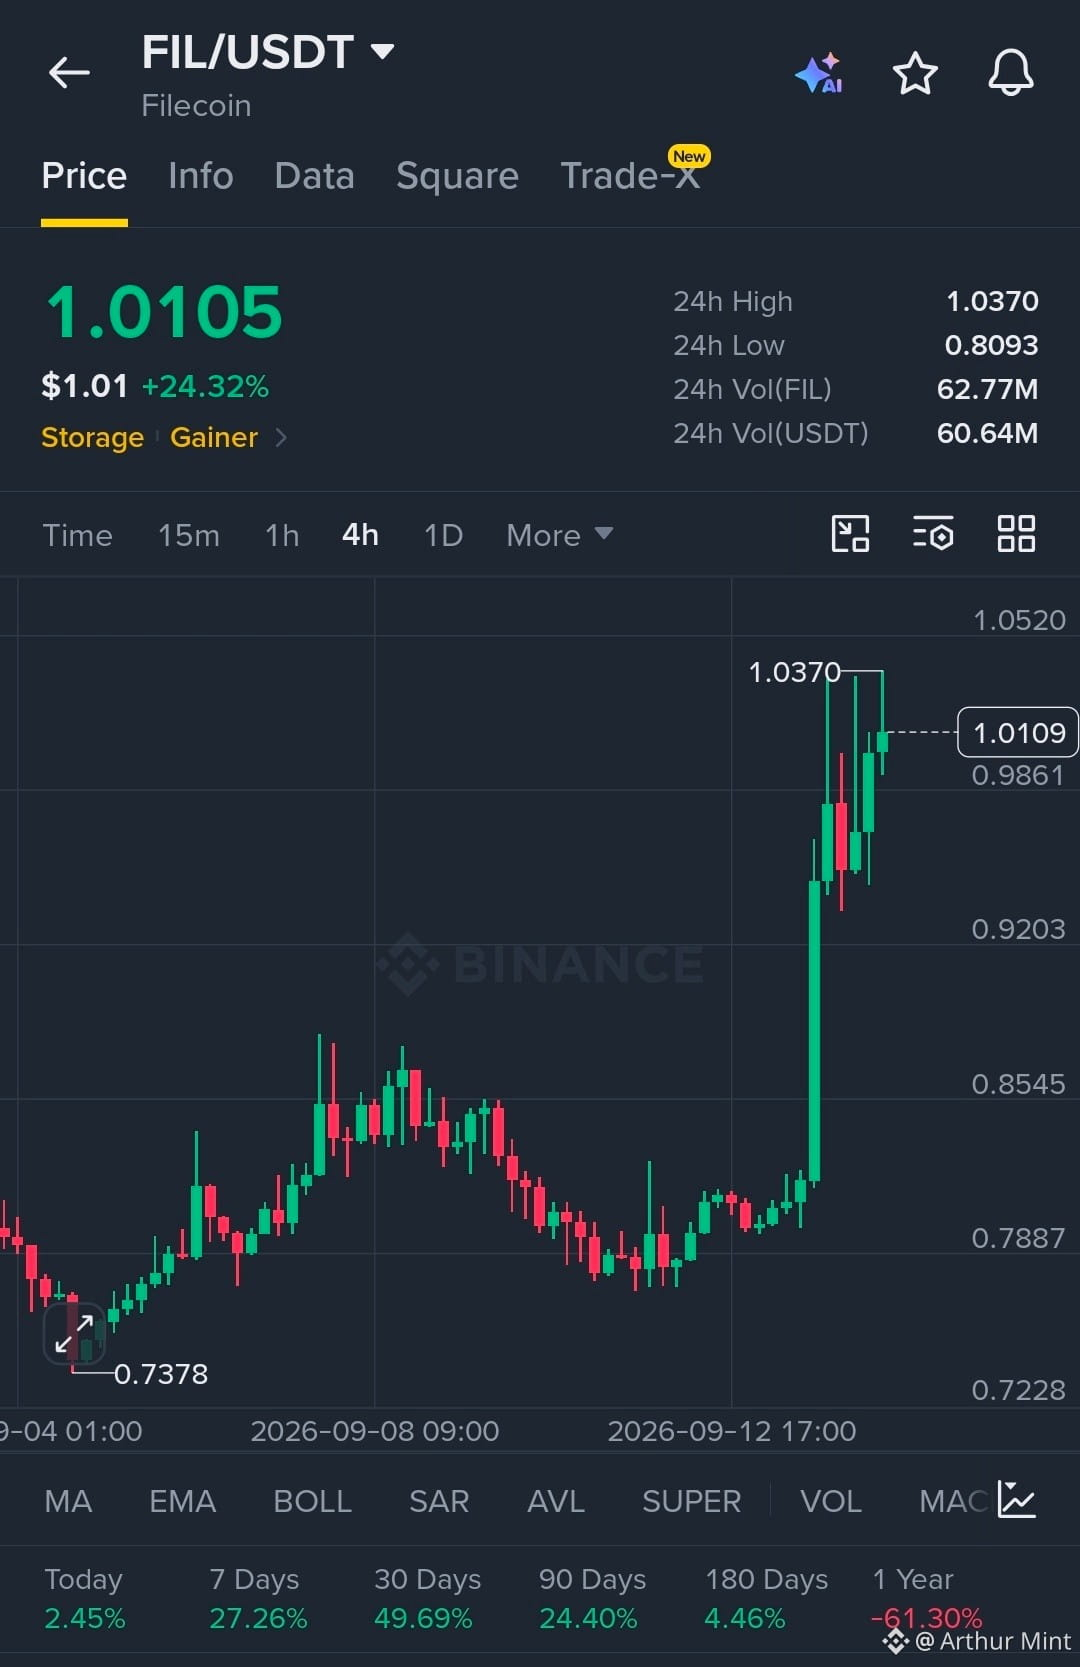
$FIL is showing strong momentum after a powerful breakout.
Bulls remain in control as FIL holds above the breakout structure.
EP
0.9900 - 1.0100
TP
TP1 1.0370
TP2 1.0800
TP3 1.1200
SL
0.9550
Liquidity above 1.0370 remains the key target. A clean reaction from the 0.99-1.01 zone can support continuation, while holding the breakout structure keeps bullish momentum intact.
Let’s go $FIL
$FIL is showing strong momentum after a powerful breakout.
Bulls remain in control as FIL holds above the breakout structure.
EP
0.9900 - 1.0100
TP
TP1 1.0370
TP2 1.0800
TP3 1.1200
SL
0.9550
Liquidity above 1.0370 remains the key target. A clean reaction from the 0.99-1.01 zone can support continuation, while holding the breakout structure keeps bullish momentum intact.
Let’s go $FIL
Bulls remain in control as FIL holds above the breakout structure.
EP
0.9900 - 1.0100
TP
TP1 1.0370
TP2 1.0800
TP3 1.1200
SL
0.9550
Liquidity above 1.0370 remains the key target. A clean reaction from the 0.99-1.01 zone can support continuation, while holding the breakout structure keeps bullish momentum intact.
Let’s go $FIL
516
·
--
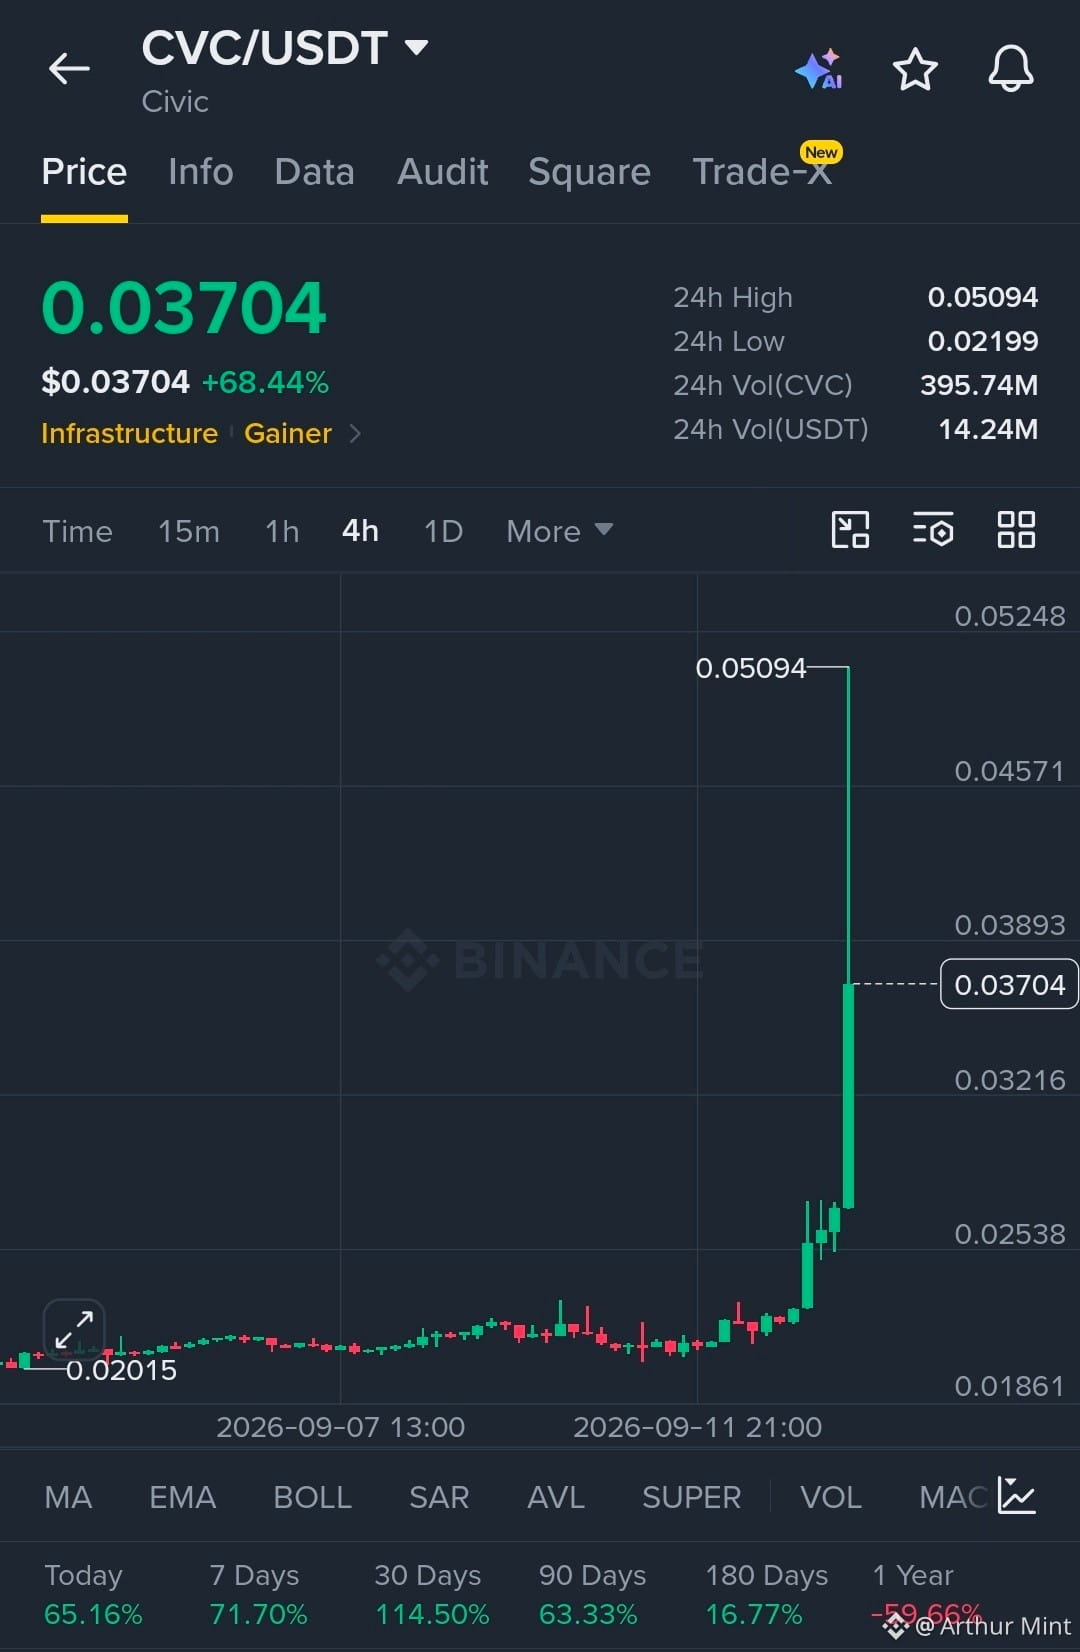
$CVC is showing explosive strength after a clean breakout above the previous range.
Buyers remain in control while the structure holds above the breakout zone.
EP
0.0340 - 0.0370
TP
TP1 0.03893
TP2 0.04571
TP3 0.05094
SL
0.03180
Liquidity expanded sharply into the breakout, with CVC reacting from 0.05094 after the impulse. Holding the breakout structure keeps continuation liquidity above in focus, while losing the entry zone would weaken the current setup.
Let’s go $CVC
$CVC is showing explosive strength after a clean breakout above the previous range.
Buyers remain in control while the structure holds above the breakout zone.
EP
0.0340 - 0.0370
TP
TP1 0.03893
TP2 0.04571
TP3 0.05094
SL
0.03180
Liquidity expanded sharply into the breakout, with CVC reacting from 0.05094 after the impulse. Holding the breakout structure keeps continuation liquidity above in focus, while losing the entry zone would weaken the current setup.
Let’s go $CVC
Buyers remain in control while the structure holds above the breakout zone.
EP
0.0340 - 0.0370
TP
TP1 0.03893
TP2 0.04571
TP3 0.05094
SL
0.03180
Liquidity expanded sharply into the breakout, with CVC reacting from 0.05094 after the impulse. Holding the breakout structure keeps continuation liquidity above in focus, while losing the entry zone would weaken the current setup.
Let’s go $CVC
1
410
·
--
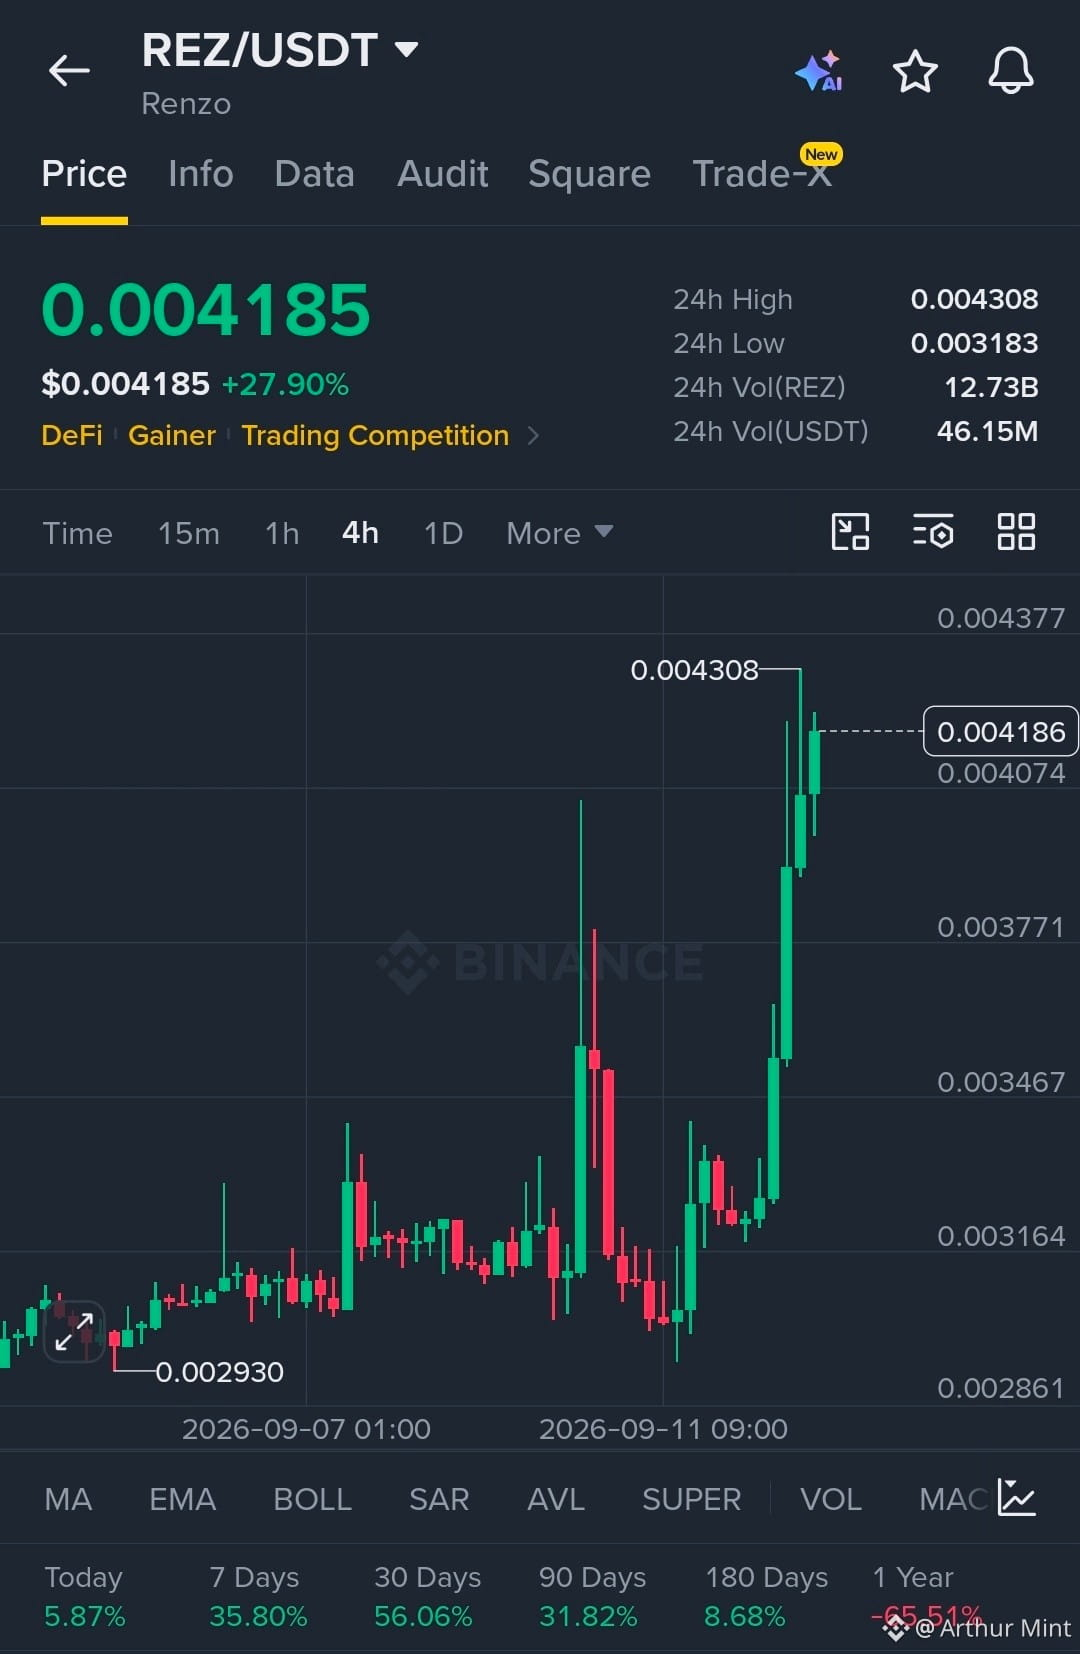
$REZ is showing strong bullish momentum.
Buyers remain in control as structure holds above the breakout zone.
EP
0.00405 - 0.00418
TP
TP1 0.00430
TP2 0.00450
TP3 0.00475
SL
0.00382
Liquidity is building above the recent high, while strong reaction from lower levels confirms aggressive demand. Holding the breakout structure keeps continuation in play.
Let’s go $REZ
$REZ is showing strong bullish momentum.
Buyers remain in control as structure holds above the breakout zone.
EP
0.00405 - 0.00418
TP
TP1 0.00430
TP2 0.00450
TP3 0.00475
SL
0.00382
Liquidity is building above the recent high, while strong reaction from lower levels confirms aggressive demand. Holding the breakout structure keeps continuation in play.
Let’s go $REZ
Buyers remain in control as structure holds above the breakout zone.
EP
0.00405 - 0.00418
TP
TP1 0.00430
TP2 0.00450
TP3 0.00475
SL
0.00382
Liquidity is building above the recent high, while strong reaction from lower levels confirms aggressive demand. Holding the breakout structure keeps continuation in play.
Let’s go $REZ
1
230
·
--
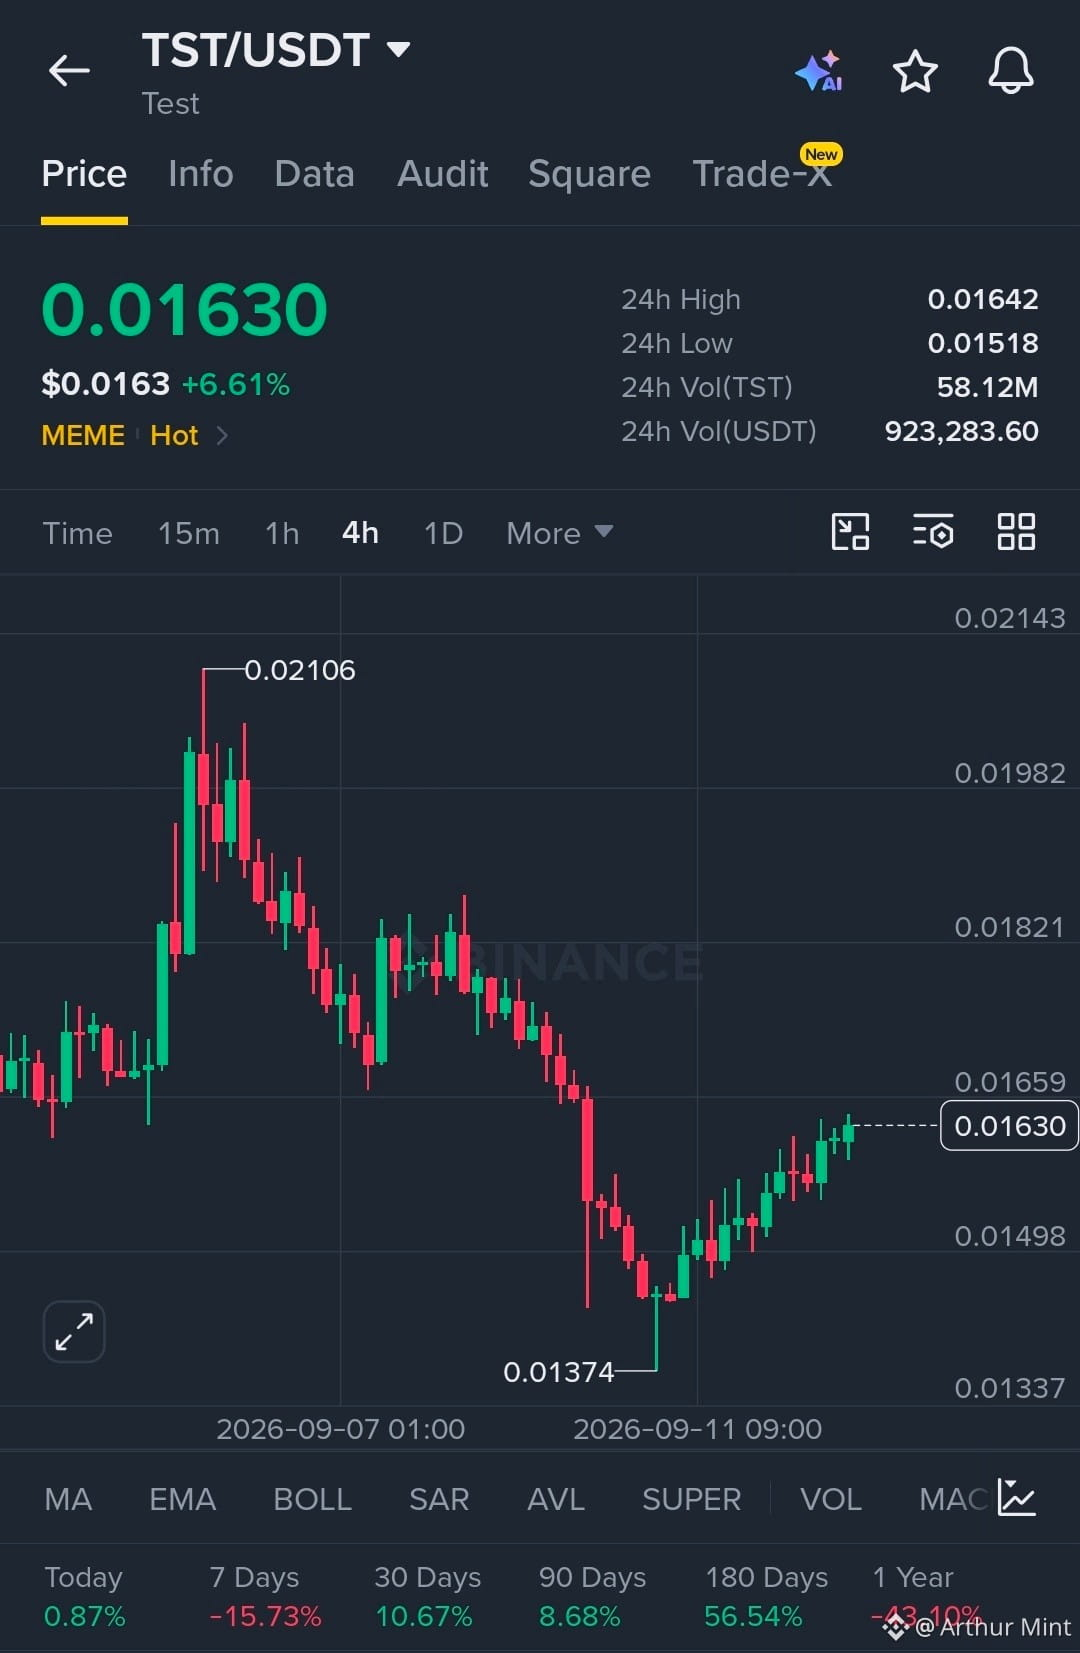
$TST is showing strong recovery momentum after a sharp liquidity reaction.
Bulls are regaining control as the structure pushes toward resistance.
EP
0.0158 - 0.0163
TP
TP1 0.01659
TP2 0.01821
TP3 0.01982
SL
0.01480
Liquidity was swept near the recent low, followed by a strong reaction and recovery. Holding the current structure keeps upside liquidity and continuation levels in focus.
Let’s go $TST
$TST is showing strong recovery momentum after a sharp liquidity reaction.
Bulls are regaining control as the structure pushes toward resistance.
EP
0.0158 - 0.0163
TP
TP1 0.01659
TP2 0.01821
TP3 0.01982
SL
0.01480
Liquidity was swept near the recent low, followed by a strong reaction and recovery. Holding the current structure keeps upside liquidity and continuation levels in focus.
Let’s go $TST
Bulls are regaining control as the structure pushes toward resistance.
EP
0.0158 - 0.0163
TP
TP1 0.01659
TP2 0.01821
TP3 0.01982
SL
0.01480
Liquidity was swept near the recent low, followed by a strong reaction and recovery. Holding the current structure keeps upside liquidity and continuation levels in focus.
Let’s go $TST
779
·
--
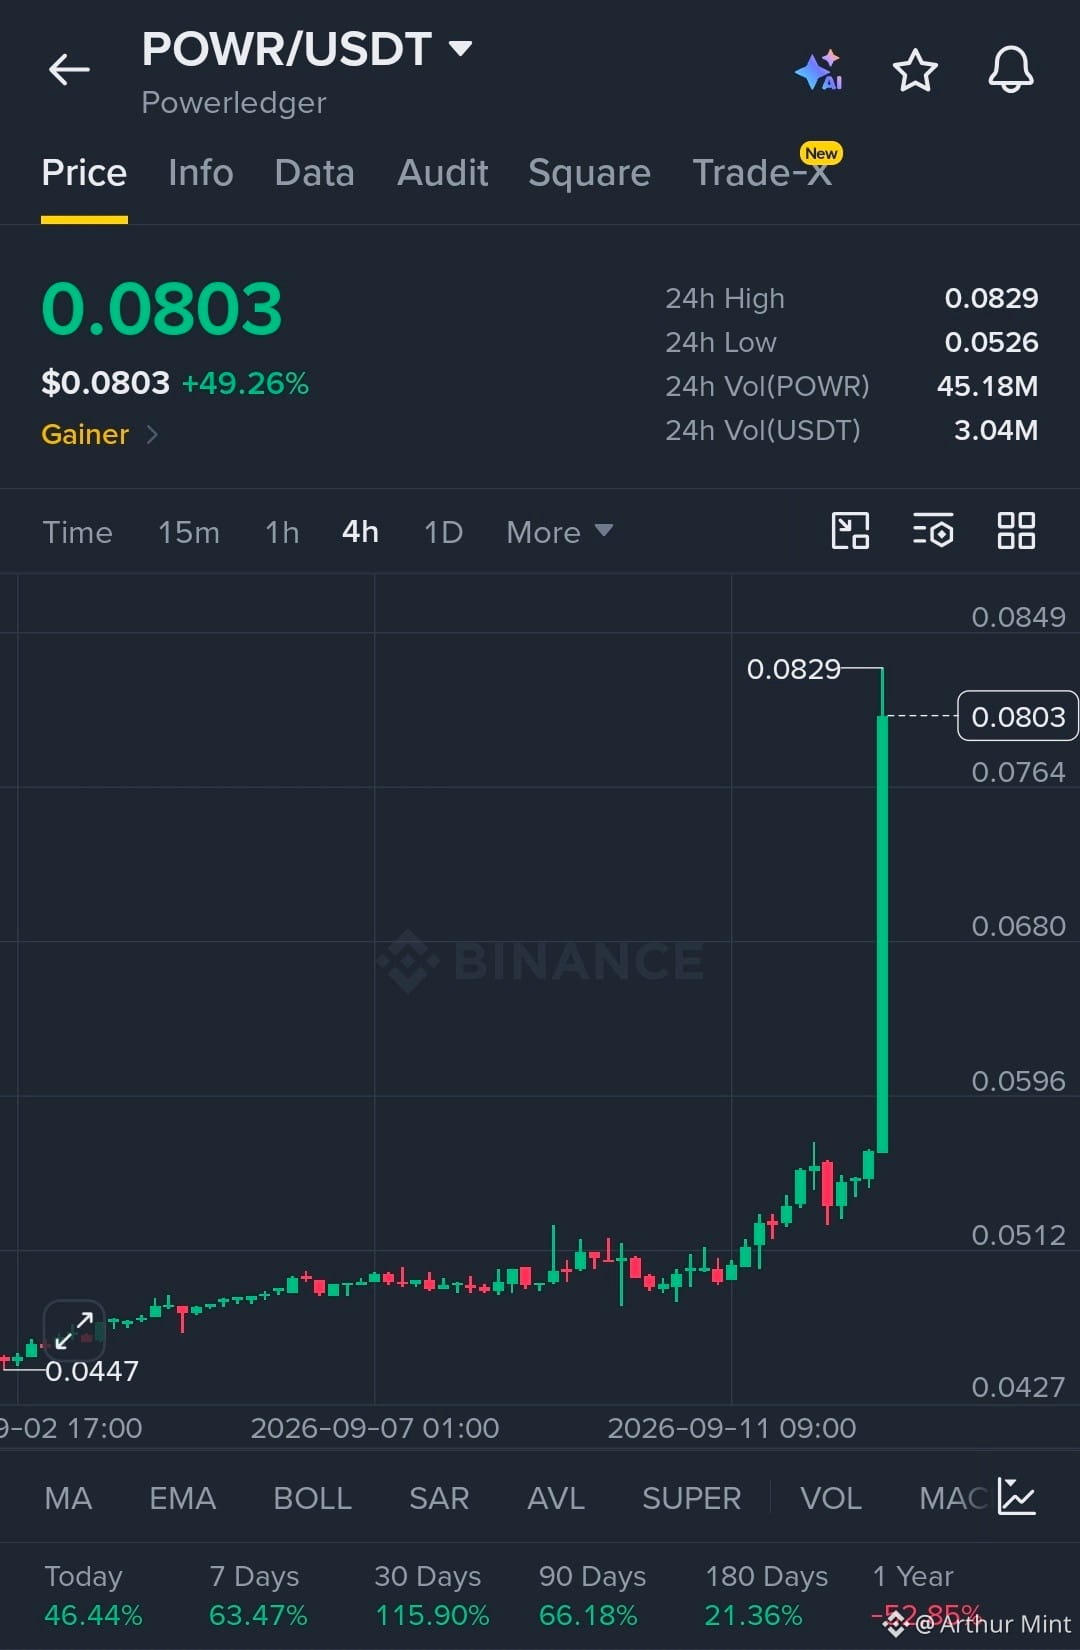
$POWR is showing explosive strength with momentum firmly expanding.
POWR structure remains bullish with buyers maintaining control.
EP
0.0780 - 0.0805
TP
TP1 0.0829
TP2 0.0865
TP3 0.0910
SL
0.0745
Liquidity is building above the recent high, while strong reaction from the breakout confirms aggressive demand. Holding the breakout structure keeps continuation pressure intact.
Let’s go $POWR
$POWR is showing explosive strength with momentum firmly expanding.
POWR structure remains bullish with buyers maintaining control.
EP
0.0780 - 0.0805
TP
TP1 0.0829
TP2 0.0865
TP3 0.0910
SL
0.0745
Liquidity is building above the recent high, while strong reaction from the breakout confirms aggressive demand. Holding the breakout structure keeps continuation pressure intact.
Let’s go $POWR
POWR structure remains bullish with buyers maintaining control.
EP
0.0780 - 0.0805
TP
TP1 0.0829
TP2 0.0865
TP3 0.0910
SL
0.0745
Liquidity is building above the recent high, while strong reaction from the breakout confirms aggressive demand. Holding the breakout structure keeps continuation pressure intact.
Let’s go $POWR
268
·
--
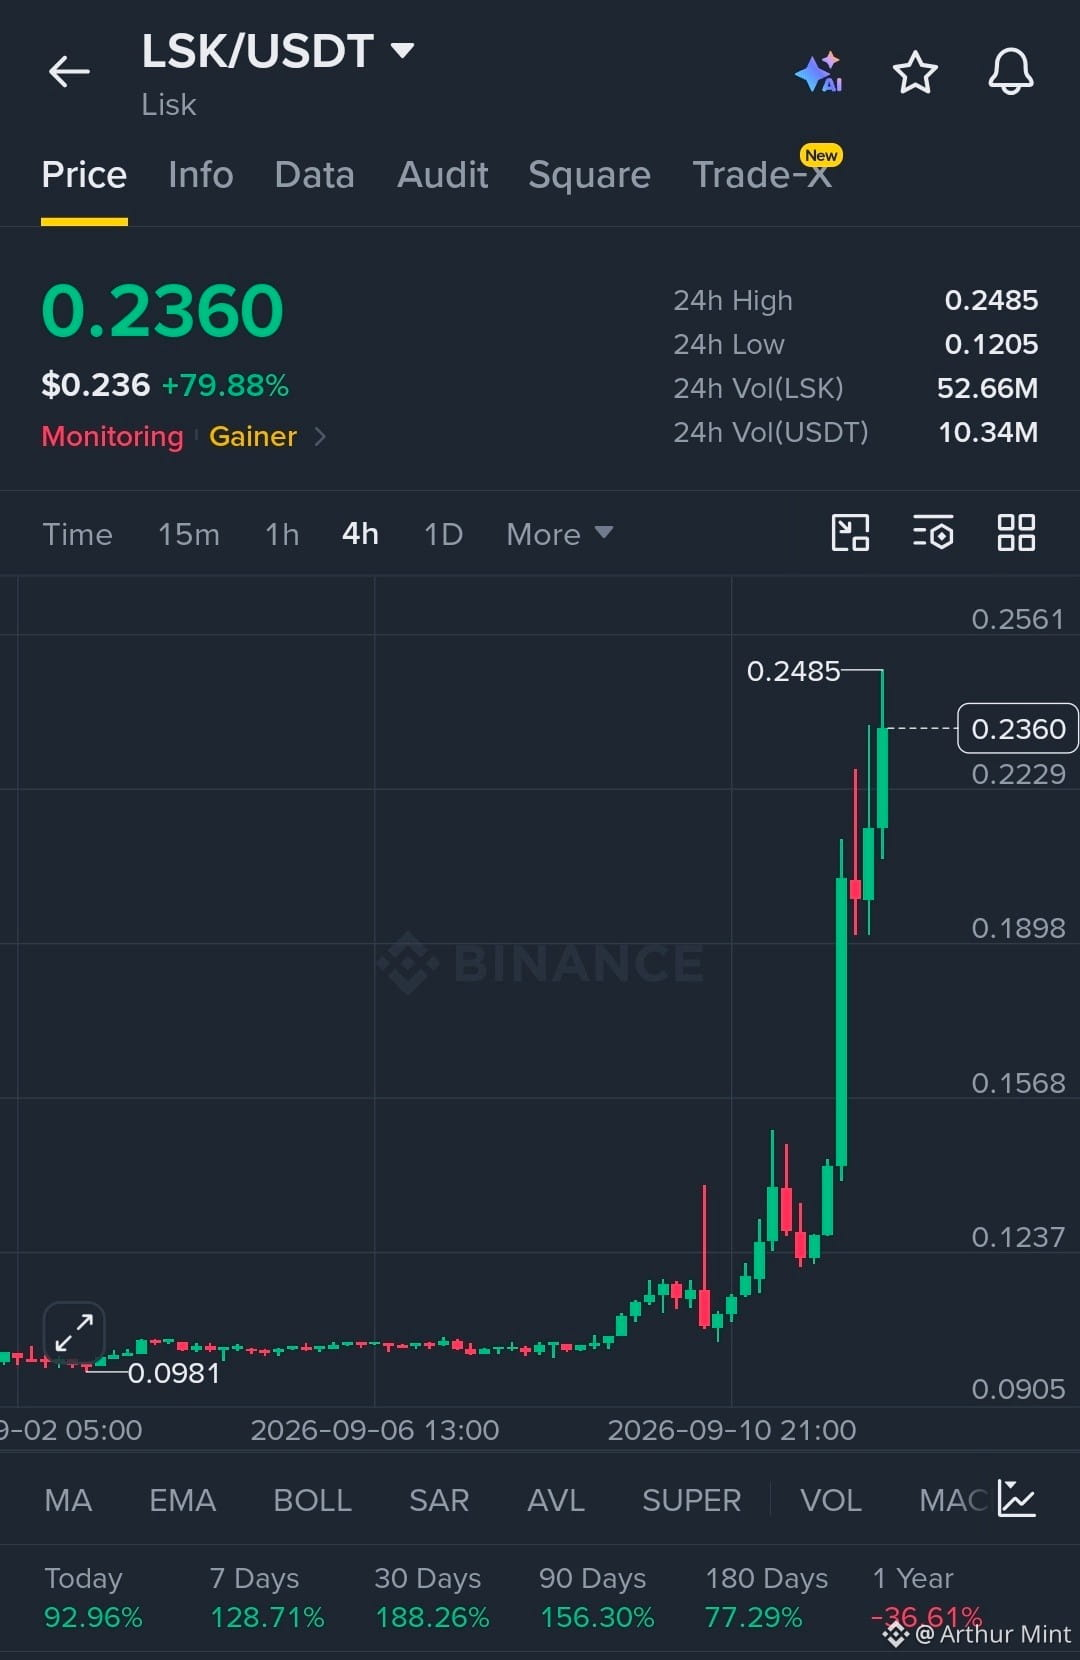
$LSK is showing explosive strength after breaking aggressively toward the 0.2485 liquidity zone.
Structure remains controlled as buyers continue defending the bullish expansion.
EP
0.2230 - 0.2360
TP
TP1 0.2485
TP2 0.2700
TP3 0.3000
SL
0.1890
Liquidity above 0.2485 is being targeted after a powerful reaction from lower levels. Holding the current structure keeps buyers in control, with continuation favored once nearby liquidity is cleared.
Let’s go $LSK
$LSK is showing explosive strength after breaking aggressively toward the 0.2485 liquidity zone.
Structure remains controlled as buyers continue defending the bullish expansion.
EP
0.2230 - 0.2360
TP
TP1 0.2485
TP2 0.2700
TP3 0.3000
SL
0.1890
Liquidity above 0.2485 is being targeted after a powerful reaction from lower levels. Holding the current structure keeps buyers in control, with continuation favored once nearby liquidity is cleared.
Let’s go $LSK
Structure remains controlled as buyers continue defending the bullish expansion.
EP
0.2230 - 0.2360
TP
TP1 0.2485
TP2 0.2700
TP3 0.3000
SL
0.1890
Liquidity above 0.2485 is being targeted after a powerful reaction from lower levels. Holding the current structure keeps buyers in control, with continuation favored once nearby liquidity is cleared.
Let’s go $LSK
342
·
--
Bullish
CPI is out, and the “hold” case just got weaker.
August CPI rose 0.4% MoM and 3.4% YoY, while core CPI printed 0.3% MoM—above the 0.2% expected—and 2.4% YoY. Add August’s 162K payroll gain, and I think the Fed now has more reason to hike 25 bps than stay on hold at the Sept. 15–16 meeting. Futures also moved sharply toward a hike after the release.
My market bias? Short term, I’m cautious on risk assets and selectively bullish on gold. Sticky inflation supports gold’s hedge appeal, but higher yields can still cap upside, so I’m not chasing the first move.
For me, the key signal now is yields: if they stay elevated, pressure can linger; if they cool, gold and risk assets may rebound quickly.
Would you hike or hold here?
#CPIWatch
CPI is out, and the “hold” case just got weaker.
August CPI rose 0.4% MoM and 3.4% YoY, while core CPI printed 0.3% MoM—above the 0.2% expected—and 2.4% YoY. Add August’s 162K payroll gain, and I think the Fed now has more reason to hike 25 bps than stay on hold at the Sept. 15–16 meeting. Futures also moved sharply toward a hike after the release.
My market bias? Short term, I’m cautious on risk assets and selectively bullish on gold. Sticky inflation supports gold’s hedge appeal, but higher yields can still cap upside, so I’m not chasing the first move.
For me, the key signal now is yields: if they stay elevated, pressure can linger; if they cool, gold and risk assets may rebound quickly.
Would you hike or hold here?
#CPIWatch
August CPI rose 0.4% MoM and 3.4% YoY, while core CPI printed 0.3% MoM—above the 0.2% expected—and 2.4% YoY. Add August’s 162K payroll gain, and I think the Fed now has more reason to hike 25 bps than stay on hold at the Sept. 15–16 meeting. Futures also moved sharply toward a hike after the release.
My market bias? Short term, I’m cautious on risk assets and selectively bullish on gold. Sticky inflation supports gold’s hedge appeal, but higher yields can still cap upside, so I’m not chasing the first move.
For me, the key signal now is yields: if they stay elevated, pressure can linger; if they cool, gold and risk assets may rebound quickly.
Would you hike or hold here?
#CPIWatch

4
494
·
--
$SOL is showing strong resilience after defending the lower liquidity zone.
Structure remains constructive while buyers maintain control above support.
EP
99.20–99.80
TP
TP1 101.27
TP2 103.47
TP3 105.66
SL
97.38
Liquidity was swept near the local lows, followed by a clear reaction from buyers. Holding above 99.20 keeps the recovery structure intact, with upside liquidity resting around 101.27 and 103.47.
Let’s go $SOL
$SOL is showing strong resilience after defending the lower liquidity zone.
Structure remains constructive while buyers maintain control above support.
EP
99.20–99.80
TP
TP1 101.27
TP2 103.47
TP3 105.66
SL
97.38
Liquidity was swept near the local lows, followed by a clear reaction from buyers. Holding above 99.20 keeps the recovery structure intact, with upside liquidity resting around 101.27 and 103.47.
Let’s go $SOL
Structure remains constructive while buyers maintain control above support.
EP
99.20–99.80
TP
TP1 101.27
TP2 103.47
TP3 105.66
SL
97.38
Liquidity was swept near the local lows, followed by a clear reaction from buyers. Holding above 99.20 keeps the recovery structure intact, with upside liquidity resting around 101.27 and 103.47.
Let’s go $SOL

512
·
--
$XRP is showing strong resilience after defending the lower liquidity zone.
Structure remains constructive while buyers maintain control above support.
EP
1.335–1.350
TP
TP1 1.377
TP2 1.416
TP3 1.454
SL
1.309
Liquidity was swept near the local lows, followed by a clear reaction from buyers. Holding above 1.335 keeps the recovery structure intact, with upside liquidity resting around 1.377 and 1.416.
Let’s go $XRP
$XRP is showing strong resilience after defending the lower liquidity zone.
Structure remains constructive while buyers maintain control above support.
EP
1.335–1.350
TP
TP1 1.377
TP2 1.416
TP3 1.454
SL
1.309
Liquidity was swept near the local lows, followed by a clear reaction from buyers. Holding above 1.335 keeps the recovery structure intact, with upside liquidity resting around 1.377 and 1.416.
Let’s go $XRP
Structure remains constructive while buyers maintain control above support.
EP
1.335–1.350
TP
TP1 1.377
TP2 1.416
TP3 1.454
SL
1.309
Liquidity was swept near the local lows, followed by a clear reaction from buyers. Holding above 1.335 keeps the recovery structure intact, with upside liquidity resting around 1.377 and 1.416.
Let’s go $XRP

198
·
--
$ZEC is showing strong resilience after a sharp liquidity reset.
Structure remains constructive while buyers defend the reaction zone.
EP
1,090–1,115
TP
TP1 1,150
TP2 1,210
TP3 1,290
SL
1,050
Liquidity was swept near the local lows, followed by a strong reaction from buyers. Holding above 1,090 keeps the recovery structure intact, with upside liquidity resting around 1,210 and the previous high near 1,296.
Let’s go $ZEC
$ZEC is showing strong resilience after a sharp liquidity reset.
Structure remains constructive while buyers defend the reaction zone.
EP
1,090–1,115
TP
TP1 1,150
TP2 1,210
TP3 1,290
SL
1,050
Liquidity was swept near the local lows, followed by a strong reaction from buyers. Holding above 1,090 keeps the recovery structure intact, with upside liquidity resting around 1,210 and the previous high near 1,296.
Let’s go $ZEC
Structure remains constructive while buyers defend the reaction zone.
EP
1,090–1,115
TP
TP1 1,150
TP2 1,210
TP3 1,290
SL
1,050
Liquidity was swept near the local lows, followed by a strong reaction from buyers. Holding above 1,090 keeps the recovery structure intact, with upside liquidity resting around 1,210 and the previous high near 1,296.
Let’s go $ZEC

340
Log in to explore more content
Join global crypto users on Binance Square
⚡️ Get latest and useful information about crypto.
💬 Trusted by the world’s largest crypto exchange.
👍 Discover real insights from verified creators.
Email / Phone number
Trending Topics
FedRateWatch
791,588 views
3,727 Discussing
Share & Win Traffic Reward in our Trending Hashtag Campaign
✨Topic: FOMC September, What's The Fed's Next Move?
👉How to Join:
Publish a short post or article with hashtag #FedRateWatch
Create content based on the below angles:
- August core CPI rose 0.3% month-over-month, and the odds of a 25bp hike this week are now close to 90%. Do you anticipate a rate hike this week? Is it a one-off, or the start of a longer hiking cycle?
- If the hike lands, how does it play out for BTC, tech stocks, and gold? Bullish or bearish?
- How are you planning to trade next? Share your BTC, stocks or gold trade/holdings with our trade sharing widget.
⏰Campaign Period:
- 2026-09-15 11:00 - 2026-09-17 3:00 UTC
🎁Reward:
- Qualified posts that comply with the above guidelines and contain more than 100 words will be reviewed and may receive a random traffic boost of 500 to 3,000 views. You will receive a notification from your feed secretary if your post is selected.
- Get a chance to have your article featured on Binance Square Official
Need ideas for your post? Visit the topic page #FedRateWatch or the Square Guide on How to Post for Better Reach.
Binance Square Official
·485 Likes
·1.1M views
BitcoinFalls4%
225 views
48 Discussing
OpenAIDiscussesNewFundingAt$1.2TValuation
0 views
0 Discussing