
AWAN BITTER SOUL
7.5k Posts

AWAN BITTER SOUL
 Square Verified+
Soul Over Everything GOOD BYE - X (MAwan909)

NOT Holder
Frequent Trader
3.2 Years
18 Following
36.8K+ Followers
26.0K+ Liked
Posts
All
Quotes
Live
PINNED
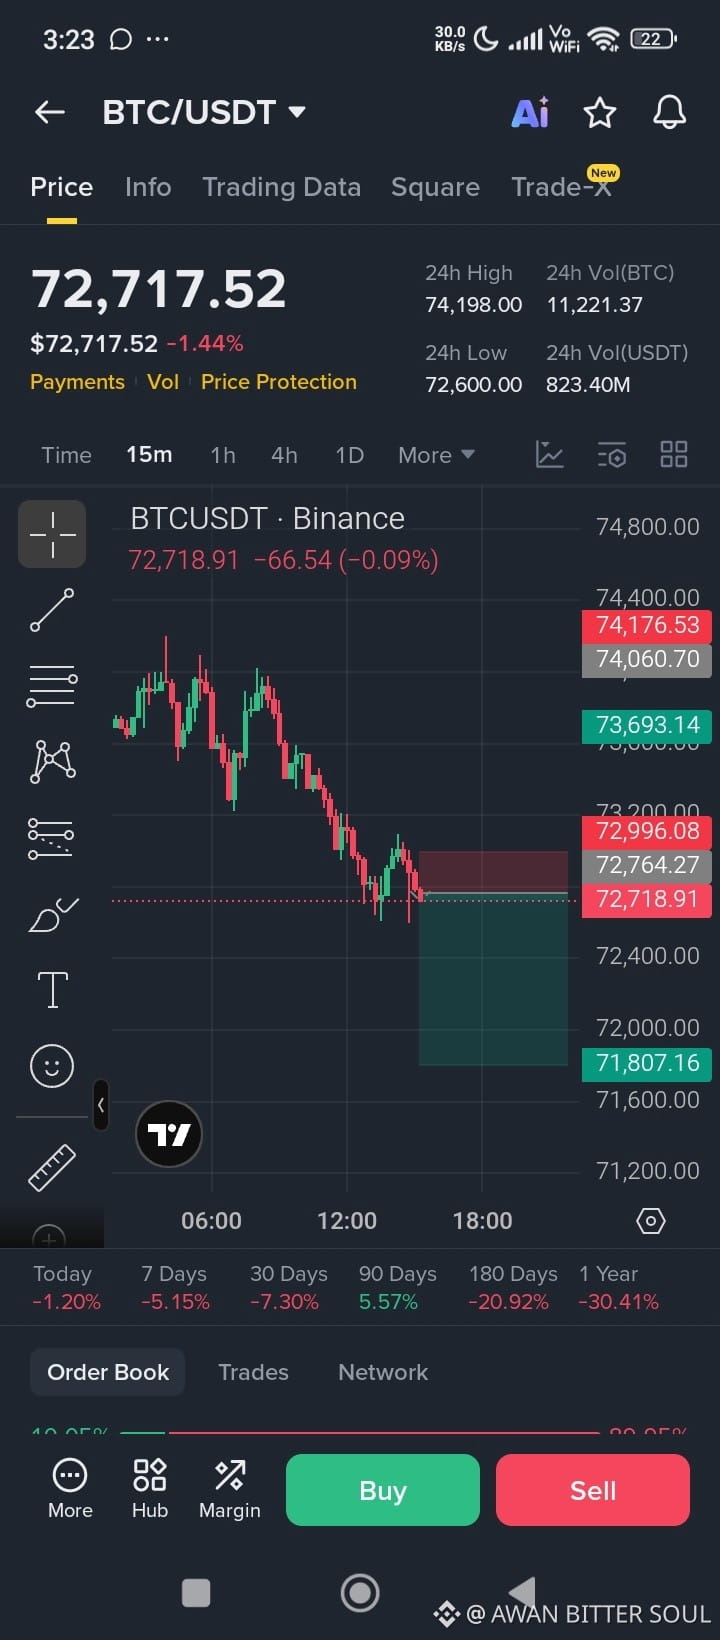
$BTC USDT REJECTION ALERT
SHORT Setup
Entry: 72,720 - 72,800
🎯 TP1: 72,300
🎯 TP2: 65,800
🛑 Stop Loss: 72,996
Price faced rejection from resistance and bearish momentum remains dominant. A move below support can push BTC toward lower targets.
SHORT Setup
Entry: 72,720 - 72,800
🎯 TP1: 72,300
🎯 TP2: 65,800
🛑 Stop Loss: 72,996
Price faced rejection from resistance and bearish momentum remains dominant. A move below support can push BTC toward lower targets.
Soul Over Everything. GOOD BYE AWAN 🫠👋🏽
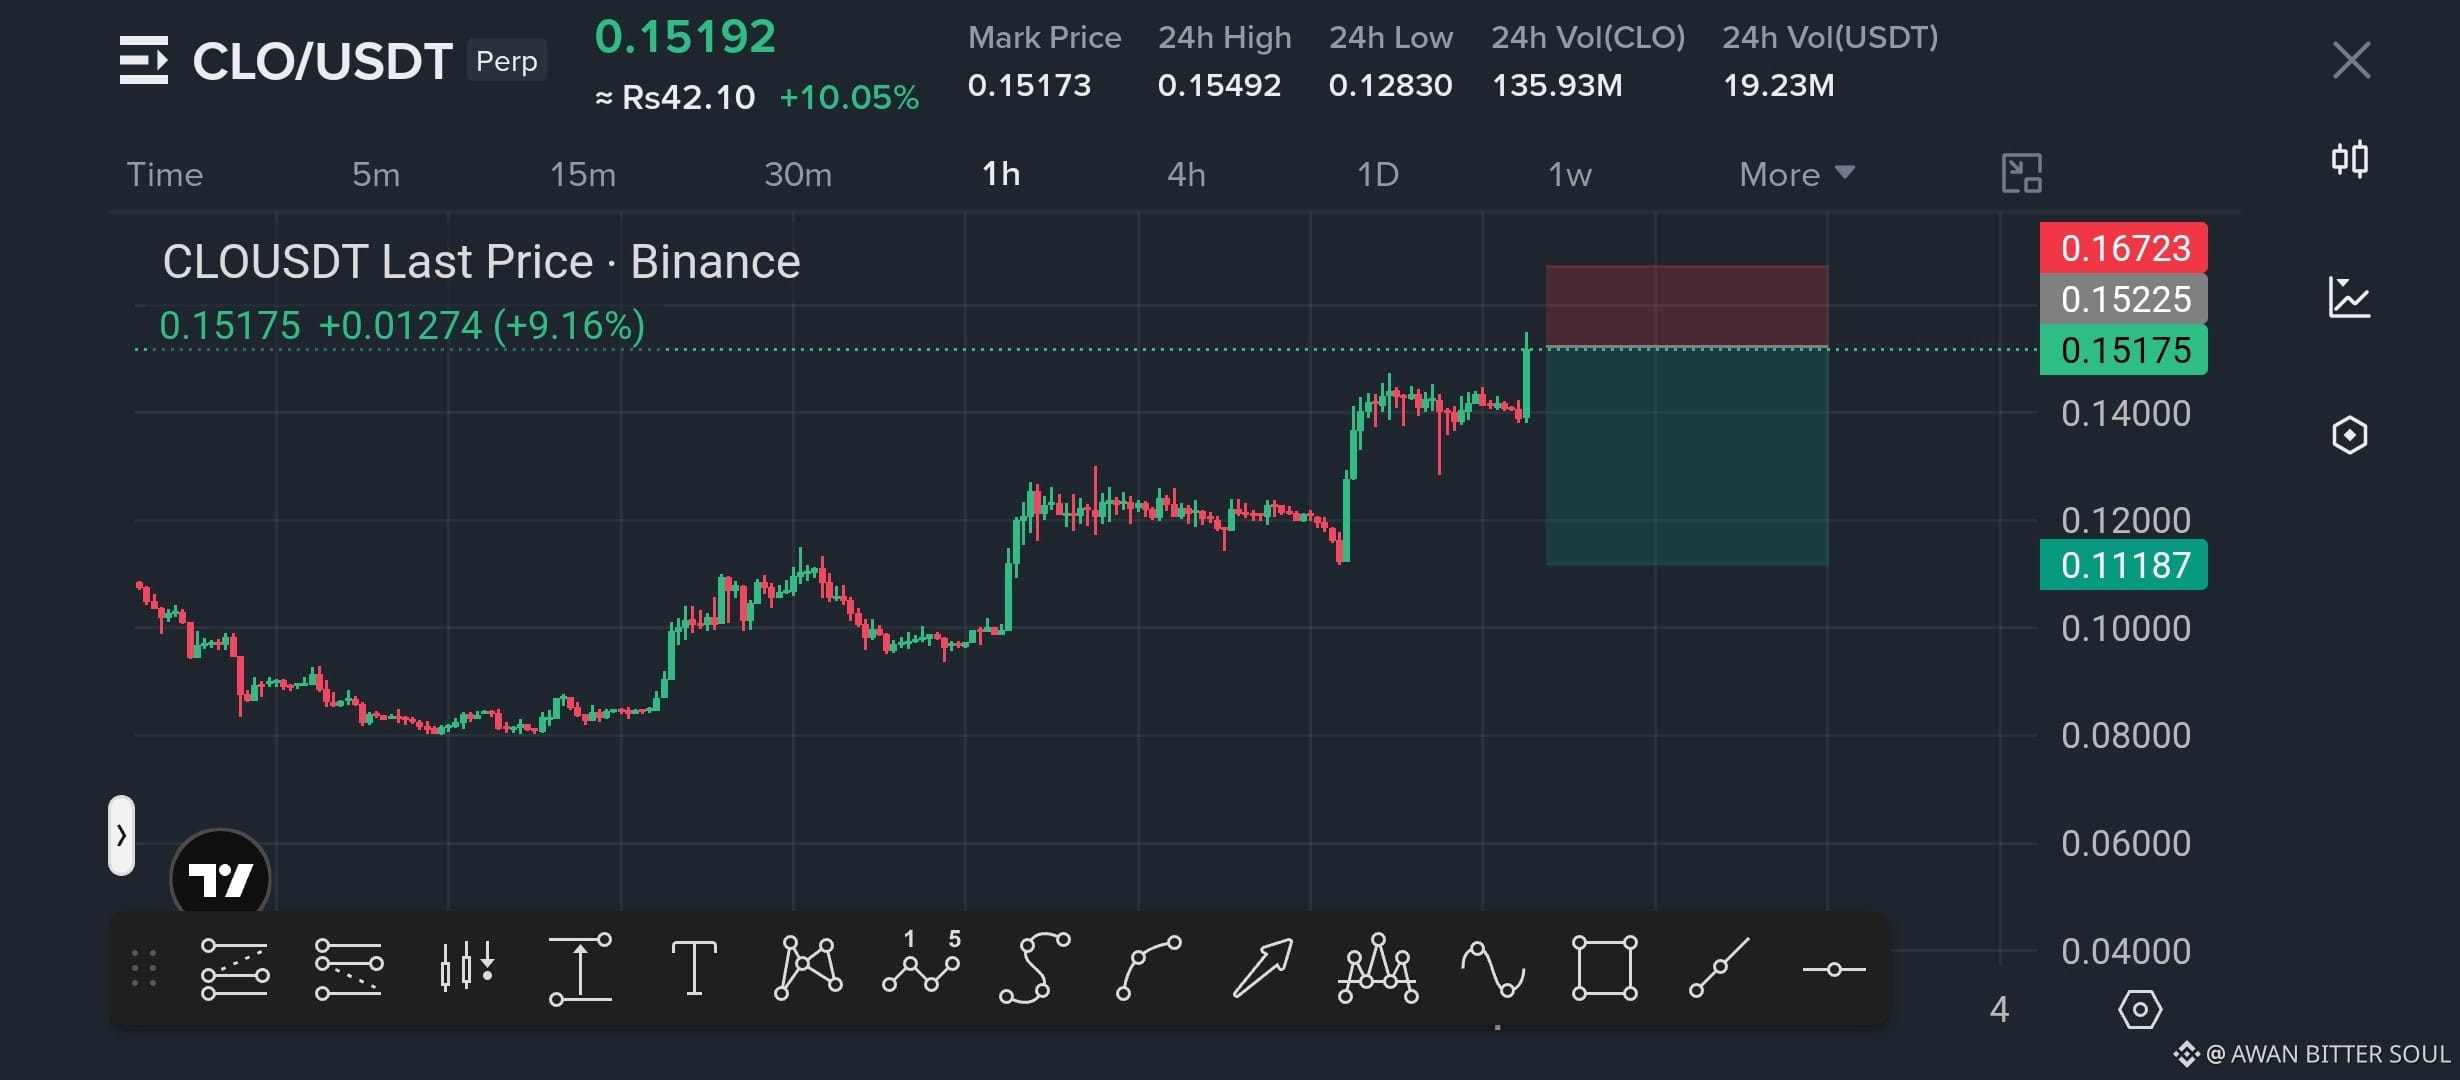
$CLO is pushing into a major resistance zone after a strong rally — rejection here could trigger a sharp pullback.
$CLO — SHORT
Entry: $0.1525–$0.1530
SL: $0.1672
TP1: $0.1450
TP2: $0.1350
TP3: $0.1200
Why? Extended move + resistance rejection setup.
Debate: Will $CLO lose $0.145 next?
Click here to Trade 👇️
$CLO — SHORT
Entry: $0.1525–$0.1530
SL: $0.1672
TP1: $0.1450
TP2: $0.1350
TP3: $0.1200
Why? Extended move + resistance rejection setup.
Debate: Will $CLO lose $0.145 next?
Click here to Trade 👇️
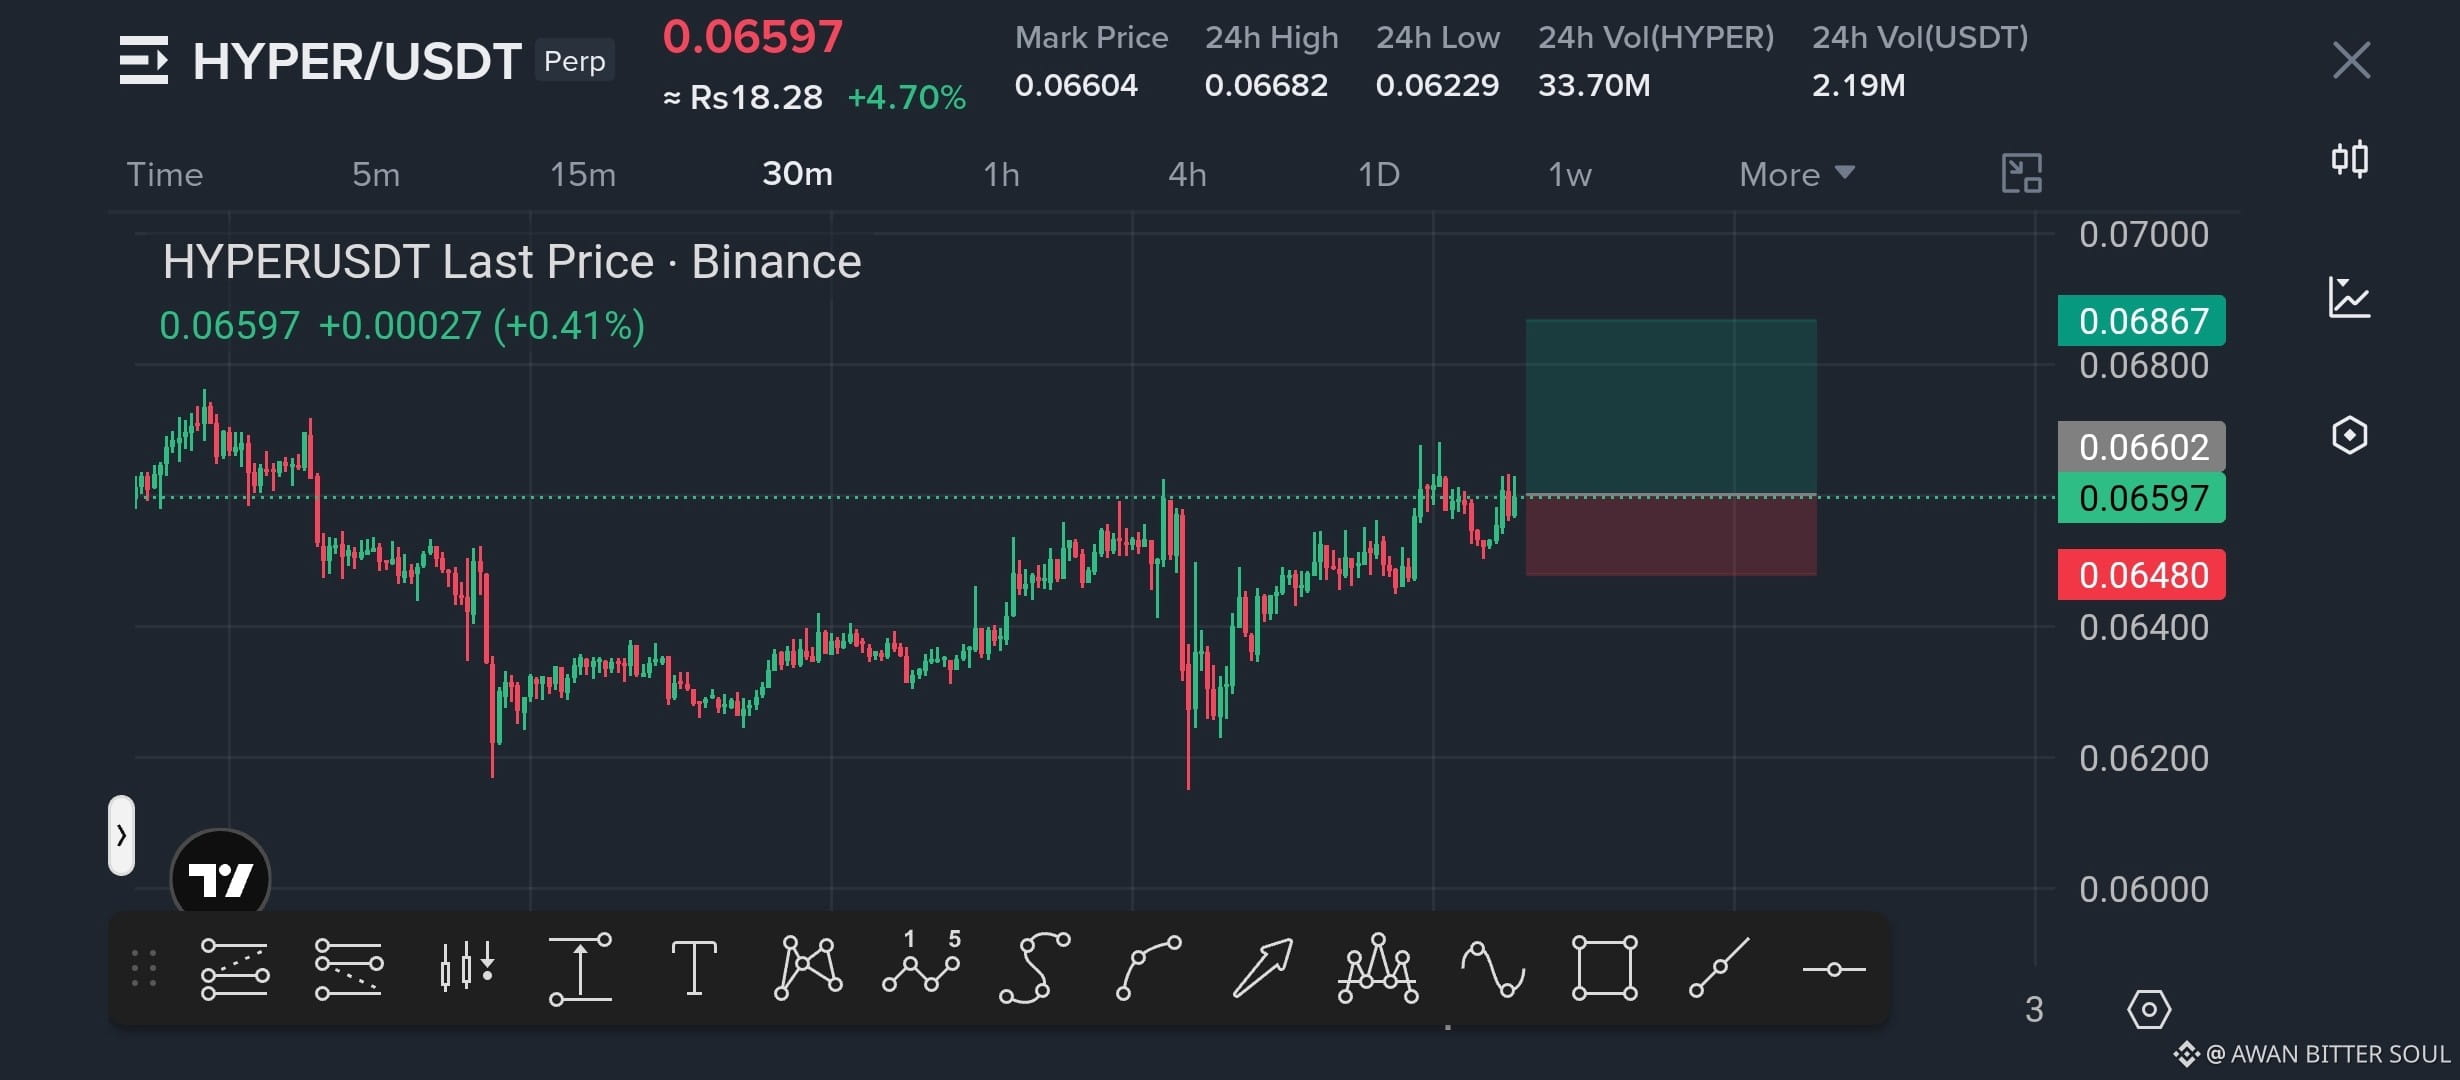
$HYPER is holding the breakout area with bullish momentum building on the 30m chart.
$HYPER — LONG
Entry: $0.0658–$0.0660
SL: $0.0648
TP1: $0.0668
TP2: $0.0677
TP3: $0.06867
Why? Higher lows + strong recovery favor continuation toward resistance.
Debate: Can $HYPER break $0.0686?
Click here to Trade 👇️
$HYPER — LONG
Entry: $0.0658–$0.0660
SL: $0.0648
TP1: $0.0668
TP2: $0.0677
TP3: $0.06867
Why? Higher lows + strong recovery favor continuation toward resistance.
Debate: Can $HYPER break $0.0686?
Click here to Trade 👇️
🚨 $BTC FIRST TP HIT
CONGRATULATIONS! 🚨
Congratulations @AWAN BITTER SOUL Family — our $BTC LONG signal delivered the first target perfectly, with $79K touched! 🎯
TP1: $79,400 ✅ HIT
👉 Always close 50% at the first TP and secure your profit.
👉 Keep the remaining 50% running only while BTC holds the bullish structure.
Next Move:
$80,500 → $81,828 remain the next upside targets. If BTC holds above the $78K area, the continuation setup stays valid; otherwise, protect your remaining position.
Always risk your own capital & trade with proper risk management.
Congratulations, @AWAN BITTER SOUL family! Another target secured. 🏆
CONGRATULATIONS! 🚨
Congratulations @AWAN BITTER SOUL Family — our $BTC LONG signal delivered the first target perfectly, with $79K touched! 🎯
TP1: $79,400 ✅ HIT
👉 Always close 50% at the first TP and secure your profit.
👉 Keep the remaining 50% running only while BTC holds the bullish structure.
Next Move:
$80,500 → $81,828 remain the next upside targets. If BTC holds above the $78K area, the continuation setup stays valid; otherwise, protect your remaining position.
Always risk your own capital & trade with proper risk management.
Congratulations, @AWAN BITTER SOUL family! Another target secured. 🏆
AWAN BITTER SOUL
·
--
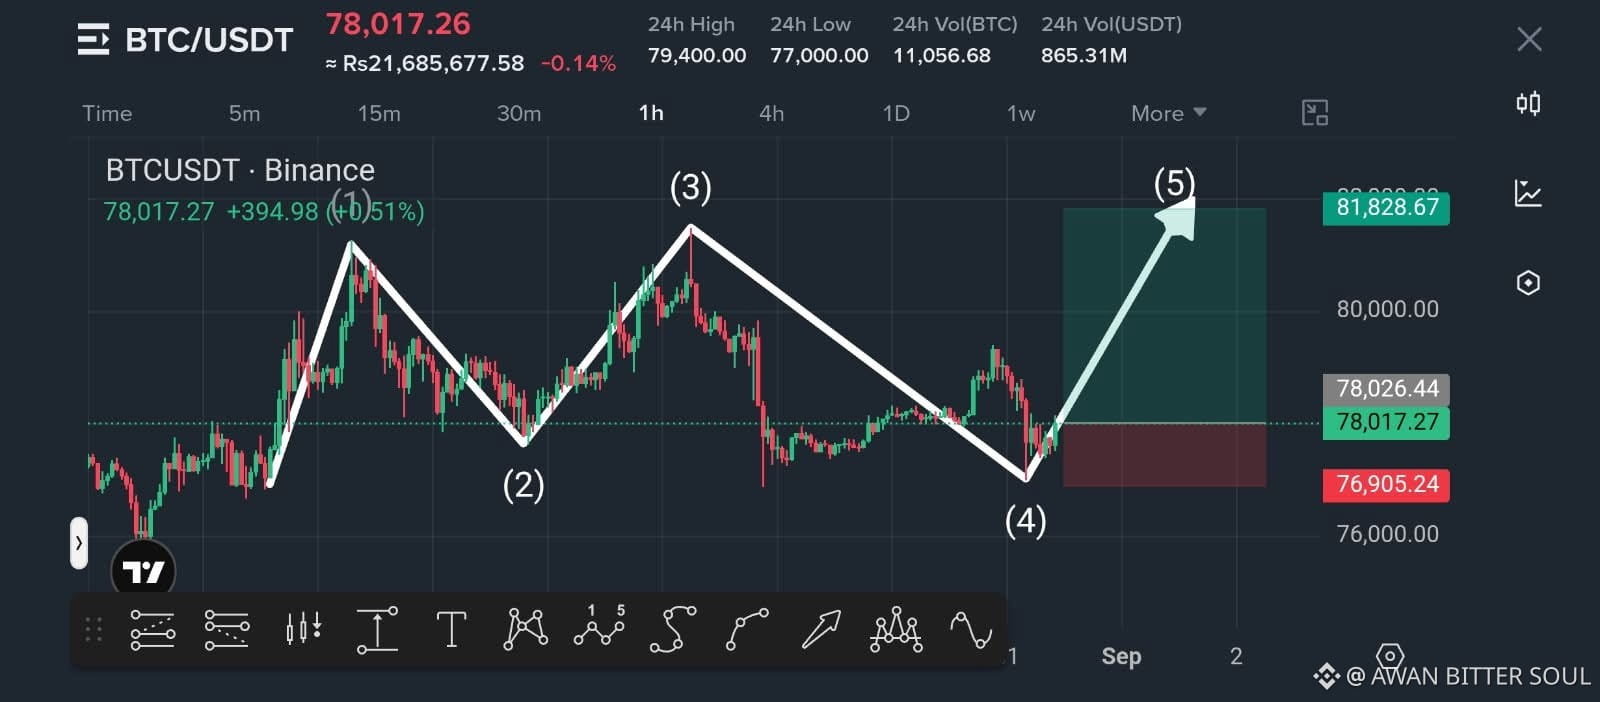
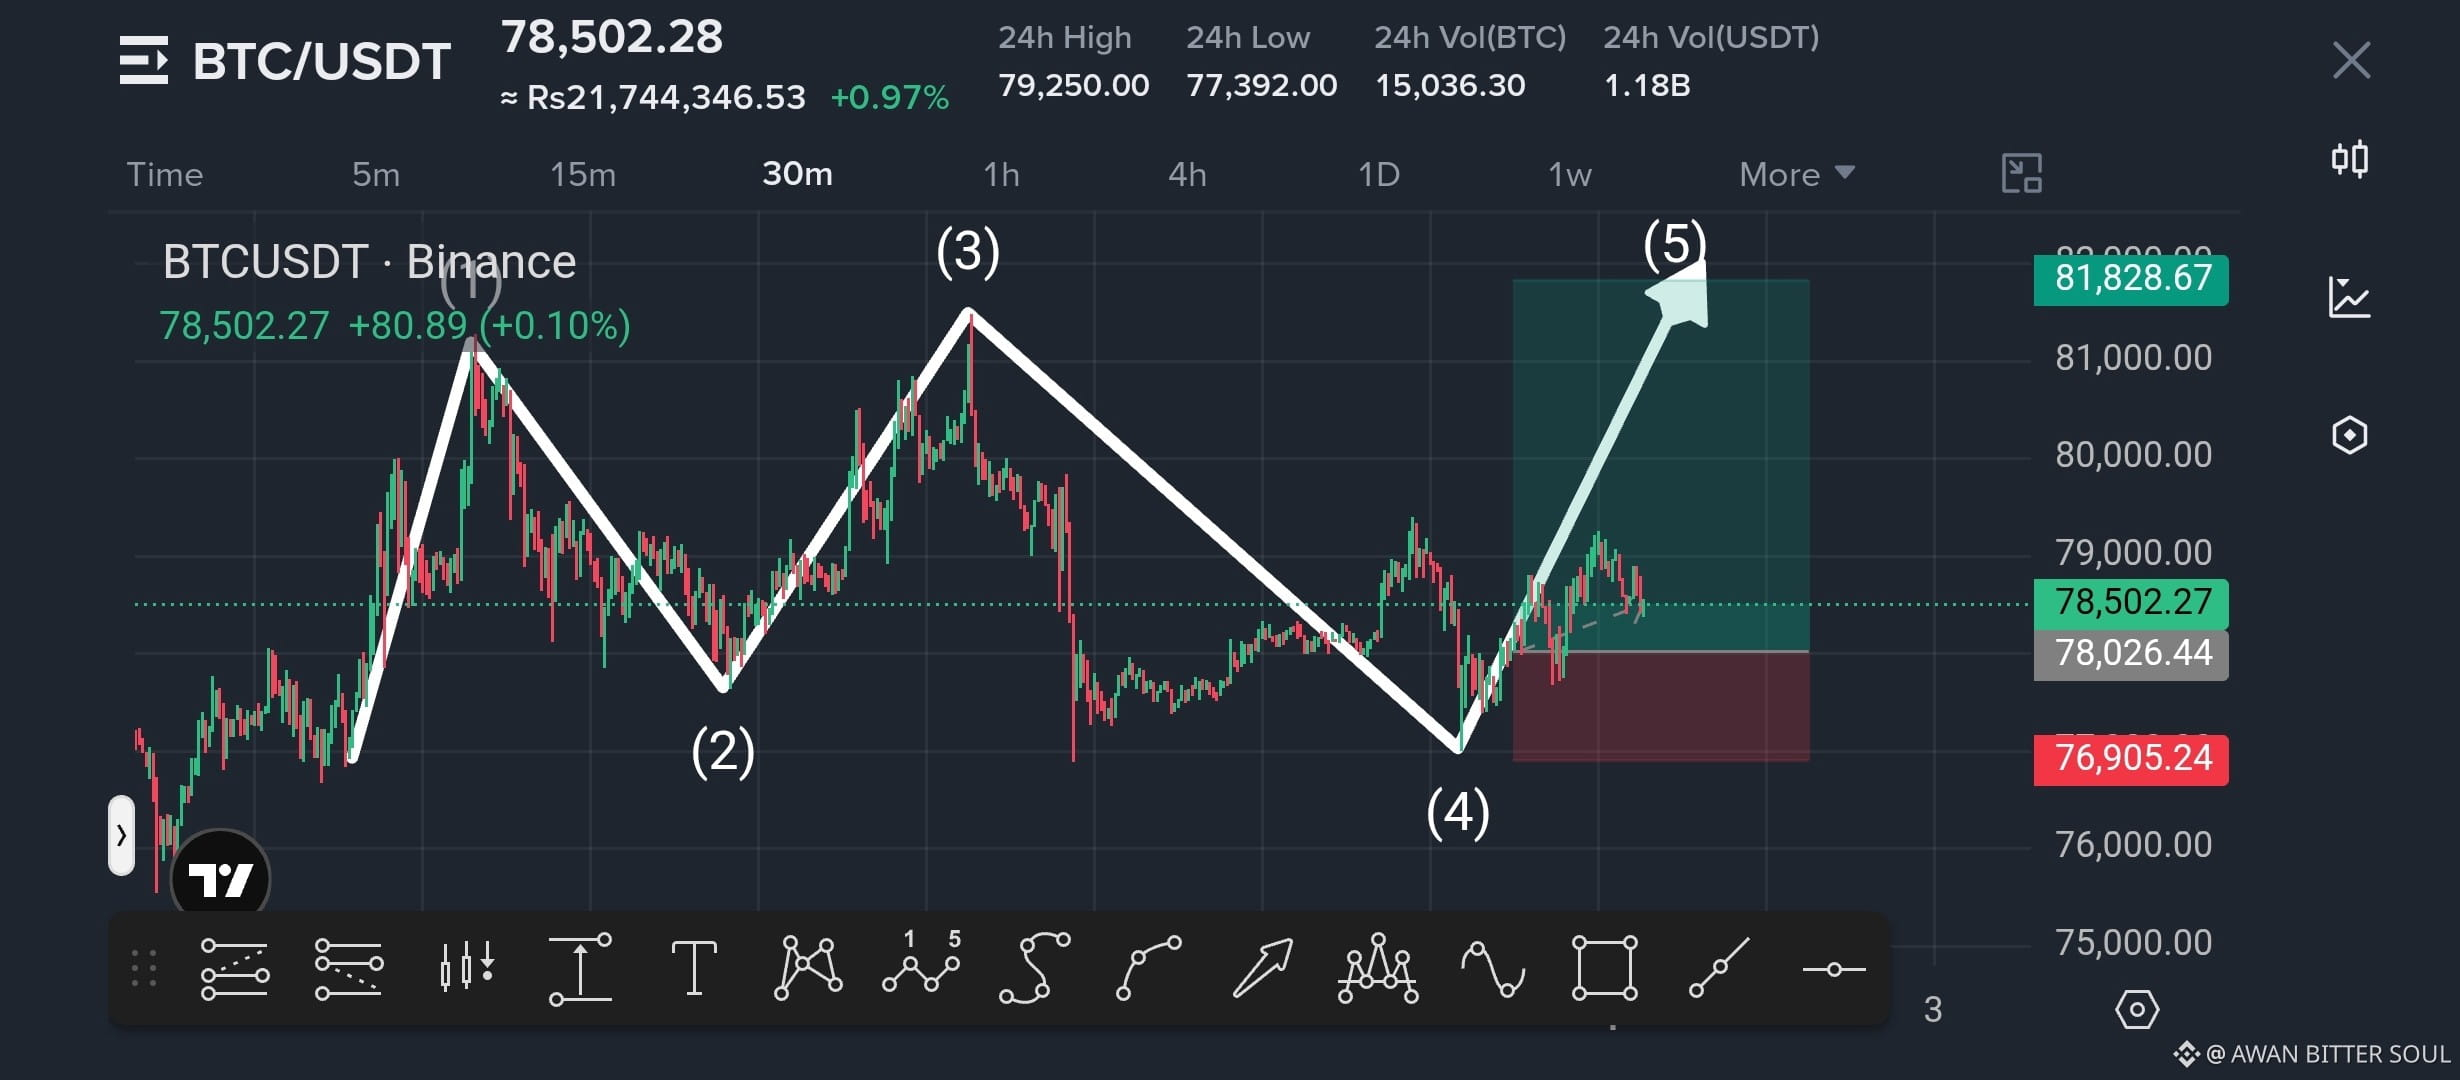
The pullback may have done its job — and the chart is now showing the kind of structure traders watch before a larger leg higher.
$BTC — LONG
Entry: $77,700–$77,950
TP1: $79,400
TP2: $80,500
TP3: $81,828
SL: $76,905
Why this setup? Wave 4 appears to have completed near support, while price is reclaiming the $78K area. The marked structure points toward a potential Wave 5 continuation, with upside liquidity adding fuel.
Invalidation: a clean break below $76,905 weakens this bullish structure.
Would you ride this long toward $81.8K?
$BTC — LONG
Entry: $77,700–$77,950
TP1: $79,400
TP2: $80,500
TP3: $81,828
SL: $76,905
Why this setup? Wave 4 appears to have completed near support, while price is reclaiming the $78K area. The marked structure points toward a potential Wave 5 continuation, with upside liquidity adding fuel.
Invalidation: a clean break below $76,905 weakens this bullish structure.
Would you ride this long toward $81.8K?
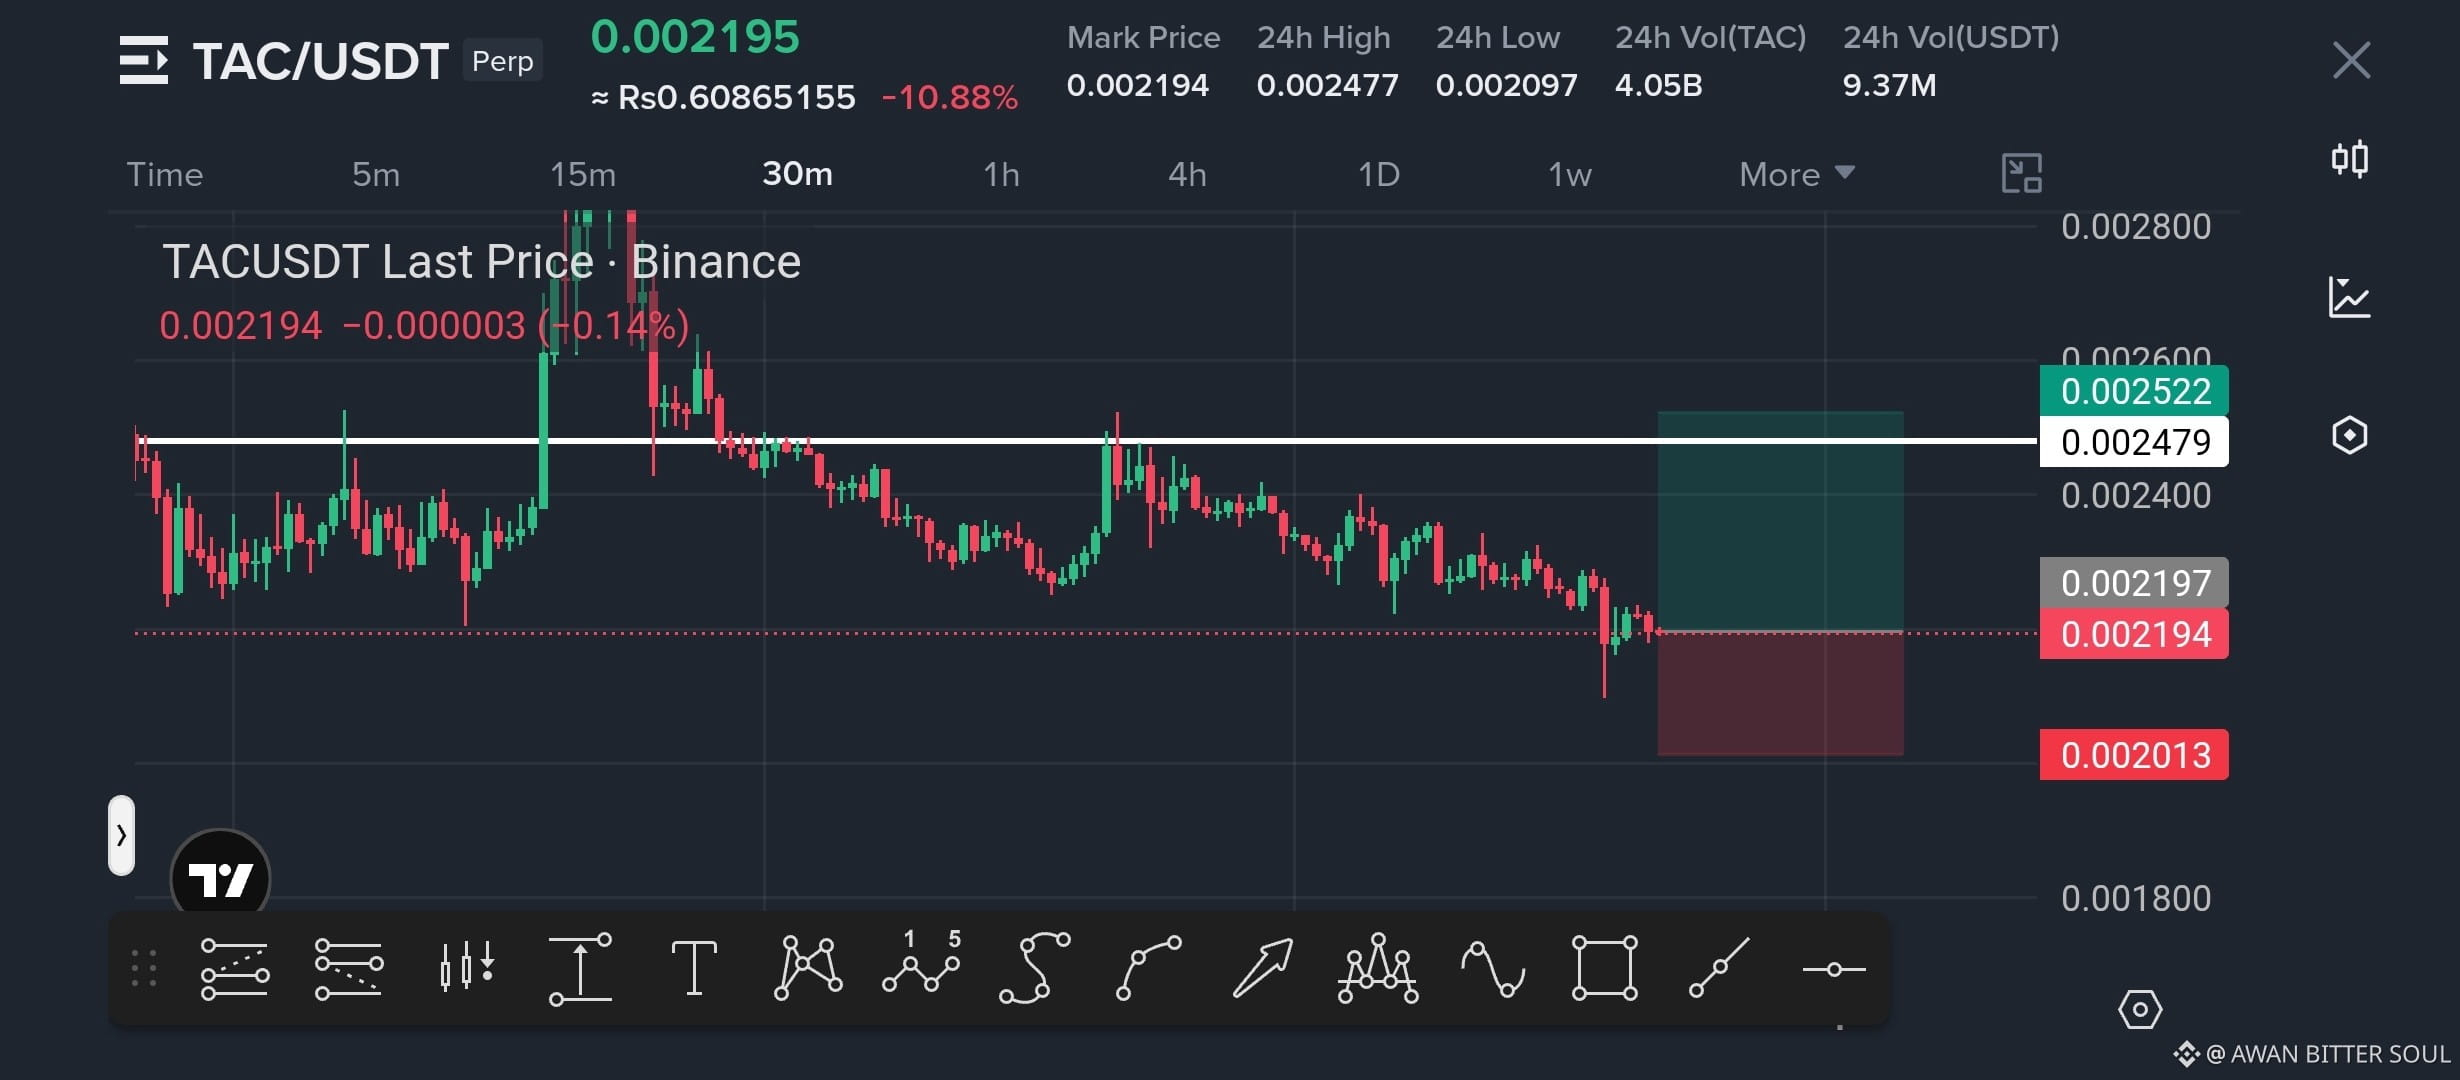
🚨🚨 $TAC RE-ENTRY LONG ALERT 🚨🚨
📌 Trade Setup: LONG
Entry: 0.00219–0.00222
🔥 TP1 ➜ 0.00230
🔥 TP2 ➜ 0.00240
🔥 TP3 ➜ 0.00252
❌ SL ➜ 0.00201
$TAC is showing a potential bounce zone after the sell-off. Reclaim 0.00220 and bulls could push higher.
Trade Here On $TAC 👇
📌 Trade Setup: LONG
Entry: 0.00219–0.00222
🔥 TP1 ➜ 0.00230
🔥 TP2 ➜ 0.00240
🔥 TP3 ➜ 0.00252
❌ SL ➜ 0.00201
$TAC is showing a potential bounce zone after the sell-off. Reclaim 0.00220 and bulls could push higher.
Trade Here On $TAC 👇
🎯 CONGRATULATIONS, TRADERS! 🎯
$AXL LONG — ALL TP TARGETS HIT! ✅🔥
TP1 ✔️
TP2 ✔️
TP3 ✔️
Another clean setup, another successful trade.
Big congratulations to everyone who followed the signal and secured profits! 💰📈
More setups coming — stay ready!
$AXL LONG — ALL TP TARGETS HIT! ✅🔥
TP1 ✔️
TP2 ✔️
TP3 ✔️
Another clean setup, another successful trade.
Big congratulations to everyone who followed the signal and secured profits! 💰📈
More setups coming — stay ready!
AWAN BITTER SOUL
·
--
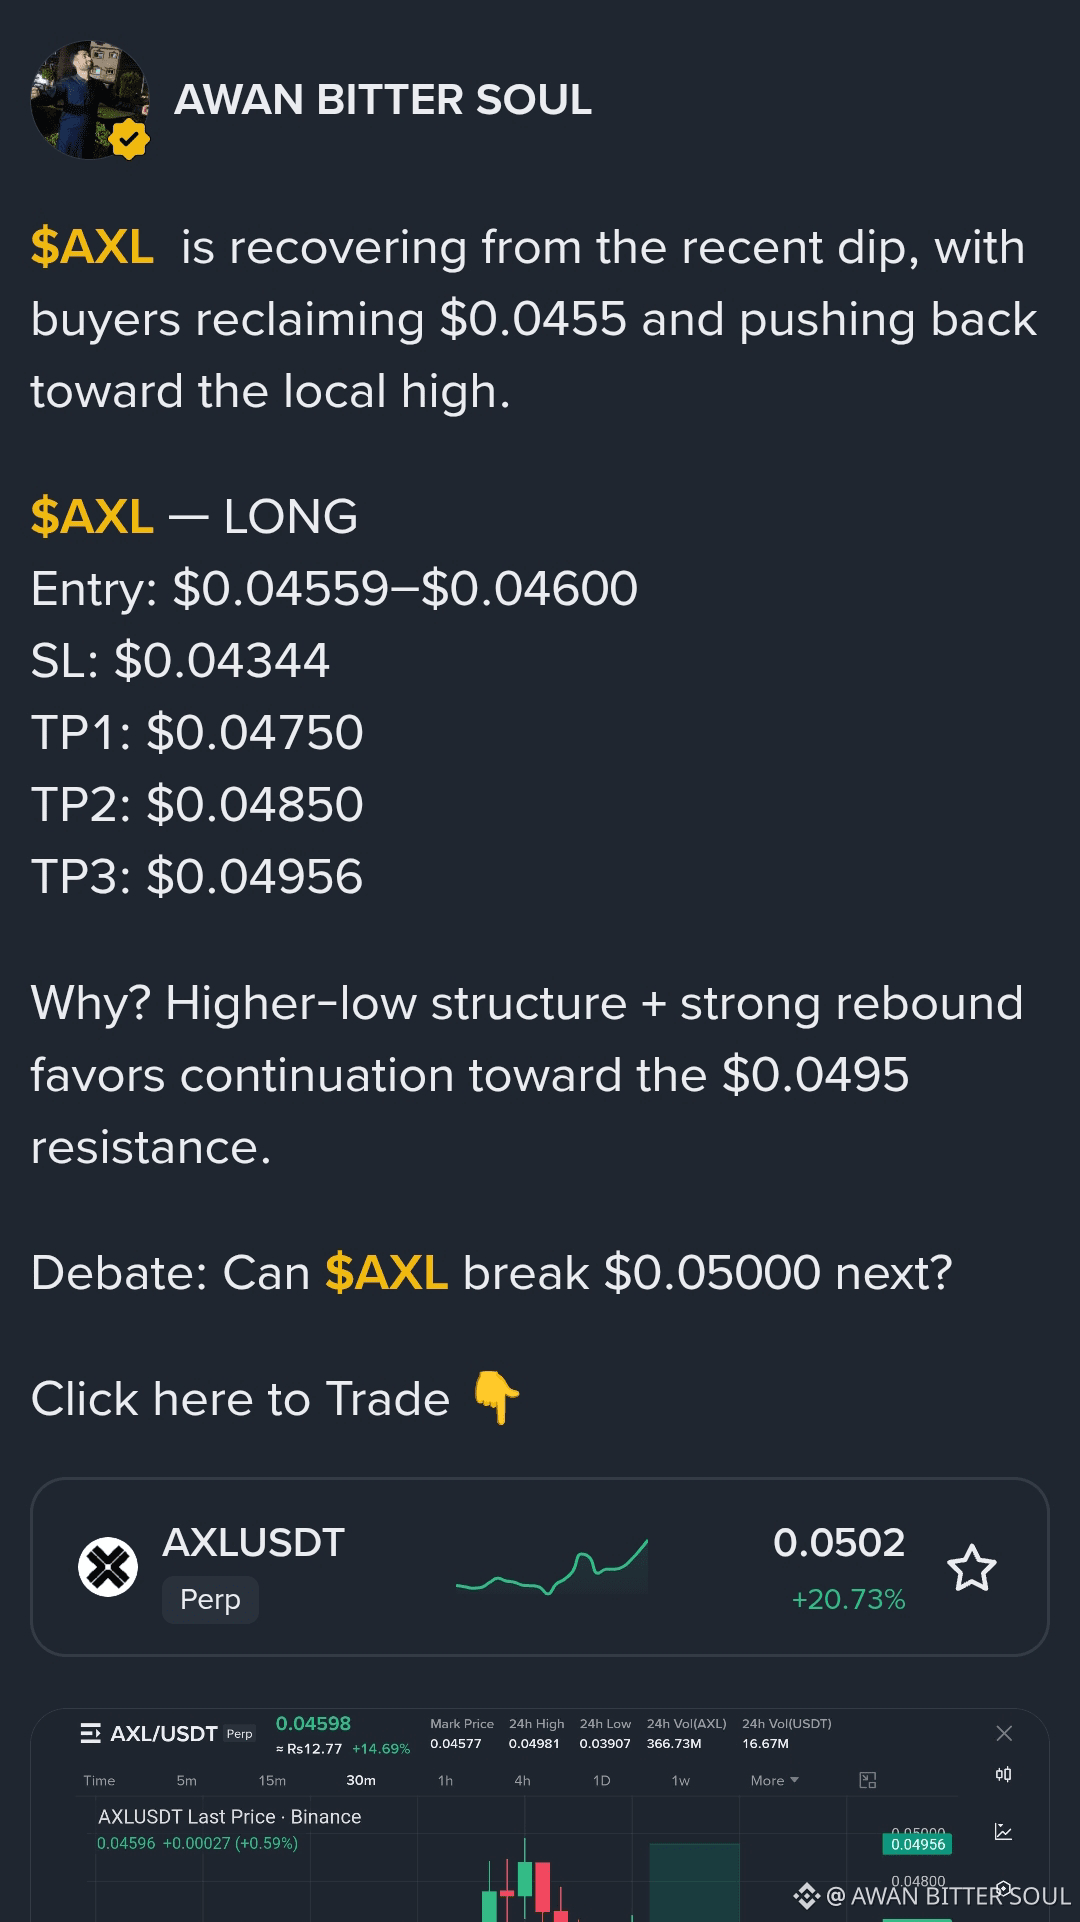
$AXL is recovering from the recent dip, with buyers reclaiming $0.0455 and pushing back toward the local high.
$AXL — LONG
Entry: $0.04559–$0.04600
SL: $0.04344
TP1: $0.04750
TP2: $0.04850
TP3: $0.04956
Why? Higher-low structure + strong rebound favors continuation toward the $0.0495 resistance.
Debate: Can $AXL break $0.05000 next?
Click here to Trade 👇️
$AXL — LONG
Entry: $0.04559–$0.04600
SL: $0.04344
TP1: $0.04750
TP2: $0.04850
TP3: $0.04956
Why? Higher-low structure + strong rebound favors continuation toward the $0.0495 resistance.
Debate: Can $AXL break $0.05000 next?
Click here to Trade 👇️
🚨 $0G — ALL TARGETS HIT! 🚨
$0G LONG delivered a perfect TP run! 🔥
TP1: $0.2010 ✅
TP2: $0.2070 ✅
TP3: $0.2130 ✅
All 3 targets hit successfully. Huge congratulations to everyone who followed the setup and stayed disciplined!
Clean analysis → Clean execution → Full profit. 🏆📈
$0G LONG delivered a perfect TP run! 🔥
TP1: $0.2010 ✅
TP2: $0.2070 ✅
TP3: $0.2130 ✅
All 3 targets hit successfully. Huge congratulations to everyone who followed the setup and stayed disciplined!
Clean analysis → Clean execution → Full profit. 🏆📈
AWAN BITTER SOUL
·
--
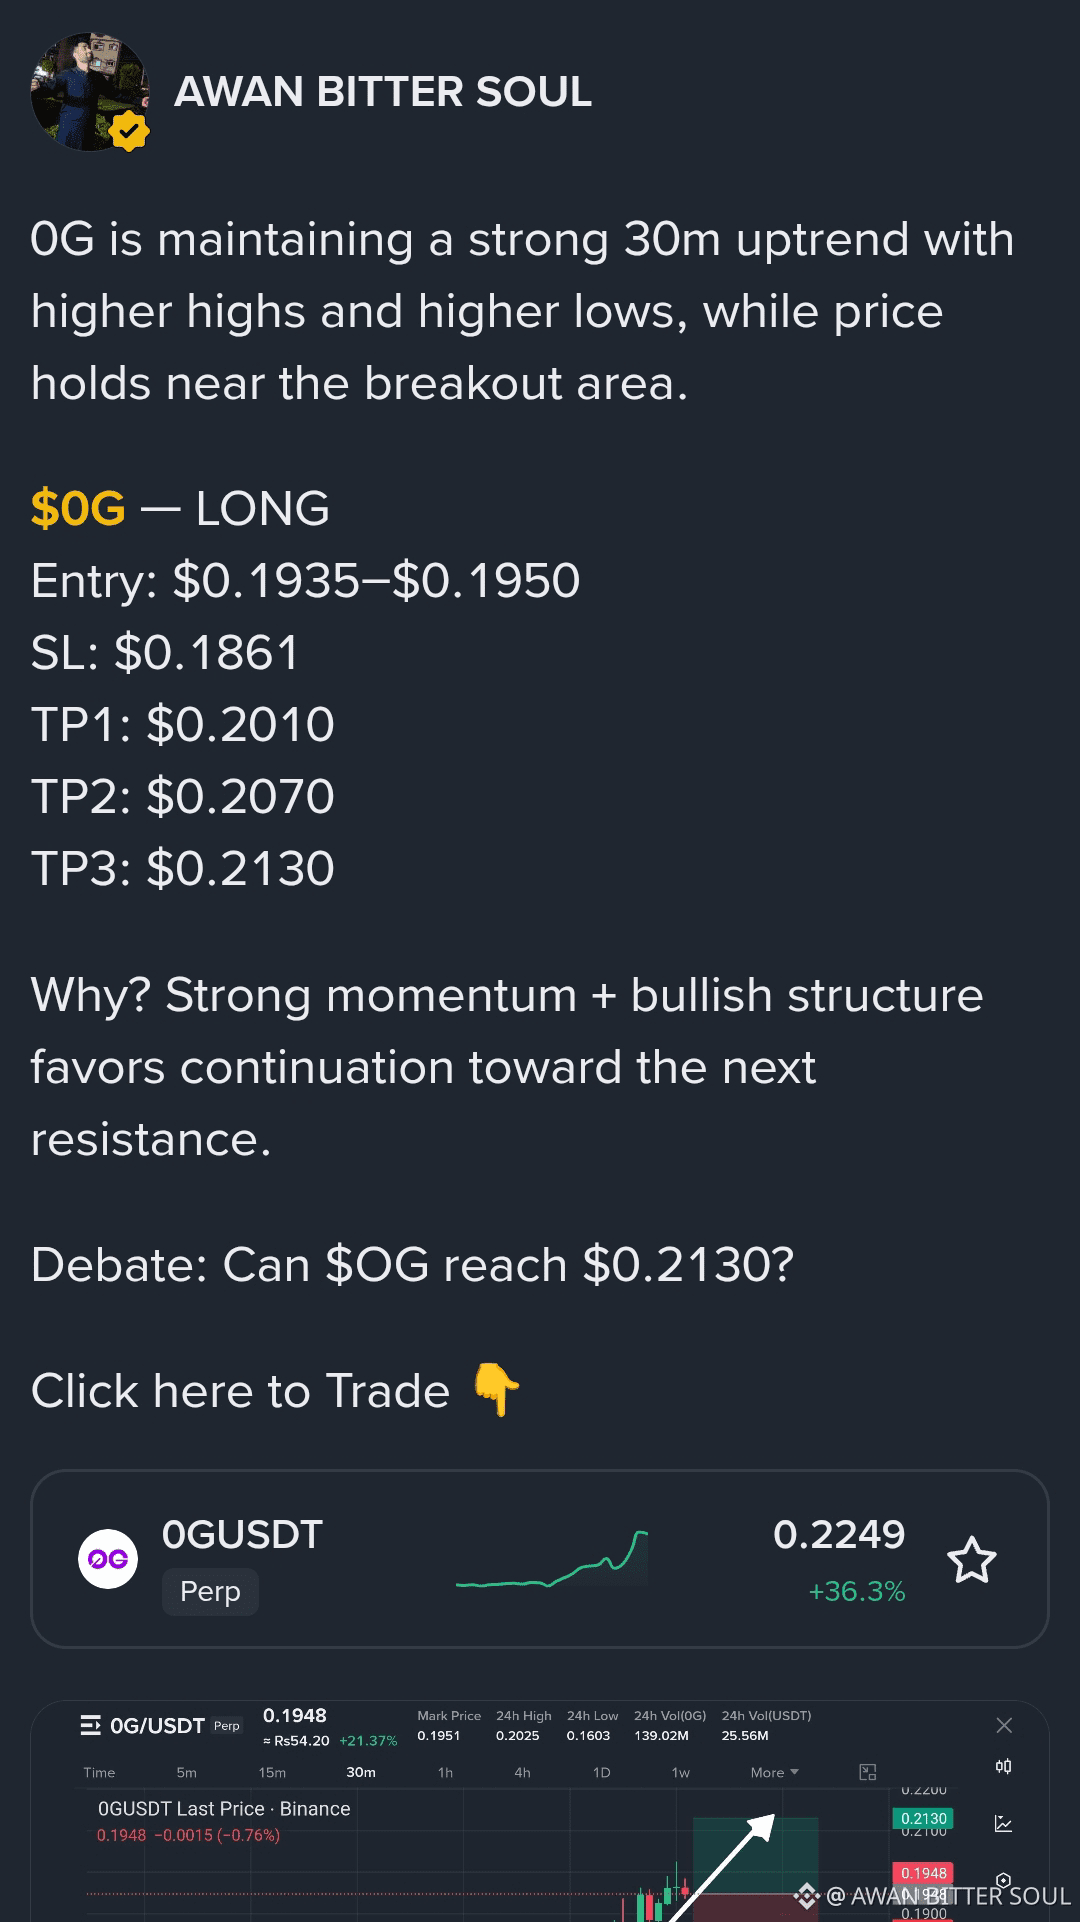
0G is maintaining a strong 30m uptrend with higher highs and higher lows, while price holds near the breakout area.
$0G — LONG
Entry: $0.1935–$0.1950
SL: $0.1861
TP1: $0.2010
TP2: $0.2070
TP3: $0.2130
Why? Strong momentum + bullish structure favors continuation toward the next resistance.
Debate: Can $OG reach $0.2130?
Click here to Trade 👇️
$0G — LONG
Entry: $0.1935–$0.1950
SL: $0.1861
TP1: $0.2010
TP2: $0.2070
TP3: $0.2130
Why? Strong momentum + bullish structure favors continuation toward the next resistance.
Debate: Can $OG reach $0.2130?
Click here to Trade 👇️
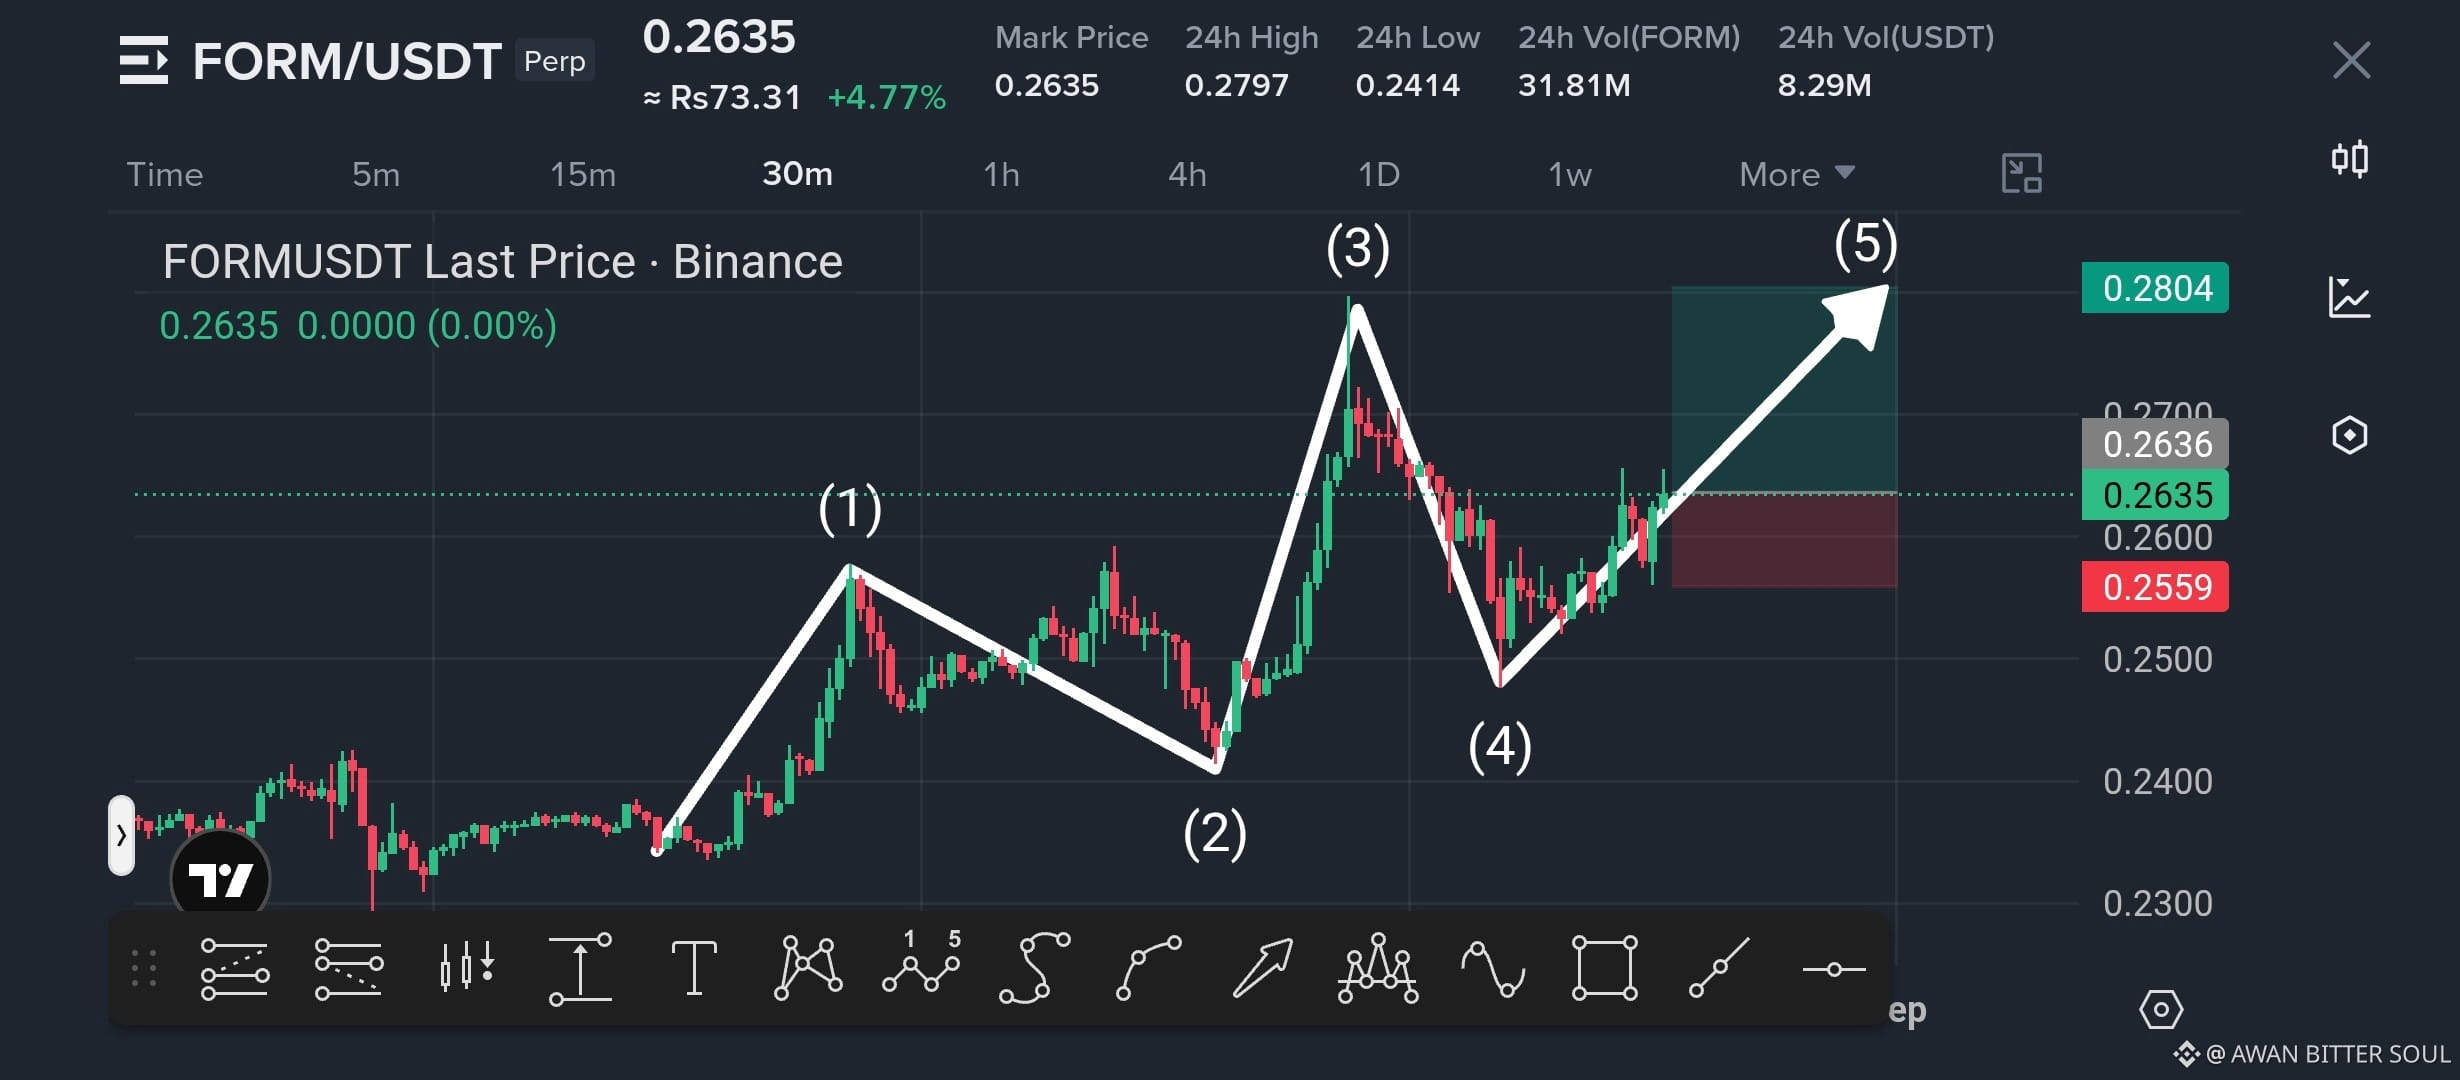
$FORM is completing a bullish 5-wave structure, with wave (4) holding and price pushing toward the next resistance zone.
$FORM — LONG
Entry: $0.2620–$0.2640
SL: $0.2559
TP1: $0.2700
TP2: $0.2760
TP3: $0.2804
Why? Higher lows and strong recovery from wave (4) support continuation.
Debate: Can $FORM reach $0.2804?
Click here to Trade 👇️
$FORM — LONG
Entry: $0.2620–$0.2640
SL: $0.2559
TP1: $0.2700
TP2: $0.2760
TP3: $0.2804
Why? Higher lows and strong recovery from wave (4) support continuation.
Debate: Can $FORM reach $0.2804?
Click here to Trade 👇️
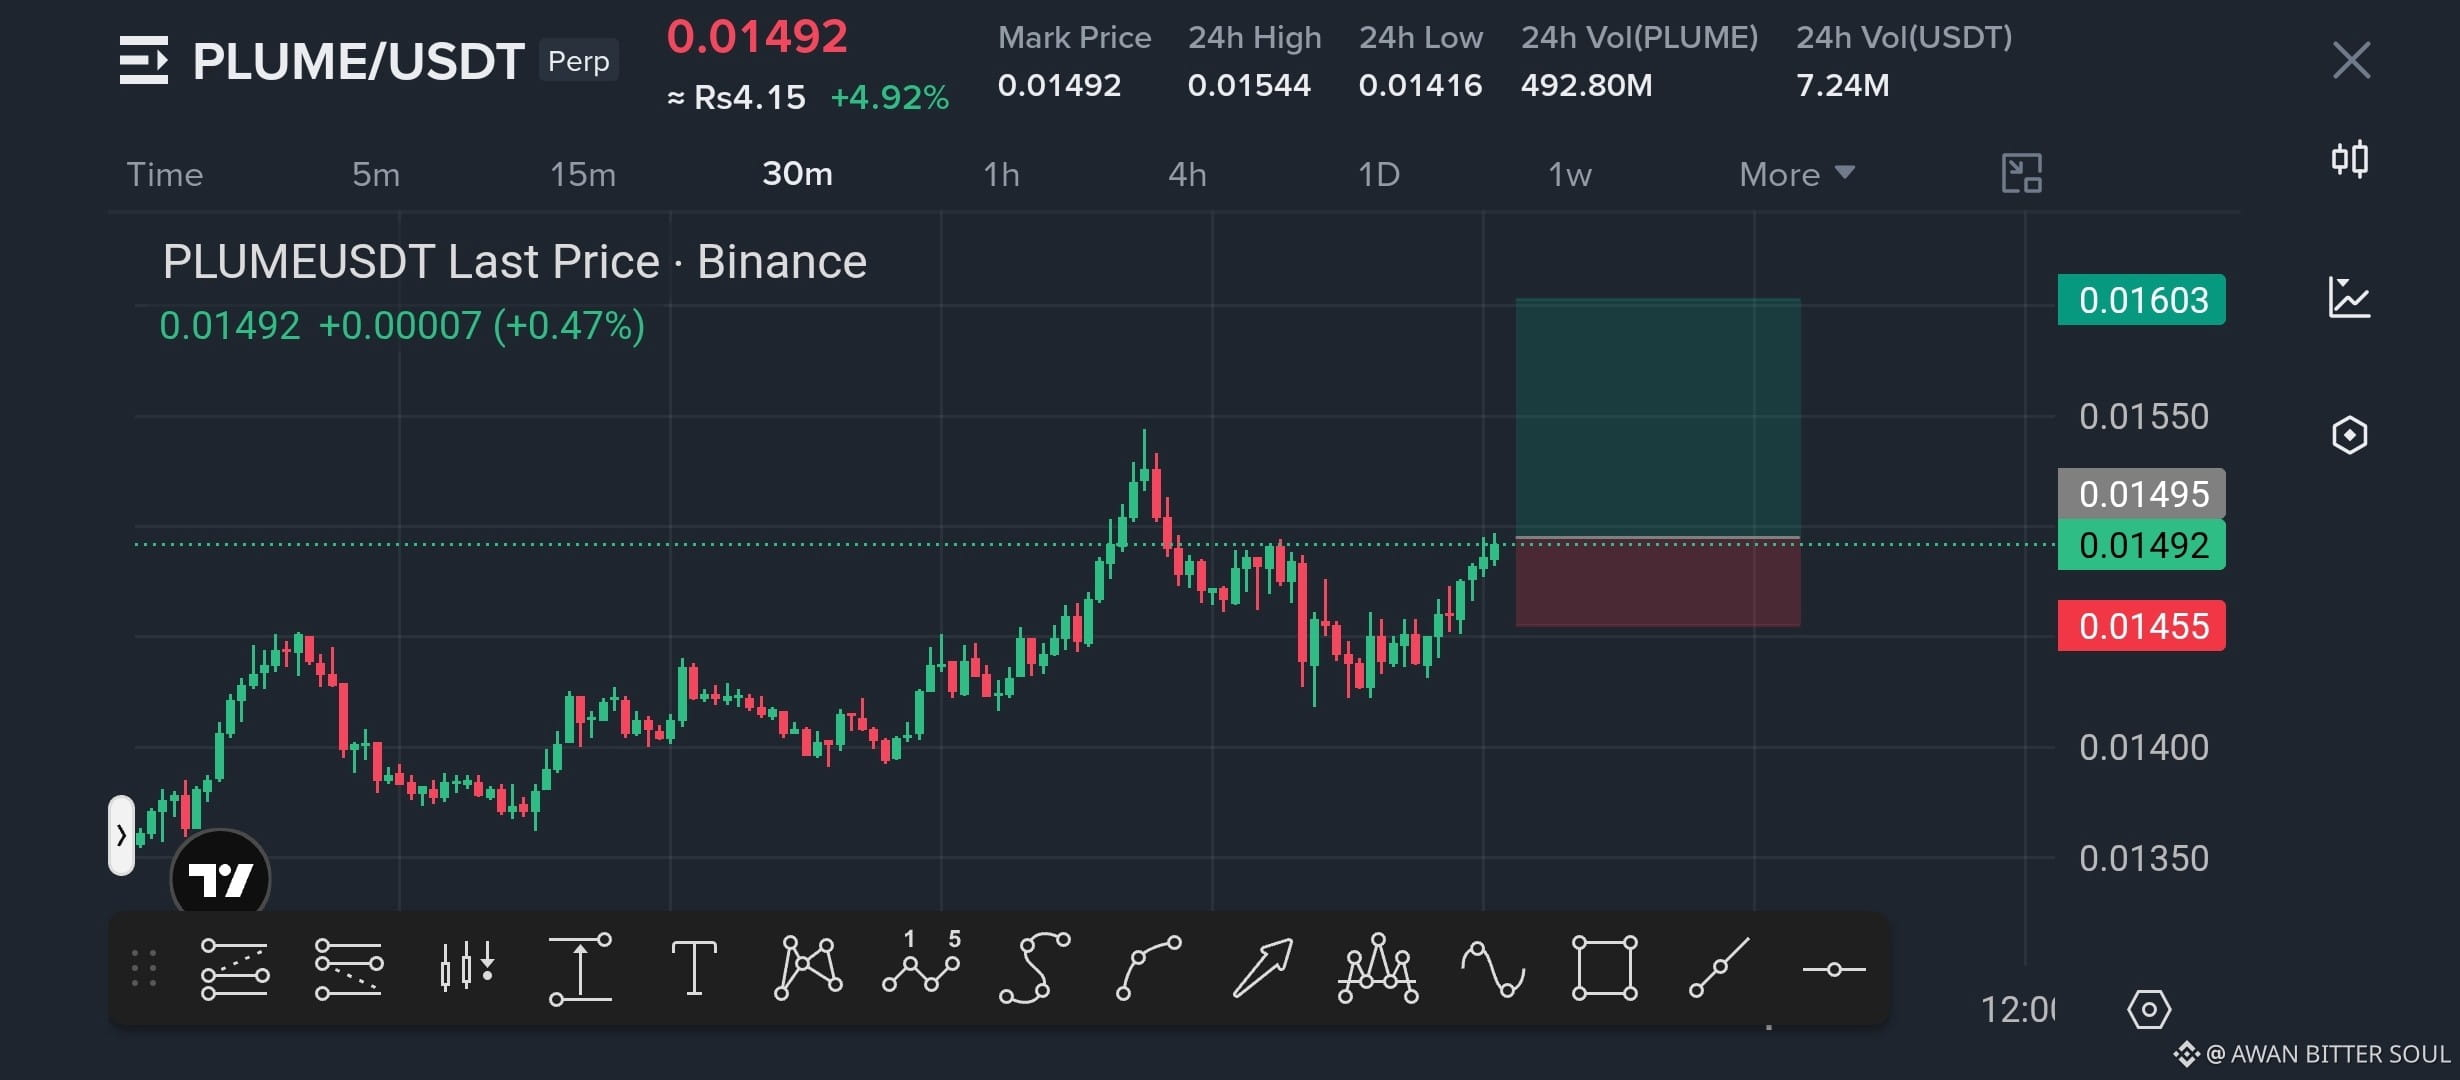
$PLUME is reclaiming the $0.0149 area with higher lows, suggesting buyers are preparing for another push higher.
$PLUME — LONG
Entry: $0.01490–$0.01496
SL: $0.01455
TP1: $0.01544
TP2: $0.01570
TP3: $0.01603
Why? Bullish structure with momentum building above support.
Debate: Can $PLUME break $0.01544?
Click here to Trade 👇️
$PLUME — LONG
Entry: $0.01490–$0.01496
SL: $0.01455
TP1: $0.01544
TP2: $0.01570
TP3: $0.01603
Why? Bullish structure with momentum building above support.
Debate: Can $PLUME break $0.01544?
Click here to Trade 👇️
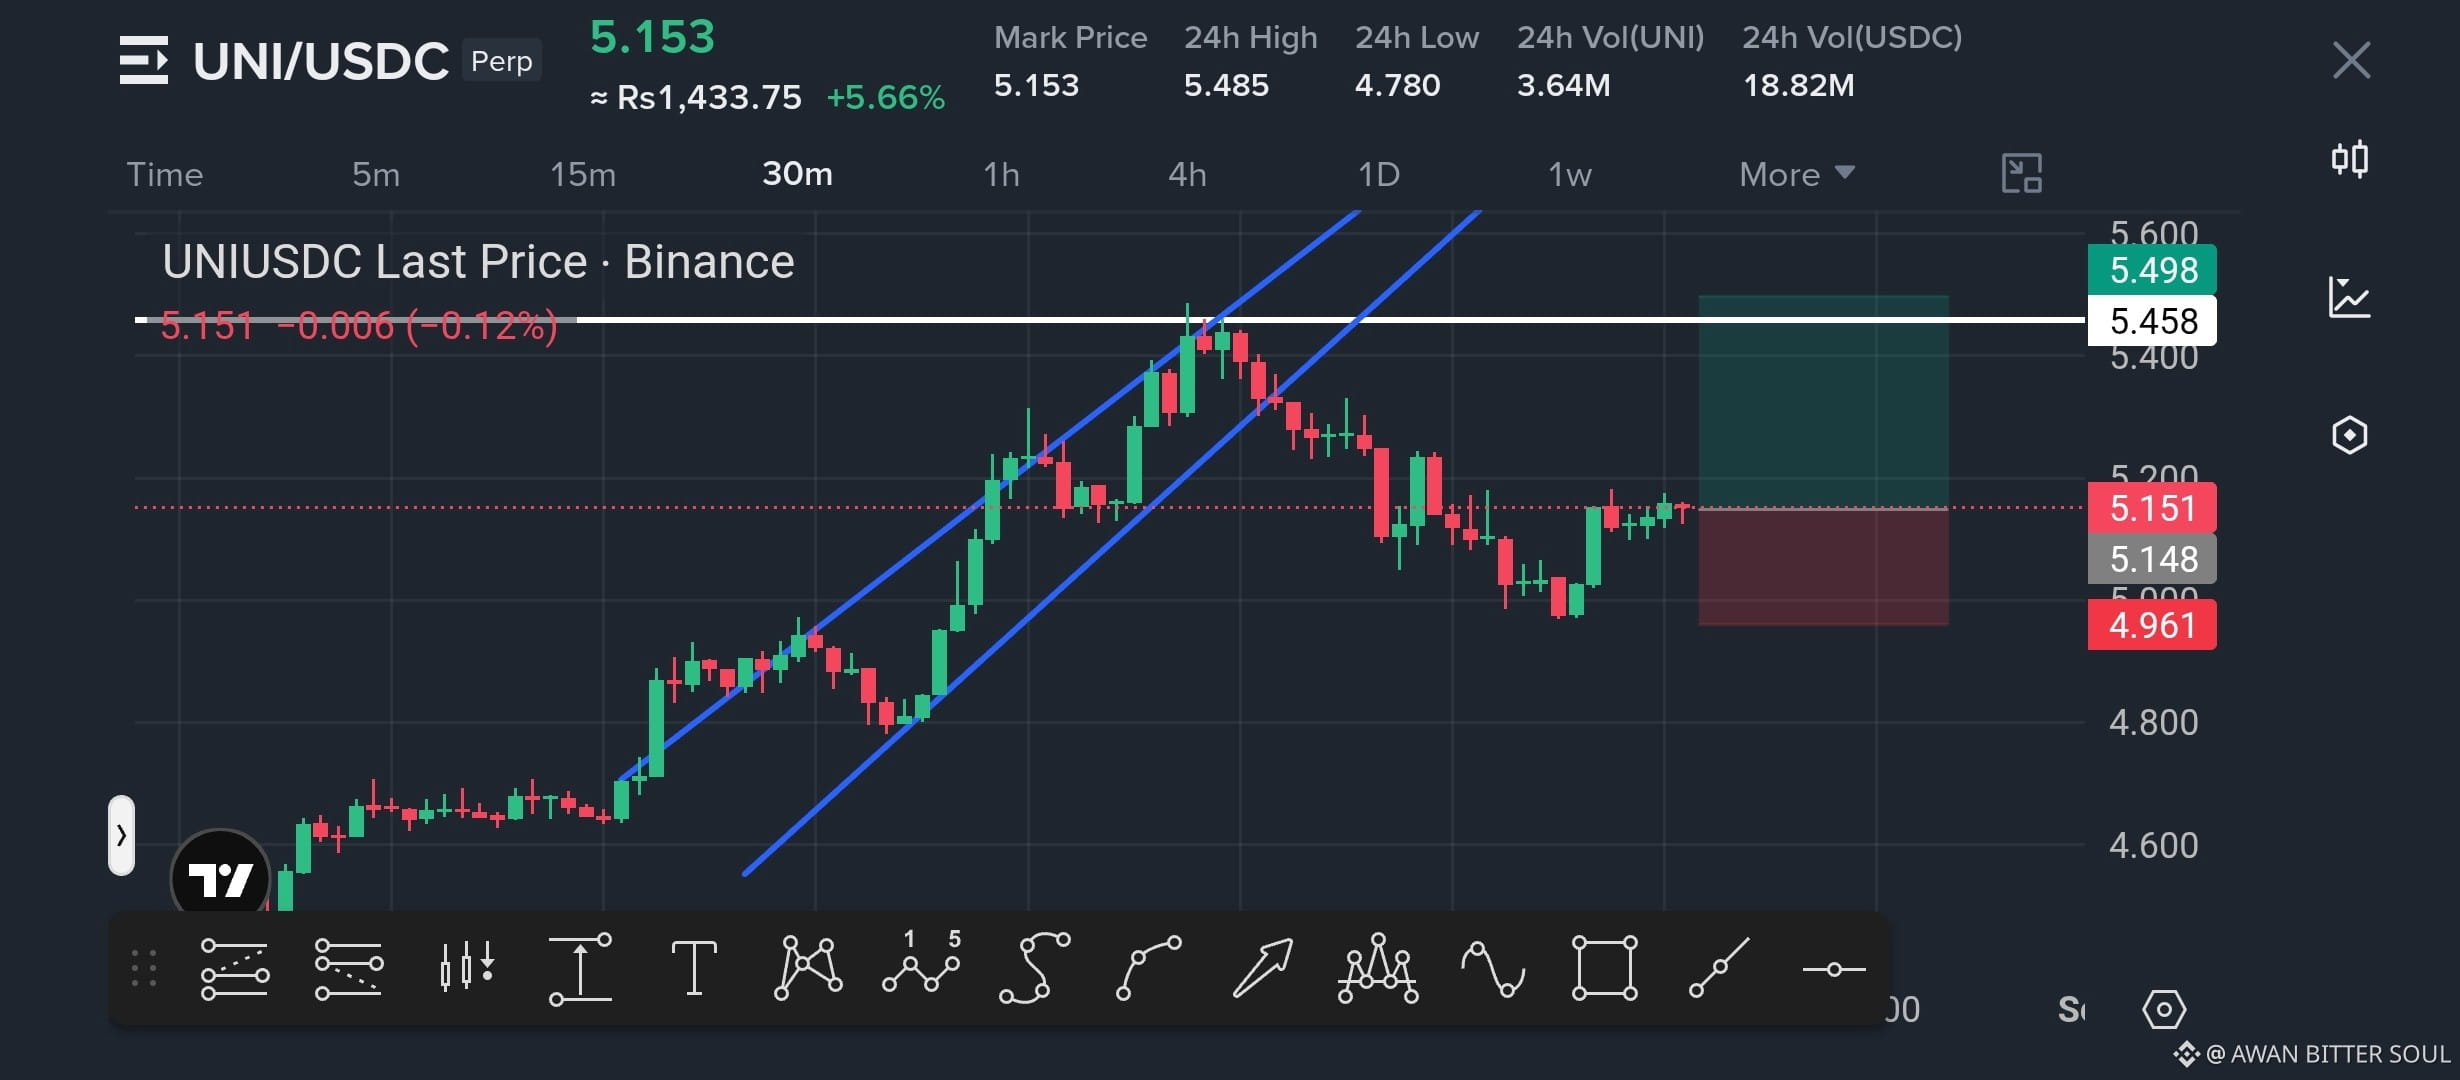
$UNI is holding the $5.15 area after a healthy pullback, with buyers attempting to regain momentum toward the upper resistance.
$UNI — LONG
Entry: $5.13–$5.16
SL: $4.96
TP1: $5.30
TP2: $5.45
TP3: $5.50
Why? Support is holding and the short-term structure favors a recovery toward the previous high.
Debate: Can $UNI reclaim $5.45?
Click here to Trade 👇️
$UNI — LONG
Entry: $5.13–$5.16
SL: $4.96
TP1: $5.30
TP2: $5.45
TP3: $5.50
Why? Support is holding and the short-term structure favors a recovery toward the previous high.
Debate: Can $UNI reclaim $5.45?
Click here to Trade 👇️
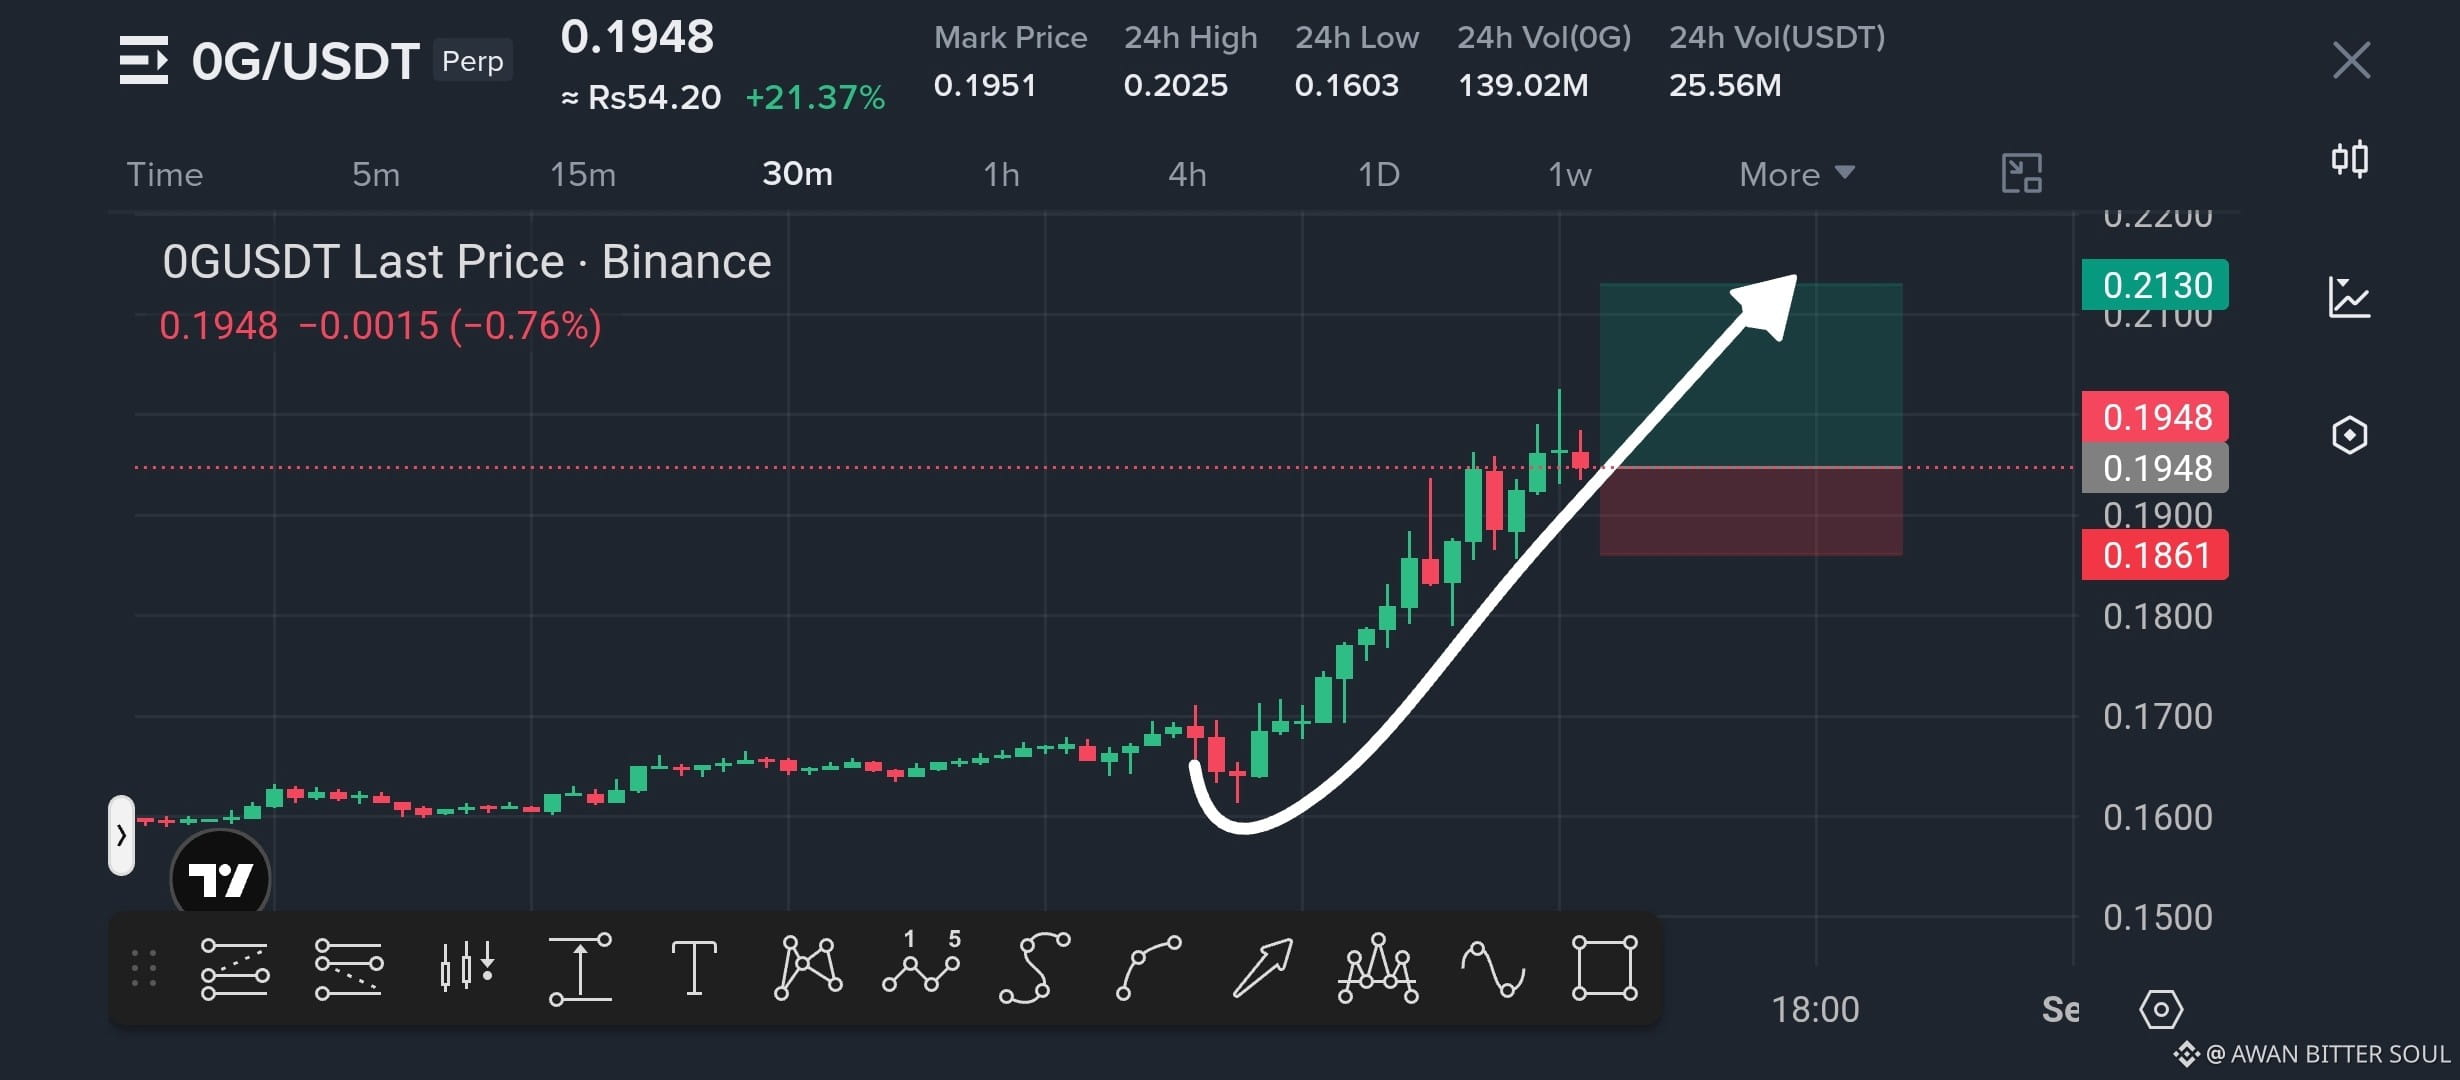
0G is maintaining a strong 30m uptrend with higher highs and higher lows, while price holds near the breakout area.
$0G — LONG
Entry: $0.1935–$0.1950
SL: $0.1861
TP1: $0.2010
TP2: $0.2070
TP3: $0.2130
Why? Strong momentum + bullish structure favors continuation toward the next resistance.
Debate: Can $OG reach $0.2130?
Click here to Trade 👇️
$0G — LONG
Entry: $0.1935–$0.1950
SL: $0.1861
TP1: $0.2010
TP2: $0.2070
TP3: $0.2130
Why? Strong momentum + bullish structure favors continuation toward the next resistance.
Debate: Can $OG reach $0.2130?
Click here to Trade 👇️
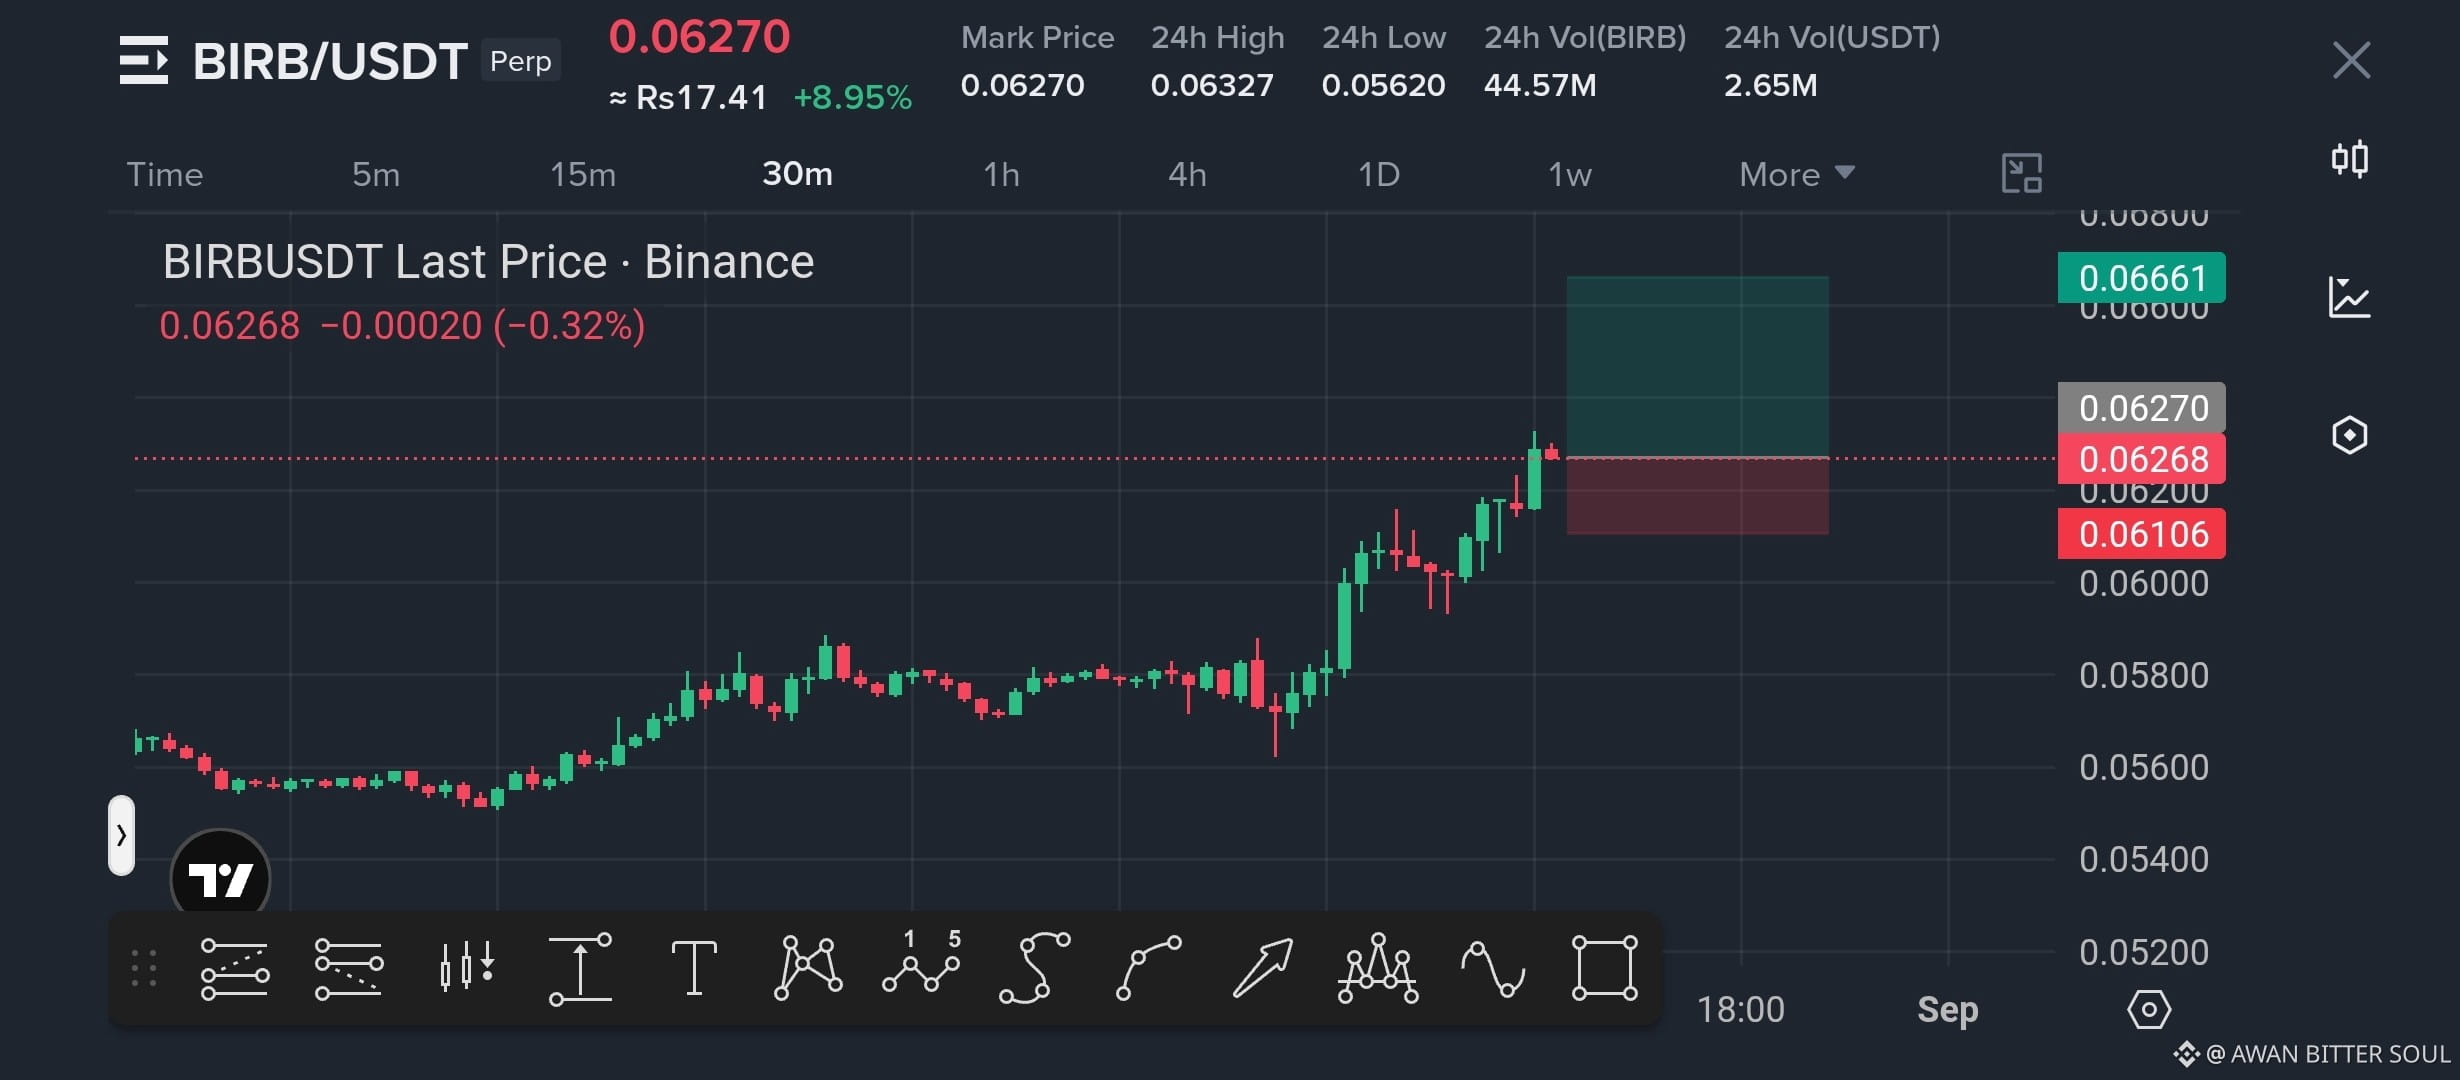
$BIRB is breaking higher with strong momentum, holding above the recent breakout area and favoring continuation toward the next resistance.
$BIRB — LONG
Entry: $0.06220–$0.06270
SL: $0.06106
TP1: $0.06380
TP2: $0.06500
TP3: $0.06661
Why? Strong 30m uptrend + breakout momentum supports another push higher.
Debate: Can $BIRB break $0.0666?
Click here to Trade 👇️
$BIRB — LONG
Entry: $0.06220–$0.06270
SL: $0.06106
TP1: $0.06380
TP2: $0.06500
TP3: $0.06661
Why? Strong 30m uptrend + breakout momentum supports another push higher.
Debate: Can $BIRB break $0.0666?
Click here to Trade 👇️
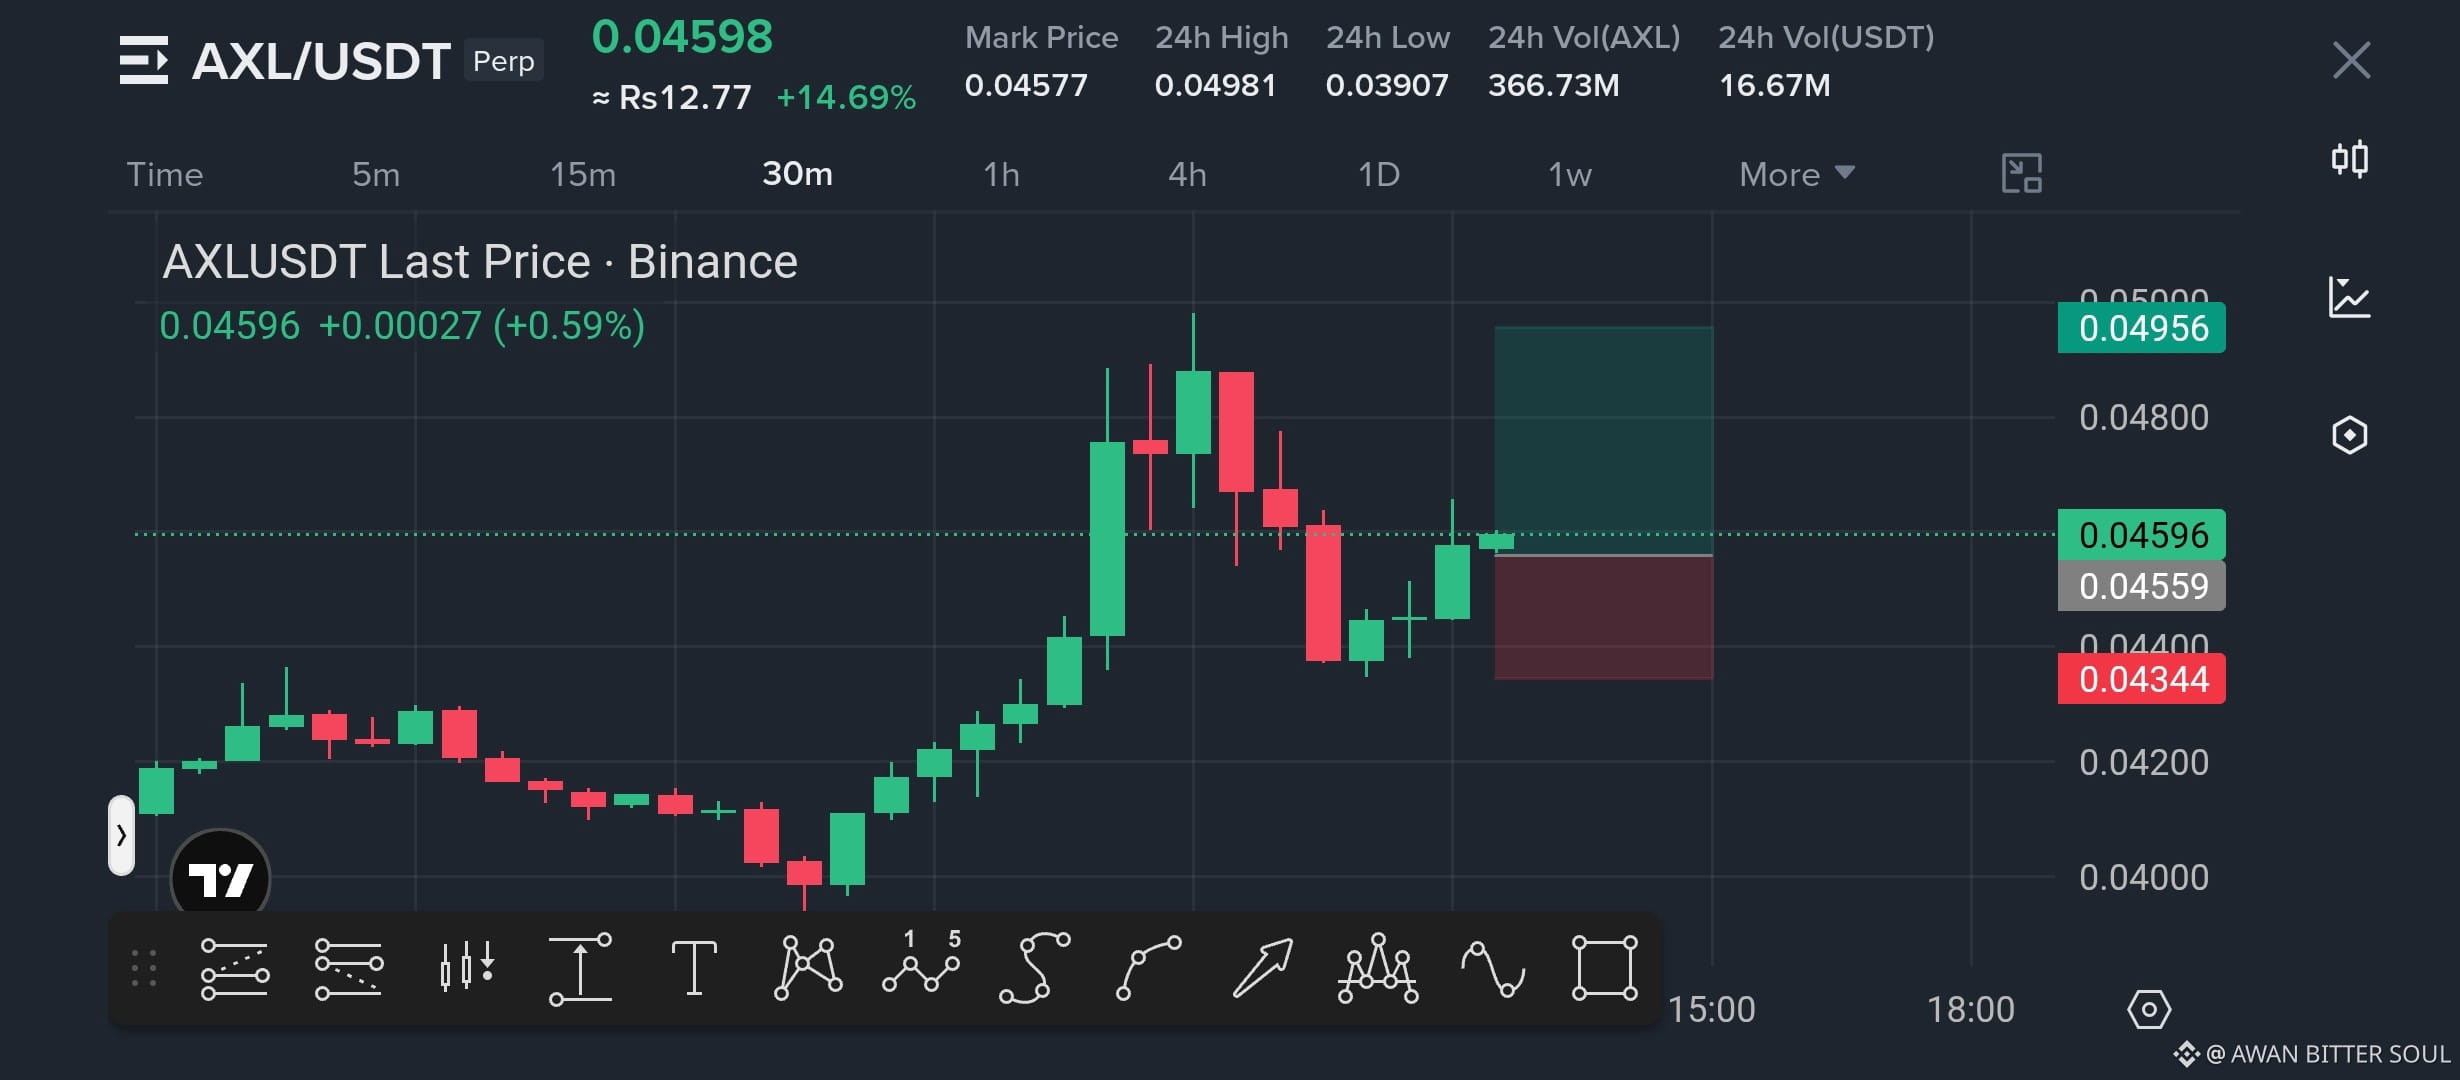
$AXL is recovering from the recent dip, with buyers reclaiming $0.0455 and pushing back toward the local high.
$AXL — LONG
Entry: $0.04559–$0.04600
SL: $0.04344
TP1: $0.04750
TP2: $0.04850
TP3: $0.04956
Why? Higher-low structure + strong rebound favors continuation toward the $0.0495 resistance.
Debate: Can $AXL break $0.05000 next?
Click here to Trade 👇️
$AXL — LONG
Entry: $0.04559–$0.04600
SL: $0.04344
TP1: $0.04750
TP2: $0.04850
TP3: $0.04956
Why? Higher-low structure + strong rebound favors continuation toward the $0.0495 resistance.
Debate: Can $AXL break $0.05000 next?
Click here to Trade 👇️
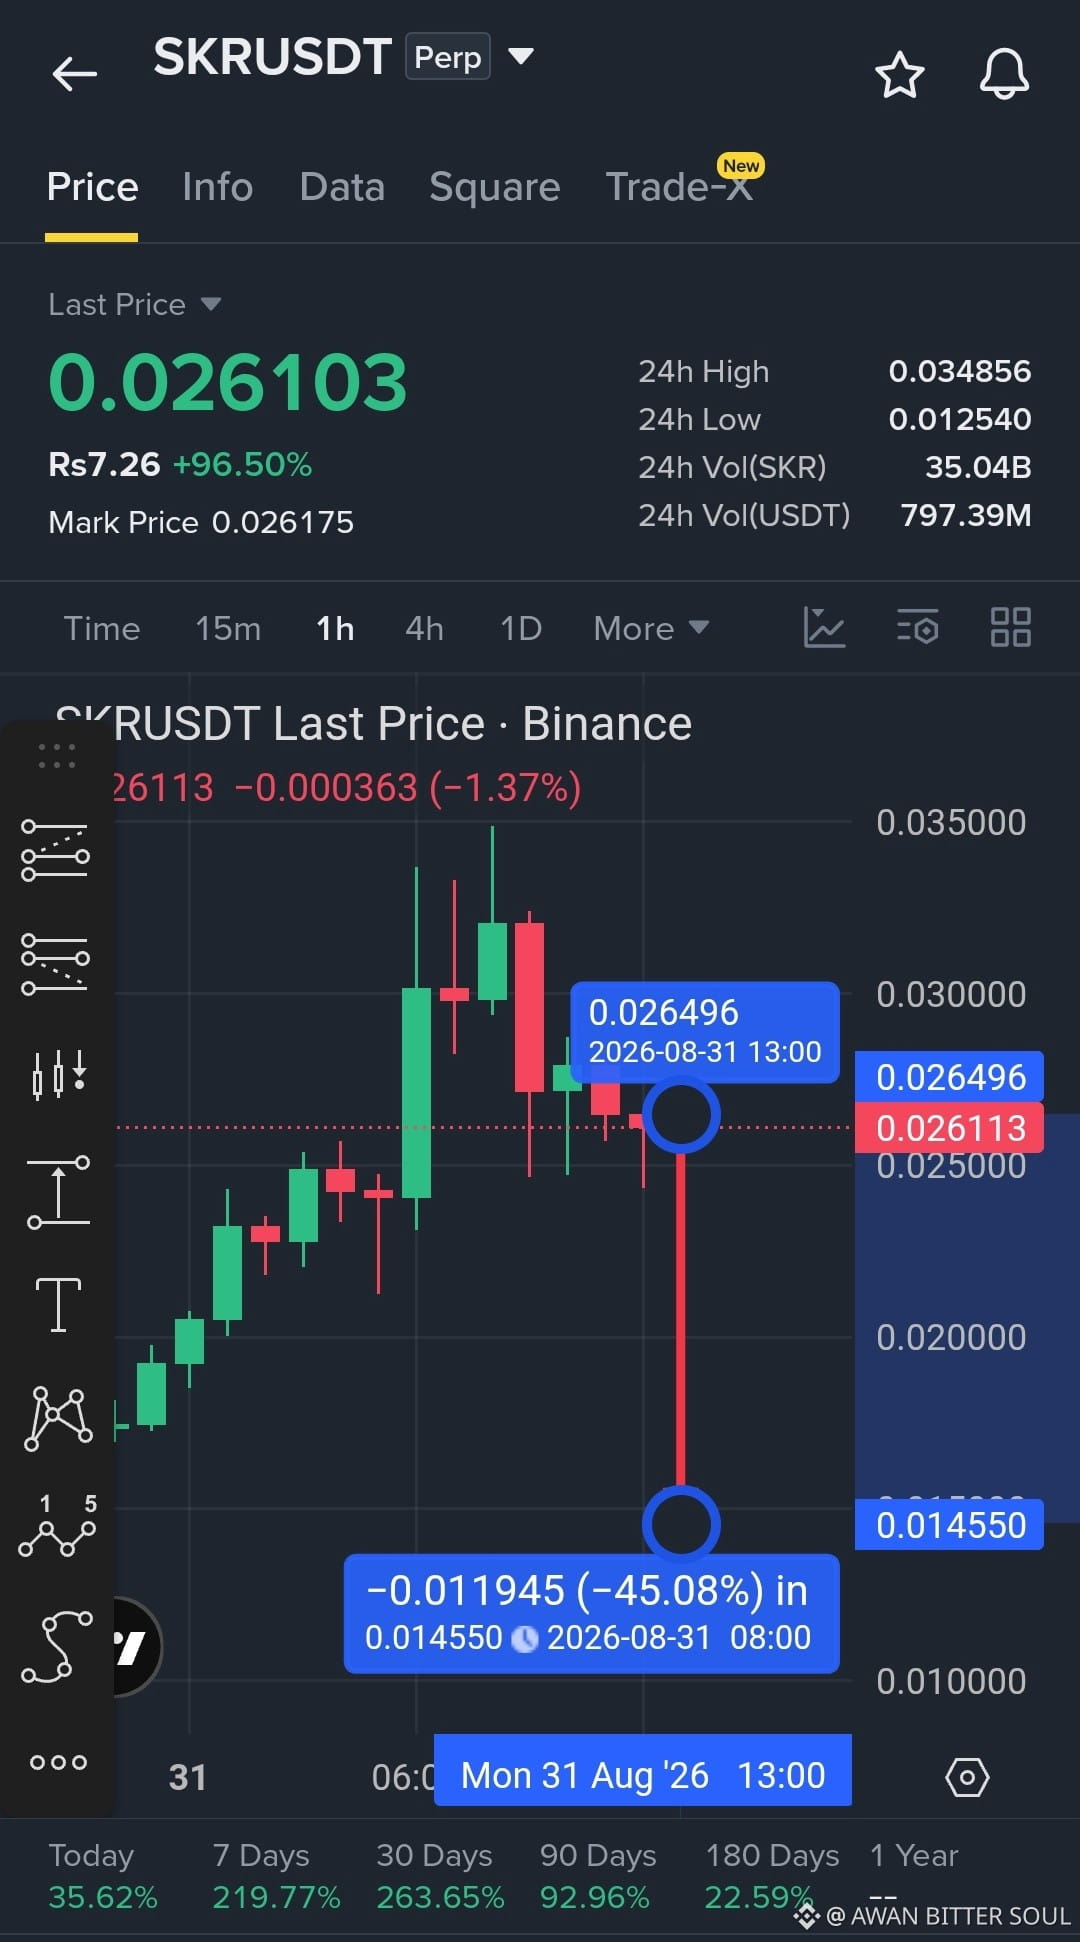
$SKR has seen an explosive rally followed by a sharp rejection, and the 1H structure is now showing signs of distribution.
$SKR — SHORT
Entry: $0.02615–$0.02700
SL: $0.02950
TP1: $0.02300
TP2: $0.02000
TP3: $0.01455
Why? Heavy rejection after the parabolic move could trigger a deeper retracement.
Debate: Can $SKR fall back toward $0.020?
Click here to Trade 👇️
$SKR — SHORT
Entry: $0.02615–$0.02700
SL: $0.02950
TP1: $0.02300
TP2: $0.02000
TP3: $0.01455
Why? Heavy rejection after the parabolic move could trigger a deeper retracement.
Debate: Can $SKR fall back toward $0.020?
Click here to Trade 👇️
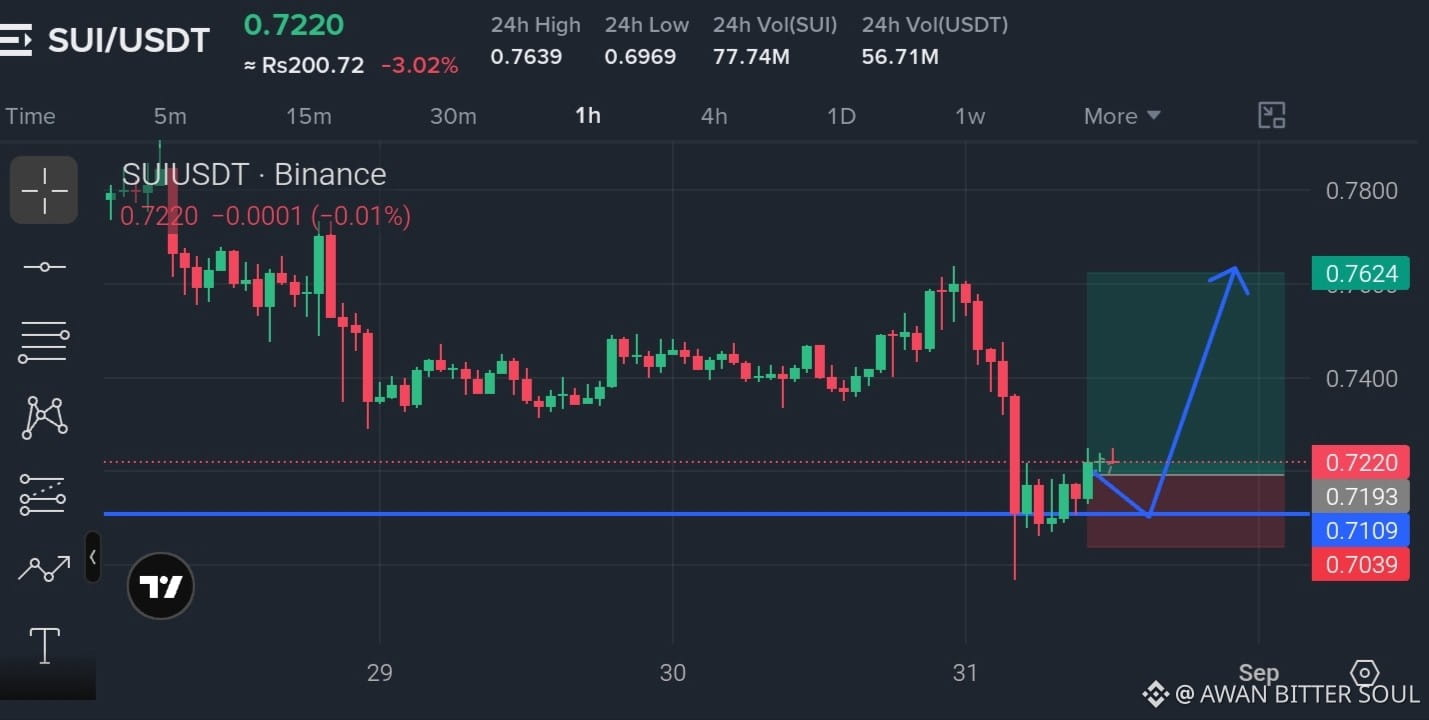
$SUI is holding the $0.7109 support after a sharp flush, with buyers attempting to reclaim the $0.7193 area.
$SUI — LONG
Entry: $0.7193–$0.7220
SL: $0.7039
TP1: $0.7350
TP2: $0.7480
TP3: $0.7624
Why? Support is holding and the rebound structure favors a move toward higher resistance.
Debate: Can $SUI reclaim $0.7400 next?
Click here to Trade 👇️
$SUI — LONG
Entry: $0.7193–$0.7220
SL: $0.7039
TP1: $0.7350
TP2: $0.7480
TP3: $0.7624
Why? Support is holding and the rebound structure favors a move toward higher resistance.
Debate: Can $SUI reclaim $0.7400 next?
Click here to Trade 👇️
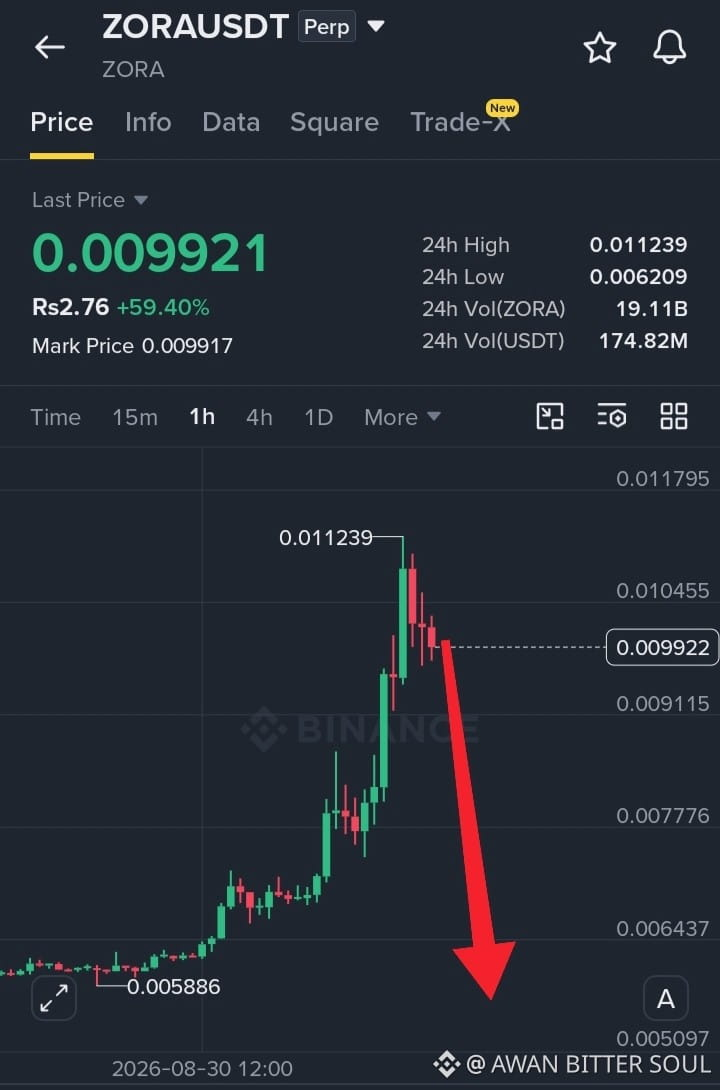
$ZORA facing heavy rejection after the parabolic move sellers could trigger a deeper correction.
Entry: $0.00990–$0.01010
TP: $0.00910 / $0.00780 / $0.00645
SL: $0.01065
Entry: $0.00990–$0.01010
TP: $0.00910 / $0.00780 / $0.00645
SL: $0.01065
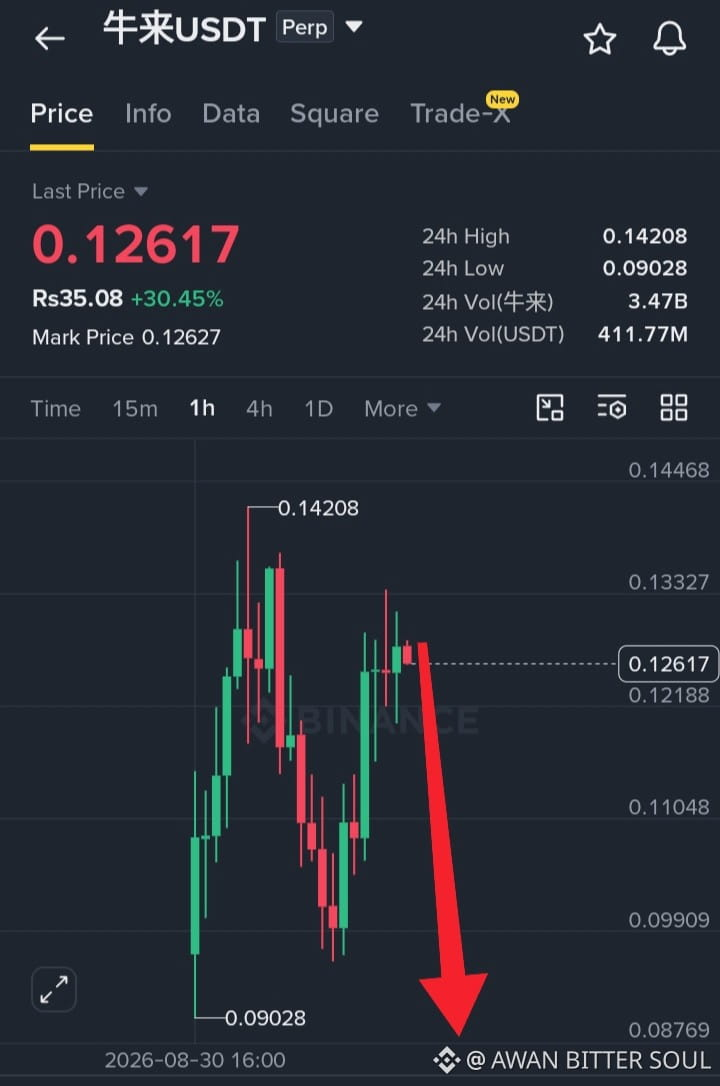
$牛来 is facing rejection around $0.126, with the latest candles showing sellers stepping in after the sharp pump.
$牛来 — SHORT
Entry: $0.1250–$0.1270 | TP1: $0.1180 | TP2: $0.1050 | TP3: $0.0900
SL: $0.1340
Why: rejection from the upper range favors a deeper pullback.
Above $0.1340, the short setup is invalid.
$牛来 — SHORT
Entry: $0.1250–$0.1270 | TP1: $0.1180 | TP2: $0.1050 | TP3: $0.0900
SL: $0.1340
Why: rejection from the upper range favors a deeper pullback.
Above $0.1340, the short setup is invalid.
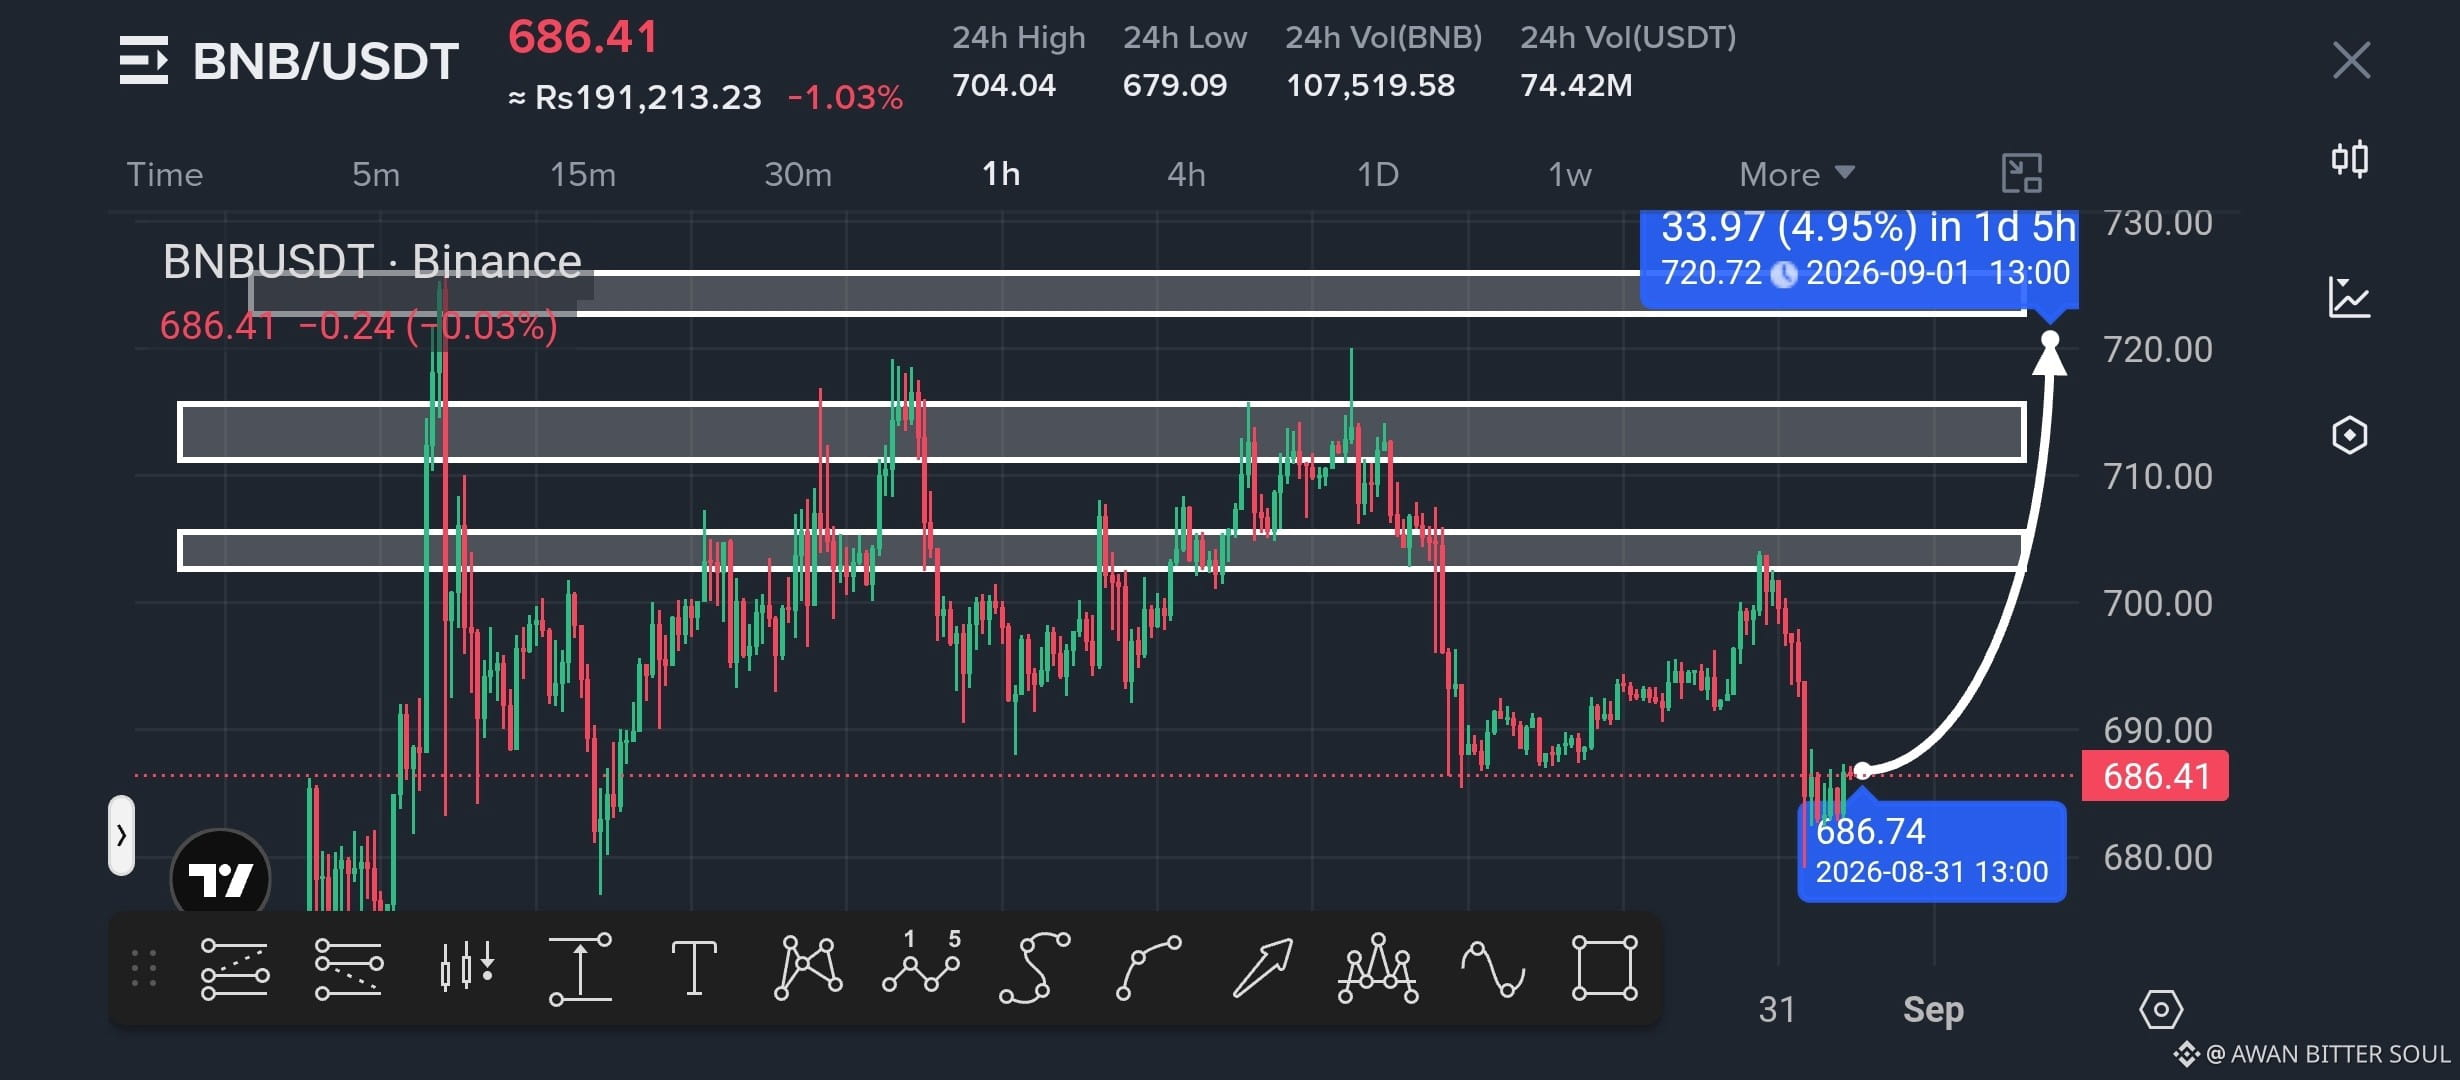
BNB is sitting at a key rebound area after the sharp selloff, and buyers are starting to defend the $686 zone. The chart shows a clear recovery path toward the resistance levels above, with $704 as the first major hurdle.
$BNB — LONG
Entry: $685.50–$686.00
TP1: $704.00
TP2: $712.00
TP3: $720.72
SL: $679.00
Why this setup? Price is holding near the recent low while the marked structure points toward a recovery through the $700+ resistance levels.
A clean break below $679 invalidates the bullish idea.
Can BNB reclaim $704 and continue toward $720?
$BNB — LONG
Entry: $685.50–$686.00
TP1: $704.00
TP2: $712.00
TP3: $720.72
SL: $679.00
Why this setup? Price is holding near the recent low while the marked structure points toward a recovery through the $700+ resistance levels.
A clean break below $679 invalidates the bullish idea.
Can BNB reclaim $704 and continue toward $720?
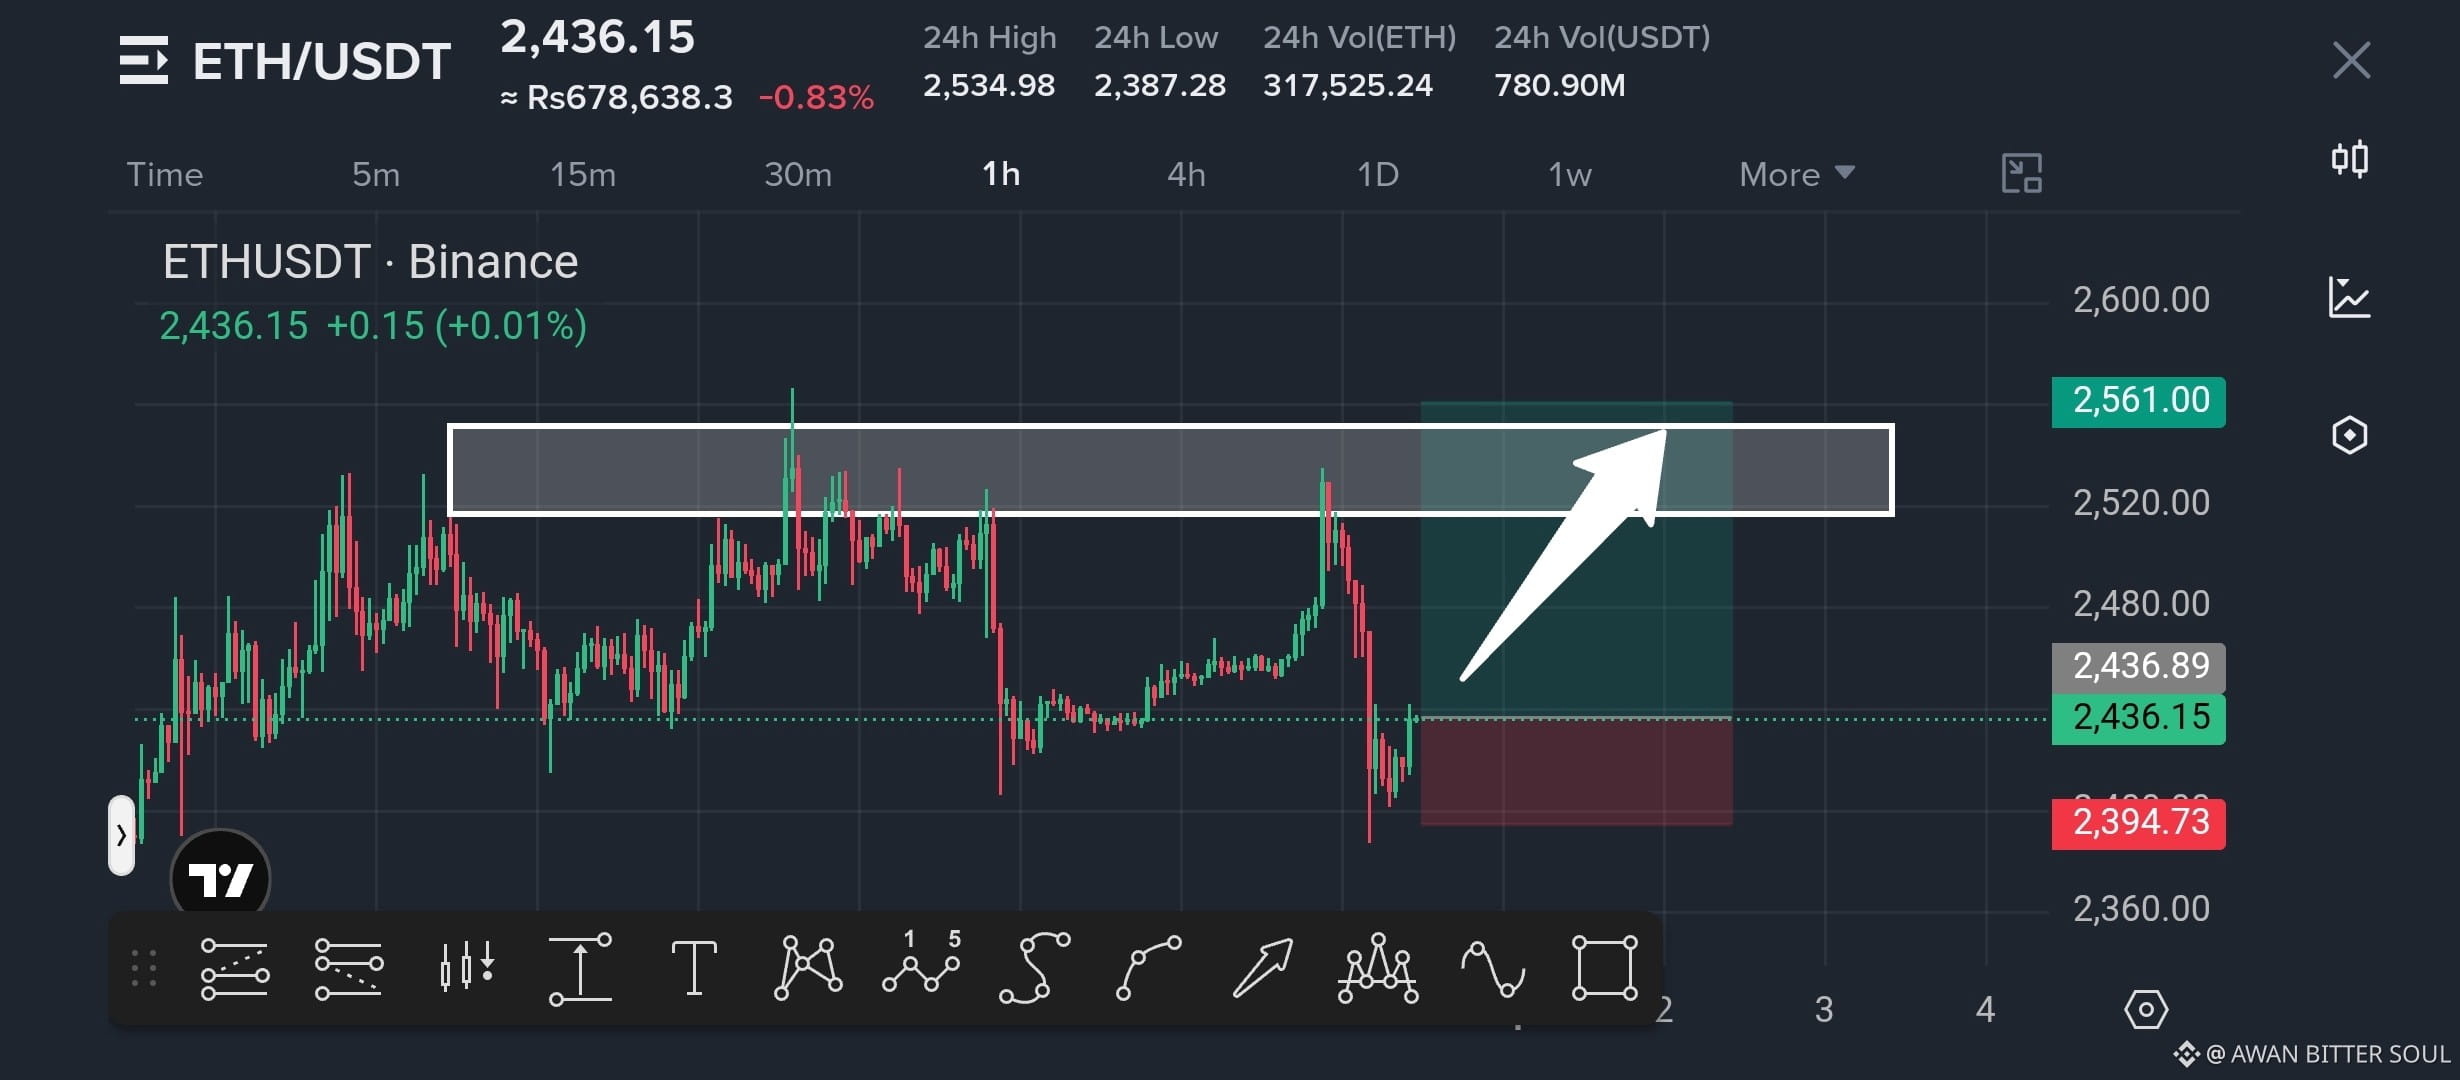
Ethereum is holding the recovery zone after that sharp rejection, and the current structure is showing buyers trying to regain control. The major resistance sits around $2,520–$2,540, and a clean breakout could open the path toward $2,560.
$ETH — LONG
Entry: $2,430–$2,450
TP1: $2,480
TP2: $2,520
TP3: $2,561
SL: $2,394.73
Why? Price is stabilizing above support after the flush, while the chart points toward a retest of the upper resistance zone.
If ETH loses $2,394.73, the setup is invalidated.
Can ETH break $2,520 and run toward $2,561?
$ETH — LONG
Entry: $2,430–$2,450
TP1: $2,480
TP2: $2,520
TP3: $2,561
SL: $2,394.73
Why? Price is stabilizing above support after the flush, while the chart points toward a retest of the upper resistance zone.
If ETH loses $2,394.73, the setup is invalidated.
Can ETH break $2,520 and run toward $2,561?
Log in to explore more content