

Crypto_Titan70
11.3k Posts

Crypto_Titan70
Report
Block User
Market Analysis and Insight of the Market
Open Trade
Occasional Trader
2 Years
77 Following
499 Followers
5.7K+ Liked
Posts
Portfolio
All
Quotes
·
--
Bearish
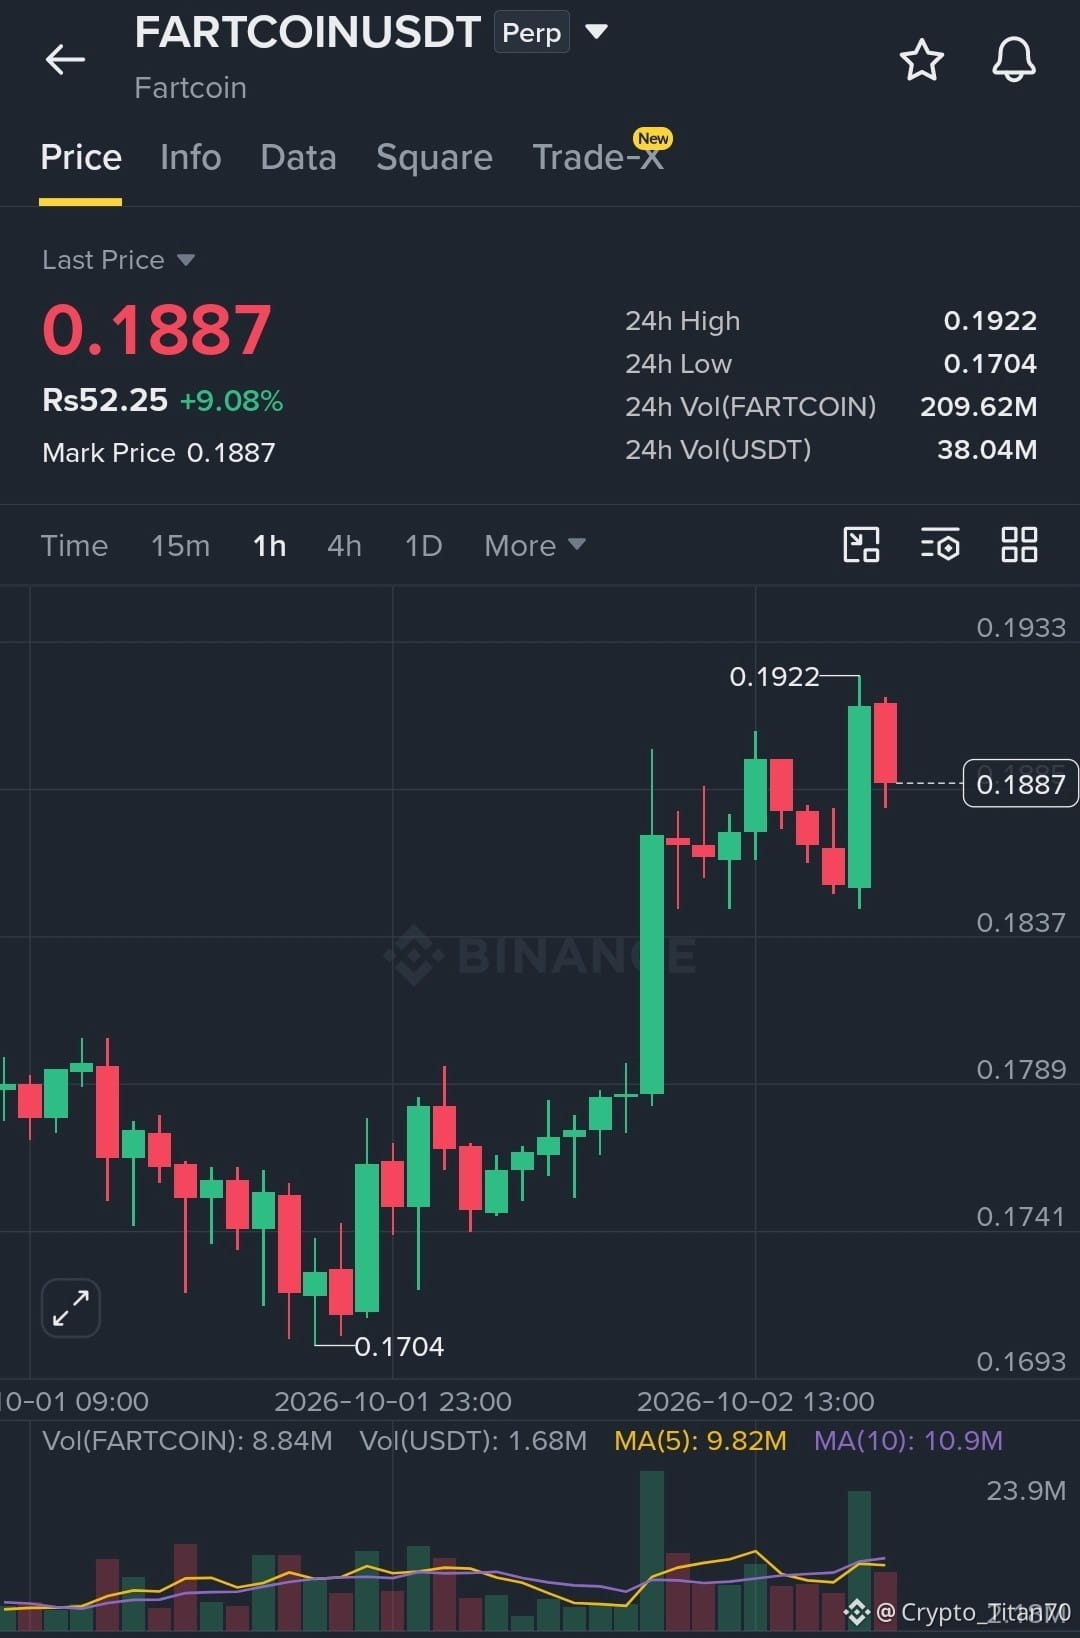
$FARTCOIN is looking ready for a correction 📉
The current structure suggests a downside move from here. High confidence in a pullback.
🔻 **Short Setup**
Entry Zone: $0.1881 – $0.1883
🎯 TP1: $0.1862
🎯 TP2: $0.1847
🎯 TP3: $0.1832
🛑 SL: $0.1900
Watch for the price to hit the entry zone before opening. Keep an eye on the stop loss to manage the risk of a sudden bounce.
Trade $FARTCOINhere 👇
#FARTCOIN
{future}(FARTCOINUSDT)
$SAND
{future}(SANDUSDT)
$US
{future}(USUSDT)
$FARTCOIN is looking ready for a correction 📉
The current structure suggests a downside move from here. High confidence in a pullback.
🔻 **Short Setup**
Entry Zone: $0.1881 – $0.1883
🎯 TP1: $0.1862
🎯 TP2: $0.1847
🎯 TP3: $0.1832
🛑 SL: $0.1900
Watch for the price to hit the entry zone before opening. Keep an eye on the stop loss to manage the risk of a sudden bounce.
Trade $FARTCOINhere 👇
#FARTCOIN
$SAND
$US
The current structure suggests a downside move from here. High confidence in a pullback.
🔻 **Short Setup**
Entry Zone: $0.1881 – $0.1883
🎯 TP1: $0.1862
🎯 TP2: $0.1847
🎯 TP3: $0.1832
🛑 SL: $0.1900
Watch for the price to hit the entry zone before opening. Keep an eye on the stop loss to manage the risk of a sudden bounce.
Trade $FARTCOINhere 👇
#FARTCOIN
$SAND
$US
71
·
--
Bearish
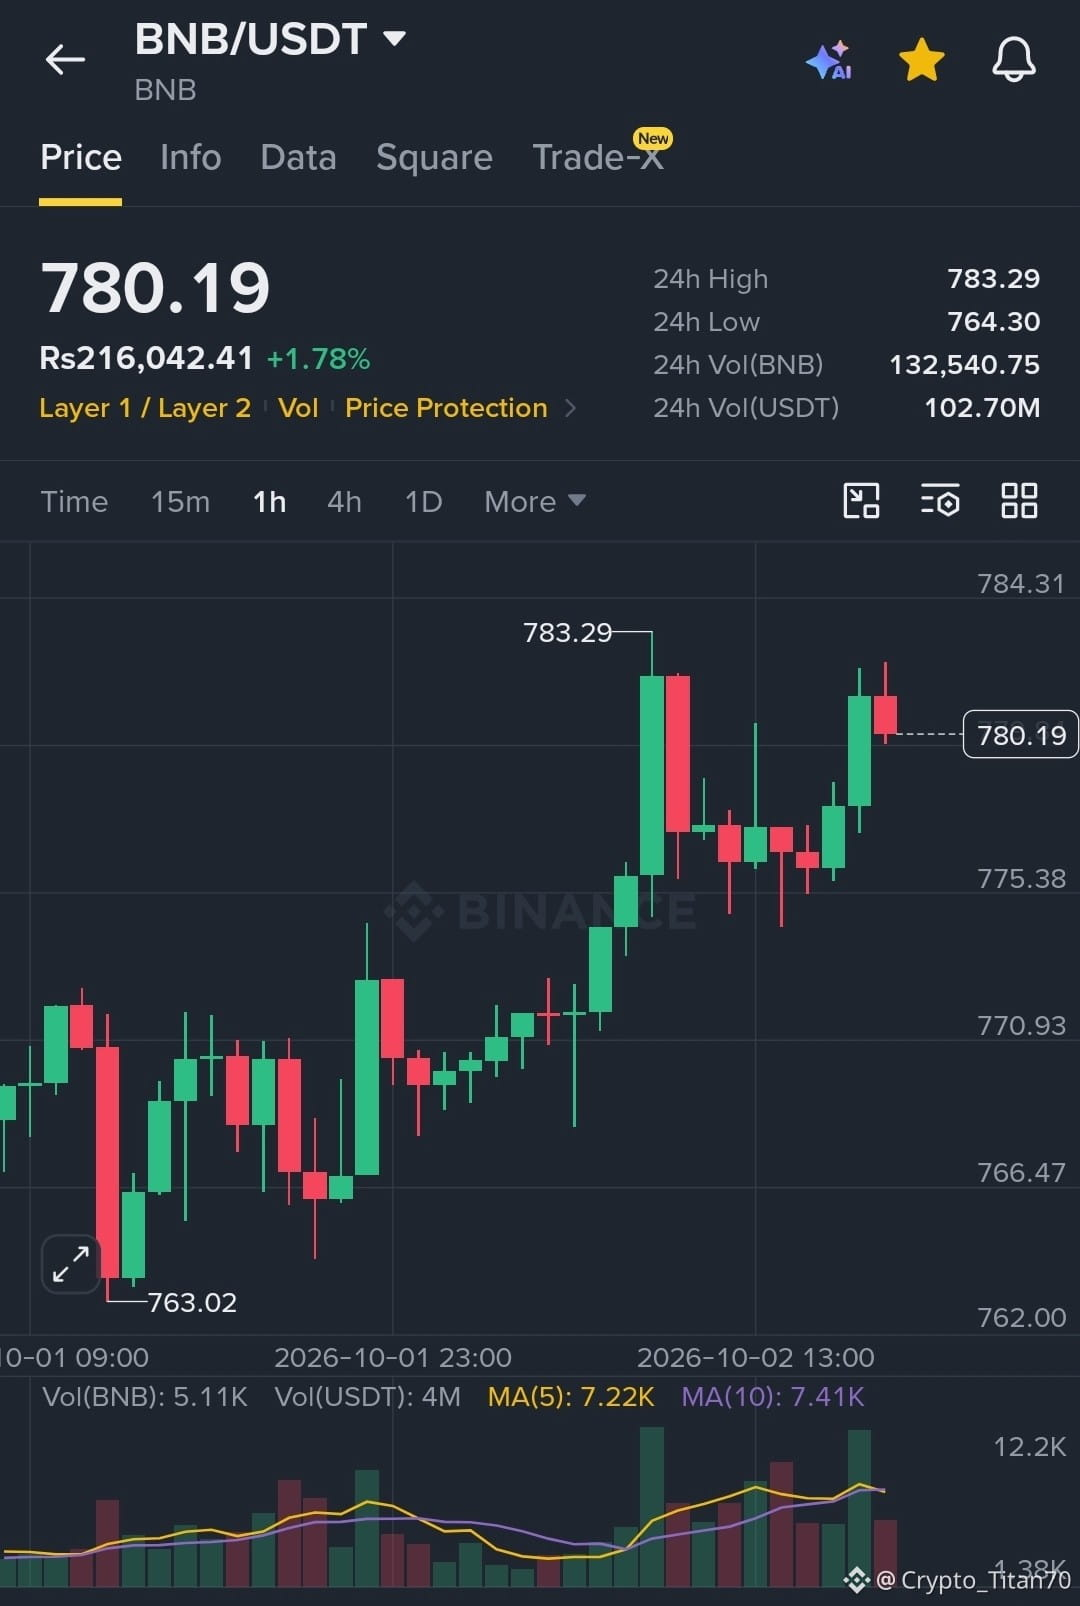
$BNB — aggressive short setup 🔴
BNB is currently testing a critical resistance zone. While overall momentum is still strong, price is hitting a wall between $770 and $775, making this a high-reward, aggressive play for a potential pullback.
🔻 **Short Setup (Max 30x)**
Entry Zone: $778 – $782
🎯 TP1: $774
🎯 TP2: $766
🎯 TP3: $758
🛑 SL: $789
Since this is an aggressive short against strong momentum, keep your position size small and adhere strictly to the stop loss.
Trade $BNBhere 👇
#BNB
{spot}(BNBUSDT)
$SAND
{future}(SANDUSDT)
$US
{future}(USUSDT)
$BNB — aggressive short setup 🔴
BNB is currently testing a critical resistance zone. While overall momentum is still strong, price is hitting a wall between $770 and $775, making this a high-reward, aggressive play for a potential pullback.
🔻 **Short Setup (Max 30x)**
Entry Zone: $778 – $782
🎯 TP1: $774
🎯 TP2: $766
🎯 TP3: $758
🛑 SL: $789
Since this is an aggressive short against strong momentum, keep your position size small and adhere strictly to the stop loss.
Trade $BNBhere 👇
#BNB
$SAND
$US
BNB is currently testing a critical resistance zone. While overall momentum is still strong, price is hitting a wall between $770 and $775, making this a high-reward, aggressive play for a potential pullback.
🔻 **Short Setup (Max 30x)**
Entry Zone: $778 – $782
🎯 TP1: $774
🎯 TP2: $766
🎯 TP3: $758
🛑 SL: $789
Since this is an aggressive short against strong momentum, keep your position size small and adhere strictly to the stop loss.
Trade $BNBhere 👇
#BNB
$SAND
$US
117
·
--
Bearish
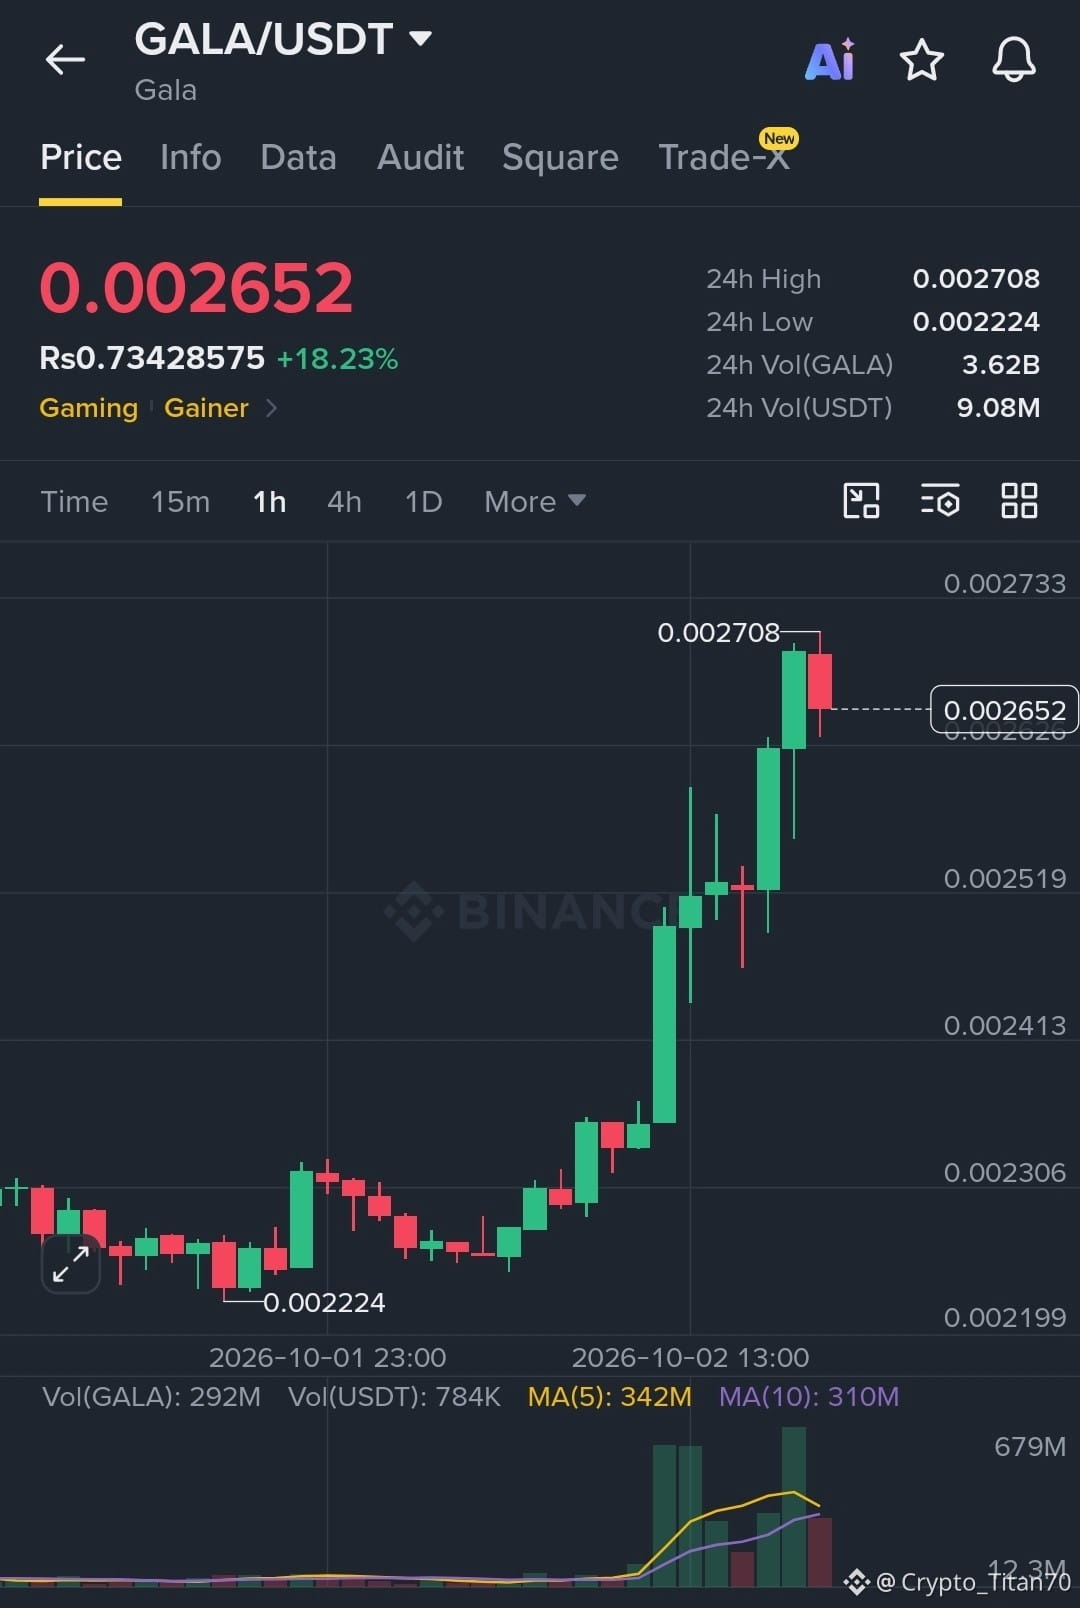
$GALA — buyers are stepping in as breakout momentum builds 🚀
Price is pushing above the $0.00265 area with fresh upside pressure. If the breakout holds, the next resistance levels may come into play.
🟢 **Entry Zone:** $0.00265 – $0.00271
🎯 TP1: $0.00277
🎯 TP2: $0.00285
🎯 TP3: $0.00293
🛑 SL: $0.00257
Look for confirmation above the breakout zone instead of chasing a sudden spike. Consider taking partial profit at TP1 and keep the stop in place if momentum fades.
Buy & Trade $GALAhere 🔥
#GALA
{spot}(GALAUSDT)
$SAND
{future}(SANDUSDT)
$US
{future}(USUSDT)
$GALA — buyers are stepping in as breakout momentum builds 🚀
Price is pushing above the $0.00265 area with fresh upside pressure. If the breakout holds, the next resistance levels may come into play.
🟢 **Entry Zone:** $0.00265 – $0.00271
🎯 TP1: $0.00277
🎯 TP2: $0.00285
🎯 TP3: $0.00293
🛑 SL: $0.00257
Look for confirmation above the breakout zone instead of chasing a sudden spike. Consider taking partial profit at TP1 and keep the stop in place if momentum fades.
Buy & Trade $GALAhere 🔥
#GALA
$SAND
$US
Price is pushing above the $0.00265 area with fresh upside pressure. If the breakout holds, the next resistance levels may come into play.
🟢 **Entry Zone:** $0.00265 – $0.00271
🎯 TP1: $0.00277
🎯 TP2: $0.00285
🎯 TP3: $0.00293
🛑 SL: $0.00257
Look for confirmation above the breakout zone instead of chasing a sudden spike. Consider taking partial profit at TP1 and keep the stop in place if momentum fades.
Buy & Trade $GALAhere 🔥
#GALA
$SAND
$US
153
·
--
Bearish
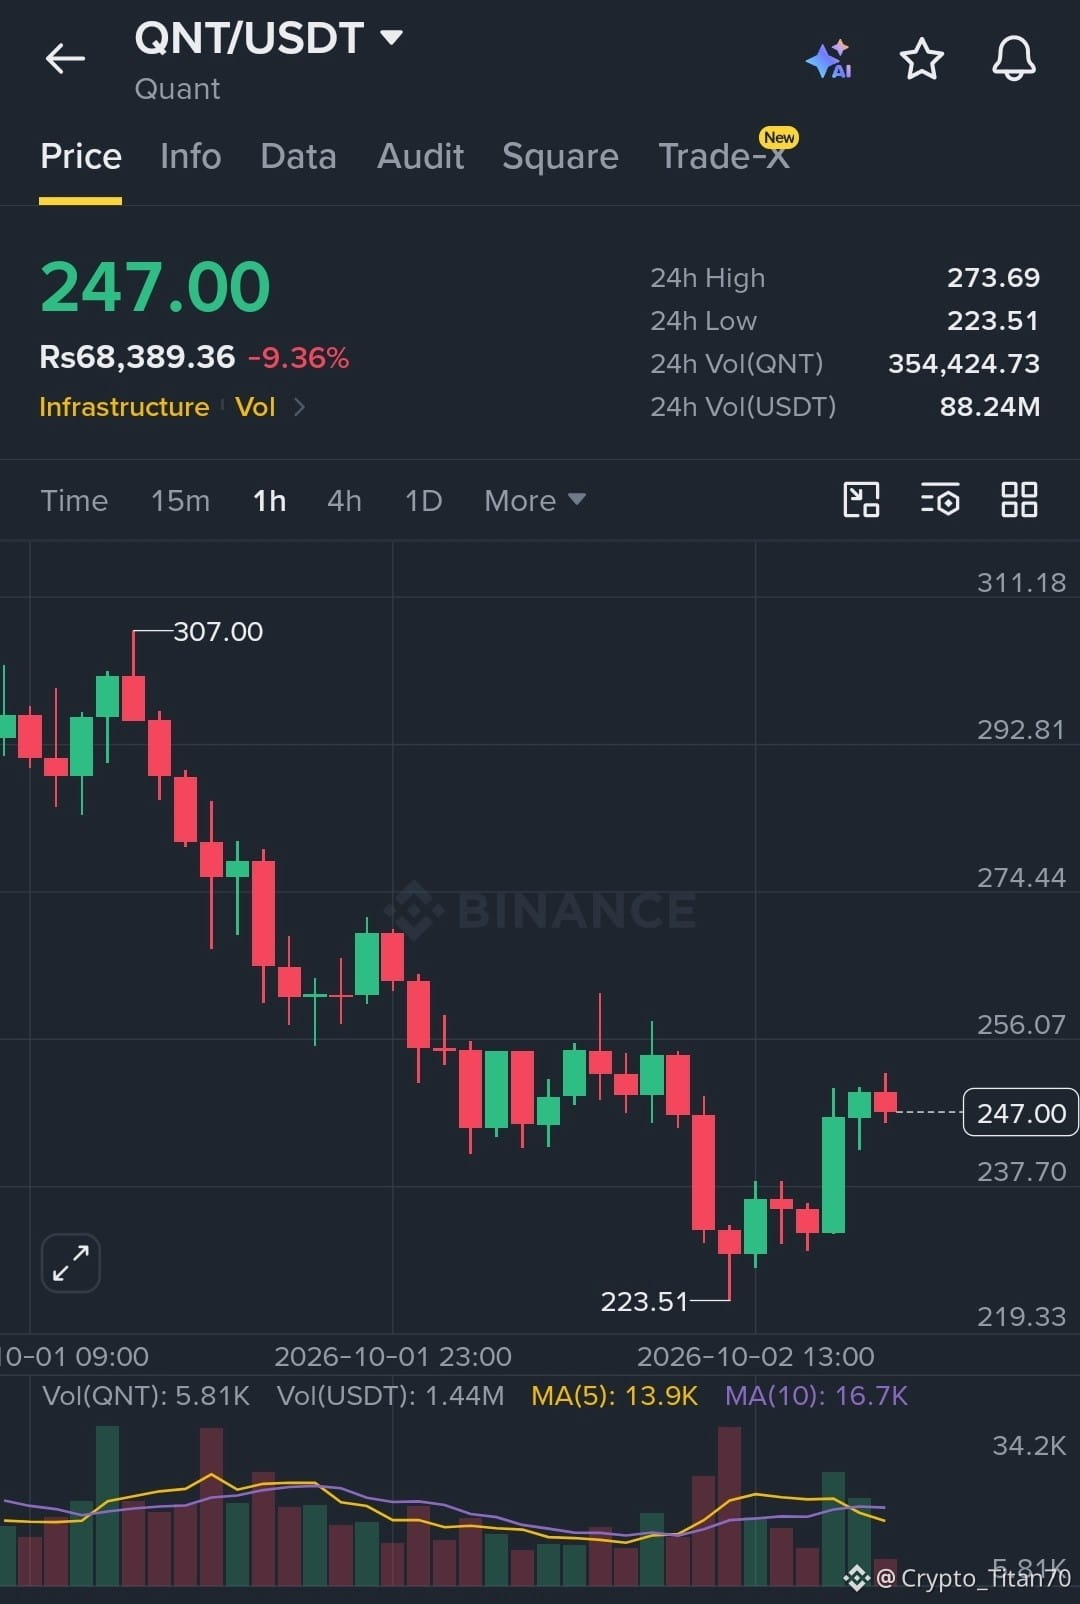
$QNT update ‼️
TP2 has been reached, with price touching $250.37 for a gain of roughly 2.9% from the entry zone 📈
🎯 TP3: $253.35
Consider securing partial profits and moving the stop to breakeven to protect the position. From here, let the remaining trade run only if momentum continues.
Trade safely and manage the position carefully.
#QNT
{future}(QNTUSDT)
$SAND
{future}(SANDUSDT)
$US
{future}(USUSDT)
$QNT update ‼️
TP2 has been reached, with price touching $250.37 for a gain of roughly 2.9% from the entry zone 📈
🎯 TP3: $253.35
Consider securing partial profits and moving the stop to breakeven to protect the position. From here, let the remaining trade run only if momentum continues.
Trade safely and manage the position carefully.
#QNT
$SAND
$US
TP2 has been reached, with price touching $250.37 for a gain of roughly 2.9% from the entry zone 📈
🎯 TP3: $253.35
Consider securing partial profits and moving the stop to breakeven to protect the position. From here, let the remaining trade run only if momentum continues.
Trade safely and manage the position carefully.
#QNT
$SAND
$US
186
·
--
Bullish
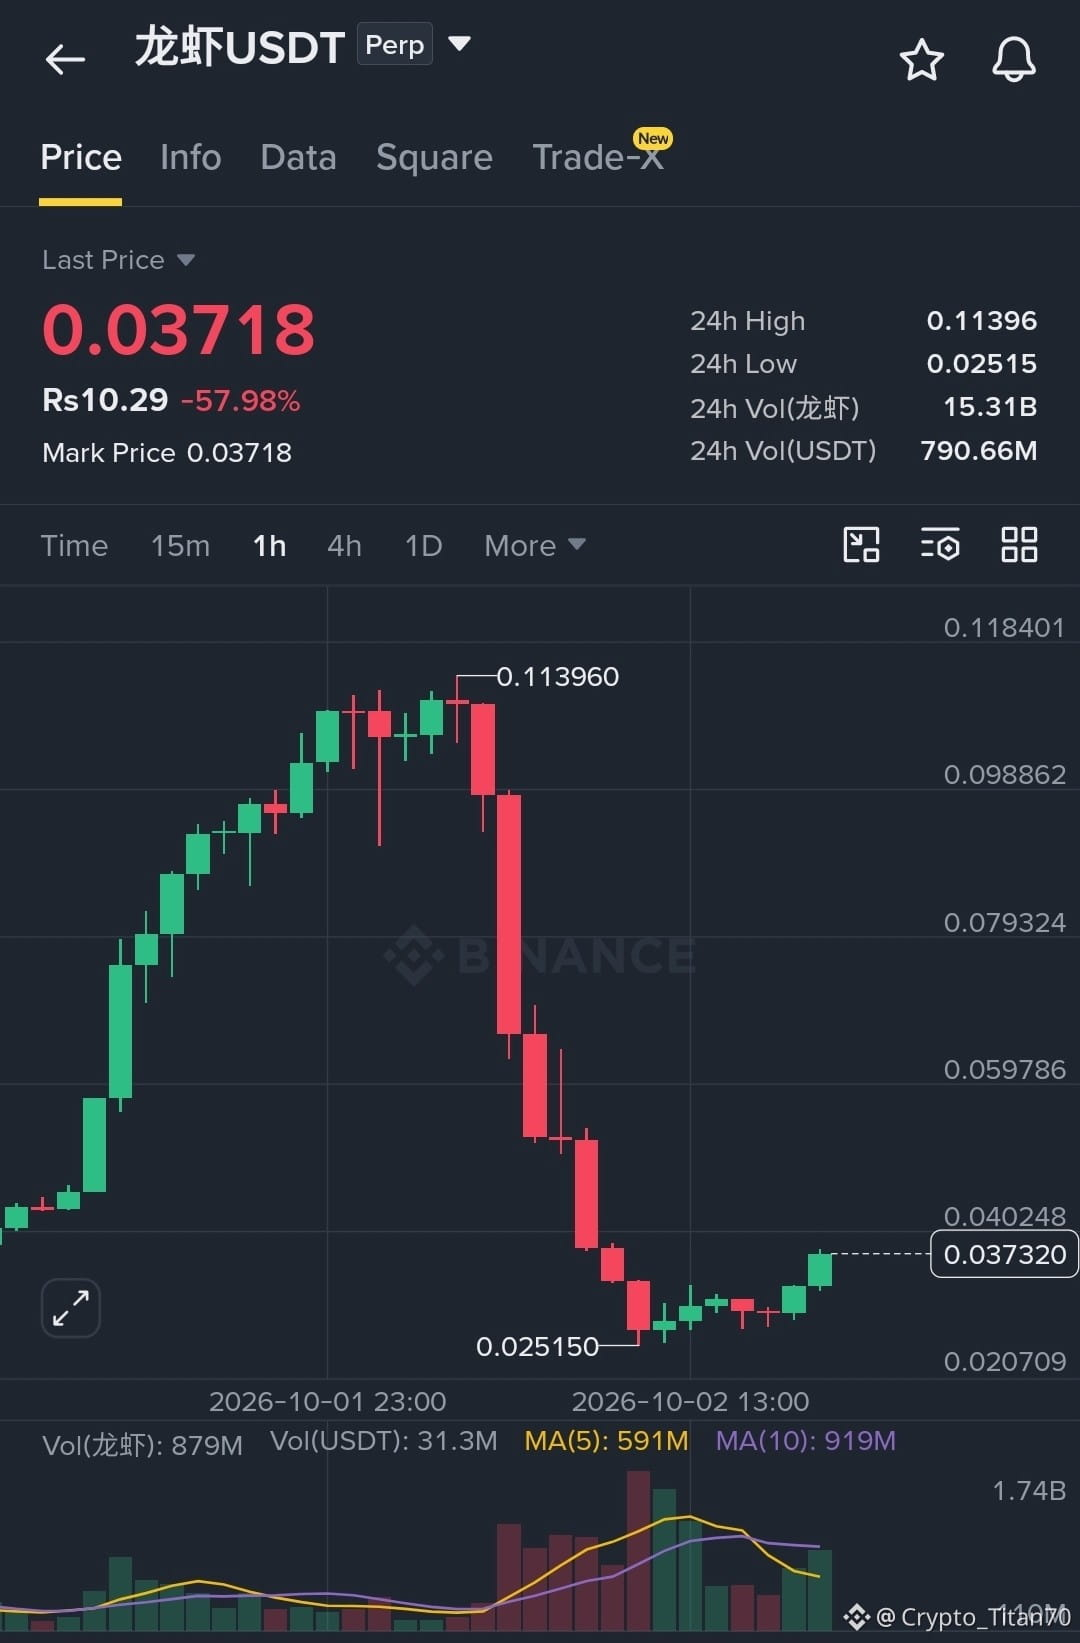
Everyone, take a look at $龙虾 — I told you this was coming!
{future}(龙虾USDT)
$SAND
{future}(SANDUSDT)
$US
{future}(USUSDT)
Everyone, take a look at $龙虾 — I told you this was coming!
$SAND
$US
$SAND
$US
1
424
·
--
Bullish
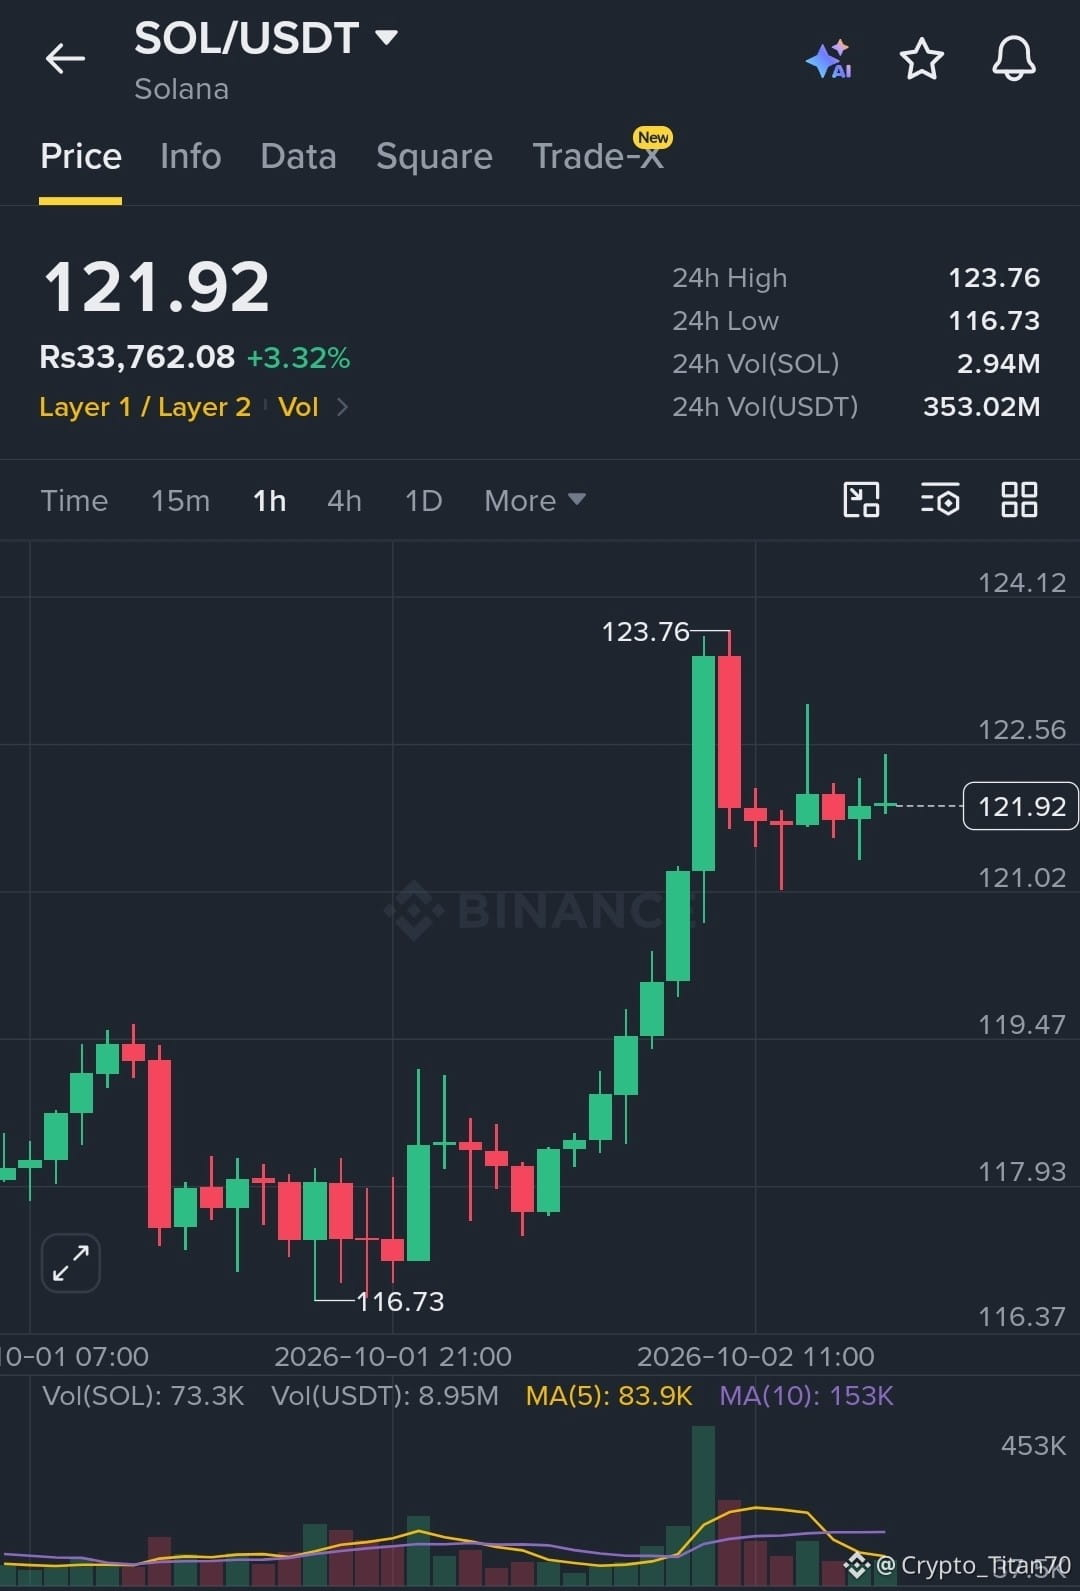
$SOL — continuation setup is taking shape 📈
SOL is holding around the $122 area after a strong rally. If buyers defend the nearby support zone, price could make another attempt toward the $123.77 resistance area and beyond.
🟢 **Long Entry:** $121.55 – $122.35
🎯 TP1: $123.75
🎯 TP2: $126.10
🎯 TP3: $129.10
🛑 SL: $119.55
The bullish setup remains valid while support holds. A decisive break below the stop zone would weaken the continuation idea, so manage risk before entering.
Trade $SOLhere 👇
#SOL
{spot}(SOLUSDT)
$BTC
{future}(BTCUSDT)
$ETH
{future}(ETHUSDT)
$SOL — continuation setup is taking shape 📈
SOL is holding around the $122 area after a strong rally. If buyers defend the nearby support zone, price could make another attempt toward the $123.77 resistance area and beyond.
🟢 **Long Entry:** $121.55 – $122.35
🎯 TP1: $123.75
🎯 TP2: $126.10
🎯 TP3: $129.10
🛑 SL: $119.55
The bullish setup remains valid while support holds. A decisive break below the stop zone would weaken the continuation idea, so manage risk before entering.
Trade $SOLhere 👇
#SOL
$BTC
$ETH
SOL is holding around the $122 area after a strong rally. If buyers defend the nearby support zone, price could make another attempt toward the $123.77 resistance area and beyond.
🟢 **Long Entry:** $121.55 – $122.35
🎯 TP1: $123.75
🎯 TP2: $126.10
🎯 TP3: $129.10
🛑 SL: $119.55
The bullish setup remains valid while support holds. A decisive break below the stop zone would weaken the continuation idea, so manage risk before entering.
Trade $SOLhere 👇
#SOL
$BTC
$ETH
47
·
--
Bullish
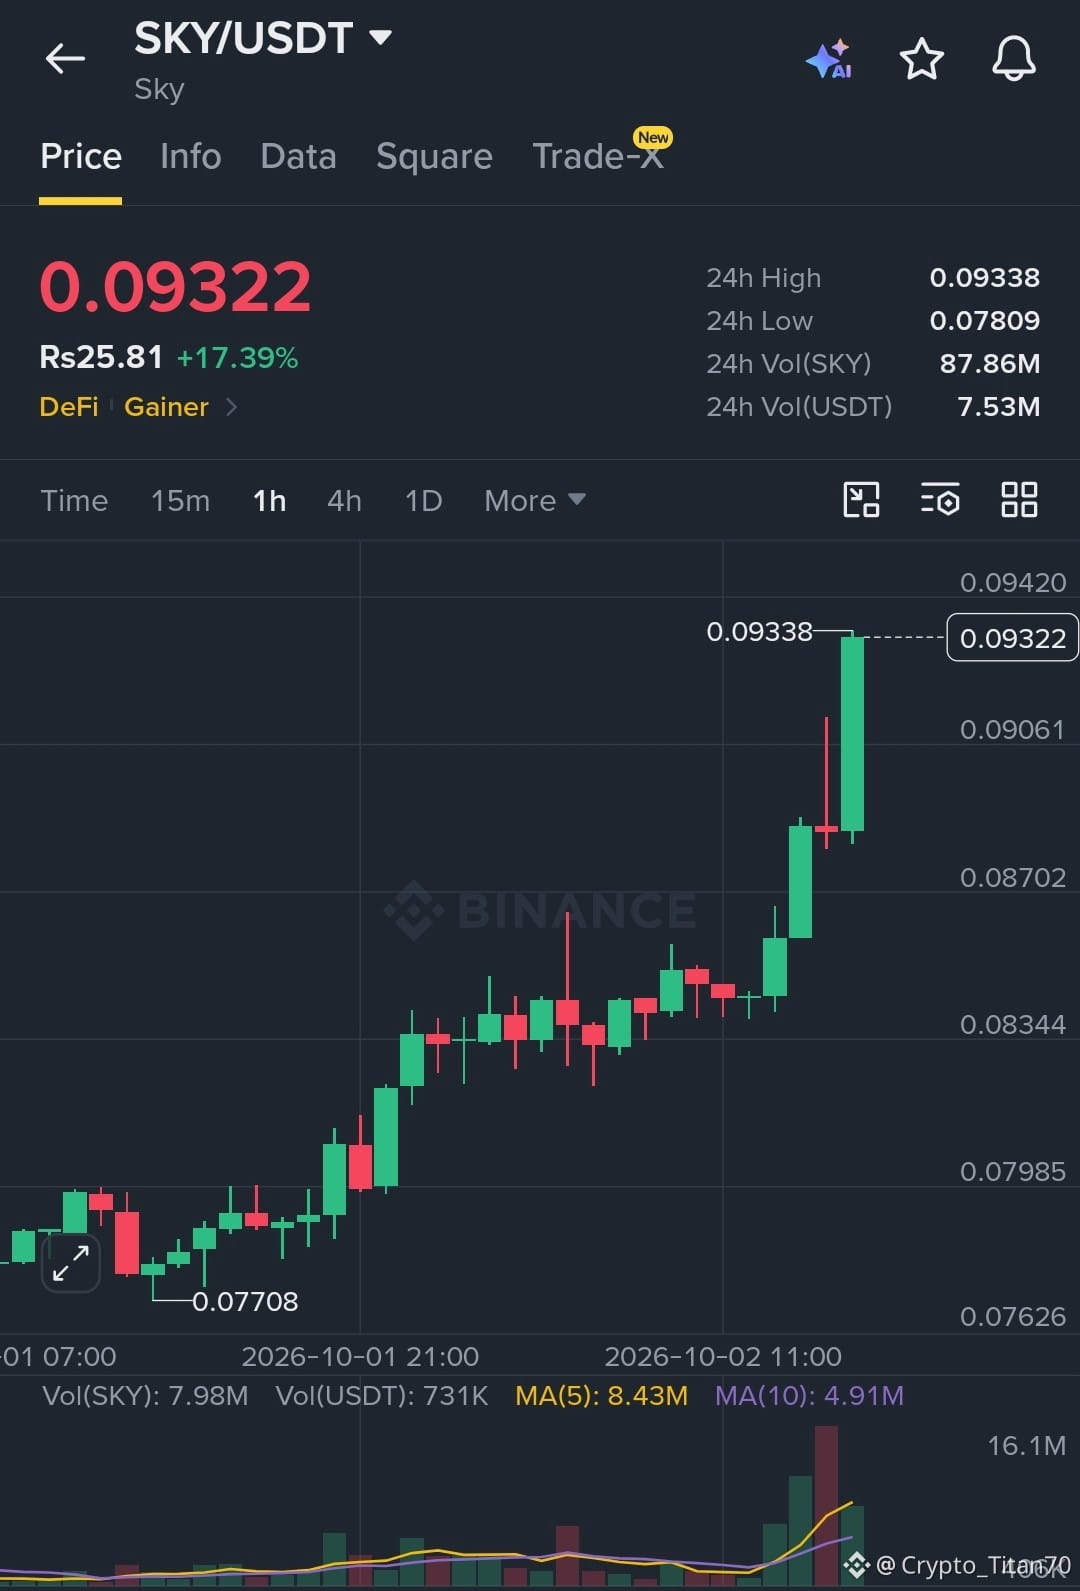
$SKY — strong breakout, but don’t chase the candle 🚀
$SKY has pushed sharply higher, showing strong buying pressure. After a move like this, waiting for a controlled pullback may offer a cleaner entry than buying at the top.
🟢 **Entry Zone:** $0.0887 – $0.0902
🎯 TP1: $0.0942
🎯 TP2: $0.0972
🎯 TP3: $0.1002
🛑 SL: $0.0854
Let price come back into the zone instead of forcing an entry. The breakout has already happened—the focus now is finding a disciplined pullback entry.
Trade $SKY here 👇
#SKY 👊
{spot}(SKYUSDT)
$SKY — strong breakout, but don’t chase the candle 🚀
$SKY has pushed sharply higher, showing strong buying pressure. After a move like this, waiting for a controlled pullback may offer a cleaner entry than buying at the top.
🟢 **Entry Zone:** $0.0887 – $0.0902
🎯 TP1: $0.0942
🎯 TP2: $0.0972
🎯 TP3: $0.1002
🛑 SL: $0.0854
Let price come back into the zone instead of forcing an entry. The breakout has already happened—the focus now is finding a disciplined pullback entry.
Trade $SKY here 👇
#SKY 👊
$SKY has pushed sharply higher, showing strong buying pressure. After a move like this, waiting for a controlled pullback may offer a cleaner entry than buying at the top.
🟢 **Entry Zone:** $0.0887 – $0.0902
🎯 TP1: $0.0942
🎯 TP2: $0.0972
🎯 TP3: $0.1002
🛑 SL: $0.0854
Let price come back into the zone instead of forcing an entry. The breakout has already happened—the focus now is finding a disciplined pullback entry.
Trade $SKY here 👇
#SKY 👊
1
62
·
--
Bullish
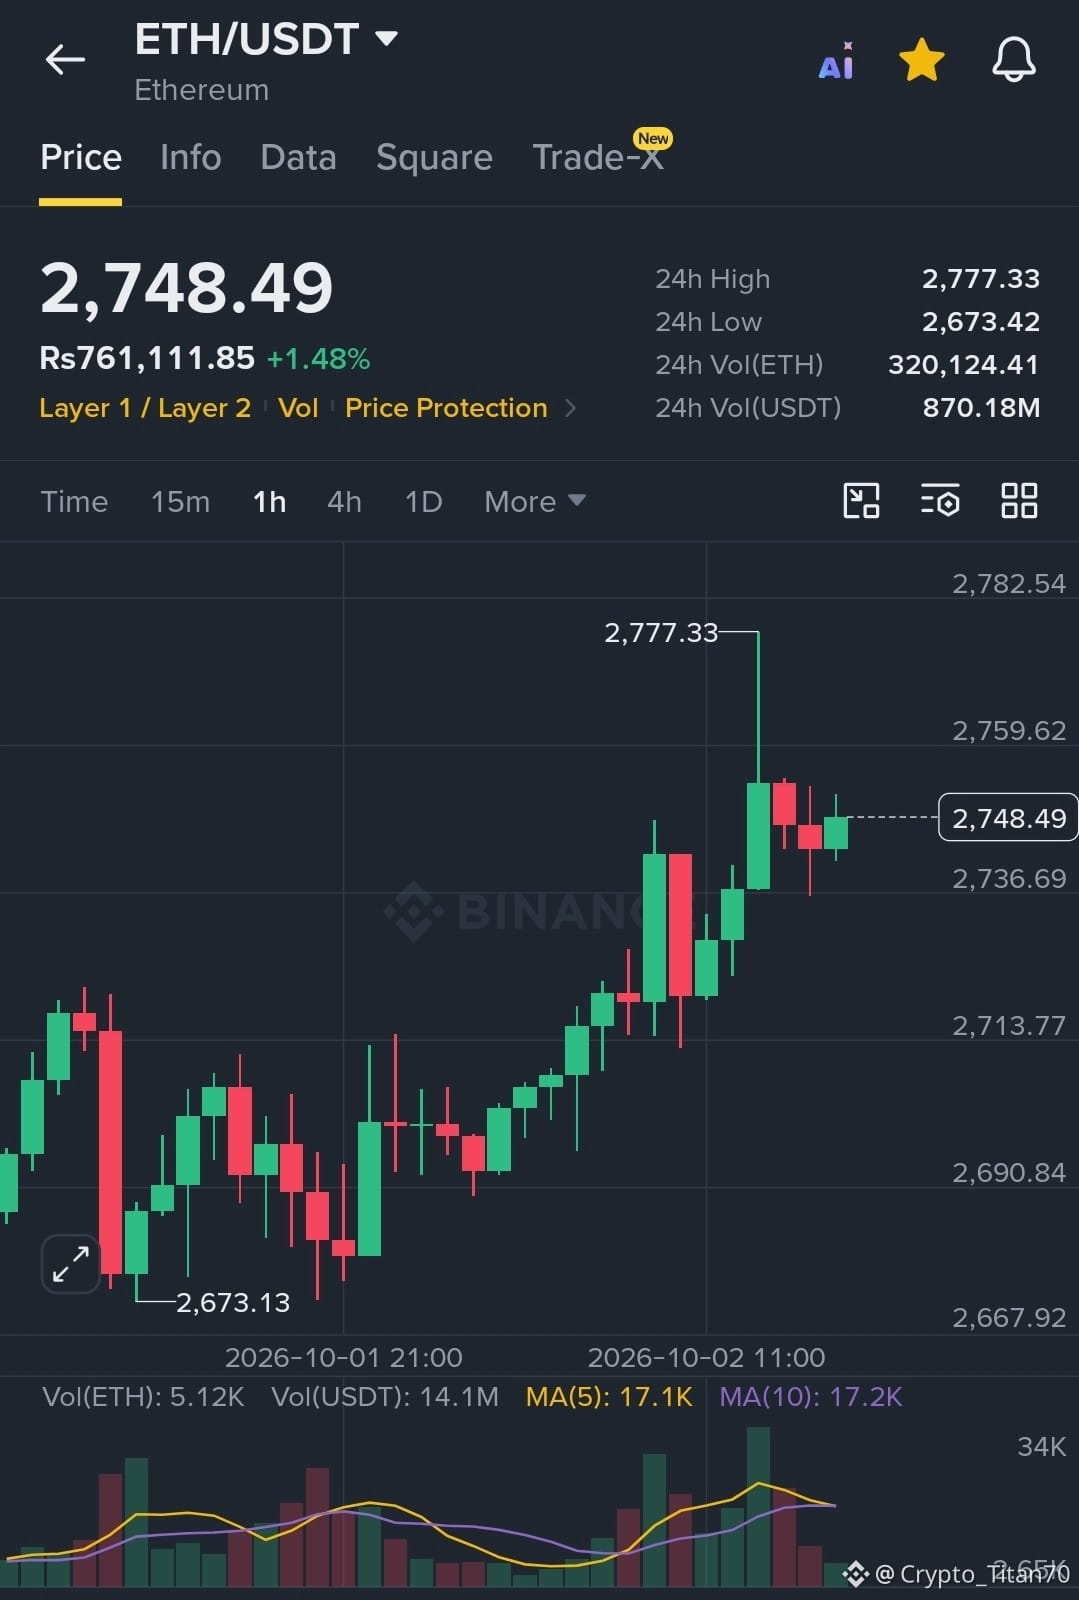
$ETH — bullish continuation setup is forming 🔥
ETH is holding near the support zone after a strong rally. If buyers continue defending the $2,720–$2,740 area, another push higher could develop.
🟢 **Long Entry:** $2,742 – $2,762
🎯 TP1: $2,805
🎯 TP2: $2,865
🎯 TP3: $2,925
🛑 SL: $2,670
The key reaction zone is $2,720–$2,740. Hold above it and the continuation setup remains valid; lose it, and the breakout could lose momentum.
Trade $ETHhere 👇
#ETH 🔥
{spot}(ETHUSDT)
$BTC
{future}(BTCUSDT)
$SOL
{future}(SOLUSDT)
$ETH — bullish continuation setup is forming 🔥
ETH is holding near the support zone after a strong rally. If buyers continue defending the $2,720–$2,740 area, another push higher could develop.
🟢 **Long Entry:** $2,742 – $2,762
🎯 TP1: $2,805
🎯 TP2: $2,865
🎯 TP3: $2,925
🛑 SL: $2,670
The key reaction zone is $2,720–$2,740. Hold above it and the continuation setup remains valid; lose it, and the breakout could lose momentum.
Trade $ETHhere 👇
#ETH 🔥
$BTC
$SOL
ETH is holding near the support zone after a strong rally. If buyers continue defending the $2,720–$2,740 area, another push higher could develop.
🟢 **Long Entry:** $2,742 – $2,762
🎯 TP1: $2,805
🎯 TP2: $2,865
🎯 TP3: $2,925
🛑 SL: $2,670
The key reaction zone is $2,720–$2,740. Hold above it and the continuation setup remains valid; lose it, and the breakout could lose momentum.
Trade $ETHhere 👇
#ETH 🔥
$BTC
$SOL
75
·
--
Bullish
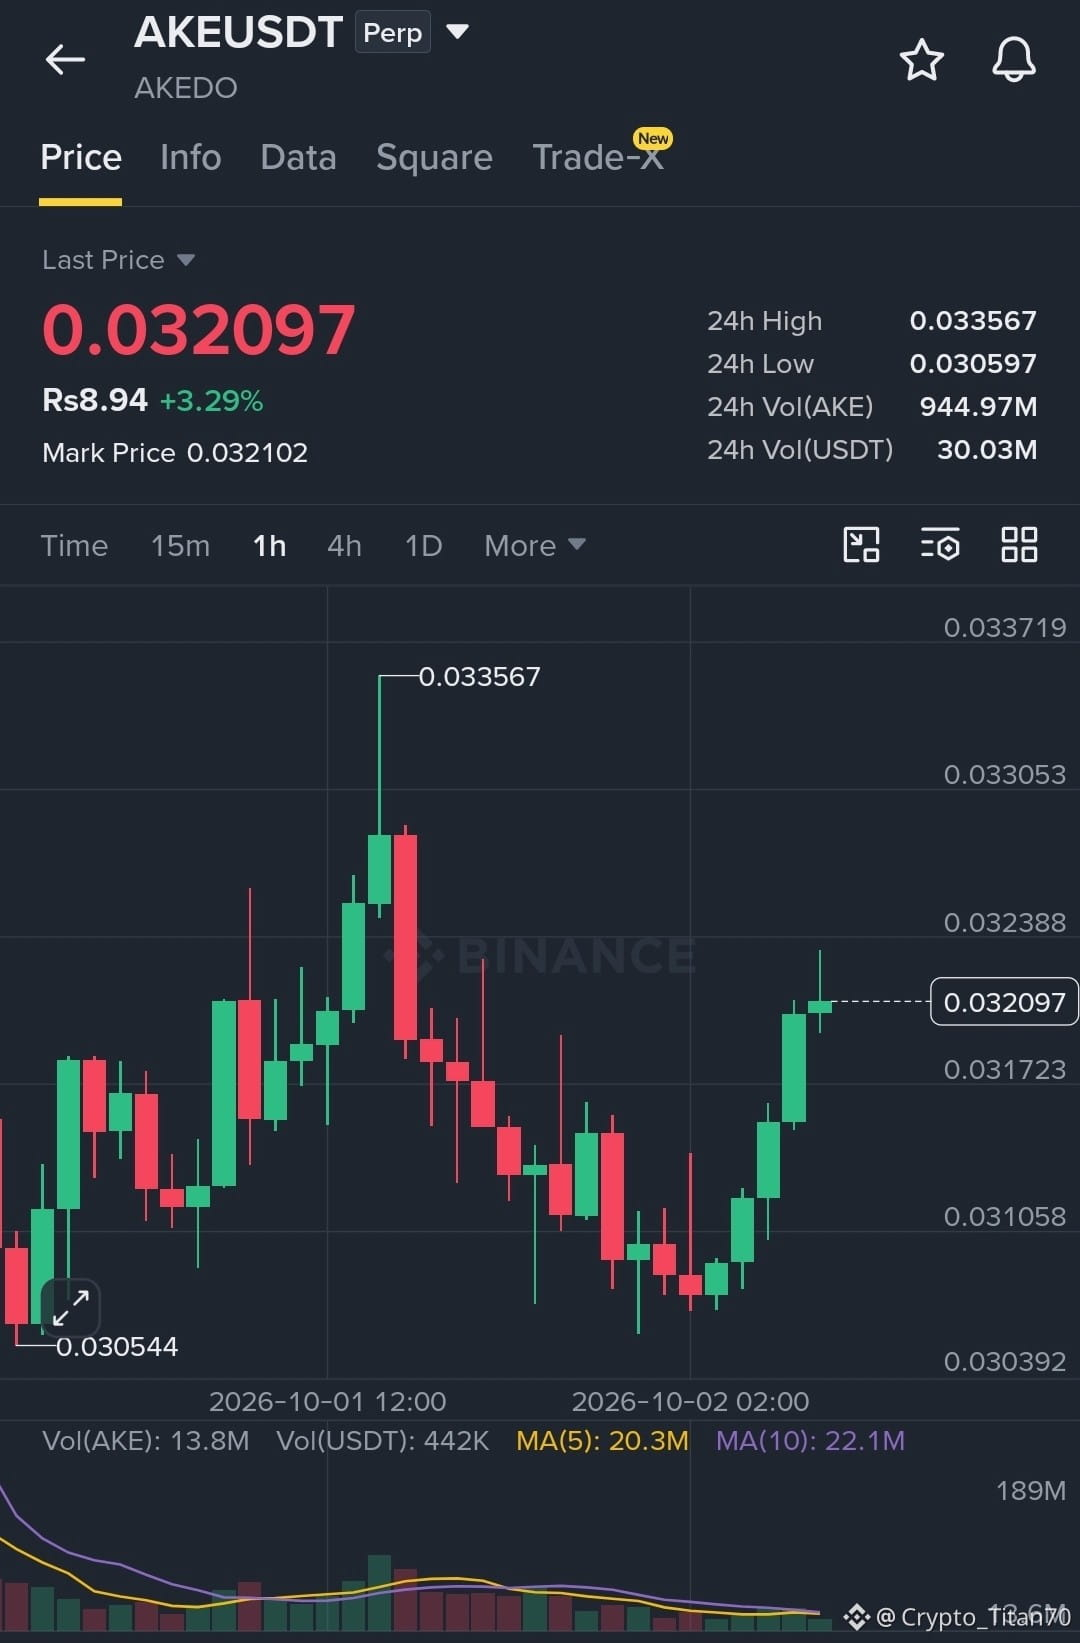
$AKE — It’s Friday, so is it time to push the market higher? Even low-quality coins are outperforming you today. Come on, show some strength and don’t embarrass yourself! $AKE
{future}(AKEUSDT)
$RE
{future}(REUSDT)
$AKE — It’s Friday, so is it time to push the market higher? Even low-quality coins are outperforming you today. Come on, show some strength and don’t embarrass yourself! $AKE
$RE
$RE
2
96
·
--
Bearish
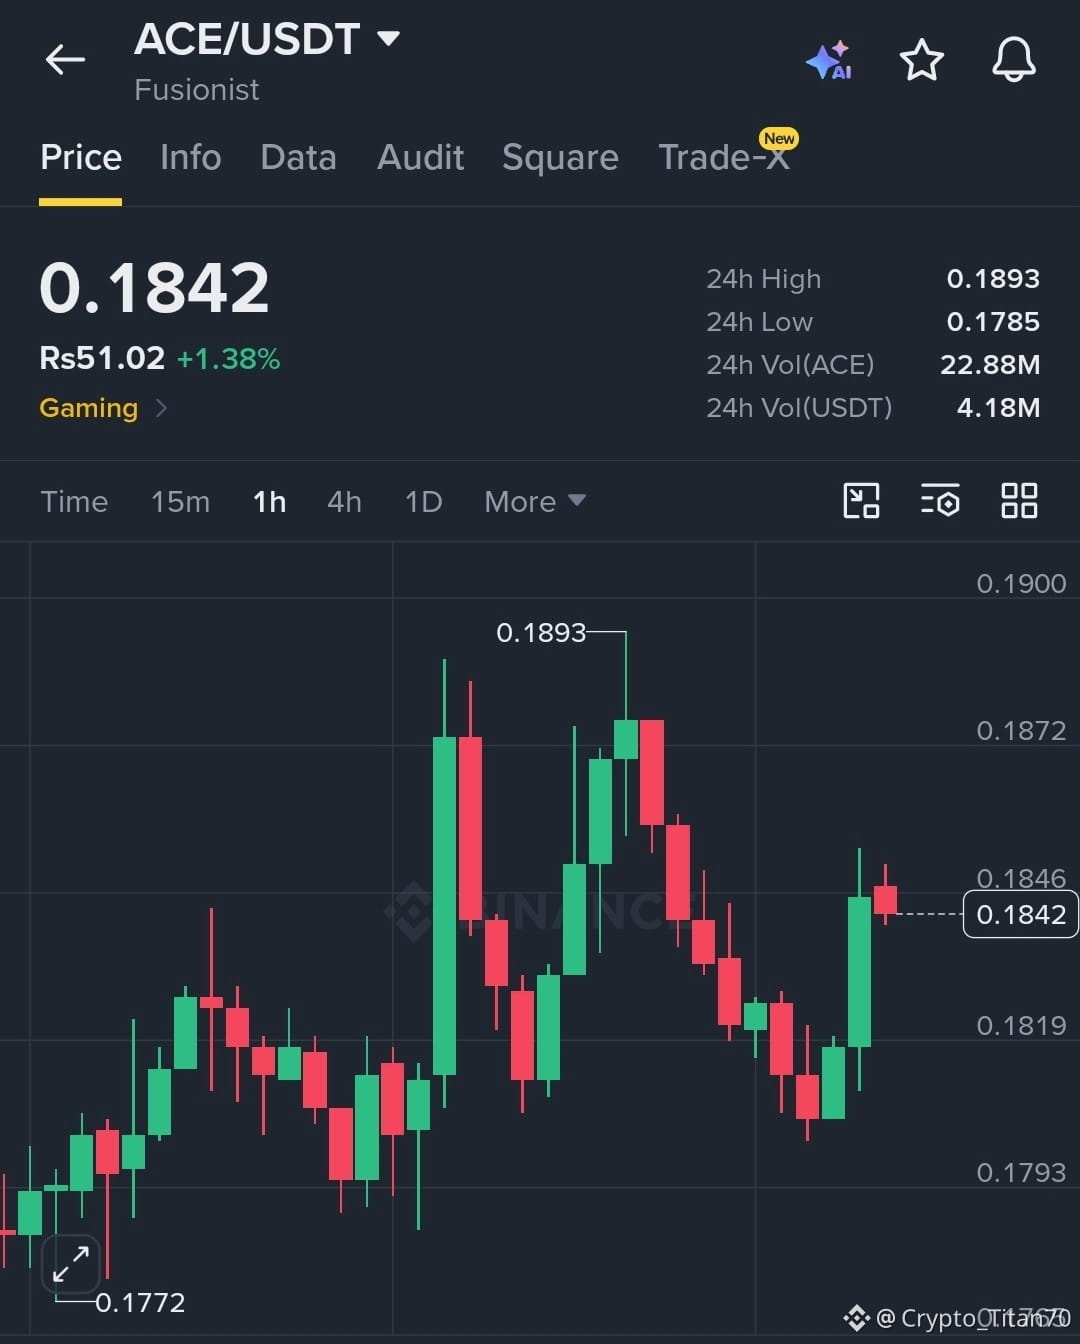
$ACE is showing a bullish structure across the higher and lower timeframes 📈
🟢 **LONG $ACE/USDT**
Bias: Strong bullish
📍 Entry Zone: $0.18420 – $0.18485
🎯 TP1: $0.18950
🎯 TP2: $0.19285
🎯 TP3: $0.19785
🛑 SL: $0.17780
If ACE holds above the lower entry level and momentum remains intact, the planned profit-taking areas are:
- Take partial profit around **$0.1895**
- Take another portion near **$0.1929**
- Leave the final portion for **$0.1979**
- After TP1 is reached, consider moving the stop toward breakeven
The daily and 1H EMA structures are bullish, while the 15M ADX shows buyers currently have control. Six of twelve signals support the long idea, with none directly bearish. Still, wait for an entry inside the zone rather than chasing a sudden candle.
Trade $ACE here 👇
#ACE
{spot}(ACEUSDT)
$AGT
{future}(AGTUSDT)
$ACE is showing a bullish structure across the higher and lower timeframes 📈
🟢 **LONG $ACE /USDT**
Bias: Strong bullish
📍 Entry Zone: $0.18420 – $0.18485
🎯 TP1: $0.18950
🎯 TP2: $0.19285
🎯 TP3: $0.19785
🛑 SL: $0.17780
If ACE holds above the lower entry level and momentum remains intact, the planned profit-taking areas are:
- Take partial profit around **$0.1895**
- Take another portion near **$0.1929**
- Leave the final portion for **$0.1979**
- After TP1 is reached, consider moving the stop toward breakeven
The daily and 1H EMA structures are bullish, while the 15M ADX shows buyers currently have control. Six of twelve signals support the long idea, with none directly bearish. Still, wait for an entry inside the zone rather than chasing a sudden candle.
Trade $ACE here 👇
#ACE
$AGT
🟢 **LONG $ACE /USDT**
Bias: Strong bullish
📍 Entry Zone: $0.18420 – $0.18485
🎯 TP1: $0.18950
🎯 TP2: $0.19285
🎯 TP3: $0.19785
🛑 SL: $0.17780
If ACE holds above the lower entry level and momentum remains intact, the planned profit-taking areas are:
- Take partial profit around **$0.1895**
- Take another portion near **$0.1929**
- Leave the final portion for **$0.1979**
- After TP1 is reached, consider moving the stop toward breakeven
The daily and 1H EMA structures are bullish, while the 15M ADX shows buyers currently have control. Six of twelve signals support the long idea, with none directly bearish. Still, wait for an entry inside the zone rather than chasing a sudden candle.
Trade $ACE here 👇
#ACE
$AGT
2
31
·
--
Bearish
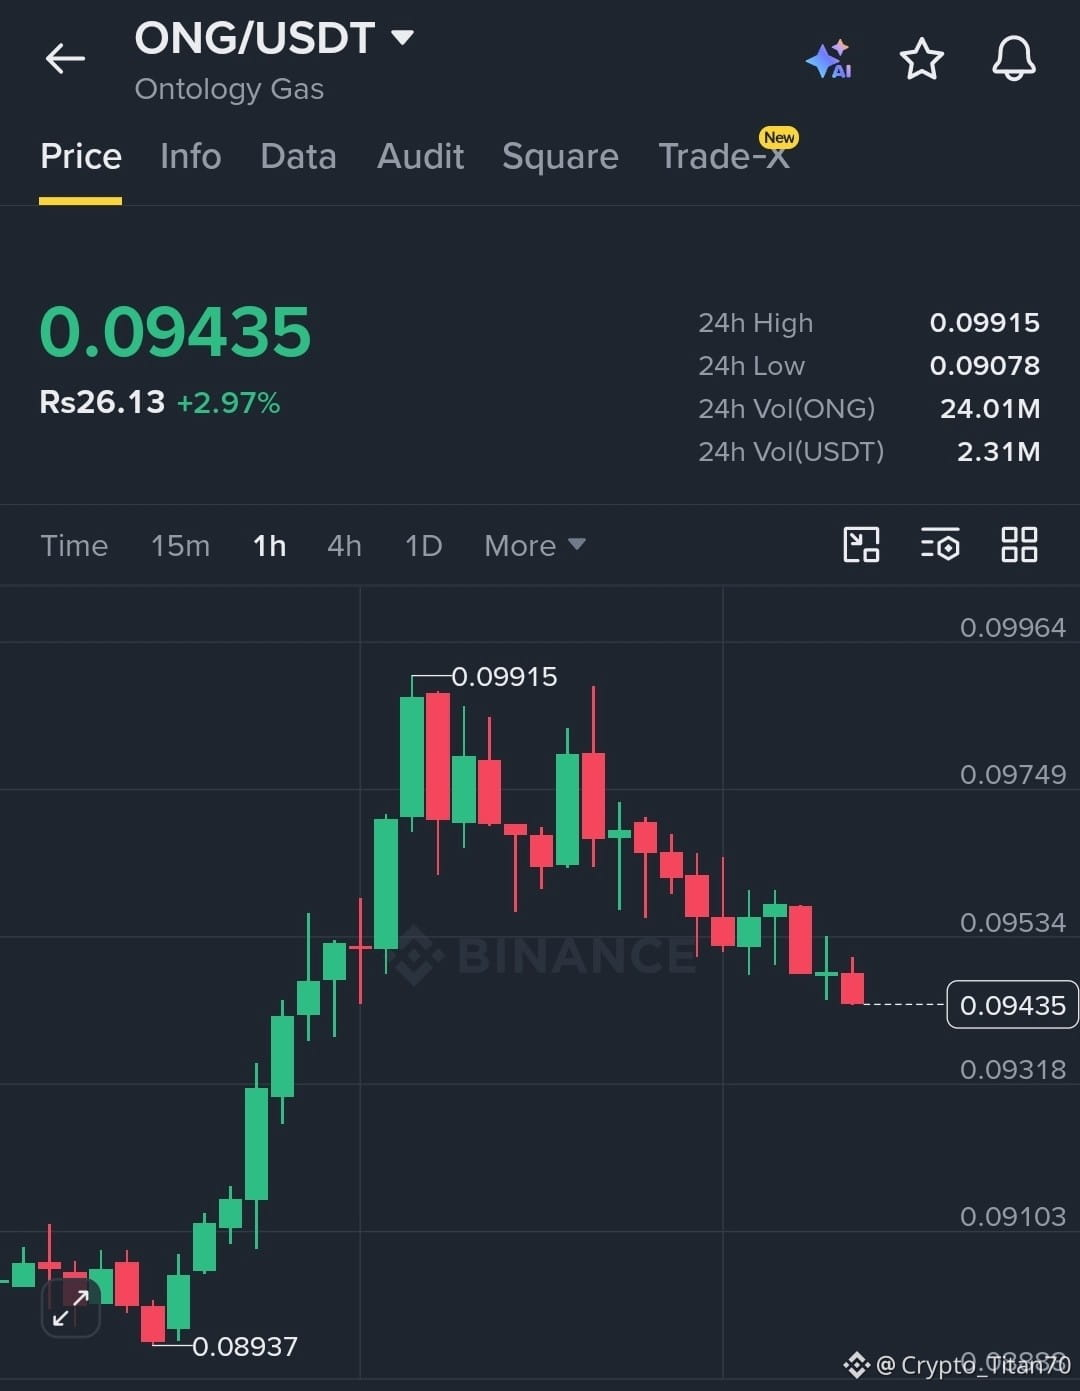
$ONG sellers are applying pressure, but the broader structure still leans bullish.
🟢 **LONG $ONG/USDT**
Bias: Cautiously bullish
📍 Entry Zone: $0.09445 – $0.09475
🎯 TP1: $0.09720
🎯 TP2: $0.09890
🎯 TP3: $0.10145
🛑 SL: $0.09115
Enter only within the planned zone. Consider taking partial profit at TP1, then moving the stop toward breakeven if the trade starts working. Conviction is moderate, so keep the position size light.
**Why consider the long?**
- The daily trend remains bullish, with price above the EMA50 and EMA200.
- The 4H and 1H structures are also stacked positively.
- The main concern is short-term selling pressure: the 15M ADX shows an active trend, with DI− well above DI+.
- Five of twelve signals support the long idea, while two are bearish and five remain undecided.
This is a counter-pressure entry, not a chase. If sellers continue dominating and price breaks below the stop zone, the bullish setup is invalidated.
Trade $ONG here 👇
#ONG
{spot}(ONGUSDT)
$RE
{future}(REUSDT)
$ONG sellers are applying pressure, but the broader structure still leans bullish.
🟢 **LONG $ONG /USDT**
Bias: Cautiously bullish
📍 Entry Zone: $0.09445 – $0.09475
🎯 TP1: $0.09720
🎯 TP2: $0.09890
🎯 TP3: $0.10145
🛑 SL: $0.09115
Enter only within the planned zone. Consider taking partial profit at TP1, then moving the stop toward breakeven if the trade starts working. Conviction is moderate, so keep the position size light.
**Why consider the long?**
- The daily trend remains bullish, with price above the EMA50 and EMA200.
- The 4H and 1H structures are also stacked positively.
- The main concern is short-term selling pressure: the 15M ADX shows an active trend, with DI− well above DI+.
- Five of twelve signals support the long idea, while two are bearish and five remain undecided.
This is a counter-pressure entry, not a chase. If sellers continue dominating and price breaks below the stop zone, the bullish setup is invalidated.
Trade $ONG here 👇
#ONG
$RE
🟢 **LONG $ONG /USDT**
Bias: Cautiously bullish
📍 Entry Zone: $0.09445 – $0.09475
🎯 TP1: $0.09720
🎯 TP2: $0.09890
🎯 TP3: $0.10145
🛑 SL: $0.09115
Enter only within the planned zone. Consider taking partial profit at TP1, then moving the stop toward breakeven if the trade starts working. Conviction is moderate, so keep the position size light.
**Why consider the long?**
- The daily trend remains bullish, with price above the EMA50 and EMA200.
- The 4H and 1H structures are also stacked positively.
- The main concern is short-term selling pressure: the 15M ADX shows an active trend, with DI− well above DI+.
- Five of twelve signals support the long idea, while two are bearish and five remain undecided.
This is a counter-pressure entry, not a chase. If sellers continue dominating and price breaks below the stop zone, the bullish setup is invalidated.
Trade $ONG here 👇
#ONG
$RE
3
31
·
--
Bullish
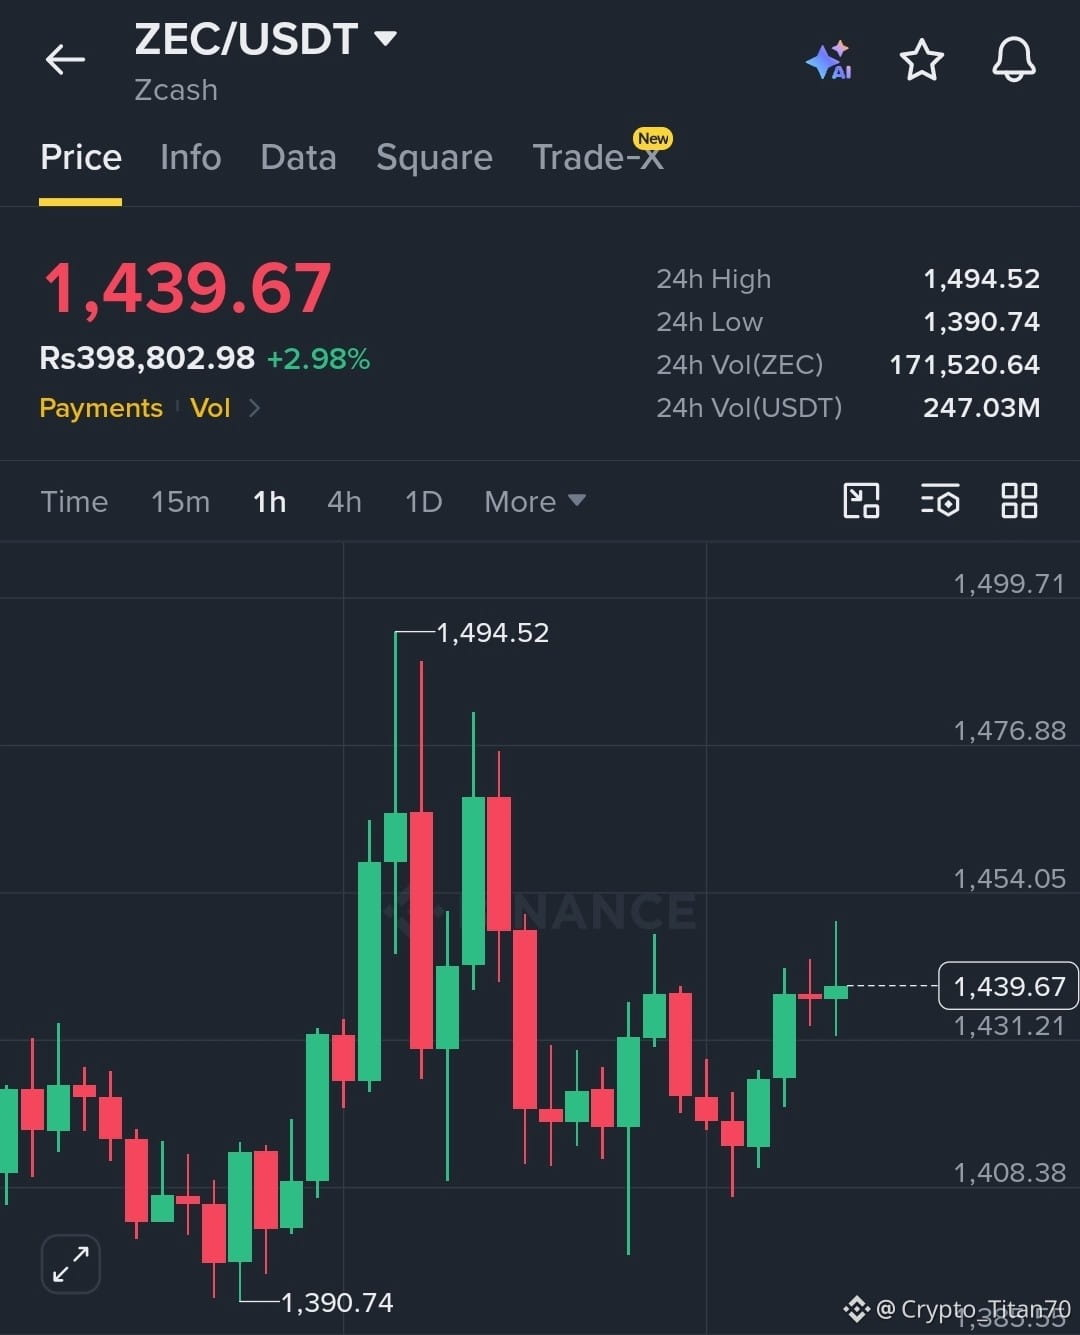
🚀 Guys, $ZEC long setup is active now!
ZEC is holding strong after the recent push higher, and buyers could extend the move if price remains above the entry zone.
**ZECUSDT Perpetual**
📍 Entry Zone: $1,436 – $1,448
🎯 TP1: $1,480
🎯 TP2: $1,508
🛑 Stop Loss: $1,338
A clean hold above the entry area keeps the bullish setup valid. Take partial profit near TP1 and manage the remainder toward TP2.
⚠️ 40× leverage carries extremely high liquidation risk. Use a much smaller position size, and never risk more than you can afford to lose.
Trade $ZEC here 👇
#ZEC
{spot}(ZECUSDT)
$RE
{future}(REUSDT)
🚀 Guys, $ZEC long setup is active now!
ZEC is holding strong after the recent push higher, and buyers could extend the move if price remains above the entry zone.
**ZECUSDT Perpetual**
📍 Entry Zone: $1,436 – $1,448
🎯 TP1: $1,480
🎯 TP2: $1,508
🛑 Stop Loss: $1,338
A clean hold above the entry area keeps the bullish setup valid. Take partial profit near TP1 and manage the remainder toward TP2.
⚠️ 40× leverage carries extremely high liquidation risk. Use a much smaller position size, and never risk more than you can afford to lose.
Trade $ZEC here 👇
#ZEC
$RE
ZEC is holding strong after the recent push higher, and buyers could extend the move if price remains above the entry zone.
**ZECUSDT Perpetual**
📍 Entry Zone: $1,436 – $1,448
🎯 TP1: $1,480
🎯 TP2: $1,508
🛑 Stop Loss: $1,338
A clean hold above the entry area keeps the bullish setup valid. Take partial profit near TP1 and manage the remainder toward TP2.
⚠️ 40× leverage carries extremely high liquidation risk. Use a much smaller position size, and never risk more than you can afford to lose.
Trade $ZEC here 👇
#ZEC
$RE
2
7
·
--
Bearish
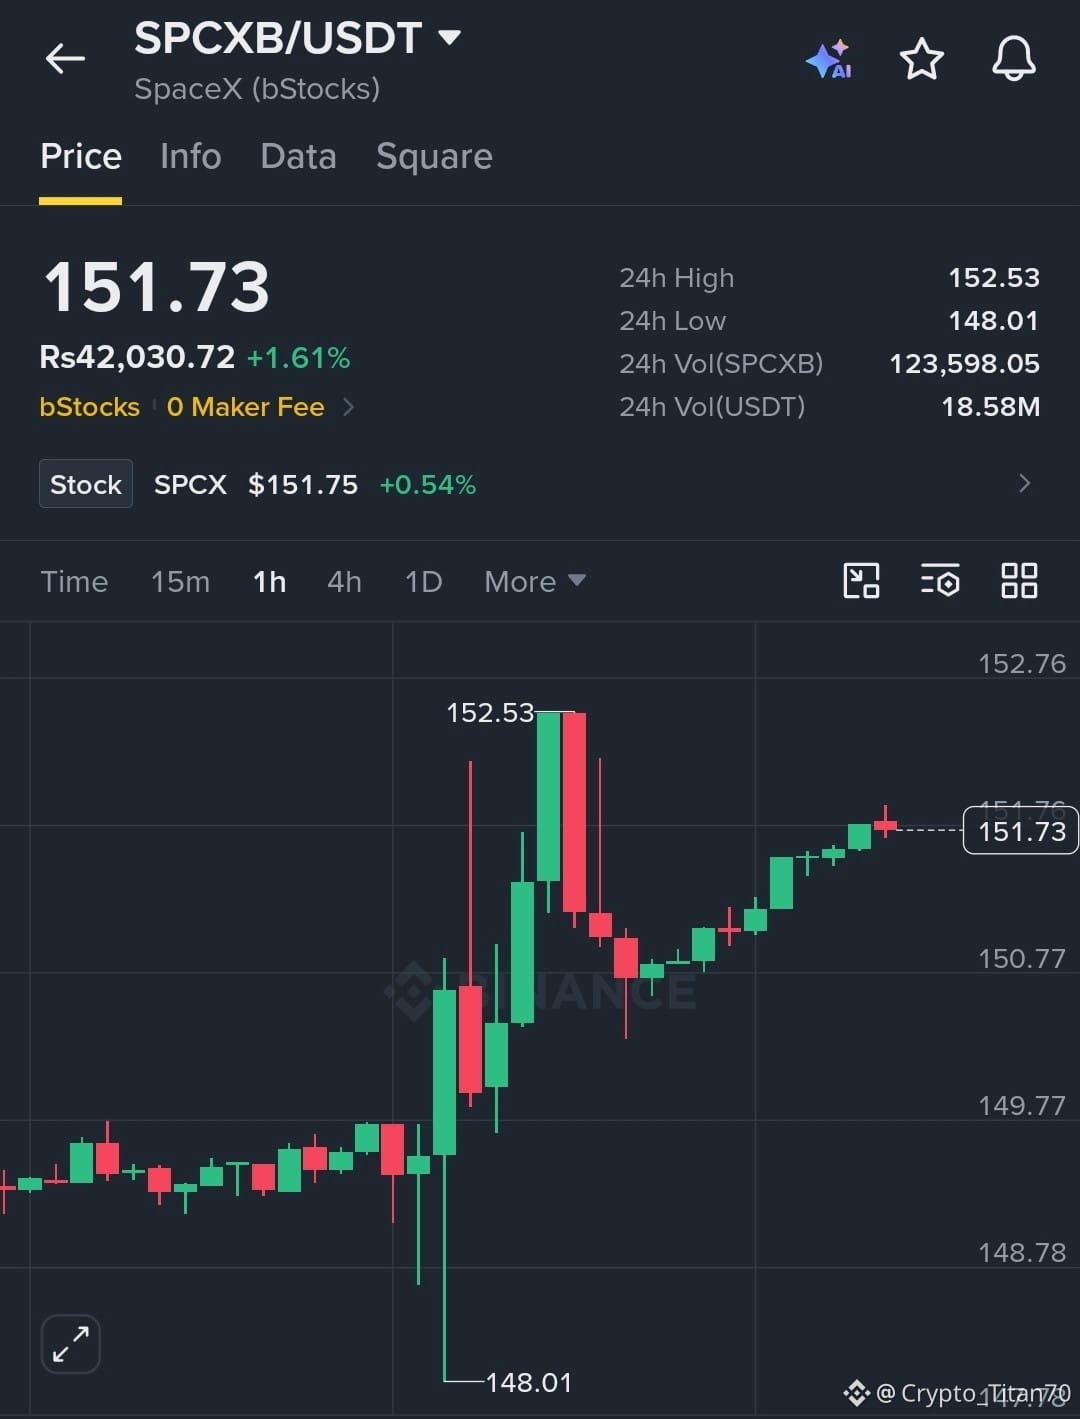
Most traders are quick to fade range-bound coins, but $SPCX is starting to challenge that idea.
🟢 **LONG $SPCX/USDT**
Bias: Mildly bullish
📍 Entry Zone: $151.82 – $151.90
🎯 TP1: $153.05
🎯 TP2: $153.80
🎯 TP3: $154.95
🛑 SL: $150.30
Only enter inside the zone. Consider taking partial profit at TP1, then moving the stop toward breakeven if momentum continues. Conviction is moderate, so keep the position size light.
**Why the long setup?**
- The 4H structure remains bullish, with price above the EMA50 and EMA200.
- The 15M ADX is showing moderate trend strength, while DI+ remains ahead of DI−.
- The 4H RSI is holding above the bullish momentum zone.
- Four of eleven signals are bullish, with no direct bearish signals and the rest undecided.
The bigger picture is still range-bound, but the lower-timeframe trend is leaning upward. A breakdown from the daily range would invalidate this long idea.
Trade $SPCX here 👇
#SPCX
{future}(SPCXUSDT)
$AGT
{future}(AGTUSDT)
Most traders are quick to fade range-bound coins, but $SPCX is starting to challenge that idea.
🟢 **LONG $SPCX /USDT**
Bias: Mildly bullish
📍 Entry Zone: $151.82 – $151.90
🎯 TP1: $153.05
🎯 TP2: $153.80
🎯 TP3: $154.95
🛑 SL: $150.30
Only enter inside the zone. Consider taking partial profit at TP1, then moving the stop toward breakeven if momentum continues. Conviction is moderate, so keep the position size light.
**Why the long setup?**
- The 4H structure remains bullish, with price above the EMA50 and EMA200.
- The 15M ADX is showing moderate trend strength, while DI+ remains ahead of DI−.
- The 4H RSI is holding above the bullish momentum zone.
- Four of eleven signals are bullish, with no direct bearish signals and the rest undecided.
The bigger picture is still range-bound, but the lower-timeframe trend is leaning upward. A breakdown from the daily range would invalidate this long idea.
Trade $SPCX here 👇
#SPCX
$AGT
🟢 **LONG $SPCX /USDT**
Bias: Mildly bullish
📍 Entry Zone: $151.82 – $151.90
🎯 TP1: $153.05
🎯 TP2: $153.80
🎯 TP3: $154.95
🛑 SL: $150.30
Only enter inside the zone. Consider taking partial profit at TP1, then moving the stop toward breakeven if momentum continues. Conviction is moderate, so keep the position size light.
**Why the long setup?**
- The 4H structure remains bullish, with price above the EMA50 and EMA200.
- The 15M ADX is showing moderate trend strength, while DI+ remains ahead of DI−.
- The 4H RSI is holding above the bullish momentum zone.
- Four of eleven signals are bullish, with no direct bearish signals and the rest undecided.
The bigger picture is still range-bound, but the lower-timeframe trend is leaning upward. A breakdown from the daily range would invalidate this long idea.
Trade $SPCX here 👇
#SPCX
$AGT
1
21
·
--
Bearish
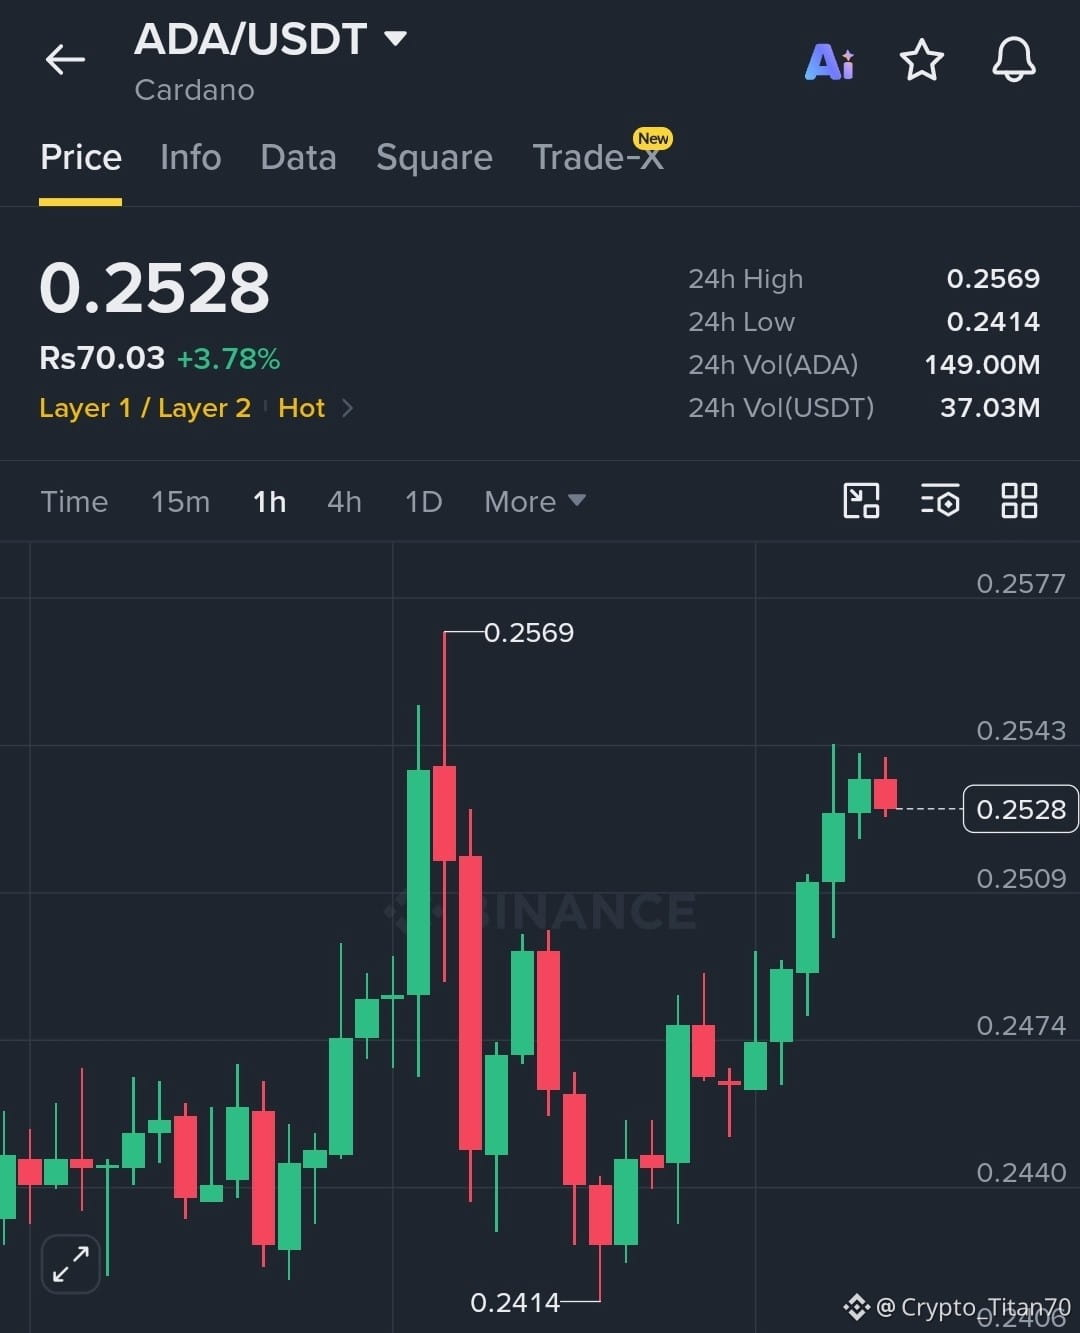
Guys, a **$ADA long setup is active** 🤝♥️
ADA is holding above nearby support after the recent pullback. As long as price stays above the $0.2480 area, buyers may get another chance to push higher.
Entry Zone: $0.2492 – $0.2517
🎯 TP1: $0.2518
🎯 TP2: $0.2528 – $0.2542
🛑 SL: $0.2155
Leverage increases liquidation risk significantly, so keep the position size small and use strict risk management. Avoid entering if price loses the support zone.
Long $ADA here 👇
#ADA
{spot}(ADAUSDT)
$MEGA
{future}(MEGAUSDT)
Guys, a **$ADA long setup is active** 🤝♥️
ADA is holding above nearby support after the recent pullback. As long as price stays above the $0.2480 area, buyers may get another chance to push higher.
Entry Zone: $0.2492 – $0.2517
🎯 TP1: $0.2518
🎯 TP2: $0.2528 – $0.2542
🛑 SL: $0.2155
Leverage increases liquidation risk significantly, so keep the position size small and use strict risk management. Avoid entering if price loses the support zone.
Long $ADA here 👇
#ADA
$MEGA
ADA is holding above nearby support after the recent pullback. As long as price stays above the $0.2480 area, buyers may get another chance to push higher.
Entry Zone: $0.2492 – $0.2517
🎯 TP1: $0.2518
🎯 TP2: $0.2528 – $0.2542
🛑 SL: $0.2155
Leverage increases liquidation risk significantly, so keep the position size small and use strict risk management. Avoid entering if price loses the support zone.
Long $ADA here 👇
#ADA
$MEGA
2
22
·
--
Bullish
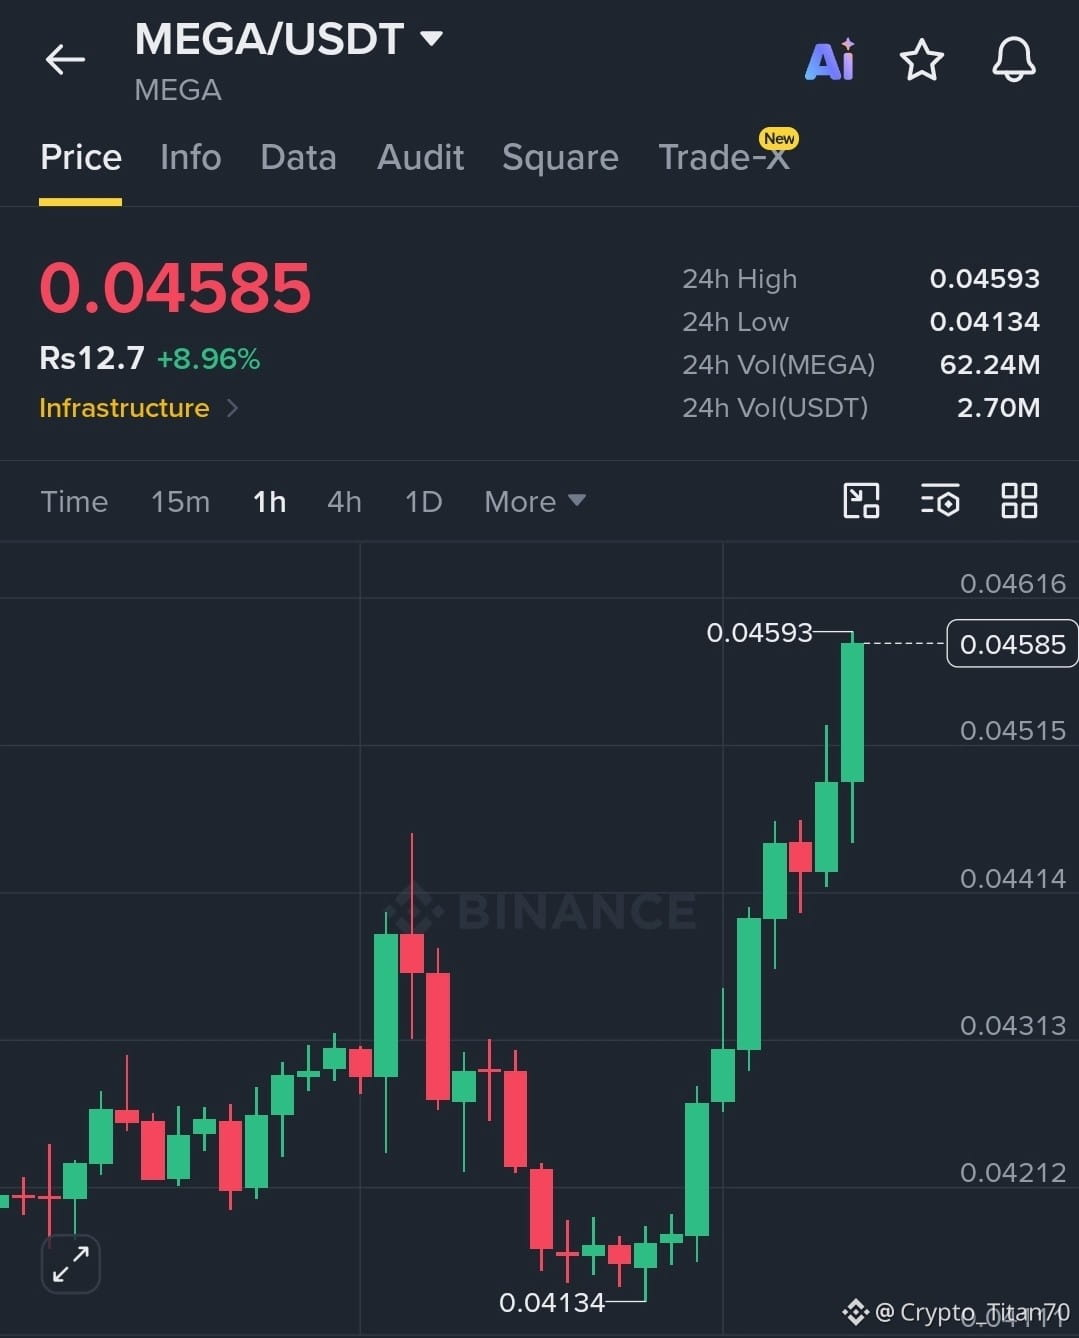
🔥 $MEGA long setup is active 🔥
Buyers are stepping in around the current zone, and a sustained move higher could open the way toward the next upside targets.
Entry: $0.04565
🎯 TP1: $0.04950
🎯 TP2: $0.05510
🎯 TP3: $0.06220
🛑 SL: $0.04130
Wait for confirmation before entering and keep risk controlled. If momentum weakens, avoid chasing the move.
Long $MEGA here 👇
#MEGA
{future}(MEGAUSDT)
$RE
{future}(REUSDT)
🔥 $MEGA long setup is active 🔥
Buyers are stepping in around the current zone, and a sustained move higher could open the way toward the next upside targets.
Entry: $0.04565
🎯 TP1: $0.04950
🎯 TP2: $0.05510
🎯 TP3: $0.06220
🛑 SL: $0.04130
Wait for confirmation before entering and keep risk controlled. If momentum weakens, avoid chasing the move.
Long $MEGA here 👇
#MEGA
$RE
Buyers are stepping in around the current zone, and a sustained move higher could open the way toward the next upside targets.
Entry: $0.04565
🎯 TP1: $0.04950
🎯 TP2: $0.05510
🎯 TP3: $0.06220
🛑 SL: $0.04130
Wait for confirmation before entering and keep risk controlled. If momentum weakens, avoid chasing the move.
Long $MEGA here 👇
#MEGA
$RE
3
18
·
--
Bearish
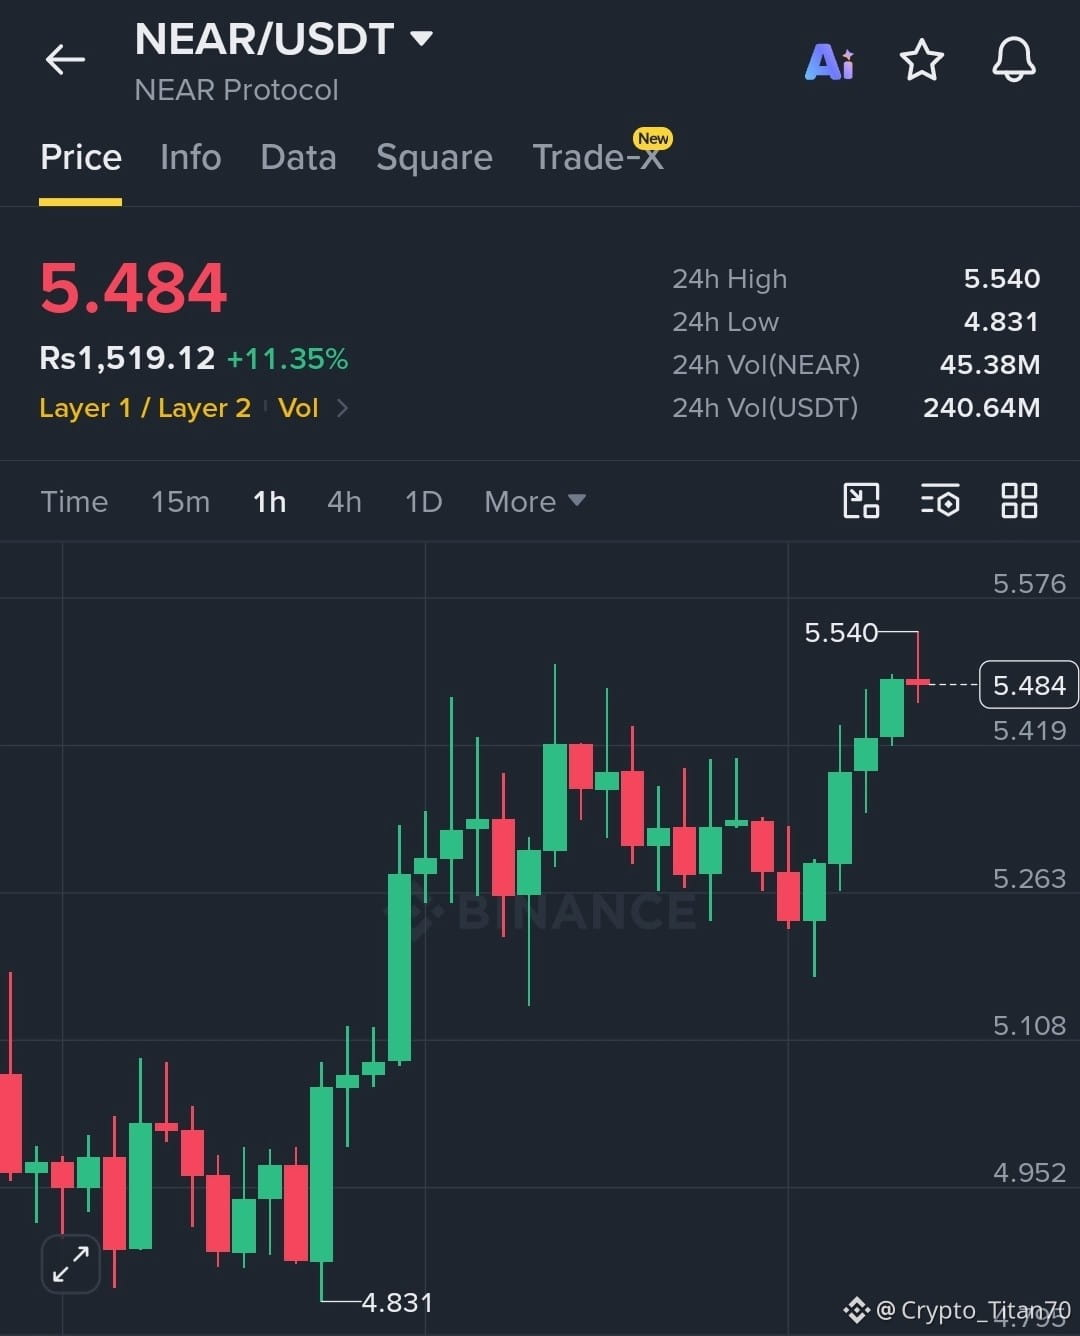
$NEAR — rejection short setup is forming 📉
$NEARhas pushed into a key resistance area, but momentum is starting to show signs of hesitation. If sellers defend this zone and price confirms the rejection, a move back toward lower support levels could follow.
**Trade Plan: Short**
Entry Zone: $5.470 – $5.480
🎯 TP1: $5.405
🎯 TP2: $5.305
🎯 TP3: $5.205
🛑 SL: $5.565
The $5.48 area remains the key level to watch. A firm rejection could strengthen the bearish setup, while a clean break above resistance would weaken the idea.
Trade $NEAR here 👇
#NEAR
{spot}(NEARUSDT)
$RE
{future}(REUSDT)
$NEAR — rejection short setup is forming 📉
$NEARhas pushed into a key resistance area, but momentum is starting to show signs of hesitation. If sellers defend this zone and price confirms the rejection, a move back toward lower support levels could follow.
**Trade Plan: Short**
Entry Zone: $5.470 – $5.480
🎯 TP1: $5.405
🎯 TP2: $5.305
🎯 TP3: $5.205
🛑 SL: $5.565
The $5.48 area remains the key level to watch. A firm rejection could strengthen the bearish setup, while a clean break above resistance would weaken the idea.
Trade $NEAR here 👇
#NEAR
$RE
$NEARhas pushed into a key resistance area, but momentum is starting to show signs of hesitation. If sellers defend this zone and price confirms the rejection, a move back toward lower support levels could follow.
**Trade Plan: Short**
Entry Zone: $5.470 – $5.480
🎯 TP1: $5.405
🎯 TP2: $5.305
🎯 TP3: $5.205
🛑 SL: $5.565
The $5.48 area remains the key level to watch. A firm rejection could strengthen the bearish setup, while a clean break above resistance would weaken the idea.
Trade $NEAR here 👇
#NEAR
$RE
3
14
·
--
Bullish
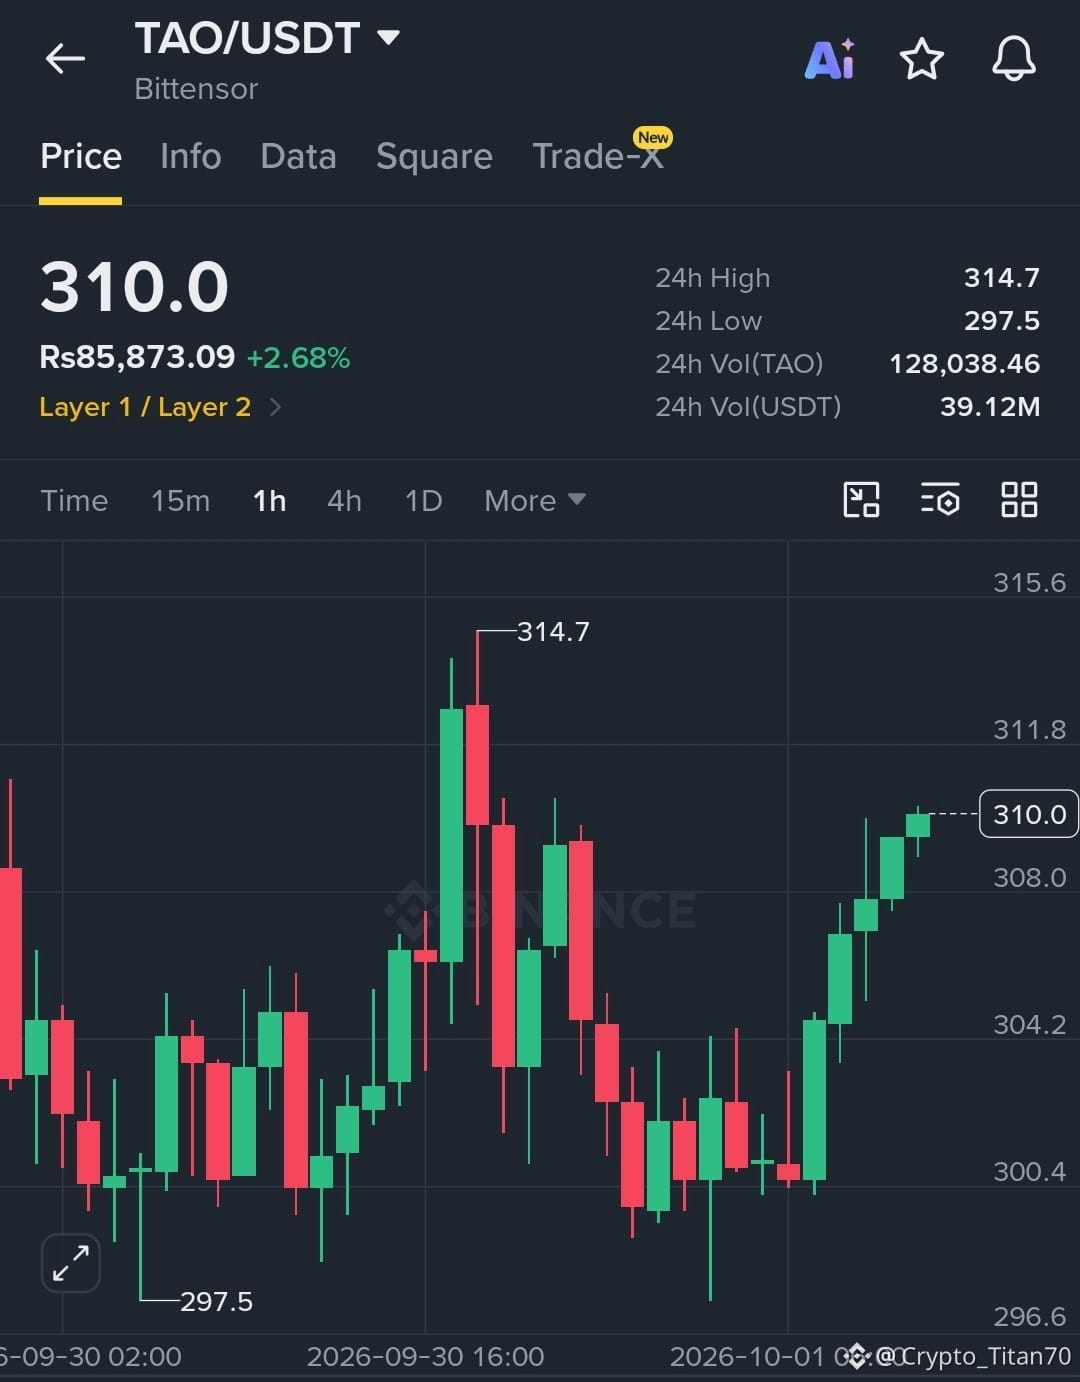
$TAO — The bull market has arrived, and the combination of AI and blockchain is poised to become mainstream. AI-focused coins could see gains far beyond expectations.
{future}(TAOUSDT)
$AGT
{future}(AGTUSDT)
$LAB
{future}(LABUSDT)
$TAO — The bull market has arrived, and the combination of AI and blockchain is poised to become mainstream. AI-focused coins could see gains far beyond expectations.
$AGT
$LAB
$AGT
$LAB
3
58
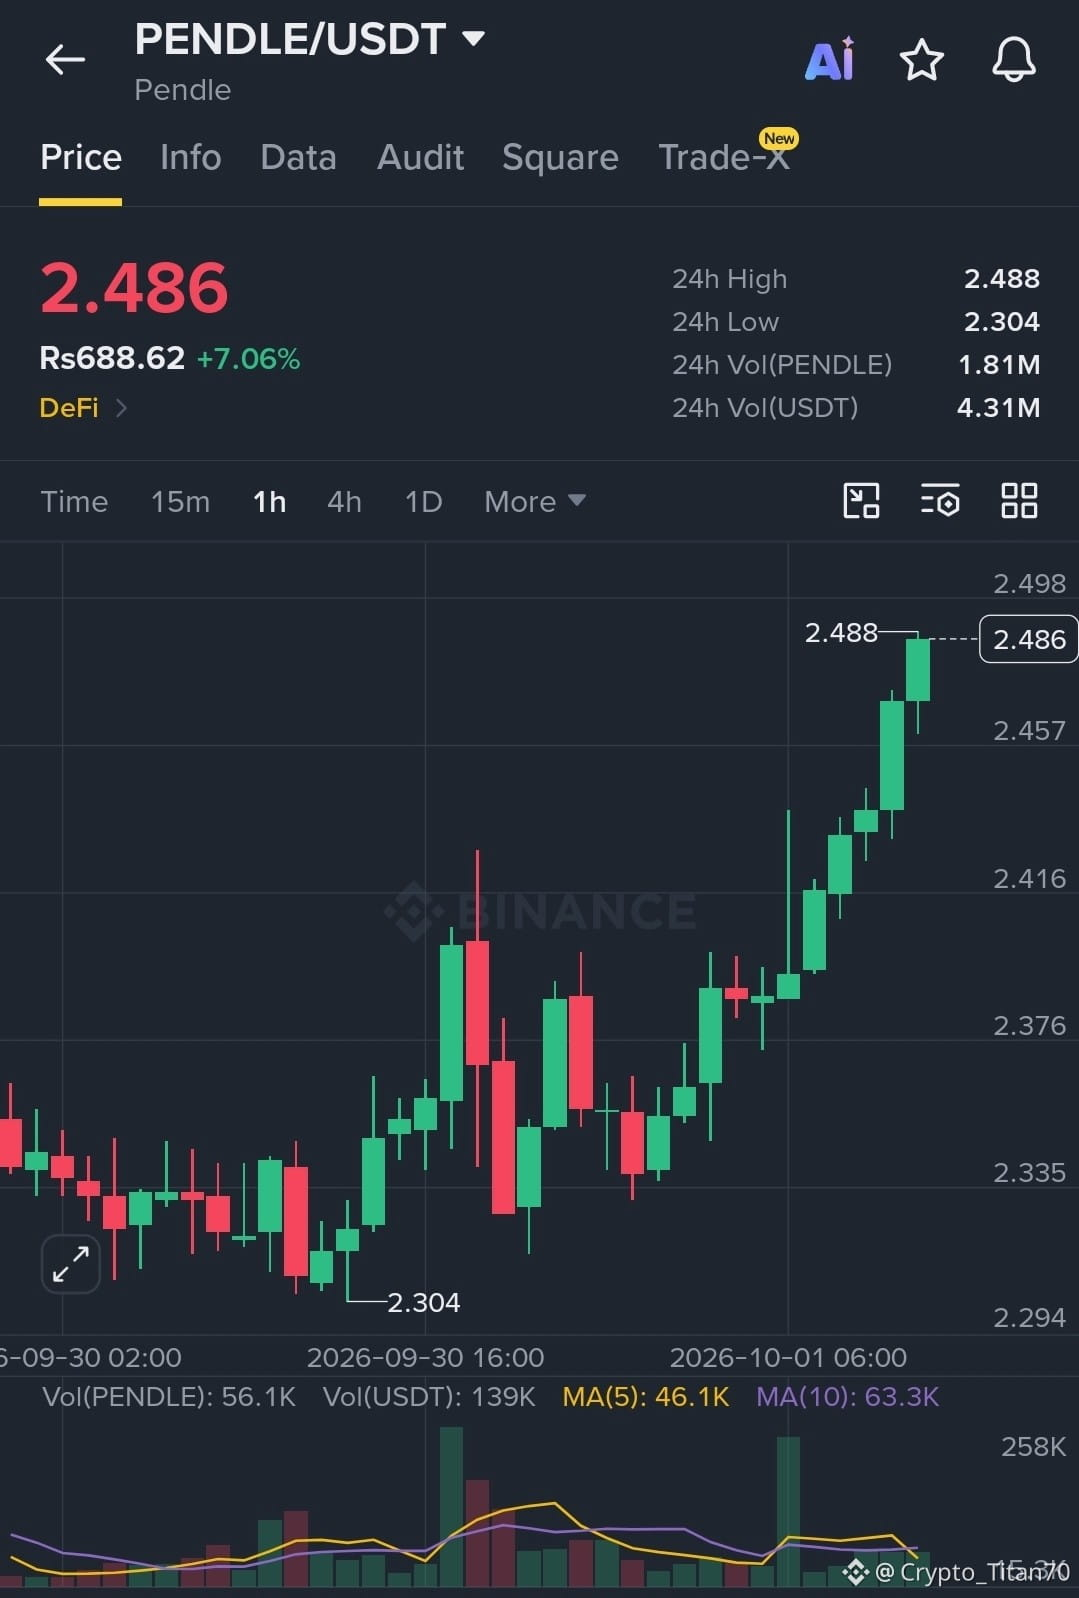
🔥 $PENDLE long setup is live 🔥
Buyers are stepping in around the current level, and a sustained push could send price toward the next upside targets.
Entry: $2.4800
🎯 TP1: $2.7050
🎯 TP2: $2.8550
🎯 TP3: $2.9850
🛑 SL: $2.3700
Wait for confirmation and manage your position size carefully. If momentum fades, avoid forcing the trade.
Long $PENDLE here 👇
#PENDLE
{spot}(PENDLEUSDT)
$AGT
{future}(AGTUSDT)
🔥 $PENDLE long setup is live 🔥
Buyers are stepping in around the current level, and a sustained push could send price toward the next upside targets.
Entry: $2.4800
🎯 TP1: $2.7050
🎯 TP2: $2.8550
🎯 TP3: $2.9850
🛑 SL: $2.3700
Wait for confirmation and manage your position size carefully. If momentum fades, avoid forcing the trade.
Long $PENDLE here 👇
#PENDLE
$AGT
Buyers are stepping in around the current level, and a sustained push could send price toward the next upside targets.
Entry: $2.4800
🎯 TP1: $2.7050
🎯 TP2: $2.8550
🎯 TP3: $2.9850
🛑 SL: $2.3700
Wait for confirmation and manage your position size carefully. If momentum fades, avoid forcing the trade.
Long $PENDLE here 👇
#PENDLE
$AGT
3
11
$BTC $ETH $CL — A bull market doesn’t come to an end after only one or three months; these cycles can continue for a long time. In the end, the true winner will be revealed when it’s time to take profits and withdraw funds. 👇👇👇
{future}(BTCUSDT)
{future}(ETHUSDT)
{future}(CLUSDT)
$BTC $ETH $CL — A bull market doesn’t come to an end after only one or three months; these cycles can continue for a long time. In the end, the true winner will be revealed when it’s time to take profits and withdraw funds. 👇👇👇
2
35
·
--
Bullish
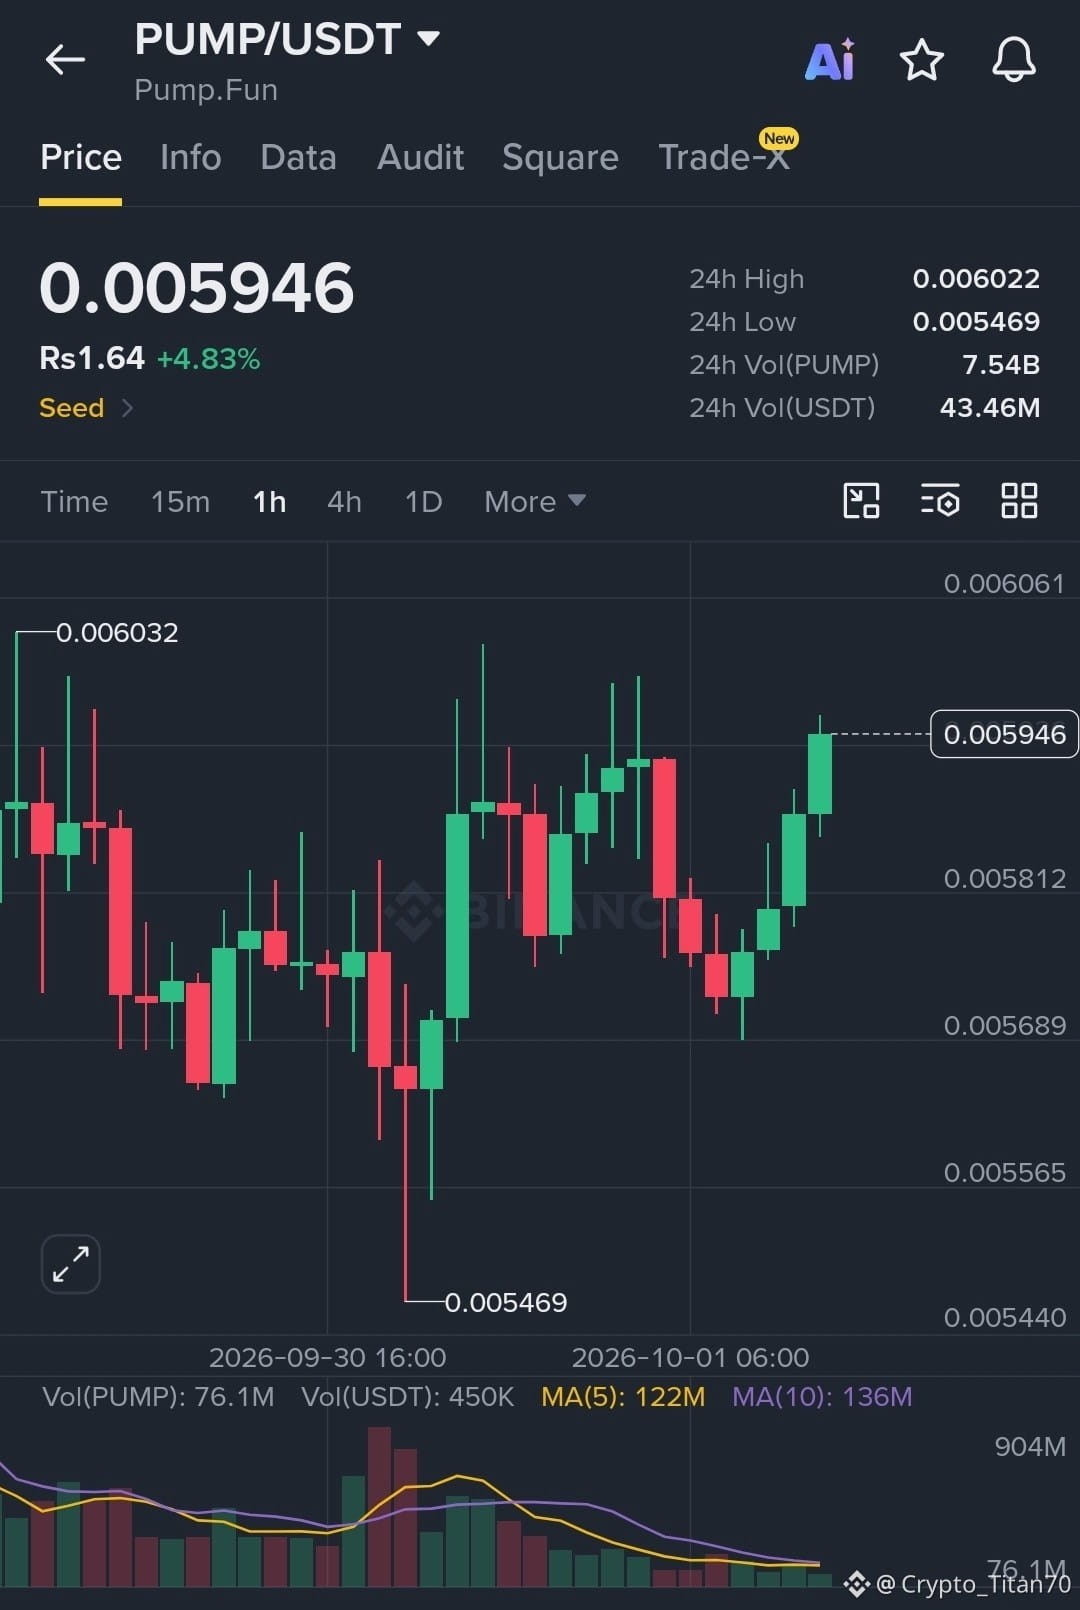
$PUMP — buyers are aiming for a fresh high 🚀
Momentum is building around the current support zone, and a sustained move higher could send $PUMPtoward the next resistance levels.
Long Setup
Entry Zone: $0.00582 – $0.00602
🎯 TP1: $0.00650
🎯 TP2: $0.00705
🎯 TP3: $0.00805
🎯 TP4: $0.00905
🎯 TP5: $0.01005
🛑 SL: $0.00528
Wait for confirmation before entering, especially if price starts moving sharply. Keep risk controlled and avoid chasing extended candles.
Trade $PUMP here 👇
#PUMP
{spot}(PUMPUSDT)
$AGT
{future}(AGTUSDT)
$PUMP — buyers are aiming for a fresh high 🚀
Momentum is building around the current support zone, and a sustained move higher could send $PUMPtoward the next resistance levels.
Long Setup
Entry Zone: $0.00582 – $0.00602
🎯 TP1: $0.00650
🎯 TP2: $0.00705
🎯 TP3: $0.00805
🎯 TP4: $0.00905
🎯 TP5: $0.01005
🛑 SL: $0.00528
Wait for confirmation before entering, especially if price starts moving sharply. Keep risk controlled and avoid chasing extended candles.
Trade $PUMP here 👇
#PUMP
$AGT
Momentum is building around the current support zone, and a sustained move higher could send $PUMPtoward the next resistance levels.
Long Setup
Entry Zone: $0.00582 – $0.00602
🎯 TP1: $0.00650
🎯 TP2: $0.00705
🎯 TP3: $0.00805
🎯 TP4: $0.00905
🎯 TP5: $0.01005
🛑 SL: $0.00528
Wait for confirmation before entering, especially if price starts moving sharply. Keep risk controlled and avoid chasing extended candles.
Trade $PUMP here 👇
#PUMP
$AGT
2
67
Log in to explore more content
Join global crypto users on Binance Square
⚡️ Get latest and useful information about crypto.
💬 Trusted by the world’s largest crypto exchange.
👍 Discover real insights from verified creators.
Email / Phone number