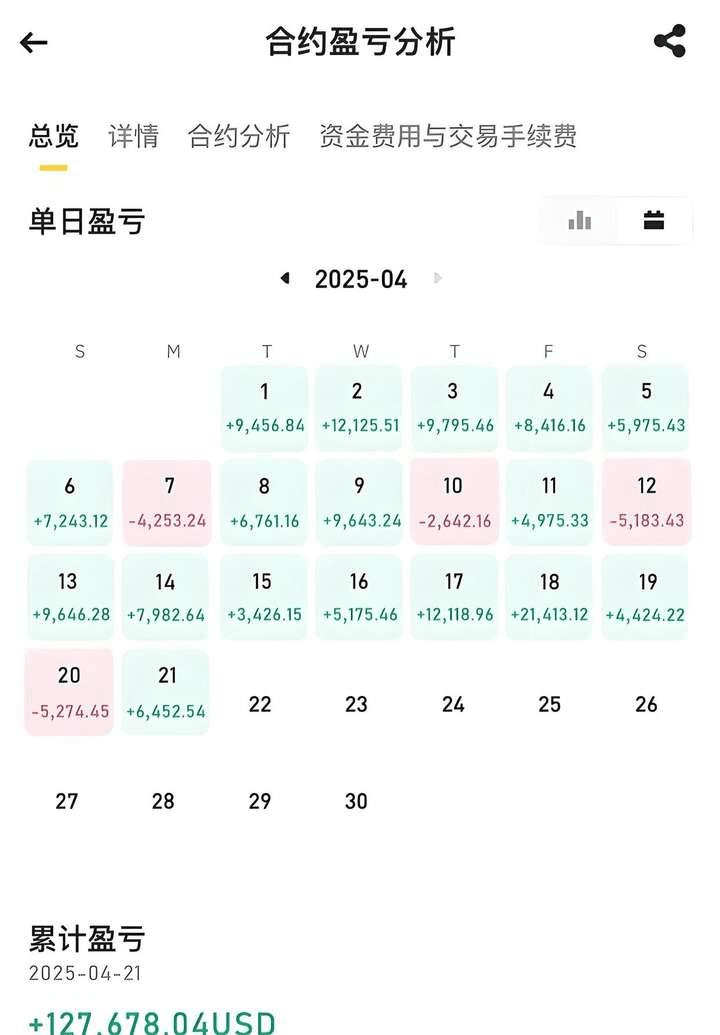
In April of this year, I went from 500U to 50,000U using a violent rolling position guide: a three-step breakdown of 'small capital leverage transformation' (with a position management formula).
I have practiced this method over ten thousand times, achieving a win rate of 80%! Last month in March, I also earned 120,000U in one month!
I. Startup Phase (500U→2000U): Use '10% Position + 10x Leverage' to tackle new coins' first explosion.
Core Logic: Each time only take 50U (10% of capital) for trial and error, locking the single loss within 5U (stop-loss 10%).
50U × 10x leverage = 500U position, target 20% increase (earn 100U).
In August 2025, HTX launched BOT, 50U leverage 10x, dropped 15% to bottom fish, rose 30% in 3 hours, earned 150U, rolled to 650U, repeated 8 times to reach 2100U.
Avoid emotional trading.
II. Explosive Phase (2000U→10,000U): Switch to '20% Position + 5x Leverage' to chase whale hotspots.
In September 2025, DeFi 2.0 leader FLX launched with 400U capital at 5x leverage (2000U position), stop-loss 5% (loss 20U), target 15% (earn 60U), rose 40% in 3 days, directly earned 1600U, rolled to 3700U.
Immediately move the stop-loss to the cost line after 10% profit to ensure no loss of principal.
III. Ultimate Phase (10,000U→50,000U): 'Hedge + Ladder Rolling' to prevent black swans.
After every profit, withdraw 30% to hold BTC spot, and reduce positions by half according to the 'position halving method' before opening new positions.
Operational Steps
1. Once 10,000U arrives, buy 3000U of BTC (anti-dip anchor).
2. Split 7000U into 7 orders, each order 1000U to open ETH perpetual (2x leverage = 2000U position).
3. Each order stop-loss 3% (loss 30U), take profit 5% (earn 50U), with 4 profitable orders among 7 able to break 20,000U.
Deadly Details: When total assets drop over 15% (e.g., from 30,000 to 25,500), immediately close 60% of positions, triggering the '20% profit protection line' to restart.
Trap 1: Full margin bet on new coins (someone once invested 300U fully in MEME coins, liquidated in an hour owing 200U).
Trap 2: (Dropping 15% without stop-loss, but instead increasing position, ultimately losing capital).
Trap 3: Taking small profits and running (investing 1000U to earn 1500U, withdrawing 1200U, missing subsequent 10x explosion).
3 Iron Rules:
1. Spend 500U as if it were 50U: Single opening should not exceed 10% of capital, keeping 'zero risk' below 0.5%.
2. Only act when BTC stands firm at 68,000U: When the market stabilizes, the probability of explosive growth in hotspot coins triples.
3. Profit = Position × Odds × Discipline: The first two determine the upper limit, the last one determines whether you can survive to '50,000U'.
In the crypto space, 500U is not the principal but rather the 'ticket to leverage using discipline'.

Super Coin Trading Method: Rolling Position for 3 Months to Multiply by 300 Times, Easily Earning 30 Million
Since the Federal Reserve lowered interest rates, many newcomers wanting to enter the crypto space have flooded in. The crypto world is a place where the fittest survive. The threshold is low, anyone can enter the crypto space, but not everyone can make money in it. If you plan to enter the crypto space, you must remember that it is not a place for overnight wealth; it requires long-term accumulation and continuous learning.
Many people come into the crypto space with dreams of becoming rich overnight, fantasizing about turning a few thousand into a million. Of course, some have succeeded, but in most cases, it can only be achieved through 'rolling positions'. Although rolling positions are theoretically feasible, they are far from an easy path.
Rolling positions are a strategy suitable for use when significant opportunities arise and do not require frequent operation. If you seize a few such opportunities in your lifetime, you can accumulate from zero to tens of millions. And with tens of millions in assets, an ordinary person can join the ranks of the wealthy and achieve financial freedom.
When you genuinely want to make money, don’t think about how much you want to earn or how to earn that much. Don’t even think about goals in the tens of millions or hundreds of millions. Instead, start from your actual situation and dedicate more time to solidify your knowledge. Simply boasting will not bring substantial changes; the key to trading is recognizing the size of opportunities. You cannot always trade lightly, nor can you always trade heavily. You can practice with small amounts of capital during normal times, and when real big opportunities arise, you can go all out. When you really grow from tens of thousands to a million, you will have unconsciously learned some ways and logic to make big money. At this point, your mindset will become more stable, and future operations will resemble previous successes.
If you want to learn rolling positions, or learn how to grow from a few thousand to several million, then you need to pay close attention to the following content.
1. Judging the Timing for Rolling Positions
Rolling positions are not something you can just do; they require certain background and conditions to have a greater chance of success. The following four situations are most suitable for rolling positions:
(1) Breakthrough after Long-term Consolidation: When the market has been in a horizontal range for a long time and volatility drops to a new low, once the market chooses a breakout direction, you can consider using rolling positions.
(2) Bottom Fishing During a Major Drop in a Bull Market: In a bull market, if the market experiences a large rise followed by a sudden drop, you can consider using rolling positions to bottom fish.
(3) Weekly Level Breakthrough: When the market breaks through significant resistance or support at the weekly level, you can consider using rolling positions to seize the breakout opportunity.
(4) Market Sentiment and News Events: When market sentiment is generally optimistic or pessimistic, and there are significant news events or policy changes that may affect the market, you can consider using rolling positions.
Only in the above four situations does the chance of success for rolling positions increase. At other times, you should operate cautiously or forgo the opportunity. But even when the market seems suitable for rolling positions, you need to strictly control risks, set stop-loss points, and prevent potential losses.
2. Technical Analysis
After confirming that the market meets the conditions for rolling positions, the next step is technical analysis. First, confirm the trend by using technical indicators to determine the direction, such as moving averages, MACD, RSI, etc. If possible, combine multiple technical indicators to confirm the trend direction, as preparing more is always beneficial. Next, identify key support and resistance levels to assess the validity of the breakout. Finally, use divergence signals to capture reversal opportunities. (Divergence signal: When a coin price sets a new high but the MACD does not, forming a top divergence, indicating that the price will rebound, you can reduce your position or short; conversely, when the price sets a new low but the MACD does not, forming a bottom divergence, indicating that the price will rebound, you can increase your position or go long.)
3. Position Management
After this step is done, the next is position management. Reasonable position management includes three key steps: determining the initial position, setting rules for increasing positions, and formulating a strategy for reducing positions. I will provide an example to help everyone understand the specific operations of these three steps:
Initial Position: If my total capital is 1 million, then the initial position should not exceed 10%, which is 100,000.
Position Increase Rule: You must wait for the price to break through key resistance levels before increasing your position. Each time you increase your position, it should not exceed 50% of the original position, which means a maximum of an additional 50,000.
Position Reduction Strategy: Gradually reduce your position after reaching the expected profit target. Don’t hesitate when it’s time to let go. Each time you reduce your position, it should not exceed 30% of the current position to gradually lock in profits.
In fact, as ordinary people, we should invest more when there are significant opportunities and invest less when there are fewer opportunities. With good luck, you can earn a few million; with bad luck, you can only accept it. However, I still want to remind you that when you make money, you should withdraw your invested capital and use the profits to play. You can afford not to make money, but you cannot afford to lose money.
4. Adjusting Holdings
After completing position management, the most critical step is how to achieve rolling positions through adjusting holdings.
The operational steps are undoubtedly the following:
1. Choosing the Right Moment: Enter the market when it meets the conditions for rolling positions.
2. Opening a Position: Open a position based on technical analysis signals, choosing a suitable entry point.
3. Increasing Positions: Gradually increase your position as the market continues to move in your favor.
4. Reducing Positions: Gradually reduce your position when reaching the predetermined profit target or when the market shows a reversal signal.
5. Closing Positions: When reaching the profit target or when the market shows a clear reversal signal, close your positions completely.
Here, I will share my specific operations for rolling positions:
(1) Floating Profit Position Increase: When the invested assets appreciate, you can consider increasing your position, but the premise is to ensure that the holding cost has decreased, thereby reducing the risk of losses. This does not mean you should increase your position every time you make money, but only at the right time, such as during a convergence breakout in a trend, where you can increase your position after the breakout and quickly reduce it, or you can increase your position during a trend pullback.
(2) Base Position + Trading: Divide the assets into two parts, keeping one part unchanged as the base position, and using the other part to trade during market price fluctuations to lower costs and increase profits. The ratio can refer to the following three types:
1. Half Position Rolling: Half of the funds are used for long-term holding, while the other half is used for trading during price fluctuations.
2. 30% Base Position: 30% of the funds are held long-term, and the remaining 70% are used for trading during price fluctuations.
3. 70% Base Position: 70% of the funds are held long-term, and the remaining 30% are used for trading during price fluctuations.
The purpose of this approach is to maintain a certain holding while optimizing the holding cost through short-term market fluctuations.
5. Risk Management
Risk management is primarily divided into two parts: controlling total positions and allocating funds. You must ensure that the overall position does not exceed the acceptable risk range, and fund allocation should be reasonable; do not invest all your funds in a single operation. Of course, you should also monitor in real-time, keeping a close eye on market dynamics and changes in technical indicators, adjusting flexibly according to market changes, and setting stop-loss or adjusting positions as necessary.
Many people hear about rolling positions and feel both scared and eager to try; they want to test it but are afraid of the risks. In fact, the risk of rolling positions themselves is not high; the risk lies in leverage. However, if used properly, leverage won't be too risky.
For example, if I have 10,000 in capital and open a position at 1,000 for a coin, I use 10x leverage and only use 10% of the total capital (that is, 1,000) as margin, which is effectively 1x leverage. I set a 2% stop-loss, and if it triggers, I will only lose 2% of that 1,000, which is 200. Even if the liquidation condition is triggered, you will only lose that 1,000, not all your capital. Those who get liquidated often use higher leverage or larger positions, causing them to trigger liquidation with slight market fluctuations. But with this method, even if the market is adverse, your losses are limited. So 20x can roll, 30x can roll, and 3x can roll too; even using 0.5x is fine. Any leverage can roll, the key is to use it reasonably and control positions reasonably.
This is the basic process of using rolling positions. Friends who want to learn can watch it a few more times, think it over carefully; of course, there will be different opinions, but I only share experiences and do not persuade others.
So how can small capital grow?
Here, the compound interest effect must be mentioned. Imagine if you have a coin and its value doubles every day; after a month, its value will become astonishing. The first day the value doubles, the second day it doubles again, and so on, resulting in astronomical figures. This is the power of compound interest. Even starting with small funds, after a long time of continuous doubling, it can increase to millions.
For friends looking to enter with small capital, I recommend focusing on big goals. Many believe that with small capital, they should frequently engage in short-term trading for quick appreciation, but it is more suitable for medium to long-term investments. Instead of earning small profits daily, one should focus on achieving several times growth in each trade, using multiples and exponential growth.
Regarding positions, first, understand the importance of diversifying risk; do not concentrate all funds in one trade. You can divide the funds into three or four parts, using only one part for each trade. If you have 40,000, divide it into 4 parts and use 10,000 for trading. Secondly, use leverage moderately; personally, I suggest not using more than 10x for major coins and no more than 4x for altcoins. Additionally, adjust dynamically; if you incur losses, supplement with equal funds from outside, and if you make profits, withdraw some appropriately. No matter what, don't let yourself incur losses. Finally, increase your positions, but this should only be done under the condition that you are already profitable. When your funds grow to a certain extent, you can gradually increase the amount for each trade, but do not add too much at once; transition slowly.
I believe that with reasonable position management and a solid trading strategy, small capital can gradually achieve significant appreciation. The key is to patiently wait for the right timing, focusing on the big goals of each trade rather than small daily profits. Of course, I have also been liquidated, but I had spot gains to offset my losses; I don't believe you haven't earned a penny with your spot holdings. My futures only accounted for 2% of my total capital; no matter how much I lost, I wouldn't lose everything, and my loss was always within my controllable range. Finally, I hope that each of us can accumulate wealth gradually and earn millions.

The most stable way to trade contracts in the crypto space.
Choose good coins and be a good person. As leverage traders, volatility can be amplified by leverage multiples; during trading, the primary consideration should not be volatility but certainty. Go long on strong coins during upward trends; conversely, short on the weakest coins during downward trends. For example, at the beginning of a new quarter, the strongest performing coins are EOS and ETH; the preferred choices for pullbacks are these two coins. During downturns, the first choice for shorts is Bitcoin. Even if the final outcome is that mainstream coins decline more than Bitcoin, shorting or chasing Bitcoin can largely avoid the risk of violent rebounds. Most crypto participants are short-term traders, and while trading, they rarely have the opportunity to stick to ideal exit points, nor are they very skilled at position control. They cannot rely on consolidations for trading and pulling averages; given this situation, for most traders, a good entry price outweighs everything. Once profits emerge, withdraw a portion to secure gains, and set stop-loss at cost for the remaining portion. This is something I have always emphasized in my community.
(3) Following the trend with positions will bring you substantial profits; do not exit early. (4) If the position aligns with the larger trend and the profits on paper prove you are correct, a pyramiding technique can be employed for position increases; (refer to point 2) (5) Maintain your position until the trend reverses and close it. (6) If the market trend is contrary to your position, stop-loss and exit quickly. In addition to adhering to these strategies, remember these three qualities: discipline, discipline, and discipline! The way of trading is to accumulate small amounts over time; compounding is king. If you stray from your cost, you must resolutely avoid turning into a loss. If you have made a profit, make sure to pocket some to prevent working for nothing. In summary, the key message is: if you make a profit, be bold in taking it, and let the remaining amount stay at its original cost.
Perpetual contract profit-making techniques.
1. Avoid full margin trading: How should funds be allocated? Fund allocation should be understood from two aspects: First, understand the loss that your account can or is prepared to endure. This is the foundation of our fund allocation thought process. After determining this total amount, consider how much you can afford to lose if you continuously fail in the market. I personally believe that the most risky approach should also be divided into three parts. That is to say, you should give yourself at least three chances. For example, if the total account funds are 200,000, and the maximum loss allowed is 20%, which is 40,000, then I suggest the most aggressive loss plan be: the first loss 10,000, the second loss 10,000, and the third loss 20,000. I believe such a loss plan has a certain degree of reasonableness because if you make one correct decision out of three, you can profit or at least continue to survive in the market. Not being kicked out by the market is itself a form of success and presents a winning opportunity.
2. Grasp the overall market trend. Trends are much harder to trade than consolidations because trends involve chasing highs and cutting losses, requiring position discipline, while high selling and low buying align with human nature. Trading that aligns with human nature tends to lose money, and it's precisely because it's difficult that it pays off. In an upward trend, every violent pullback should prompt you to go long. Do you remember what I said about probability? So, if you are not in the market or have exited, be patient and wait. When there is a decline of 10-20%, be bold and go long.
3. Setting profit and loss targets: Profit and loss targets can be said to be the key to whether one can profit. In several trades, we must ensure that total profits exceed total losses. Achieving this is not difficult, as long as we do the following: ① Each stop-loss ≤ 5% of total capital; ② Each profit > 5% of total capital; ③ Total trading win rate > 50%. As long as the above requirements are met (profit-loss ratio greater than 1 and win rate greater than 50%), profits can be achieved. Of course, high profit-loss ratios and low win rates or low profit-loss ratios and high win rates are also possible. Anyway, as long as total profits are positive, it's fine: Total profit = Initial capital × (Average profit × Win rate - Average loss × Loss rate).
4. Remember not to trade too frequently. Since BTC perpetual contracts are traded 24/7 without interruption, many newcomers trade every day, trying to operate on all 22 trading days in a month. As the saying goes, 'those who walk by the river often will inevitably get wet.' The more you trade, the more likely you are to make mistakes. After making mistakes, your mindset will deteriorate; once your mindset changes, it may lead to 'revenge' trading: possibly against the trend or over-leveraging. This can lead to a series of mistakes, easily resulting in massive losses that may take years to recover.
5. Timing for entering contracts: Many traders open positions at any time of day, which is essentially no different from giving away money. The purpose of contracts is to develop a stable profit strategy under controllable risks and relatively stable indicators, rather than to become rich instantly through 100x leverage! Therefore, the timing for entering contracts is particularly important.
(1)During periods of significant positive/negative news, do not open positions, as the market is very chaotic, and spot prices can fluctuate between 1-3%. If you choose to bet on the market at this time, you may easily be caught off guard by sudden swings.
(2): I generally choose to enter after significant fluctuations, during the second bottom test or after a rise, as the fluctuations in the market will gradually stabilize after the second wave of trends. The risk coefficient in the subsequent range is the lowest. The purpose of contracts is to execute the most suitable strategy within the least risk range.
(3): Enter only within the indicator's range; avoid opening positions unless the indicator parameters meet your expectations. This can be understood as entering only within your strategy's parameters and ignoring market conditions until reaching your psychological price. Since contracts amplify leverage, the risk coefficient also increases, making self-discipline extremely important. In summary, when the market stabilizes and the indicators align, the risk rate drops by 50%, then you can trade. Perpetual contracts have flaws and risks, including liquidation risk. Liquidation occurs when losses reach a certain level, causing margin to become insufficient to support the position. At that point, the exchange will automatically liquidate the position to protect its interests and those of other traders. For example, if a trader has 100 USDT of investment capital and opens a long position worth 1000 USDT (using 10x leverage), if the price of Bitcoin is 100 USDT, the trader essentially borrows 900 USDT to purchase 10 BTC. If the price subsequently drops to 90 USDT, the value of the 10 BTC is now equal to the borrowed amount. If the price continues to drop, the value of the 10 BTC falls below the borrowed amount, leading to liquidation. After liquidation, the user loses not only potential profit but also the initial margin (capital). Moreover, higher leverage increases the likelihood of liquidation; using 10x leverage means a 10% adverse price movement will trigger liquidation. If using 100x leverage, even a 1% adverse movement can trigger liquidation. The previous example assumes a 100% loss leads to liquidation, but in actual trading, different exchanges have different thresholds for calculating liquidation losses, some may set it at 90%. Therefore, in actual trading, directly referencing the exchange's liquidation price is more accurate. Flash crash risk: A flash crash refers to a sudden and extreme market fluctuation that quickly returns to normal levels. This may trigger stop-loss orders or cause liquidation, leading to investor losses. Flash crashes may result from insufficient exchange liquidity or malicious market manipulation. Funding rate erosion: Exchanges often require users holding perpetual contracts to pay a funding rate every 8 hours. Although each payment is only 0.000x%, if the position is large and held for a long time, the cumulative funding fees can add up to a substantial amount.
Contract trading carries significant risks; trade with caution! Coupled with the MACD indicator, the win rate can reach 70%, avoiding liquidation!
In the crypto space, playing back and forth is essentially a struggle between retail investors and whales. If you do not have cutting-edge news or first-hand information, you can only be cut! If you want to layout together and harvest the whales, feel free to reach out. I welcome like-minded individuals from the crypto space to discuss together~ The MACD practical mnemonic for contracts:
1. When MACD is above the zero axis, every time a golden cross occurs, the coin price is about to set a new high.
2. When MACD is below the zero axis, every time a death cross occurs, the coin price is about to set a new low.
3. When MACD is below the zero axis and a golden cross occurs, it belongs to a rebound trend in a downtrend, and participation should only occur after rising above the zero axis.
4. When MACD is above the zero axis, a golden cross occurs, which belongs to an upward trend bullish market; one can buy high and sell low until a top divergence forms. When MACD sells low, the coin price rises, and if the subsequent red column does not exceed the previous high, it will likely decline.
5. MACD sells low; if the coin price drops or levels off, and the subsequent green column does not reach the previous low, it will likely rise.
6. MACD high-level narrowing: After a significant surge in coin price, the MACD moves away from the zero axis with red columns shortening, suggesting a quick exit.
7. MACD low-level golden cross: After a large drop in coin price, the MACD moves away from the zero axis, poised to rise, and a second golden cross indicates a stronger upward trend.
8. MACD golden pit: After an upward wave, a pullback occurs; if the MACD death cross occurs within 7 days with a short green column followed by a golden cross, it will rise.
The MACD indicator plays a particularly important role in technical analysis and is an essential part of learning technical analysis. Its importance can be summarized in the following points.
1. The MACD indicator is the most effective technical indicator tested against historical trends and is also the most widely used indicator.
2. The MACD indicator is derived from the EMA moving average indicator and has a good application effect in grasping trending markets. Trend investors generally need to reference this indicator in practice.
3. The top and bottom divergence of the MACD indicator is recognized as the best method for 'bottom buying and top escaping'; this method is an important tool for concretizing trend theory and wave theory.
4. Many veterans have experienced this: when they first entered the market, they began learning the MACD indicator, then gradually discarded it. After a long period of learning and comparison, especially after practical testing, they ultimately returned to the MACD indicator. This shows its uniqueness.
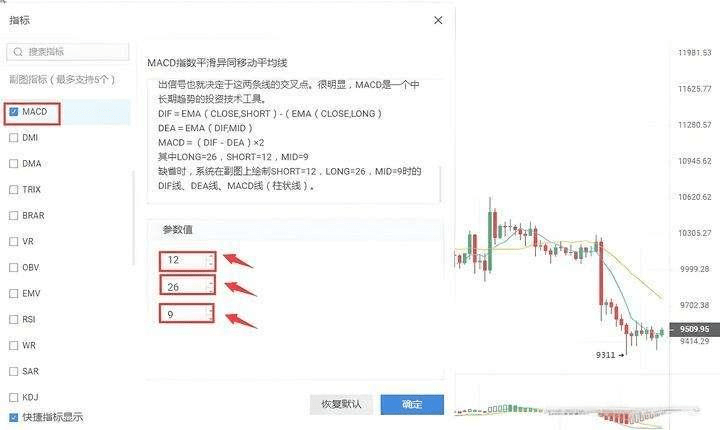
5. The MACD indicator is also widely used in quantitative trading. Due to these advantages, the MACD indicator has become the most commonly used technical indicator among professional traders. The concept and algorithm of the MACD indicator. MACD, or Moving Average Convergence Divergence, was created by Gerald Appel to track price movement trends and analyze K-line buying and selling timing. This indicator is a common indicator in market software and is known as the 'king of indicators'. As shown in [Figure 1].
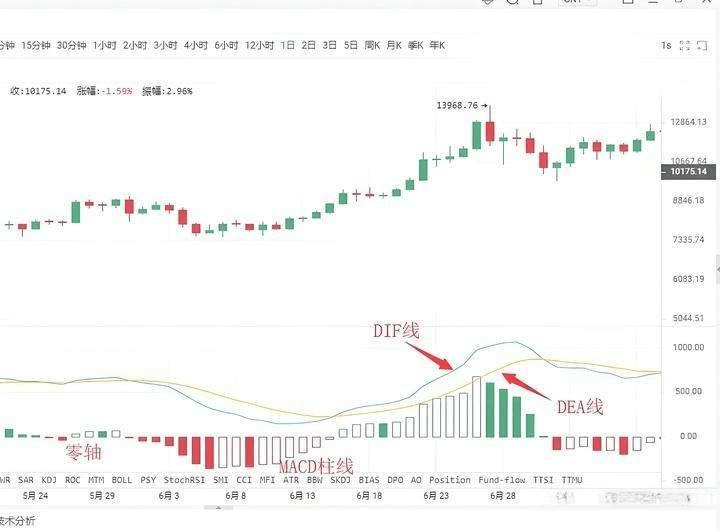
The MACD indicator in the crypto space consists of the DIF fast line, the DEA slow line, the MACD histogram, and the zero axis, collectively known as the 'three lines and one axis'. Investors analyze price movements through the intersections, divergences, breakouts, support, and resistance of these 'three lines and one axis'. The MACD indicator has become a preferred indicator in many market software, indicating its widespread application and signifying that it is among the most effective and practical indicators validated by history.
The golden cross and death cross of MACD: The 'golden cross' and 'death cross' are extremely important formations in technical indicator analysis. The golden cross pattern, also known as the golden cross, refers to the shorter-period indicator line crossing upward through the longer-period indicator line (of the same type), often indicating a short-term buying opportunity. If the golden cross appears in the following situations: 1. After a short-term rapid decline in a downtrend; 2. After a pullback in an uptrend; 3. After a consolidation in an uptrend, especially when the golden cross appears at a local low, it is a more reliable buying signal.
The death cross pattern, also known as a death cross, refers to a shorter-period indicator line crossing downward through a longer-period indicator line (of the same type), often signaling a short-term selling opportunity. If the death cross pattern appears in either 1. After a consolidation during a downtrend; 2. After a rebound during an uptrend; 3. After a short-term rapid rise during an uptrend, especially when the death cross appears at a local high, it serves as a more reliable sell signal. After understanding the golden cross and death cross patterns, we can look specifically at the MACD indicator's golden cross and death cross patterns. The appearance of golden and death crosses in different positions reflects different market meanings.
Situation 1: Buying point for low-level golden cross. If the position of the DIFF line and DEA line's golden cross occurs below the zero axis and is far from the zero axis, this golden cross is termed a low-level golden cross. Investors can view this golden cross as merely a short-term rebound in price; whether the K-line can form a genuine reversal still requires observation and confirmation with other indicators.
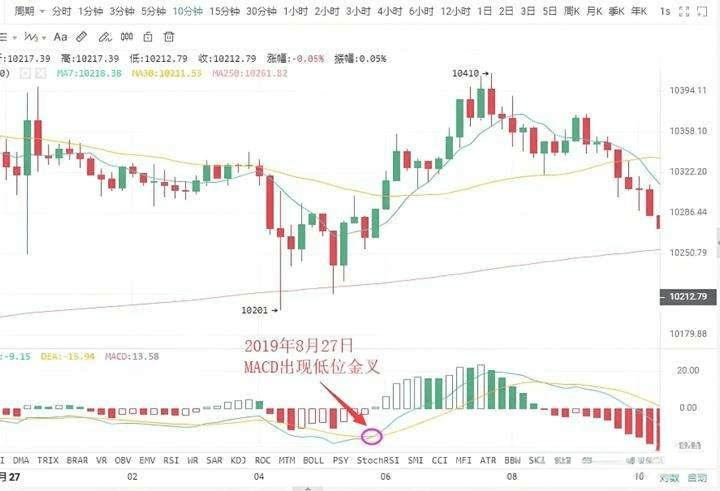
As shown in the figure: On August 27, 2019, in the BTC 10-minute K-line chart, a low-level golden cross appeared with the price pullback, followed by a rebound of $200. Short-term investors can seize the opportunity to enter. Situation 2: Golden cross near the zero axis buying point. If an upward trend has formed, and the golden cross occurs near the zero axis, this often presents an excellent buying opportunity for investors. This is because after the upward trend forms, a golden cross near the zero axis indicates that the correction has completely ended and a new round of upward momentum has started. If this is accompanied by a golden cross on the volume line, it indicates that the price increase is supported by trading volume, making the buying signal even more reliable. Once this buying point appears, investors absolutely should not miss it; otherwise, they will miss a significant rally.
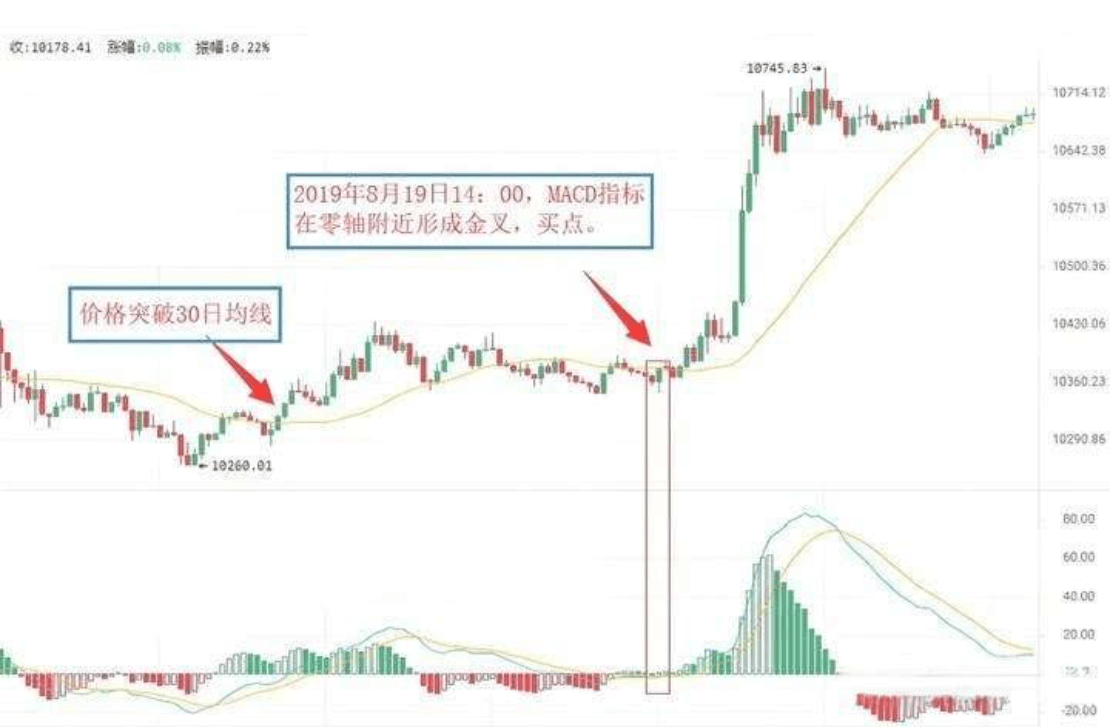
As shown in the figure: On August 19, 2019, at 09:30, in the BTC 5-minute K-line chart, Bitcoin broke through the 30-day moving average, indicating that an upward trend has begun to form. For a period afterward, the price was almost always above the 30-day moving average. At 14:00 on August 19, the MACD indicator formed a golden cross near the zero axis, indicating that a significant upward trend is about to occur. Investors can decisively buy in. Situation 3: High-level golden cross buying point. If the DIFF line and DEA line's golden cross occurs above the zero axis and is far from the zero axis, this golden cross is termed a high-level golden cross. High-level golden crosses generally occur during the upward process of K-line, indicating that the consolidation has ended, and the K-line is about to continue the previous upward trend. Therefore, once a high-level golden cross appears, it is a good signal to increase positions. In practice, when an upward trend forms and the K-line rises slowly for an extended period, once the MACD indicator forms a high-level golden cross, it often foreshadows an accelerated rise of the K-line.
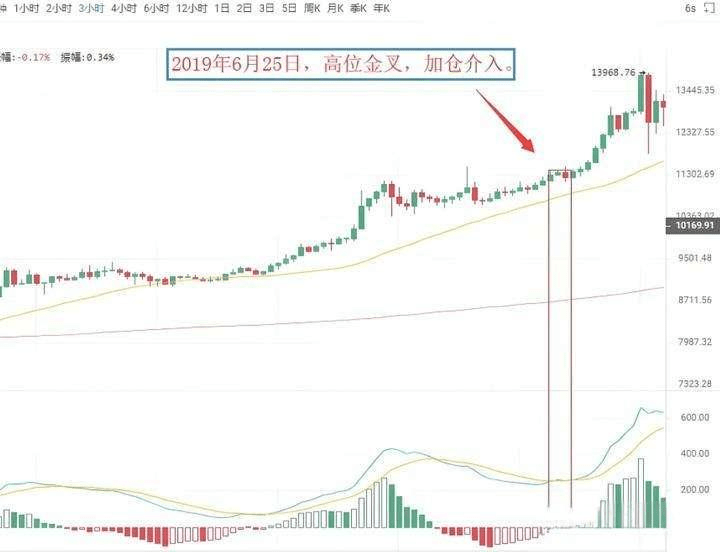
As shown in the figure: On June 25, 2019, in the BTC 3-hour K-line chart, the price of Bitcoin was in an upward trend, and after consolidating, it rose again, while the MACD indicator showed a high-level golden cross. This indicates that the pullback has ended, and the price will continue the previous upward trend. Investors should pay attention to seizing this position to increase.
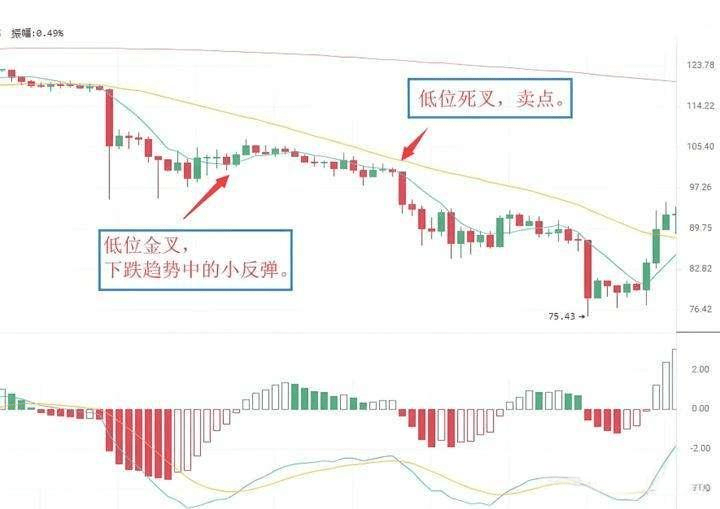
As shown in the figure: On July 14, 2019, in the LTC 3-hour K-line chart, the MACD indicator showed a low-level golden cross, and the price experienced a slight rebound, followed by a rapid descent. Shortly after, the MACD indicator appeared a death cross below the zero axis, and the K-line began a new downward trend. Spot investors can sell their positions at the death cross and later buy back to lower their holding costs. Situation 5: Selling point near zero axis death cross. If the previous market direction was a downtrend, and the DIFF line near the zero axis breaks below the DEA line, forming a cross, it is called a zero-axis death cross. This indicates that the market has accumulated considerable downward momentum near the zero axis, and the appearance of the death cross signals the release of downward momentum, suggesting that the K-line will continue the original downward trend, serving as a sell signal.
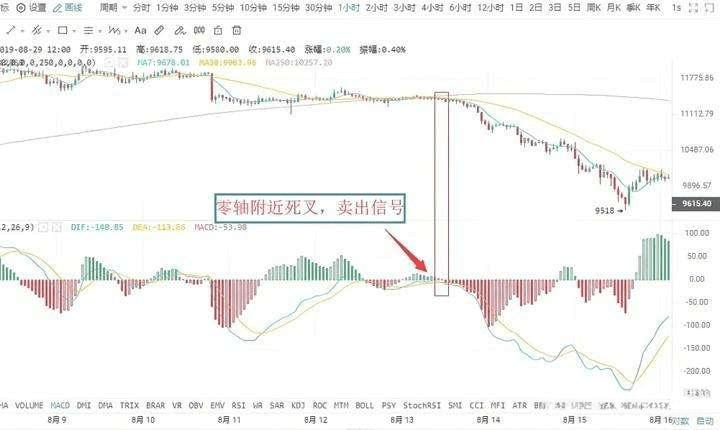
As shown in the figure: On August 12, 2019, in the BTC 1-hour K-line chart, the DIFF line near the zero axis broke below the DEA line, forming a death cross. This indicates that the market's downward momentum is beginning to be released, serving as a sell signal, and investors should decisively sell their positions; otherwise, they will be deeply trapped. Situation 6: Selling point for high-level death cross. The DIFF line breaking below the DEA line far above the zero axis forms a high-level death cross. This type of death cross pattern often accompanies MACD's top divergence. The manifestation is as follows: during an upward trend, the price continues to create new highs, but the MACD's DIF line and DEA line no longer continue to rise or attack, instead diverging from the price trend, gradually moving downwards. Above the zero axis, when the DIF line crosses below the DEA line, forming a downward crossing trend, it constitutes a death cross, serving as a relatively reliable sell signal.
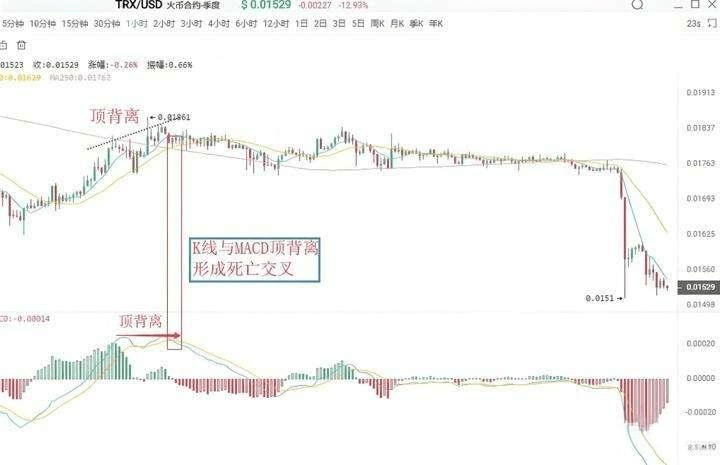
As shown in the figure: On August 23, 2019, in the TRX 1-hour K-line chart, after the wave of TRX increased, the price continued to create new highs but the DIF line and DEA line did not continue to rise, forming a death cross and signaling a sell.
Divergence between MACD and K-line: Divergence is a term used in physics to describe momentum. In technical analysis, it is a highly successful and widely applicable analytical method. In a downtrend, when the price sets a new low but the indicator line does not, it is known as bottom divergence, indicating that upward momentum is accumulating and serving as a buying signal. In an uptrend, when the price sets a new high but the indicator line does not, it is known as top divergence, indicating that downward momentum is accumulating and serving as a selling signal.
I. Bottom Divergence
(1) MACD histogram and DIFF line bottom divergence: The bottom divergence between the DIFF line and price occurs when the price sets a new low during a downtrend, but the DIFF line does not create a new low. This indicates that the decrease in price is less than the decrease in the DIFF line, and upward momentum is accumulating, indicating that the price is about to stop falling; the probability of an increase in the next period is relatively high. The MACD histogram is the hidden MACD bar line behind the DIFF line, divided into red and green, and its divergence with the price is an important application of the MACD indicator, widely used in practice. The bottom divergence between the MACD histogram and price refers to when the price creates new lows in waves while the MACD histogram does not follow suit. Market upward momentum is accumulating, suggesting that the price will stop falling, with a higher probability of increasing in the next period. When bottom divergence appears, investors can grasp specific buying points through two methods.
(2) Specific buying timing. The bottom divergence between the DIFF line, MACD histogram, and price is not a specific point in time, but rather a pattern that occurs over a period. However, for investors, specific buying timing indicates that the price is about to stop falling. Therefore, to grasp specific buying timing, when the DIFF line, MACD histogram, and K-line show bottom divergence, investors must integrate this bottom divergence with other technical analysis tools to specify the buying point. First: Histogram color change or MACD golden cross. A histogram color change indicates that market upward momentum has begun to dominate. This generally occurs after 'histogram shortening', and although it may be slightly late, it is more reliable. When bottom divergence appears, if the histogram successfully changes color or forms a golden cross, investors can buy in.
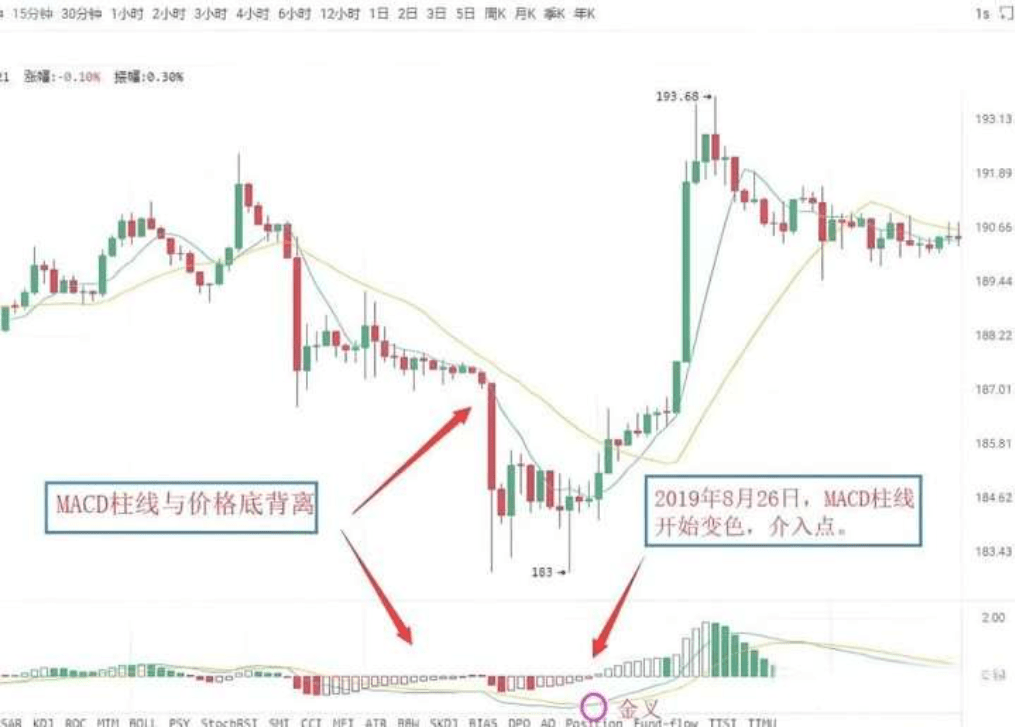
As shown in the figure: On August 26, Ethereum (ETH) 15-minute K-line chart, the price of Ethereum set a new low during a downturn, but the MACD histogram did not create a new low, forming a histogram and price bottom divergence. This indicates that market upward momentum is starting to accumulate, and the price is likely to rise. The subsequent histogram color change, coupled with these two sequential buying signals, further increases the reliability of the upward trend, allowing investors to enter when the histogram changes color. Second: Combine with other technical analysis tools and K-line reversal patterns. Bottom divergence combined with K-line reversal patterns, such as 'single needle bottoming' or 'bottom red three soldiers', is a practical application of the 'multi-indicator combination' principle.
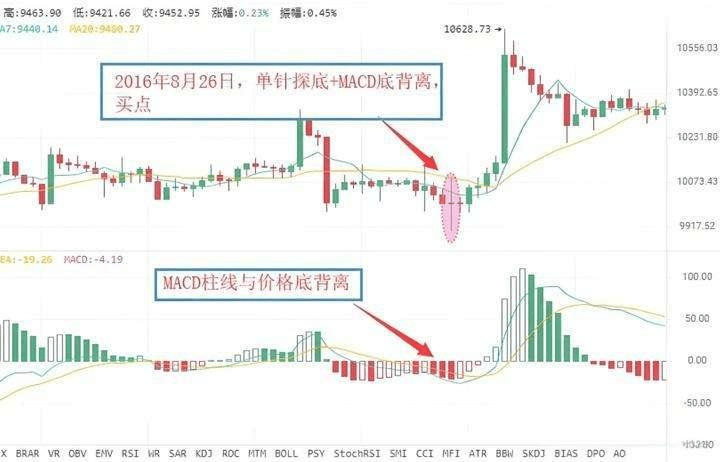
As shown in the figure: On August 26, 2016, in the BTC 30-minute K-line chart, the price of Bitcoin set a new low, but the MACD histogram did not create a new low, forming a histogram and price bottom divergence pattern, signaling continuous strengthening of market upward momentum. With the price's decline halting, a buying signal of 'MACD histogram and price bottom divergence + K-line single needle bottoming' emerges. The price subsequently experiences a rise.
II. Top Divergence
(1) MACD histogram and DIFF line divergence at the top: MACD histogram and K-line divergence occurs when the price sets a new high in an upward trend, but the MACD histogram does not create a new high. This indicates that downward momentum is accumulating, and the price may drop at any time. The DIFF line and K-line divergence occurs when the price sets a new high in an upward trend, but the DIFF line does not create a new high. This indicates that the market's downward momentum is continuously accumulating, and the price is likely to enter a downward trend.
(2) Specific selling timing: Similar to bottom divergence, in practice, according to the principle of multi-indicator combination, investors can utilize the following methods to make sell signals more specific. First: Histogram color change or MACD death cross. After the MACD histogram and K-line top divergence forms, if the histogram suddenly shortens significantly, it indicates that the market's downward momentum is beginning to be released. Investors should be cautious and sell in a timely manner. A change in the MACD histogram color indicates that the market's downward momentum has gained the upper hand, generally appearing after continuous histogram reduction. If a histogram and K-line top divergence occurs, followed by a color change or MACD death cross, investors should be cautious and exit promptly.
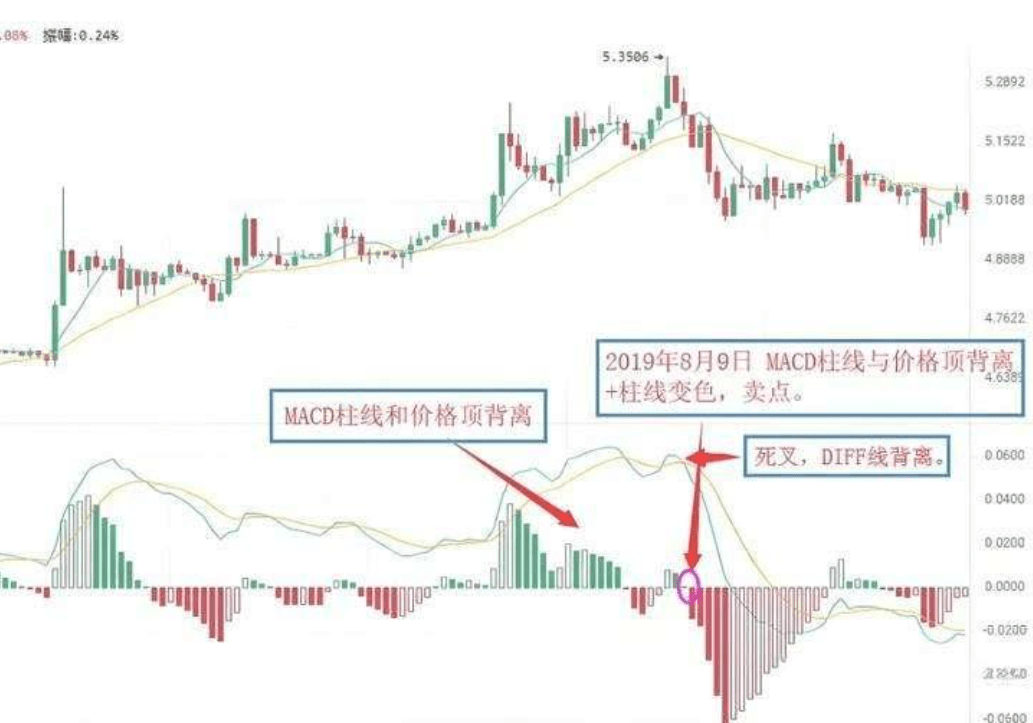
As shown in the figure: On August 9, 2019, in the HT 1-hour K-line chart, the price of Huobi set a new high, but the MACD histogram did not create a new high, forming a top divergence between the histogram and the price. This indicates that downward momentum is beginning to accumulate, and the price may drop at any time. Subsequently, the MACD histogram changed from red to green, signaling a 'histogram and price top divergence + histogram color change' sell signal. Investors should be cautious and exit in a timely manner. After the MACD histogram and price top divergence occurs, if other technical analysis tools also show sell signals simultaneously, the reliability of the sell signal will greatly increase; at this point, investors should pay attention to exiting decisively. Common sell signals of this kind include 'histogram and price top divergence + K-line reversal patterns', etc.
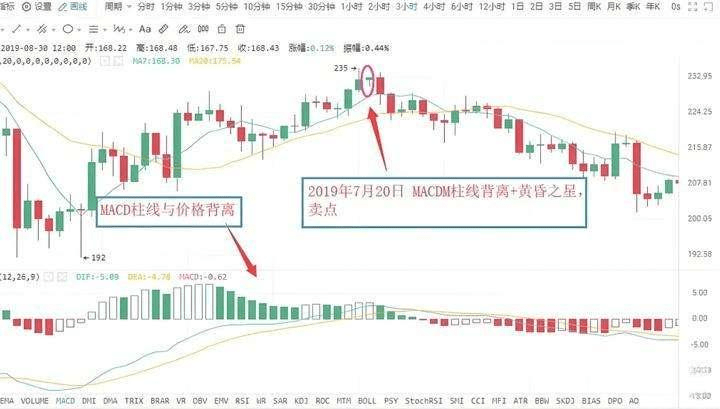
As shown in the figure: On July 20, 2019, in the ETH 3-hour K-line chart, Ethereum's price set a new high, but the MACD histogram did not create a new high, forming a histogram and price top divergence. This indicates that market downward momentum is continuously strengthening, and the price may be set to drop. Subsequently, the MACD histogram gradually shortened, and K-line formed a bearish evening star pattern. Investors should pay attention to exit in a timely manner, as the K-line then experienced a significant downward trend. Note: Evening Star: During an upward trend, a longer bullish candle appears first, followed by a shorter entity candle (either bullish or bearish). This is referred to as a star, which is the main part of the K-line combination. The third candle is a longer bearish candle that has deeply penetrated the body of the first candle. The evening star signals a price peak and retreat, with some predicting an accuracy rate of over 80%. Modifying MACD parameters: The lagging response to price changes sometimes leads to less than ideal buy/sell levels; this is a flaw of the MACD indicator. One way to change this is to adjust the indicator parameters, making the MACD indicator more responsive to trends, so that buy/sell points can be more ideal. The default parameters of the MACD indicator in commonly used market software are 12/26/9. Under these parameter settings, the MACD indicator's response to price changes often exhibits noticeable lag. The lag of the MACD indicator can be addressed by adjusting parameters. Common parameter combinations include 5/34/5 and 5/10/30, etc. Investors can also try and discover more in practice.
Execution is a critical flaw in trading; holding positions is a common ailment in investing. Without good execution, even the best strategies cannot translate into profits. However, excessive holding magnifies even small mistakes, like a malignant transformation; when you can no longer hold on and leave the market, I estimate no one will say goodbye to you. Even if you visited, a year later, no one will remember you. Any entry cannot be held based on luck, any gambit cannot be staked fully; one failure means packing up and leaving, while a hundred successes are considered success.


