A Satoshi Test verifies control of a self-hosted wallet address by requiring the user to transfer a small amount of cryptocurrency to Binance within a specified timeframe. Successful completion proves control of the address, and the test amount will be credited in the user's account. If the transaction fails, the user can reattempt the test.
During crypto asset transfers, the Travel Rule requires information about the counterparty’s address. Maintaining a repository of stored addresses with the necessary Travel Rule information enables pre-validation, streamlining the deposit and withdrawal processes.
When submitting Travel Rule details via the address book, validation e.g. the Satoshi Test may be conducted, depending on the nature of counterparty (i.e. self vs third-party). If the verification is successful, the address is marked as verified. For addresses that cannot be technically verified (e.g. a third-party self-hosted wallet address), declaration that the submitted information is true, accurate and complete will be required.
Once an address is verified or declared, future withdrawals to the same address can be pre-filled with the stored information, eliminating the need to complete the questionnaire again.
There may be a few possible reasons. You have either yet to undergo the verification process or the information provided could be incorrect, you are recommended to check your address status and provide accurate information. Withdrawals made to this address will still have to complete the questionnaire process.
The verification process is still on-going, please wait for the status to be updated. While it is still pending, withdrawals made to this address will still have to complete the questionnaire process but the information will be pre-filled.
1. Go to the Address Management page, click on [Add] - [Add address].

2. In the “Save address” pop-up, input the following relevant details for your self-hosted address, click [Save].

3. The “Verification Reminder” prompt will pop out, click [Verify Now] to proceed.

4. Answer the corresponding question regarding the address confirmation (the user will have different questions depending on the entity).


5. Select Verification Method and Deposit Token for the Satoshi Test, click [Submit].

6. A pop-up will appear to let the user deposit the pre-set amount of the chosen token-network to the deposit address.
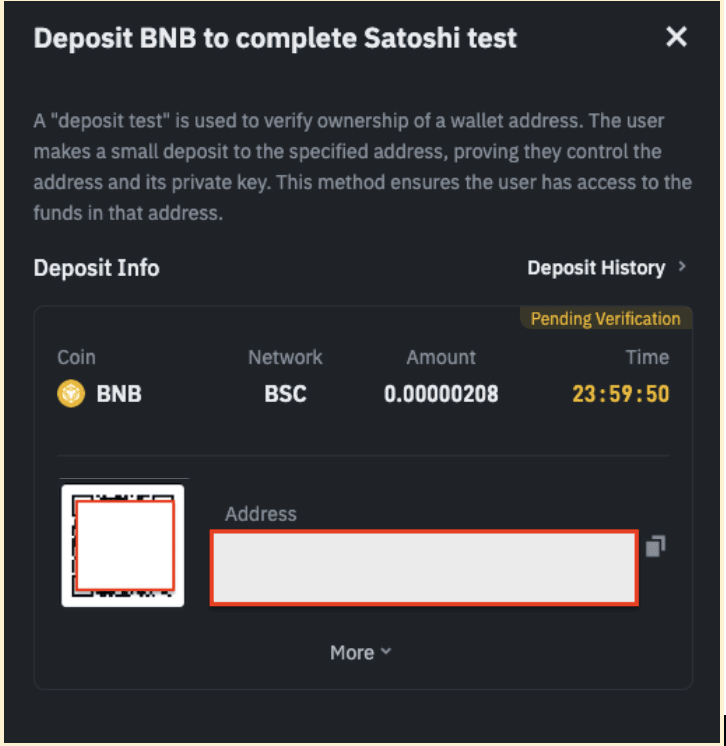
7. After depositing, the address status will be displayed as “Pending” to indicate that it is pending for results.

8. Once the deposit has been credited, address status will be updated to “Verified”, click on [Verified] to check the Verification Detail.


1. Go to the Address Management page, click on [Add] - [Add address].

2. In the “Save address” pop-up, input the following relevant details for your self-hosted address, click [Save].

3. The “Verification Reminder” prompt will pop out, click [Verify Now] to proceed.

4. Answer the corresponding question regarding the address confirmation (the user will have different questions depending on the entity).


5. Once submitted, click on [Check Verification Status], address status will be updated to “Declared”, click on [Declared] to check the Verification Detail.

1. Go to the Address Management page, click on [Add] - [Add address].
2. In the “Save address” pop-up, input the following relevant details for your self-hosted address, click [Save].

3. The “Verification Reminder” prompt will pop out, click [Verify Now] to proceed.
4. Answer the corresponding question regarding the address confirmation (the user will have different questions depending on the entity).


5. Once submitted, click on [Check Verification Status].
a. If VASP is not in GTR, address status will be updated to “Declared”, click on [Declared] to check the Verification Detail.

b. If VASP is in GTR, address status will be updated to “Verified”, click on [Verified] to check the Verification Detail.

