Trading cryptocurrencies is about repeatedly doing simple things, persistently using a method over time to master it. Trading can be like other industries; practice makes perfect, and decisions can be made effortlessly.
This year marks my seventeenth year trading cryptocurrencies. I entered the market with 10,000, and now I support my family through trading! I can say that I have used 80% of the methods and techniques in the market. If you want to treat trading as a second profession to support your family, sometimes listening more and watching more will reveal insights beyond your current understanding; at the very least, it will save you 5 years of detours!
This article is quite long; if you can't finish it, scroll to the end. There is a saying that is a decade of blood, sweat, and tears experience in the crypto space!
Valuable insights! Needs repeated understanding~
---------------------------------Divider-----------------------------------------
My insights are
XAUUSD Section
1. Strategy principle and trend oscillation judgment:
1. Strategy Principle: Trend-following approach + technical tools
Strategy A: The principle of this strategy is to trade using Japanese candlestick techniques and support/resistance line tools in trending markets.

Strategy B: [This strategy is a trend-following strategy; based on certain considerations, it is not recorded for now, but may be recorded in the future.]
Strategy C: Determine the direction using the Roche Hawk, then set the conditions for signals generated by the Roche Hawk for breakout following equivalent price movements [the points here are based on five-digit quotations, the same applies below].
2. Standards for judging trend oscillation:
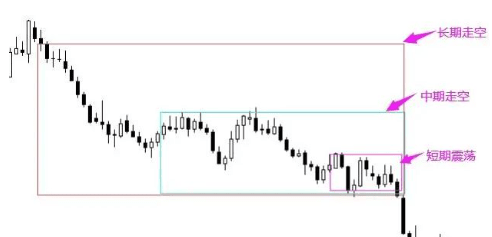
Use daily charts to judge trends, with short-term analysis using 5-10 trading day K-lines, medium-term analysis using 11-30 trading day K-lines, long-term analysis using more than 30-100 trading day K-lines, and 100 or more K-lines for ultra-long-term.
2. Entry and exit and adding positions:
When entering, the short-term trend must align with the medium/long-term trend to open a position; signals should only be entered when the short-term market approaches the support/resistance lines of the medium to long-term/ultra-long-term.
1. Entry and adding positions:
Strategy A:
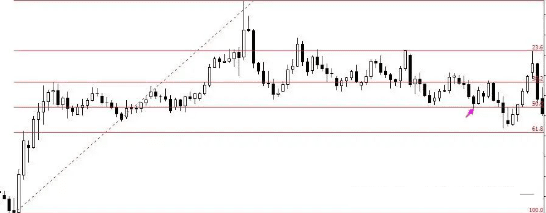
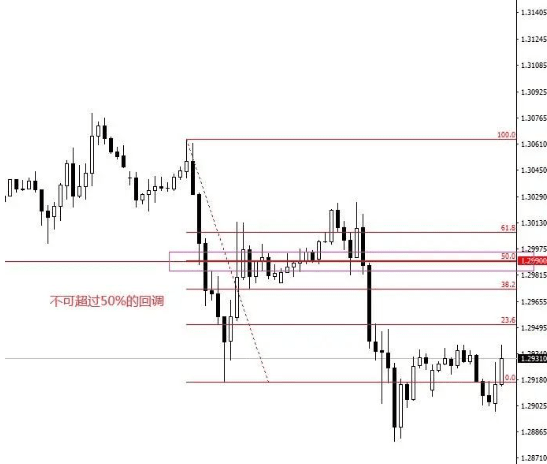
1) When judging the market as a trending market, small levels (only using H1 level) near daily support/resistance [a. The peaks and troughs of a trend form support/resistance positions; b. The 50% Fibonacci retracement position is an important support/resistance level] should show specific candlestick patterns [Strategy A Attachment 1 and Attachment 2, with notes at the end of the article] and confirm before opening a position. If there are existing positions in the market:
a. If a signal appears again, it is a signal for adding positions, and adding positions should only be done at pullback positions, and the original position must have already moved to breakeven;
b. When the first position taken exits profit, if the second position remains in the market, and a pullback signal from the H1 trading level's support/resistance forms, it can enter if it does not turn the previous position from profit to loss (i.e., the profit from the previous moving stop-loss can cover the initial stop-loss loss of this position) [the trend line here need not be considered].

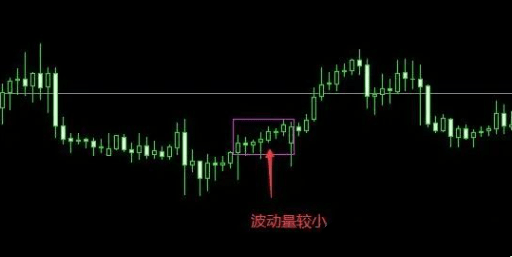
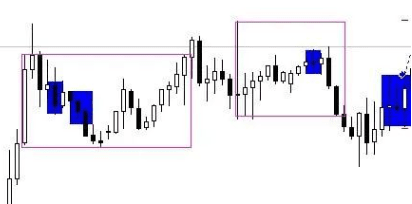
2) When judging the current market as oscillating, do not operate in the middle of the range, only operate when signals appear within 10% of the support/resistance intervals at the upper and lower bounds of the range (continuation signals within the oscillating range reaching a 2:1 risk-reward ratio and near support/resistance levels can also be operated);
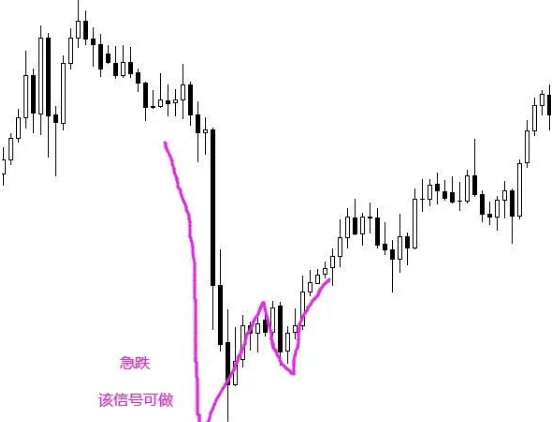
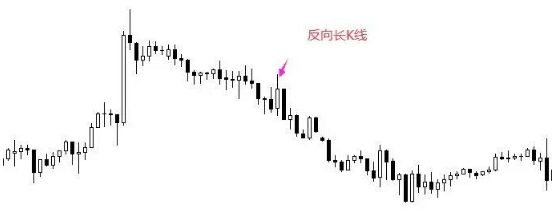
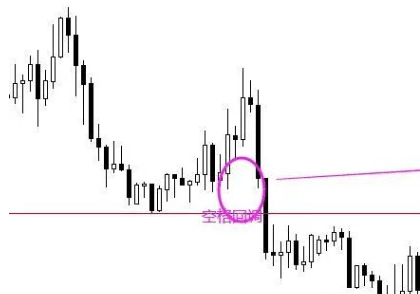
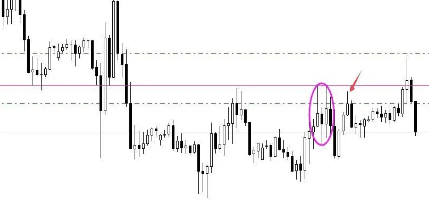
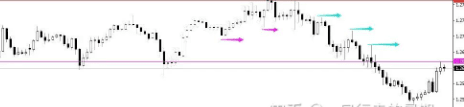
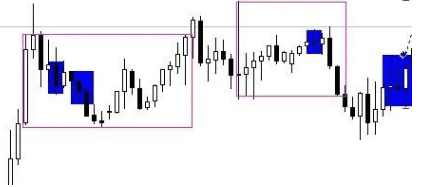
3) Special long wick trading model.
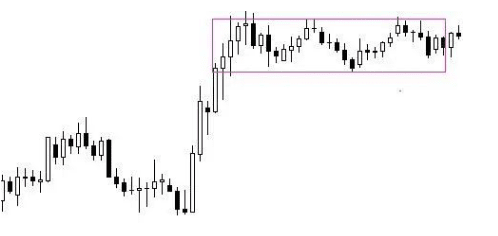
Entry - Only enter positions near key levels that align with medium to long-term trending markets, requiring significant volume when long wicks appear (a single K-line or a series of K-lines; significant volume needs to be in a rapid decline model), and the breakout of the long wick needs to be greater than or equal to 15 K-lines (i.e., the number of K-lines from the appearance of the long wick to the breakout should be greater than or equal to 15). Additionally, this model should not exhibit significant retracement trends, meaning that the retracement of this long wick model must not exceed 50% from the starting K-line.
Strategy B: [This strategy is a trend-following strategy; based on certain considerations, it is not recorded for now, but may be recorded in the future.]
Strategy C:
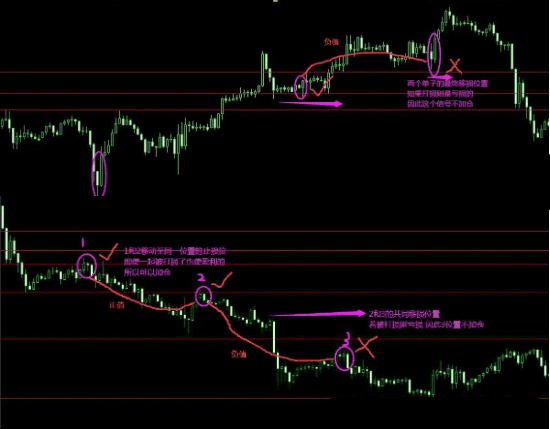
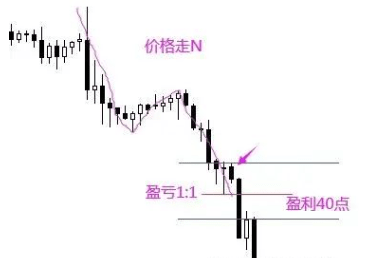
1) Long positions: H1 level, price moves up N, then forms the Roche Hawk pattern for long entries [see Attachment 3, with notes at the end of the article].
2) Short position: H1 level, price moves down N, then forms the Roche Hawk pattern for short entries [see Attachment 3, with notes at the end of the article].
2. Exit:
Strategy A:
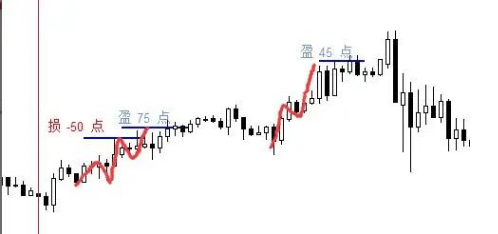
1) Initial stop-loss: Long wick models set stop-loss above (if the long wick stop-loss is close to dense support/resistance levels, then set according to the dense area), and pattern stop-loss set according to the previous dense area support/resistance; stop-loss should not exceed 100 points;
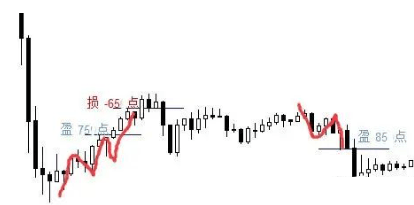
2) Take-profit and moving stop-loss: For half of the position in the trade, exit passively by moving the trailing stop (when the close breaks out), and each time the price reaches a peak/trough, perform a follow-up until stopped out by the trailing stop (within 38.2% of long K-lines, rapid rises/falls of long doji, and reversals also belong to the moving positions); the other half of the position also has a trailing stop but is set to take profit at 2 times the stop-loss points. When that position takes profit, and the other one hasn't moved the stop-loss, it can first be moved to a breakeven position; when the profit point reaches the same point as the stop-loss, it can be moved to a breakeven position based on market conditions.

Strategy B: [This strategy is a trend-following strategy; based on certain considerations, it is not recorded for now, but may be recorded in the future.]
Strategy C:
Exit when the price reaches the set stop-loss or take-profit level.
[This strategy will be optimized later to only move trailing stops.]
3. Risk Control: Drawdown control, selection of products.
1. Position control: Both Strategy A and Strategy B are split into 2 positions to enter, with a stop-loss of 1% + 1% for opening positions; Strategy C enters with a position of within 1.5%;
2. Product: XAUUSD.
4. Other details [including rules]:
Strategy A:
1. Key entry position details: Each key position/interval can only have 2 entries in a single direction per week;
2. Definition of breakout pullback: A breakout pullback without special instructions refers to the H1 pullback after the daily line closes above/below; otherwise, it refers to the H1 pullback after closing above/below. If it is an H1 level breakout pullback, it needs to be specified, and H1 level breakout pullbacks need to have space.
3. Definition of key positions and intervals: The entry position must not exceed 85 points from the dense stop-loss interval [based on its volatility, it can reach about 100 points], and the expected risk-reward ratio must reach 2:1 to enter (calculated based on the distance to the first support/resistance position from the weekly analysis); and the K-line must touch within 30 points of its price during the session; for signals near support levels, they need to be positive signals, such as long signals needing to be above the support level, and short signals needing to be below the resistance level. Signals appearing near support levels during oscillating markets should be subjectively judged based on the previous K-line situation - usually, expanding oscillations are signals to avoid, and consecutive K-lines with long upper and lower shadows appearing beforehand should also not enter.
4. Definition of moving stop-loss: Move the stop-loss once for each close on H1/H4/D1.
5. Handling missed signal positions:
A. Do not take that signal;
B. If the price oscillates back to the entry position within 10 K-lines, you may enter, but if the rise exceeds the stop-loss points, do not enter.
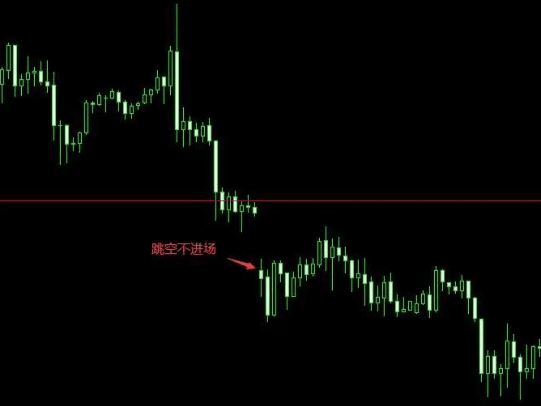
6. Do not enter if there is a gap window above for long positions or below for short positions, unless the window is closed.

7. Amplitude of the pattern:
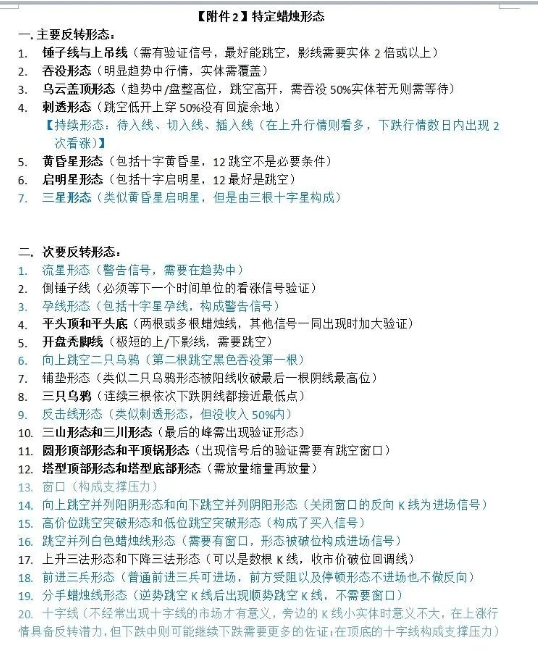
The amplitude of the XAUUSD pattern requires the last K-line to exceed at least 20 points, such as engulfing patterns, evening stars, etc.
8. Do not enter during major market movements:
Do not enter during the week of elections.
Strategy B: [This strategy is a trend-following strategy; based on certain considerations, it is not recorded for now, but may be recorded in the future.]
Strategy C:
1. Product volatility limits: XAUUSD - 25-100 points (based on market fluctuations);
2. A single K-line containing more than 4 subsequent K-lines at close/open is considered oscillating and do not enter;
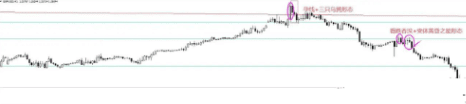
3. Do not enter if the 1-2-3 structure exceeds 1.5:1 (based on the latest starting 1-2-3 structure);
4. Do not enter on missed signals;
5. Do not enter on a second signal when there is already a signal for one product;
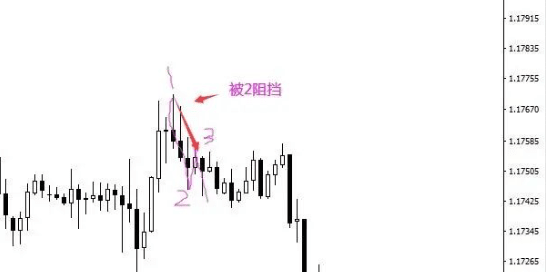
6. In the 1-2-3 structure, the connection line of 1-3 cannot be blocked by 2;
7. Do not enter when the market is highly volatile, such as during election weeks, interest rate decisions, or on NFP days.
5. Review and Summary:
Conduct a weekly review of the week's openings and make possible optimizations for summary.
Attachment 1: (Attachment 1 is based on the (Japanese candlestick chart technique), so there is no need for excessive repetition here).
Attachment 2: Specific candlestick patterns (it is worth noting that candlestick patterns can present different details as experience grows).
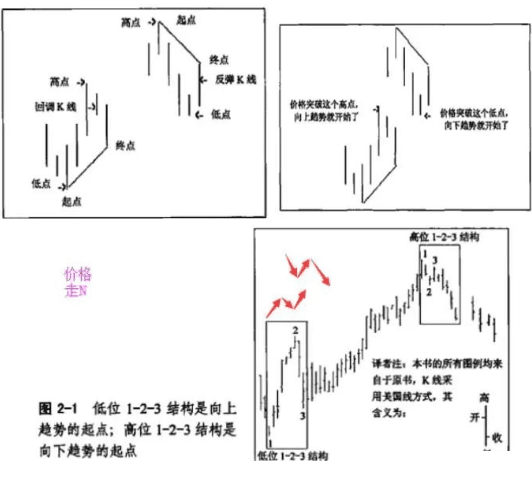
Attachment 3: The Roche Hawk trading model for XAUUSD.
1. Principle:
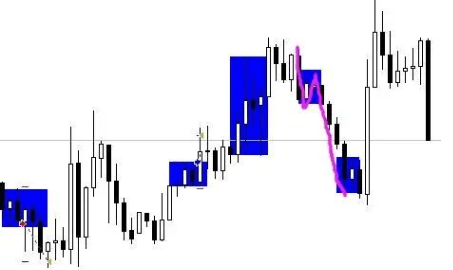
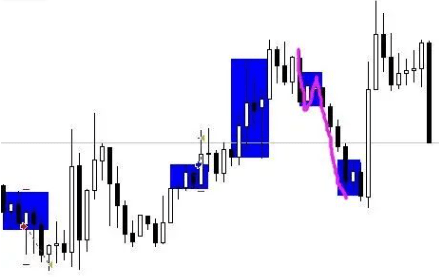
Starting from the trend-following approach of the Roche Hawk, capture equivalent price fluctuations after recognizing a compatible model.
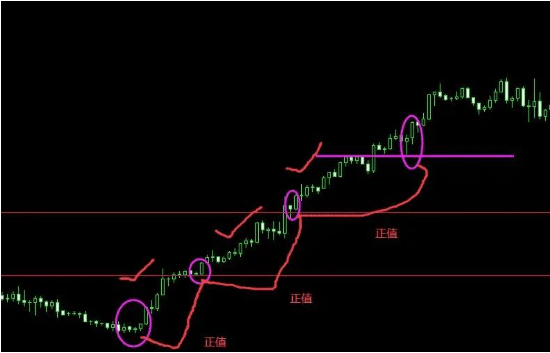
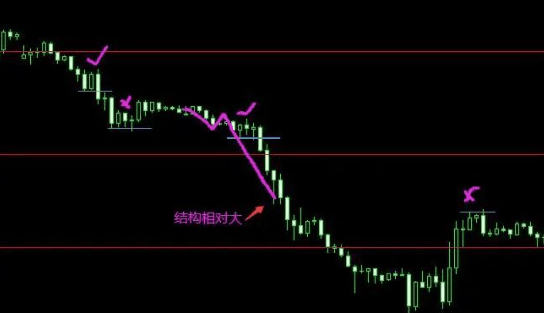
After price movement, if a pullback/rebound occurs, connect it to form a trend line. If highs/lows are broken, it indicates a trend, with high 1-2-3 and low 1-2-3 (confirming the trend). When point 2 is broken, the Roche Hawk (RH) is established. Here, point 3 cannot break point 1; if it does, this 1-2-3 becomes invalid.
2. Entry:
Enter when the Roche Hawk formation breaks out (at least four K-lines confirmed).
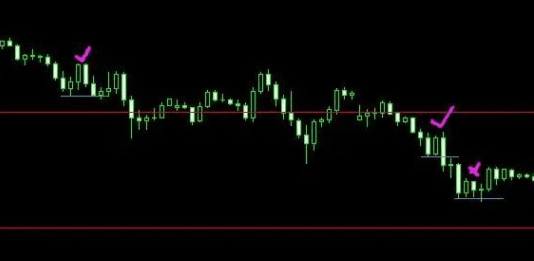
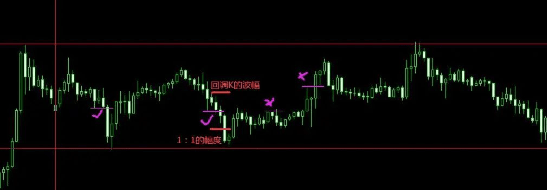
3. Exit:
After entering, capture the market according to a 1:1 risk-reward ratio on pullbacks.
4. Filtering rules
1. Do not enter when the structure is too large (when point 2 is far from RH).
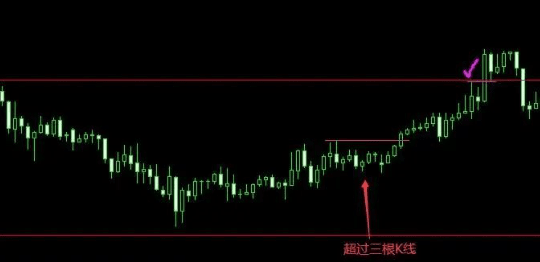
2. Do not enter if there is no breakout within three K-lines.
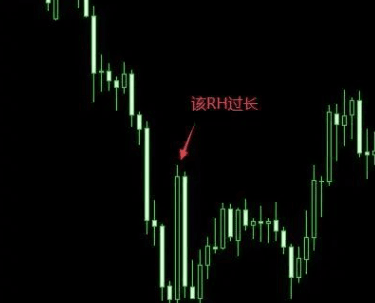
3. Do not enter if the RH is too long.
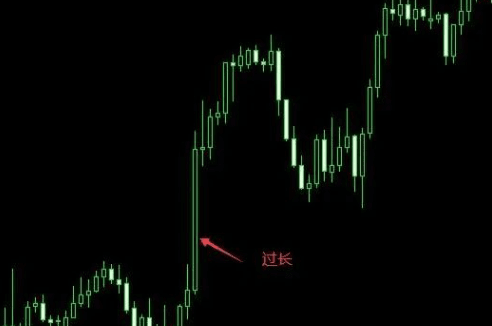
4. Do not enter when the previous K-line's running range is too long.
5. Do not enter when the volatility is very low.
6. Do not enter on gaps.
7. Do not enter when price fluctuations are too large, such as during election weeks, interest rate decisions, or on NFP days.
5. Products and periods:
XAUUSD's H1 level period.
6. Additional Details:
8. Product volatility limits: XAUUSD - 25-100 points.
9. A single K-line containing more than 4 subsequent K-lines at close/open is considered oscillating and do not enter.
10. Do not enter if the 1-2-3 structure exceeds 1.5:1 (based on the latest starting 1-2-3 structure).
11. Do not enter on missed signals.
12. Do not enter on a second signal when there is already a signal for one product.
13. In the 1-2-3 structure, the connection line of 1-3 cannot be blocked by 2.
14. Do not enter when market fluctuations are large, such as during election weeks, interest rate decisions on the day.
If you are also a tech enthusiast and are keen on studying technical operations in the crypto space, consider following @加密大师兄888 ; you will gain more insights! #技术分析参考