

The last round of both personal and studio projects that received results was the Grass project. If this round can yield results, I think Nexus has a much higher possibility.
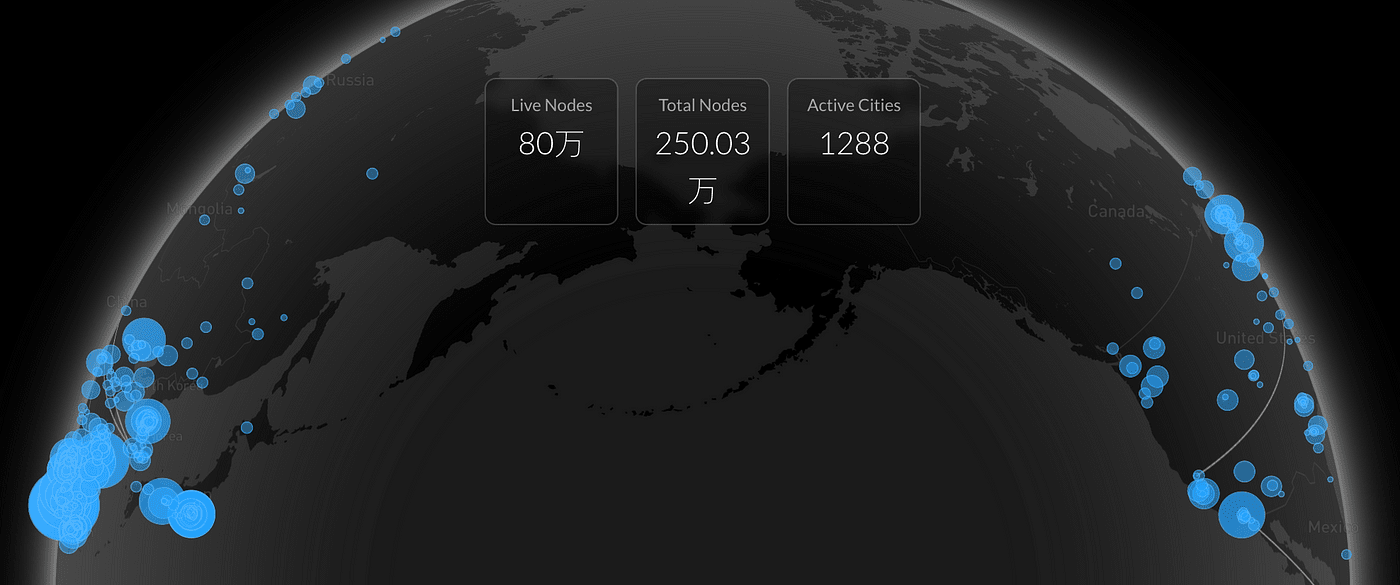
This is because from June 23 to now, Nexus only has 2.5 million nodes, with only 800,000 active nodes. Grass has 2.8 million effective users.
Secondly, because the previous two rounds of Nexus mining only lasted a few days, this round may last for 3 months, which is a significant benefit compared to Grass's year-long idle mining.
So let's see how Nexus participates, this article mainly includes the following parts:
(1) Nexus participation threshold
(2) Browser mining tutorial (0 cost — must do)
(3) Preparation before node deployment (can be skipped)
(4) Node deployment tutorial one (beginner level, one-click deployment directly see 'tutorial two')
(5) Node deployment tutorial two (one-click deployment)
1. Nexus participation threshold
Nexus has previously held two rounds of mining activities, both lasting only a few days. This time it is the Nexus Testnet III mining activity, which started on June 23, and there is no specified end time. If the coin is issued in Q3, we can still mine for 2–3 months.
Nexus Testnet III mining is divided into two parts:
Browser mining only requires staying online on the official website without any cost;
Node mining can be deployed on a PC or VPS. Using VPS requires purchasing it yourself, usually costing 3–7 USD per month.
Nexus has almost zero cost; you can accumulate points just by staying online. Users can mine in the browser while using the Prover ID to deploy multiple nodes with the same account on VPS to increase computing power and earn more points. Every 1000 points can be exchanged for 1 $NEX test coin.
2. Browser mining tutorial (0 cost)
This is very simple; just stay online in the browser, truly 0 cost. If you only want to earn a basic income without spending money on VPS, you can participate in this, and it is recommended to use a fingerprint browser to open multiple sessions.
The steps are as follows:
Log in to https://app.nexus.xyz/
Sign up to earn points
Link your wallet, and the system will automatically switch to the Nexus testnet

If a page like the above appears, it indicates that mining is underway. After accumulating a certain number of points, click claim to exchange points for tokens, with every 1000 points exchanged for 1 $NEX test coin.
As long as the data in points is fluctuating, do not refresh the page indiscriminately; any point can be claimed as tokens.
IP fluctuations may recalculate points (I have encountered this before).
If you feel that browser mining speed is too slow, you can deploy a node on your computer or rent a VPS to mine with the same account.
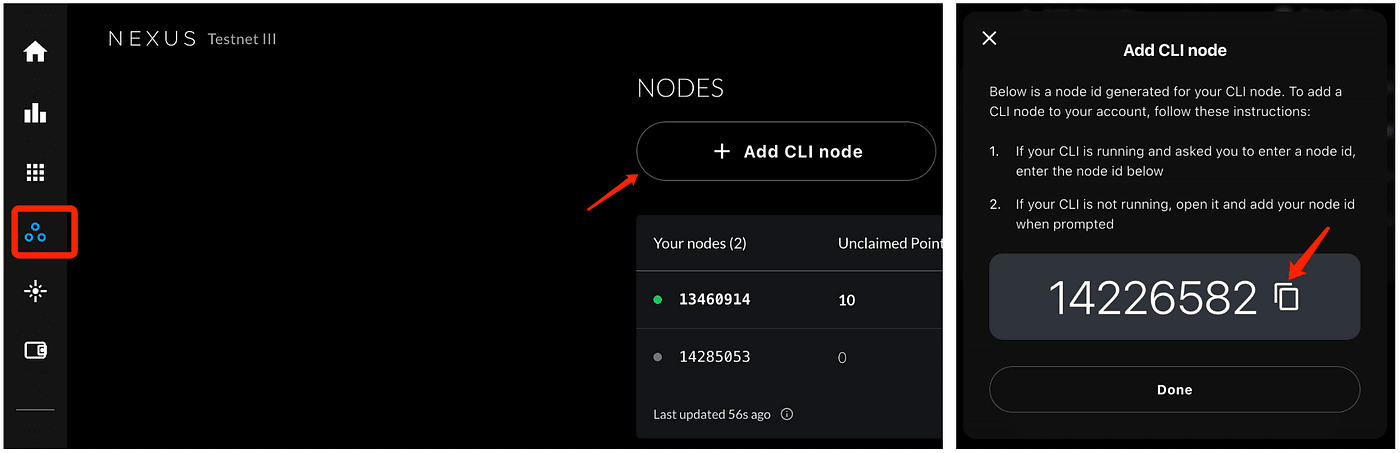
If you are preparing to deploy nodes for mining, extract the Prover ID from the official website in advance, the steps are as follows:
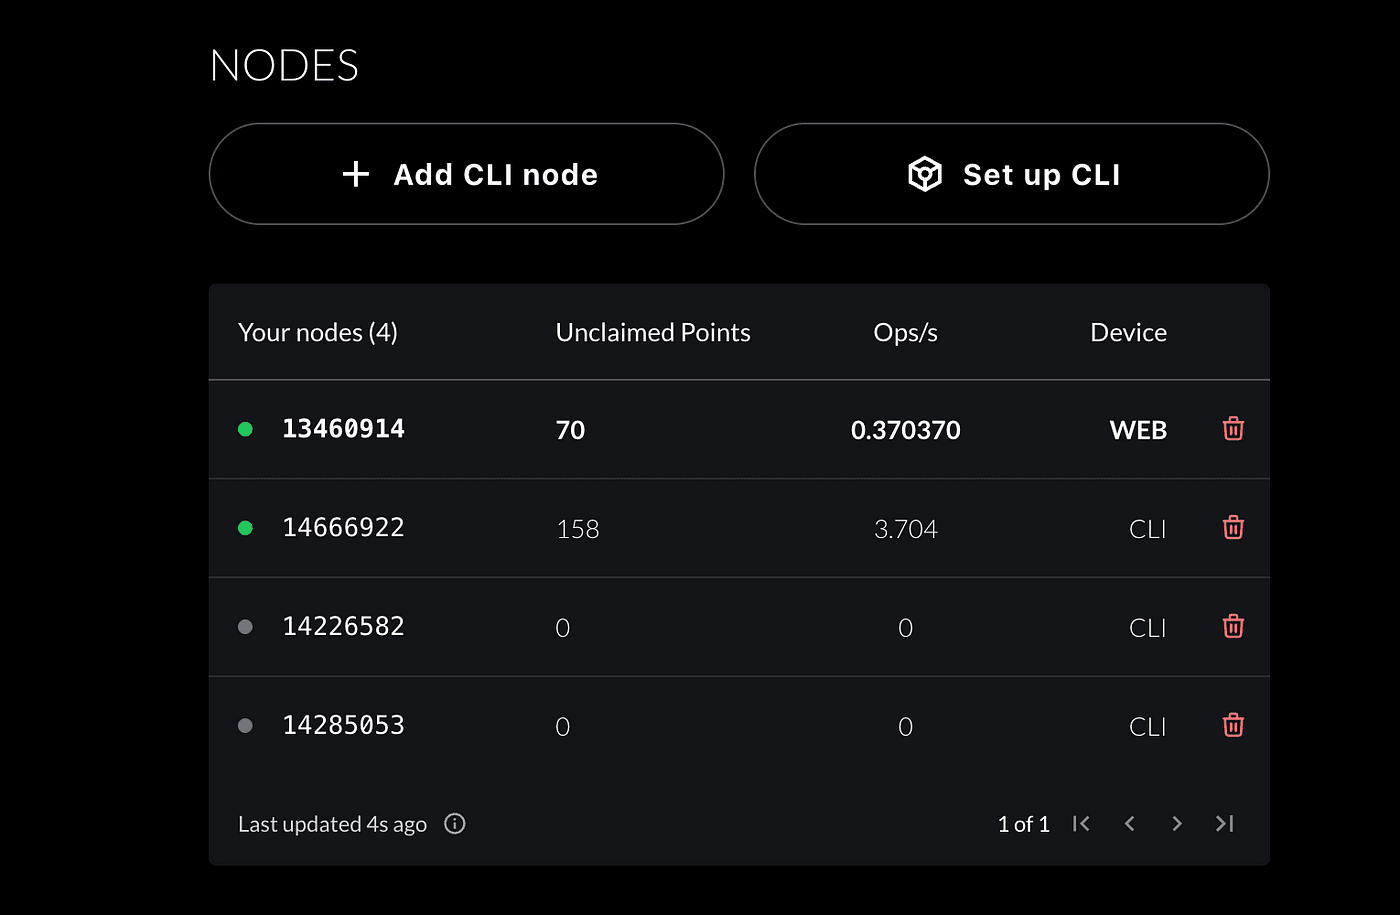
Click on the nodes icon on the official website;
Click '+Add CLI node'
Copy the ID in the pop-up page and save it for later use
3. Preparation before node deployment (can be skipped)
At this point, we enter the node deployment stage. You can deploy on your own PC or rent a VPS for deployment. You can use many PCs or VPS to share a Prover ID for mining, or generate multiple Prover IDs from many wallets to mine.
Not everyone has multiple computers, and VPS is not expensive now. I found a $3/month VPS, significantly reducing costs, so this tutorial focuses on VPS aspects during the node deployment phase.
Before node deployment, the following preparations need to be made
(1) VPS/Virtual Machine
Minimum VPS configuration
CPU: 2 cores (recommended 4 cores, AVX2 instruction set support)
Memory: 4GB (recommended 8GB)
Storage: 20GB SSD
Bandwidth: 10Mbps, monthly traffic 500GB+
Operating System: Ubuntu 20.04 LTS or 22.04 LTS (recommended 20.04 to avoid OpenSSL compatibility issues)
VPS providers
DigitalOcean (around $10/month)
Contabo (around $6/month)
the.hosting (around $5.7/month)
Mintair (from $3.99/month)
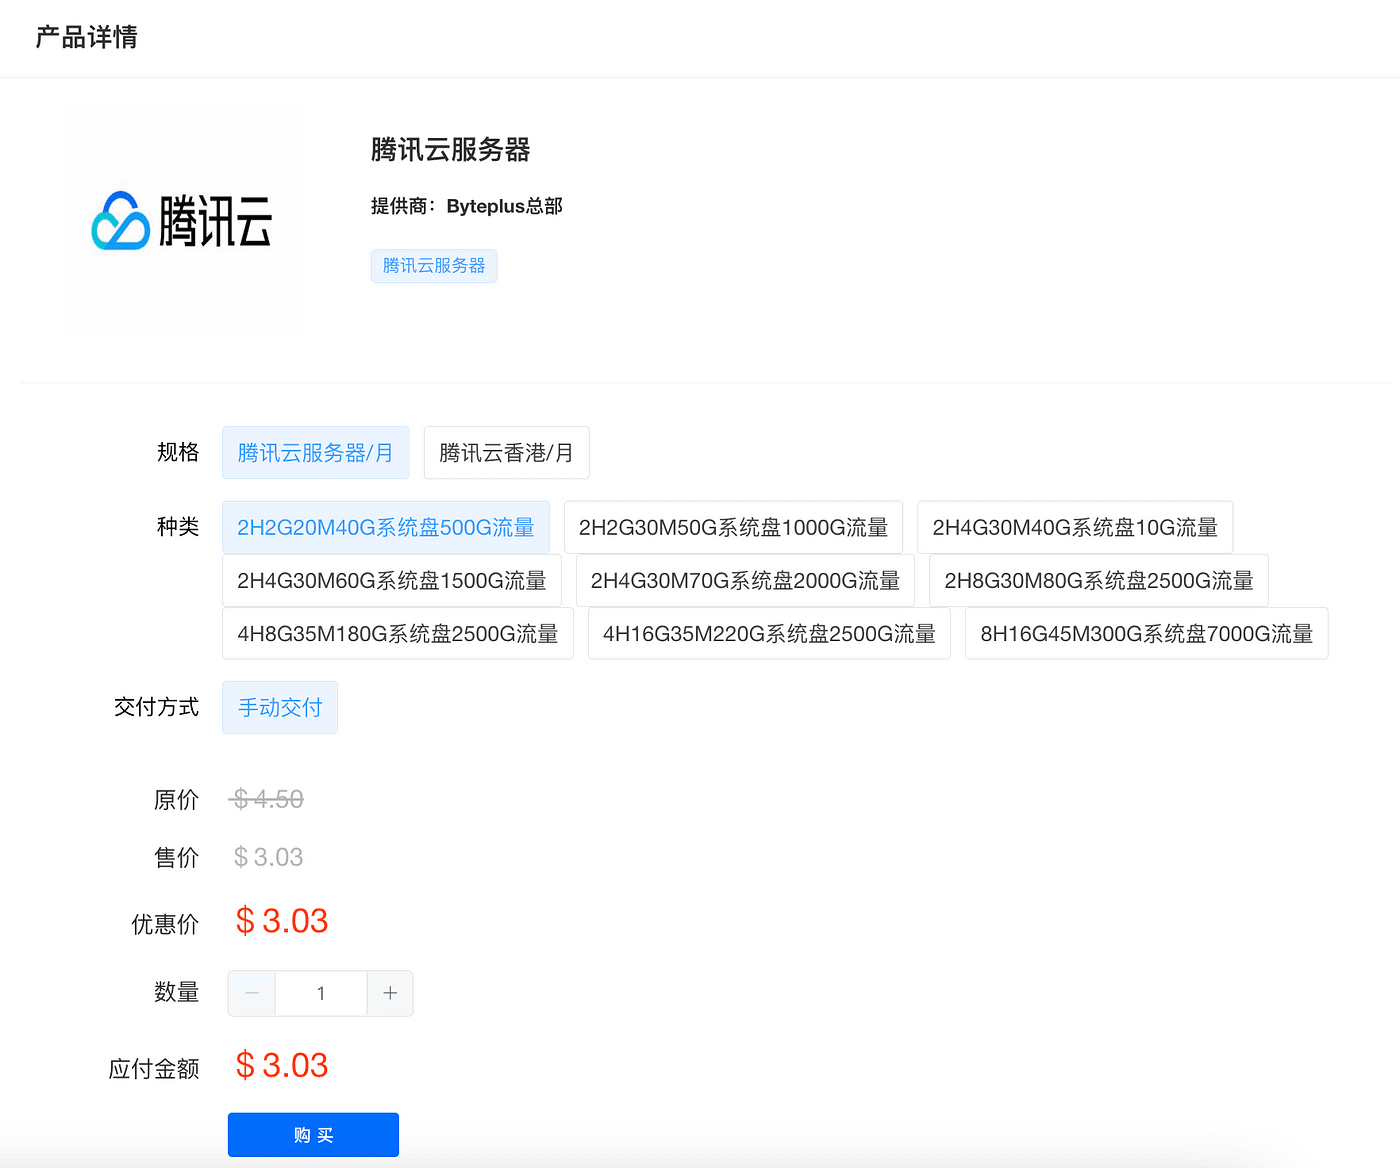
Tencent Cloud overseas ($3.03/month)
Tencent Cloud has lower prices, we choose Tencent Cloud as the VPS used in the tutorial.
VPS purchase link: https://bp.byteplus.pro/#/login?type=register&invitation=418356
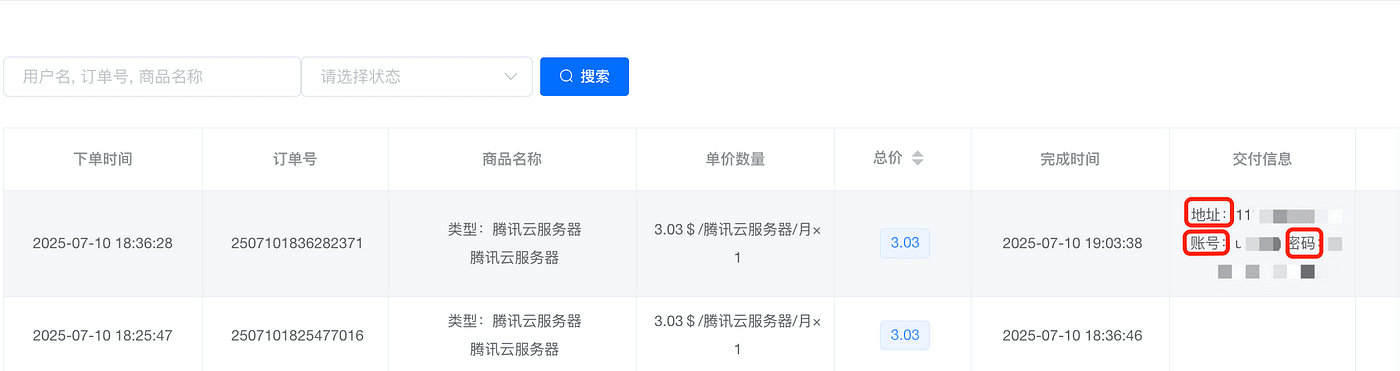
After purchasing the VPS, remember the address, account, and password, as they will be used in Xshell.
(2) Specific steps to connect to VPS using SSH
There are many SSH tools:
Windows has Xshell, Finalshell, Putty, etc., and this tutorial uses Xshell for demonstration;
Macbook generally uses Termius
The principle is the same; just log in with the public IP, account, and password of the VPS.
After downloading Xshell, the specific steps are as follows:
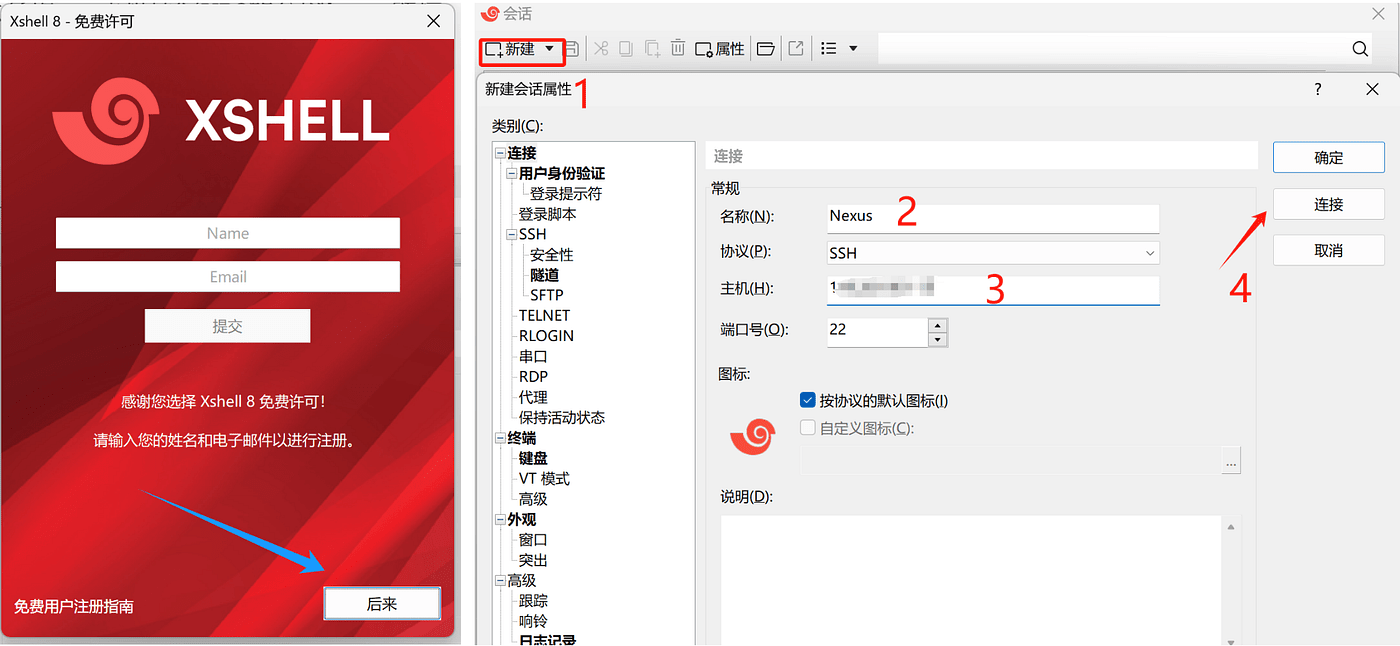
No registration is required, choose 'Later'
Click 'New'
Enter any name in the name field — fill in the public IP of the VPS in the host — connect
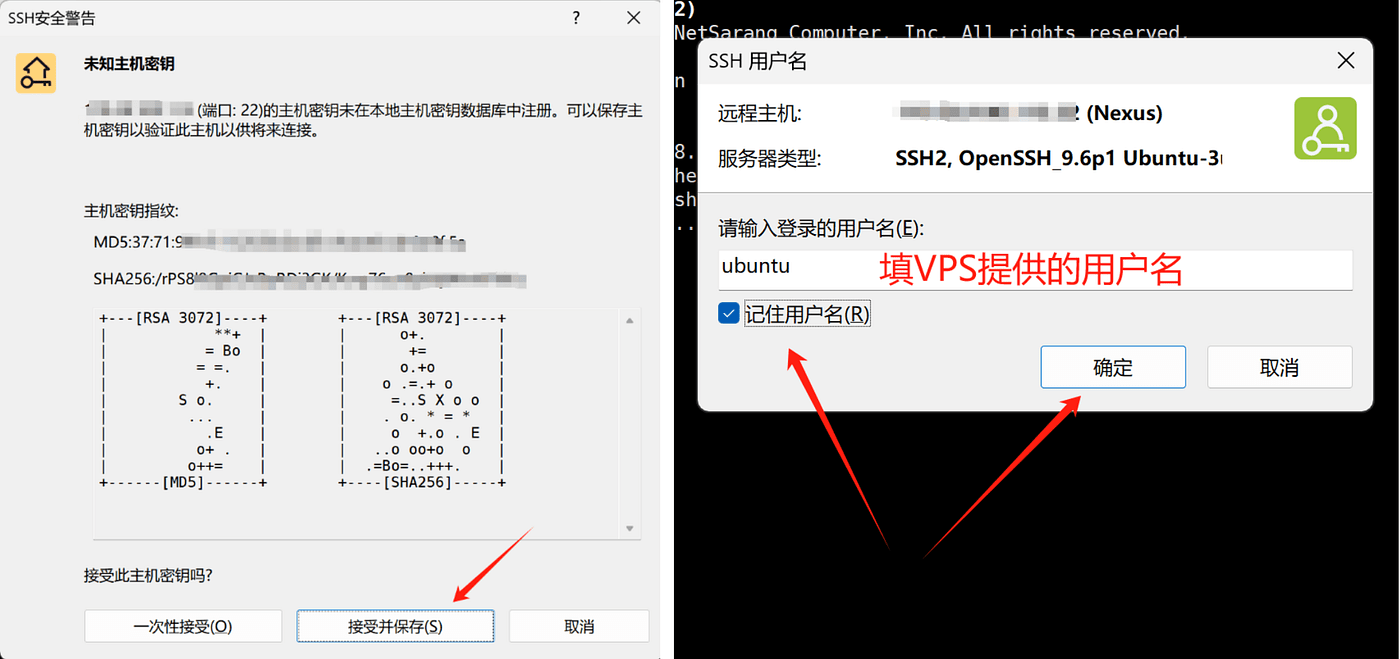
Click 'Accept and Save' on the pop-up page
Fill in the username provided by the VPS; by default, it is root, but it may also be ubuntu;
Enter the password
If Xshell connects successfully, the page has a green dot, and the screen also shows the username (Figure 2)
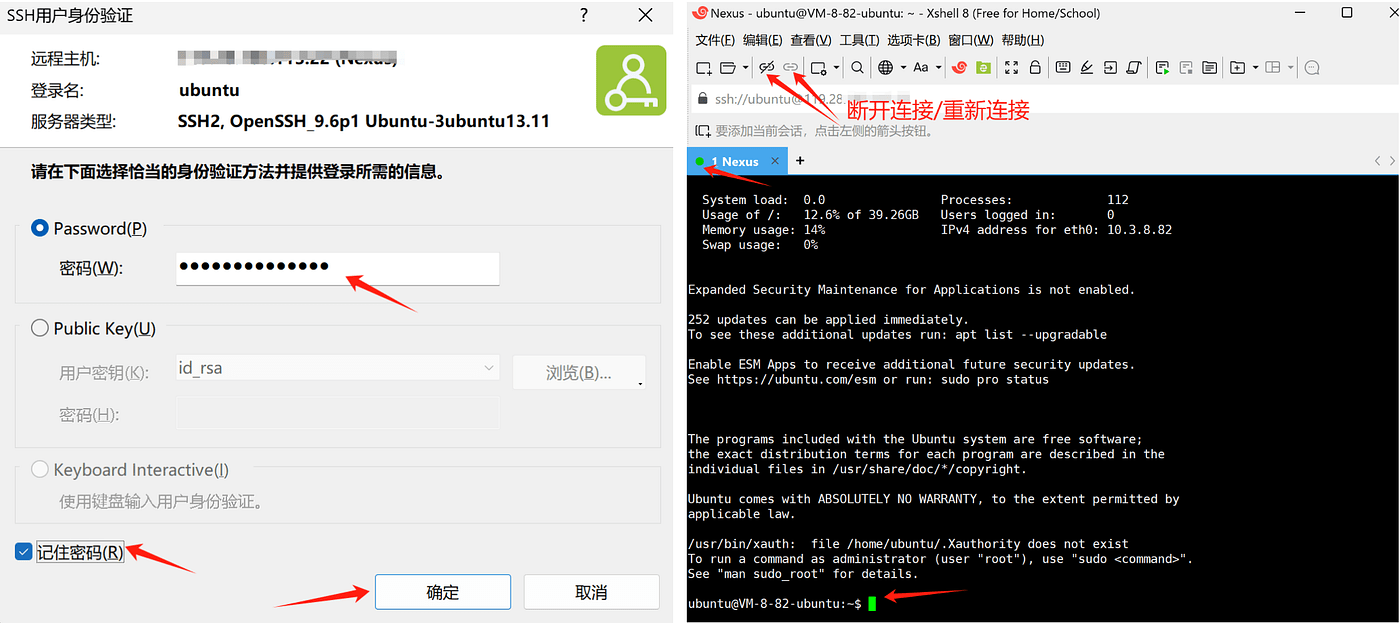
At this point, Xshell successfully connects to the VPS, and you can start deploying nodes.
Click 'Accept and Save' on the pop-up page
Fill in the username provided by the VPS; by default, it is root, but it may also be ubuntu;
Enter the password
If Xshell connects successfully, the page has a green dot, and the screen also shows the username (Figure 2)
At this point, Xshell successfully connects to the VPS, and you can start deploying nodes.
4. Node deployment tutorial one (beginner level, can be skipped)
I wrote 'can be skipped' here mainly because node deployment is relatively cumbersome, and various errors may occur in the process, preventing smooth completion. Therefore, I wrote (Node Deployment Tutorial Two) in the afternoon, which is a one-click deployment code that only requires you to enter a string of code in the VPS, and the system can deploy it automatically.
So (Node Deployment Tutorial One) is for those who have strong hands-on ability and want to challenge themselves; the specific steps are as follows:
Step 1: Update the system
Ensure that the system is up to date to avoid dependency issues
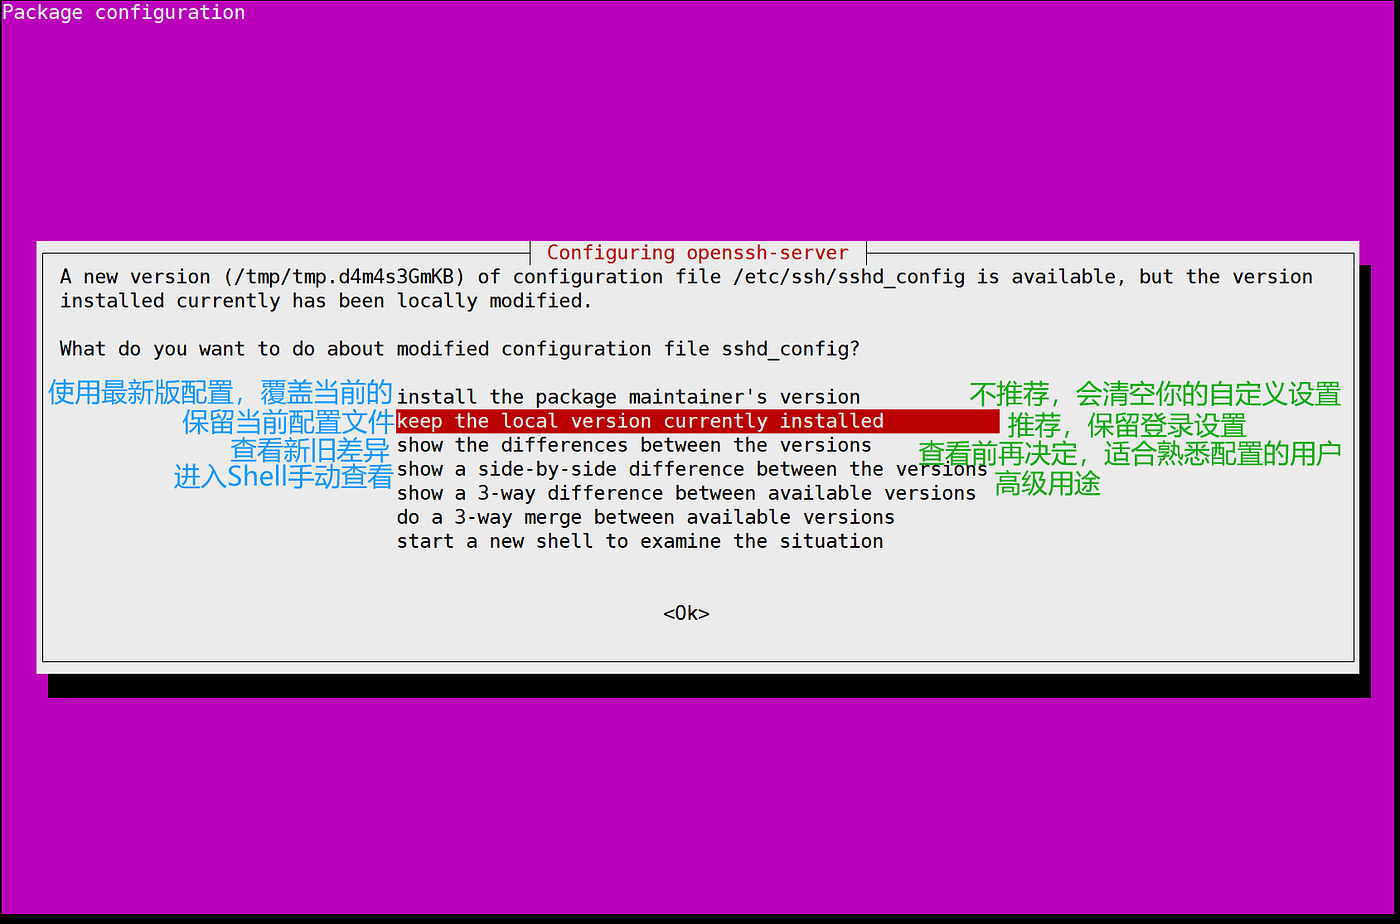
sudo apt update && sudo apt upgrade -y
After the update, the system will pop up the following interface; directly select the second option and press Enter (which means to keep your current SSH configuration to prevent remote connection issues after the upgrade)
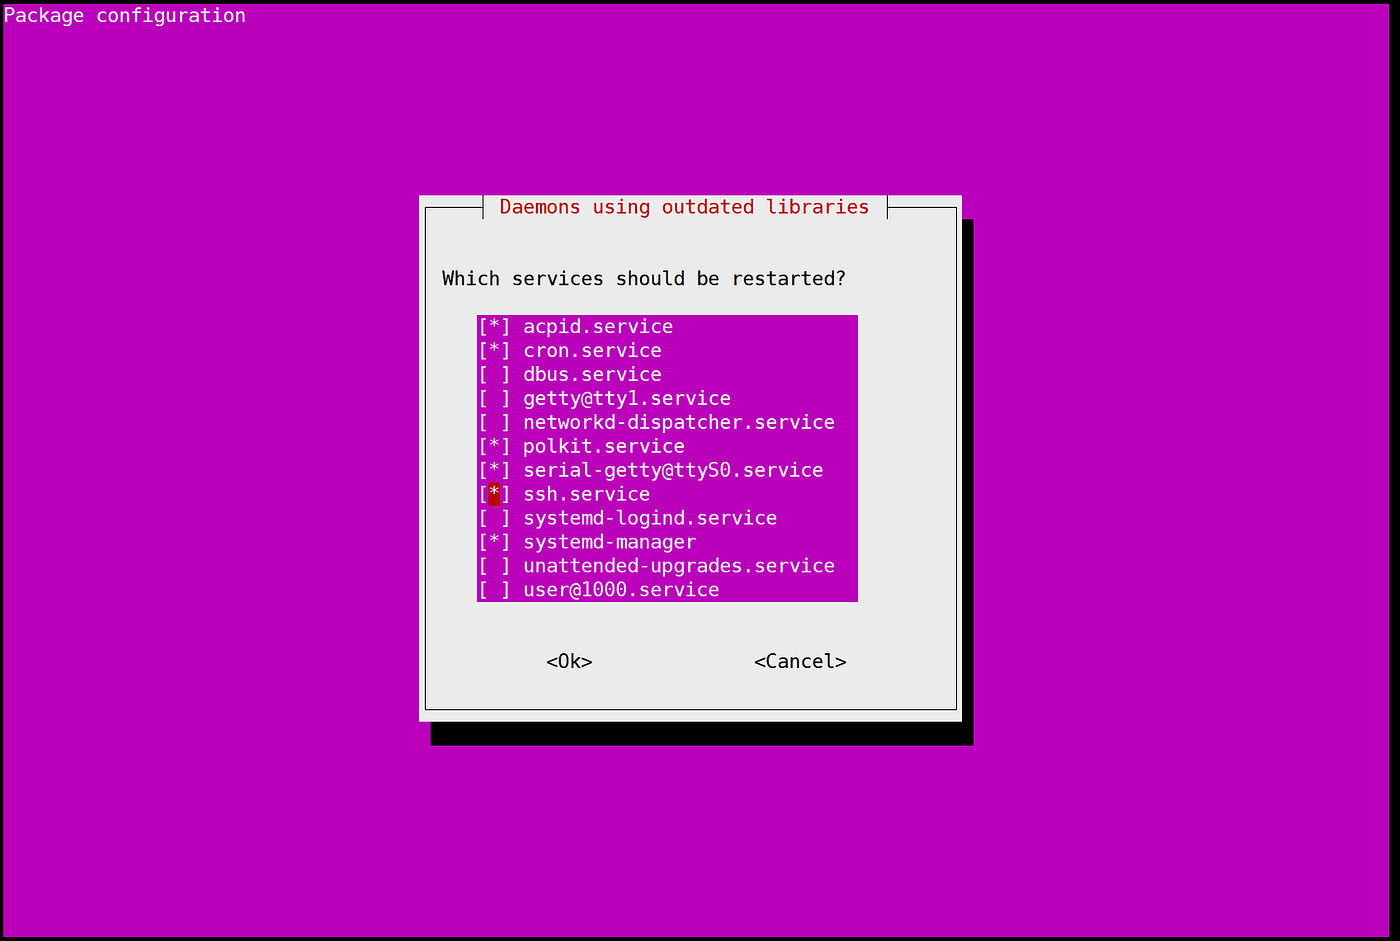
If the system shows the following prompt, it means: the following services are using outdated libraries, do you want to restart these services now?
Strongly recommend — uncheck ssh.service, the steps are as follows:
Use the keyboard arrow key ↓ to select ssh.service
Press the space bar to uncheck (the preceding [*] will disappear)
Keep other default selections
Press the Tab key to switch to <Ok>, then press Enter to continue
This way, the system will restart other services while keeping your current SSH session uninterrupted.
Enter the following command to check the system version
lsb_release -a

Step 3: Add 4G Swap (to solve compilation interruptions)
sudo fallocate -l 4G /swapfile
sudo chmod 600 /swapfile
sudo mkswap /swapfile
sudo swapon /swapfile
echo '/swapfile none swap sw 0 0' | sudo tee -a /etc/fstab
Verify if it takes effect:
free -h
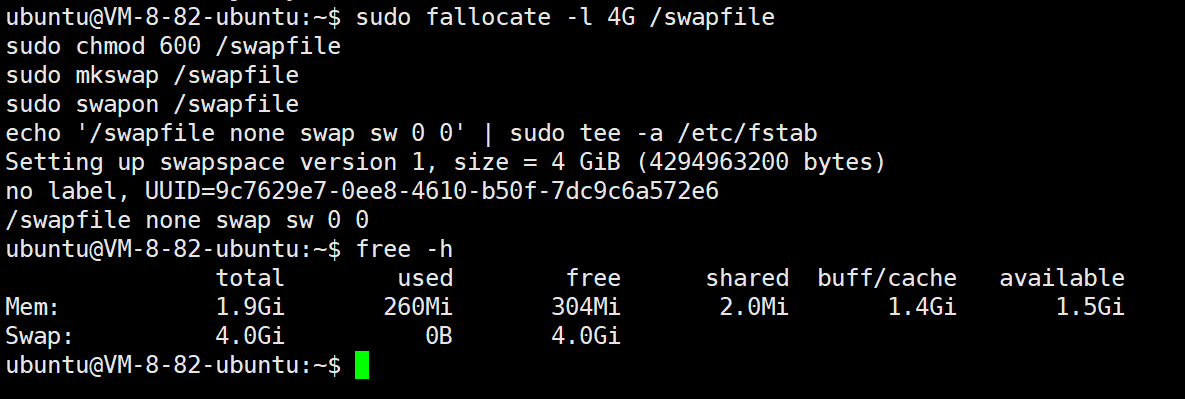
Confirm that the output contains Swap: 4.0G to be successful.
Why is a 2GB memory VPS recommended to set 4GB Swap?
Rust compilation has high memory requirements. For example, when compiling nexus-cli with cargo build — release, it may use 2.5GB–3.5GB of memory.
To prevent OOM (out of memory), without swap, the system will directly kill the compilation process, and SSH may also disconnect.
Swap = temporary buffer. Although slower, it can effectively prevent crashes, especially suitable for low-spec VPS.
Step 4: Install basic dependencies and development tools
sudo apt install -y curl iptables build-essential git wget lz4 jq make gcc nano automake autoconf tmux htop nvme-cli pkg-config libssl-dev libleveldb-dev tar clang bsdmainutils ncdu unzip protobuf-compiler
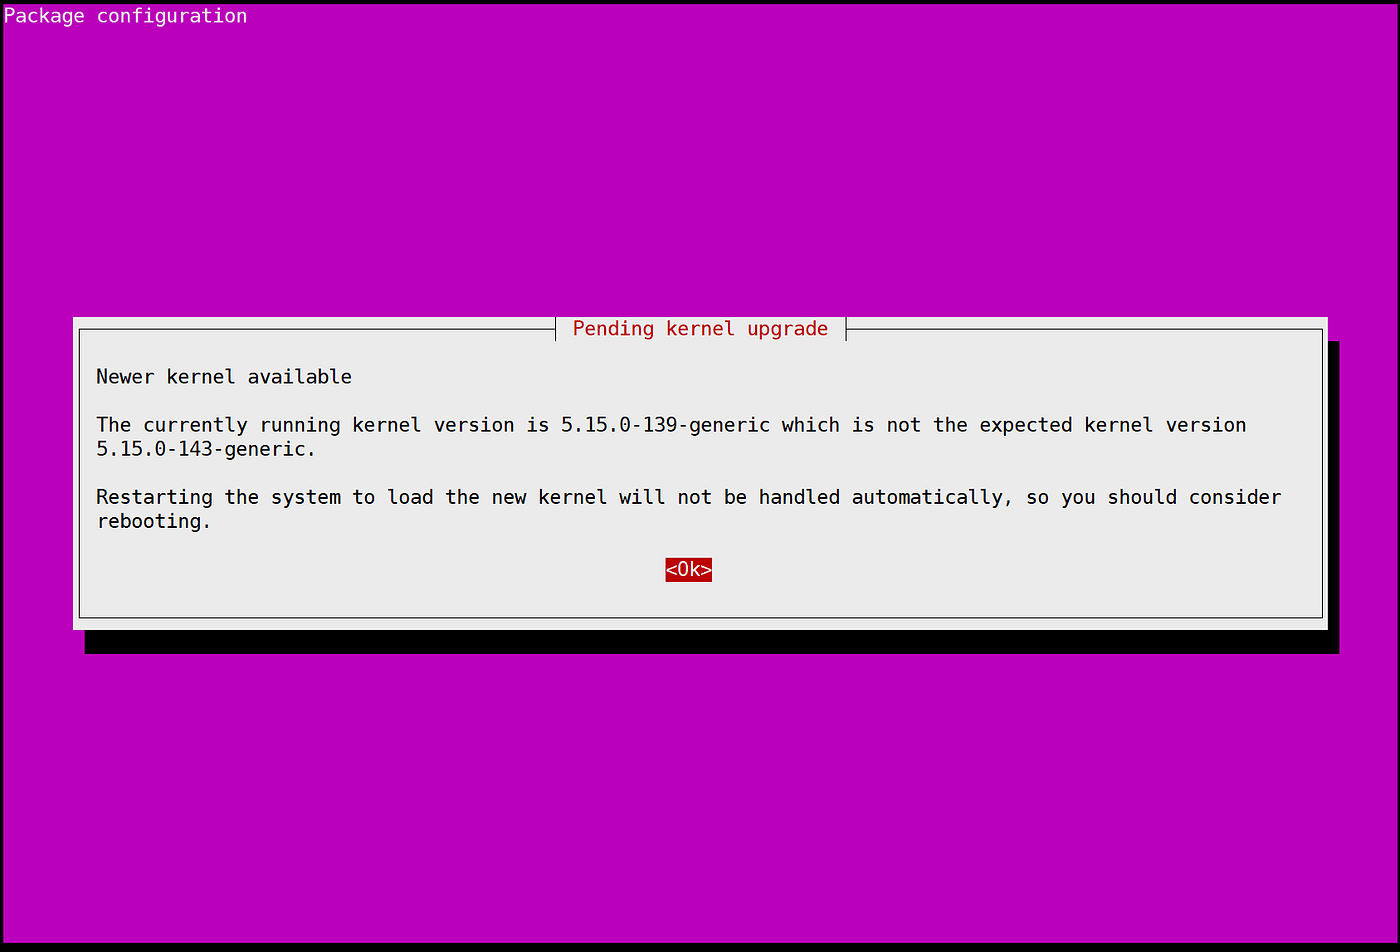
The above image means that the new kernel (5.15.0-143-generic) has been installed, but the currently running kernel is still the old one (5.15.0-139-generic). If you wish to use the new kernel, you need to manually restart the system.
Since the Nexus node has not yet been completely deployed (Rust/Docker, nexus-cli has not been installed), it is recommended not to restart yet, first complete the deployment process.
Just press Enter
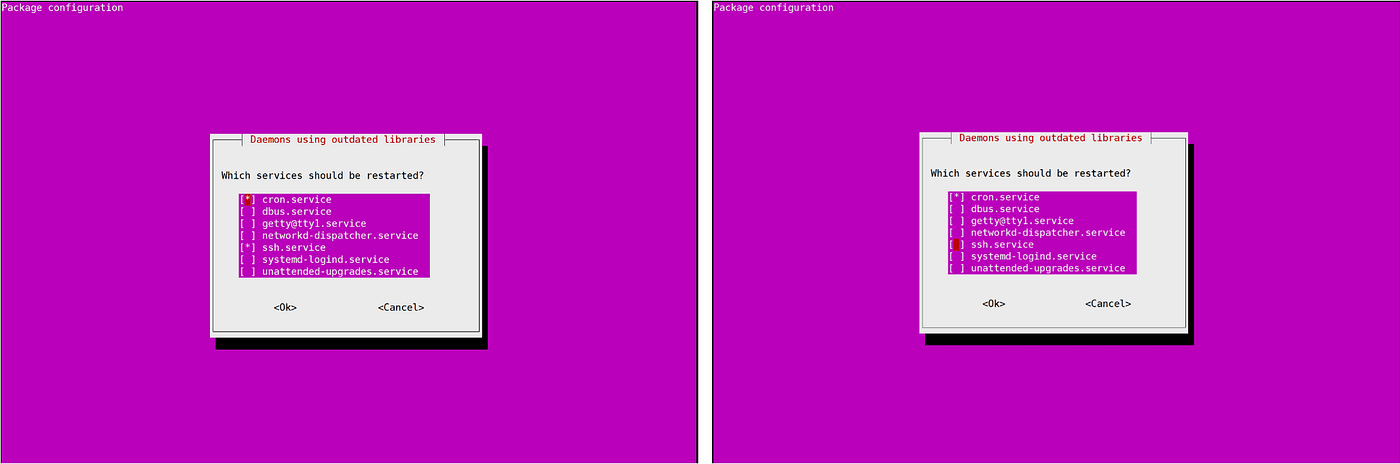
Figure one [*] ssh.service is currently checked, as we logged into the VPS via Xshell SSH before. Restarting ssh.service at this time may disconnect; if there are issues with the SSH configuration, it may also prevent you from logging in again.
The correct approach is to uncheck ssh.service
Use ↓ to move to ssh.service
Press the space bar to uncheck (from [*] to [ ]) (Figure 2)
✅ Just keep the cron.service checked (this is the system's scheduled task service, restarting is fine)
Then press the Tab key → select <Ok> → press Enter
This will ensure that your current SSH session does not get interrupted while other system services are correctly restarted.
Step 5: Enable automatic security updates
sudo dpkg-reconfigure --priority=low unattended-upgrades
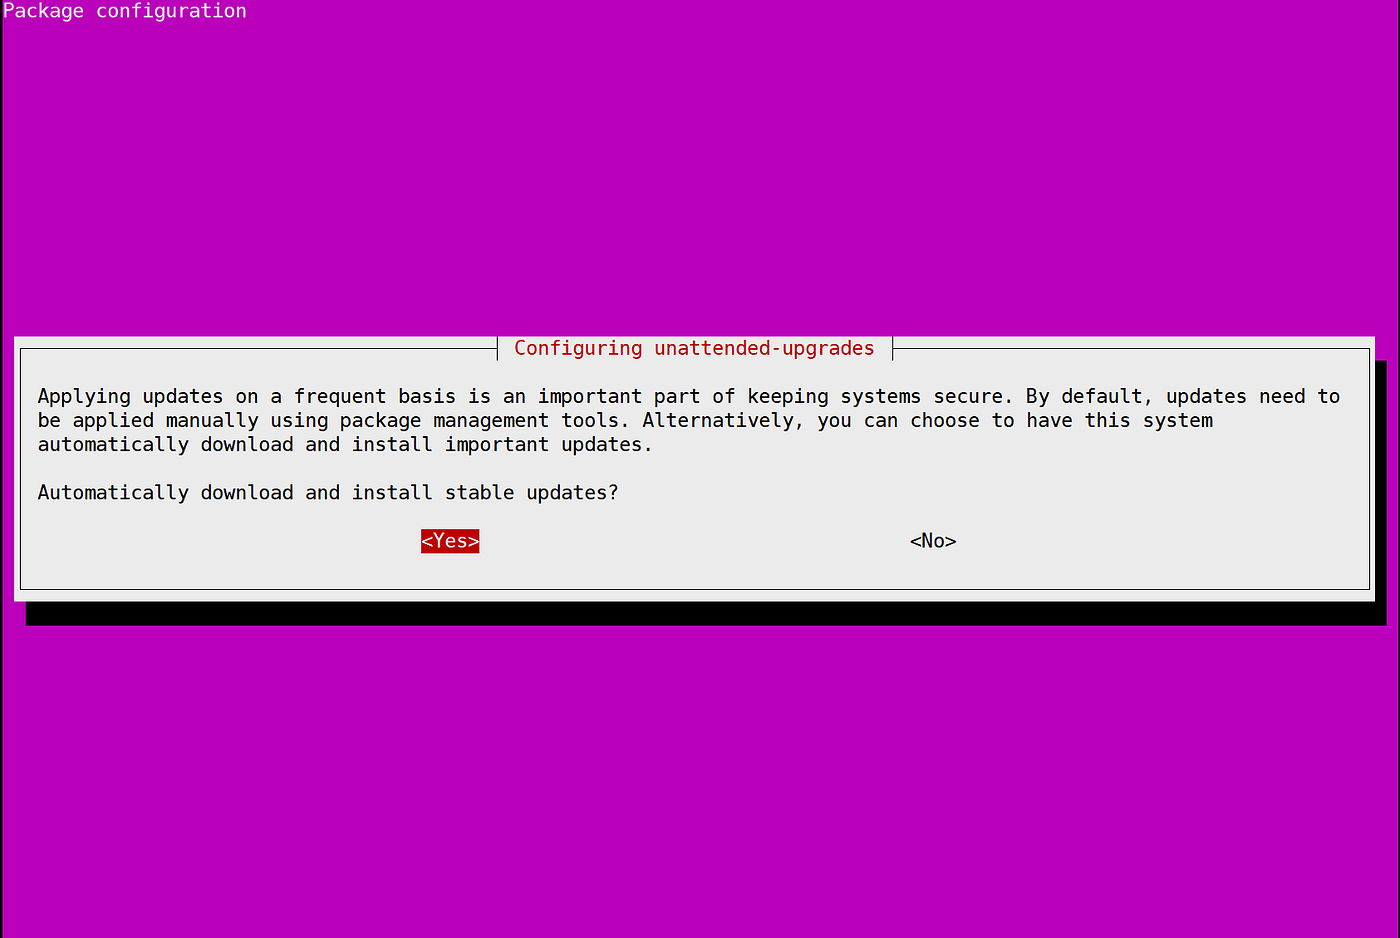
The system asks: 'Do you want to automatically download and install the system's stable updates?' Just press Enter.
This will enable the automatic security update feature, and the system will automatically install stable security patches and critical updates regularly in the background, reducing the risk of being hacked. It is very suitable for long-term running VPS node servers.
Step 6: Enable SSH brute force login protection (Fail2ban)
sudo systemctl enable fail2ban
sudo systemctl start fail2ban

Fail2ban has successfully started and is set to start at boot
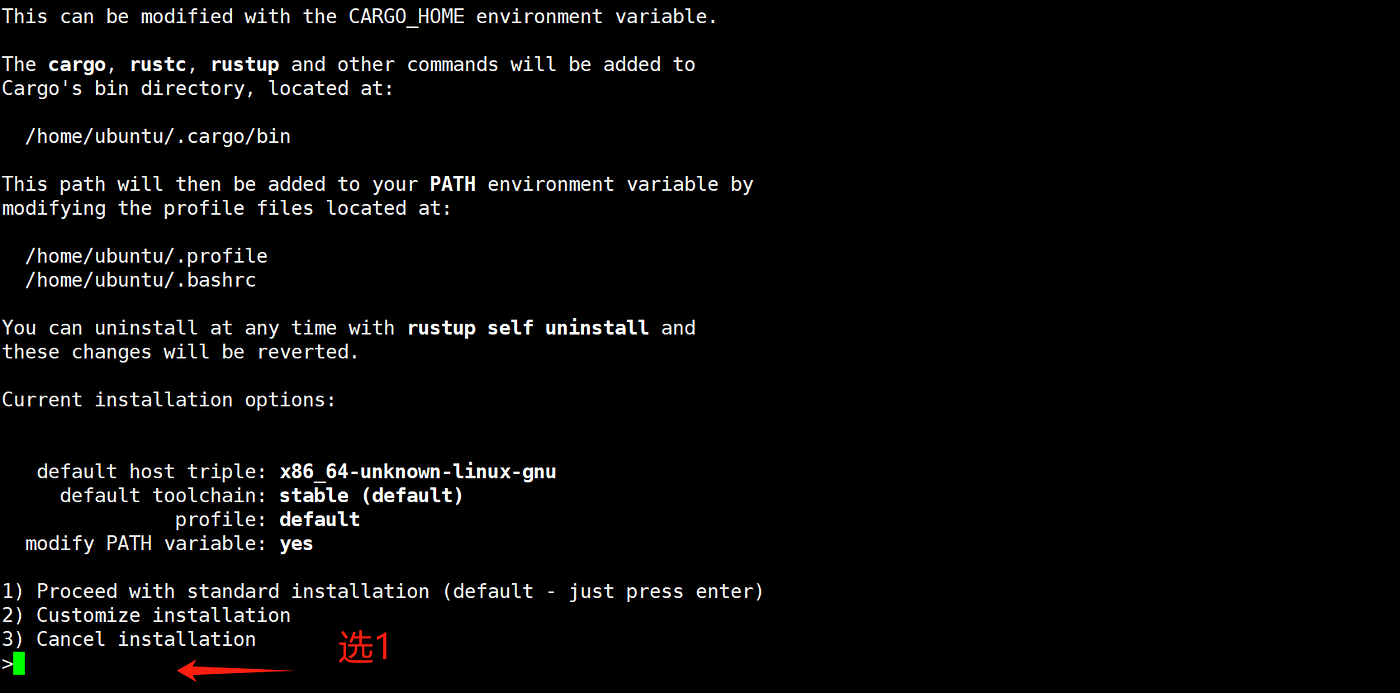
Step 6: Install Rust compiler (Nexus CLI dependency)
curl --proto '=https' --tlsv1.2 -sSf https://sh.rustup.rs | sh
source $HOME/.cargo/env
rustup update
rustc --version
Step 7: Use a screen session to maintain the connection
To avoid disconnections during the VPS compilation process, you can use screen:
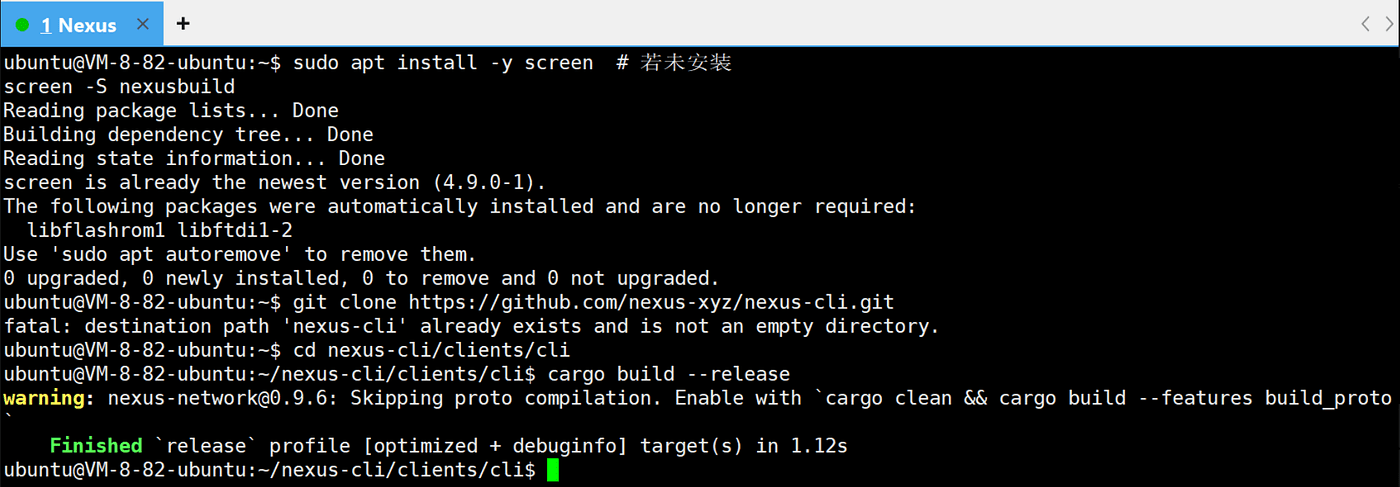
sudo apt install -y screen
screen -S nexusbuild
Enter the screen session and then execute the following steps
Step 8: Clone and compile Nexus CLI (source method)
Clone code
git clone https://github.com/nexus-xyz/nexus-cli.git
cd nexus-cli/clients/cli
Compile Nexus CLI (the binary is called nexus-network)
cargo build --release --bin nexus-network
Wait for 5–20 minutes for the system to compile itself
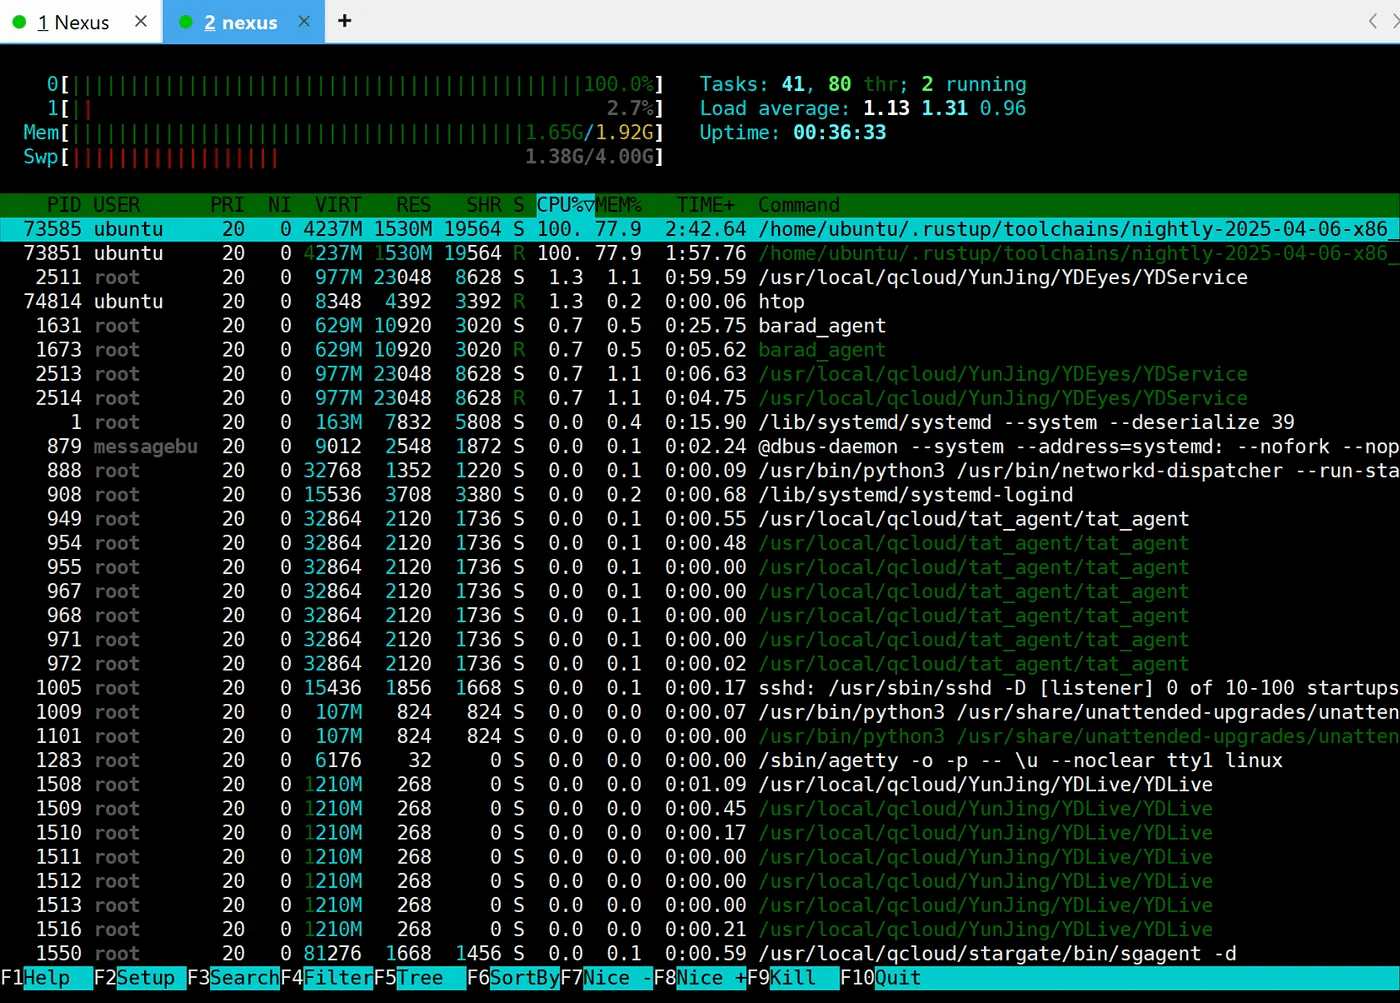
It may get stuck for a long time at the last step. You can open another SSH window and type htop to see if the CPU is running. If it is running, it indicates that the background is still continuing; just wait.
If you get disconnected, please reconnect and use the command below to continue compiling from where you left off:
screen -r nexusbuild
cd ~/nexus-cli/clients/cli
cargo build --release --bin nexus-network
As shown in the figure, the compilation is complete:
After completion, press Ctrl+A+D to detach from the session (can be skipped)
The above image shows an error: warning: [email protected]: Skipping proto compilation. Enable with cargo clean && cargo build --features build_proto
You can ignore this; it indicates that the nexus-network module skipped the Protocol Buffers (proto) compilation step.
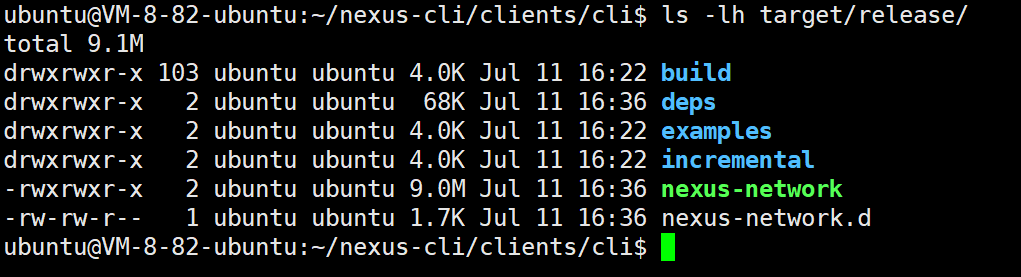
Use the following command to check if the nexus-network executable file has been successfully built
ls -lh target/release/
If you see -rwxr-xr-x nexus-network, it indicates that the nexus-network executable file has been built successfully.
Step 9: Install to system path (rename to nexus-cli)
sudo cp target/release/nexus-network /usr/local/bin/nexus-cli
Verify whether nexus-network has been correctly installed as the nexus-cli command
nexus-cli --version

This indicates that the CLI can be called globally, and you can start registering or starting the node.
Step 10: Register the node
If this is your first run, please register a user and node:
nexus-cli register-user --wallet-address
nexus-cli register-node
<YOUR_WALLET_ADDRESS> for your EVM compatible wallet address (like MetaMask).
After registration, the node credentials are saved in ~/.nexus/config.json.
If you already have a Prover ID, start directly
nexus-cli start --node-id <yourProver_ID>
Replace <YOUR_PROVER_ID> with the ID you copied in Nexus OS.
For example, mine:
nexus-cli start --node-id 14666922
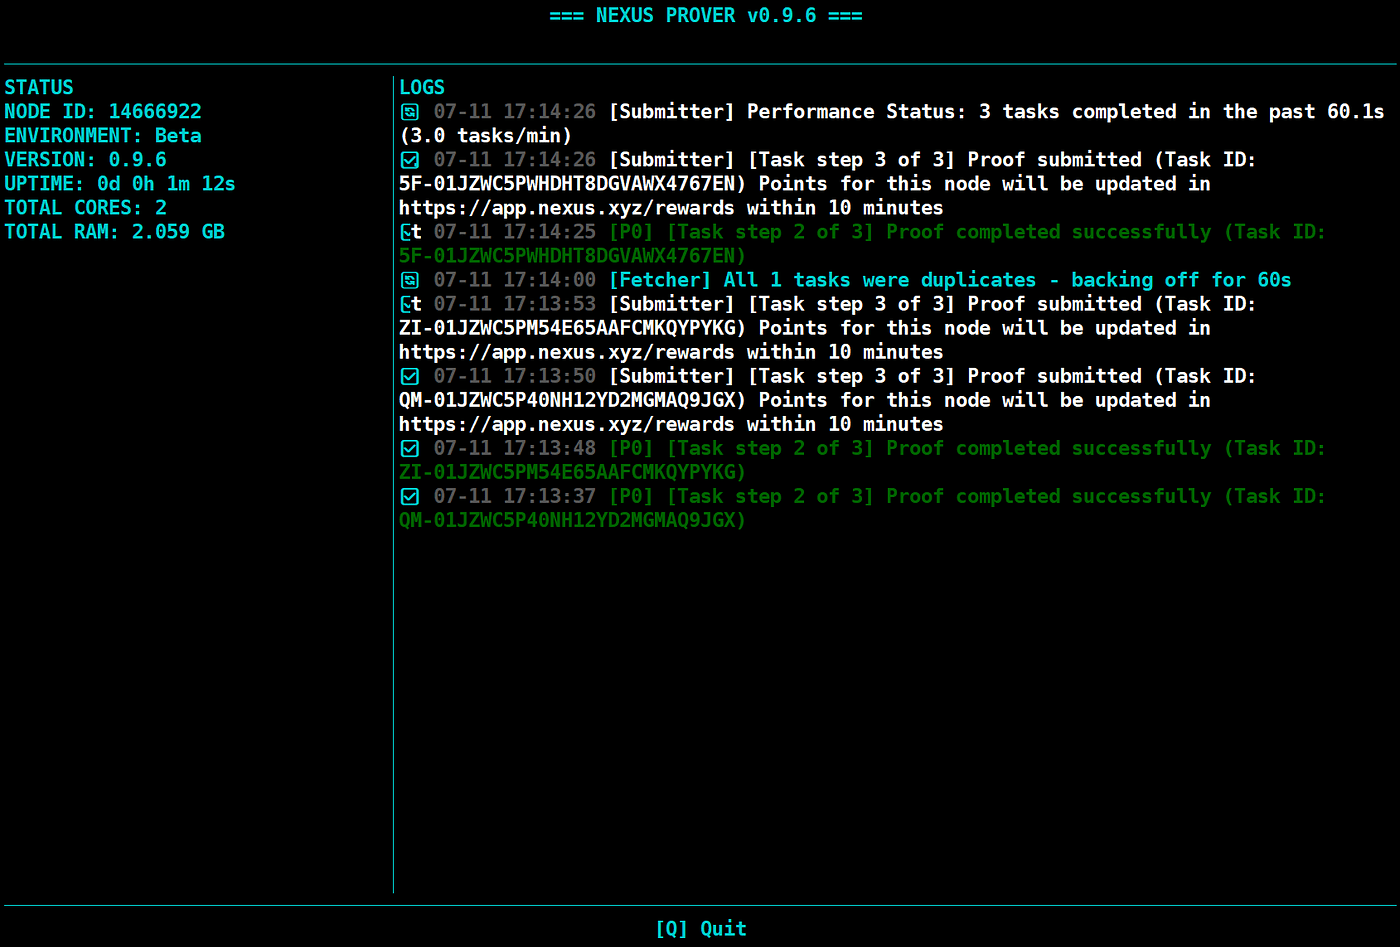 This shows:
Version number: v0.9.6
Node status: online
Started processing Proof tasks (including Submit, Complete Task)
Performance Status: 3 tasks completed indicates that the system has been effectively running during the reward period
Step 11: Background running & startup configuration
Use screen to prevent the node from stopping after SSH disconnects:
screen -S nexus
nexus-cli start --node-id
To detach from the screen session: Ctrl + A → then press D, the node continues running
Reconnect:
screen -r nexus
Step 12: Set systemd to run automatically
(1) Enter the command
sudo nano /etc/systemd/system/nexus.service
(2) Paste the following content (replace <yourProver_ID>):
General scripts
[Unit]
Description=Nexus CLI Node
After=network.target
[Service]
User=root
ExecStart=/usr/local/bin/nexus-cli start --node-id
Restart=always
RestartSec=10
StandardOutput=append:/var/log/nexus.log
StandardError=append:/var/log/nexus.err.log
[Install]
WantedBy=multi-user.target
Upgrade script
[Unit]
Description=Nexus CLI Node
After=network.target
[Service]
Type=simple
User=ubuntu
WorkingDirectory=/home/ubuntu
Environment="PATH=/home/ubuntu/.cargo/bin:/usr/local/sbin:/usr/local/bin:/usr/sbin:/usr/bin"
ExecStart=/usr/local/bin/nexus-cli start --node-id
Restart=always
RestartSec=10
StandardOutput=append:/var/log/nexus.log
StandardError=append:/var/log/nexus.err.log
[Install]
WantedBy=multi-user.target
✅ Explanation:
WorkingDirectory=/home/ubuntu: Ensure that CLI can read local configurations like ~/.nexus/config.json
Environment="RUST_BACKTRACE=1": If it still fails, more debug information can be obtained
User=ubuntu: Do not use root, as you did not initialize the wallet and node configuration with root
Key modification points:
Use /usr/bin/bash -c to wrap a layer, loading the cargo environment variables (this is likely the current error reason)
Explicitly set WorkingDirectory to avoid not finding the configuration file
Use User=ubuntu to avoid permission issues (the wallet you initialized is in the ubuntu user directory)

Press Ctrl + O → to indicate 'Write Out' to save the file
A prompt will appear: File Name to Write: /etc/systemd/system/nexus.service
At this point, directly press Enter to confirm save
Then press Ctrl + X → to exit the nano editor
(3) Enable the service:
sudo systemctl daemon-reexec
sudo systemctl daemon-reload
sudo systemctl restart nexus.service
sudo journalctl -u nexus.service -f
(4) View logs:
sudo journalctl -u nexus.service -f
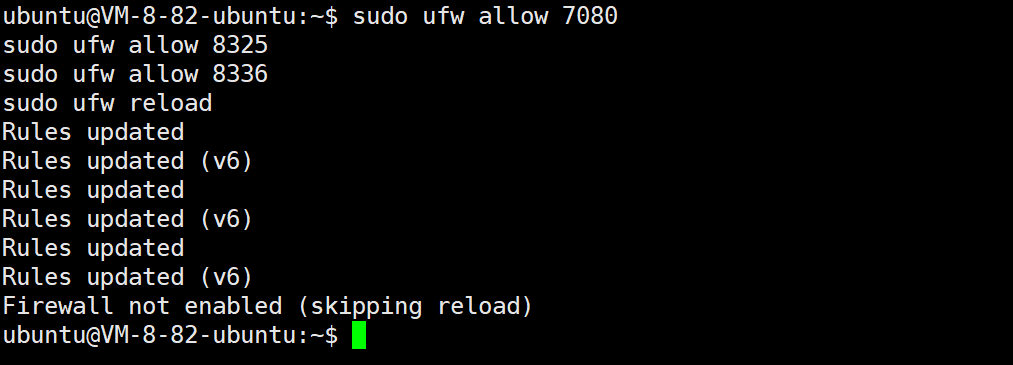
Step 13: Firewall configuration (allow ports)
sudo ufw allow 7080
sudo ufw allow 8325
sudo ufw allow 8336
sudo ufw reload
Step 14: Stability improvement (scheduled restart)
crontab -e
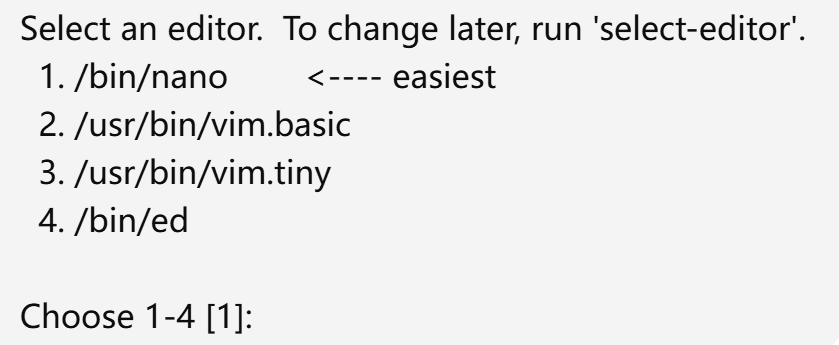
When encountering this, enter 1, press Enter, and you can use the simplest editor nano to open the cron editing interface.
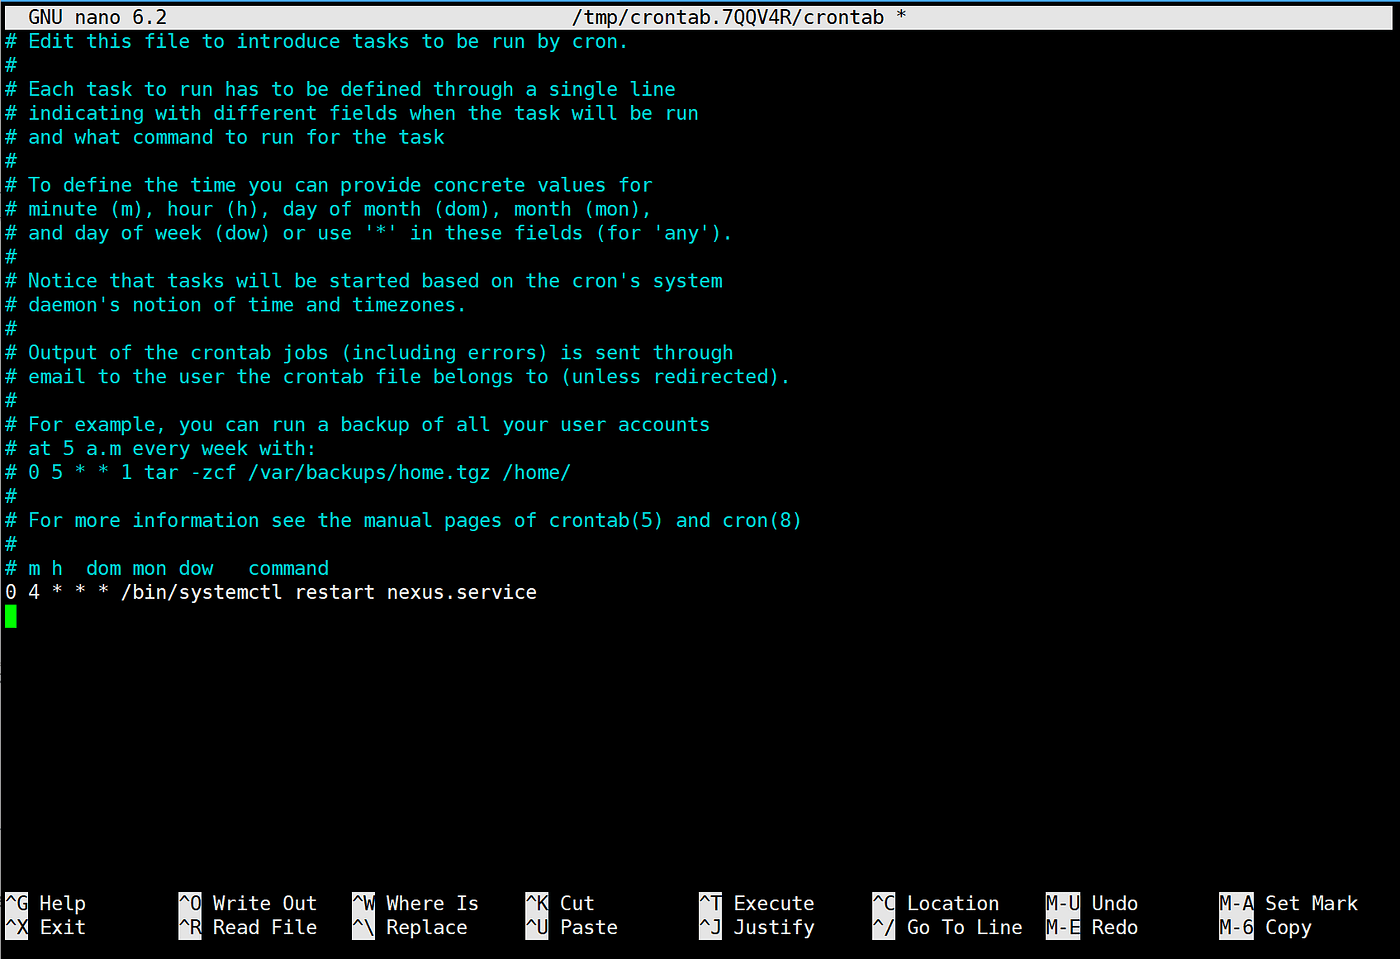
When you see a page like the above, please add the following line in the empty line below the last line to set the Nexus service to restart at 4 am every day:
0 4 * /bin/systemctl restart nexus.service
After adding, it will be completed:
Press Ctrl + O to save the file
Press Enter to confirm the file name save
Press Ctrl + X to exit the editor
After saving and exiting, you can use the following command to check if the setup was successful:
crontab -l
The output should include the line you just added. If so, the scheduled task is set successfully ✅
To test if you can manually restart the service, you can also execute:
sudo systemctl restart nexus.service
At this point, the personal VPS deployment node tutorial has been successfully completed.
Use the command to check the status | nexus-cli status
Check the node status on the official website: app/nexus.xyz/nodes
Claim points: https://app.nexus.xyz/rewards
Real-time logs | sudo journalctl -u nexus.service -f
5. Node deployment tutorial two (one-click deployment)
I believe after the manual deployment process above, you may have gotten dizzy, and various errors may occur during deployment, making it impossible to complete smoothly.
Don't worry, I have made a one-click deployment execution command on Github based on the above process for your reference.
If you are a beginner, please prepare a VPS and SSH tools, refer to the tutorial(Section 3 — Preparation before node deployment)
Due to Twitter's layout limitations, the remaining content cannot be displayed properly. For more operations, please check our Medium:
https://medium.com/@jiamigou/%E5%8A%A0%E5%AF%86%E7%8B%97%E6%95%B4%E7%BC%96%E7%A9%BA%E6%8A%95%E7%AC%AC361%E7%AF%87-nexus-%E5%8F%91%E5%B8%81%E5%89%8D-%E6%9C%80%E5%90%8E%E4%B8%80%E8%BD%AE%E6%8C%96%E7%9F%BF%E6%95%99%E7%A8%8B-ad996ee3223a