
One: What is an airdrop?
1.1 What is an airdrop? The crypto community is constantly participating in airdrops.
After the project team creates a new coin, they distribute tokens to existing or potential users to stimulate market activity and user data, enhancing project recognition. Tokens are distributed for free, but some airdrops require users to complete specific tasks before claiming. This is a common marketing strategy among many cryptocurrency projects.
1.2 How do cryptocurrency airdrops work?
There are many types of cryptocurrency airdrops; a common method is to distribute a small amount of cryptocurrency to wallets. However, some rarer projects use NFTs instead of conventional cryptocurrencies for distribution.
Some projects' token distributions do not have attached conditions, while others require users to complete specific tasks before receiving. These tasks typically include following social media accounts, subscribing to news updates, daily check-ins, etc.
In some cases, airdrops are only available to wallets that have interacted with the project platform before a specific date. 1INCH and Uniswap are classic examples of early adopters of this model, with airdrops worth thousands of dollars.
1.3 Why do cryptocurrency projects conduct airdrops?
As mentioned earlier, blockchain projects promote themselves by distributing tokens for free, expanding network development. A large number of holders often releases positive signals, indicating a higher degree of decentralization in token ownership. Cryptocurrency airdrops can incentivize recipients to use and promote the project, nurturing an initial user base before the project goes live on cryptocurrency trading platforms.
1.4 Types of Airdrops
As we can see, there are various ways to conduct cryptocurrency airdrops. The types of interactive tasks we participate in for airdrops can be roughly divided into several categories: social tasks, testnet tasks, check-in tasks, Gas interaction tasks, and staking tasks.
Social Tasks
Social tasks require users to complete certain social media tasks, such as sharing relevant posts about the project on Twitter, joining the project's official Discord, or creating posts on Instagram and tagging several friends. To receive the airdrop, users need to fill out a form containing their wallet address information and provide proof of task completion.
Testnet Tasks
Users need to claim free test tokens on the testnet, and after successfully claiming, conduct interactive tests such as Swap interactions, staking interactions, voting, creating NFTs, etc.
1.5 How to claim airdrops?
As mentioned earlier, processes vary by project. However, to receive airdrops, you must have a cryptocurrency wallet. Once you have a wallet, you can check whether you have received free tokens. If not, you must interact with the website to claim the airdrop.
1.6 How many accounts are suitable for participating in airdrops?
A configuration of a hundred accounts is an ideal choice for beginners. From an income perspective, it is also a relatively considerable amount. By participating in about 30 interactive projects each month, although earnings can fluctuate, even projects with lower returns usually yield some returns in the range of a few dollars; whereas higher-earning projects might reach a few hundred or even a thousand dollars, but large airdrops exceeding a few hundred dollars typically occur about once a month based on recent airdrop situations.
Assuming you have configured 100 accounts and dedicate about two hours daily for interaction, with each project offering a minimum of 3 dollars in airdrop, excluding some uncertainties (like bots, unclear airdrops, etc.), about 1/3 to 1/4 ratio, calculating based on participating in 30 projects monthly: 20 projects × 3 dollars = 60 USD/per environment, leading to an approximate monthly income of 6000 USD.
It is important to actively learn and obtain relevant information. Platforms like Twitter have abundant information about airdrops that is worth collecting and analyzing. An annual income exceeding 100,000 USD is not considered high for someone managing 100 accounts full-time; to enter this industry and understand its prospects, one must actively seek relevant information, as industry insights ultimately require personal analysis and judgment.

Two: How to set up a multi-account interaction environment
If after complete learning you still feel uncertain about how to operate, it is advisable to reassess whether this is suitable for you—web3 is a large stage, and finding the right track for yourself is more important.
2.1 Basic level device configuration (1 PC)
Configuration table for 100 accounts:
System: Windows 10 (Windows 7 cannot use scripts and browser synchronization)
Memory: 8G of RAM
Storage: 512 G+ SSD
CPU: I5/17 8th generation or above, multi-threaded E5 processor or Intel processor
GPU: Non-mining demand can be ignored
Note: The basic computer cost is around 3000±; a hundred accounts do not require too much memory.
2.2 VPN and Independent IP Selection
The airdrop projects participated in are all on external networks, requiring a VPN to access. Most who have been exposed to web3 should have their VPN software; this will not be elaborated further.
Use independent IPs for fingerprint browser multi-windowing to prevent bots!
Note: Low stability and low bandwidth VPNs can affect interaction efficiency.
2.3 Essential Software for Airdrops
Fingerprint Browser:
Typically, we use a fingerprint browser to handle multiple accounts for airdrops.
Use a fingerprint browser to solve the multi-account issue, the main benefits include:
(1) Binding IP is very convenient;
(2) Can sync with one click, especially suitable for users who manually collect rewards;
(3) Account management is relatively convenient.
There are many fingerprint browsers available for collecting rewards, including ADS, MoreLogin, and Bit, with Bit being the cheapest and convenient for later automation development. The functions of each fingerprint browser are largely similar, so for pure airdrop tasks, choosing the cheapest fingerprint browser is sufficient.

Our studio uses the Bit browser; here is the user guide for Bit browser
Step One
Register at https://www.bitbrowser.cn/?code=16bd3b (Fingerprint Browser)
Select Language -- Click Register -- Download and Log In
Step Two: Create Environment
The first step after entering the Bit application is to create a window
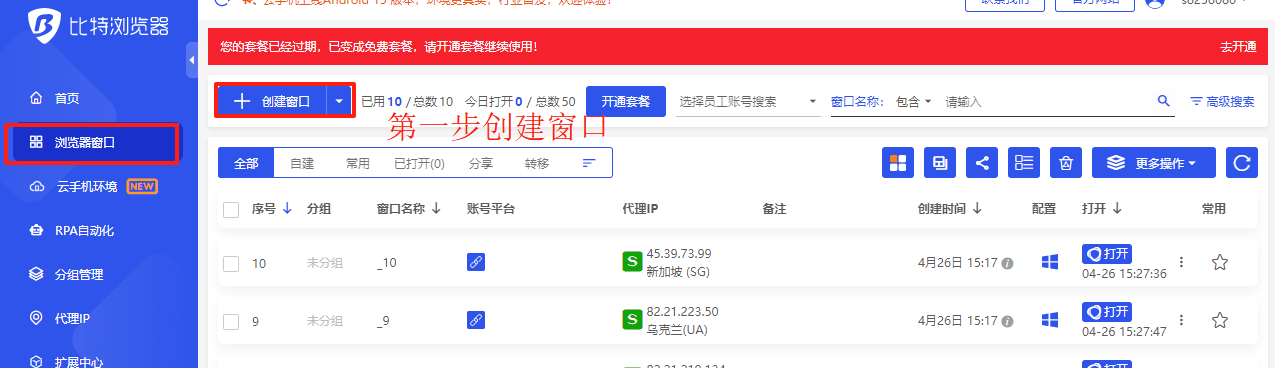


After setting according to the picture, you can create windows, so your browser's basic settings are complete.
Step Three: IP Setup

Three: Login Account
Login trio: Google, Twitter, Discord accounts
Active daily on Twitter and Discord accounts
After logging in, daily active operations on the account are required, such as following a few bloggers, liking and commenting, and keeping the Discord account active by joining a few channels. This operation takes about 30 minutes daily. Discord can use immersive translation since it is in English.
Four: Summary
At this point, you can independently complete the environment setup, and then it's time to find projects to complete tasks. Usually, a task takes about a few minutes to operate. The tasks on the testnet are relatively complex, taking a bit longer, about 30-40 minutes.
After completing the setup, start learning how to find suitable airdrop projects, how to check the funding situation of airdrop projects (do not participate in projects with funding below 500,000 USD), how to scientifically distinguish high-yield projects, and how to interact with airdrop projects.


