

Peter_Parker0
19.2k Posts

Peter_Parker0
 Square Verified+
Report
Block User
Crypto trader|Market sniper Spot & Futures| TA wizard | Risk-first Altcoin gems|Bullish vibes only #CryptoTrading $BTC|Twitter|Cryptocobain032
Open Trade
High-Frequency Trader
2.6 Years
719 Following
45.8K+ Followers
49.0K+ Liked
Posts
Portfolio
All
Quotes
Videos
Live
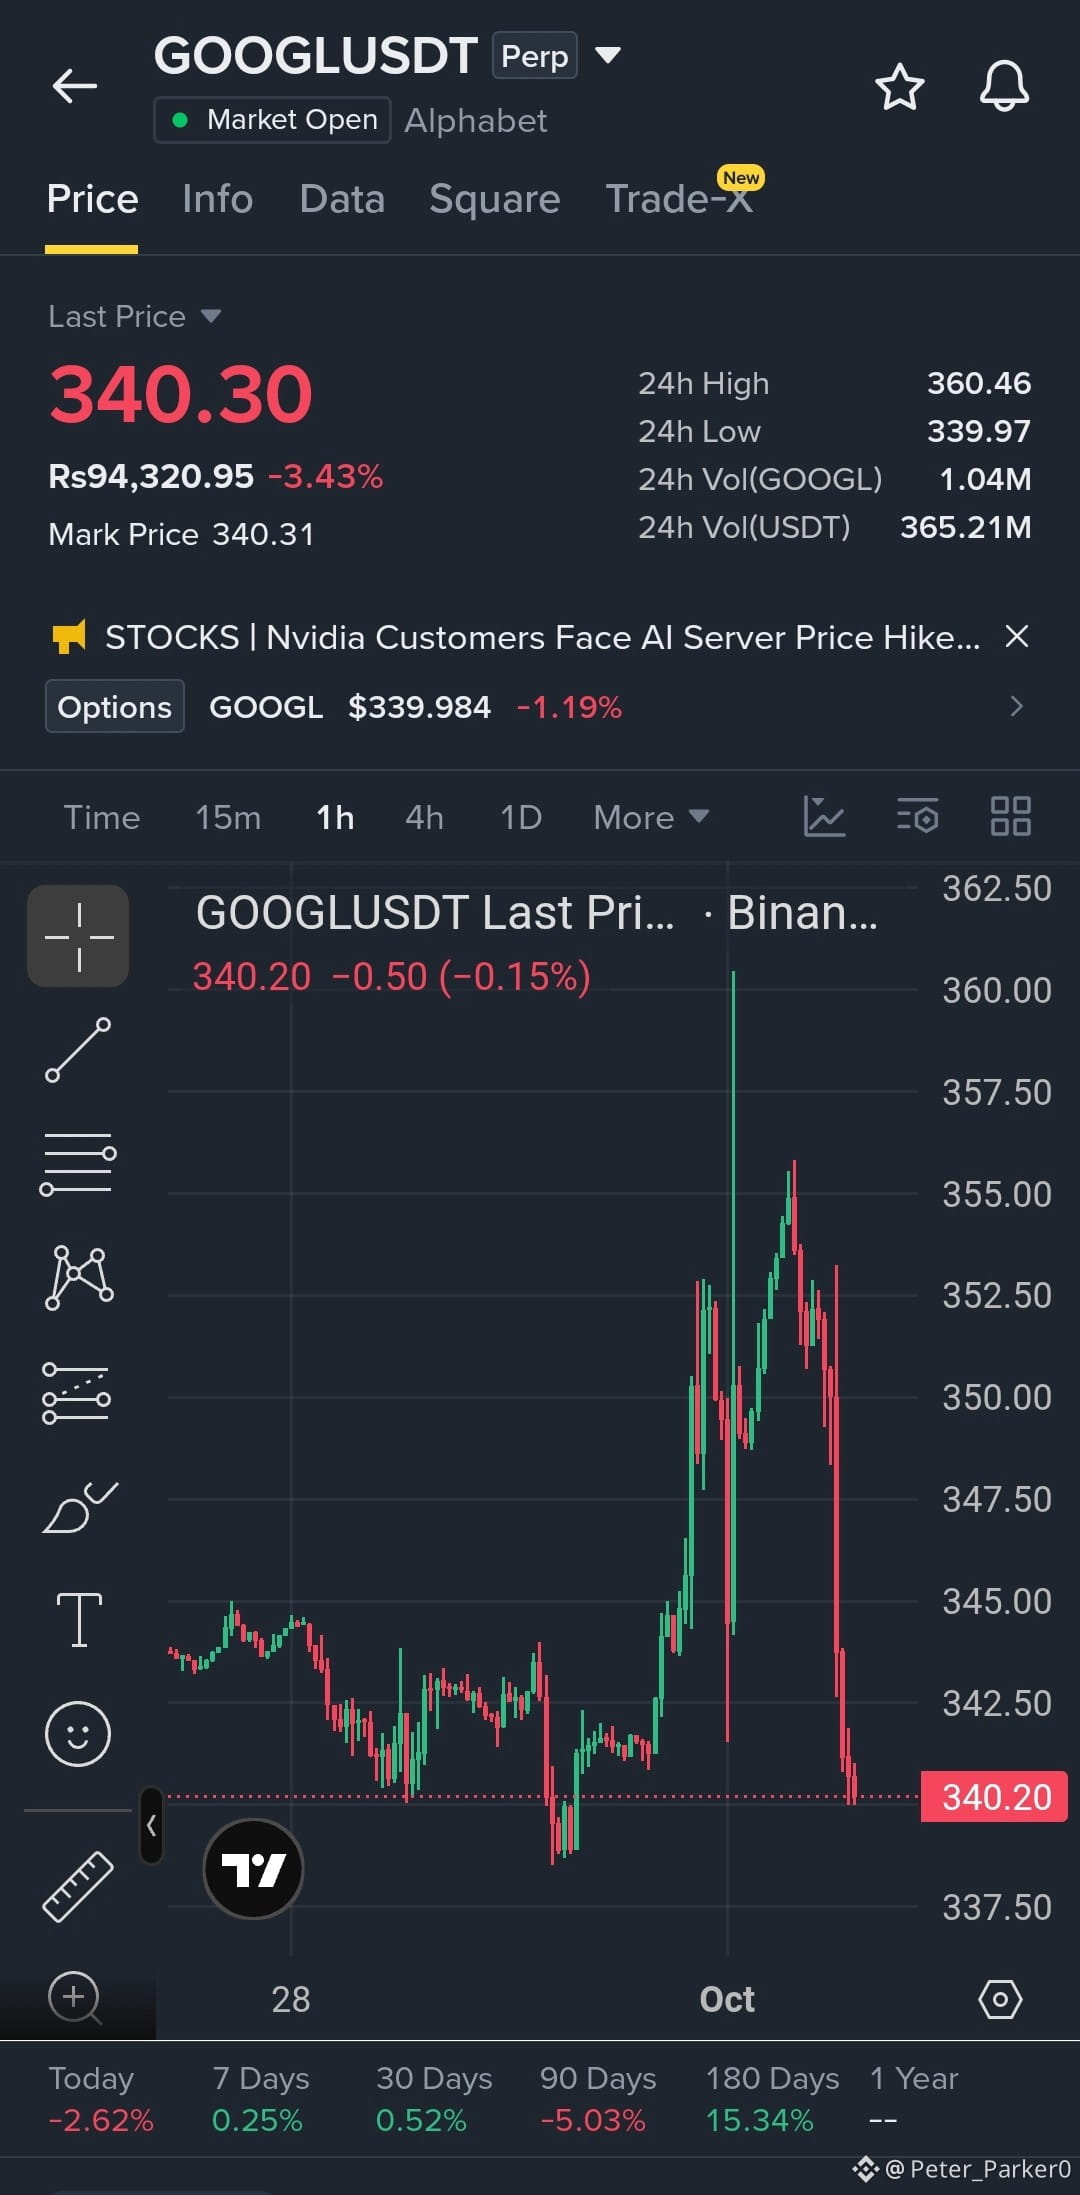
$GOOGL is setting up for another push after holding its recent structure. Buyers are still in control as long as the entry zone remains defended.
📈 LONG SETUP
Entry: $339.41 – $342.82
🎯 TP1: $359.38
🎯 TP2: $370.22
🎯 TP3: $383.93
🛑 SL: $329.11
The key here is confirmation above the entry range with sustained buying pressure. If momentum fades and price loses the setup zone, I’d rather step aside than chase.
Watching $GOOGL L closely. 👀
{future}(GOOGLUSDT)
$GOOGL is setting up for another push after holding its recent structure. Buyers are still in control as long as the entry zone remains defended.
📈 LONG SETUP
Entry: $339.41 – $342.82
🎯 TP1: $359.38
🎯 TP2: $370.22
🎯 TP3: $383.93
🛑 SL: $329.11
The key here is confirmation above the entry range with sustained buying pressure. If momentum fades and price loses the setup zone, I’d rather step aside than chase.
Watching $GOOGL L closely. 👀
📈 LONG SETUP
Entry: $339.41 – $342.82
🎯 TP1: $359.38
🎯 TP2: $370.22
🎯 TP3: $383.93
🛑 SL: $329.11
The key here is confirmation above the entry range with sustained buying pressure. If momentum fades and price loses the setup zone, I’d rather step aside than chase.
Watching $GOOGL L closely. 👀
2
612
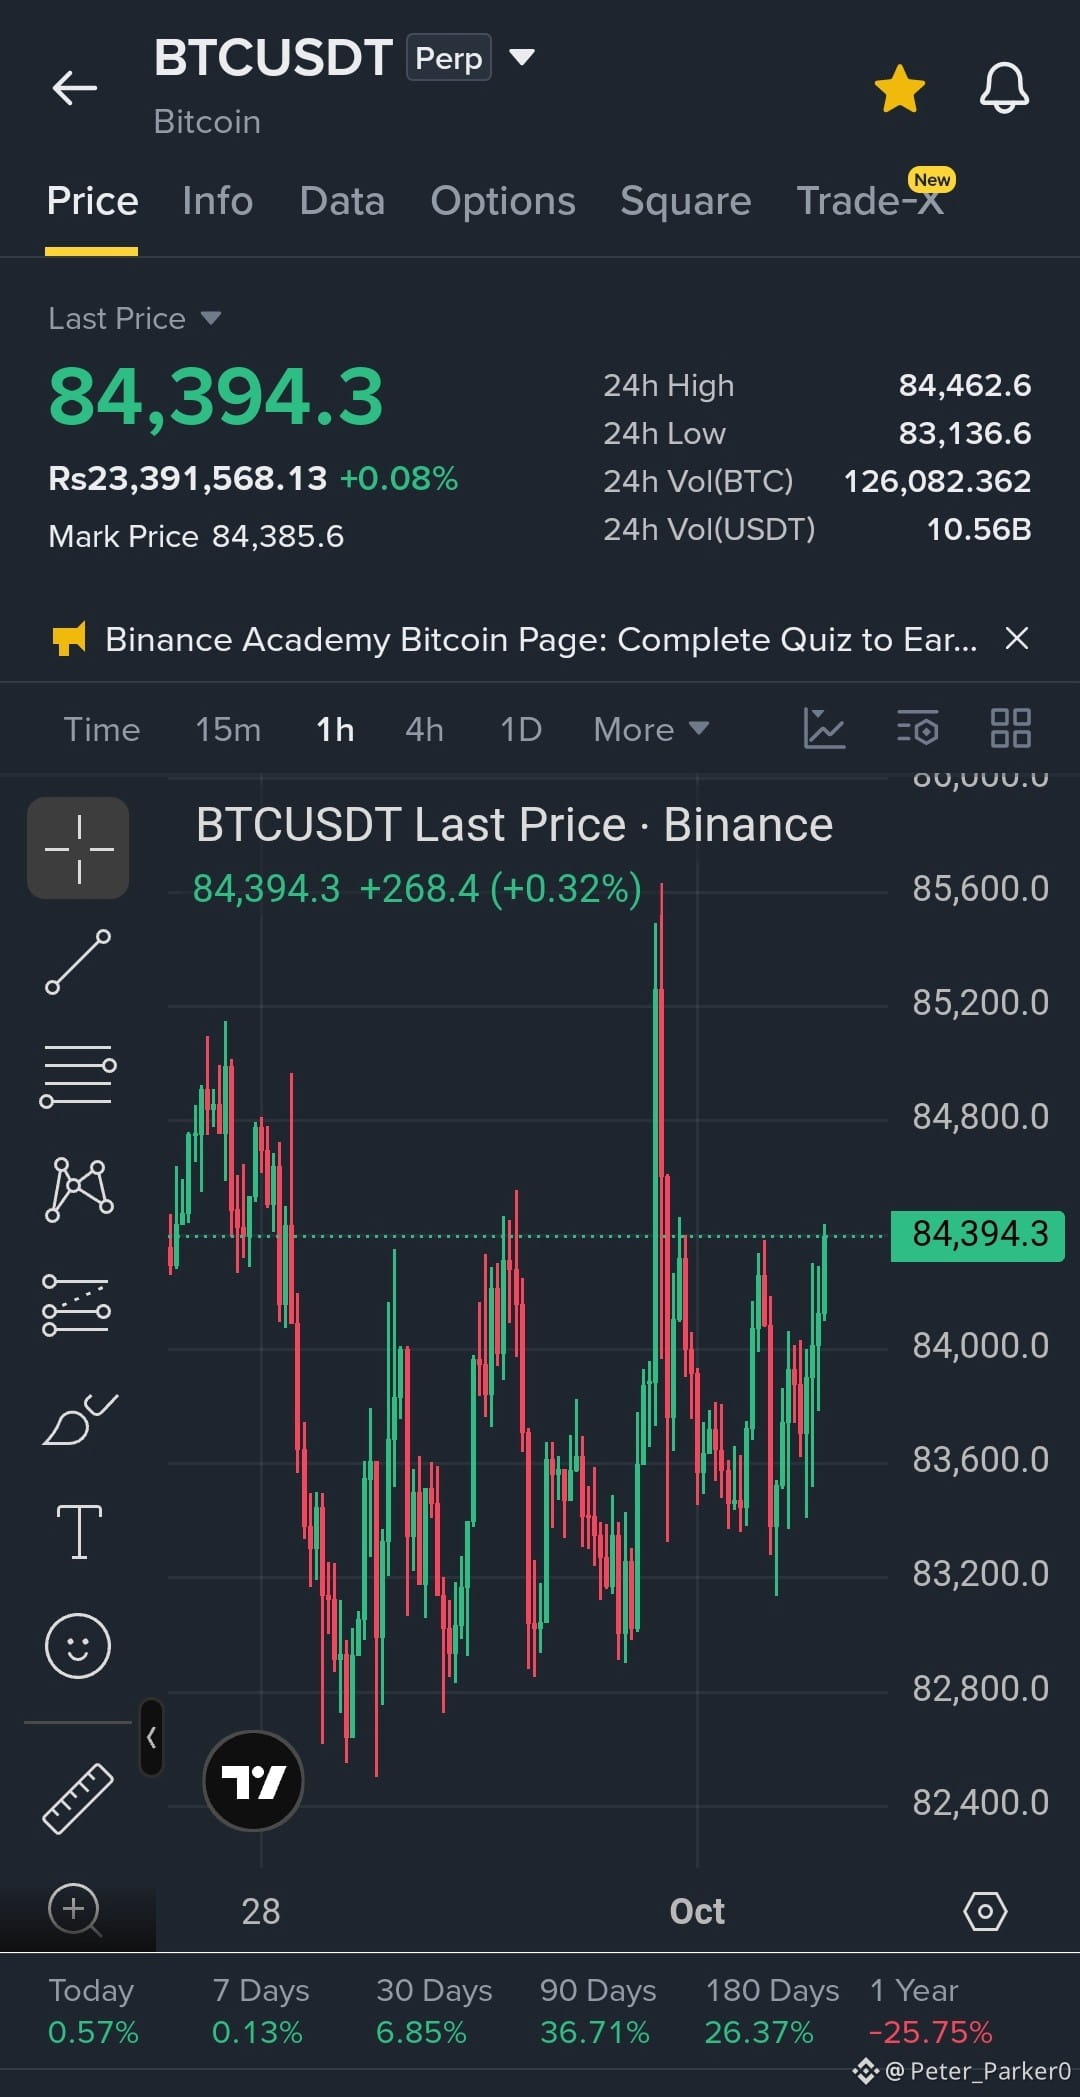
$BTC is hovering around $84K, with buyers trying to keep the current structure intact. A sustained hold above the $83,900 area could open the door for another push higher.
📈 LONG SETUP
Entry Zone: $83,900 – $84,300
🎯 TP1: $85,240
🎯 TP2: $86,000
🛑 Stop Loss: $81,000
The key is confirmation: I’d want to see BTC defend the entry zone and build buying momentum before entering. If that support fails, the setup loses its strength and I’d rather stay out than force the trade.
Watching $84K closely. 👀
$BTC
{future}(BTCUSDT)
#MetaMaskExitsLidoValidatorsAfterSecurityIncident #KoreaProposesTokenizingStocksAndBonds #DollarIndexHitsHighestSinceMay2025 #EtherGains70.9%InQ3 #MicronBeatsEarningsLiftsGuidance
$BTC is hovering around $84K, with buyers trying to keep the current structure intact. A sustained hold above the $83,900 area could open the door for another push higher.
📈 LONG SETUP
Entry Zone: $83,900 – $84,300
🎯 TP1: $85,240
🎯 TP2: $86,000
🛑 Stop Loss: $81,000
The key is confirmation: I’d want to see BTC defend the entry zone and build buying momentum before entering. If that support fails, the setup loses its strength and I’d rather stay out than force the trade.
Watching $84K closely. 👀
$BTC
#MetaMaskExitsLidoValidatorsAfterSecurityIncident #KoreaProposesTokenizingStocksAndBonds #DollarIndexHitsHighestSinceMay2025 #EtherGains70.9%InQ3 #MicronBeatsEarningsLiftsGuidance
📈 LONG SETUP
Entry Zone: $83,900 – $84,300
🎯 TP1: $85,240
🎯 TP2: $86,000
🛑 Stop Loss: $81,000
The key is confirmation: I’d want to see BTC defend the entry zone and build buying momentum before entering. If that support fails, the setup loses its strength and I’d rather stay out than force the trade.
Watching $84K closely. 👀
$BTC
#MetaMaskExitsLidoValidatorsAfterSecurityIncident #KoreaProposesTokenizingStocksAndBonds #DollarIndexHitsHighestSinceMay2025 #EtherGains70.9%InQ3 #MicronBeatsEarningsLiftsGuidance
1
1
251
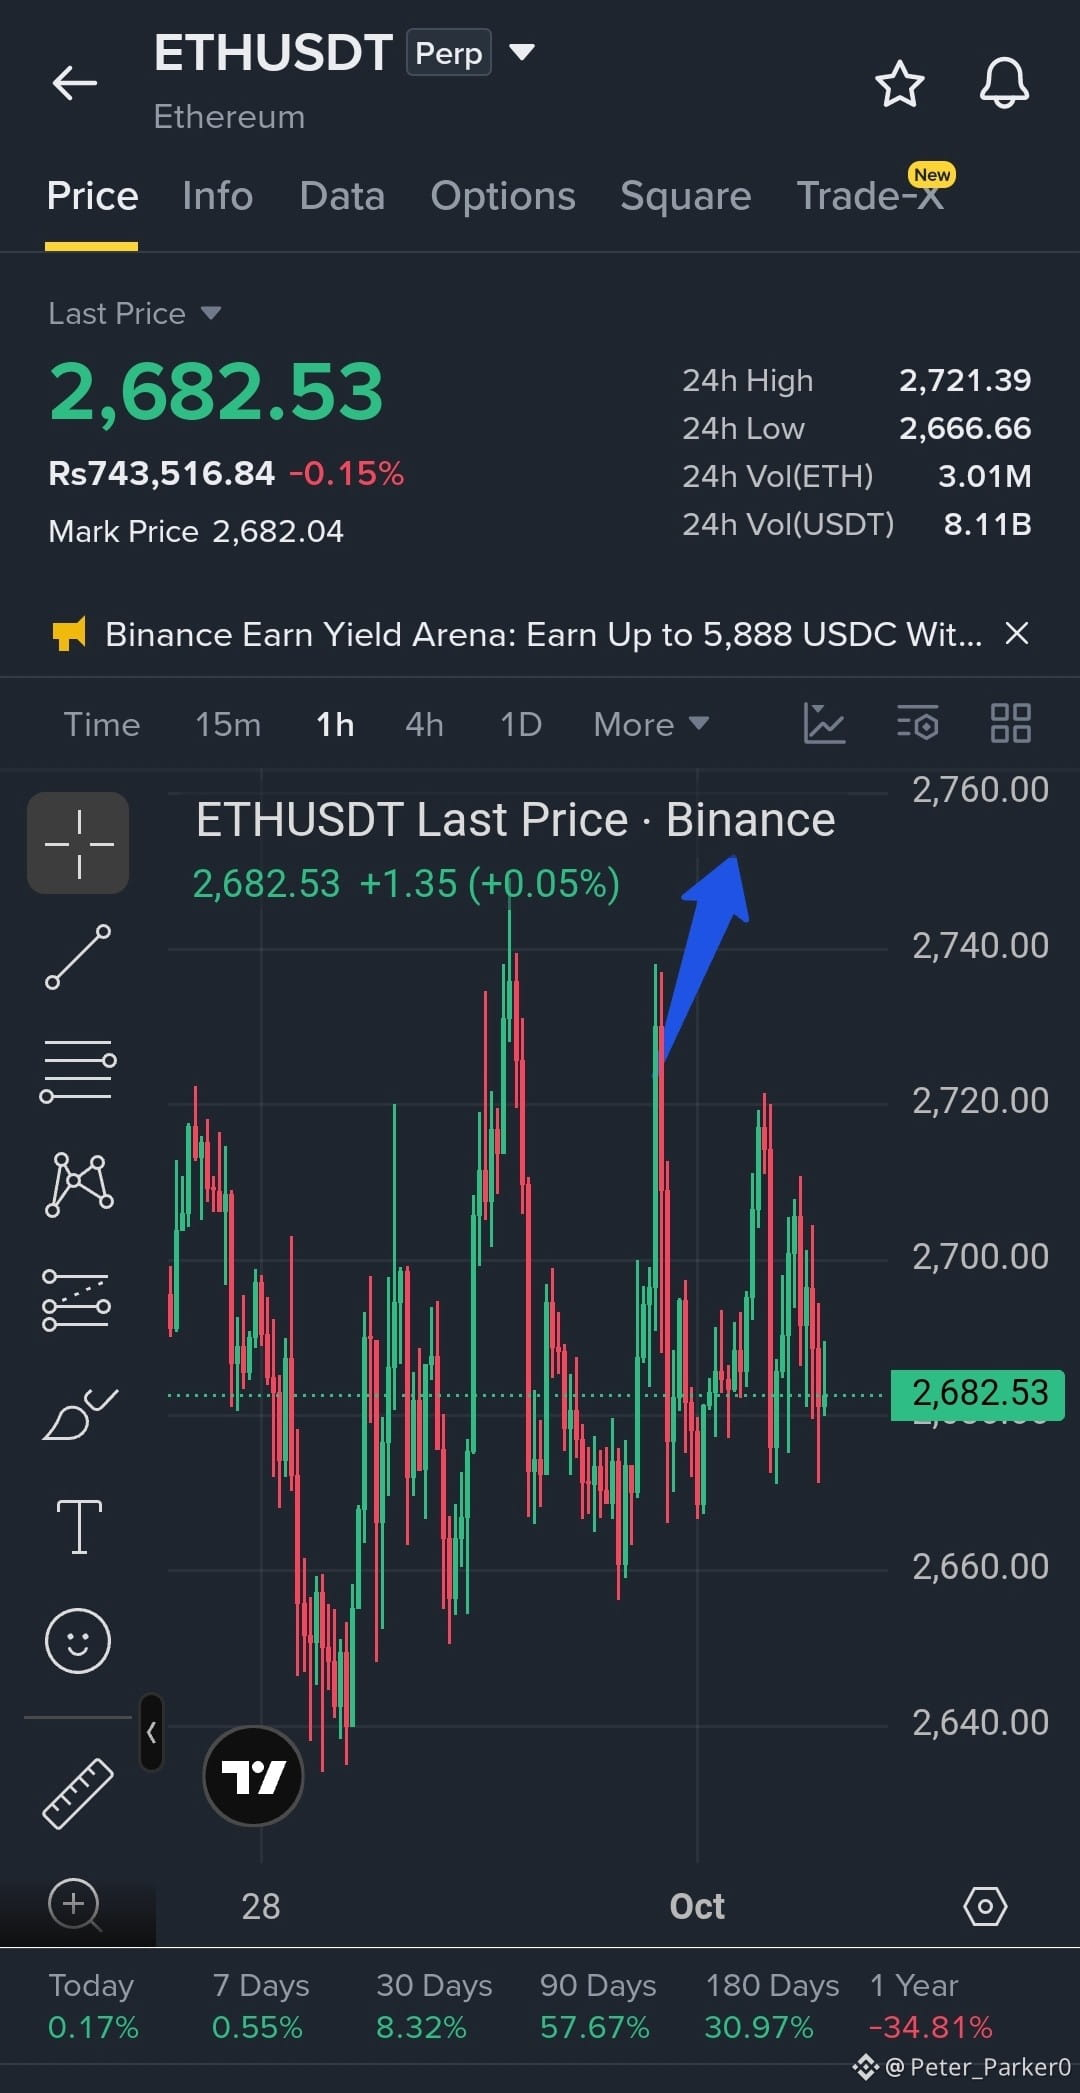
$ETH is holding near the $2,680 area, and buyers are looking ready to defend this zone.
📈 LONG SETUP
Entry: $2,676 – $2,690
🎯 TP1: $2,715
🎯 TP2: $2,740
🛑 SL: $2,490
A clean hold above the entry zone could give bulls room to push toward the next resistance levels. I’d want to see buyers step in with strong momentum before chasing the move.
If ETH loses the setup zone and selling pressure takes over, the long idea is invalidated.
Let’s see what ETH does next. 👀
$ETH
{future}(ETHUSDT)
#MetaMaskExitsLidoValidatorsAfterSecurityIncident #KoreaProposesTokenizingStocksAndBonds #DollarIndexHitsHighestSinceMay2025 #MicronBeatsEarningsLiftsGuidance #EtherGains70.9%InQ3
$ETH is holding near the $2,680 area, and buyers are looking ready to defend this zone.
📈 LONG SETUP
Entry: $2,676 – $2,690
🎯 TP1: $2,715
🎯 TP2: $2,740
🛑 SL: $2,490
A clean hold above the entry zone could give bulls room to push toward the next resistance levels. I’d want to see buyers step in with strong momentum before chasing the move.
If ETH loses the setup zone and selling pressure takes over, the long idea is invalidated.
Let’s see what ETH does next. 👀
$ETH
#MetaMaskExitsLidoValidatorsAfterSecurityIncident #KoreaProposesTokenizingStocksAndBonds #DollarIndexHitsHighestSinceMay2025 #MicronBeatsEarningsLiftsGuidance #EtherGains70.9%InQ3
📈 LONG SETUP
Entry: $2,676 – $2,690
🎯 TP1: $2,715
🎯 TP2: $2,740
🛑 SL: $2,490
A clean hold above the entry zone could give bulls room to push toward the next resistance levels. I’d want to see buyers step in with strong momentum before chasing the move.
If ETH loses the setup zone and selling pressure takes over, the long idea is invalidated.
Let’s see what ETH does next. 👀
$ETH
#MetaMaskExitsLidoValidatorsAfterSecurityIncident #KoreaProposesTokenizingStocksAndBonds #DollarIndexHitsHighestSinceMay2025 #MicronBeatsEarningsLiftsGuidance #EtherGains70.9%InQ3
79
$MOVR 🚀 BULLISH BREAKOUT SETUP
The $2.49 long-liquidation zone could become a key reaction area if buyers step back in. A clean reclaim with stronger buying pressure may open the door for a fresh upside push.
🎯 Target 1: $2.55
🎯 Target 2: $2.62
🎯 Target 3: $2.72
🚀 Breakout Goal: $2.80
Holding above the liquidation zone and reclaiming nearby resistance would support continuation toward the targets. A weak bounce or rejection would signal caution.
Trade smart. 📈
{future}(MOVRUSDT)
#MicronBeatsEarningsLiftsGuidance #KoreaProposesTokenizingStocksAndBonds #DollarIndexHitsHighestSinceMay2025 #EtherGains70.9%InQ3
$MOVR 🚀 BULLISH BREAKOUT SETUP
The $2.49 long-liquidation zone could become a key reaction area if buyers step back in. A clean reclaim with stronger buying pressure may open the door for a fresh upside push.
🎯 Target 1: $2.55
🎯 Target 2: $2.62
🎯 Target 3: $2.72
🚀 Breakout Goal: $2.80
Holding above the liquidation zone and reclaiming nearby resistance would support continuation toward the targets. A weak bounce or rejection would signal caution.
Trade smart. 📈
#MicronBeatsEarningsLiftsGuidance #KoreaProposesTokenizingStocksAndBonds #DollarIndexHitsHighestSinceMay2025 #EtherGains70.9%InQ3
The $2.49 long-liquidation zone could become a key reaction area if buyers step back in. A clean reclaim with stronger buying pressure may open the door for a fresh upside push.
🎯 Target 1: $2.55
🎯 Target 2: $2.62
🎯 Target 3: $2.72
🚀 Breakout Goal: $2.80
Holding above the liquidation zone and reclaiming nearby resistance would support continuation toward the targets. A weak bounce or rejection would signal caution.
Trade smart. 📈
#MicronBeatsEarningsLiftsGuidance #KoreaProposesTokenizingStocksAndBonds #DollarIndexHitsHighestSinceMay2025 #EtherGains70.9%InQ3
1
348
$龙虾 🚀 BULLISH BREAKOUT SETUP
The $0.08713 long-liquidation area is now an important level to watch. If buyers defend this zone and price starts building higher lows, a breakout attempt could accelerate quickly.
🎯 Target 1: $0.0900
🎯 Target 2: $0.0940
🎯 Target 3: $0.0990
🚀 Breakout Goal: $0.1050
A reclaim above nearby resistance with expanding momentum would strengthen the bullish structure. Losing the liquidation zone would weaken the setup.
Trade smart. 📈
{future}(龙虾USDT)
#MetaMaskExitsLidoValidatorsAfterSecurityIncident #MicronBeatsEarningsLiftsGuidance #DollarIndexHitsHighestSinceMay2025 #EtherGains70.9%InQ3 #CFTCSubmitsTwoEventContractRulesToWhiteHouse
$龙虾 🚀 BULLISH BREAKOUT SETUP
The $0.08713 long-liquidation area is now an important level to watch. If buyers defend this zone and price starts building higher lows, a breakout attempt could accelerate quickly.
🎯 Target 1: $0.0900
🎯 Target 2: $0.0940
🎯 Target 3: $0.0990
🚀 Breakout Goal: $0.1050
A reclaim above nearby resistance with expanding momentum would strengthen the bullish structure. Losing the liquidation zone would weaken the setup.
Trade smart. 📈
#MetaMaskExitsLidoValidatorsAfterSecurityIncident #MicronBeatsEarningsLiftsGuidance #DollarIndexHitsHighestSinceMay2025 #EtherGains70.9%InQ3 #CFTCSubmitsTwoEventContractRulesToWhiteHouse
The $0.08713 long-liquidation area is now an important level to watch. If buyers defend this zone and price starts building higher lows, a breakout attempt could accelerate quickly.
🎯 Target 1: $0.0900
🎯 Target 2: $0.0940
🎯 Target 3: $0.0990
🚀 Breakout Goal: $0.1050
A reclaim above nearby resistance with expanding momentum would strengthen the bullish structure. Losing the liquidation zone would weaken the setup.
Trade smart. 📈
#MetaMaskExitsLidoValidatorsAfterSecurityIncident #MicronBeatsEarningsLiftsGuidance #DollarIndexHitsHighestSinceMay2025 #EtherGains70.9%InQ3 #CFTCSubmitsTwoEventContractRulesToWhiteHouse
839
$ALICE 🚀 BULLISH BREAKOUT SETUP
The $0.22705 liquidation level gives bulls a clear area to defend. If price holds above it and buyers regain momentum, $ALICE could attempt another push through overhead resistance.
🎯 Target 1: $0.235
🎯 Target 2: $0.245
🎯 Target 3: $0.258
🚀 Breakout Goal: $0.270
A sustained reclaim with stronger volume would support continuation toward the targets. Failure to hold the key zone would put the breakout idea under pressure.
Trade smart. 📈
{future}(ALICEUSDT)
#KoreaProposesTokenizingStocksAndBonds #MetaMaskExitsLidoValidatorsAfterSecurityIncident #US10YearYieldNears5.3% #CFTCSubmitsTwoEventContractRulesToWhiteHouse
$ALICE 🚀 BULLISH BREAKOUT SETUP
The $0.22705 liquidation level gives bulls a clear area to defend. If price holds above it and buyers regain momentum, $ALICE could attempt another push through overhead resistance.
🎯 Target 1: $0.235
🎯 Target 2: $0.245
🎯 Target 3: $0.258
🚀 Breakout Goal: $0.270
A sustained reclaim with stronger volume would support continuation toward the targets. Failure to hold the key zone would put the breakout idea under pressure.
Trade smart. 📈
#KoreaProposesTokenizingStocksAndBonds #MetaMaskExitsLidoValidatorsAfterSecurityIncident #US10YearYieldNears5.3% #CFTCSubmitsTwoEventContractRulesToWhiteHouse
The $0.22705 liquidation level gives bulls a clear area to defend. If price holds above it and buyers regain momentum, $ALICE could attempt another push through overhead resistance.
🎯 Target 1: $0.235
🎯 Target 2: $0.245
🎯 Target 3: $0.258
🚀 Breakout Goal: $0.270
A sustained reclaim with stronger volume would support continuation toward the targets. Failure to hold the key zone would put the breakout idea under pressure.
Trade smart. 📈
#KoreaProposesTokenizingStocksAndBonds #MetaMaskExitsLidoValidatorsAfterSecurityIncident #US10YearYieldNears5.3% #CFTCSubmitsTwoEventContractRulesToWhiteHouse
1
279
$QNT 🚀 BULLISH BREAKOUT SETUP
The $258.14 long-liquidation level is a critical reaction point for $QNT. If buyers absorb the selling pressure and reclaim the nearby resistance, momentum could shift toward another upside leg.
🎯 Target 1: $264
🎯 Target 2: $272
🎯 Target 3: $282
🚀 Breakout Goal: $295
Holding above the liquidation zone while printing higher highs would keep the breakout structure intact. A rejection and loss of support would weaken the bullish case.
Trade smart. 📈
{future}(QNTUSDT)
#MetaMaskExitsLidoValidatorsAfterSecurityIncident #USWeeklyJoblessClaimsFallTo197000 #US10YearYieldNears5.3% #EtherGains70.9%InQ3 #CFTCSubmitsTwoEventContractRulesToWhiteHouse
$QNT 🚀 BULLISH BREAKOUT SETUP
The $258.14 long-liquidation level is a critical reaction point for $QNT . If buyers absorb the selling pressure and reclaim the nearby resistance, momentum could shift toward another upside leg.
🎯 Target 1: $264
🎯 Target 2: $272
🎯 Target 3: $282
🚀 Breakout Goal: $295
Holding above the liquidation zone while printing higher highs would keep the breakout structure intact. A rejection and loss of support would weaken the bullish case.
Trade smart. 📈
#MetaMaskExitsLidoValidatorsAfterSecurityIncident #USWeeklyJoblessClaimsFallTo197000 #US10YearYieldNears5.3% #EtherGains70.9%InQ3 #CFTCSubmitsTwoEventContractRulesToWhiteHouse
The $258.14 long-liquidation level is a critical reaction point for $QNT . If buyers absorb the selling pressure and reclaim the nearby resistance, momentum could shift toward another upside leg.
🎯 Target 1: $264
🎯 Target 2: $272
🎯 Target 3: $282
🚀 Breakout Goal: $295
Holding above the liquidation zone while printing higher highs would keep the breakout structure intact. A rejection and loss of support would weaken the bullish case.
Trade smart. 📈
#MetaMaskExitsLidoValidatorsAfterSecurityIncident #USWeeklyJoblessClaimsFallTo197000 #US10YearYieldNears5.3% #EtherGains70.9%InQ3 #CFTCSubmitsTwoEventContractRulesToWhiteHouse
1
651
$1000PEPE 🚀 BULLISH BREAKOUT SETUP
A large $15.4K short liquidation cluster around $0.00443 could become an important fuel zone if buyers push through it. A clean breakout above this area may trigger additional short covering and strengthen upside momentum.
🎯 Target 1: $0.00455
🎯 Target 2: $0.00470
🎯 Target 3: $0.00490
🚀 Breakout Goal: $0.00510
If price holds above $0.00443 after the breakout and buying volume expands, continuation becomes more constructive. A failed reclaim would suggest waiting for a better setup.
Trade smart. 📈
{future}(1000PEPEUSDT)
#USWeeklyJoblessClaimsFallTo197000
#KoreaProposesTokenizingStocksAndBonds
#MetaMaskExitsLidoValidatorsAfterSecurityIncident
#CFTCSubmitsTwoEventContractRulesToWhiteHouse
$1000PEPE 🚀 BULLISH BREAKOUT SETUP
A large $15.4K short liquidation cluster around $0.00443 could become an important fuel zone if buyers push through it. A clean breakout above this area may trigger additional short covering and strengthen upside momentum.
🎯 Target 1: $0.00455
🎯 Target 2: $0.00470
🎯 Target 3: $0.00490
🚀 Breakout Goal: $0.00510
If price holds above $0.00443 after the breakout and buying volume expands, continuation becomes more constructive. A failed reclaim would suggest waiting for a better setup.
Trade smart. 📈
#USWeeklyJoblessClaimsFallTo197000
#KoreaProposesTokenizingStocksAndBonds
#MetaMaskExitsLidoValidatorsAfterSecurityIncident
#CFTCSubmitsTwoEventContractRulesToWhiteHouse
A large $15.4K short liquidation cluster around $0.00443 could become an important fuel zone if buyers push through it. A clean breakout above this area may trigger additional short covering and strengthen upside momentum.
🎯 Target 1: $0.00455
🎯 Target 2: $0.00470
🎯 Target 3: $0.00490
🚀 Breakout Goal: $0.00510
If price holds above $0.00443 after the breakout and buying volume expands, continuation becomes more constructive. A failed reclaim would suggest waiting for a better setup.
Trade smart. 📈
#USWeeklyJoblessClaimsFallTo197000
#KoreaProposesTokenizingStocksAndBonds
#MetaMaskExitsLidoValidatorsAfterSecurityIncident
#CFTCSubmitsTwoEventContractRulesToWhiteHouse
263
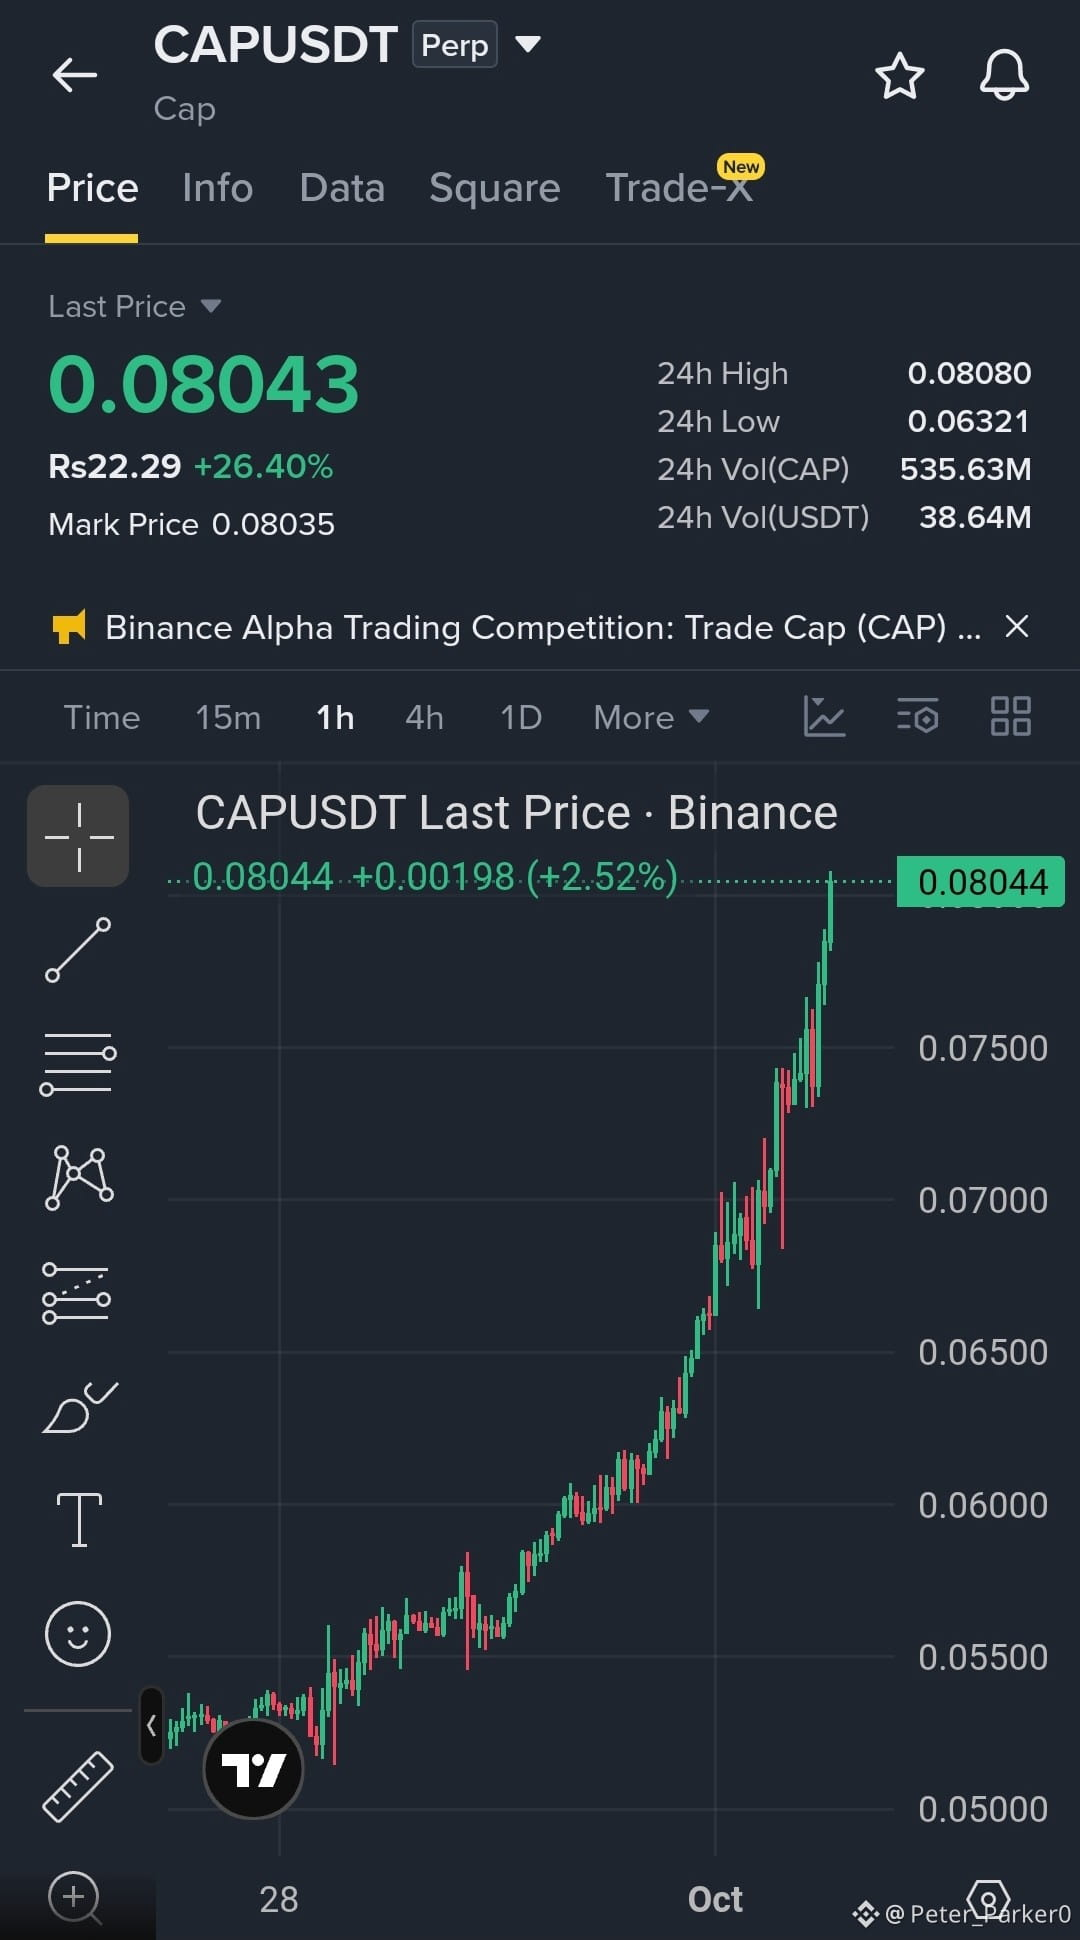
$CAP is pressing the 0.08080 resistance after a powerful 1H recovery — another breakout attempt is getting interesting.
LONG 📈
EP: $0.07950–$0.08040
TP1: $0.08200
TP2: $0.08450
TP3: $0.08800
SL: $0.07680
CAP has climbed aggressively from the $0.06321 24H low, building a clear higher-high/higher-low structure on the 1H chart. Buyers are still controlling momentum, but price is now testing the $0.08080 24H high, making confirmation important.
A clean 1H break and hold above $0.08080 could open the way toward the next upside levels. If price gets rejected and loses the $0.07680 invalidation area, the long setup should be avoided.
Watch $0.08080 closely — confirmation matters more than chasing the candle.
{future}(CAPUSDT)
$CAP is pressing the 0.08080 resistance after a powerful 1H recovery — another breakout attempt is getting interesting.
LONG 📈
EP: $0.07950–$0.08040
TP1: $0.08200
TP2: $0.08450
TP3: $0.08800
SL: $0.07680
CAP has climbed aggressively from the $0.06321 24H low, building a clear higher-high/higher-low structure on the 1H chart. Buyers are still controlling momentum, but price is now testing the $0.08080 24H high, making confirmation important.
A clean 1H break and hold above $0.08080 could open the way toward the next upside levels. If price gets rejected and loses the $0.07680 invalidation area, the long setup should be avoided.
Watch $0.08080 closely — confirmation matters more than chasing the candle.
LONG 📈
EP: $0.07950–$0.08040
TP1: $0.08200
TP2: $0.08450
TP3: $0.08800
SL: $0.07680
CAP has climbed aggressively from the $0.06321 24H low, building a clear higher-high/higher-low structure on the 1H chart. Buyers are still controlling momentum, but price is now testing the $0.08080 24H high, making confirmation important.
A clean 1H break and hold above $0.08080 could open the way toward the next upside levels. If price gets rejected and loses the $0.07680 invalidation area, the long setup should be avoided.
Watch $0.08080 closely — confirmation matters more than chasing the candle.
243
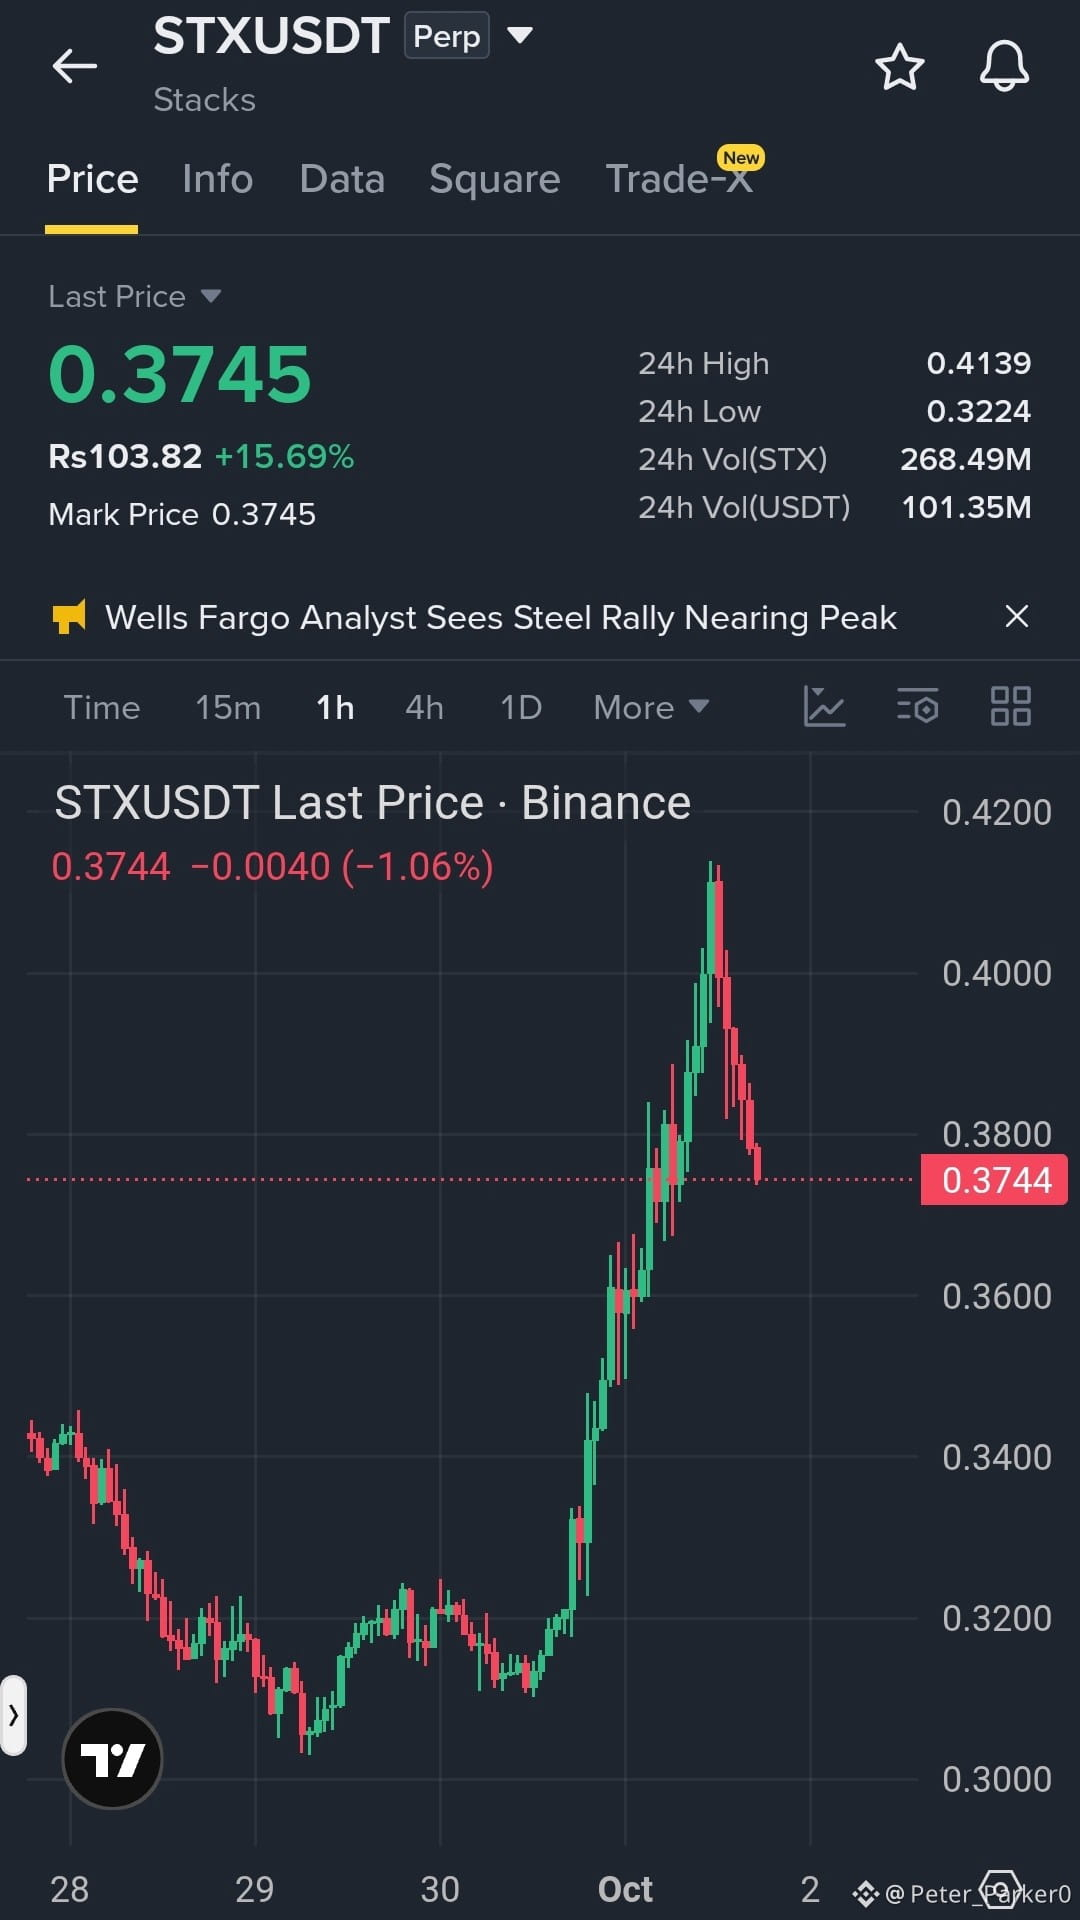
$STX — THE PULLBACK COULD BE THE SETUP! 🔥
STX just ripped from the $0.32 area toward $0.414, showing serious buyer strength. Now price is cooling near $0.374, and this pullback could become interesting if buyers defend the current zone and reclaim $0.38–$0.39.
LONG SETUP
Entry: $0.370 – $0.380
TP1: $0.395
TP2: $0.415
TP3: $0.435
TP4: $0.460
TP5: $0.500
SL: $0.350
The key is whether STX can regain $0.38–$0.39 with fresh buying pressure. A clean break above the recent $0.414 high could open the door to another upside extension. A sustained move below $0.35 would weaken and invalidate this setup.
Keep $STX on watch — this pullback is where the next move could start. 👀
{future}(STXUSDT)
#CFTCSubmitsTwoEventContractRulesToWhiteHouse #MetaMaskExitsLidoValidatorsAfterSecurityIncident #US10YearYieldNears5.3%
$STX — THE PULLBACK COULD BE THE SETUP! 🔥
STX just ripped from the $0.32 area toward $0.414, showing serious buyer strength. Now price is cooling near $0.374, and this pullback could become interesting if buyers defend the current zone and reclaim $0.38–$0.39.
LONG SETUP
Entry: $0.370 – $0.380
TP1: $0.395
TP2: $0.415
TP3: $0.435
TP4: $0.460
TP5: $0.500
SL: $0.350
The key is whether STX can regain $0.38–$0.39 with fresh buying pressure. A clean break above the recent $0.414 high could open the door to another upside extension. A sustained move below $0.35 would weaken and invalidate this setup.
Keep $STX on watch — this pullback is where the next move could start. 👀
#CFTCSubmitsTwoEventContractRulesToWhiteHouse #MetaMaskExitsLidoValidatorsAfterSecurityIncident #US10YearYieldNears5.3%
STX just ripped from the $0.32 area toward $0.414, showing serious buyer strength. Now price is cooling near $0.374, and this pullback could become interesting if buyers defend the current zone and reclaim $0.38–$0.39.
LONG SETUP
Entry: $0.370 – $0.380
TP1: $0.395
TP2: $0.415
TP3: $0.435
TP4: $0.460
TP5: $0.500
SL: $0.350
The key is whether STX can regain $0.38–$0.39 with fresh buying pressure. A clean break above the recent $0.414 high could open the door to another upside extension. A sustained move below $0.35 would weaken and invalidate this setup.
Keep $STX on watch — this pullback is where the next move could start. 👀
#CFTCSubmitsTwoEventContractRulesToWhiteHouse #MetaMaskExitsLidoValidatorsAfterSecurityIncident #US10YearYieldNears5.3%
88
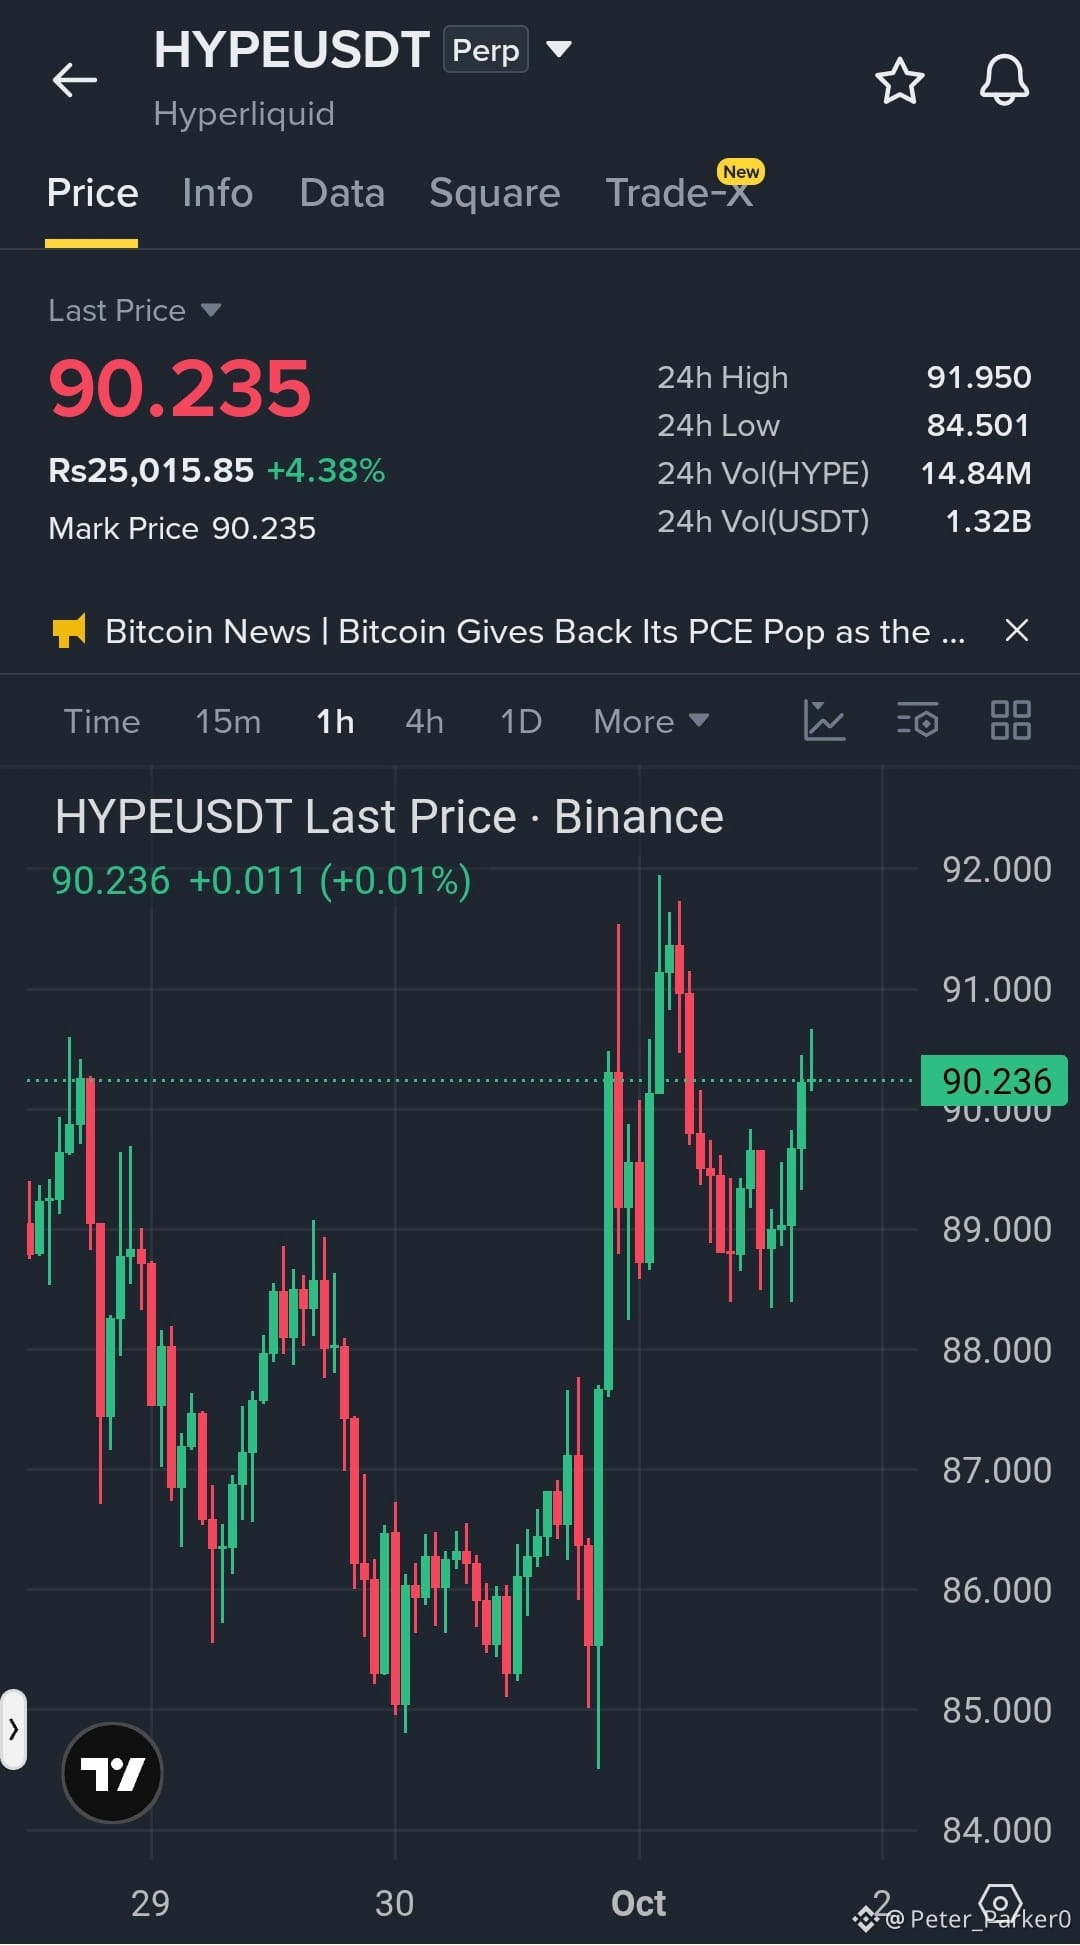
$HYPE — THE BREAKOUT WATCH IS ON! 🚀
HYPE is back around the $90 area after a sharp move from the mid-$80s, and buyers are once again pushing toward the recent $91.95 high. If $92 breaks and holds with strong momentum, another upside leg could start opening up.
LONG SETUP Entry: $90 – $92
TP1: $95
TP2: $100
TP3: $105
TP4: $110
TP5: $120
SL: $83
The key level is $92. A clean breakout above it could attract fresh buyers, while rejection and a sustained move below the entry zone would weaken the setup.
Keep $HYPE on your radar — the next breakout attempt could get interesting. 👀
$HYPE — THE BREAKOUT WATCH IS ON! 🚀
HYPE is back around the $90 area after a sharp move from the mid-$80s, and buyers are once again pushing toward the recent $91.95 high. If $92 breaks and holds with strong momentum, another upside leg could start opening up.
LONG SETUP Entry: $90 – $92
TP1: $95
TP2: $100
TP3: $105
TP4: $110
TP5: $120
SL: $83
The key level is $92. A clean breakout above it could attract fresh buyers, while rejection and a sustained move below the entry zone would weaken the setup.
Keep $HYPE on your radar — the next breakout attempt could get interesting. 👀
HYPE is back around the $90 area after a sharp move from the mid-$80s, and buyers are once again pushing toward the recent $91.95 high. If $92 breaks and holds with strong momentum, another upside leg could start opening up.
LONG SETUP Entry: $90 – $92
TP1: $95
TP2: $100
TP3: $105
TP4: $110
TP5: $120
SL: $83
The key level is $92. A clean breakout above it could attract fresh buyers, while rejection and a sustained move below the entry zone would weaken the setup.
Keep $HYPE on your radar — the next breakout attempt could get interesting. 👀
119
Verified
#micronbeatsearningsliftsguidance
🚨 $MU — MICRON JUST SHOOK THE MARKET!
Earnings beat expectations, and the upgraded guidance is putting serious attention on the memory-chip giant. 📈
Now the real question: can MU turn this earnings strength into a sustained move, or will traders sell the news?
Volatility is likely to stay high — this one is definitely on the radar. 👀
MU bulls just got a fresh catalyst.
#MicronBeatsEarningsLiftsGuidance
$SNDKB
{spot}(SNDKBUSDT)
$NVDAB
{spot}(NVDABUSDT)
#micronbeatsearningsliftsguidance
🚨 $MU — MICRON JUST SHOOK THE MARKET!
Earnings beat expectations, and the upgraded guidance is putting serious attention on the memory-chip giant. 📈
Now the real question: can MU turn this earnings strength into a sustained move, or will traders sell the news?
Volatility is likely to stay high — this one is definitely on the radar. 👀
MU bulls just got a fresh catalyst.
#MicronBeatsEarningsLiftsGuidance
$SNDKB
$NVDAB
🚨 $MU — MICRON JUST SHOOK THE MARKET!
Earnings beat expectations, and the upgraded guidance is putting serious attention on the memory-chip giant. 📈
Now the real question: can MU turn this earnings strength into a sustained move, or will traders sell the news?
Volatility is likely to stay high — this one is definitely on the radar. 👀
MU bulls just got a fresh catalyst.
#MicronBeatsEarningsLiftsGuidance
$SNDKB
$NVDAB

890
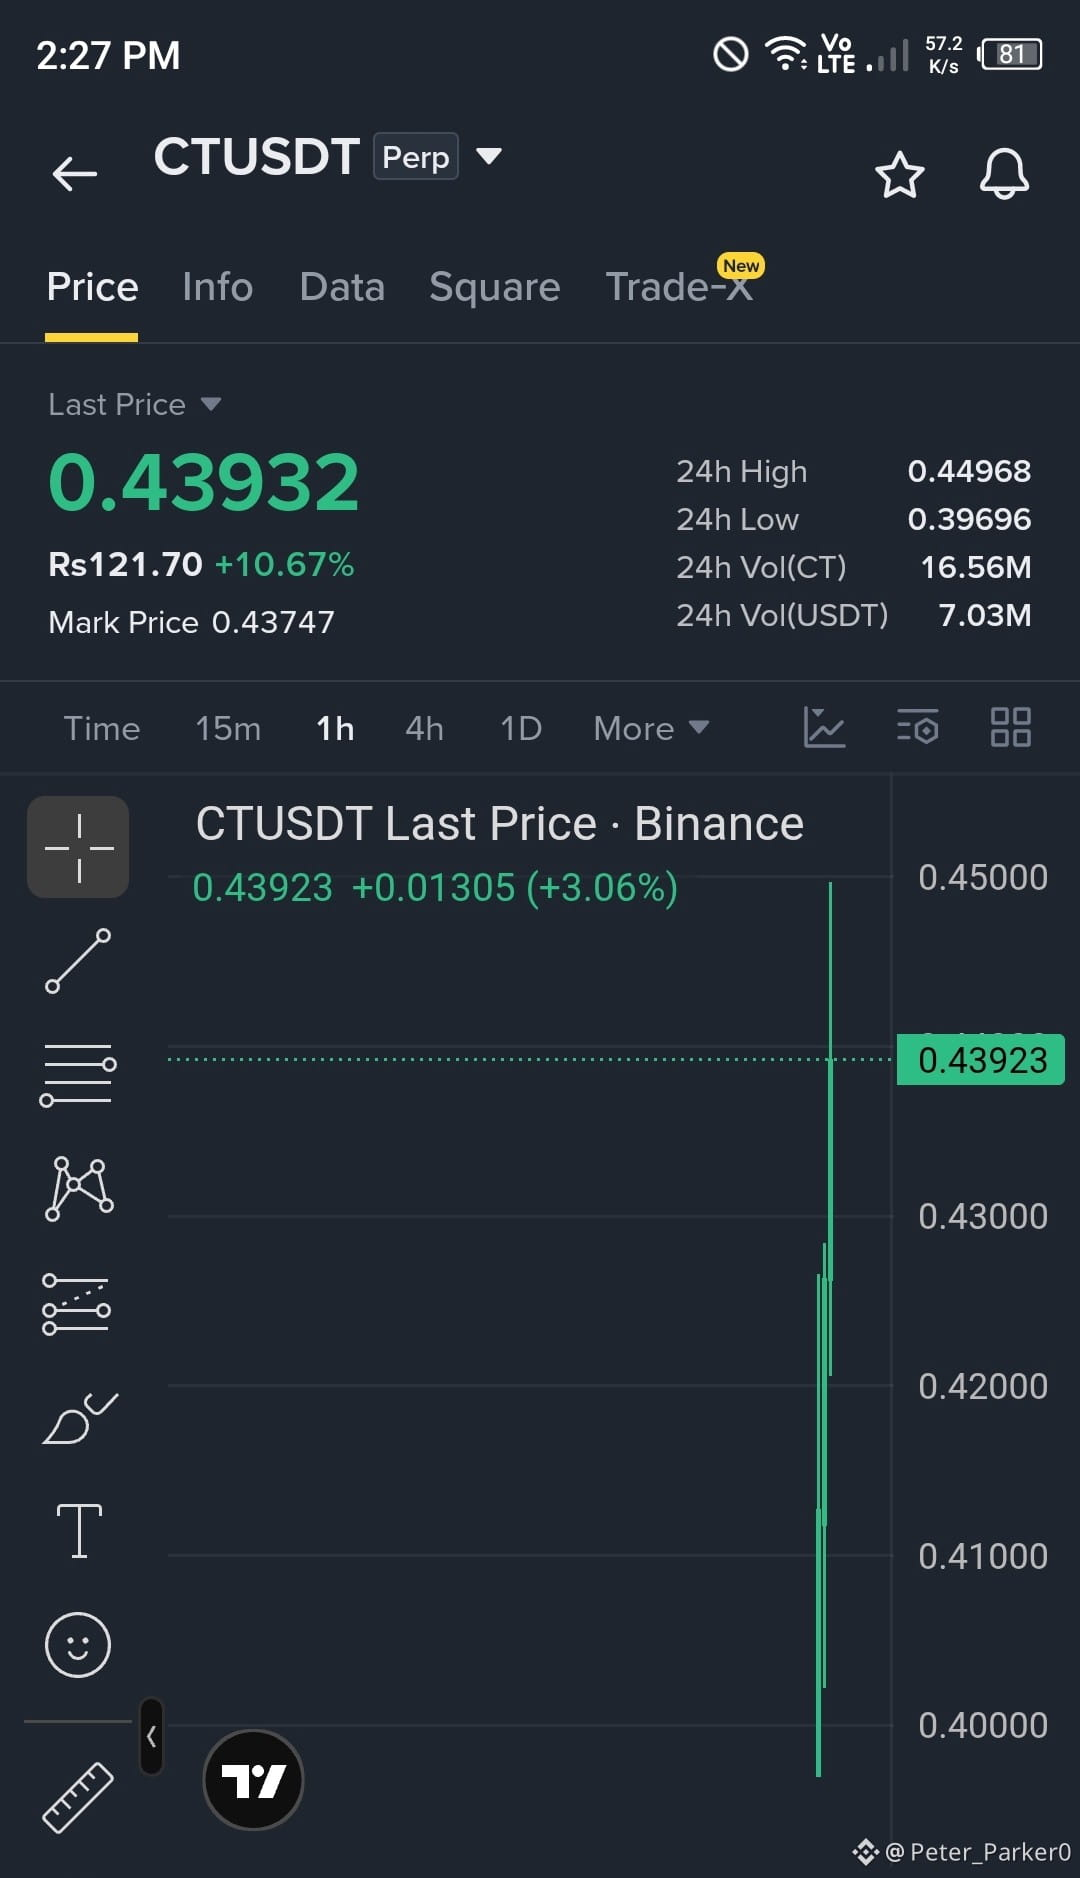
🚨 $CT JUST WOKE UP — NOW THE REAL TEST BEGINS!
$CT launched today and buyers wasted no time stepping in. The first major level I’m watching is $0.45.
If $CT can stay strong above $0.44, the next upside zones come into focus:
🎯 $0.46
🎯 $0.48
But watch the downside closely. Losing the $0.41–$0.42 area could signal that the early momentum is starting to cool off.
The launch was explosive… now let’s see if the bulls can keep control. 👀
Are you watching $0.45 or waiting for a stronger breakout?
{future}(CTUSDT)
#KoreaProposesTokenizingStocksAndBonds
🚨 $CT JUST WOKE UP — NOW THE REAL TEST BEGINS!
$CT launched today and buyers wasted no time stepping in. The first major level I’m watching is $0.45.
If $CT can stay strong above $0.44, the next upside zones come into focus:
🎯 $0.46
🎯 $0.48
But watch the downside closely. Losing the $0.41–$0.42 area could signal that the early momentum is starting to cool off.
The launch was explosive… now let’s see if the bulls can keep control. 👀
Are you watching $0.45 or waiting for a stronger breakout?
#KoreaProposesTokenizingStocksAndBonds
$CT launched today and buyers wasted no time stepping in. The first major level I’m watching is $0.45.
If $CT can stay strong above $0.44, the next upside zones come into focus:
🎯 $0.46
🎯 $0.48
But watch the downside closely. Losing the $0.41–$0.42 area could signal that the early momentum is starting to cool off.
The launch was explosive… now let’s see if the bulls can keep control. 👀
Are you watching $0.45 or waiting for a stronger breakout?
#KoreaProposesTokenizingStocksAndBonds
487
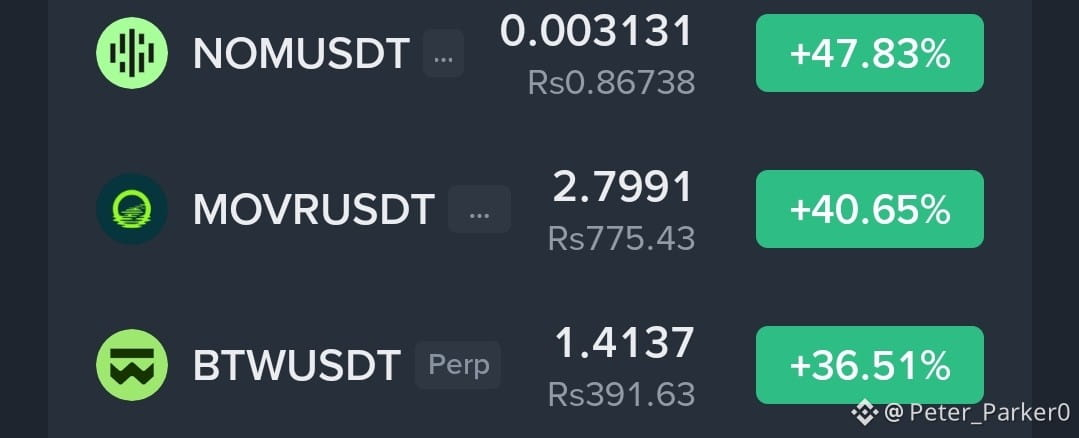
🚨 THREE MARKET MONSTERS ARE MOVING 🚨
$NOM
{spot}(NOMUSDT)
USDT +47.83%
$MOVR USDT +40.65%
$BTW USDT +36.51%
These three are absolutely flying right now, but after moves this explosive, 30x leverage can magnify losses just as quickly as gains.
If you’re trading them, wait for a clean setup instead of chasing a green candle. Tight risk control matters more than catching every move.
🔥 NOM
🔥 MOVR
🔥 BTW
Which one are you watching most closely?
🚨 THREE MARKET MONSTERS ARE MOVING 🚨
$NOM
USDT +47.83%
$MOVR USDT +40.65%
$BTW USDT +36.51%
These three are absolutely flying right now, but after moves this explosive, 30x leverage can magnify losses just as quickly as gains.
If you’re trading them, wait for a clean setup instead of chasing a green candle. Tight risk control matters more than catching every move.
🔥 NOM
🔥 MOVR
🔥 BTW
Which one are you watching most closely?
$NOM
USDT +47.83%
$MOVR USDT +40.65%
$BTW USDT +36.51%
These three are absolutely flying right now, but after moves this explosive, 30x leverage can magnify losses just as quickly as gains.
If you’re trading them, wait for a clean setup instead of chasing a green candle. Tight risk control matters more than catching every move.
🔥 NOM
🔥 MOVR
🔥 BTW
Which one are you watching most closely?
760
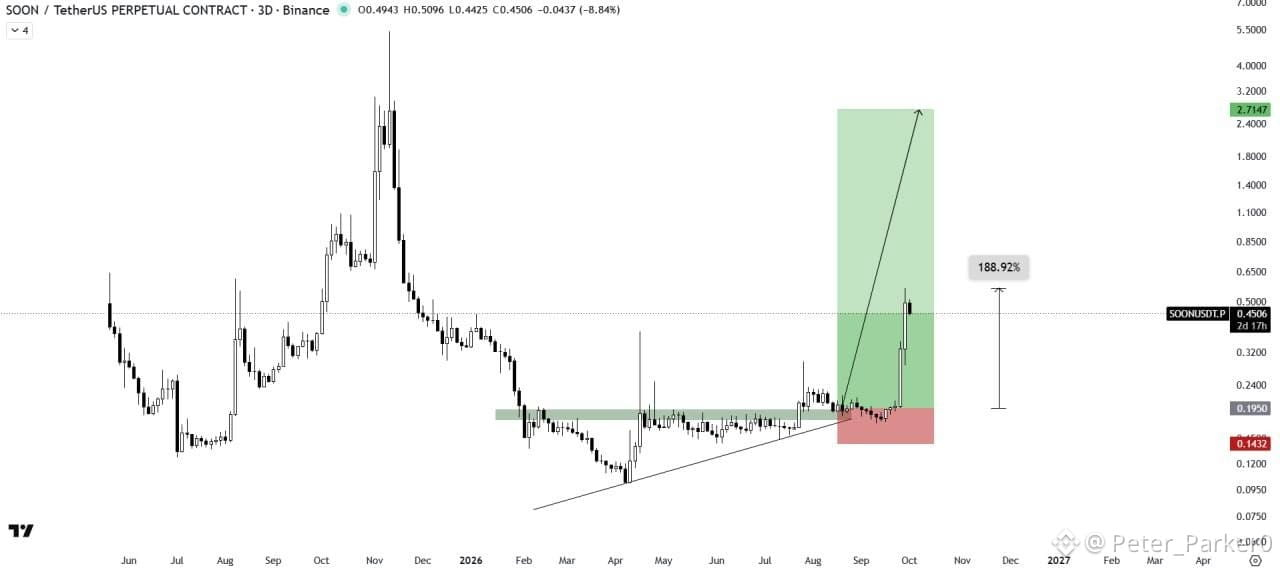
🚨 $SOON JUST BROKE THE SLEEPING RANGE 🚨
This chart is getting VERY interesting. $SOON spent months compressing around the 0.195 zone, respecting the rising trendline — and now price has exploded above the range with serious momentum.
🔥 SOON LONG SETUP
Entry Zone: 0.44 – 0.50
Support: 0.195
SL: 0.143
🎯 TP1: 0.85
🎯 TP2: 1.40
🎯 TP3: 2.70
The big move is already underway, but chasing candles can be dangerous. I’d watch for a pullback/retest and confirmation that the breakout zone is turning into support.
If buyers keep control, this chart has a massive upside structure in play. But if 0.143 breaks, the setup is invalid.
$SOON — breakout or fakeout? 👀
{future}(SOONUSDT)
🚨 $SOON JUST BROKE THE SLEEPING RANGE 🚨
This chart is getting VERY interesting. $SOON spent months compressing around the 0.195 zone, respecting the rising trendline — and now price has exploded above the range with serious momentum.
🔥 SOON LONG SETUP
Entry Zone: 0.44 – 0.50
Support: 0.195
SL: 0.143
🎯 TP1: 0.85
🎯 TP2: 1.40
🎯 TP3: 2.70
The big move is already underway, but chasing candles can be dangerous. I’d watch for a pullback/retest and confirmation that the breakout zone is turning into support.
If buyers keep control, this chart has a massive upside structure in play. But if 0.143 breaks, the setup is invalid.
$SOON — breakout or fakeout? 👀
This chart is getting VERY interesting. $SOON spent months compressing around the 0.195 zone, respecting the rising trendline — and now price has exploded above the range with serious momentum.
🔥 SOON LONG SETUP
Entry Zone: 0.44 – 0.50
Support: 0.195
SL: 0.143
🎯 TP1: 0.85
🎯 TP2: 1.40
🎯 TP3: 2.70
The big move is already underway, but chasing candles can be dangerous. I’d watch for a pullback/retest and confirmation that the breakout zone is turning into support.
If buyers keep control, this chart has a massive upside structure in play. But if 0.143 breaks, the setup is invalid.
$SOON — breakout or fakeout? 👀
414
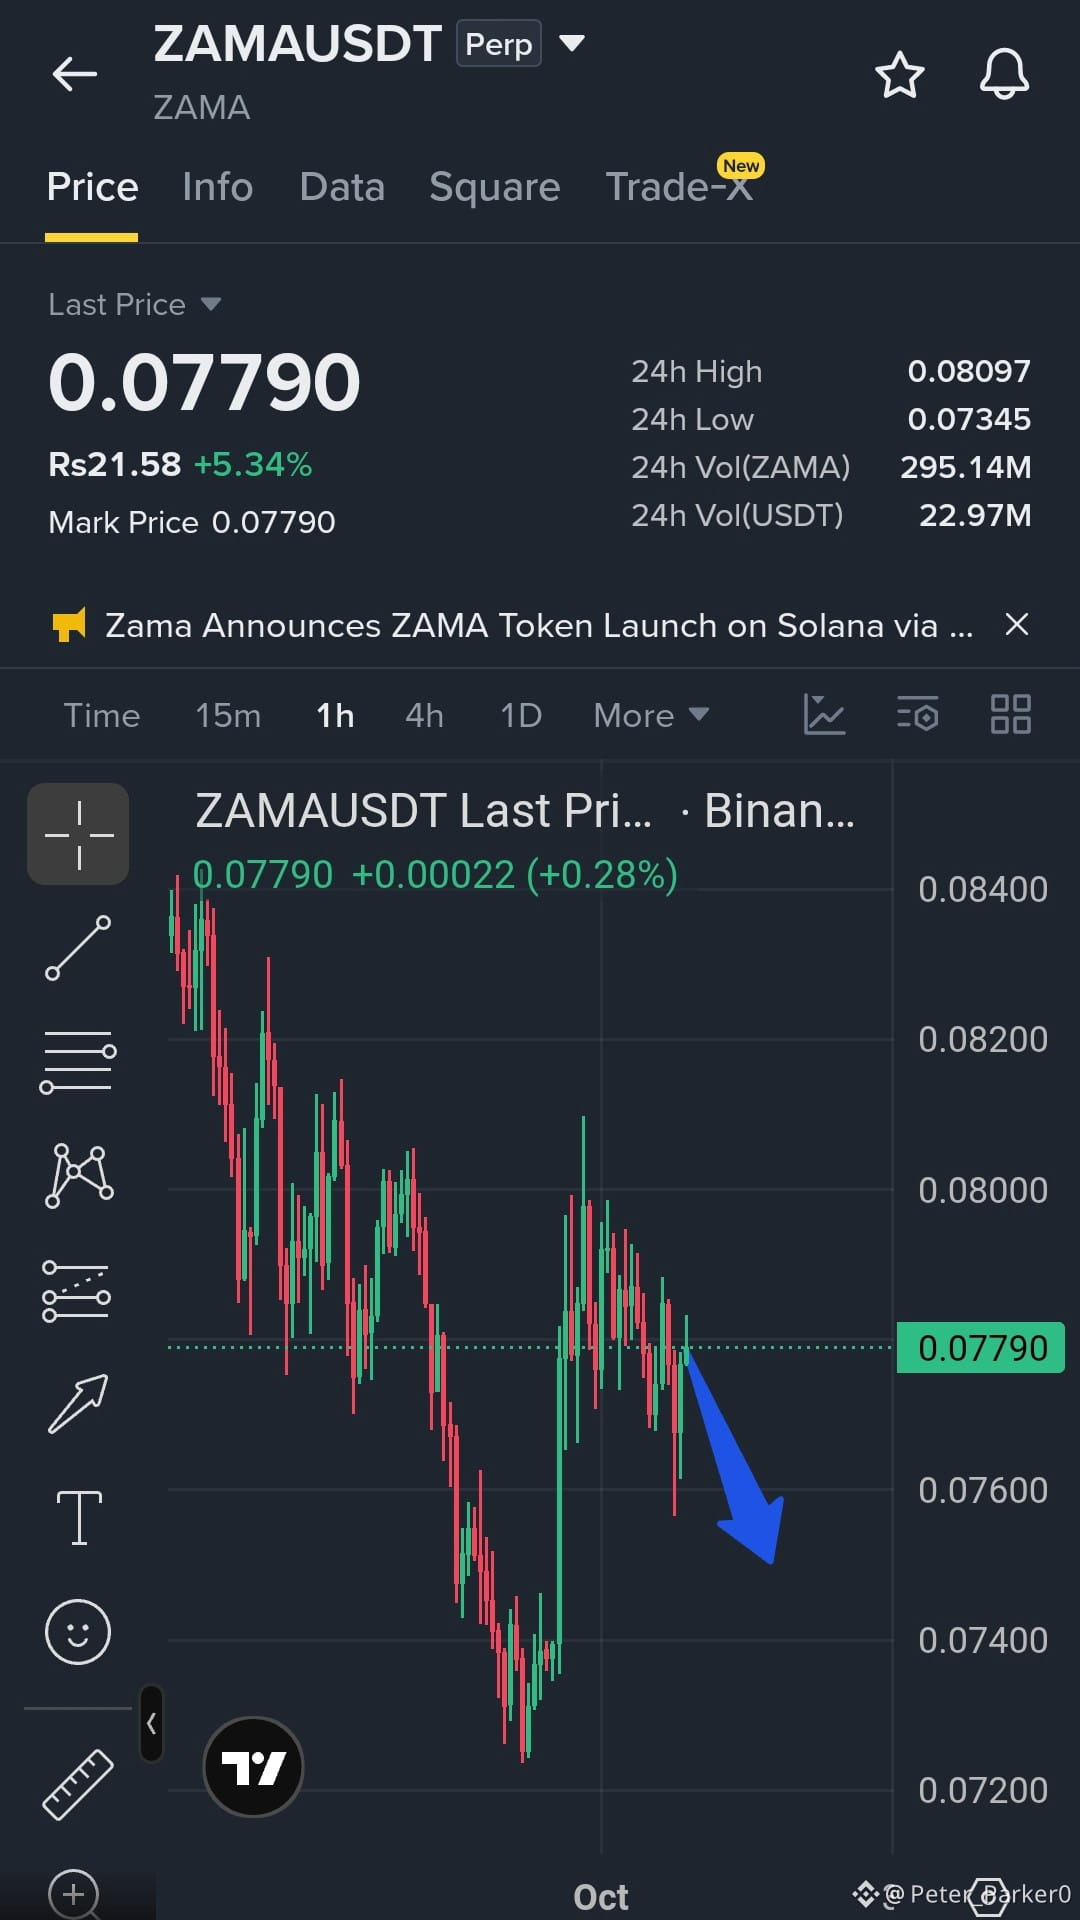
⚠️ $ZAMA BEARISH SETUP — sellers are starting to take control.
The upside momentum is losing steam, and the 0.077–0.079 area could become a key rejection zone. If price fails to reclaim this region and sellers step in, another downside move could develop.
🔻 $ZAMA SHORT
Entry: 0.077 – 0.079
SL: 0.085
TP1: 0.076
TP2: 0.073
TP3: 0.070
I’d wait for a clear rejection before entering rather than chasing the move. If $ZAMA reclaims and holds above 0.085, this bearish setup is invalidated.
Trade with a plan, not emotions. DYOR.
#AltcoinSeasonIndexHoldsAbove60For5Days
⚠️ $ZAMA BEARISH SETUP — sellers are starting to take control.
The upside momentum is losing steam, and the 0.077–0.079 area could become a key rejection zone. If price fails to reclaim this region and sellers step in, another downside move could develop.
🔻 $ZAMA SHORT
Entry: 0.077 – 0.079
SL: 0.085
TP1: 0.076
TP2: 0.073
TP3: 0.070
I’d wait for a clear rejection before entering rather than chasing the move. If $ZAMA reclaims and holds above 0.085, this bearish setup is invalidated.
Trade with a plan, not emotions. DYOR.
#AltcoinSeasonIndexHoldsAbove60For5Days
The upside momentum is losing steam, and the 0.077–0.079 area could become a key rejection zone. If price fails to reclaim this region and sellers step in, another downside move could develop.
🔻 $ZAMA SHORT
Entry: 0.077 – 0.079
SL: 0.085
TP1: 0.076
TP2: 0.073
TP3: 0.070
I’d wait for a clear rejection before entering rather than chasing the move. If $ZAMA reclaims and holds above 0.085, this bearish setup is invalidated.
Trade with a plan, not emotions. DYOR.
#AltcoinSeasonIndexHoldsAbove60For5Days
222
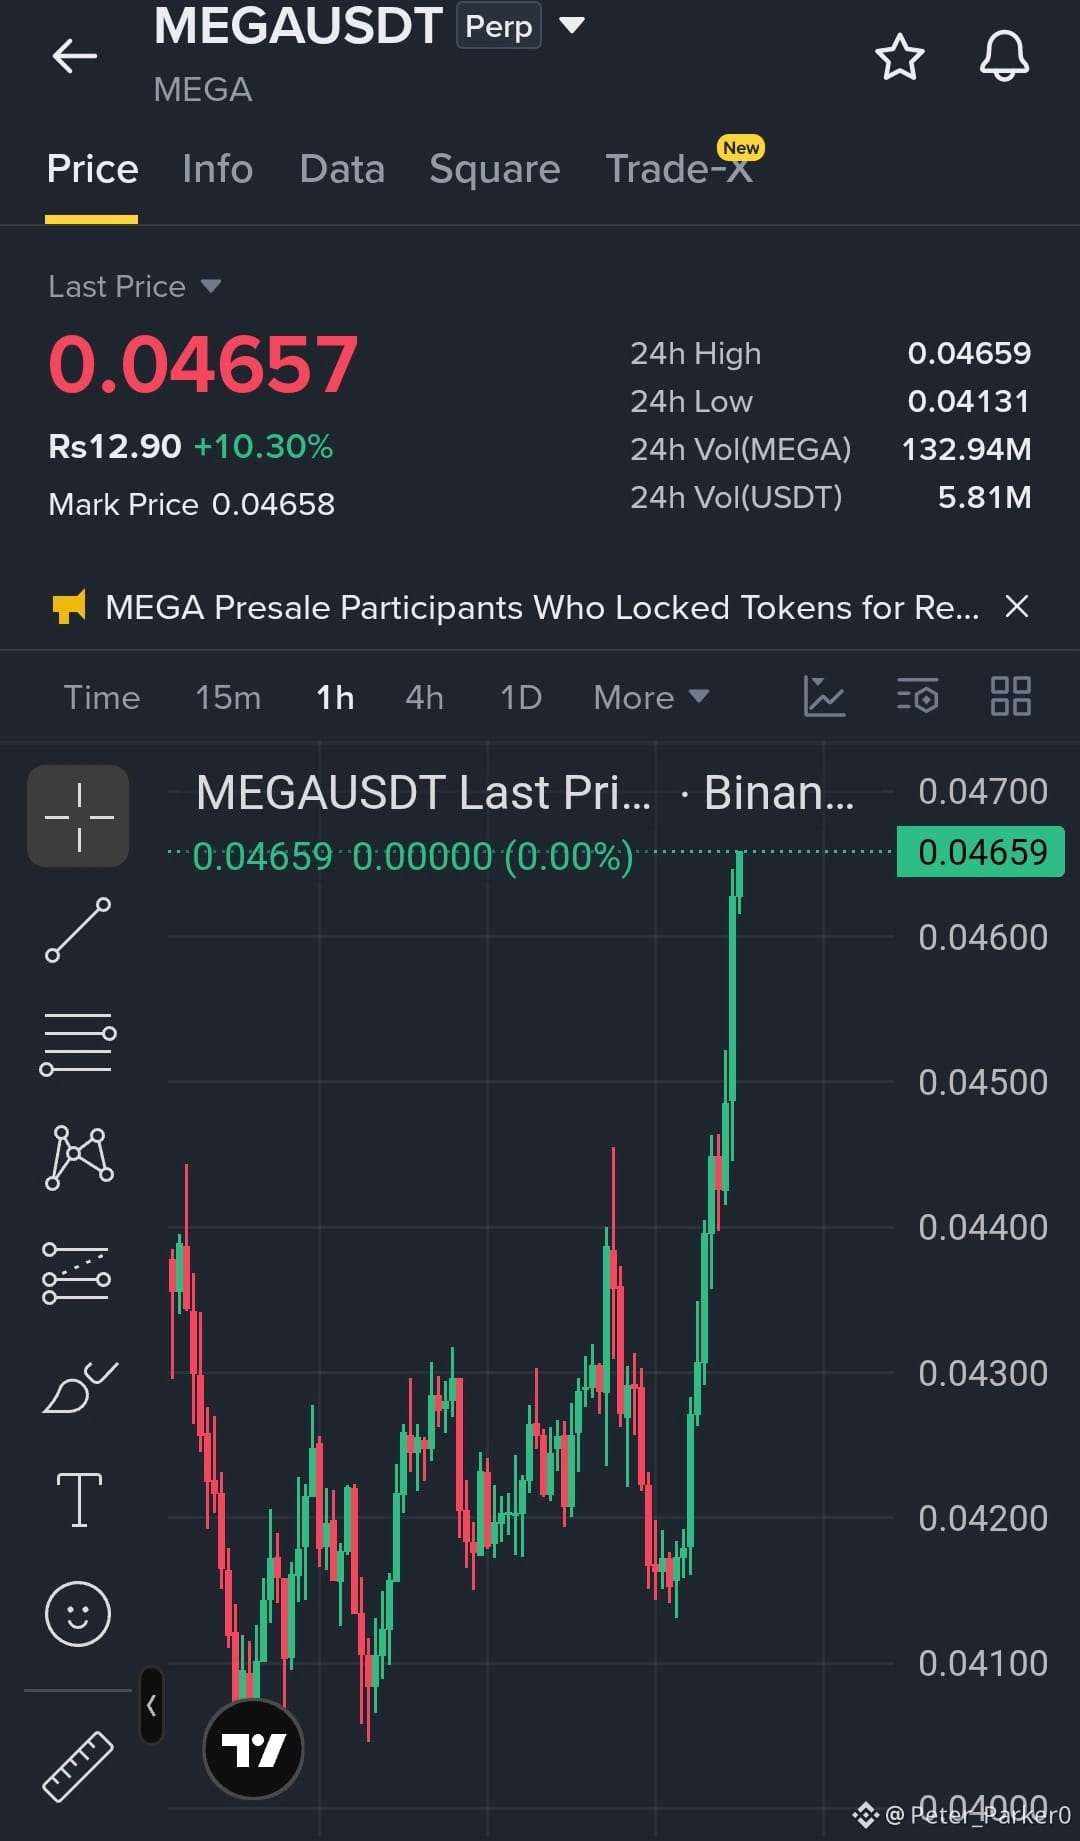
Guys Big Long now on $MEGA
{future}(MEGAUSDT)
with 10x Leverage .
Entry Zone: 0.0464 / 0.0453
TP1: 0.048
TP2: 0.050
TP3: 0.053
SL: 0.0436
Guys Big Long now on $MEGA
with 10x Leverage .
Entry Zone: 0.0464 / 0.0453
TP1: 0.048
TP2: 0.050
TP3: 0.053
SL: 0.0436
with 10x Leverage .
Entry Zone: 0.0464 / 0.0453
TP1: 0.048
TP2: 0.050
TP3: 0.053
SL: 0.0436
2
385
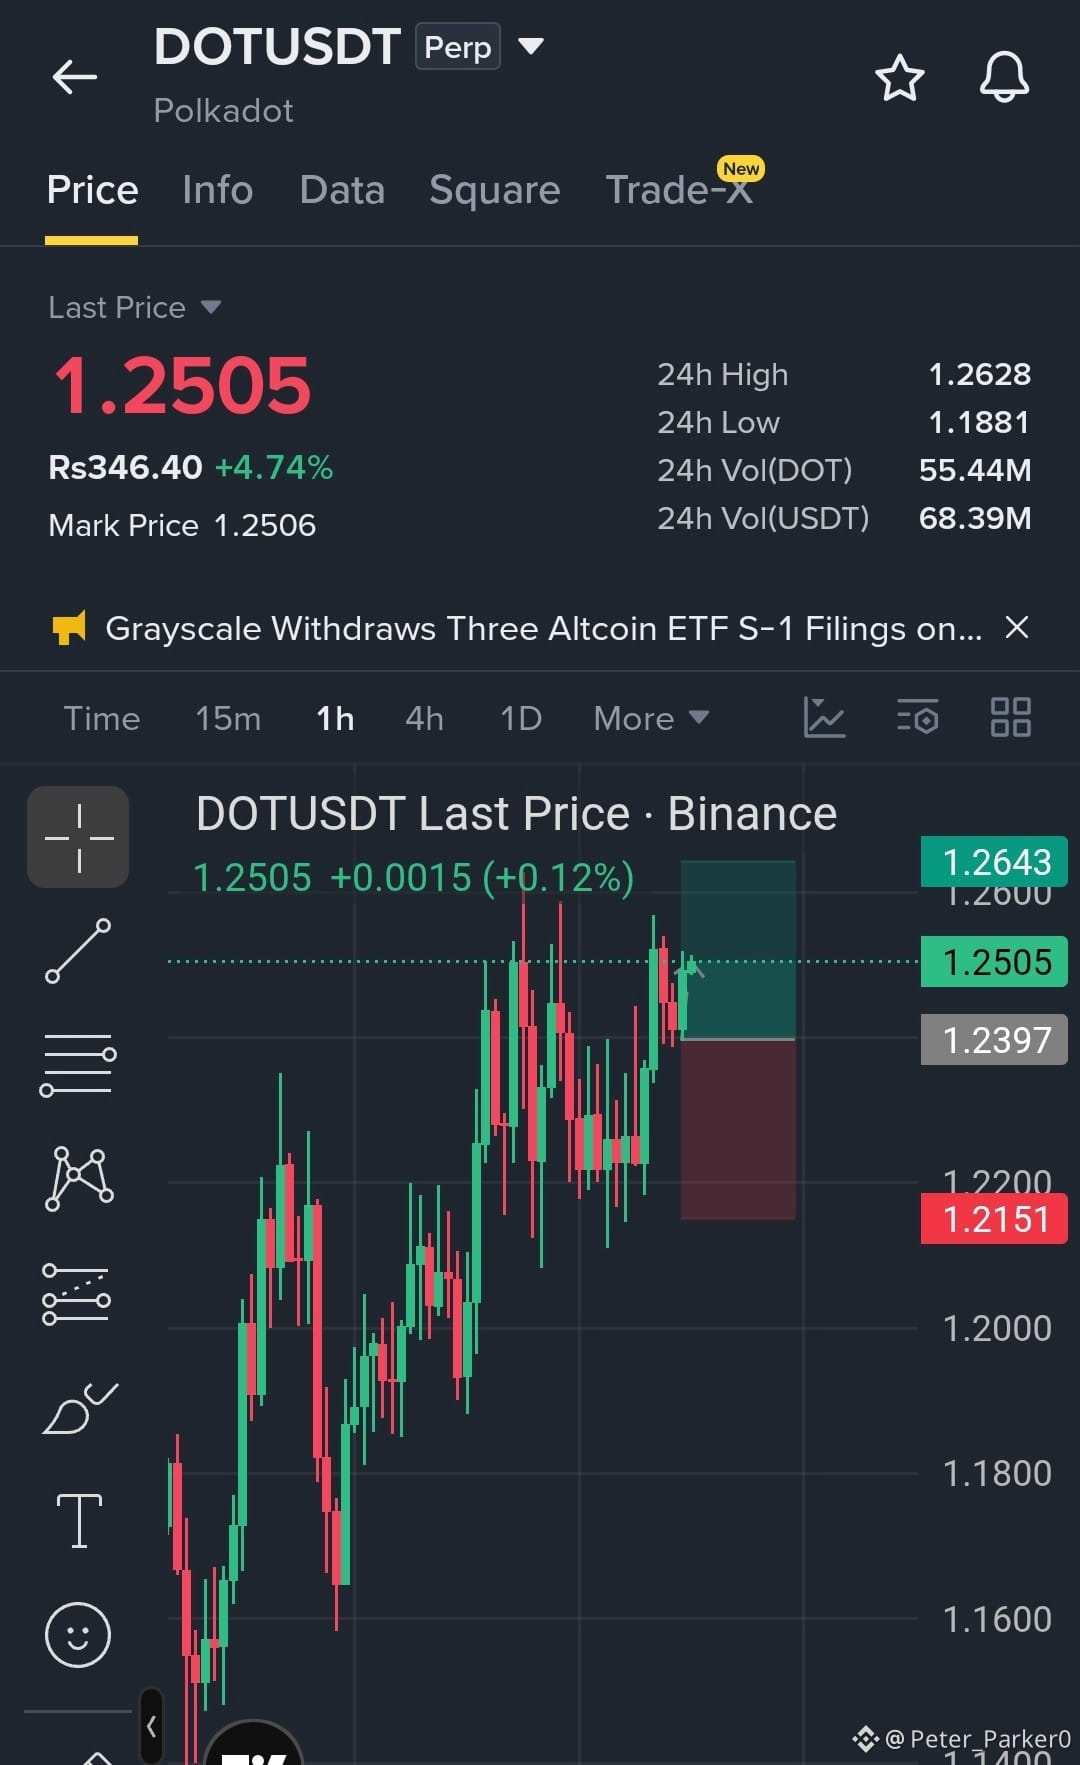
Guys Go Long on $DOT With 20x Leverage .
{future}(DOTUSDT)
Trading Ideas Long $DOT
Entry: 1.22 - 1.26
SL: 1.14
TP1: 1.29
TP2: 1.33
TP3: 1.36
trade $DOT here :👇
Guys Go Long on $DOT With 20x Leverage .
Trading Ideas Long $DOT
Entry: 1.22 - 1.26
SL: 1.14
TP1: 1.29
TP2: 1.33
TP3: 1.36
trade $DOT here :👇
Trading Ideas Long $DOT
Entry: 1.22 - 1.26
SL: 1.14
TP1: 1.29
TP2: 1.33
TP3: 1.36
trade $DOT here :👇
1
146
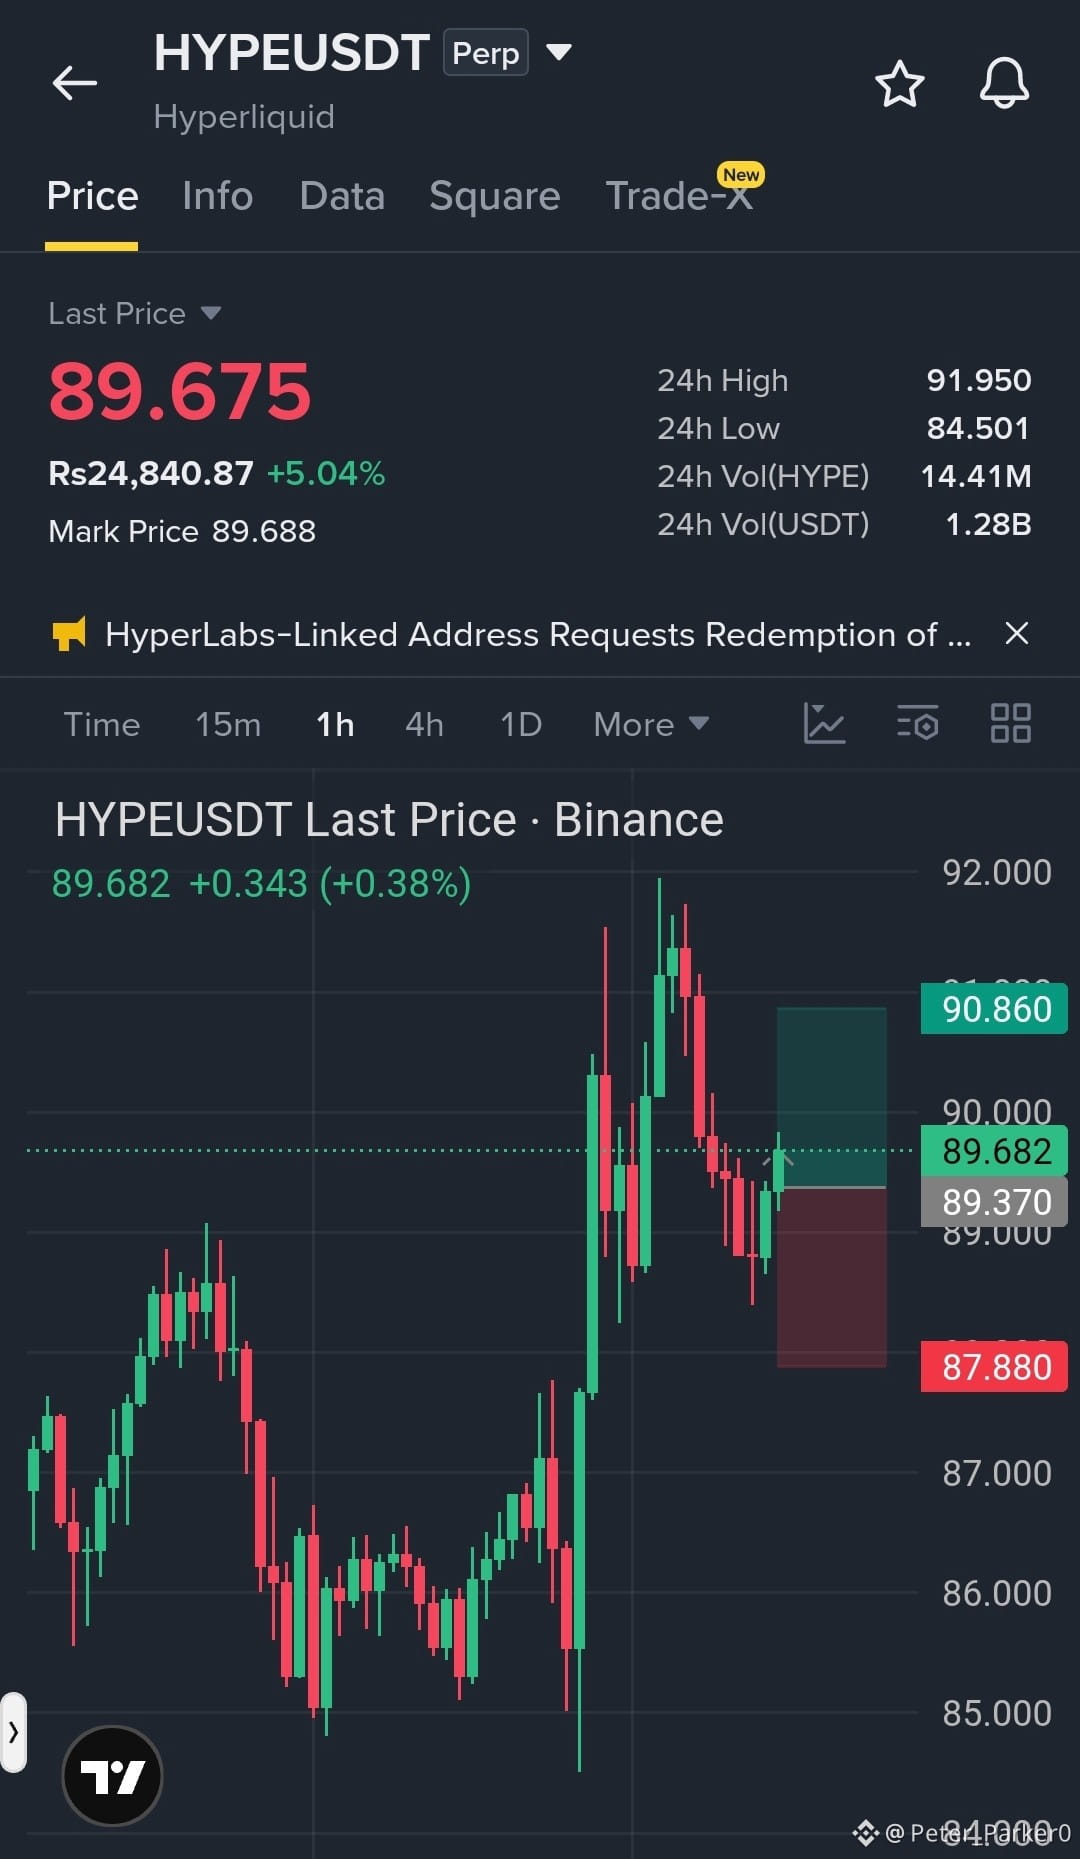
Guys Go Long on $HYPE With Maximum Leverage .
{future}(HYPEUSDT)
Entry Zone: 88.80 – 90.00
TP1: $93.11
TP2: $95.70
Stop Loss: 85.00
Guys Go Long on $HYPE With Maximum Leverage .
Entry Zone: 88.80 – 90.00
TP1: $93.11
TP2: $95.70
Stop Loss: 85.00
Entry Zone: 88.80 – 90.00
TP1: $93.11
TP2: $95.70
Stop Loss: 85.00
1
100
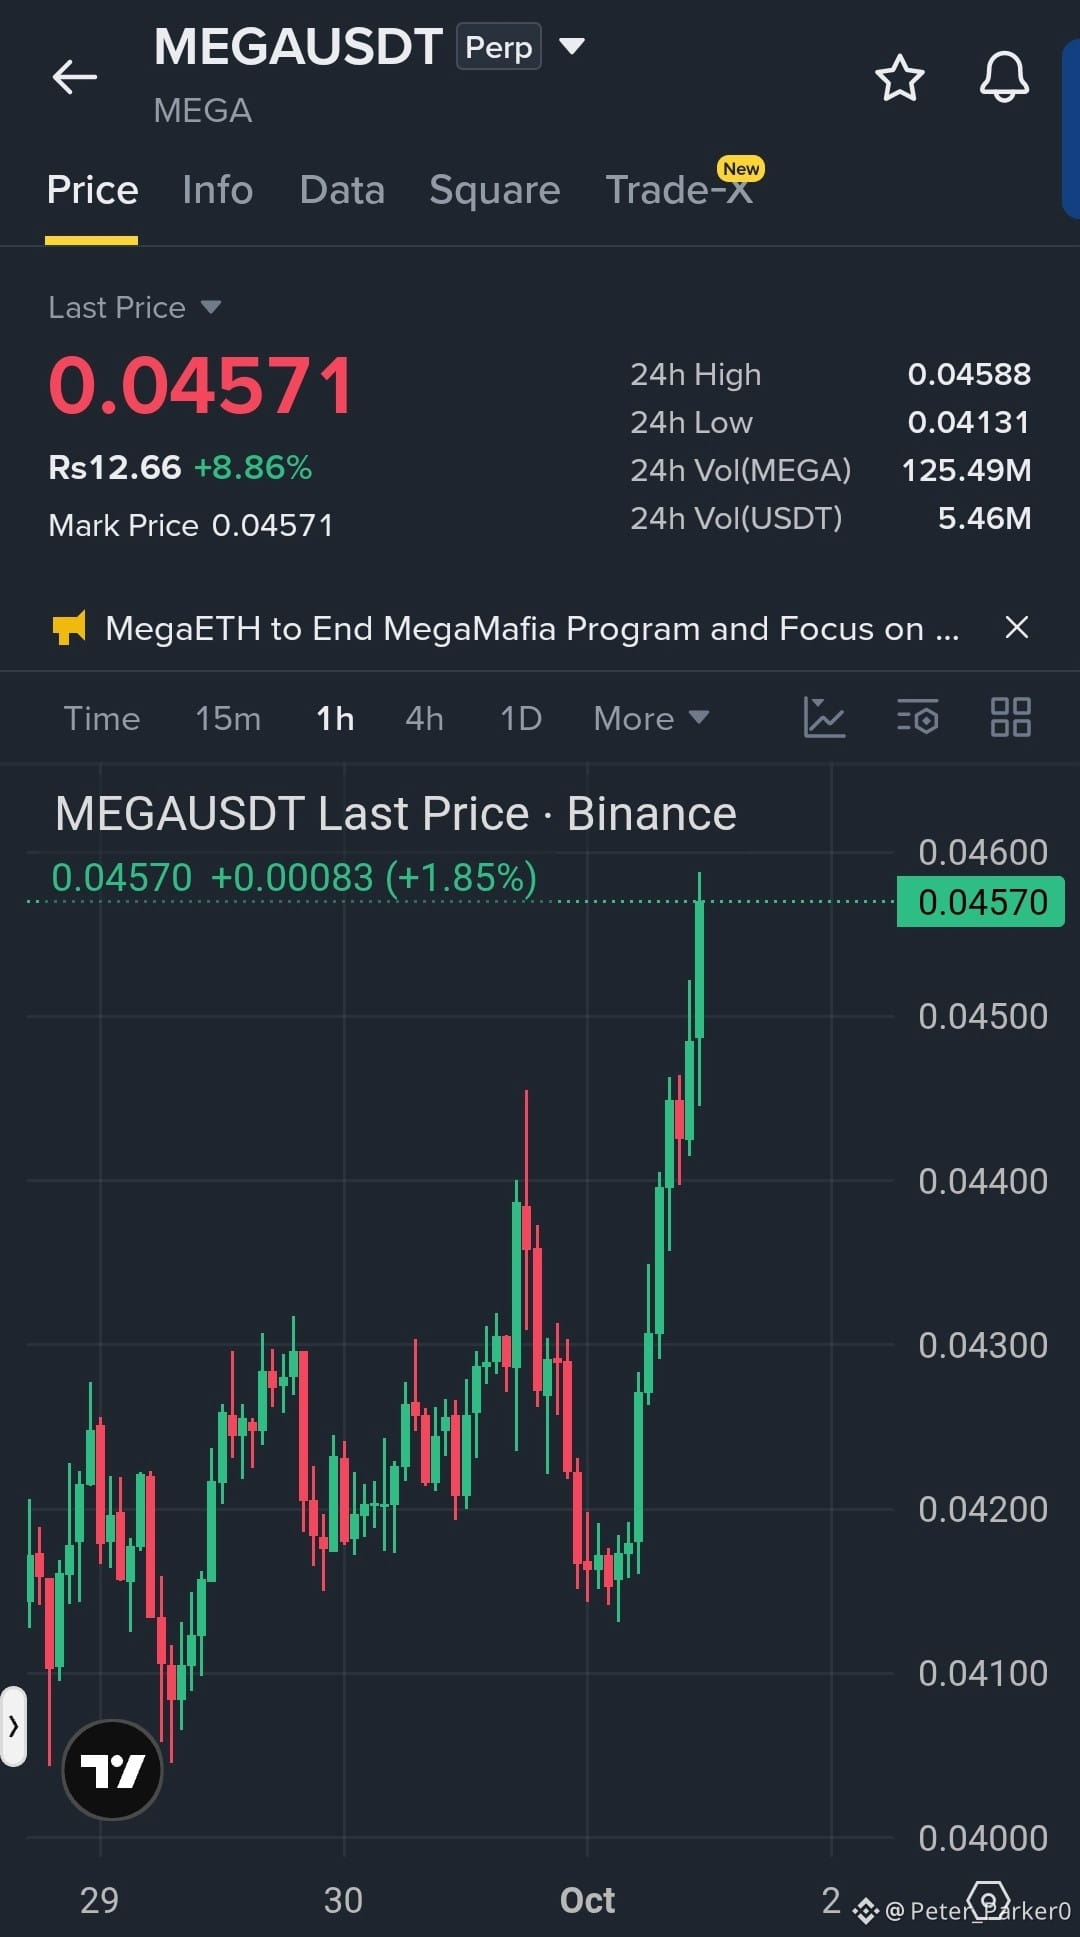
🔥 $MEGA — Okay, I’m officially giving the chart one more chance to make me proud 😂❤️
Entry: 0.04560
SL: 0.04138
TP1: 0.04942
TP2: 0.05500
TP3: 0.06208
If MEGA starts waking up from here, I’m expecting the bulls to make some noise. 🐂🔥
My plan is simple: respect the entry, protect the downside, and let the targets do the talking.
If SL hits, I’ll accept the heartbreak. 😭
If TP hits… suddenly I never doubted MEGA for a second. 😂🚀
Long MEGA — DYOR, manage your risk.
{future}(MEGAUSDT)
$STX
{future}(STXUSDT)
$NIGHT
{spot}(NIGHTUSDT)
🔥 $MEGA — Okay, I’m officially giving the chart one more chance to make me proud 😂❤️
Entry: 0.04560
SL: 0.04138
TP1: 0.04942
TP2: 0.05500
TP3: 0.06208
If MEGA starts waking up from here, I’m expecting the bulls to make some noise. 🐂🔥
My plan is simple: respect the entry, protect the downside, and let the targets do the talking.
If SL hits, I’ll accept the heartbreak. 😭
If TP hits… suddenly I never doubted MEGA for a second. 😂🚀
Long MEGA — DYOR, manage your risk.
$STX
$NIGHT
Entry: 0.04560
SL: 0.04138
TP1: 0.04942
TP2: 0.05500
TP3: 0.06208
If MEGA starts waking up from here, I’m expecting the bulls to make some noise. 🐂🔥
My plan is simple: respect the entry, protect the downside, and let the targets do the talking.
If SL hits, I’ll accept the heartbreak. 😭
If TP hits… suddenly I never doubted MEGA for a second. 😂🚀
Long MEGA — DYOR, manage your risk.
$STX
$NIGHT
294
Log in to explore more content
Join global crypto users on Binance Square
⚡️ Get latest and useful information about crypto.
💬 Trusted by the world’s largest crypto exchange.
👍 Discover real insights from verified creators.
Email / Phone number
Trending Topics
EtherGains70.9%InQ3
179,390 views
1,191 Discussing
One of the best third quarters in history 💰
September closed out last night, and with it, the quarter. For the quarter, BTC is up 42%—the second-best Q3 on record. ETH had a record-breaking Q3 overall, up 70%.
Looking at the chart, things are still looking good: we’re holding support, but we’re testing it more and more often. Plus, ETF momentum is weakening — inflows are gradually declining, and yesterday saw outflows for the first time in a long while.
Yes, historically, October has been a good month for crypto — it’s not called “Uptober” for nothing. But it’s also one of the most volatile months. Last year, for example, we managed to hit a new all-time high (ATH) and experience a flash crash.
🚀 High Accuracy Trades.
$BTC
$ETH
$SOL
#EtherGains70.9%InQ3 #DollarIndexHitsHighestSinceMay2025 #CFTCSubmitsTwoEventContractRulesToWhiteHouse #MicronBeatsEarningsLiftsGuidance
Knowledge is Power
·0 Likes
·253 views
TreasuryLetsStatesFileStablecoinCertificationsEarly
11,889 views
93 Discussing
US10YearYieldNears5.3%
161,402 views
1,163 Discussing