
Harshith Elite Trader
7.9k Beiträge

Harshith Elite Trader
Melden
Nutzer blockieren
Harshith | Private Crypto Trader | Precision Entries. Calculated Risk. | Capital Preservation First. | Profits Built with Discipline.🔥🔥
Trade eröffnen
Regelmäßiger Trader
9.2 Monate
497 Following
1.4K+ Follower
7.7K+ Like gegeben
Beiträge
Portfolio
Alle
Zitierungen
Live
·
--
Bullisch
Übersetzung ansehen
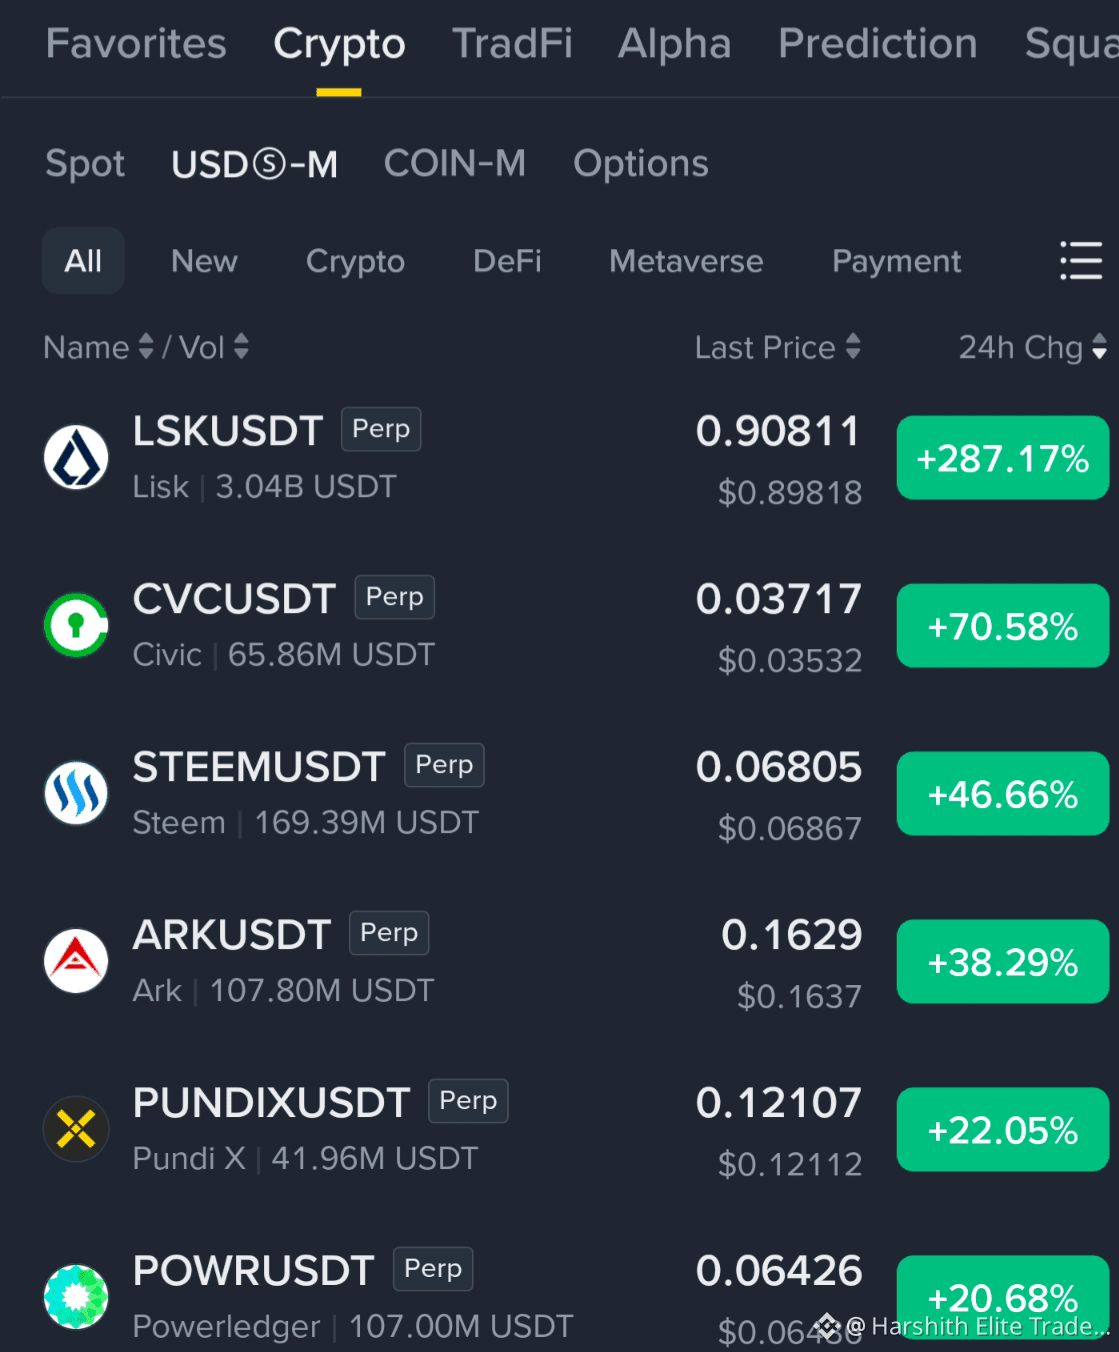
🔥🔥 FUTURES MARKET IS ON FIRE — WATCH THESE TARGETS 🚀📈
Momentum is getting aggressive. Keep an eye on these potential next levels:
🚀 $LSK
Current: 0.90526 | +284.75%
🎯 Target: 1.10
🔥 $CVC
Current: 0.03646 | +67.63%
🎯 Target: 0.05
📈 $STEEM
🎯 Target: 0.075
⚡ Massive volatility is already in play — watch momentum and key levels closely.
Keep this on your radar 👀🔥
{future}(STEEMUSDT)
{future}(CVCUSDT)
{future}(LSKUSDT)
🔥🔥 FUTURES MARKET IS ON FIRE — WATCH THESE TARGETS 🚀📈
Momentum is getting aggressive. Keep an eye on these potential next levels:
🚀 $LSK
Current: 0.90526 | +284.75%
🎯 Target: 1.10
🔥 $CVC
Current: 0.03646 | +67.63%
🎯 Target: 0.05
📈 $STEEM
🎯 Target: 0.075
⚡ Massive volatility is already in play — watch momentum and key levels closely.
Keep this on your radar 👀🔥
Momentum is getting aggressive. Keep an eye on these potential next levels:
🚀 $LSK
Current: 0.90526 | +284.75%
🎯 Target: 1.10
🔥 $CVC
Current: 0.03646 | +67.63%
🎯 Target: 0.05
📈 $STEEM
🎯 Target: 0.075
⚡ Massive volatility is already in play — watch momentum and key levels closely.
Keep this on your radar 👀🔥
3
674
·
--
Bärisch
Übersetzung ansehen
🔴 Guys 💪 $CL — SHORT SETUP IN FOCUS 📉🔥
$CL /USDT is approaching a key zone where rejection could open the way for further downside.
🔻 SHORT SETUP
Entry: 96.80 – 97.00
TP1: 95.50
TP2: 94.50
TP3: 93.50
SL: 98.00
⚡ Watch the 96.80–97.00 zone closely. A rejection here could strengthen the bearish move toward the targets.
👇👇 Click Here To SHORT $CL
{future}(CLUSDT)
🔴 Guys 💪 $CL — SHORT SETUP IN FOCUS 📉🔥
$CL /USDT is approaching a key zone where rejection could open the way for further downside.
🔻 SHORT SETUP
Entry: 96.80 – 97.00
TP1: 95.50
TP2: 94.50
TP3: 93.50
SL: 98.00
⚡ Watch the 96.80–97.00 zone closely. A rejection here could strengthen the bearish move toward the targets.
👇👇 Click Here To SHORT $CL
$CL /USDT is approaching a key zone where rejection could open the way for further downside.
🔻 SHORT SETUP
Entry: 96.80 – 97.00
TP1: 95.50
TP2: 94.50
TP3: 93.50
SL: 98.00
⚡ Watch the 96.80–97.00 zone closely. A rejection here could strengthen the bearish move toward the targets.
👇👇 Click Here To SHORT $CL
1
166
·
--
Bullisch
Übersetzung ansehen
🟢 $BTC — HIGH-CONVICTION LONG SETUP 🚀📈
$BTC /USDT is showing a trend-following LONG opportunity with 77% confidence.
🟢 LONG · 150X
Entry: 76,979.43 – 77,054.57
SL: 76,212.27
TP Area: 77,620.55 – 78,626.46
⚡ Respect the SL and manage leverage carefully — this is a probabilistic setup, not a guaranteed move.
🚀 Click Here 👇👇 LONG $BTC
{future}(BTCUSDT)
🟢 $BTC — HIGH-CONVICTION LONG SETUP 🚀📈
$BTC /USDT is showing a trend-following LONG opportunity with 77% confidence.
🟢 LONG · 150X
Entry: 76,979.43 – 77,054.57
SL: 76,212.27
TP Area: 77,620.55 – 78,626.46
⚡ Respect the SL and manage leverage carefully — this is a probabilistic setup, not a guaranteed move.
🚀 Click Here 👇👇 LONG $BTC
$BTC /USDT is showing a trend-following LONG opportunity with 77% confidence.
🟢 LONG · 150X
Entry: 76,979.43 – 77,054.57
SL: 76,212.27
TP Area: 77,620.55 – 78,626.46
⚡ Respect the SL and manage leverage carefully — this is a probabilistic setup, not a guaranteed move.
🚀 Click Here 👇👇 LONG $BTC
2
30
·
--
Bullisch
Übersetzung ansehen
🚀 $我踏马来了 — LOW LIQUIDITY, HIGH VOLATILITY 👀🔥
$我踏马来了 is attracting attention as a low-valued Chinese-area meme coin, with liquidity reportedly just above $1M.
💥 Low liquidity can mean aggressive price swings when buying pressure arrives — but it also increases downside risk.
🟢 BULLISH WATCH
If momentum and volume start expanding, an early move could turn explosive.
No FOMO. Watch the liquidity, volume and breakout confirmation closely.
🚀 $我踏马来了 👀
{future}(我踏马来了USDT)
🚀 $我踏马来了 — LOW LIQUIDITY, HIGH VOLATILITY 👀🔥
$我踏马来了 is attracting attention as a low-valued Chinese-area meme coin, with liquidity reportedly just above $1M.
💥 Low liquidity can mean aggressive price swings when buying pressure arrives — but it also increases downside risk.
🟢 BULLISH WATCH
If momentum and volume start expanding, an early move could turn explosive.
No FOMO. Watch the liquidity, volume and breakout confirmation closely.
🚀 $我踏马来了 👀
$我踏马来了 is attracting attention as a low-valued Chinese-area meme coin, with liquidity reportedly just above $1M.
💥 Low liquidity can mean aggressive price swings when buying pressure arrives — but it also increases downside risk.
🟢 BULLISH WATCH
If momentum and volume start expanding, an early move could turn explosive.
No FOMO. Watch the liquidity, volume and breakout confirmation closely.
🚀 $我踏马来了 👀
1
81
·
--
Bullisch
Übersetzung ansehen
🟢 $EGLD — BUYERS ARE DEFENDING EVERY DIP 🚀📈
$EGLD is showing bullish momentum, with buyers stepping in on pullbacks. Waiting for a clean retest before riding the next leg higher.
🟢 LONG SETUP
Entry: 4.67438 – 4.69962
SL: 4.62389
TP1: 4.72908
TP2: 4.77115
TP3: 4.81323
📊 Current: 4.687
RSI: 39 | EMA20: 4.73258
⚡ Retest + support hold could strengthen the upside continuation.
👉 Catch $EGLD 👈
{future}(EGLDUSDT)
🟢 $EGLD — BUYERS ARE DEFENDING EVERY DIP 🚀📈
$EGLD is showing bullish momentum, with buyers stepping in on pullbacks. Waiting for a clean retest before riding the next leg higher.
🟢 LONG SETUP
Entry: 4.67438 – 4.69962
SL: 4.62389
TP1: 4.72908
TP2: 4.77115
TP3: 4.81323
📊 Current: 4.687
RSI: 39 | EMA20: 4.73258
⚡ Retest + support hold could strengthen the upside continuation.
👉 Catch $EGLD 👈
$EGLD is showing bullish momentum, with buyers stepping in on pullbacks. Waiting for a clean retest before riding the next leg higher.
🟢 LONG SETUP
Entry: 4.67438 – 4.69962
SL: 4.62389
TP1: 4.72908
TP2: 4.77115
TP3: 4.81323
📊 Current: 4.687
RSI: 39 | EMA20: 4.73258
⚡ Retest + support hold could strengthen the upside continuation.
👉 Catch $EGLD 👈
2
42
·
--
Bullisch
Übersetzung ansehen
🟢 $BTR — WHALES ARE BACK IN CONTROL 🚀🐋
$BTR is surging again and looks ready for another aggressive move. After yesterday’s strong run, buyers are stepping back in with momentum building once again.
🟢 LONG / BULLISH BIAS
A bullish move above the prior low could open the door for another strong expansion leg.
⚡ High-volatility setup — can move aggressively once momentum kicks in. Manage position size carefully and avoid chasing extended candles.
Welcome to the LONG side 🟢🔥
Watch $BTR closely 👇
{future}(BTRUSDT)
🟢 $BTR — WHALES ARE BACK IN CONTROL 🚀🐋
$BTR is surging again and looks ready for another aggressive move. After yesterday’s strong run, buyers are stepping back in with momentum building once again.
🟢 LONG / BULLISH BIAS
A bullish move above the prior low could open the door for another strong expansion leg.
⚡ High-volatility setup — can move aggressively once momentum kicks in. Manage position size carefully and avoid chasing extended candles.
Welcome to the LONG side 🟢🔥
Watch $BTR closely 👇
$BTR is surging again and looks ready for another aggressive move. After yesterday’s strong run, buyers are stepping back in with momentum building once again.
🟢 LONG / BULLISH BIAS
A bullish move above the prior low could open the door for another strong expansion leg.
⚡ High-volatility setup — can move aggressively once momentum kicks in. Manage position size carefully and avoid chasing extended candles.
Welcome to the LONG side 🟢🔥
Watch $BTR closely 👇
2
49
·
--
Bullisch
Übersetzung ansehen
🟢 $4 — DIPS ARE FOR EATING 🚀📈
$4 is showing a potential setup for another leg higher toward the recent highs.
🟢 LONG SETUP
Entry: 0.01912 – 0.01955
TP1: 0.020420
TP2: 0.02129
SL: 0.018355
⚡ MA25 support is the key. Failure to hold could trigger a deeper retracement toward 0.0185.
Never go all-in — use a position size that fits your account.
This setup looks ready 👀🔥
👇 Click Below To Take Trade With Me
Trade $4 here 👇
{future}(4USDT)
🟢 $4 — DIPS ARE FOR EATING 🚀📈
$4 is showing a potential setup for another leg higher toward the recent highs.
🟢 LONG SETUP
Entry: 0.01912 – 0.01955
TP1: 0.020420
TP2: 0.02129
SL: 0.018355
⚡ MA25 support is the key. Failure to hold could trigger a deeper retracement toward 0.0185.
Never go all-in — use a position size that fits your account.
This setup looks ready 👀🔥
👇 Click Below To Take Trade With Me
Trade $4 here 👇
$4 is showing a potential setup for another leg higher toward the recent highs.
🟢 LONG SETUP
Entry: 0.01912 – 0.01955
TP1: 0.020420
TP2: 0.02129
SL: 0.018355
⚡ MA25 support is the key. Failure to hold could trigger a deeper retracement toward 0.0185.
Never go all-in — use a position size that fits your account.
This setup looks ready 👀🔥
👇 Click Below To Take Trade With Me
Trade $4 here 👇
1
33
·
--
Bärisch
Übersetzung ansehen
🔴 $MET — SHORT TRADE LIVE 📉🔥
Guys, I’m taking a 10x isolated SHORT on $MET in Futures.
🔻 SHORT SETUP
Entry Zone: $0.242 – $0.246
TP1: $0.237
TP2: $0.232
TP3: $0.226
TP4: $0.218
SL: $0.255
Sellers are in focus from this zone. I’m watching for downside continuation toward the targets.
👇 Click Below To Take The Trade With Me
Trade $MET here 👇
{future}(METUSDT)
🔴 $MET — SHORT TRADE LIVE 📉🔥
Guys, I’m taking a 10x isolated SHORT on $MET in Futures.
🔻 SHORT SETUP
Entry Zone: $0.242 – $0.246
TP1: $0.237
TP2: $0.232
TP3: $0.226
TP4: $0.218
SL: $0.255
Sellers are in focus from this zone. I’m watching for downside continuation toward the targets.
👇 Click Below To Take The Trade With Me
Trade $MET here 👇
Guys, I’m taking a 10x isolated SHORT on $MET in Futures.
🔻 SHORT SETUP
Entry Zone: $0.242 – $0.246
TP1: $0.237
TP2: $0.232
TP3: $0.226
TP4: $0.218
SL: $0.255
Sellers are in focus from this zone. I’m watching for downside continuation toward the targets.
👇 Click Below To Take The Trade With Me
Trade $MET here 👇
1
33
·
--
Bullisch
Übersetzung ansehen
🔥 BINANCE HOT COINS — $牛来 TAKES #1 🚀📈
$牛来 is heating up fast, with +83.51% in 24H and a massive rise of 590K in popularity compared with yesterday.
🔥 Heat Ranking
① $牛来 — $0.1420 | +83.51%
② $ZEC — $1,106.46 | -9.80%
③ $IOST — $0.001012 | -9.88%
④ $PONS — $0.6482 | +9.51%
⑤ $ETH — $2,473.40 | -0.17%
💰 Flow
24H Trading Volume: $866M
Main Funds Net Inflow: $12.9956M
Main Funds Net Outflow: $178.2K
🚀 Bulls are clearly active around $牛来, with attention and liquidity heating up rapidly.
Watch closely 👀🔥
{future}(牛来USDT)
🔥 BINANCE HOT COINS — $牛来 TAKES #1 🚀📈
$牛来 is heating up fast, with +83.51% in 24H and a massive rise of 590K in popularity compared with yesterday.
🔥 Heat Ranking
① $牛来 — $0.1420 | +83.51%
② $ZEC — $1,106.46 | -9.80%
③ $IOST — $0.001012 | -9.88%
④ $PONS — $0.6482 | +9.51%
⑤ $ETH — $2,473.40 | -0.17%
💰 Flow
24H Trading Volume: $866M
Main Funds Net Inflow: $12.9956M
Main Funds Net Outflow: $178.2K
🚀 Bulls are clearly active around $牛来 , with attention and liquidity heating up rapidly.
Watch closely 👀🔥
$牛来 is heating up fast, with +83.51% in 24H and a massive rise of 590K in popularity compared with yesterday.
🔥 Heat Ranking
① $牛来 — $0.1420 | +83.51%
② $ZEC — $1,106.46 | -9.80%
③ $IOST — $0.001012 | -9.88%
④ $PONS — $0.6482 | +9.51%
⑤ $ETH — $2,473.40 | -0.17%
💰 Flow
24H Trading Volume: $866M
Main Funds Net Inflow: $12.9956M
Main Funds Net Outflow: $178.2K
🚀 Bulls are clearly active around $牛来 , with attention and liquidity heating up rapidly.
Watch closely 👀🔥
1
382
·
--
Bärisch
Übersetzung ansehen
🔴 $SAHARA — REJECTION AT RESISTANCE 📉🔥
$SAHARA rejected the 0.00920 resistance zone, with sellers pushing price lower. The breakdown below 0.00908 keeps the structure bearish.
🔻 SHORT SETUP
Entry: 0.00904–0.00910
SL: 0.00920
TP1: 0.00895
TP2: 0.00880
TP3: 0.00865
⚡ Key level: 0.00908
Below this zone → downside momentum remains in focus.
Trade $SAHARA here 👇
{future}(SAHARAUSDT)
🔴 $SAHARA — REJECTION AT RESISTANCE 📉🔥
$SAHARA rejected the 0.00920 resistance zone, with sellers pushing price lower. The breakdown below 0.00908 keeps the structure bearish.
🔻 SHORT SETUP
Entry: 0.00904–0.00910
SL: 0.00920
TP1: 0.00895
TP2: 0.00880
TP3: 0.00865
⚡ Key level: 0.00908
Below this zone → downside momentum remains in focus.
Trade $SAHARA here 👇
$SAHARA rejected the 0.00920 resistance zone, with sellers pushing price lower. The breakdown below 0.00908 keeps the structure bearish.
🔻 SHORT SETUP
Entry: 0.00904–0.00910
SL: 0.00920
TP1: 0.00895
TP2: 0.00880
TP3: 0.00865
⚡ Key level: 0.00908
Below this zone → downside momentum remains in focus.
Trade $SAHARA here 👇
1
116
·
--
Bullisch
Übersetzung ansehen
🔴 $SNDK — MARKET OPEN VOLATILITY SETUP 📉➡️📈🔥
When the market opens at 6:30 PM, $SNDK could see a sharp dump first before buyers step back in.
🎯 My analysis:
Potential dip toward $1,600 → then a bullish reversal.
🟢 Bullish target: $1,800+
The key is how price reacts around $1,600. If buyers defend that zone strongly, the rebound could accelerate.
Watch $SNDK closely 👇
{future}(SNDKUSDT)
🔴 $SNDK — MARKET OPEN VOLATILITY SETUP 📉➡️📈🔥
When the market opens at 6:30 PM, $SNDK could see a sharp dump first before buyers step back in.
🎯 My analysis:
Potential dip toward $1,600 → then a bullish reversal.
🟢 Bullish target: $1,800+
The key is how price reacts around $1,600. If buyers defend that zone strongly, the rebound could accelerate.
Watch $SNDK closely 👇
When the market opens at 6:30 PM, $SNDK could see a sharp dump first before buyers step back in.
🎯 My analysis:
Potential dip toward $1,600 → then a bullish reversal.
🟢 Bullish target: $1,800+
The key is how price reacts around $1,600. If buyers defend that zone strongly, the rebound could accelerate.
Watch $SNDK closely 👇
1
146
·
--
Bärisch
Übersetzung ansehen
🔴 GUY'S 💸 $ZEC — REJECTION BELOW $1,120 📉🔥
Sellers are stepping in after $ZEC failed to hold the $1,120 zone. If price remains below $1,105, downside continuation could follow.
🔻 SHORT SETUP
Entry: 1,102–1,108
SL: 1,123
TP1: 1,090
TP2: 1,075
TP3: 1,063
⚠️ Key level: $1,105
Below this zone → bearish momentum stays in focus.
Trade $ZEC here 👇
{future}(ZECUSDT)
🔴 GUY'S 💸 $ZEC — REJECTION BELOW $1,120 📉🔥
Sellers are stepping in after $ZEC failed to hold the $1,120 zone. If price remains below $1,105, downside continuation could follow.
🔻 SHORT SETUP
Entry: 1,102–1,108
SL: 1,123
TP1: 1,090
TP2: 1,075
TP3: 1,063
⚠️ Key level: $1,105
Below this zone → bearish momentum stays in focus.
Trade $ZEC here 👇
Sellers are stepping in after $ZEC failed to hold the $1,120 zone. If price remains below $1,105, downside continuation could follow.
🔻 SHORT SETUP
Entry: 1,102–1,108
SL: 1,123
TP1: 1,090
TP2: 1,075
TP3: 1,063
⚠️ Key level: $1,105
Below this zone → bearish momentum stays in focus.
Trade $ZEC here 👇
1
67
·
--
Bullisch
Übersetzung ansehen
🟢 $DOGS — BULLISH BREAKOUT WATCH 🚀📈
The D1 structure remains bullish, while $DOGS is currently testing key short-term resistance around 0.00005150–0.00005200.
🔥 Key Zone: 0.00005150–0.00005200
🚀 Breakout Trigger: Sustained move above 0.00005200
A clean breakout and hold above this resistance could open the door for the next bullish leg.
📌 Levels are mapped — now waiting for confirmation.
Watch $DOGS closely 👇
{future}(DOGSUSDT)
🟢 $DOGS — BULLISH BREAKOUT WATCH 🚀📈
The D1 structure remains bullish, while $DOGS is currently testing key short-term resistance around 0.00005150–0.00005200.
🔥 Key Zone: 0.00005150–0.00005200
🚀 Breakout Trigger: Sustained move above 0.00005200
A clean breakout and hold above this resistance could open the door for the next bullish leg.
📌 Levels are mapped — now waiting for confirmation.
Watch $DOGS closely 👇
The D1 structure remains bullish, while $DOGS is currently testing key short-term resistance around 0.00005150–0.00005200.
🔥 Key Zone: 0.00005150–0.00005200
🚀 Breakout Trigger: Sustained move above 0.00005200
A clean breakout and hold above this resistance could open the door for the next bullish leg.
📌 Levels are mapped — now waiting for confirmation.
Watch $DOGS closely 👇
1
93
·
--
Bullisch
Übersetzung ansehen
🟢 $ICP — BULLISH MOMENTUM BUILDING 🚀📈
$ICP is holding near the recent high zone, with buyers showing continued strength.
🟢 LONG $ICP
📍 Entry Zone: 2.74–2.78
🎯 TP1: 2.88
🎯 TP2: 3.00
🎯 TP3: 3.15
🛑 SL: 2.64
🔥 If the bullish structure holds, a continuation move toward the higher targets could develop.
🚀 Click Here 👇👇 LONG now 👇
{future}(ICPUSDT)
🟢 $ICP — BULLISH MOMENTUM BUILDING 🚀📈
$ICP is holding near the recent high zone, with buyers showing continued strength.
🟢 LONG $ICP
📍 Entry Zone: 2.74–2.78
🎯 TP1: 2.88
🎯 TP2: 3.00
🎯 TP3: 3.15
🛑 SL: 2.64
🔥 If the bullish structure holds, a continuation move toward the higher targets could develop.
🚀 Click Here 👇👇 LONG now 👇
$ICP is holding near the recent high zone, with buyers showing continued strength.
🟢 LONG $ICP
📍 Entry Zone: 2.74–2.78
🎯 TP1: 2.88
🎯 TP2: 3.00
🎯 TP3: 3.15
🛑 SL: 2.64
🔥 If the bullish structure holds, a continuation move toward the higher targets could develop.
🚀 Click Here 👇👇 LONG now 👇
1
152
·
--
Bullisch
Übersetzung ansehen
🔥 $SUSHI — ASCENDING TRIANGLE BREAKOUT SETUP 🚀📈
$SUSHI is forming an Ascending Triangle on the 15M chart, with buyers pressing against key resistance.
🟢 LONG #SUSHI
📍 Resistance: 0.2480–0.2500
🚀 Entry: Above 0.2500 after confirmation
🎯 TP1: 0.2700
🎯 TP2: 0.2900
🛑 SL: Below 0.2390
📊 Confirmation: Breakout + strong volume could strengthen the bullish setup.
🔥 Current price: 0.2470 | +21.97%
Trade $SUSHI here 👇
{future}(SUSHIUSDT)
🔥 $SUSHI — ASCENDING TRIANGLE BREAKOUT SETUP 🚀📈
$SUSHI is forming an Ascending Triangle on the 15M chart, with buyers pressing against key resistance.
🟢 LONG #SUSHI
📍 Resistance: 0.2480–0.2500
🚀 Entry: Above 0.2500 after confirmation
🎯 TP1: 0.2700
🎯 TP2: 0.2900
🛑 SL: Below 0.2390
📊 Confirmation: Breakout + strong volume could strengthen the bullish setup.
🔥 Current price: 0.2470 | +21.97%
Trade $SUSHI here 👇
$SUSHI is forming an Ascending Triangle on the 15M chart, with buyers pressing against key resistance.
🟢 LONG #SUSHI
📍 Resistance: 0.2480–0.2500
🚀 Entry: Above 0.2500 after confirmation
🎯 TP1: 0.2700
🎯 TP2: 0.2900
🛑 SL: Below 0.2390
📊 Confirmation: Breakout + strong volume could strengthen the bullish setup.
🔥 Current price: 0.2470 | +21.97%
Trade $SUSHI here 👇
2
16
Übersetzung ansehen
🟢 $UNI — BULLISH STRUCTURE REMAINS STRONG 🚀📈
$UNI is maintaining a strong upward structure after a solid momentum move, with buyers continuing to defend pullbacks.
🟢 LONG $UNI
📍 Entry Zone: 6.90–6.96
🎯 TP1: 7.15
🎯 TP2: 7.35
🎯 TP3: 7.60
🛑 SL: 6.68
🔥 If buyers keep absorbing dips,could extend toward the higher targets.
🚀 Click Here 👇👇 LONG now 👇
{future}(UNIUSDT)
🟢 $UNI — BULLISH STRUCTURE REMAINS STRONG 🚀📈
$UNI is maintaining a strong upward structure after a solid momentum move, with buyers continuing to defend pullbacks.
🟢 LONG $UNI
📍 Entry Zone: 6.90–6.96
🎯 TP1: 7.15
🎯 TP2: 7.35
🎯 TP3: 7.60
🛑 SL: 6.68
🔥 If buyers keep absorbing dips,could extend toward the higher targets.
🚀 Click Here 👇👇 LONG now 👇
$UNI is maintaining a strong upward structure after a solid momentum move, with buyers continuing to defend pullbacks.
🟢 LONG $UNI
📍 Entry Zone: 6.90–6.96
🎯 TP1: 7.15
🎯 TP2: 7.35
🎯 TP3: 7.60
🛑 SL: 6.68
🔥 If buyers keep absorbing dips,could extend toward the higher targets.
🚀 Click Here 👇👇 LONG now 👇
1
36
Übersetzung ansehen
🟢 $JTO — BREAKOUT AREA HOLDING STRONG 🚀📈
$JTO is holding above its recent breakout area, with buyers defending lower levels.
🟢 LONG $JTO
📍 Entry Zone: 0.458–0.464
🎯 TP1: 0.475
🎯 TP2: 0.490
🎯 TP3: 0.510
🛑 SL: 0.445
🔥 Continued buying momentum could push toward the next resistance zones.
🚀 Click Here 👇👇 LONG now 👇
{future}(JTOUSDT)
🟢 $JTO — BREAKOUT AREA HOLDING STRONG 🚀📈
$JTO is holding above its recent breakout area, with buyers defending lower levels.
🟢 LONG $JTO
📍 Entry Zone: 0.458–0.464
🎯 TP1: 0.475
🎯 TP2: 0.490
🎯 TP3: 0.510
🛑 SL: 0.445
🔥 Continued buying momentum could push toward the next resistance zones.
🚀 Click Here 👇👇 LONG now 👇
$JTO is holding above its recent breakout area, with buyers defending lower levels.
🟢 LONG $JTO
📍 Entry Zone: 0.458–0.464
🎯 TP1: 0.475
🎯 TP2: 0.490
🎯 TP3: 0.510
🛑 SL: 0.445
🔥 Continued buying momentum could push toward the next resistance zones.
🚀 Click Here 👇👇 LONG now 👇
2
20
·
--
Bullisch
🟢 $ZEC — BULLISCHER MOMENTUM BAUT SICH AUF 🚀📈
$ZEC zeigt einen starken bullischen Momentum mit steigendem Volumen und anhaltendem Kaufdruck.
🟢 LONG $ZEC
📍 Einstiegszone: 1,175–1,185
🎯 TP1: 1,220
🎯 TP2: 1,265
🎯 TP3: 1,320
🛑 SL: 1,140
🔥 Wenn die aktuelle Unterstützung hält, könnte als Nächstes eine weitere Aufwärtsbewegung in Richtung höherer Widerstandsniveaus folgen.
🚀 Hier klicken 👇👇 Jetzt LONG 👇
{future}(ZECUSDT)
🟢 $ZEC — BULLISCHER MOMENTUM BAUT SICH AUF 🚀📈
$ZEC zeigt einen starken bullischen Momentum mit steigendem Volumen und anhaltendem Kaufdruck.
🟢 LONG $ZEC
📍 Einstiegszone: 1,175–1,185
🎯 TP1: 1,220
🎯 TP2: 1,265
🎯 TP3: 1,320
🛑 SL: 1,140
🔥 Wenn die aktuelle Unterstützung hält, könnte als Nächstes eine weitere Aufwärtsbewegung in Richtung höherer Widerstandsniveaus folgen.
🚀 Hier klicken 👇👇 Jetzt LONG 👇
$ZEC zeigt einen starken bullischen Momentum mit steigendem Volumen und anhaltendem Kaufdruck.
🟢 LONG $ZEC
📍 Einstiegszone: 1,175–1,185
🎯 TP1: 1,220
🎯 TP2: 1,265
🎯 TP3: 1,320
🛑 SL: 1,140
🔥 Wenn die aktuelle Unterstützung hält, könnte als Nächstes eine weitere Aufwärtsbewegung in Richtung höherer Widerstandsniveaus folgen.
🚀 Hier klicken 👇👇 Jetzt LONG 👇
1
137
·
--
Bullisch
🌊🔥 $CHILLGUY — MOMENTUM-WELLE BAUT SICH AUF 🚀📈
🟢 #CHILLGUY /USDT LONG
📍 Einstiegszone: 0.0150–0.0155
🎯 TP1: 0.0160
🎯 TP2: 0.0170
🎯 TP3: 0.0180
🛑 SL: 0.0140
⚡ Hebel: 3x–5x
$CHILLGUY zeigt eine starke Erholungsdynamik, wobei Käufer den Preis nach oben treiben.
🔥 Ein anhaltender Move über die Einstiegszone könnte den Weg zu den höheren Zielen öffnen.
Handle $CHILLGUY hier 👇
{future}(CHILLGUYUSDT)
🌊🔥 $CHILLGUY — MOMENTUM-WELLE BAUT SICH AUF 🚀📈
🟢 #CHILLGUY /USDT LONG
📍 Einstiegszone: 0.0150–0.0155
🎯 TP1: 0.0160
🎯 TP2: 0.0170
🎯 TP3: 0.0180
🛑 SL: 0.0140
⚡ Hebel: 3x–5x
$CHILLGUY zeigt eine starke Erholungsdynamik, wobei Käufer den Preis nach oben treiben.
🔥 Ein anhaltender Move über die Einstiegszone könnte den Weg zu den höheren Zielen öffnen.
Handle $CHILLGUY hier 👇
🟢 #CHILLGUY /USDT LONG
📍 Einstiegszone: 0.0150–0.0155
🎯 TP1: 0.0160
🎯 TP2: 0.0170
🎯 TP3: 0.0180
🛑 SL: 0.0140
⚡ Hebel: 3x–5x
$CHILLGUY zeigt eine starke Erholungsdynamik, wobei Käufer den Preis nach oben treiben.
🔥 Ein anhaltender Move über die Einstiegszone könnte den Weg zu den höheren Zielen öffnen.
Handle $CHILLGUY hier 👇
1
74
·
--
Bullisch
Übersetzung ansehen
🟢 $SOXL — SEMICONDUCTOR MOMENTUM REMAINS STRONG 🚀📈
$SOXL is holding above recent support while bullish momentum continues across the semiconductor space.
🟢 LONG $SOXL
📍 Entry Zone: 119.50–120.30
🎯 TP1: 123.00
🎯 TP2: 127.00
🎯 TP3: 132.00
🛑 SL: 115.80
🔥 Sustained buying pressure could drive another continuation move toward the higher targets.
🚀 Click Here 👇👇 LONG Now 👇
{future}(SOXLUSDT)
🟢 $SOXL — SEMICONDUCTOR MOMENTUM REMAINS STRONG 🚀📈
$SOXL is holding above recent support while bullish momentum continues across the semiconductor space.
🟢 LONG $SOXL
📍 Entry Zone: 119.50–120.30
🎯 TP1: 123.00
🎯 TP2: 127.00
🎯 TP3: 132.00
🛑 SL: 115.80
🔥 Sustained buying pressure could drive another continuation move toward the higher targets.
🚀 Click Here 👇👇 LONG Now 👇
$SOXL is holding above recent support while bullish momentum continues across the semiconductor space.
🟢 LONG $SOXL
📍 Entry Zone: 119.50–120.30
🎯 TP1: 123.00
🎯 TP2: 127.00
🎯 TP3: 132.00
🛑 SL: 115.80
🔥 Sustained buying pressure could drive another continuation move toward the higher targets.
🚀 Click Here 👇👇 LONG Now 👇
1
181
Anmelden und weiter Inhalte entdecken
Krypto-Nutzer weltweit auf Binance Square kennenlernen
⚡️ Bleib in Sachen Krypto stets am Puls.
💬 Die weltgrößte Kryptobörse vertraut darauf.
👍 Erhalte verlässliche Einblicke von verifizierten Creators.
E-Mail-Adresse/Telefonnummer
Trendthemen
FedRateWatch
619,140 Aufrufe
2,875 Kommentare
Teile & gewinne Traffic-Belohnungen in unserer Kampagne mit angesagtem Hashtag
✨Thema: FOMC September, Was ist der nächste Schritt der Fed?
👉So nimmst du teil:
Veröffentliche einen kurzen Beitrag oder Artikel mit dem Hashtag #FedRateWatch
Erstelle Inhalte basierend auf den folgenden Blickwinkeln:
- Der August-Core-CPI stieg um 0,3% im Monatsvergleich, und die Wahrscheinlichkeit für eine 25bp-Erhöhung diese Woche liegt nun bei fast 90%. Erwartest du diese Woche eine Zinserhöhung? Handelt es sich um einen einmaligen Schritt oder den Beginn eines längeren Zinserhöhungszyklus?
- Wenn die Erhöhung erfolgt: Wie entwickelt sich das für BTC, Tech-Aktien und Gold? Aufwärts- oder abwärtsgerichtet?
- Wie planst du als Nächstes zu handeln? Teile deinen BTC-, Aktien- oder Gold-Trade/Bestände mit unserem Trade-Sharing-Widget.
⏰Kampagnenzeitraum:
- 2026-09-15 11:00 - 2026-09-17 3:00 UTC
🎁Belohnung:
- Qualifizierte Beiträge, die die oben genannten Richtlinien erfüllen und mehr als 100 Wörter enthalten, werden überprüft und erhalten möglicherweise einen zufälligen Traffic-Boost von 500 bis 3.000 Aufrufen. Du erhältst eine Benachrichtigung von deiner Feed-Secretary, wenn dein Beitrag ausgewählt wird.
- Erhalte die Chance, dass dein Artikel auf Binance Square Official vorgestellt wird
Du brauchst Ideen für deinen Beitrag? Besuche die Themenseite #FedRateWatch oder die Square Guide on How to Post for Better Reach.
Binance Square Official
·403 Likes
·894k Aufrufe
EthereumFallsBelow$2400
4 Aufrufe
20 Kommentare
USSenateBlocksClarityAct
0 Aufrufe
7 Kommentare