Trading platform for professionals

One of the most popular and powerful trading bots in the world is the 3Commas automated cryptocurrency trading bot, which comes in the form of a web platform located at 3Commas.io. This version offers the best capabilities for customizing the bot for cryptocurrency trading.
For people who want to continue monitoring their automated trading bots on the go, there is also a mobile app for both iOS and Android for this platform.

To create an account on the 3commas platform, follow the instructions below:
Smart trading methods on the 3commas platform
There are two types of trading: traditional trading, which we're all familiar with, and trading using bots, which many people don't know how to use, but which, without exaggeration, can dramatically increase profits thanks to the modern features it offers.
The 3commas platform offers several smart trading bots. Follow along to learn more about them and how to use them.
Smart Trade Bot for Trading
With this bot, you can buy and sell digital currencies using pre-defined conditions. The bot carries out the buying and selling operations on your behalf, based on the conditions you enter. We will now learn how to enter the conditions to begin trading with the bot.
How to use the Smart Trade bot for trading
For example, let's have a prior analysis of Shiba Inu (or a recommendation from an analyst):
NIB/ USDT
Buy: $0.000023
Goal 1: $0.000025
Goal 2: $0.000026
Goal 3: $0.000027
Stop Loss: $0.000022
If the recommendation is in a foreign language, it should be as follows:
NIB/ USDT
ENTRY ZONE: 0.000023
TARGET 1 : 0.000025
TARGET 2 : 0.000026
TARGET 3 : 0.000027
0.000025 : STOP loss
First, we go to the SMART TRADING tab in the side tabs and choose SmartTrade from its menus.
Then we choose the currency we want to use for trading and choose the trading pair as shown in the image below.

Scroll down and select SmartTrade to start trading with the bot. Select the Price option from the Cond menu to enter specific trading conditions.

1- We enter a price slightly lower than the purchase price. When it is reached, the bot places a purchase order.
2- We enter the price that is placed in the order to buy the currency.
3- Determine the amount you want to use for purchase and trading.
4- Click on Set take profit to enter the selling targets (which are the targets found in the previous analysis).
Now we've placed a purchase order for $100, let's explain what happens:
The robot places a purchase order and then purchases the specified amount of the previously selected currency.
In the following steps, we will set sell targets (for the currency to reach the desired price). The bot will sell the currency when the targets are met (selling the currency purchased in this order after the price targets are met and a profit is made).

In this tab, we enter the first target for the sale, then click Spilt Targets.

Then we set the percentage we want to sell as shown in the picture, then we add this target (Add TP target).

We continue entering the second target and the percentage we want to sell at in the second target as shown in the image below, then we add this target (Add TP target).

Then we continue entering the third target and the percentage we want to sell at in the third target as in the image below, then we add this target (Add TP target).

From the Set Stop Loss option, we set a stop loss condition. That is, if the currency price falls and the targets are not achieved, a sell order will be placed for the entire quantity purchased when the currency price reaches the stop loss level, as in the image below.

Now that we have finished entering the conditions and targets, we click Create Trade to add this trade to the bot list.

Then, click Confirm to confirm the creation of the bot. This completes the creation of the bot, and all that remains is to monitor it.

Smart Buy Bot
Smart Buy is a recent addition to 3Commas' tools, specifically designed for traders with exposure to futures exchanges.
You can click Smart Buy, choose the currency pair to trade, enter the buy amount, and then give the robot control.
Smart buying method
From the Smart Trade tab, we choose the currency we want to use for trading, then choose the trading pair.

We scroll down and choose Smart Bay, then we enter the amount we want to buy, and we enter the price we want to buy the currency.

We enter purchase targets, i.e., we buy the currency in stages, and we can set a price for each stage depending on the decline in the market price.
For example, we will buy 1 million Shiba in stages:
In the first stage, when it drops by 5% below the asking price, we buy 25% of the entire quantity (i.e., a quarter of a million Shiba Inu).

The second stage: When it drops by 9.74% below the asking price, we buy 50% of the entire quantity (i.e. half a million Shiba).

The third stage: When it drops by 14.25% below the asking price, we buy 25% of the entire quantity (i.e. a quarter of a million Shiba).

Don't forget to enter a stop-loss condition, meaning when the currency price is heading towards an increase, and when it reaches the stop-loss price, the bot places a buy order for the entire quantity at the price we enter to stop the loss.

Now that we have finished entering the terms and targets, we click Create Trade to add this trade to the bot list.
Then we confirm the process of creating the bot by clicking on confirm.
Smart Sell Bot
Smart Sell is also a recent addition to 3Commas' tools. Click Smart Sell, select the currency pair to trade, enter the sell amount, and then give the bot control.
With this plugin, you can sell in stages, rather than in one stage, thus achieving the best average price for the currency you want to sell.
Smart selling method
From the Smart Trade tab, we choose the currency we want to use for trading, then choose the trading pair.

We scroll down and choose smart sell, then we set the quantity we want to sell, and we set the price we want to sell the currency at.
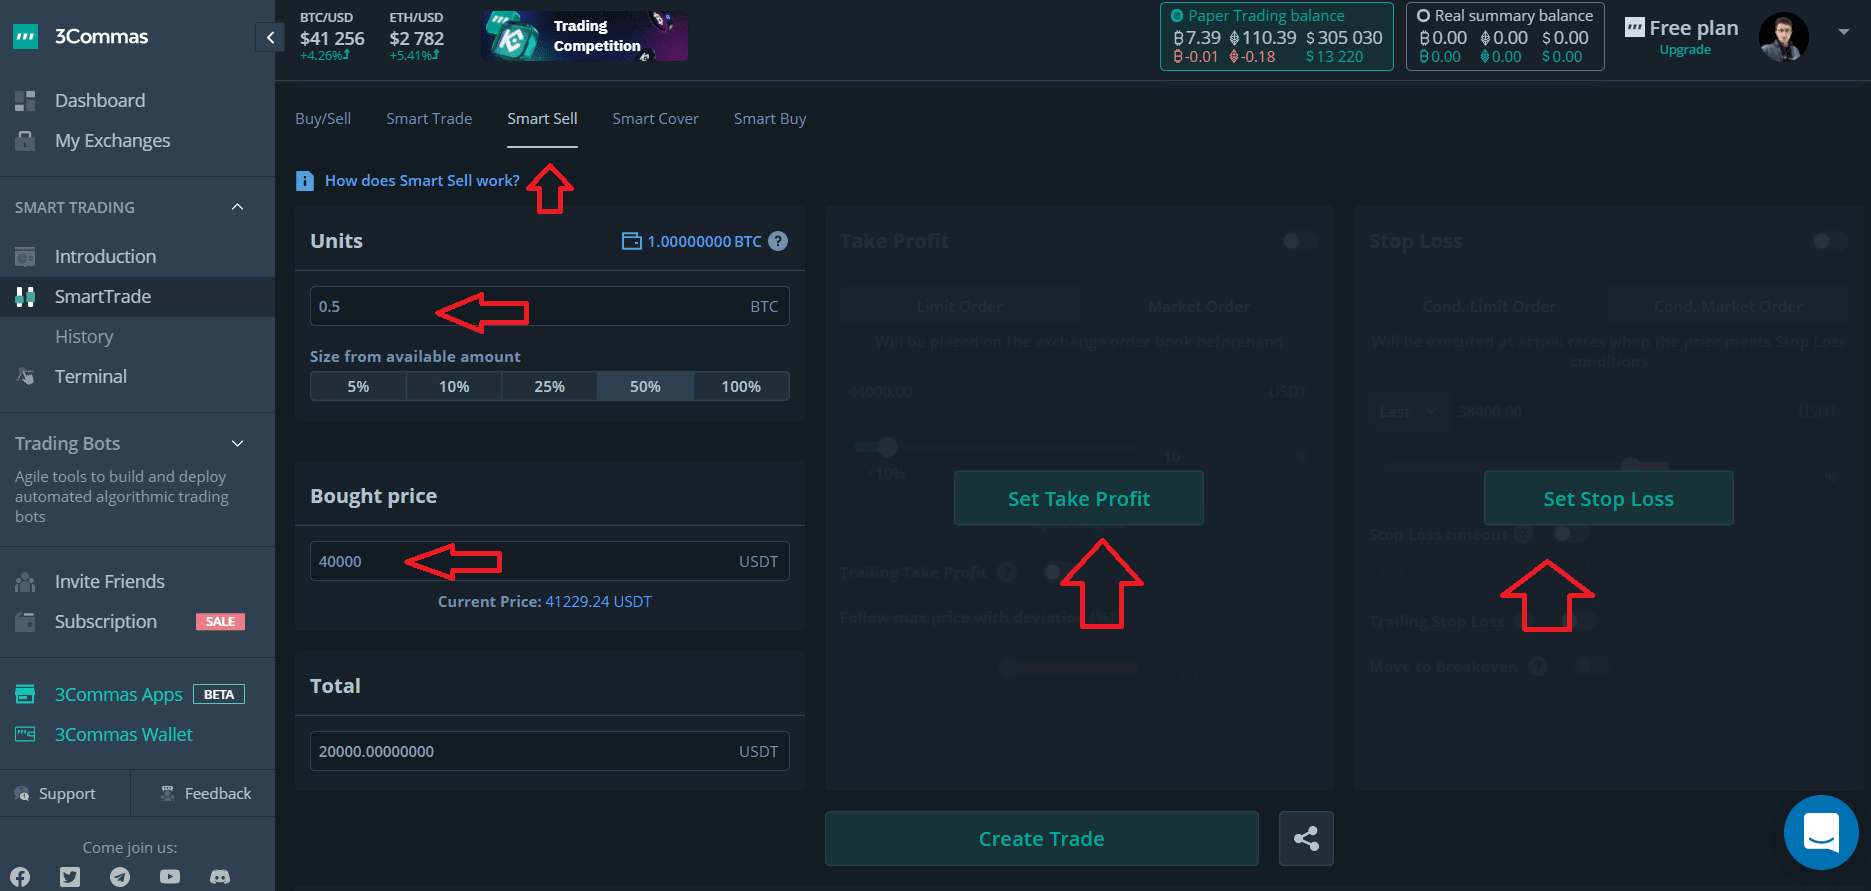
We enter selling targets, meaning we sell the currency in stages, and we can set a price for each stage depending on the rise in the market price.
For example, we will sell half a Bitcoin in stages:
In the first stage, when it rises by 10% above the ask price, we sell 50% of the entire quantity (i.e., a quarter of a Bitcoin).

In the second stage, when it rises by 20% above the ask price, we sell 50% of the entire quantity (i.e., a quarter of a Bitcoin).

We enter a stop-loss condition, i.e., when the currency's price is heading down, and when it reaches the stop-loss price, the bot places a sell order for the entire quantity at the price we enter for the stop-loss. In our example, we sell when Bitcoin reaches 38,000.

Now that we have finished entering the conditions and targets, we click Create Trade to add this trade to the bot list.
Then we confirm the process of creating the bot by clicking on confirm.

Smart Cover
This bot allows you to sell your long-term cryptocurrencies at the top and then buy them back at the bottom, thus earning more cryptocurrency by exploiting the decline in its price. We set the sell condition, then enter the buy condition when we want to buy back the currency.
The Smart Cover bot has a sell condition and a buy condition. The sell condition is triggered when the order is created, and the sale is executed when the price specified in the sell order is reached. The buy condition is triggered after the sell order is executed. We can adjust how to buy back the coins using the Set Take Profit and Stop Loss sections.
How to use the smart cover
From the Smart Trade tab, we choose the currency we want to use for trading, then choose the trading pair.
We scroll down and choose smart cover, then we put the quantity we want to sell, and we put the price we want as in the image below.

In this option we can sell all our holdings of the currency if we choose 100%.

After selling the currency, you must buy it back by entering purchase targets, i.e., buying the currency in stages. We can set a price for each stage depending on the decline in the currency's price in the market.
For example, we will buy the same amount we sold in two stages:
In the first stage, when it decreases by 3.44% from the selling price, we buy 50% of the entire quantity.

In the second stage, when it decreases by 6.89% from the selling price, we buy 50% of the entire quantity.

We enter a stop-loss condition, i.e. when the currency price is heading towards an increase, and when it reaches the stop-loss price, the bot places a sell order to buy the quantity at the price we enter for the stop-loss. In our example, we place a buy order when the currency reaches the price of 2950, and the buy price presented in the order is 2955.

Now that we have finished entering the terms and targets, click Create Trade to add this trade to the robot's list.
Then we confirm the process of creating the bot by clicking on confirm.

Trading bots on the 3commas platform
The 3commas platform features numerous trading bots that make our work much easier. These bots monitor the market for us. They are capable of executing buy and sell transactions for cryptocurrencies and generating profits without our intervention. This way, we don't have to sit in front of the screen for long hours monitoring the market.
Follow us to learn about these bots and how to create and work with them.
DCA Bot
DCA strategy: Dollar cost averaging, which involves investing in a currency over predetermined time periods to reduce the average purchase price of the currency over time and mitigate volatility risks.
We use the DCA bot to divide the investment into parts (each part with a lower price than the previous one) and buy the currency in different price zones over time and at different prices, thus obtaining a better average price for the currency and significantly reducing the risks resulting from volatility.
Watch the following video to understand how this bot works more:
How to set up DCA bot
Click on the DCA Bot tab, then Create a bot manually to create a new bot.

We select Wizard, then click Create a new DCA bot.

We give the bot an optional name, choose one currency as shown in the image, then click Next step.

Enter the pair you want to invest in, then click Next step. In our example, we selected the USDT/LTC pair.

First, we choose how the bot works:
Long: To buy currency at a low price and sell it at a higher price.
Short: To sell the currency we are essentially storing and buy more of it after it has decreased.
Then we enter the desired amount in each purchase order. We entered $10. (That is, in each purchase order, the bot will purchase $10 worth of Litecoin.)
Secondly, we choose the type of currency we want to save profits in:
Either Quote: meaning the profit will be in USDT (we chose this option)
Or Base: meaning that the profit will be in LTC
We select Limit to trade the bot at the specified price, not the market price. Then we click Next step.

We enter the trading indicator, which determines the bot's trajectory. Read the following article to learn how to choose the correct indicators for the bot's operation. Then, click Next Step.

We enter a safety order, also known as a safety trade or a cooling trade. This involves purchasing a number of trades after the currency price has dropped, in order to reduce the arithmetic average of the total trades that the bot has purchased, thus reducing the entry price to the market. This is done in several stages:
Size of each new transaction
The level of currency decline that determines the purchase of a new position (in percentage)
Maximum number of trades the bot will buy after the coin price drops (for the average coin price)
Maximum number of trades to be placed on the exchange at the same time (for all currencies)
Increase the volume of trades being bought (increase the amount of currency bought as a percentage)
Increase the percentage of safety trades (change in the price at which the currency is bought after it has fallen)
Then we click Next step.

Stop Loss: We activate this option as shown in the image below:
Set the stop loss ratio at which the bot will sell all trades.
We choose between stopping the deal or stopping the deal with the bot closing.
Then we click Next step.

We determine the profit percentage we want from Take profit:
The profit margin we want
Choose between profit from the first entry level or from the total average of trades (preferably the total level of trades)
Then we click Next step.

Advanced Settings:
Determine the minimum daily trading volume for the currency (if the trading volume decreases, no trades will be opened)
Minimum currency price to open a trade
Maximum currency price to open a trade
Time delay between the buying period and the arrival of the signal from the QFL, if the QFL indicator was previously selected among the indicators
It is the time in seconds that the bot will wait after closing a trade and before accepting a signal to start a new trade for the same currency pair.
The number of trades that the bot will stop when it reaches (opens).
Then we click Create Bot.

With this, we have completed the creation of this smart bot. All that remains is to monitor its operation and learn more about its features.
For more explanation, watch the following video:
Selecting successful bots and copying them on the 3commas platform
A common strategy on the 3commas platform for creating proven trading bots is to copy a bot previously created by someone else. This method allows us to see the bot's performance over the past period. If we choose a bot with good performance, we only need to copy its settings instead of creating them from scratch, as we explained earlier. This helps reduce the complexity of creating a bot from scratch.
However, one important thing to note is that this strategy is considered somewhat effective. The bot's conditions may not match the platform we're using, the trading pairs we own, or even the balance we have in our wallet on the platform we're using. Therefore, after choosing the appropriate bot, we must enter its settings and adjust them to suit our balance or even the state of the market, which is highly volatile.
How to copy and modify a previous bot
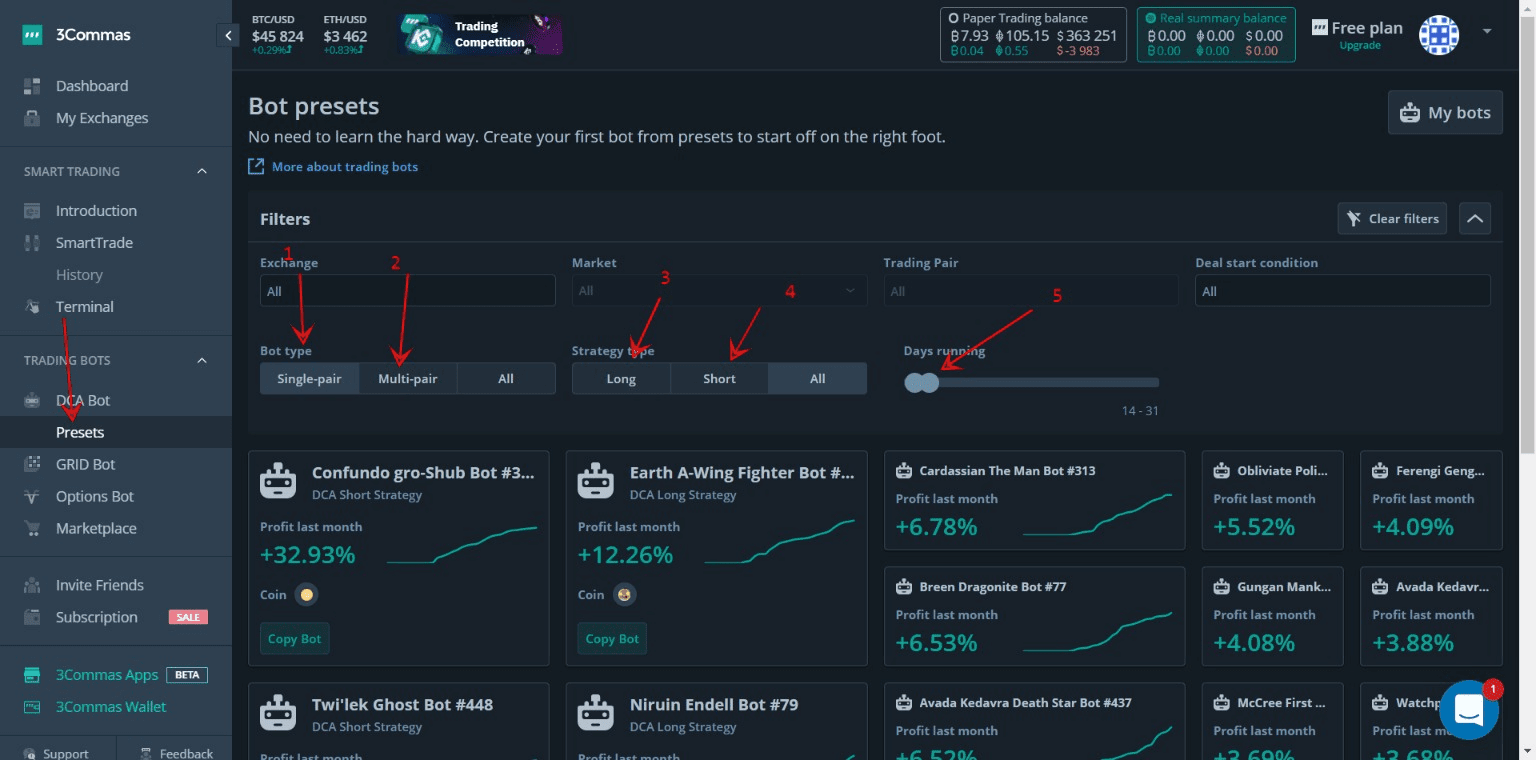
From the 3commas platform, we choose the Presets tab, then we can easily perform some types of filtering for the bots to choose the bot that best matches the settings we want and to apply the filtering as shown in the image:
Select one currency to trade within the bot.
Select more than one currency to trade within the bot
Choosing a Long Strategy
Choosing a Short Strategy
Select the bot's operating period
We select one of the bots and then click on it to copy its settings. A notification may appear about the trading pair. We agree to copy the bot.

It may appear that these settings are available on the Binance platform. It is preferable to use the Binance platform, or we can copy the settings for use on the platform we are working on if the currencies are available on the platform we are using.

After copying the settings, we click on the Edit setting option to modify them to suit us.

We can now see the settings of the bot we copied, and also the trading pair it uses, as shown in the image.

We can change the settings as shown in the picture:
Transaction size
Choose BTC to earn profit with
Choose 2CRZ to earn profit using it
Select the indicator we want

Scroll down to adjust the rest of the settings:
Profit percentage in the bot
Buying volume in security trades
Number of security transactions

With this, we have modified the most important things in this bot, then we click on Create Bot to create this bot.
You can also, dear reader, modify any settings you want, based on what we explained in the previous paragraphs (how to create this bot), choose what suits you, and modify it.
GRID boot
The Grid bot is ideal for trading cryptocurrencies that don't have an uptrend or a downtrend. This means that they move within a specific range, like a channel, neither rising nor falling too much, within a specific price zone.
If we create a Grid bot wisely, it can work well and consistently for weeks, months, and even years, generating very good profits.
Let's not forget that creating this bot is easy and suitable for beginners and does not require a lot of skill.
How to create a GRID bot
We go to the GRID Bot tab, then enter the data as follows:
Choose the type of currency we want to use for trading.
Choosing a trading pair
Set an optional name for the bot.

Scroll down and choose one of the strategies:
Using the artificial intelligence option (1)
All we have to do is enter the amount we will invest in box (2).
Then we click on the Create step (3)
So we created this bot using AI technology, and all we have to do is monitor it and make profits.

Using the manual strategy by entering the following options:
We enter the highest price of the currency
We enter the lowest price of the currency
We choose the number of grid lines we want (buy and sell prices)
Quantity in one network
The total amount we want to invest

Scroll down and enter the rest of the options:
Choose to profit via LTC
Choose to earn with USDT
Then we click Create, and thus we have created this bot manually, and we will find it at the bottom where we can monitor its work.

We notice that this bot requested to buy an amount of LTC to be used in sell orders if the currency rises.
For more explanation, watch the following video:
Boot Options
The Options Bot is an advanced tool from the 3Commas platform that allows buyers or sellers to reduce volatility risk and profit from both upward and downward movements in cryptocurrency prices. The Options Bot operates on a smart contract that gives its owner the right (but not the obligation) to buy or sell a cryptocurrency at a predetermined price before or at the contract's expiration, but in exchange for a premium.
It's worth noting that this bot only works with the Deribit platform, and you can create an account on this platform through the following link here.
How to create an Options bot
We go to the Options bot tab and enter the bot settings as follows:
Choose our Deribit account
Choose the currency in which we will invest
Select the bot's expiration period
Choose the strategy we want to make the bot
Choose how to set up the bot (simple or advanced), we will now choose simple
Choose your expected level of currency volatility by moving the slider.
Choose your currency price prediction by moving the pointer.
Enter the largest possible loss value.

Or in the case of advanced numbers as in the image below:
We choose advanced
We enter the first goal according to the type of strategy we chose previously.
We enter the second goal according to the type of strategy we chose previously.

Now click Connect an account to create this bot
Prepared by: Tadawul Company / Mr. Bassam